SpringMVC(一) 构建项目
1.创建项目
创建一个空的Maven项目
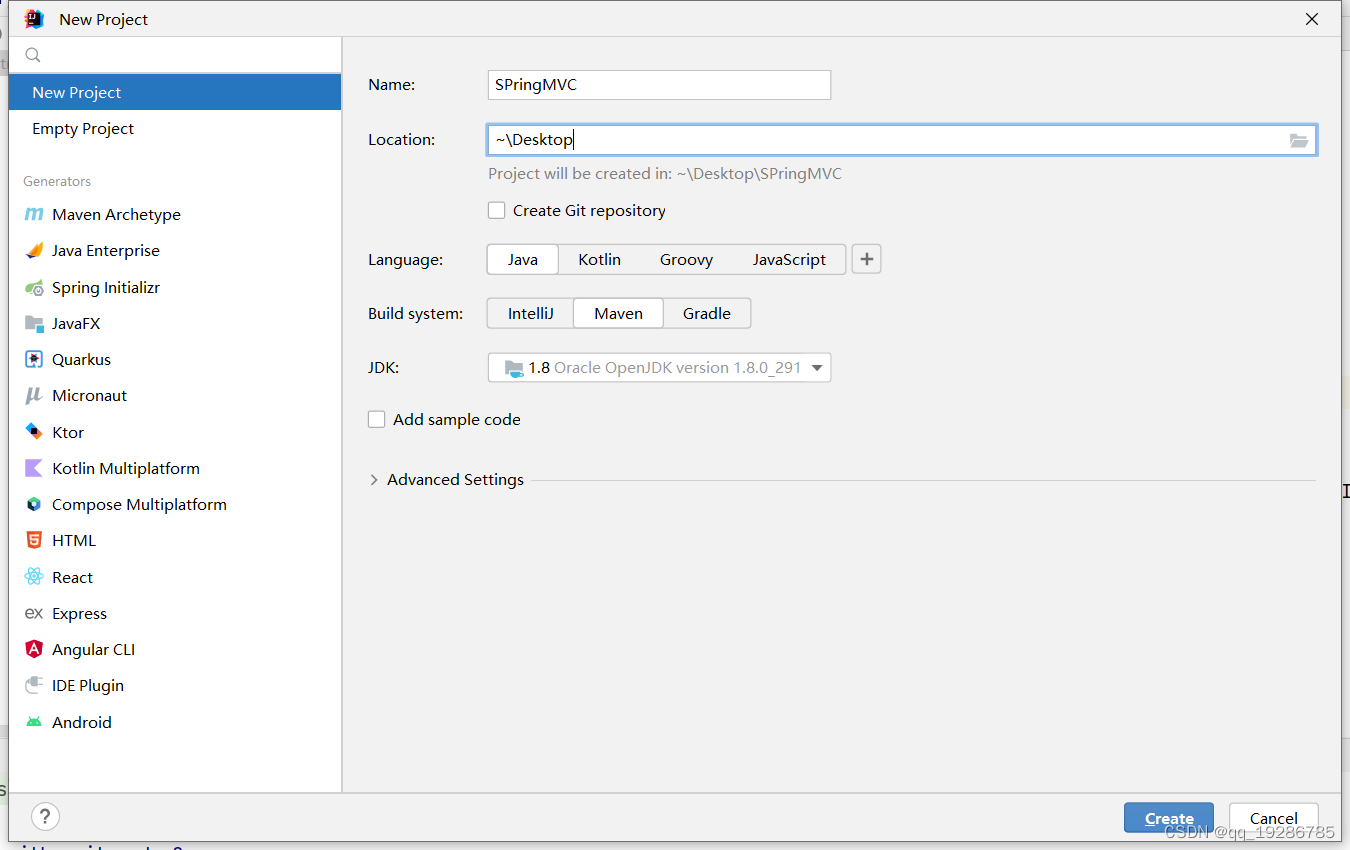
删除src目录,将新建的项目作为一个工作空间使用,然后在里面创建Module。
2.创建Module
选中刚才创建的项目,右键创建Module

选择Java语言的Maven 项目
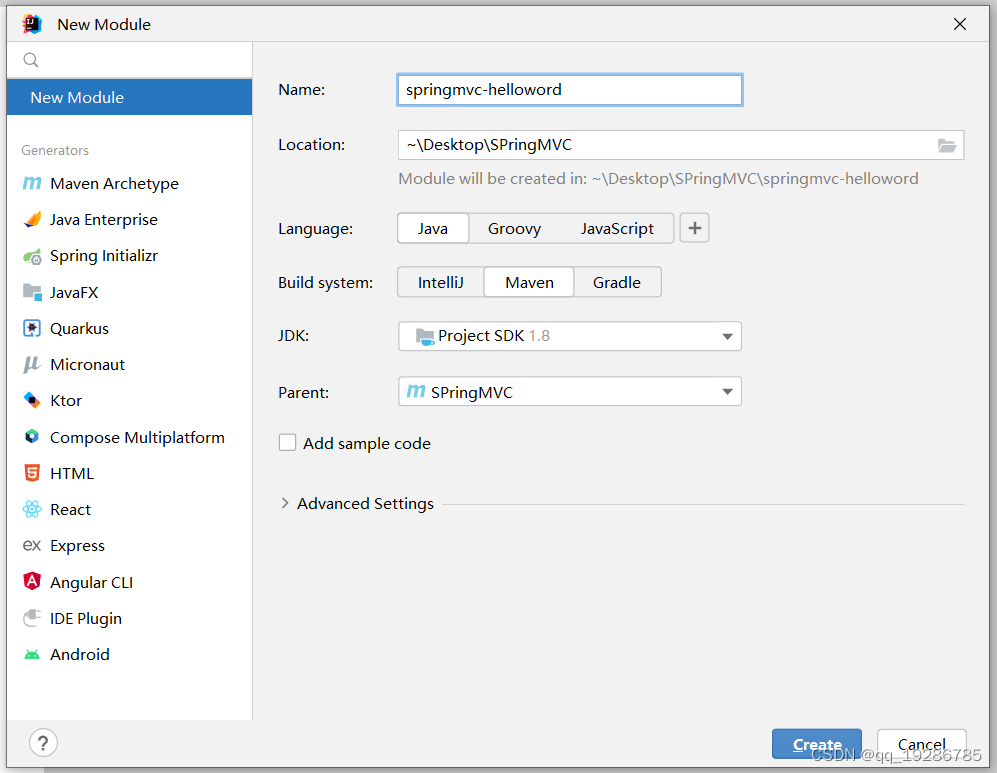
3.添加SpringMVC依赖
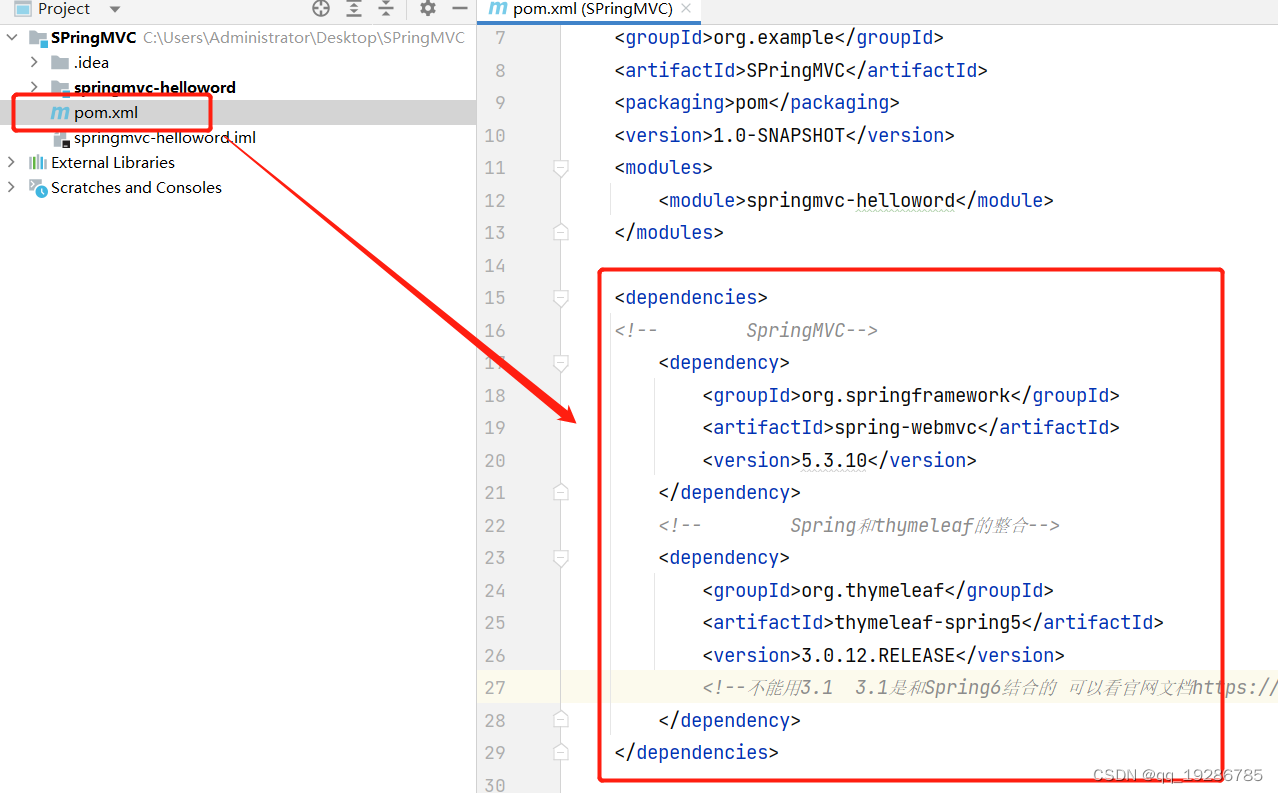
在父项目中添加的依赖会被子module继承,我们打开父项目Pom.xml添加下面的依赖
<dependencies>
    <!--        SpringMVC-->
        <dependency>
            <groupId>org.springframework</groupId>
            <artifactId>spring-webmvc</artifactId>
            <version>5.3.10</version>
        </dependency>
        <!--        Spring和thymeleaf的整合-->
        <dependency>
            <groupId>org.thymeleaf</groupId>
            <artifactId>thymeleaf-spring5</artifactId>
            <version>3.0.12.RELEASE</version>
            <!--不能用3.1  3.1是和Spring6结合的 可以看官网文档https://www.thymeleaf.org/doc/tutorials/3.1/thymeleafspring.html#integrating-thymeleaf-with-spring-->
        </dependency>
</dependencies>
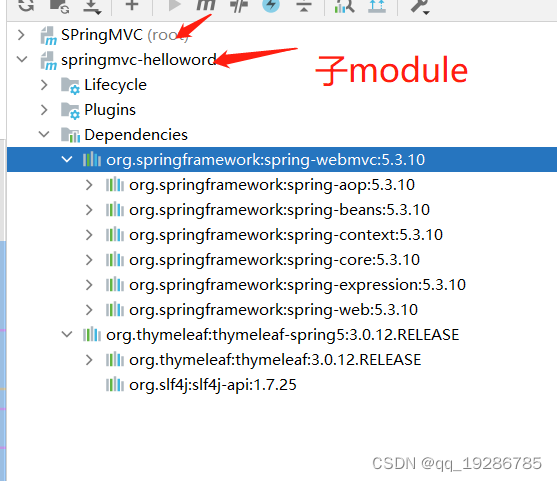
刷新一下Maven 可以看到spring-mvc依赖和thymeleaf-spring整合依赖已经被加载进来了
4.创建Web框架
选中module中main文件夹,在main文件夹下面创建webapp文件夹
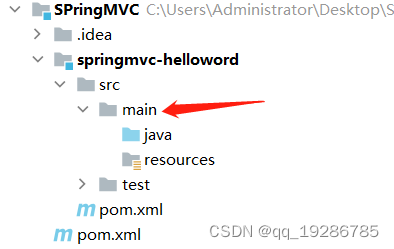

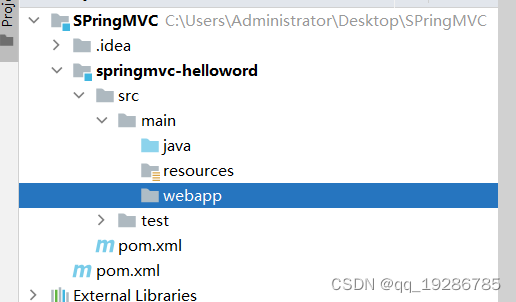
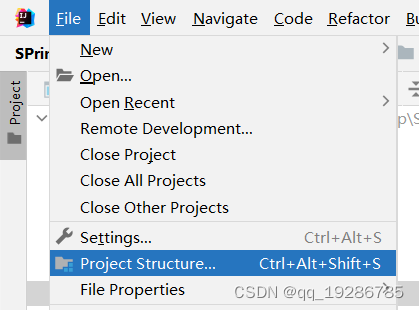
创建完之后,正常是idea自动识别为Web框架的,但是有时候idea不能自动识别,需要手动设置一下,我们打开项目结构。
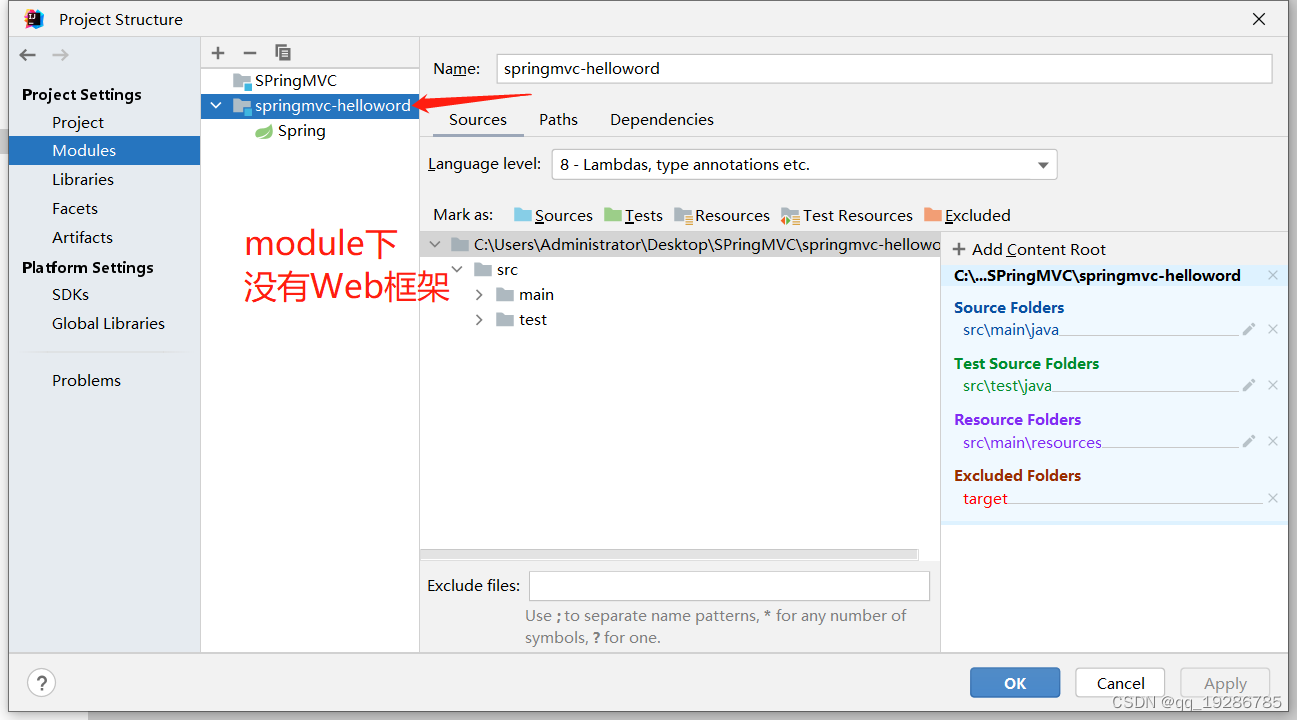
在module下创建一个web框架
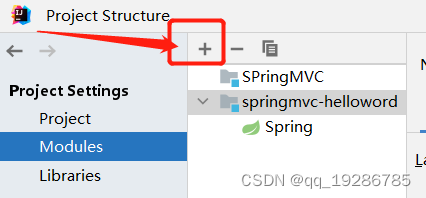
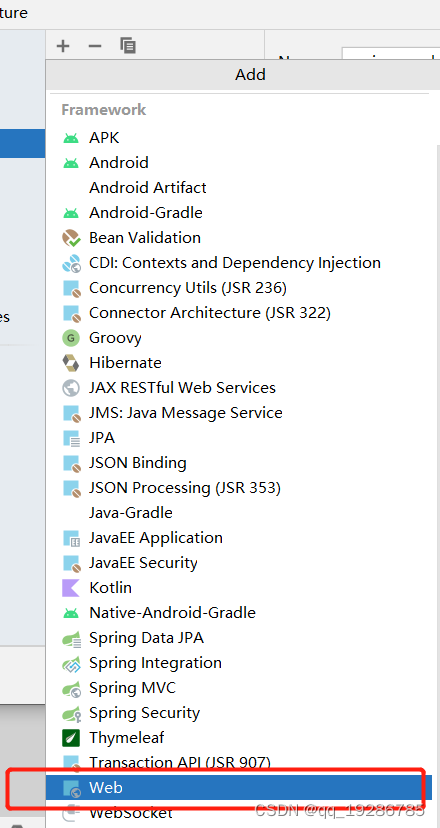
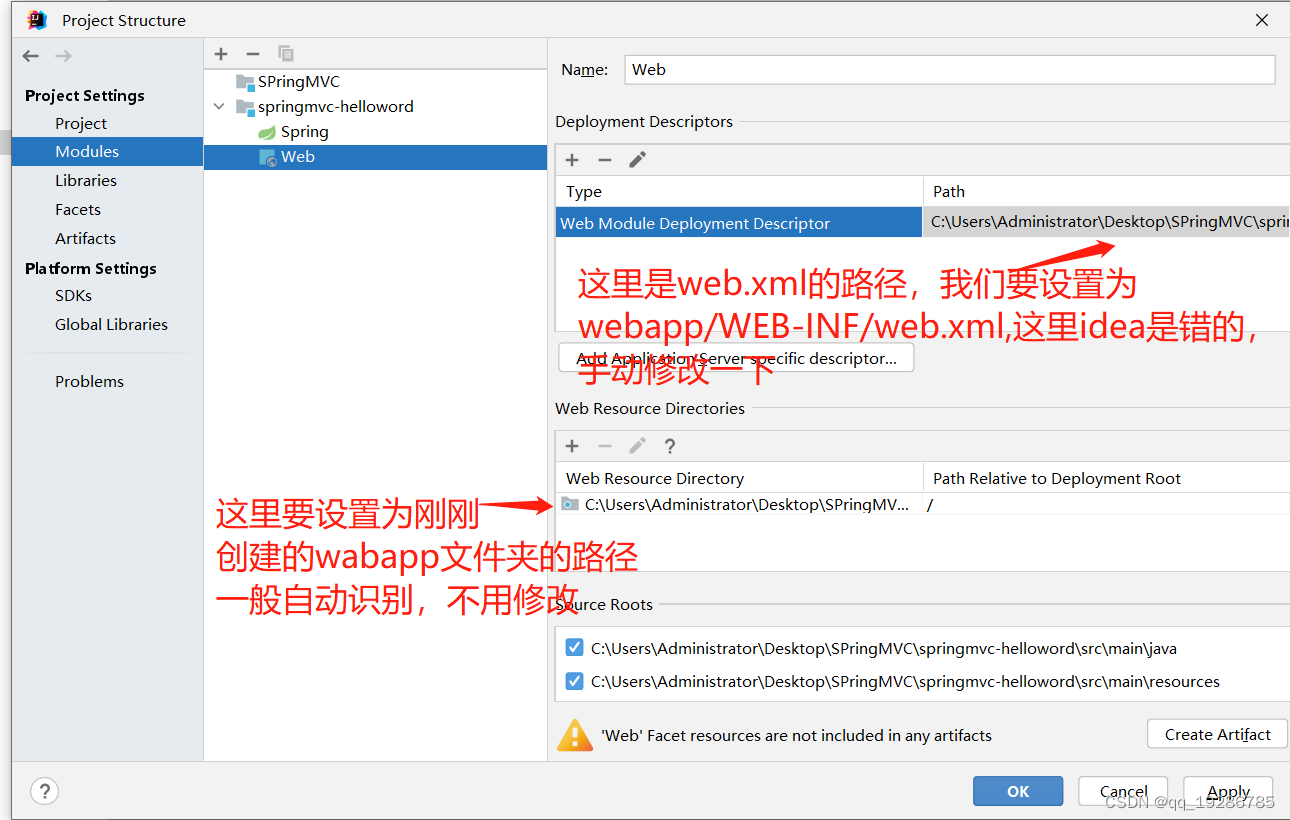
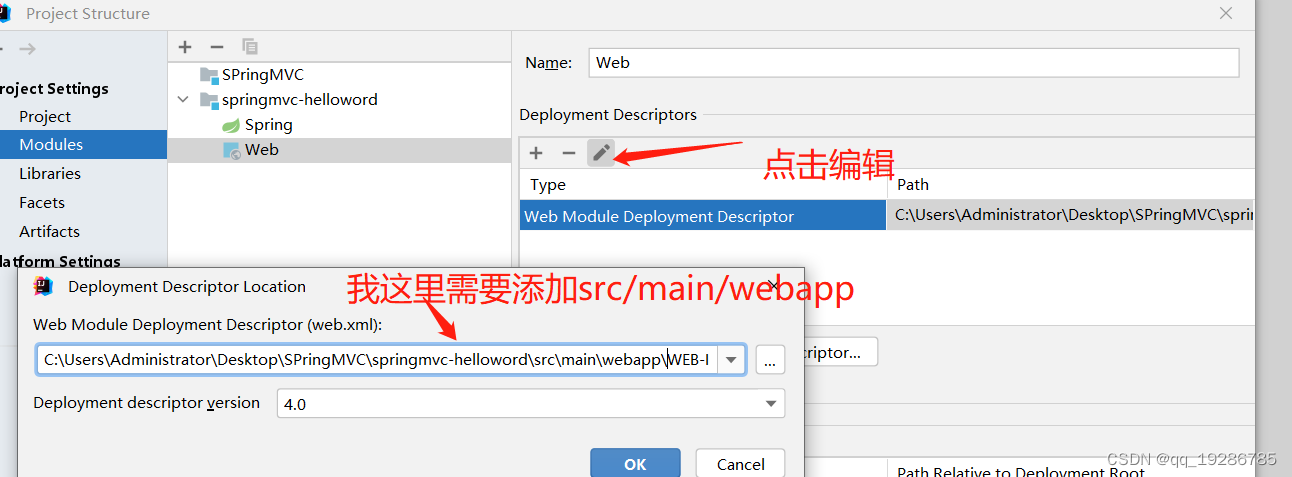
我这里最终修改为了:C:\Users\Administrator\Desktop\SPringMVC\springmvc-helloword\src\main\webapp\WEB-INF\web.xml,上面这两个路径一定要好好检查一下。最终我们创建的是这个样子。
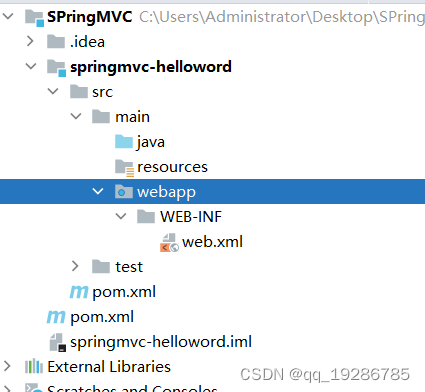
5.web.xml文件中注册DispatcherServlet
然后打开web.xml,添加SPringMVC的servlet,我的设置为这样:
<?xml version="1.0" encoding="UTF-8"?>
<web-app xmlns="http://xmlns.jcp.org/xml/ns/javaee"
         xmlns:xsi="http://www.w3.org/2001/XMLSchema-instance"
         xsi:schemaLocation="http://xmlns.jcp.org/xml/ns/javaee http://xmlns.jcp.org/xml/ns/javaee/web-app_4_0.xsd"
         version="4.0">


    <!-- 配置SpringMVC的前端控制器,对浏览器发送的请求统一进行处理 -->
    <servlet>
        <servlet-name>springMVC</servlet-name>
        <servlet-class>org.springframework.web.servlet.DispatcherServlet</servlet-class>
        <!-- 通过初始化参数指定SpringMVC配置文件的位置和名称 -->
        <init-param>
            <!-- contextConfigLocation为固定值 -->
            <param-name>contextConfigLocation</param-name>
            <!-- 使用classpath:表示从类路径查找配置文件,例如maven工程中的src/main/resources -->
            <param-value>classpath:springMVC.xml</param-value>
<!--            配置成这个路径也可以 classpath就是打包之后村存放类的根路径 /WEB-INF/classes/springMVC.xml-->
<!--            /和后边的联系在一块-->
        </init-param>
        <!--
             作为框架的核心组件,在启动过程中有大量的初始化操作要做
            而这些操作放在第一次请求时才执行会严重影响访问速度
            因此需要通过此标签将启动控制DispatcherServlet的初始化时间提前到服务器启动时
        -->
        <load-on-startup>1</load-on-startup>
    </servlet>
    <servlet-mapping>
        <servlet-name>springMVC</servlet-name>
        <!--
            设置springMVC的核心控制器所能处理的请求的请求路径
            /所匹配的请求可以是/login或.html或.js或.css方式的请求路径
            但是/不能匹配.jsp请求路径的请求
        -->
        <url-pattern>/</url-pattern>
    </servlet-mapping>


</web-app>
6.创建SpringMVC配置文件
然后在Resources文件夹下面创建SpringMVC的配置文件 springMVC.xml(主要和web.xml中设置的文件名一样)
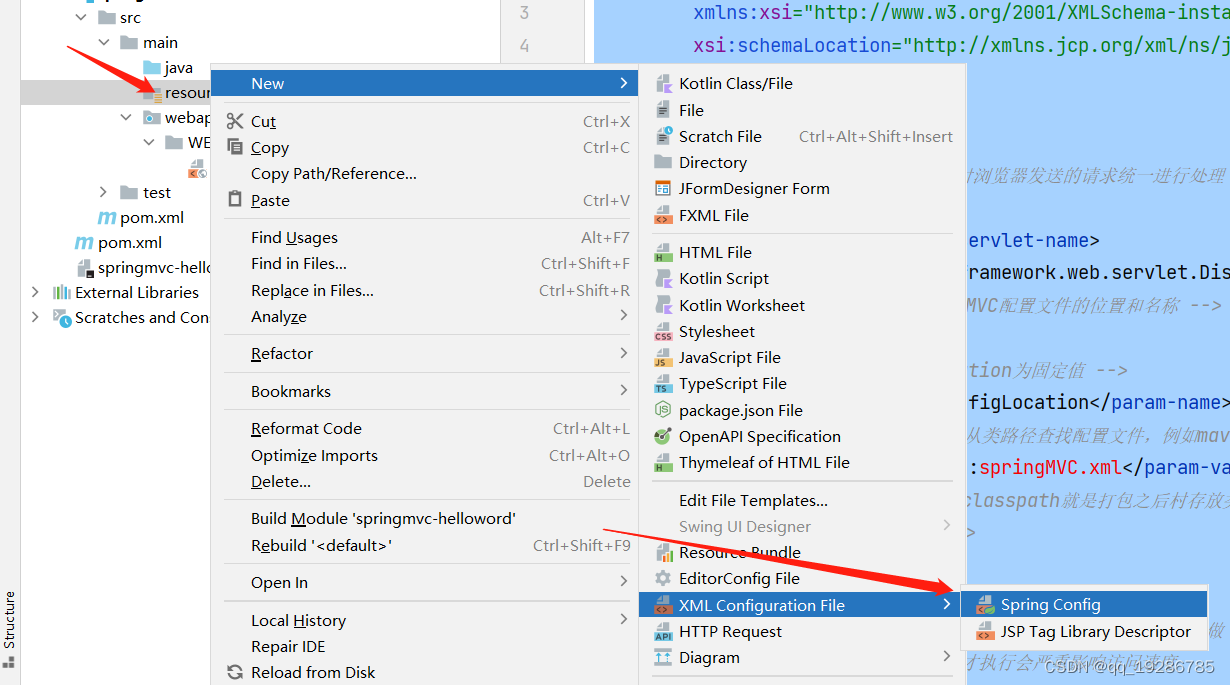
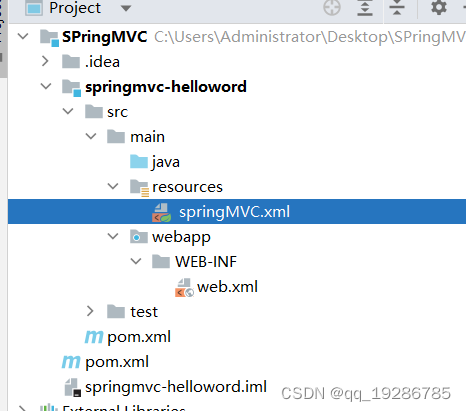
7.创建controller
创建HelloController类,并且按照图片添加注解和设置方法,注意方法返回值要是String
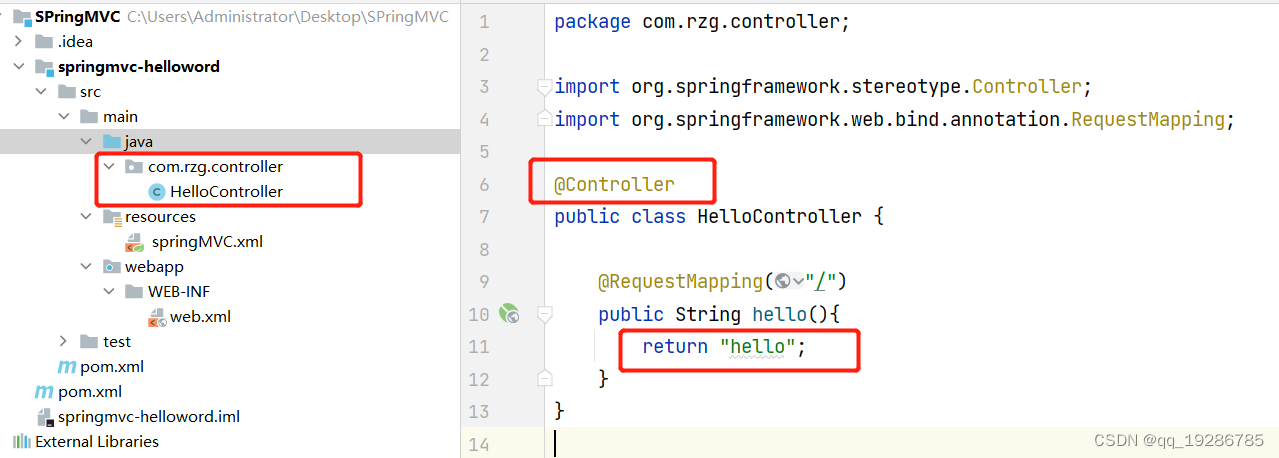
创建完成之后,Spring还不会把这个HelloController当做Controller,要在Spring配置文件中打开组件扫描,让这个@Controller生效。
8.开启组件扫描
spring配置文件(springMVC.xml)中添加component-scan
<?xml version="1.0" encoding="UTF-8"?>
<beans xmlns="http://www.springframework.org/schema/beans"
       xmlns:xsi="http://www.w3.org/2001/XMLSchema-instance"
       xmlns:context="http://www.springframework.org/schema/context"
       xsi:schemaLocation="http://www.springframework.org/schema/beans http://www.springframework.org/schema/beans/spring-beans.xsd http://www.springframework.org/schema/context https://www.springframework.org/schema/context/spring-context.xsd">

    <!-- 自动扫描包 扫描base-package包下面的注解-->
    <context:component-scan base-package="com.rzg.controller"/>

</beans>
9.设置视图解析器
spring配置文件(springMVC.xml)中添加 Thymeleaf视图解析器
<?xml version="1.0" encoding="UTF-8"?>
<beans xmlns="http://www.springframework.org/schema/beans"
       xmlns:xsi="http://www.w3.org/2001/XMLSchema-instance"
       xmlns:context="http://www.springframework.org/schema/context"
       xsi:schemaLocation="http://www.springframework.org/schema/beans http://www.springframework.org/schema/beans/spring-beans.xsd http://www.springframework.org/schema/context https://www.springframework.org/schema/context/spring-context.xsd">

    <!-- 自动扫描包 扫描base-package包下面的注解-->
    <context:component-scan base-package="com.rzg.controller"/>

    <!-- 配置Thymeleaf视图解析器 -->
    <bean id="viewResolver" class="org.thymeleaf.spring5.view.ThymeleafViewResolver">
        <!-- 视图解析器的顺序,可以看出视图解析器可以配置多个 -->
        <property name="order" value="1"/>
        <property name="characterEncoding" value="UTF-8"/>
        <property name="templateEngine">
            <bean class="org.thymeleaf.spring5.SpringTemplateEngine">
                <property name="templateResolver">
                    <bean class="org.thymeleaf.spring5.templateresolver.SpringResourceTemplateResolver">

                        <!-- 视图前缀 -->
                        <property name="prefix" value="/WEB-INF/templates/"/>

                        <!-- 视图后缀 -->
                        <property name="suffix" value=".html"/>
                        <property name="templateMode" value="HTML5"/>
                        <property name="characterEncoding" value="UTF-8" />
                    </bean>
                </property>
            </bean>
        </property>
    </bean>
</beans>
项目创建到目前为止,访问根路径/时,DispatcherServlet会调用匹配到的HelloController中hello()方法,返回hello字符串,根据Thymeleaf视图解析器中配置的视图前缀,视图后缀拼接成一个文件名(/WEB-INF/templates/hello.html),对着个文件进行处理,然后返回前端。下面我们在这个路径下创建 hello.html
10.创建hello.html文件
创建/WEB-INF/templates/hello.html文件,写一个HelloWord。

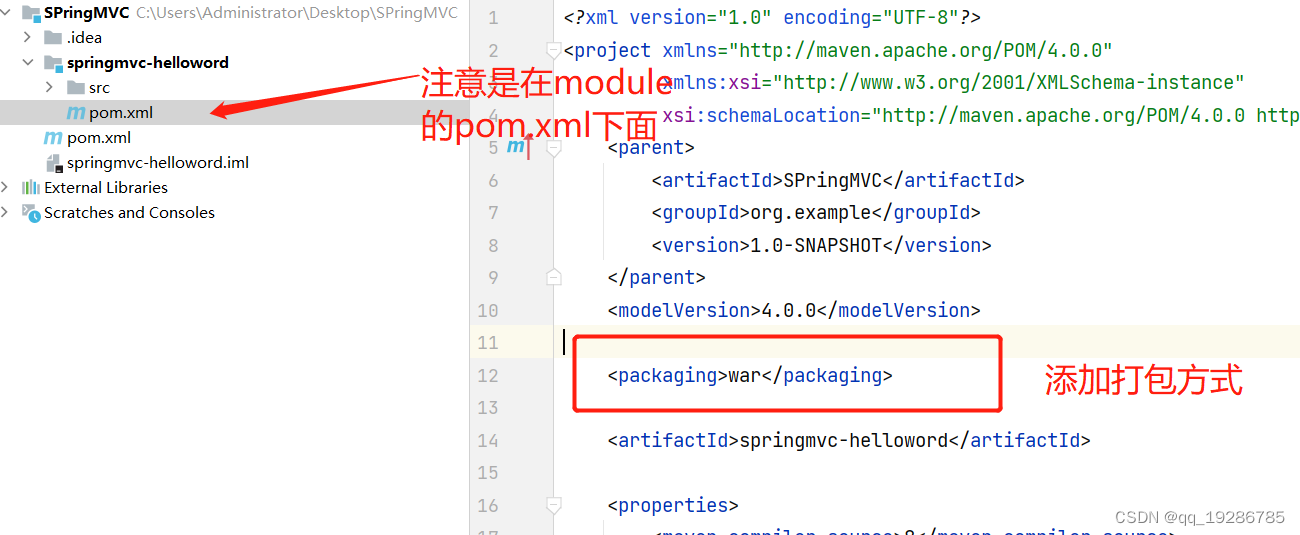
11.module模块pom.xml中设置打包方式
按照下图添加打包方式,注意修改pom.xml之后一定要刷新才生效
12.配置Tomcat
要确保电脑已经安装了Tomcat

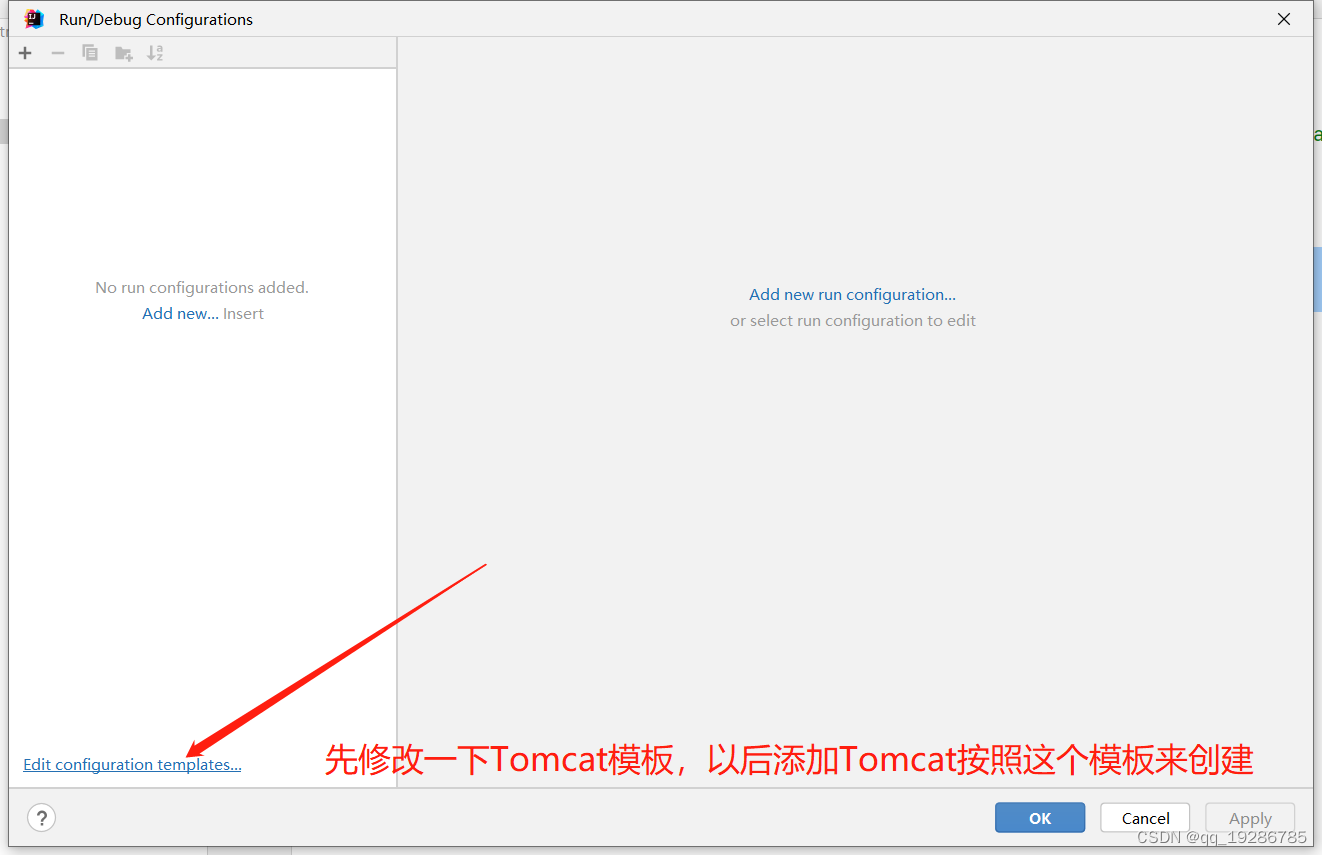
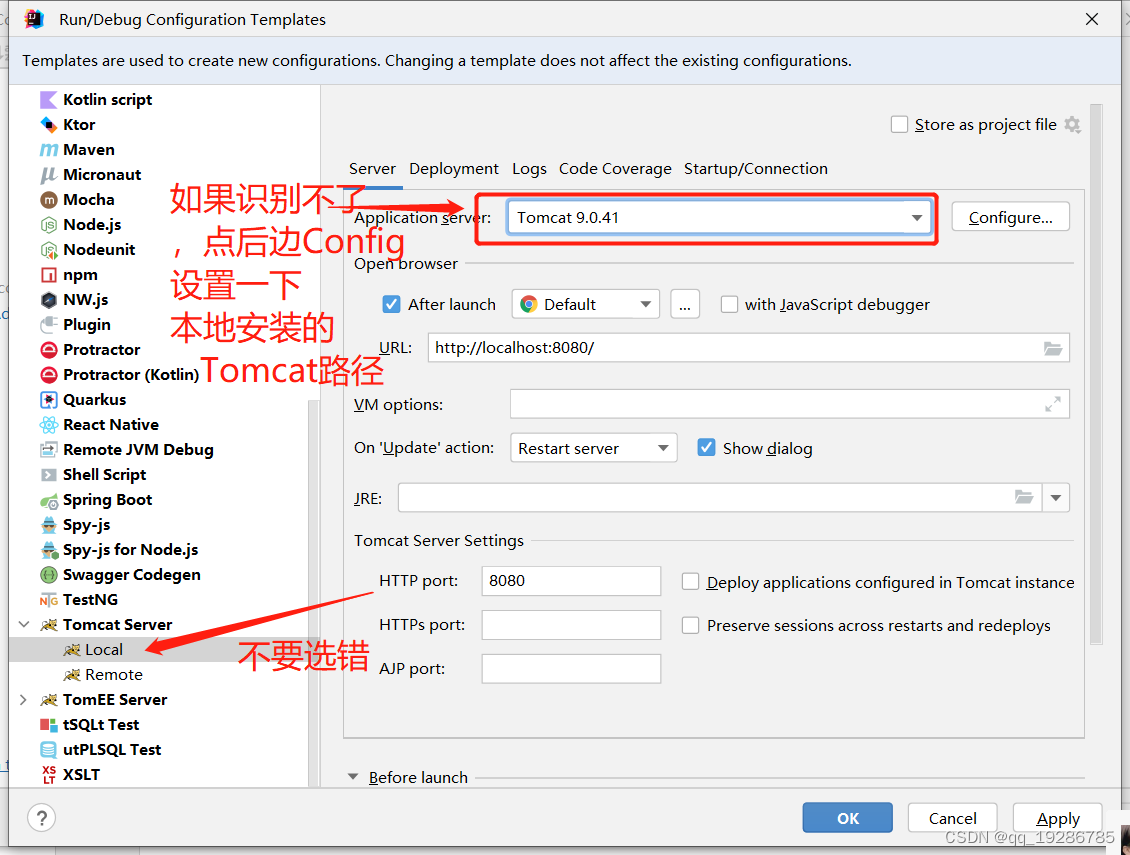
完了 点击Apply -》 Ok,在根据模板创建一个Tomcat
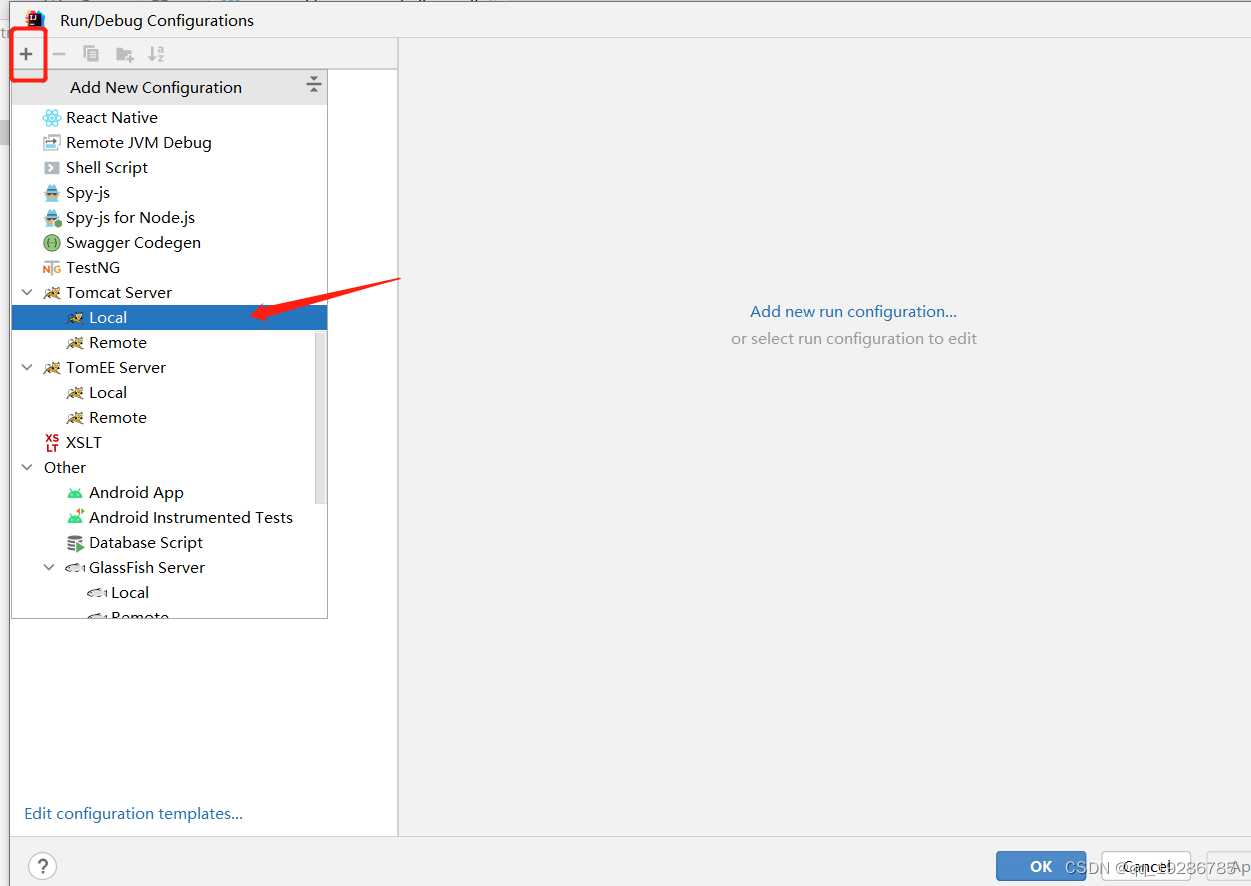
然后将刚刚的程序打成的包,放进Tomcat中 如下图:
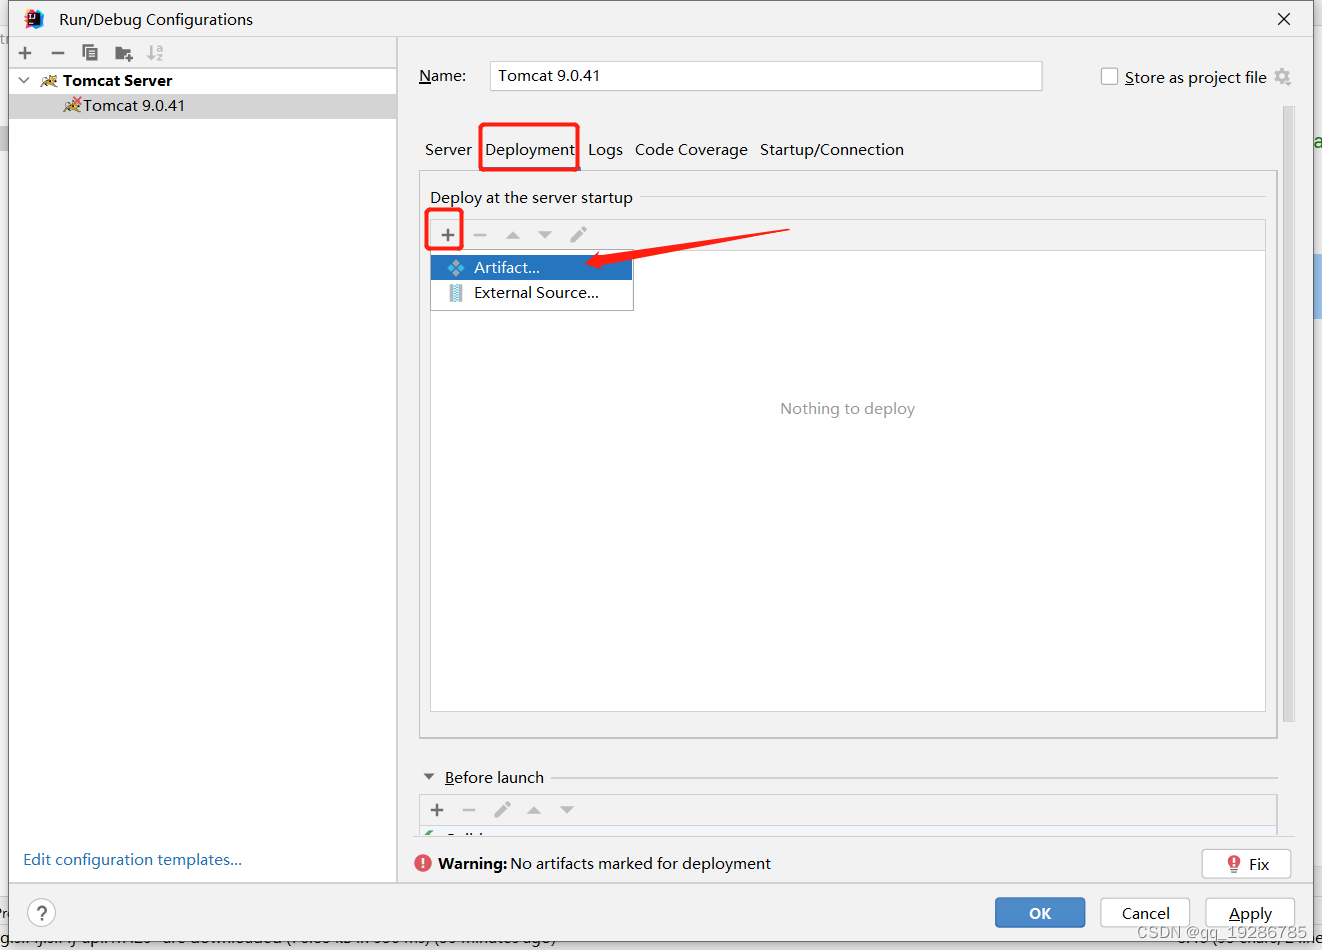
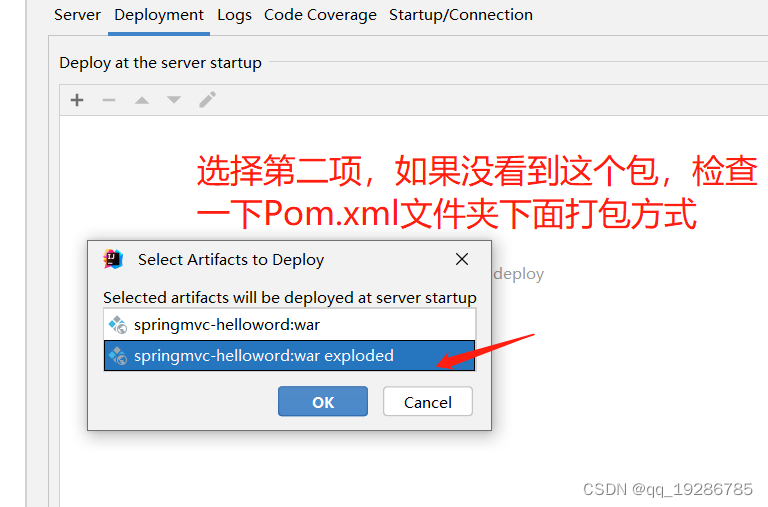
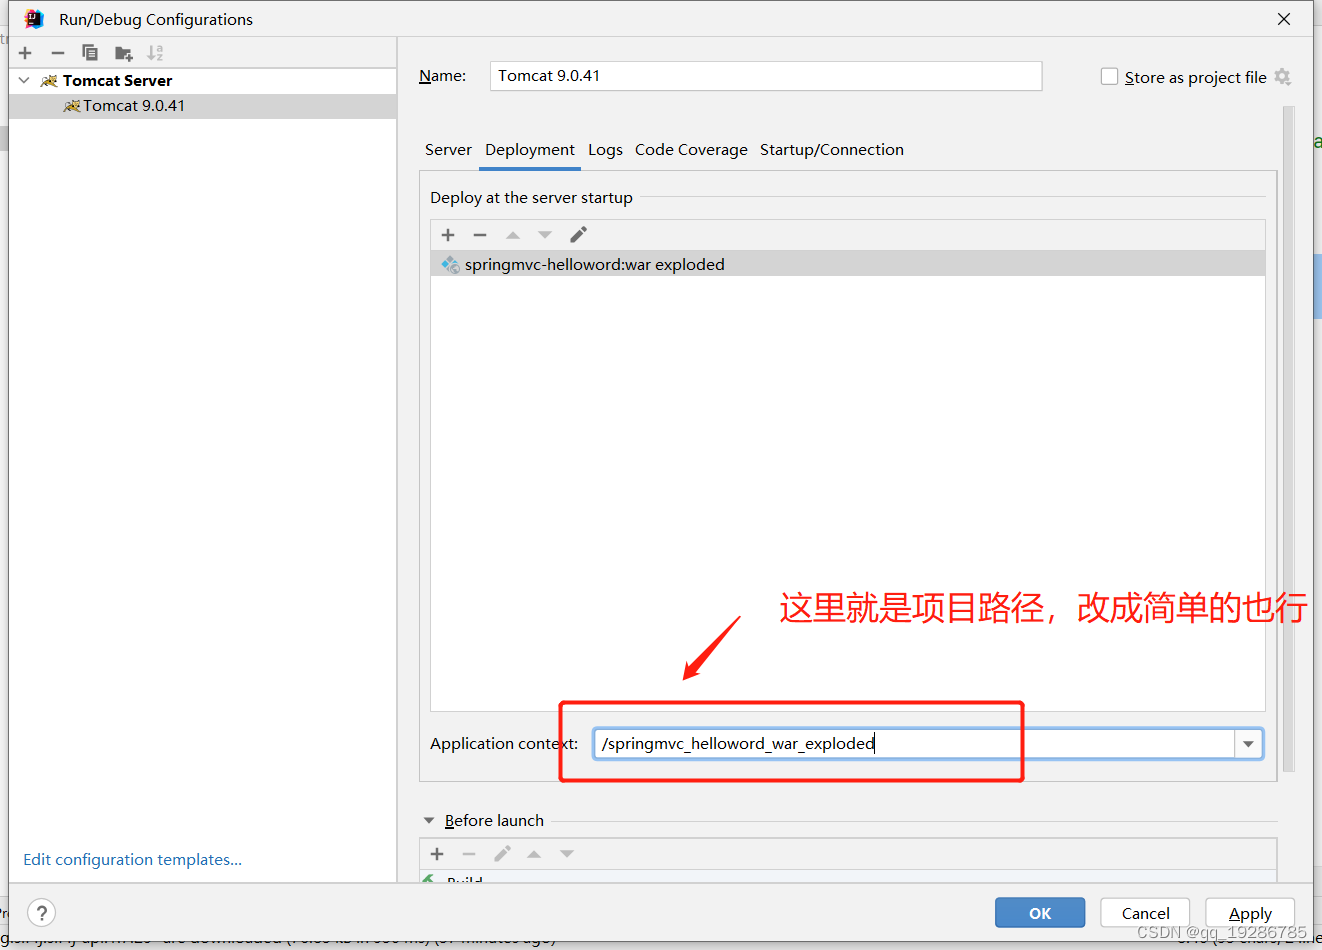
点击Apply-》Ok 然后Debug运行

![[外链图片转存失败,源站可能有防盗链机制,建议将图片保存下来直接上传(img-MflSbKPZ-1670766023485)(C:\Users\Administrator\AppData\Roaming\Typora\typora-user-images\image-20221211213735815.png)]](https://img-blog.csdnimg.cn/8c6ead8540ff4d32a830d0dde2534872.png)
13.程序运行,访问测试:

结束

