tinkerCAD案例:19. Move Circuit Assembly 移动电路组件
In this tutorial, you’ll learn how to add the Move circuit assembly to a design.
在本教程中,您将学习如何将移动电路装配体添加到设计中。
When you assemble the Move circuit assembly with real electronic components like a vibration motor and switch, you create a design that jitters and moves!
当您将Move电路组件与振动电机和开关等真实电子元件组装在一起时,您将创建一个抖动和移动的设计!
-
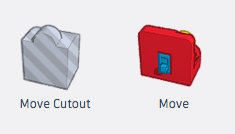
Circuit Assemblies can be found in their own category in the Shapes Panel.
电路组件可以在“形状”面板中找到其自己的类别。

说明
-
Click the Shapes Panel dropdown and select Circuit Assemblies from the list.
单击“形状面板”下拉列表,然后从列表中选择“电路装配体”。
-
Notice how for each circuit assembly, there is a corresponding Cutout.
请注意,对于每个电路程序集,都有一个相应的切口。
-
Continue to the next step to explore the Move circuit assembly and Cutout.
继续执行下一步,探索“移动电路”程序集和“切口”。
-
-
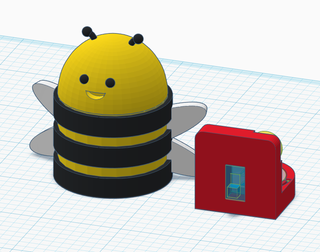
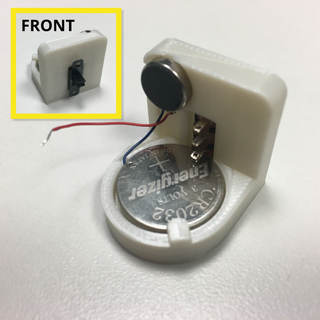
The Move circuit assembly on the right consists of a few different parts: a 3D printed holder (in red), a vibration motor, a slideswitch, and a battery. The slideswitch is used to power the motor on and off, which will make your design move around when placed on a smooth, flat surface.
右侧的Move电路组件由几个不同的部分组成:3D打印支架(红色),振动电机,滑动开关和电池。滑动开关用于打开和关闭电机,当放置在光滑、平坦的表面上时,这将使您的设计四处移动。The Move Cutout is a special hole designed to create a cavity for the Move circuit assembly within a design.
移动切口是一个特殊的孔,旨在为设计中的移动电路组件创建一个空腔。
说明
-
Drag out the Move circuit assembly into the editor.
将“移动线路”程序集拖出到编辑器中。
-
Drag out the Move Cutout into the editor.
将“移动切口”拖出到编辑器中。
-
Continue to the next step.
继续执行下一步。 -
In this step, we’ll align the Move circuit assembly and Cutout before adding it to the Bumblebee design.
在此步骤中,我们将对齐移动电路组件和切口,然后再将其添加到大黄蜂设计中。

说明
-
Select both the Move Cutout and the Move circuit assembly and click the Align button. Center both on the workplane by clicking on the two middle dots along the workplane.
同时选择“移动切口”和“移动线路”组件,然后单击“对齐”按钮。通过单击工作平面上的两个中间点,将两者居中。
-
Continue to the next step.
继续执行下一步。 -
Let’s make the Bumblebee transparent to make it easier to see how the cutout and circuit assembly fit inside.
让我们让大黄蜂透明,以便更容易看到切口和电路组件如何适合内部。

说明
-
Select the Bumblebee, click on the Solid color in the inspector, and check the transparent box.
选择大黄蜂,单击检查器中的纯色,然后选中透明框。
-
Continue to the next step.
继续执行下一步。 -
Now you’re ready to add the Move circuit assembly to the Bumblebee. We’ll need to ensure that there is room to access the switch on the back of the circuit assembly so you can easily turn the vibration motor on and off.
现在,您已准备好将 Move 电路组件添加到大黄蜂。我们需要确保有空间来访问电路组件背面的开关,以便您可以轻松地打开和关闭振动电机。

说明
-
Click on the Top side of the View Cube to make it easier to position the objects in your design.
单击视图立方体的顶部,以便更轻松地在设计中定位对象。
-
Select the Bumblebee, the Move cutout, and the Move circuit assembly, click the align button, and align them so that they are centered across the width of the bumblebee. Next, align all three shapes along the back edge of the Bumblebee. Check out the animation above for help.
选择“大黄蜂”、“移动”切口和“移动”电路组件,单击对齐按钮,然后对齐它们,使它们在大黄蜂的宽度上居中。接下来,沿大黄蜂的后边缘对齐所有三个形状。查看上面的动画以获取帮助。
-
Select the Bumblebee and the cutout (do not select the Move Circuit Assembly) and group them to apply the cutout to the Bumblebee. Note that once you group your Cutout with a design, the new group cannot be scaled. This is to make sure your design will still fit around the Circuit Assembly!
选择大黄蜂和切口(不要选择移动电路组件)并将它们分组以将切口应用于大黄蜂。请注意,一旦使用设计对抠图进行分组,新组就无法缩放。这是为了确保您的设计仍然适合电路组件!
-
Rotate the camera to check how the cutout has created a cavity in the Bumblebee that we can fit the Move Circuit Assembly into.
旋转相机以检查切口如何在大黄蜂中创建一个空腔,我们可以将移动电路组件安装到其中。
-
Continue to the next step.
继续执行下一步。 -
When exporting your circuit assembly, you will want to export it separately from your design. In this step, we’ll export the Bumblebee and Move circuit assembly individually.
导出电路装配体时,需要将其与设计分开导出。在此步骤中,我们将分别导出大黄蜂和移动电路程序集。说明
-
Select the Move circuit assembly and click the Export button.
选择“移动线路”程序集,然后单击“导出”按钮。
-
Ensure that “The selected shape” is selected and select .STL to export the circuit assembly for 3D printing. Exporting the circuit assembly will only export the 3D-printable components in the assembly. The electronic components will not be included.
确保选中“所选形状”并选择 。STL导出电路组件进行3D打印。导出电路组件将仅导出程序集中的可 3D 打印组件。电子元件将不包括在内。
-
Select the Bumblebee and click the Export button.
选择大黄蜂,然后单击“导出”按钮。
-
Ensure that “The selected shape” is selected and select .STL to export the Bumblebee for 3D printing.
确保选中“所选形状”并选择 。STL出口大黄蜂进行3D打印。
-
Continue to the next step.
继续执行下一步。
-
-
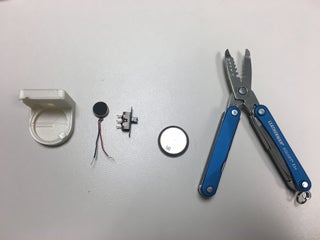
After 3D printing your parts, you will need three electronic components to build your Move Circuit Assembly:
3D 打印零件后,您将需要三个电子组件来构建您的移动电路组件:- Vibration motor 振动电机
- Slideswitch 滑动开关
- Coin cell battery 纽扣电池
Find all Move electronic components on Sparkfun
在 Sparkfun 上查找所有 Move 电子元件You will be leaving Tinkercad and taken to an external site when you click the link above.
当您单击上面的链接时,您将离开Tinkercad并被带到外部站点。Note: Coin cell batteries can cause serious injury if swallowed. Keep coin cell batteries out of reach of small children!
注意:如果吞咽纽扣电池,可能会造成严重伤害。将纽扣电池放在小孩接触不到的地方!You’ll also need the following parts and tools:
您还需要以下部件和工具:- The 3D printed Move Circuit Assembly holder
3D打印移动电路组件支架 - Needle-nose pliers 针嘴钳
说明
-
Gather all your electronic components, your 3D printed Move holder, and needle-nose pliers.
收集您的所有电子元件、3D 打印的 Move 支架和尖嘴钳。
-
Continue to the next step.
继续执行下一步。 -
说明
-
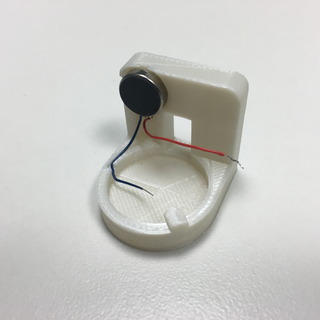
Peel the adhesive backing from the vibration motor and stick the motor to the back of the 3D printed holder.
从振动电机上剥离粘合剂背衬,并将电机粘在3D打印支架的背面。
-
Guide the blue wire into the channel on the left side of the holder such that the exposed part of the wire is at the center of the base. In the next step, we’ll add the battery, which needs to make contact with the exposed end of the blue wire.
将蓝线引导到支架左侧的通道中,使电线的裸露部分位于底座的中心。在下一步中,我们将添加电池,它需要与蓝线的裸露端接触。
-
Continue to the next step.
继续执行下一步。
-
-
说明
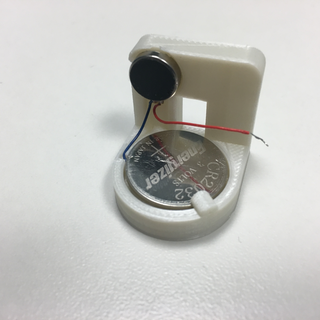
- Add your coin cell battery into the holder with the positive side (+) of the battery facing up. The negative side of the battery should be touching the blue wire. Make sure that the red wire from the vibration motor is not underneath the battery.
将纽扣 - 电池放入支架中,电池的正极面(+)朝上。电池的负极应接触蓝线。确保振动电机的红线不在电池下方。
- Add your coin cell battery into the holder with the positive side (+) of the battery facing up. The negative side of the battery should be touching the blue wire. Make sure that the red wire from the vibration motor is not underneath the battery.
-
说明
-
Add your slideswitch through the front of the holder so that the three pins face the back of the assembly and the bottom pin is touching the positive side of the battery. Press down on the battery when inserting the switch to ensure the battery is underneath the switch pins.
将滑动开关穿过支架的正面,使三个引脚面向组件的背面,底部引脚接触电池的正极。插入开关时按下电池,确保电池位于开关引脚下方。
-
Continue to the next step.
继续执行下一步。
-
-
The last step is to connect the vibration motor to the switch so it’s easy to turn on and off.
最后一步是将振动电机连接到开关,以便于打开和关闭。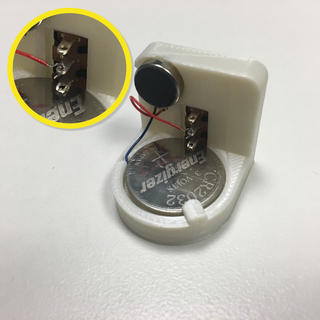
说明
-
Thread the positive (red) wire from the vibration motor into the hole of the middle pin of the slideswitch, ensuring that the wire does not touch the bottom pin of the switch.
将振动电机的正极(红色)导线穿入滑动开关中间引脚的孔中,确保导线不接触开关的底部引脚。
-
Use needlenose pliers to help secure the wire to the pin and ensure that the wire does not touch any other pin of the slideswitch.
使用尖嘴钳帮助将电线固定到引脚上,并确保电线不会接触滑动开关的任何其他引脚。
-
-
The last step is to connect the vibration motor to the switch so it’s easy to turn on and off.
最后一步是将振动电机连接到开关,以便于打开和关闭。说明
-
Thread the positive (red) wire from the vibration motor into the hole of the middle pin of the slideswitch, ensuring that the wire does not touch the bottom pin of the switch.
将振动电机的正极(红色)导线穿入滑动开关中间引脚的孔中,确保导线不接触开关的底部引脚。
-
Use needlenose pliers to help secure the wire to the pin and ensure that the wire does not touch any other pin of the slideswitch.
使用尖嘴钳帮助将.电线固定到引脚上,并确保电线不会接触滑动开关的任何其他引脚。
-
-

说明
-
Turn the Move Circuit Assembly on by pulling the switch to the bottom position. At this point, your assembly should be moving!
通过将开关拉到底部位置来打开移动电路组件。此时,您的程序集应该正在移动!If your motor is not turning on, try taping the blue wire of your motor to the bottom of the battery to ensure a good connection.
如果您的电机没有打开,请尝试将电机的蓝线贴在电池底部以确保连接良好。
-
-

说明
-
Turn off your Move circuit assembly so it will be easier to add to the Bumblebee.
关闭您的 Move 电路组件,以便更容易添加到大黄蜂中。
-
Place the Bumblebee and Move circuit assembly on a flat surface and slide the circuit assembly into the back of the Bumblebee.
将大黄蜂和移动电路组件放在平坦的表面上,然后将电路组件滑入大黄蜂的背面。
-
Continue to the next step.
继续执行下一步。
-
-
Now you can make your Bumblebee move by turning your switch on and off.
现在,您可以通过打开和关闭开关来使大黄蜂移动。Congratulations, you’ve built the Move Circuit Assembly! Now that you’ve learned how Move works, try designing your own model from scratch to fit around the circuit assembly.
恭喜,您已经构建了移动电路组件!现在您已经了解了 Move 的工作原理,请尝试从头开始设计您自己的模型以适应电路装配体。


![LeetCode[面试题04.08]首个共同祖先](https://img-blog.csdnimg.cn/fa456d6b84b74e70bf46cd0cb7f450f4.png)