在本篇博客中,我们将使用原生JavaScript实现一个简单的前端MVVM框架,类似于VUE。MVVM是Model-View-ViewModel的缩写,是一种用于构建现代化、可维护的前端应用程序的架构模式。MVVM框架通过数据绑定和组件化的方式实现了视图与数据的双向绑定,使得数据的变化可以自动反映在视图上,同时视图的变化也会自动更新数据,从而实现了数据和视图的同步更新。
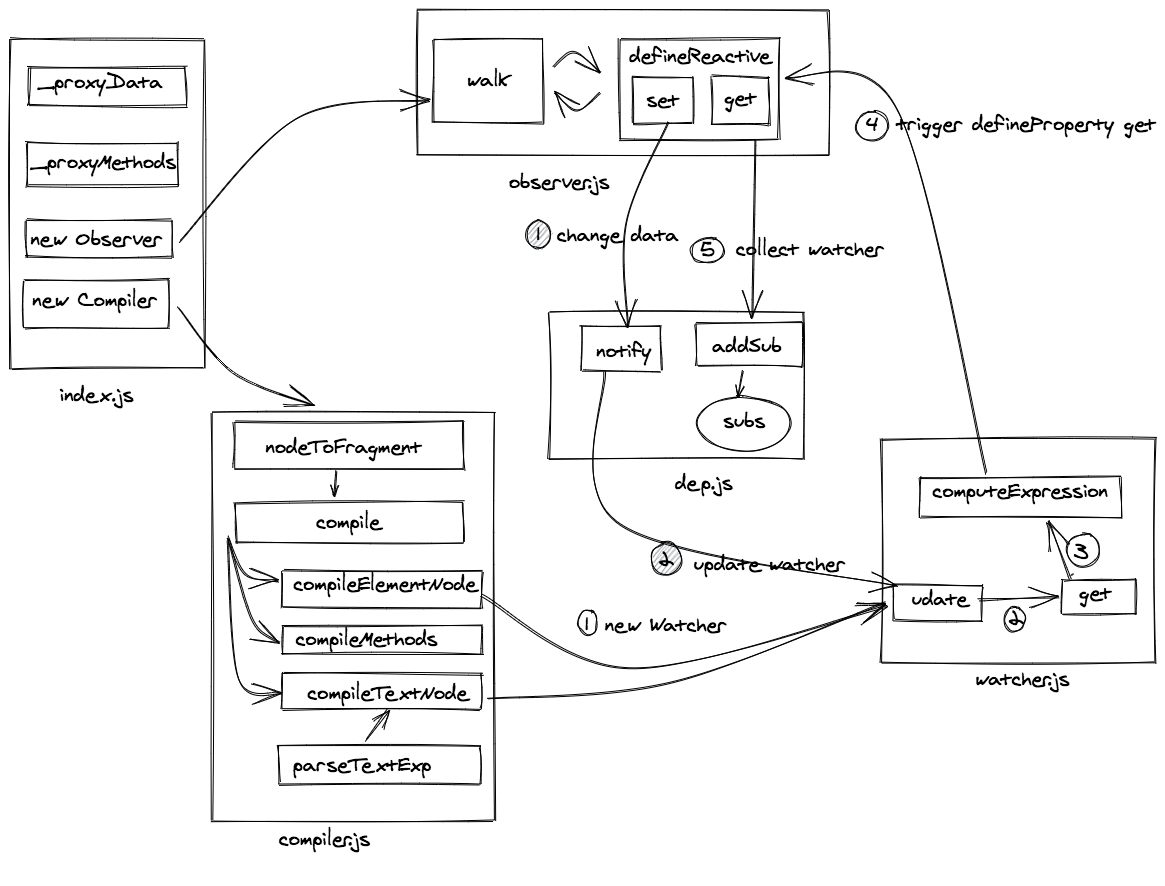
本篇博客将分为多个部分来介绍实现MVVM框架的过程。首先,我们会介绍MVVM框架的基本原理和核心概念。然后,我们会逐步实现MVVM框架的各个功能模块,包括数据劫持、编译模板、观察者和依赖收集等。最后,我们会通过一个简单的示例来演示MVVM框架的使用。
1. MVVM框架基本原理和核心概念
MVVM框架是一种基于数据驱动的前端框架,它的核心概念包括:
-
Model(模型):代表应用程序的数据和业务逻辑。在MVVM框架中,Model通常是一个JavaScript对象,用于存储应用程序的数据。
-
View(视图):代表用户界面。在MVVM框架中,View通常是HTML模板,用于展示数据。
-
ViewModel(视图模型):是View和Model之间的连接层。ViewModel负责将Model的数据转换成View可以显示的数据,并监听View中的事件,当View发生变化时,更新Model中的数据。
MVVM框架通过数据绑定和组件化的方式实现了View和Model之间的双向绑定。当Model中的数据发生变化时,View会自动更新;当View中的数据发生变化时,Model会自动更新。这种双向绑定机制使得数据和视图始终保持同步,大大简化了前端开发的复杂性。
2. 实现Observer:数据劫持
数据劫持是MVVM框架的核心功能之一,它通过拦截对象的属性访问来实现对数据的监控。在我们的MVVM框架中,我们将使用Observer类来实现数据劫持功能。
// observer.js

// 定义Dep类,用于收集依赖和通知更新
class Dep {
  constructor() {
    this.subs = {};
  }

  addSub(target) {
    this.subs[target.uid] = target;
  }

  notify() {
    for (let uid in this.subs) {
      this.subs[uid].update();
    }
  }
}

// 定义Observer类,用于实现数据劫持
export default class Observer {
  constructor(data) {
    this.data = data;
    this.walk(this.data);
  }

  walk(data) {
    if (!data || typeof data !== "object") {
      return;
    }
    Object.keys(data).forEach((key) => {
      this.defineReactive(data, key, data[key]);
    });
  }

  defineReactive(data, key, value) {
    var dep = new Dep();
    Object.defineProperty(data, key, {
      enumerable: true,
      configurable: false,
      get: () => {
        Dep.target && dep.addSub(Dep.target);
        return value;
      },
      set: (newValue) => {
        value = newValue;
        dep.notify();
      },
    });
    this.walk(value);
  }
}
在上述代码中,我们定义了Dep类用于收集依赖和通知更新,以及Observer类用于实现数据劫持功能。Dep类中的subs属性用于存储所有的Watcher实例,它会在get方法中被使用来收集依赖,在notify方法中被使用来通知更新。Observer类的构造函数接受一个data参数,用于指定要劫持的数据对象。walk方法用于遍历对象数据并调用defineReactive方法对每个属性进行劫持。
在defineReactive方法中,我们使用Object.defineProperty来定义对象的属性,拦截对属性的访问和修改。在get方法中,我们将Dep.target(当前的Watcher实例)添加到对应的依赖中,以便在属性发生变化时能够通知更新;在set方法中,当属性发生变化时,我们将通知所有的依赖进行更新。
3. 实现Compiler:模板编译
模板编译是MVVM框架的另一个重要功能,它通过解析模板中的特殊符号(例如{{}}、v-model、v-text等)来实现对视图的更新。在我们的MVVM框架中,我们将使用Compiler类来实现模板编译功能。
// compiler.js

import Watcher from "./watcher";

export default class Compiler {
  constructor(context) {
    this.$el = context.$el;
    this.context = context;
    if (this.$el) {
      this.$fragment = this.nodeToFragment(this.$el);
      this.compiler(this.$fragment);
      this.$el.appendChild(this.$fragment);
    }
  }

  nodeToFragment(node) {
    let fragment = document.createDocumentFragment();
    if (node.childNodes && node.childNodes.length) {
      node.childNodes.forEach((child) => {
        if (!this.ignorable(child)) {
          fragment.appendChild(child);
        }
      });
    }
    return fragment;
  }

  ignorable(node) {
    var reg = /^[\t\n\r]+/;
    return (
      node.nodeType === 8 || (node.nodeType === 3 && reg.test(node.textContent))
    );
  }

  compiler(fragment) {
    if (fragment.childNodes && fragment.childNodes.length) {
      fragment.childNodes.forEach((child) => {
        if (child.nodeType === 1) {
          this.compilerElementNode(child);
        } else if (child.nodeType === 3) {
          this.compilerTextNode(child);
        }
      });
    }
  }

  compilerElementNode(node) {
    let attrs = [...node.attributes];
    attrs.forEach((attr) => {
      let { name: attrName, value: attrValue } = attr;
      if (attrName.indexOf("v-") === 0) {
        let dirName = attrName.slice(2);
        switch (dirName) {
          case "text":
            new Watcher(attrValue, this.context, (newValue) => {
              node.textContent = newValue;
            });
            break;
          case "model":
            new Watcher(attrValue, this.context, (newValue) => {
              node.value = newValue;
            });
            node.addEventListener("input", (e) => {
              this.context[attrValue] = e.target.value;
            });
            break;
        }
      }
    });
    this.compiler(node);
  }

  compilerTextNode(node) {
    let text = node.textContent.trim();
    if (text) {
      let exp = this.parseTextExp(text);
      new Watcher(exp, this.context, (newValue) => {
        node.textContent = newValue;
      });
    }
  }

  parseTextExp(text) {
    let regText = /\{\{(.+?)\}\}/g;
    var pices = text.split(regText);
    var matches = text.match(regText);
    let tokens = [];
    pices.forEach((item) => {
      if (matches && matches.indexOf("{{" + item + "}}") > -1) {
        tokens.push("(" + item + ")");
      } else {
        tokens.push("`" + item + "`");
      }
    });
    return tokens.join("+");
  }
}
在上述代码中,我们定义了Compiler类用于实现模板编译功能。Compiler类的构造函数接受一个context参数,用于指定MVVM框架的实例对象。在构造函数中,我们将MVVM框架的根元素$el转换为文档片段,并调用compiler方法对模板进行编译。编译过程中,我们会对每个元素节点和文本节点进行解析,识别特殊符号(例如v-model和v-text),并创建对应的Watcher实例来实现数据的响应式更新。
4. 实现Watcher和Dep:观察者和依赖收集
观察者和依赖收集是MVVM框架的关键部分,它们用于观察数据的变化并执行相应的更新。在我们的MVVM框架中,我们将使用Watcher和Dep类来实现观察者和依赖收集功能。
// dep.js

export default class Dep {
  constructor() {
    this.subs = {};
  }

  addSub(target) {
    this.subs[target.uid] = target;
  }

  notify() {
    for (let uid in this.subs) {
      this.subs[uid].update();
    }
  }
}

// watcher.js

import Dep from "./dep";

var $uid = 0;
export default class Watcher {
  constructor(exp, scope, cb) {
    this.exp = exp;
    this.scope = scope;
    this.cb = cb;
    this.uid = $uid++;
    this.update();
  }

  get() {
    Dep.target = this;
    let newValue = Watcher.computeExpression(this.exp, this.scope);
    Dep.target = null;
    return newValue;
  }

  update() {
    let newValue = this.get();
    this.cb && this.cb(newValue);
  }

  static computeExpression(exp, scope) {
    let fn = new Function("scope", "with(scope){return " + exp + "}");
    return fn(scope);
  }
}
在上述代码中,我们定义了Dep类用于收集依赖和通知更新,以及Watcher类用于观察数据的变化并执行相应的更新。Dep类的subs属性用于存储所有的Watcher实例,它会在get方法中被使用来收集依赖,在notify方法中被使用来通知更新。Watcher类的uid属性用于分配唯一的标识符,确保每个Watcher实例的唯一性。Watcher类的exp属性用于保存要观察的数据表达式,scope属性用于保存观察的作用域,cb属性用于保存更新数据的回调函数。
5. 实现Vue:MVVM框架类似VUE
最后,我们将使用Vue类来整合以上实现的功能,完成一个简单的MVVM框架类似VUE的效果。
// vue.js

import Observer from "./observer";
import Compiler from "./compiler";

class Vue {
  constructor(options) {
    this.$el = document.querySelector(options.el);
    this.$data = options.data || {};

    this._proxyData(this.$data);
    this._proxyMethods(options.methods);

    new Observer(this.$data);
    new Compiler(this);
  }

  _proxyData(data) {
    Object.keys(data).forEach((key) => {
      Object.defineProperty(this, key, {
        set(newValue) {
          data[key] = newValue;
        },
        get() {
          return data[key];
        },
      });
    });
  }

  _proxyMethods(methods) {
    if (methods && typeof methods === "object") {
      Object.keys(methods).forEach((key) => {
        this[key] = methods[key];
      });
    }
  }
}

window.Vue = Vue;
在上述代码中,我们定义了Vue类用于实现MVVM框架类似VUE的效果。Vue类的构造函数接受一个options参数,其中包含了MVVM框架的配置信息。在构造函数中,我们将MVVM框架的根元素$el转换为文档片段,并调用Compiler类对模板进行编译,同时使用Observer类对数据进行劫持,从而实现了MVVM框架的基本功能。
6. 示例
现在,我们可以使用我们实现的MVVM框架来创建一个简单的示例。首先,我们需要在HTML中引入我们的MVVM框架和示例数据,并指定根元素。
<!DOCTYPE html>
<html lang="en">
  <head>
    <meta charset="UTF-8" />
    <meta name="viewport" content="width=device-width, initial-scale=1.0" />
    <title>Document</title>
    <script src="../dist/vue.js"></script>
    <!-- <script src="../src/index.js"></script> -->
  </head>
  <body>
    <div id="app">
      <p>111-{{msg + ' Vue'}}-222</p>
      <p v-text="msg"></p>
      <input type="text" v-model="msg" />
      <button @click="handleClick">click</button>
    </div>
    <script type="text/javascript">
      var vm = new Vue({
        el: "#app",
        data: {
          msg: "Hello",
          info: {
            a: "111",
          },
        },
        methods: {
          handleClick: function () {
            console.log("handleClick", this.msg);
          },
        },
      });
    </script>
  </body>
</html>
在上述示例中,我们使用了{{}}语法来显示数据,并使用v-model和@click指令来实现数据的双向绑定和事件监听。当用户在输入框中输入内容时,数据会自动更新;当点击按钮时,数据会发生变化。
以上就是我们实现的简单前端MVVM框架类似VUE的过程。通过数据劫持、模板编译、观察者和依赖收集等功能的实现,我们实现了一个具备基本MVVM功能的前端框架。当然,实际的MVVM框架比这个示例要复杂得多,但是这个简单的实现已经展示了MVVM框架的核心原理和实现思路。






![[vue] 新项目配置整理(没写完,回头有空继续)](https://img-blog.csdnimg.cn/c241205c12ad4fe3ba51556e5d8e4075.png)
