spring bean的生命周期
文章目录
- spring bean的生命周期
- 简介
- 一、bean的创建阶段
- 二、bean的初始化阶段
- 三、bean的销毁阶段
- 四、spring bean的生命周期总述
简介
本文测试并且介绍了spring中bean的生命周期,如果只想知道结果可以跳到最后一部分直接查看。
一、bean的创建阶段
spring中的bean是何时创建的?
在spring中有一个非常重要的注解,叫做**@Scope**,这个注解是用来控制spring中的bean是否是单例的,一般情况下我们不用添加,默认是单例的即@Scope(“singleton”)。但其实还可以传递其他值让spring中的bean不为单例**@Scope(“prototype”)**。
而spring创建bean的时机就和这个注解有关。
现在我们创建两个类,一个类是TestBean用来当测试bean在构造方法中打印一些东西证明他被执行了。另外一个类是TestFactory这个类实现ApplicationContextAware让他成为自己的测试工厂,要注意这两个类都要交给spring来管理。
TestBean
package com.ez4sterben.spring;

import org.springframework.context.annotation.Scope;
import org.springframework.stereotype.Component;

/**
 * 测试
 *
 * @author ez4sterben
 * @date 2023/07/27
 */
@Component
public class TestBean {

    public TestBean(){
        System.out.println("testBean实例化");
    }
}
TestFactory
package com.ez4sterben.spring;

import org.springframework.beans.BeansException;
import org.springframework.context.ApplicationContext;
import org.springframework.context.ApplicationContextAware;
import org.springframework.stereotype.Component;

import javax.annotation.PostConstruct;

/**
 * 测试工厂
 *
 * @author ez4sterben
 * @date 2023/07/27
 */
@Component
public class TestFactory implements ApplicationContextAware {
    public ApplicationContext applicationContext;

    @Override
    public void setApplicationContext(ApplicationContext applicationContext) throws BeansException {
        this.applicationContext = applicationContext;
    }
}
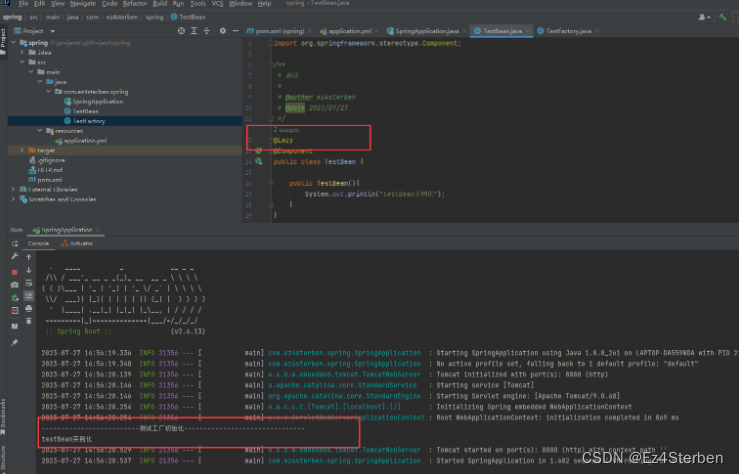
接下来启动spring boot项目。

可以看到这个类在spring项目运行后就被实例化了,即这个bean随着spring项目启动而被创建,接下来我们对代码进行修改。
TestBean
package com.ez4sterben.spring;

import org.springframework.context.annotation.Scope;
import org.springframework.stereotype.Component;

/**
 * 测试
 *
 * @author ez4sterben
 * @date 2023/07/27
 */
@Scope("prototype")
@Component
public class TestBean {

    public TestBean(){
        System.out.println("testBean实例化");
    }
}
TestFactory
package com.ez4sterben.spring;

import org.springframework.beans.BeansException;
import org.springframework.context.ApplicationContext;
import org.springframework.context.ApplicationContextAware;
import org.springframework.stereotype.Component;

import javax.annotation.PostConstruct;

/**
 * 测试工厂
 *
 * @author ez4sterben
 * @date 2023/07/27
 */
@Component
public class TestFactory implements ApplicationContextAware {
    public ApplicationContext applicationContext;

    @Override
    public void setApplicationContext(ApplicationContext applicationContext) throws BeansException {
        this.applicationContext = applicationContext;
    }

    @PostConstruct
    public void init(){
        System.out.println("-------------------------测试工厂初始化-------------------------------");
        TestBean bean = applicationContext.getBean(TestBean.class);
    }
}
其中TestBean加入了@Scope(“prototype”)这个注解,而TestFactory中加入了一个@PostConstruct的初始化方法,这个注解会让其标记的方法在spring项目启动时默认执行。
方法中我们通过工厂来实例化这个bean,再次启动项目查看输出。

可以看到testBean的构造函数中的输出内容是在applicationContext调用了getBean方法后才输出的,也就是说在加入@Scope(“prototype”)注解后,bean被创建的时机其实是移动到了工厂执行getBean()之后才会创建,有点懒加载的意思。
但其实单例形式的bean也是可以懒加载的。我们只需要在TestBean上加入注解@Lazy即可。
二、bean的初始化阶段
Spring工厂在创建完对象后,调用方法的初始化方法,完成对应的初始化操作。
这里就有几个问题了:
- 这个初始化方法是谁提供的?
- 这个初始化方法又是由谁调用的?
其实这个初始化方法是发开者根据自己的业务需求来定义的,而这个初始化方法是由spring的工厂来调用的。
那么开发者又是怎么调用初始化方法的呢?
其实这里只需要让需要初始化的bean来实现InitializingBean这个接口即可,接下来我们来实现一下。
package com.ez4sterben.spring;

import org.springframework.beans.factory.InitializingBean;
import org.springframework.stereotype.Component;

/**
 * 测试
 *
 * @author ez4sterben
 * @date 2023/07/27
 */
@Component
public class TestBean implements InitializingBean {

    private String name;

    public TestBean(){
        System.out.println("testBean实例化");
    }

    @Override
    public void afterPropertiesSet() throws Exception {
        this.name = "testBean";
        System.out.println("afterPropertiesSet: " + this.name);
    }
}
这里我们去掉@Component之外的注解,这样的话我们的bean创建就是随着项目启动进行的,并且实现了初始化方法,给这个类中的name属性赋值并且打印他,接下来启动项目查看一下输出。

显然,这个输出结果表明,在spring项目启动时,testBean这个bean完成了创建,并且根据我们的初始化需求,完成了初始化方法,而我们是没有调用这个初始化方法的,说明由spring默认的工厂来帮我们执行了这个方法。
但是其实可以发现另外一件事,我们刚才是不是使用过一个注解叫做@PostConstruct,他是不是就是用来完成初始化的?
package com.ez4sterben.spring;

import org.springframework.stereotype.Component;
import javax.annotation.PostConstruct;

/**
 * 测试
 *
 * @author ez4sterben
 * @date 2023/07/27
 */
@Component
public class TestBean {

    private String name;

    public TestBean(){
        System.out.println("testBean实例化");
    }

    @PostConstruct
    public void init(){
        this.name = "testBean";
        System.out.println("init: " + this.name);
    }
}
那么这两种方式的区别是什么呢?
import org.springframework.beans.factory.InitializingBean;
import javax.annotation.PostConstruct;
其实@PostConstruct是由java本身提供的,如果我们使用这个注解可以脱离spring框架的限制,而实现InitializingBean接口就是把一切交给spring,这里我认为还是使用java提供的比较好一些,就如@Autowired与@Resource一样,脱离框架限制总是会更好一些。
可是如果我两个都选择了会怎么样?
package com.ez4sterben.spring;

import org.springframework.beans.factory.InitializingBean;
import org.springframework.stereotype.Component;

import javax.annotation.PostConstruct;

/**
 * 测试
 *
 * @author ez4sterben
 * @date 2023/07/27
 */
@Component
public class TestBean implements InitializingBean{

    private String name;

    public TestBean(){
        System.out.println("testBean实例化");
    }

    @PostConstruct
    public void init(){
        this.name = "testBeanInit";
        System.out.println("init: " + this.name);
    }

    @Override
    public void afterPropertiesSet() throws Exception {
        this.name = "testBeanAfterPropertiesSet";
        System.out.println("afterPropertiesSet: " + this.name);
    }
}
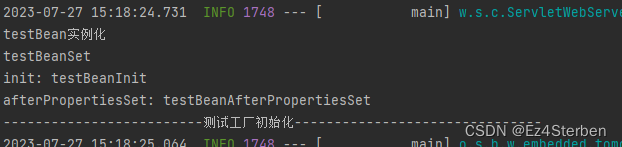
实际上会先执行@PostConstruct中的内容,然后再执行实现方法中的内容。

再细致一些观察,这个方法的名字很有意思啊afterPropertiesSet,意思是在属性设置之前,什么意思?我们可以联想我们开发中经常用的,同时也是我们刚才提起的,注入。但注入也不仅仅有@Resource这种注入还有@Value这种的注入。
package com.ez4sterben.spring;

import org.springframework.beans.factory.InitializingBean;
import org.springframework.beans.factory.annotation.Value;
import org.springframework.stereotype.Component;

import javax.annotation.PostConstruct;

/**
 * 测试
 *
 * @author ez4sterben
 * @date 2023/07/27
 */
@Component
public class TestBean implements InitializingBean{

    @Value("testBeanSet")
    private String name;

    public TestBean(){
        System.out.println("testBean实例化");
    }

    @PostConstruct
    public void init(){
        System.out.println(getName());
        this.name = "testBeanInit";
        System.out.println("init: " + this.name);
    }

    @Override
    public void afterPropertiesSet() throws Exception {
        this.name = "testBeanAfterPropertiesSet";
        System.out.println("afterPropertiesSet: " + this.name);
    }

    public String getName() {
        return name;
    }

    public void setName(String name) {
        this.name = name;
    }
}
这里通过@Value给name属性注入,并且在init方法中打印getName(),如果打印了testBeanSet,说明在这里其实已经是完成了注入了。
三、bean的销毁阶段
其实这里和初始化阶段类似,有两种实现方式,一个是实现DisposableBean接口,另一个是使用@PreDestroy注解来标记方法。
package com.ez4sterben.spring;

import org.springframework.beans.factory.DisposableBean;
import org.springframework.beans.factory.InitializingBean;
import org.springframework.beans.factory.annotation.Value;
import org.springframework.stereotype.Component;

import javax.annotation.PostConstruct;
import javax.annotation.PreDestroy;

/**
 * 测试
 *
 * @author ez4sterben
 * @date 2023/07/27
 */
@Component
public class TestBean implements InitializingBean, DisposableBean {

    @Value("testBeanSet")
    private String name;

    public String getName() {
        return name;
    }

    public void setName(String name) {
        this.name = name;
    }

    public TestBean(){
        System.out.println("testBean实例化");
    }

    @PostConstruct
    public void init(){
        System.out.println(getName());
        this.name = "testBeanInit";
        System.out.println("init: " + this.name);
    }

    @Override
    public void afterPropertiesSet() throws Exception {
        this.name = "testBeanAfterPropertiesSet";
        System.out.println("afterPropertiesSet: " + this.name);
    }

    @Override
    public void destroy() throws Exception {
        System.out.println(getName());
        System.out.println("destroy");
    }

    @PreDestroy
    public void preDestroy(){
        System.out.println("PreDestroy");
    }
}
而这整个阶段是发生在工厂关闭之后。关闭工厂的方法在ClassPathXmlApplicationContext中的close(),一般用于关闭资源等操作,这里我们就不具体测试了,另外这个销毁是只适用于@Scope(“singleton”)的bean而且@PreDestory是在重写的destory()之前执行的(最后一部分会有展示)。
四、spring bean的生命周期总述
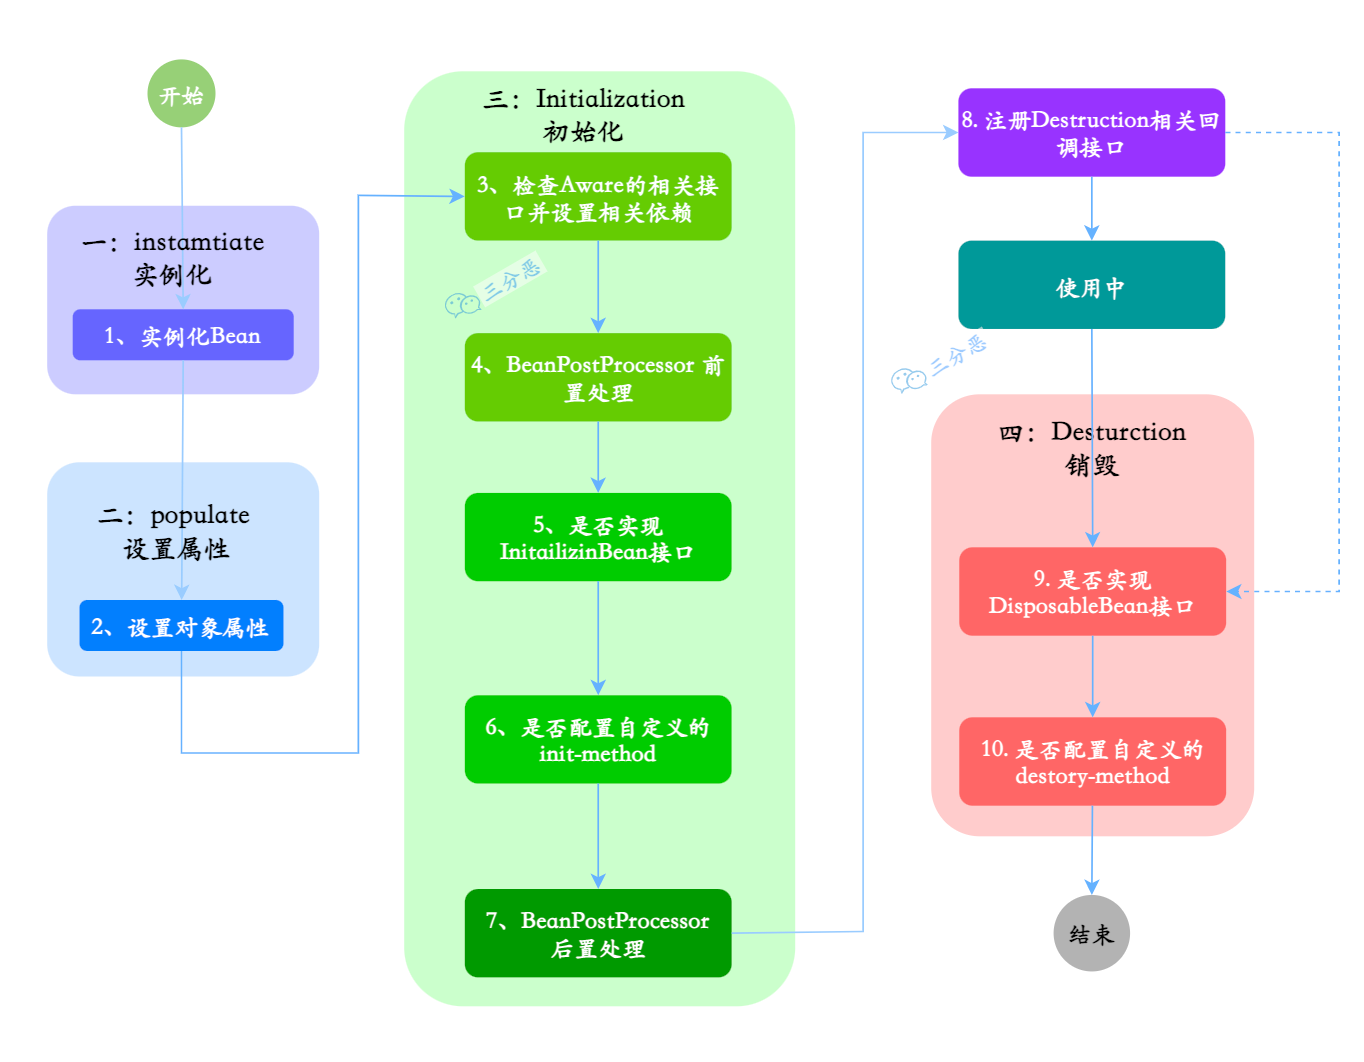
其实通过我们上面的测试可以发现,spring的声明周期其实是分为四个阶段的,并不只是三个,Spring IOC 中 Bean 的生命周期大致分为四个阶段:实例化(Instantiation)、属性赋值(Populate)、初始化(Initialization)、销毁(Destruction)。
而其中具体的操作也是很复杂的,并不只是我们测试的这些内容。
这里给大家附上详细的图片(来源java程序员进阶之路)
我们来完整的测试这一整套生命周期
首先改写TestBean
package com.ez4sterben.spring;

import org.springframework.beans.BeansException;
import org.springframework.beans.factory.*;
import org.springframework.beans.factory.annotation.Value;
import org.springframework.stereotype.Component;

import javax.annotation.PostConstruct;
import javax.annotation.PreDestroy;

/**
 * 测试
 *
 * @author ez4sterben
 * @date 2023/07/27
 */
@Component
public class TestBean implements InitializingBean, BeanFactoryAware, BeanNameAware, DisposableBean {

    @Value("testBeanSet")
    private String name;

    public String getName() {
        return name;
    }

    public void setName(String name) {
        this.name = name;
    }

    public TestBean(){
        System.out.println("1.testBean实例化");
    }

    @PostConstruct
    public void init(){
        this.name = "testBeanInit";
        System.out.println("6.init: " + this.name);
    }

    @Override
    public void afterPropertiesSet() throws Exception {
        this.name = "testBeanAfterPropertiesSet";
        System.out.println("7.afterPropertiesSet: " + this.name);
    }

    @Override
    public void destroy() throws Exception {
        System.out.println(getName());
        System.out.println("10.destroy");
    }

    @PreDestroy
    public void preDestroy(){
        System.out.println("9.PreDestroy");
    }

    @Override
    public void setBeanFactory(BeanFactory beanFactory) throws BeansException {
        System.out.println("4.setBeanFactory");
    }

    @Override
    public void setBeanName(String s) {
        System.out.println("2.setName: "+ getName());
        System.out.println("3.setBeanName");
    }
}
创建一个TestBeanPostProcessor实现BeanPostProcessor接口
package com.ez4sterben.spring;

import org.springframework.beans.BeansException;
import org.springframework.beans.factory.config.BeanPostProcessor;
import org.springframework.stereotype.Component;

/**
 * 测试bean后置处理程序
 *
 * @author ez4sterben
 * @date 2023/07/27
 */
@Component
public class TestBeanPostProcessor implements BeanPostProcessor {

    @Override
    public Object postProcessAfterInitialization(Object bean, String beanName) throws BeansException {
        System.out.println("8.postProcessAfterInitialization");
        return bean;
    }

    @Override
    public Object postProcessBeforeInitialization(Object bean, String beanName) throws BeansException {
        System.out.println("5.postProcessBeforeInitialization");
        return bean;
    }
}
重启项目查看输出,其实配置自己的TestBeanPostProcessor 后可以发现还有好多bean都会完成这个过程
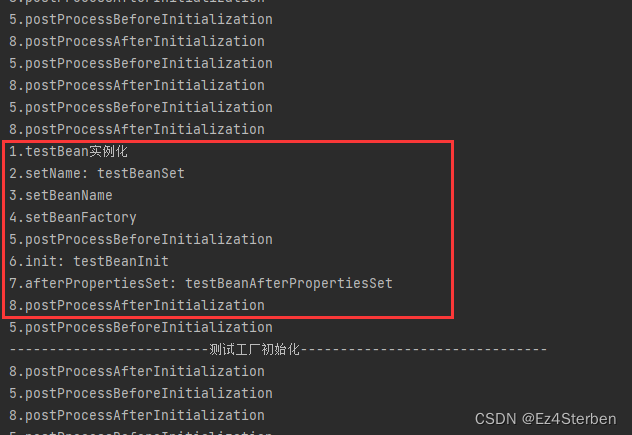
结束项目,查看输出,我们的bean都被销毁了。

这样就完成了整个bean的生命周期。


![[AWD靶场搭建]](https://s2.loli.net/2023/07/27/7EYnfT6N5J9rLBk.png)