简介
自定义PopupWindow, 适用于提示类弹窗。
使用自定义Drawable设置带箭头的背景,测试控件和弹窗的尺寸,自动设置弹窗的显示位置,让箭头指向锚点控件的中间位置,且根据锚点控件在屏幕的位置,自动适配弹窗显示位置。
适用于描述、解释弹窗。
一、效果
带箭头弹窗显示在控件的左侧,箭头相对控件居中对齐 ,且与控件左边框挨着
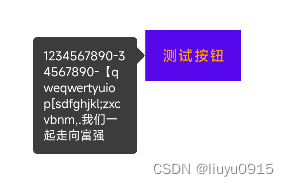

示例代码如下:
二、使用
        GuZhiExplainPupopWindow window = new GuZhiExplainPupopWindow(this);
        //设置弹窗显示文案
        window.setTips("1234567890-34567890-【qweqwertyuiop[sdfghjkl;zxcvbnm,.我们一起走向富强");
        //获取窗口的背景drawable对象
        ArrowsDrawable ad = window.getArrowsDrawable();
        //设置drawable箭头的大小
        ad.setArrowsHeight(ConvertUtils.dp2px(8));
        //设置drawable中箭头与边框距离
        ad.setArrowsPadding(ConvertUtils.dp2px(10));
        //设置drawable的padding, 实际是设置显示文案的TextView的padding
        //ad.setPadding(ConvertUtils.dp2px(10));
        window.setPadding(ConvertUtils.dp2px(10));
        //设置drawable背景色
        ad.setColor(Color.DKGRAY);
        findViewById(R.id.tv33).setOnClickListener(view -> {
            if (!window.isShowing()) {
                //设置窗口显示位置(AUTO_HORIZONTAL 是水平位置,在控件的左侧或右侧,根据控件中心在屏幕中的位置决定)
                window.setShowPosition(GuZhiExplainPupopWindow.AUTO_HORIZONTAL);
                //显示弹窗,偏移量是0,默认是箭头在控件居中位置
                window.show(view, 0, 0);
            }
        });
三、自定义布局
重写initView方法,并设置TipsTv, 同时需要注意的是,在设置弹窗布局时,根布局的宽高属性是wrap_content,设置其它是不生效的,如果需要指定textView的宽或高,或弹窗尺寸,根布局使用某ViewGroup控件,再设置其子控件的尺寸。
        GuZhiExplainPupopWindow window = new GuZhiExplainPupopWindow(this, R.layout.pupopwindow_view_guzhi_explain) {
            @Override
            public void initView(View contentView) {
                //自定义布局初始化控件
                super.initView(contentView);
                TextView customTv = contentView.findViewById(R.id.explain_tv);
                setTipsTv(customTv);
            }
        };
四、源码
package com.ttkx.deviceinfo.bkchart.popupwindow;

import android.content.Context;
import android.content.res.Resources;
import android.graphics.Color;
import android.graphics.Point;
import android.graphics.Rect;
import android.graphics.drawable.ColorDrawable;
import android.view.Gravity;
import android.view.View;
import android.view.ViewGroup;
import android.view.WindowManager;
import android.widget.PopupWindow;
import android.widget.TextView;

import com.blankj.utilcode.util.ConvertUtils;
import com.blankj.utilcode.util.Utils;
import com.ttkx.deviceinfo.R;
import com.ttkx.deviceinfo.bkchart.ArrowsDrawable;
import com.ttkx.deviceinfo.bkchart.GuZhiActivity;

import java.lang.annotation.Retention;
import java.lang.annotation.RetentionPolicy;

import androidx.annotation.IntDef;
import androidx.core.widget.PopupWindowCompat;

/**
 * 估值说明弹窗
 * Created by liuyu
 */
public class SimpleTipsPupopWindow extends PopupWindow {

    private ArrowsDrawable mBgDrawable;
    private TextView mTipsTv;
    private int mShowPosition = TOP;
    public static final int AUTO_VERTICAL = Gravity.CENTER_VERTICAL;
    public static final int AUTO_HORIZONTAL = Gravity.CENTER_HORIZONTAL;
    public static final int LEFT = Gravity.LEFT;
    public static final int TOP = Gravity.TOP;
    public static final int RIGHT = Gravity.RIGHT;
    public static final int BOTTOM = Gravity.BOTTOM;

    public SimpleTipsPupopWindow(GuZhiActivity context) {
        this(context, View.inflate(context, R.layout.pupopwindow_view_guzhi_explain, null));
    }

    public SimpleTipsPupopWindow(GuZhiActivity context, int layoutId) {
        this(context, View.inflate(context, layoutId, null));
    }

    public SimpleTipsPupopWindow(GuZhiActivity context, View contentView) {
        super(context);
        setContentView(contentView);
        setBackgroundDrawable(new ColorDrawable(Color.TRANSPARENT));
        setOutsideTouchable(true);
        init(contentView);
    }

    private void init(View contentView) {
        mBgDrawable = new ArrowsDrawable(ArrowsDrawable.TOP, ConvertUtils.dp2px(5));
        mBgDrawable.setCornerRadius(ConvertUtils.dp2px(4));
        mBgDrawable.setArrowsPadding(ConvertUtils.dp2px(10));
        mBgDrawable.setArrowsHeight(ConvertUtils.dp2px(5));
        boolean redMode = true;
        mBgDrawable.setColor(Color.parseColor(redMode ? "#e6292F3C" : "#f22b3346"));
//        mBgDrawable.setPadding(ConvertUtils.dp2px(10));
        mTipsTv = contentView.findViewById(R.id.explain_tv);
        initView(contentView);
    }

    /**
     * 用于自定义布局 初始化
     * @param contentView
     */
    public void initView(View contentView) {
    }

    /**
     * 设置tips TextView
     * @param tv
     */
    public void setTipsTv(TextView tv) {
        mTipsTv = tv;
    }

    private int makeDropDownMeasureSpec(int measureSpec) {
        int mode;
        if (measureSpec == ViewGroup.LayoutParams.WRAP_CONTENT) {
            mode = View.MeasureSpec.UNSPECIFIED;
        } else {
            mode = View.MeasureSpec.EXACTLY;
        }
        return View.MeasureSpec.makeMeasureSpec(View.MeasureSpec.getSize(measureSpec), mode);
    }

    public void setTips(String tips) {
        if (mTipsTv != null) {
            mTipsTv.setText(tips);
        }
    }

    public void show(View anchor, int os, int oy) {
        if (mBgDrawable == null) {
            return;
        }
        int showPosition = mShowPosition;


        int offsetX = 0;


        int offsetY = 0;
        int locationX = getLocationOnScreen(anchor)[0];
        int locationY = getLocationOnScreen(anchor)[1];

        if (showPosition == LEFT || showPosition == RIGHT || showPosition == AUTO_HORIZONTAL) {
            mBgDrawable.setArrowsPosition(ArrowsDrawable.LEFT, mTipsTv);
            getContentView().measure(makeDropDownMeasureSpec(getWidth()), makeDropDownMeasureSpec(getHeight()));
            int windowWidth = this.getContentView().getMeasuredWidth();
            os += anchor.getWidth();
            offsetY = (int) -(anchor.getHeight() / 2 + mBgDrawable.getArrowsCenterDistance());
            if (showPosition == LEFT) {
                boolean showLeft = locationX >= windowWidth;
                offsetX = disHor(showLeft, windowWidth, anchor, os);
            } else if (showPosition == RIGHT) {
                boolean showLeft = !(getAppScreenWidth() - (locationX + anchor.getWidth()) > windowWidth);
                offsetX = disHor(showLeft, windowWidth, anchor, os);
            } else if (showPosition == AUTO_HORIZONTAL) {
                int screenWidth = getAppScreenWidth();
                boolean showLeft = locationX + anchor.getWidth() / 2 >= screenWidth / 2;
                offsetX = disHor(showLeft, windowWidth, anchor, os);
            }
        } else {
            mBgDrawable.setArrowsPosition(ArrowsDrawable.TOP, mTipsTv);//先设置箭头drawable方向为垂直方向的,因箭头尺寸会影响到计算窗口的高度
            getContentView().measure(makeDropDownMeasureSpec(getWidth()), makeDropDownMeasureSpec(getHeight()));
            int windowHeight = this.getContentView().getMeasuredHeight();
            os += anchor.getWidth() / 2;
            offsetX = (int) (os - mBgDrawable.getArrowsCenterDistance());
            if (showPosition == TOP) {
                int distanceTop = locationY - getStatusBarHeight();//锚点控件距离顶部距离
                //计算锚点控件在屏幕中的位置
                offsetY = disVer(distanceTop >= windowHeight, windowHeight, anchor, oy);
            } else if (showPosition == BOTTOM) {
                int distanceBottom = getLocationOnScreen(anchor)[1] - anchor.getHeight() - getNavBarHeight();//锚点控件距离底部距离
                offsetY = disVer(distanceBottom < windowHeight, windowHeight, anchor, oy);
            } else if (showPosition == AUTO_VERTICAL) {
                int appScreenHeight = getAppScreenHeight();
                int anchorCenterY = locationY + anchor.getHeight() / 2;
                offsetY = disVer(appScreenHeight / 2 < anchorCenterY, windowHeight, anchor, oy);
            }
        }
        //设置textView的padding,防止设置drawable背景不生效
        Rect padding = mBgDrawable.getPadding();
        mTipsTv.setPadding(padding.left, padding.top, padding.right, padding.bottom);
        PopupWindowCompat.showAsDropDown(this, anchor, offsetX, offsetY, Gravity.START);
    }

    private int disHor(boolean showLeft, int windowWidth, View anchor, int ox) {
        int offsetX;
        if (showLeft) {//锚点控件在屏幕中上方,反之在屏幕中下方
            mBgDrawable.setArrowsPosition(ArrowsDrawable.RIGHT);
            offsetX = -windowWidth + ox - anchor.getWidth();
        } else {
            mBgDrawable.setArrowsPosition(ArrowsDrawable.LEFT);
            offsetX = ox;
        }
        return offsetX;
    }

    private int disVer(boolean showTop, int windowHeight, View anchor, int oy) {
        int offsetY = 0;
        if (showTop) {//锚点控件在屏幕中上方,反之在屏幕中下方
            mBgDrawable.setArrowsPosition(ArrowsDrawable.BOTTOM);
            offsetY = -(windowHeight + anchor.getHeight() + oy);
        } else {
            mBgDrawable.setArrowsPosition(ArrowsDrawable.TOP);
            offsetY = oy;
        }
        return offsetY;
    }

    public ArrowsDrawable getArrowsDrawable() {
        return mBgDrawable;
    }

    public void setPadding(int padding) {
        mBgDrawable.setPadding(padding);
    }

    @IntDef({LEFT, RIGHT, TOP, BOTTOM, AUTO_VERTICAL, AUTO_HORIZONTAL})
    @Retention(RetentionPolicy.SOURCE)
    public @interface ShowPosition {

    }

    /**
     * 设置显示位置(相对于锚点控件 左边、上方、右边、下面)
     * 注意:窗口相对控件的方向,与箭头方向是相反的。
     * LEFT, RIGHT, TOP, BOTTOM
     *
     * @param showPosition
     */
    public void setShowPosition(@ShowPosition int showPosition) {
        mShowPosition = showPosition;
    }

    private static int[] getLocationOnScreen(View view) {
        int[] location = new int[2];
        view.getLocationOnScreen(location);
        return location;
    }

    private static int getStatusBarHeight() {
        // 获得状态栏高度
        Resources resources = Resources.getSystem();
        int resourceId = resources.getIdentifier("status_bar_height", "dimen", "android");
        return resources.getDimensionPixelSize(resourceId);
    }

    private static int getNavBarHeight() {
        Resources res = Resources.getSystem();
        int resourceId = res.getIdentifier("navigation_bar_height", "dimen", "android");
        if (resourceId != 0) {
            return res.getDimensionPixelSize(resourceId);
        } else {
            return 0;
        }
    }

    private static int getAppScreenHeight() {
        WindowManager wm = (WindowManager) Utils.getApp().getSystemService(Context.WINDOW_SERVICE);
        if (wm == null) return -1;
        Point point = new Point();
        wm.getDefaultDisplay().getSize(point);
        return point.y;
    }

    private static int getAppScreenWidth() {
        WindowManager wm = (WindowManager) Utils.getApp().getSystemService(Context.WINDOW_SERVICE);
        if (wm == null) return -1;
        Point point = new Point();
        wm.getDefaultDisplay().getSize(point);
        return point.x;
    }
}

