目录
一、Linux-clinet操作(agent)
二、源码安装zabbix
三、Zabbix添加linux主机
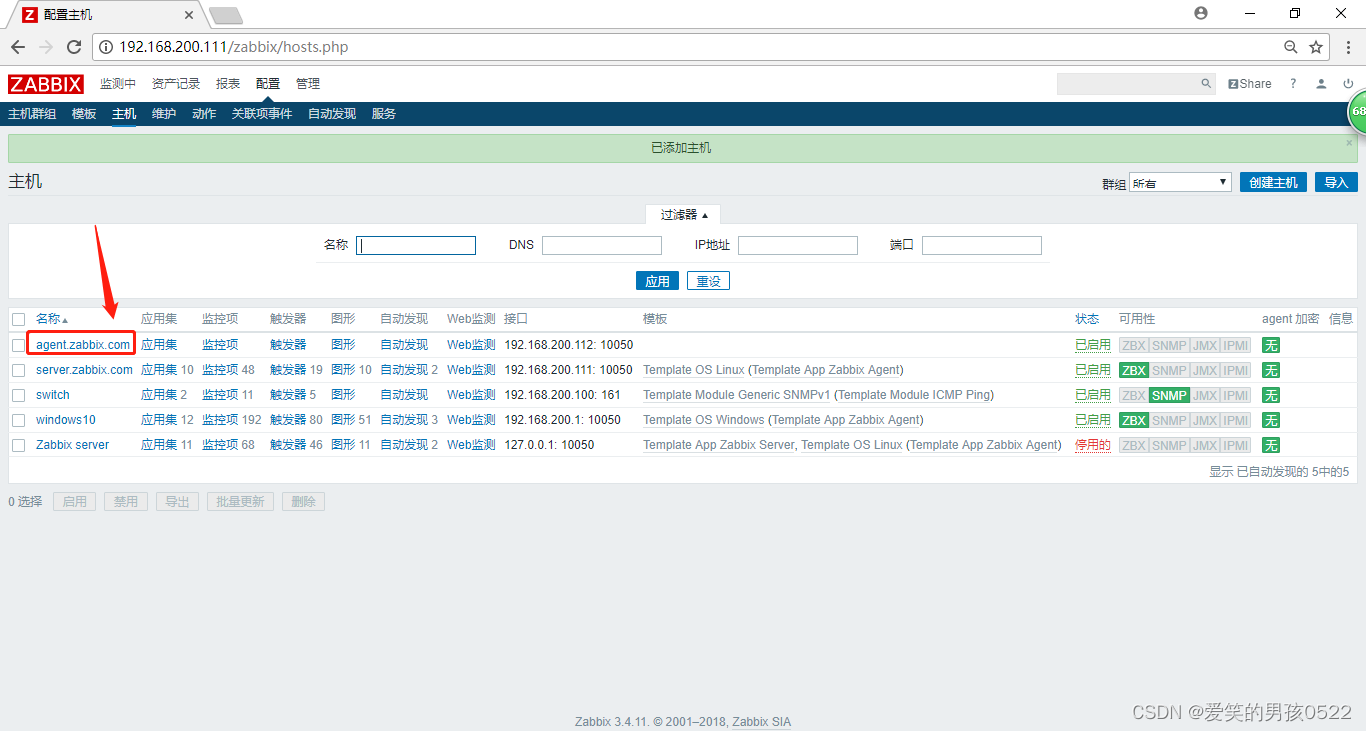
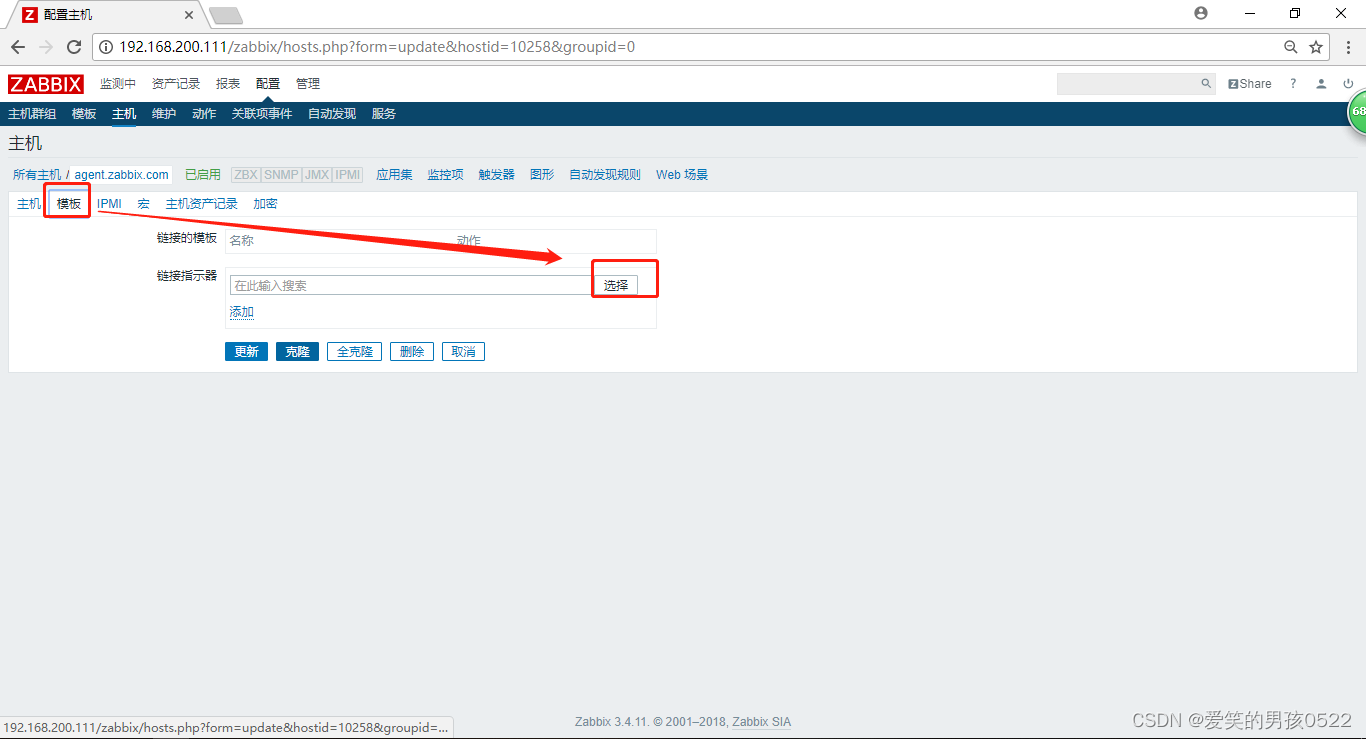
为agent.zabbix.com添加模板
等待一会 查看效果如下
一、Linux-clinet操作(agent)
[root@localhost ~]# ifconfig ens33

[root@localhost ~]# vim /etc/hostname

[root@localhost ~]# cat /etc/hostname     //更改主机名与server端hosts文件一致
agent.zabbix.com

[root@localhost ~]# hostname agent.zabbix.com

[root@localhost ~]# bash

[root@agent ~]# cat /etc/hosts
127.0.0.1   localhost localhost.localdomain localhost4 localhost4.localdomain4
::1         localhost localhost.localdomain localhost6 localhost6.localdomain6
192.168.2.20	server.zabbix.com
192.168.2.21	agent.zabbix.com

[root@agent ~]# systemctl stop firewalld

[root@agent ~]# setenforce 0

[root@agent ~]# iptables -F

[root@agent ~]# ping server.zabbix.com -c 4

PING server.zabbix.com (192.168.200.111) 56(84) bytes of data.
64 bytes from server.zabbix.com (192.168.200.111): icmp_seq=1 ttl=64 time=0.975 ms
64 bytes from server.zabbix.com (192.168.200.111): icmp_seq=2 ttl=64 time=0.518 ms
64 bytes from server.zabbix.com (192.168.200.111): icmp_seq=3 ttl=64 time=3.74 ms
64 bytes from server.zabbix.com (192.168.200.111): icmp_seq=4 ttl=64 time=1.96 ms

--- server.zabbix.com ping statistics ---
4 packets transmitted, 4 received, 0% packet loss, time 3013ms
rtt min/avg/max/mdev = 0.518/1.800/3.741/1.237 ms

[root@agent ~]# ping www.baidu.com                 #测试是否可以联网
二、源码安装zabbix
[root@agent ~]# ls

zabbix-3.4.11.tar.gz

[root@agent ~]# yum -y install libxml2-devel libcurl-devel pcre-devel ntpdate  #安装依赖包

[root@agent ~]# ntpdate s1a.time.edu.cn				#联网时间同步清华大学源

[root@agent ~]# tar xf zabbix-3.4.11.tar.gz -C /usr/src/

[root@agent ~]# cd /usr/src/zabbix-3.4.11/

[root@agent zabbix-3.4.11]# ./configure --prefix=/usr/local/zabbix --enable-agent --with-net-snmp --with-libcurl --with-libxml2 && make -j2 && make install

--enable-agent  启用agent

[root@agent zabbix-3.4.11]# cp misc/init.d/tru64/zabbix_agentd /etc/init.d/    #复制启动脚本

[root@agent zabbix-3.4.11]# vim /etc/init.d/zabbix_agentd

24 DAEMON=/usr/local/zabbix/sbin/zabbix_agentd          #更改为安装路径

[root@agent zabbix-3.4.11]# chmod +x /etc/init.d/zabbix_agentd    #添加执行权限

[root@agent zabbix-3.4.11]# cd

[root@agent ~]# useradd -M -s /sbin/nologin zabbix           #创建程序用户

[root@agent ~]# chown -R zabbix:zabbix /usr/local/zabbix/		#授权安装目录

[root@agent zabbix]# cd /usr/local/zabbix

[root@agent zabbix]# mkdir logs

[root@agent zabbix]# chown -R zabbix:zabbix logs/

[root@agent ~]# cp /usr/local/zabbix/etc/zabbix_agentd.conf{,.bak}

[root@agent ~]# vim /usr/local/zabbix/etc/zabbix_agentd.conf       #修改agent配置文件

PidFile=/tmp/zabbix_agentd.pid
Server=192.168.2.20
ServerActive=192.168.2.20
Hostname=agent.zabbix.com
LogFile=/usr/local/zabbix/logs/zabbix_agentd.log
Include=/usr/local/zabbix/etc/zabbix_agentd.conf.d/*.conf
UnsafeUserParameters=1
UserParameter=mysql.version,mysql -V
UserParameter=mysql.status[*],/usr/local/zabbix/etc/chk_mysql.sh $1
UserParameter=mysql.ping,mysqladmin -uroot -p123123 -P3306 -h192.168.2.20  ping | grep -c alive

[root@agent ~]# service zabbix_agentd start       #启动agent客户端
Zabbix agent started.

[root@agent ~]# netstat -antp | grep 10050
tcp        0      0 0.0.0.0:10050           0.0.0.0:*               LISTEN      10897/zabbix_agentd
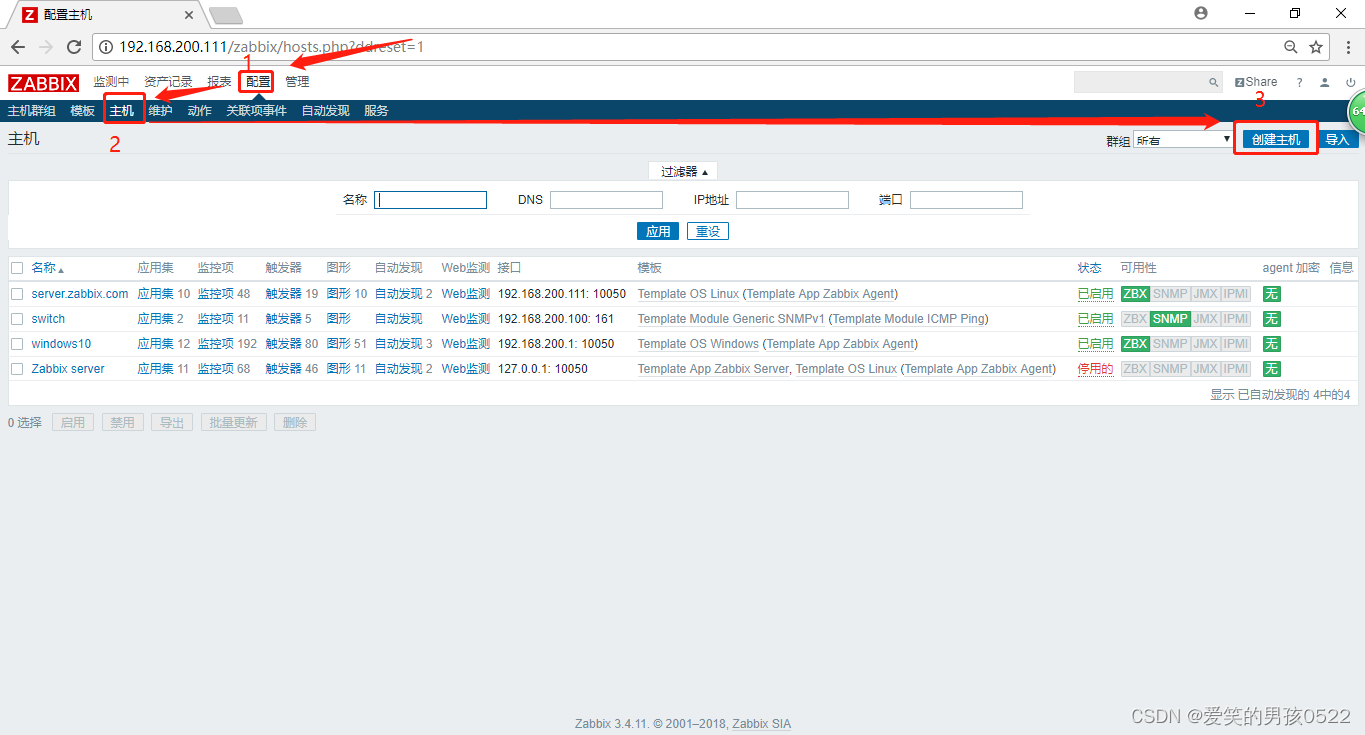
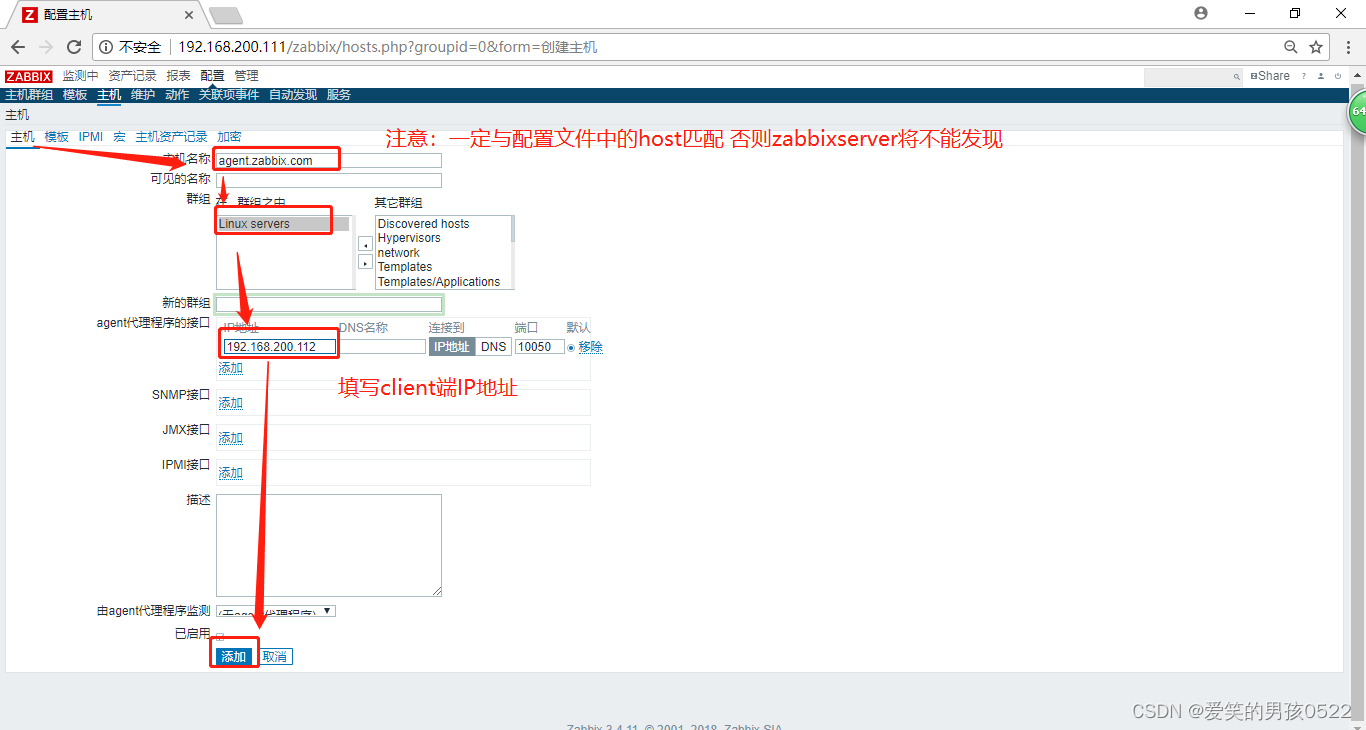
三、Zabbix添加linux主机
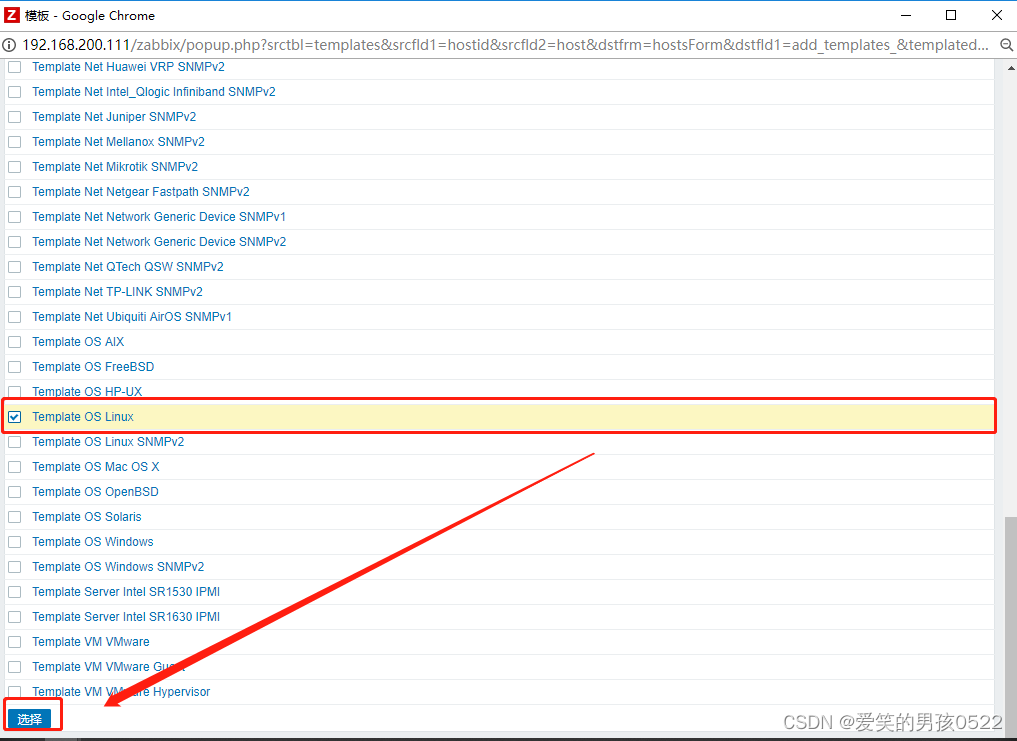
为agent.zabbix.com添加模板

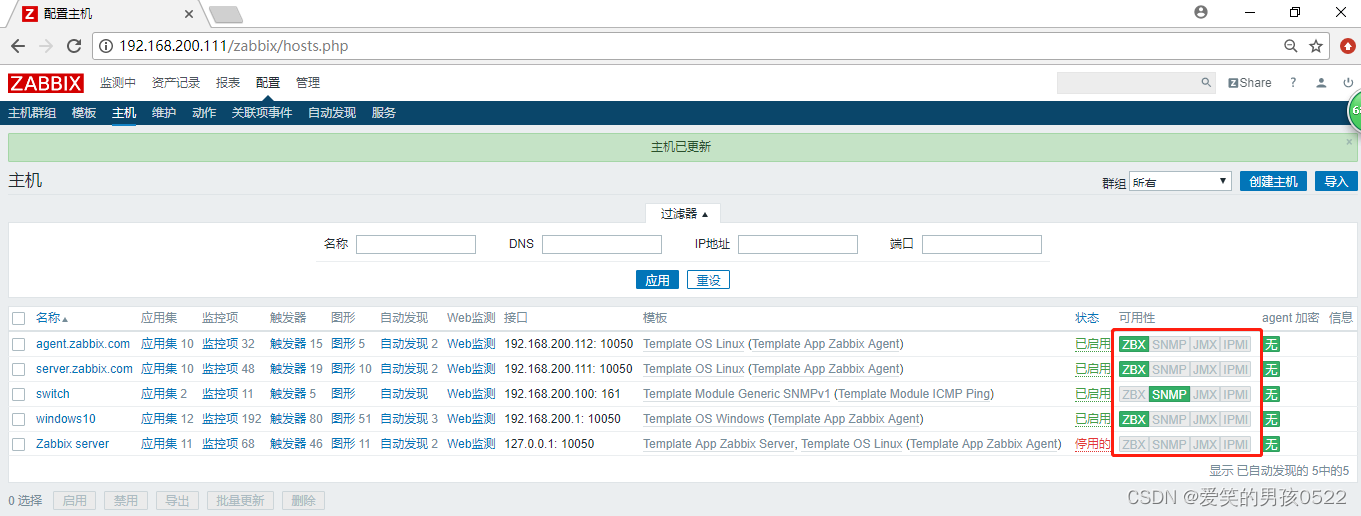
等待一会 查看效果如下
表示成功
