系列文章目录(更新中)
第一章deeplabv3+源码之慢慢解析 根目录(1)main.py–get_argparser函数
第一章deeplabv3+源码之慢慢解析 根目录(2)main.py–get_dataset函数
第一章deeplabv3+源码之慢慢解析 根目录(3)main.py–validate函数
第一章deeplabv3+源码之慢慢解析 根目录(4)main.py–main函数
第一章deeplabv3+源码之慢慢解析 根目录(5)predict.py–get_argparser函数和main函数
第二章deeplabv3+源码之慢慢解析 datasets文件夹(1)voc.py–voc_cmap函数和download_extract函数
第二章deeplabv3+源码之慢慢解析 datasets文件夹(2)voc.py–VOCSegmentation类
第二章deeplabv3+源码之慢慢解析 datasets文件夹(3)cityscapes.py–Cityscapes类
第二章deeplabv3+源码之慢慢解析 datasets文件夹(4)utils.py–6个小函数
第三章deeplabv3+源码之慢慢解析 metrics文件夹stream_metrics.py–[StreamSegMetrics类和AverageMeter类]
第四章deeplabv3+源码之慢慢解析 network文件夹(0)backbone文件夹(a)hrnetv2.py–[4个类,4个函数,1个主函数]
第四章deeplabv3+源码之慢慢解析 network文件夹(0)backbone文件夹(b)mobilenetv2.py–[3个类,3个函数]
第四章deeplabv3+源码之慢慢解析 network文件夹(0)backbone文件夹©resnet.py–[2个类,12个函数]
第四章deeplabv3+源码之慢慢解析 network文件夹(0)backbone文件夹(d)xception.py–[3个类,1个函数]
第四章deeplabv3+源码之慢慢解析 network文件夹(1)_deeplab.py–[7个类和1个函数]
第四章deeplabv3+源码之慢慢解析 network文件夹(2)modeling.py–[15个函数]
第四章deeplabv3+源码之慢慢解析 network文件夹(3)utils.py–[2个类]
第五章deeplabv3+源码之慢慢解析 utils文件夹(1)ext_transforms.py.py–[17个类]
第五章deeplabv3+源码之慢慢解析 utils文件夹(2)loss.py–[1个类]
第五章deeplabv3+源码之慢慢解析 utils文件夹(3)scheduler.py–[1个类]
第五章deeplabv3+源码之慢慢解析 utils文件夹(4)utils.py–[1个类,4个函数]
第五章deeplabv3+源码之慢慢解析 utils文件夹(5)visualizer.py–[1个类]
总结
文章目录
- 系列文章目录(更新中)
- 说明
- cityscapes.py导入
- Cityscapes类
说明
- voc.py的代码已经说完,本节讲述cityscapes.py。
- 从代码上看,cityscapes数据集处理方式比voc数据集简单。
- cityscapes.py中仅有一个类,其中包含7个小函数,从体量和难度上,可以一次说完。
- 思路上和voc.py有部分类似之处,大家可以边学习边对比。
cityscapes.py导入
#导入都是基本包,和之前相比要简单。
import json
import os
from collections import namedtuple

import torch
import torch.utils.data as data
from PIL import Image
import numpy as np
Cityscapes类
提示:可以对比前一节的VOCSegmentation类,多体会这种类的处理思路,以便处理自己的数据集。
class Cityscapes(data.Dataset):
    """Cityscapes <http://www.cityscapes-dataset.com/> Dataset.

    **Parameters:**   #详细的参数介绍,如VOCSegmentation类一样。
        - **root** (string): Root directory of dataset where directory 'leftImg8bit' and 'gtFine' or 'gtCoarse' are located.
        - **split** (string, optional): The image split to use, 'train', 'test' or 'val' if mode="gtFine" otherwise 'train', 'train_extra' or 'val'
        - **mode** (string, optional): The quality mode to use, 'gtFine' or 'gtCoarse' or 'color'. Can also be a list to output a tuple with all specified target types.
        - **transform** (callable, optional): A function/transform that takes in a PIL image and returns a transformed version. E.g, ``transforms.RandomCrop``
        - **target_transform** (callable, optional): A function/transform that takes in the target and transforms it.
    """

    # Based on https://github.com/mcordts/cityscapesScripts
    #以下时Cityscapes数据集的分类情况,共35类(包含未标注类别,实际区分34类)。此处没有和VOC数据集一样用字典,而是用元组,之后组成列表。CityscapesClass列出了各个字段对应的语义。
    CityscapesClass = namedtuple('CityscapesClass', ['name', 'id', 'train_id', 'category', 'category_id',
                                                     'has_instances', 'ignore_in_eval', 'color'])
    classes = [
        CityscapesClass('unlabeled',            0, 255, 'void', 0, False, True, (0, 0, 0)),
        CityscapesClass('ego vehicle',          1, 255, 'void', 0, False, True, (0, 0, 0)),
        CityscapesClass('rectification border', 2, 255, 'void', 0, False, True, (0, 0, 0)),
        CityscapesClass('out of roi',           3, 255, 'void', 0, False, True, (0, 0, 0)),
        CityscapesClass('static',               4, 255, 'void', 0, False, True, (0, 0, 0)),
        CityscapesClass('dynamic',              5, 255, 'void', 0, False, True, (111, 74, 0)),
        CityscapesClass('ground',               6, 255, 'void', 0, False, True, (81, 0, 81)),
        CityscapesClass('road',                 7, 0, 'flat', 1, False, False, (128, 64, 128)),
        CityscapesClass('sidewalk',             8, 1, 'flat', 1, False, False, (244, 35, 232)),
        CityscapesClass('parking',              9, 255, 'flat', 1, False, True, (250, 170, 160)),
        CityscapesClass('rail track',           10, 255, 'flat', 1, False, True, (230, 150, 140)),
        CityscapesClass('building',             11, 2, 'construction', 2, False, False, (70, 70, 70)),
        CityscapesClass('wall',                 12, 3, 'construction', 2, False, False, (102, 102, 156)),
        CityscapesClass('fence',                13, 4, 'construction', 2, False, False, (190, 153, 153)),
        CityscapesClass('guard rail',           14, 255, 'construction', 2, False, True, (180, 165, 180)),
        CityscapesClass('bridge',               15, 255, 'construction', 2, False, True, (150, 100, 100)),
        CityscapesClass('tunnel',               16, 255, 'construction', 2, False, True, (150, 120, 90)),
        CityscapesClass('pole',                 17, 5, 'object', 3, False, False, (153, 153, 153)),
        CityscapesClass('polegroup',            18, 255, 'object', 3, False, True, (153, 153, 153)),
        CityscapesClass('traffic light',        19, 6, 'object', 3, False, False, (250, 170, 30)),
        CityscapesClass('traffic sign',         20, 7, 'object', 3, False, False, (220, 220, 0)),
        CityscapesClass('vegetation',           21, 8, 'nature', 4, False, False, (107, 142, 35)),
        CityscapesClass('terrain',              22, 9, 'nature', 4, False, False, (152, 251, 152)),
        CityscapesClass('sky',                  23, 10, 'sky', 5, False, False, (70, 130, 180)),
        CityscapesClass('person',               24, 11, 'human', 6, True, False, (220, 20, 60)),
        CityscapesClass('rider',                25, 12, 'human', 6, True, False, (255, 0, 0)),
        CityscapesClass('car',                  26, 13, 'vehicle', 7, True, False, (0, 0, 142)),
        CityscapesClass('truck',                27, 14, 'vehicle', 7, True, False, (0, 0, 70)),
        CityscapesClass('bus',                  28, 15, 'vehicle', 7, True, False, (0, 60, 100)),
        CityscapesClass('caravan',              29, 255, 'vehicle', 7, True, True, (0, 0, 90)),
        CityscapesClass('trailer',              30, 255, 'vehicle', 7, True, True, (0, 0, 110)),
        CityscapesClass('train',                31, 16, 'vehicle', 7, True, False, (0, 80, 100)),
        CityscapesClass('motorcycle',           32, 17, 'vehicle', 7, True, False, (0, 0, 230)),
        CityscapesClass('bicycle',              33, 18, 'vehicle', 7, True, False, (119, 11, 32)),
        CityscapesClass('license plate',        -1, 255, 'vehicle', 7, False, True, (0, 0, 142)),
    ]

    train_id_to_color = [c.color for c in classes if (c.train_id != -1 and c.train_id != 255)] #将不需要训练的目标,train_id设定为255即可。本段代码设定0-18,即19个类别。
    train_id_to_color.append([0, 0, 0])   #增加一个[0, 0, 0],目的在于对应没有的类别。
    train_id_to_color = np.array(train_id_to_color)
    id_to_train_id = np.array([c.train_id for c in classes])

    #train_id_to_color = [(0, 0, 0), (128, 64, 128), (70, 70, 70), (153, 153, 153), (107, 142, 35),
    #                      (70, 130, 180), (220, 20, 60), (0, 0, 142)]
    #train_id_to_color = np.array(train_id_to_color)
    #id_to_train_id = np.array([c.category_id for c in classes], dtype='uint8') - 1

    def __init__(self, root, split='train', mode='fine', target_type='semantic', transform=None): #对应VOCSegmentation类的第14-65行。
        self.root = os.path.expanduser(root)
        self.mode = 'gtFine'
        self.target_type = target_type
        self.images_dir = os.path.join(self.root, 'leftImg8bit', split)  #文件夹,后文补图。

        self.targets_dir = os.path.join(self.root, self.mode, split)
        self.transform = transform

        self.split = split
        self.images = []
        self.targets = []

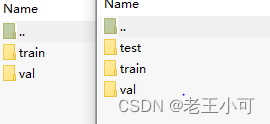
        if split not in ['train', 'test', 'val']:   #对split参数的提示。
            raise ValueError('Invalid split for mode! Please use split="train", split="test"'
                             ' or split="val"')

        if not os.path.isdir(self.images_dir) or not os.path.isdir(self.targets_dir): #确保"split" and "mode"参数存在对应的文件夹路径。
            raise RuntimeError('Dataset not found or incomplete. Please make sure all required folders for the'
                               ' specified "split" and "mode" are inside the "root" directory')

        for city in os.listdir(self.images_dir):   #获得对应的输入和目标。
            img_dir = os.path.join(self.images_dir, city)
            target_dir = os.path.join(self.targets_dir, city)

            for file_name in os.listdir(img_dir):
                self.images.append(os.path.join(img_dir, file_name))
                target_name = '{}_{}'.format(file_name.split('_leftImg8bit')[0],
                                             self._get_target_suffix(self.mode, self.target_type))
                self.targets.append(os.path.join(target_dir, target_name))

    @classmethod
    def encode_target(cls, target):    #编码函数,仅仅是返回train_id列表。
        return cls.id_to_train_id[np.array(target)]

    @classmethod
    def decode_target(cls, target):  #对应VOCSegmentation类的第86-88行。
        target[target == 255] = 19    #此代码中选0-18个类别,255即不训练的类别,定为19。
        #target = target.astype('uint8') + 1
        return cls.train_id_to_color[target]

    def __getitem__(self, index):   #按索引得到对应的输入(image)和输出(target)图片。对应VOCSegmentation类的第67-79行。
        """
        Args:
            index (int): Index
        Returns:
            tuple: (image, target) where target is a tuple of all target types if target_type is a list with more
            than one item. Otherwise target is a json object if target_type="polygon", else the image segmentation.
        """
        image = Image.open(self.images[index]).convert('RGB')
        target = Image.open(self.targets[index])
        if self.transform:
            image, target = self.transform(image, target)
        target = self.encode_target(target)
        return image, target

    def __len__(self):      #返回图片(长度)数量。对应VOCSegmentation类的第82行。
        return len(self.images)

    def _load_json(self, path):    #按输入的path,打开json文件。
        with open(path, 'r') as file:
            data = json.load(file)
        return data

    def _get_target_suffix(self, mode, target_type):   #根据target_type的不同内容,得到不同的后缀。
        if target_type == 'instance':
            return '{}_instanceIds.png'.format(mode)
        elif target_type == 'semantic':
            return '{}_labelIds.png'.format(mode)
        elif target_type == 'color':
            return '{}_color.png'.format(mode)
        elif target_type == 'polygon':
            return '{}_polygons.json'.format(mode)
        elif target_type == 'depth':
            return '{}_disparity.png'.format(mode)
Tips
1.相对VOCSegmentation类而言,Cityscapes类相对简单。
2. 补充cityscapes文件夹,可以看到对应文件夹,相对容易理解。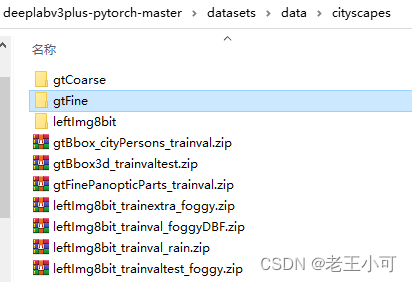
3. 对于具体文件压缩包,split参数对应的文件夹图。
4. datasets文件夹下的两个特定数据集代码已解析完毕。下一节介绍utils.py。


![[QT编程系列-12]:QT快速学习 - 0 - 主要内容](https://img-blog.csdnimg.cn/a02435c12eb1425d8e79f4222dc07929.png)


