1.TFlite 介绍
( 1 ) TFlite 概念
tflite 是谷歌自己的一个轻量级推理库。主要用于移动端。
tflite 使用的思路主要是从预训练的模型转换为 tflite 模型文件,拿到移动端部署。
tflite 的源模型可以来自 tensorflow 的 saved model 或者 frozen model, 也可以来自 keras 。
( 2 ) TFlite 优点
用Flatbuffer序列化模型文件,这种格式磁盘占用少,加载快
可以对模型进行量化,把float参数量化为uint8类型,模型文件更小、计算更快。
可以对模型进行剪枝、结构合并和蒸馏。
对NNAPI的支持。可调用安卓底层的接口,把异构的计算能力利用起来。
( 3 ) TFlite 量化
a.量化的好处
较小的存储大小 :小模型在用户设备上占用的存储空间更少。例如,一个使用小模型的 Android 应用在用户的移动设备上会占用更少的存储空间。
较小的下载大小 :小模型下载到用户设备所需的时间和带宽较少。
更少的内存用量 :小模型在运行时使用的内存更少,从而释放内存供应用的其他部分使用,并可以转化为更好的性能和稳定性。
b. 量化的过程
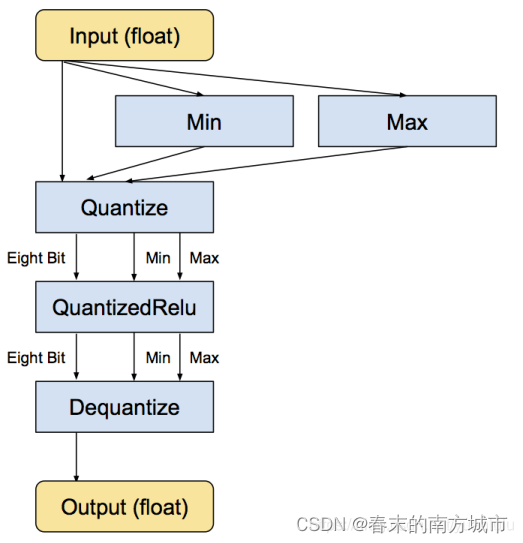
tflite的量化并不是全程使用uint8计算。而是存储每层的最大和最小值,然后把这个区间线性分成 256 个离散值,于是此范围内的每个浮点数可以用八位 (二进制) 整数来表示,近似为离得最近的那个离散值。比如,最小值是 -3 而最大值是 6 的情形,0 字节表示 -3,255 表示 6,而 128 是 1.5。每个操作都先用整形计算,输出时重新转换为浮点型。下图是量化Relu的示意图。
Tensorflow官方量化文档
c. 量化的实现
训练后动态量化
import tensorflow as tf converter = tf.lite.TFLiteConverter.from_saved_model(saved_model_dir) #converter.optimizations = [tf.lite.Optimize.DEFAULT] converter.optimizations = [tf.lite.Optimize.OPTIMIZE_FOR_SIZE] tflite_model1 = converter.convert() open("xxx.tflite", "wb").write(tflite_model1)
训练后float16量化
import tensorflow as tf converter = tf.lite.TFLiteConverter.from_saved_model(saved_model_dir) converter.optimizations = [tf.lite.Optimize.DEFAULT] converter.target_spec.supported_types = [tf.float16] tflite_quant_model = converter.convert() tflite_model1 = converter.convert() open("xxx.tflite", "wb").write(tflite_model1)
训练后int8量化
import tensorflow as tf converter = tf.lite.TFLiteConverter.from_saved_model(saved_model_dir) converter.optimizations = [tf.lite.Optimize.DEFAULT] def representative_dataset_gen(): for _ in range(num_calibration_steps): # Get sample input data as a numpy array in a method of your choosing. yield [input] converter.representative_dataset = representative_dataset_gen converter.target_spec.supported_ops = [tf.lite.OpsSet.TFLITE_BUILTINS_INT8] converter.inference_input_type = tf.int8 # or tf.uint8 converter.inference_output_type = tf.int8 # or tf.uint8 tflite_model1 = converter.convert() open("xxx.tflite", "wb").write(tflite_model1)
注:float32和float16量化可以运行再GPU上,int8量化只能运行再CPU上
2.TFlite 模型转换
( 1 )在训练的时候就保存 tflite 模型
import tensorflow as tf img = tf.placeholder(name="img", dtype=tf.float32, shape=(1, 64, 64, 3)) val = img + tf.constant([1., 2., 3.]) + tf.constant([1., 4., 4.]) out = tf.identity(val, name="out") with tf.Session() as sess: tflite_model = tf.lite.toco_convert(sess.graph_def, [img], [out]) open("converteds_model.tflite", "wb").write(tflite_model)
( 2 )使用其他格式的 TensorFlow 模型转换成 tflite 模型
首先要安装Bazel,参考:https://docs.bazel.build/versions/master/install-ubuntu.html ,只需要完成Installing using binary installer这一部分即可。然后克隆TensorFlow的源码:
git clone https://github.com/tensorflow/tensorflow.git
接着编译转换工具,这个编译时间可能比较长:
cd tensorflow/ bazel build tensorflow/python/tools:freeze_graph bazel build tensorflow/lite/toco:toco
获得到转换工具之后,开始转换模型,以下操作是冻结图:
input_checkpoint对应mobilenet_v1_1.0_224.ckpt.data-00000-of-00001,使用时去掉后缀名。
output_node_names这个可以在mobilenet_v1_1.0_224_info.txt中获取。
./freeze_graph --input_graph=/mobilenet_v1_1.0_224/mobilenet_v1_1.0_224_frozen.pb \ --input_checkpoint=/mobilenet_v1_1.0_224/mobilenet_v1_1.0_224.ckpt \ --input_binary=true \ --output_graph=/tmp/frozen_mobilenet_v1_224.pb \ --output_node_names=MobilenetV1/Predictions/Reshape_1
将冻结的图转换成tflite模型:
output_arrays 这个可以在mobilenet_v1_1.0_224_info.txt 中获取;
input_shapes 这个是预测数据的shape
./toco --input_file=/tmp/mobilenet_v1_1.0_224_frozen.pb \ --input_format=TENSORFLOW_GRAPHDEF \ --output_format=TFLITE \ --output_file=/tmp/mobilenet_v1_1.0_224.tflite \ --inference_type=FLOAT \ --input_type=FLOAT \ --input_arrays=input \ --output_arrays=MobilenetV1/Predictions/Reshape_1 \ --input_shapes=1,224,224,3
( 3 )使用检查点进行模型转换
import tensorflow as tf from tensorflow.python.framework import graph_util from tensorflow.python.platform import gfile if __name__ == "__main__": a = tf.Variable(tf.constant(5.,shape=[1]),name="a") b = tf.Variable(tf.constant(6.,shape=[1]),name="b") c = a + b init = tf.initialize_all_variables() sess = tf.Session() sess.run(init) # 导出当前计算图的GraphDef部分 graph_def = tf.get_default_graph().as_graph_def() #保存指定的节点,并将节点值保存为常数 output_graph_def = graph_util.convert_variables_to_constants(sess,graph_def,['add']) #将计算图写入到模型文件中 model_f = tf.gfile.GFile("model.pb","wb") model_f.write(output_graph_def.SerializeToString())
Bash sess = tf.Session() # 将保存的模型文件解析为GraphDef model_f = gfile.FastGFile("model.pb",'rb') graph_def = tf.GraphDef() graph_def.ParseFromString(model_f.read()) c = tf.import_graph_def(graph_def,return_elements=["add:0"]) print(sess.run(c)) #[array([ 11.], dtype=float32)]
Python import tensorflow as tf in_path=r'D:\tmp_mobilenet_v1_100_224_classification_3\output_graph.pb' out_path=r'D:\tmp_mobilenet_v1_100_224_classification_3\output_graph.tflite' input_tensor_name=['Placeholder'] input_tensor_shape={'Placeholder':[1,224,224,3]} class_tensor_name=['final_result'] convertr=tf.lite.TFLiteConverter.from_frozen_graph(in_path,input_arrays=input_tensor_name ,output_arrays=class_tensor_name ,input_shapes=input_tensor_shape) # convertr=tf.lite.TFLiteConverter.from_saved_model(saved_model_dir=in_path,input_arrays=[input_tensor_name],output_arrays=[class_tensor_name]) tflite_model=convertr.convert() with open(out_path,'wb') as f: f.write(tflite_model)
3. 在 Android 端调用 TFlite 模型文件
( 1 ) Android studio 中调用 TFlite 模型实现推理的流程
初始化interpreter(加载tflite模型)
( 2 )在 Android Studio 中导入 TFLite 模型步骤
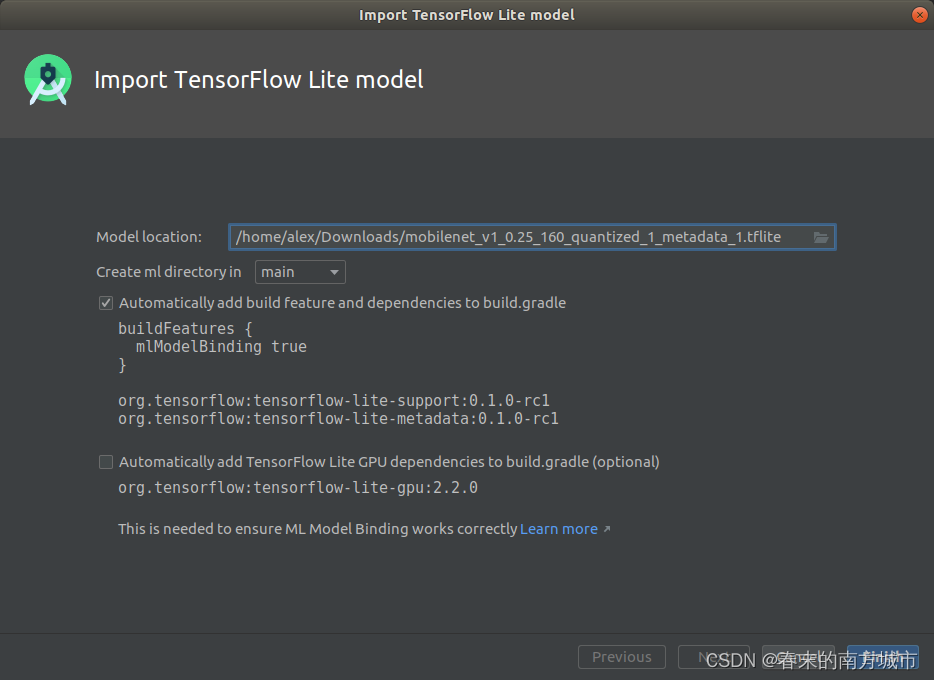
通过菜单项 File > New > Other > TensorFlow Lite Model 打开TFLite模型导入对话框。
选择后缀名为.tflite的模型文件。模型文件可以从网上下载或自行训练。
导入的.tflite模型文件位于工程的 ml/ 文件夹下面。
模型主要包括如下三种信息:
张量:输入和输出张量。比如图片需要预先处理成合适的尺寸,才能进行推理。