本工具主要是针对国空数据入库而做的。
如果你手头已经整理了一部分要素类数据,但是数据格式,字段值可能并没有完全按照规范设置好,需要将这些数据按规范批量和库,就可以尝试用这个工具。
准备数据:标准空库、你已做好的数据。
做好的数据需要把要素名改成和标准空库对应的要素同名。
如果你想把某些有用的字段值导入到标准空库,同样的字段名也要和对应字段同名。
一、要实现的功能
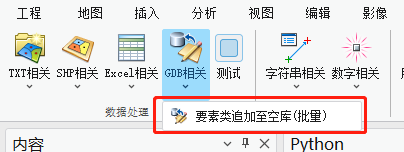
如上图所示,点击【GDB相关】下的【要素类追加至空库(批量)】工具。
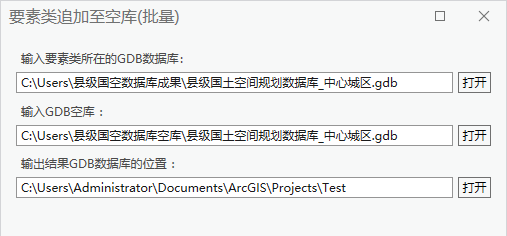
在弹出的工具框中,分别输入要素类所在的GDB数据库、GDB空库和要保存生成数据库的位置。
点击执行即可,生成结果如下:

如右图所示,工具读取输入GDB里的要素名,如果和空库里的要素同名,就会执行【追加】,输入的要素如果有和空库要素同名字段,则会保留字段和字段值,如果存在空库要素没有的字段,则丢弃该字段。
二、实现流程
首先,要把空库复制一份,不能直接修改空库。
// 复制空库
ToolManager.CopyAllFiles(gdb_empty_path, folder_path + @"/result_all.gdb");
调用的方法:
        // 复制文件夹下的所有文件到新的位置
        public static void CopyAllFiles(string sourceDir, string destDir)
        {
            //目标目录不存在则创建
            if (!Directory.Exists(destDir))
            {
                Directory.CreateDirectory(destDir);
            }
            DirectoryInfo sourceDireInfo = new DirectoryInfo(sourceDir);
            List<FileInfo> fileList = new List<FileInfo>();
            GetFileList(sourceDireInfo, fileList); // 获取源文件夹下的所有文件
            List<DirectoryInfo> dirList = new List<DirectoryInfo>();
            GetDirList(sourceDireInfo, dirList); // 获取源文件夹下的所有子文件夹
            // 创建目标文件夹结构
            foreach (DirectoryInfo dir in dirList)
            {
                string sourcePath = dir.FullName;
                string destPath = sourcePath.Replace(sourceDir, destDir); // 替换源文件夹路径为目标文件夹路径
                if (!Directory.Exists(destPath))
                {
                    Directory.CreateDirectory(destPath); // 创建目标文件夹
                }
            }
            // 复制文件到目标文件夹
            foreach (FileInfo fileInfo in fileList)
            {
                string sourceFilePath = fileInfo.FullName;
                string destFilePath = sourceFilePath.Replace(sourceDir, destDir); // 替换源文件夹路径为目标文件夹路径
                File.Copy(sourceFilePath, destFilePath, true); // 复制文件,允许覆盖目标文件
            }
        }
工具的核心是应用【追加】工具,所以需要获取各个要素类的完整路径,这里不能直接用gdb路径+要素名,因为可能存在要素数据集。所以这里写一个方法来获取要素类的完整路径:
        // 获取数据库下的所有要素类的完整路径
        public static List<string> GetFeatureClassPath(string gdb_path)
        {
            List<string> result = new List<string>();
            // 打开GDB数据库
            using Geodatabase gdb = new Geodatabase(new FileGeodatabaseConnectionPath(new Uri(gdb_path)));
            // 获取所有要素类
            IReadOnlyList<FeatureClassDefinition> featureClasses = gdb.GetDefinitions<FeatureClassDefinition>();
            foreach (FeatureClassDefinition featureClass in featureClasses)
            {
                using (FeatureClass fc = gdb.OpenDataset<FeatureClass>(featureClass.GetName()))
                {
                    // 获取要素类路径
                    string fc_path = fc.GetPath().ToString().Replace("file:///", "");
                    result.Add(fc_path);
                }
            }

            return result;
        }
考虑到入库还有表格,这里同样也要获取表格的路径:
        // 获取数据库下的所有独立表的完整路径
        public static List<string> GetTablePath(string gdb_path)
        {
            List<string> result = new List<string>();
            // 打开GDB数据库
            using Geodatabase gdb = new Geodatabase(new FileGeodatabaseConnectionPath(new Uri(gdb_path)));
            // 获取所有独立表
            IReadOnlyList<TableDefinition> tables = gdb.GetDefinitions<TableDefinition>();
            foreach (TableDefinition tableDef in tables)
            {
                using (Table table = gdb.OpenDataset<Table>(tableDef.GetName()))
                {
                    // 获取要素类路径
                    string fc_path = table.GetPath().ToString().Replace("file:///", "");
                    result.Add(fc_path);
                }
            }
            return result;
        }
获取路径后,再将对应的路径做成Dictionary备用:
                    // 获取要素类和表的完整路径
                    List<string> in_data_paths = ToolManager.GetFeatureClassAndTablePath(gdb_path);
                    List<string> empty_data_paths = ToolManager.GetFeatureClassAndTablePath(folder_path + @"/result_all.gdb");
                    // 创建dict,捕捉同名要素类和独立表
                    Dictionary<string, string> keyValuePairs= new Dictionary<string, string>();
                    foreach (var da in in_data_paths)
                    {
                        // 提取要素类或独立表名
                        string in_name = da[(da.LastIndexOf(@"/") + 1)..];
                        foreach (var em in empty_data_paths)
                        {
                            string em_name = em[(em.LastIndexOf(@"/") + 1)..];
                            if (in_name == em_name)
                            {
                                keyValuePairs.Add(da, em);
                                break;
                            }
                        }
                    }
最后执行【追加】工具即可:
                    // 执行追加工具
                    foreach (var pair in keyValuePairs)
                    {
                        string pair_name = pair.Key[(pair.Key.LastIndexOf(@"/") + 1)..];
                        // 追加
                        Arcpy.Append(pair.Key, pair.Value);
                    }
以上就是工具的核心代码。
三、工具文件分享
我把工具都集合成工具箱,不再单独放单个工具,可以到这里下载完整工具箱,会不断更新:
【ArcGIS Pro二次开发】:CC工具箱![]() https://blog.csdn.net/xcc34452366/article/details/131506345PS:可以直接点击...bin\Debug\net6.0-windows\下的.esriAddinX文件直接安装。
https://blog.csdn.net/xcc34452366/article/details/131506345PS:可以直接点击...bin\Debug\net6.0-windows\下的.esriAddinX文件直接安装。


