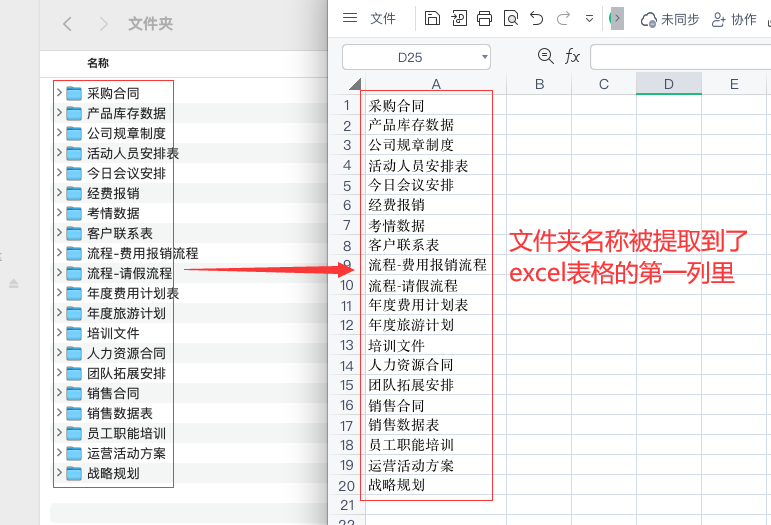
使用计算器得到需要的寄存器地址
这里PLC地址是83,对应的程序16进制读取地址是53
实际上由于PLC地址从1开始,所以这里实际地址应该是52,因为计算机从0开始

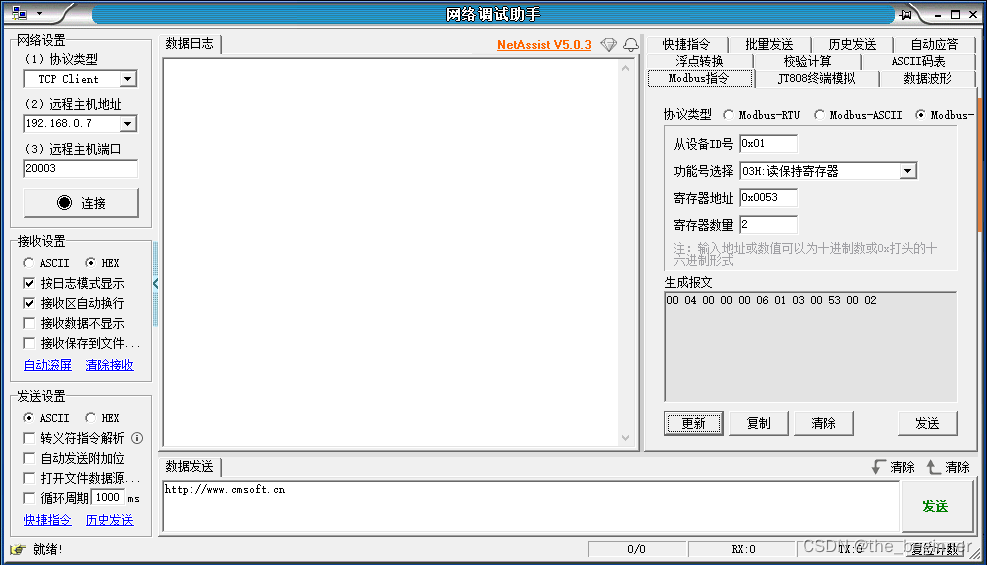
使用网络调试助手生成报文
使用Python中的内置函数int()。以下是将人员卡号’b’3b44’'转换为十进制的示例代码:
card_number = '3b44'
decimal_number = int(card_number, 16)
print(decimal_number)
使用response[-4:]获取了响应数据的后4个字节作为value96。然后,通过struct.unpack(‘>f’, value96)[0]将4字节的二进制字符串解包为单精度浮点数,并将其打印出来。
#实时电量
request = bytes.fromhex("00 20 00 00 00 06 01 03 00 5F 00 02 ")
client_socket.send(request)
response = client_socket.recv(1024)

value96 = response[-4:]
value96 = struct.unpack('>f', value96)[0]
value96=value96*10.00
value96=round(value96,2)
print("实时电量 单精度浮点数: {:.2f}".format(value96))
value40 是一个包含两个字节的字节串,即 b’\x00\x00’,将其转换为二进制,并保留8位。
以下是将字节串转换为二进制并保留8位的示例代码:
value40 = b'\x00\x00'
binary_value = bin(int.from_bytes(value40, byteorder='big'))[2:].zfill(8)
print("状态:", binary_value)
DEMO代码
#!D:/workplace/python
# -*- coding: utf-8 -*-
# @File  : main0523_04.py
# @Author:Romulushe
# @Time    : 2023/5/23 10:38
# @Software: PyCharm
# @Use: PyCharm
import socket
import struct
import time
import binascii

interval = 5
ip_address = ''#根据实际情况自定义
port_number = 502
polling_interval = float(interval)

def print_binary_value(value, name):
    binary_value = bin(int.from_bytes(value, byteorder='big'))[2:].zfill(8)[::-1]
    print(f"{name}: {binary_value}")

with socket.socket(socket.AF_INET, socket.SOCK_STREAM) as client_socket:
    try:
        client_socket.settimeout(3)
        client_socket.connect((ip_address, port_number))

        while True:
            try:
                ##电压
                request = bytes.fromhex("00 22 00 00 00 06 01 03 00 53 00 02 ")
                client_socket.send(request)
                response = client_socket.recv(1024)

                value84 = response[-4:]
                value84= struct.unpack('>f', value84)[0]
                # value84 = value84 * 10.00
                value84 = round(value84, 2)
                print("实时电压 单精度浮点数: {:.2f}".format(value84))

                ##电流
                request = bytes.fromhex("00 24 00 00 00 06 01 03 00 4F 00 02  ")
                client_socket.send(request)
                response = client_socket.recv(1024)

                value80 = response[-4:]
                value80 = struct.unpack('>f', value80)[0]
                # value84 = value80 * 10.00
                value80 = round(value80, 2)
                print("实时电流 单精度浮点数: {:.2f}".format(value80))

                ##实时温度1
                request = bytes.fromhex("00 2E 00 00 00 06 01 03 00 57 00 02 ")
                client_socket.send(request)
                response = client_socket.recv(1024)

                value88 = response[-4:]
                value88 = struct.unpack('>f', value88)[0]
                # value88 = value88 * 10.00
                value88 = round(value88, 2)
                print("实时温度1 单精度浮点数: {:.2f}".format(value88))

                #实时温度2
                request = bytes.fromhex("00 2C 00 00 00 06 01 03 00 5B 00 02 ")
                client_socket.send(request)
                response = client_socket.recv(1024)

                value92 = response[-4:]
                value92 = struct.unpack('>f', value92)[0]
                # value92 = value92 * 10.00
                value92 = round(value92, 2)
                print("实时温度2 单精度浮点数: {:.2f}".format(value92))

                ##车速
                request = bytes.fromhex("00 31 00 00 00 06 01 03 00 3B 00 01 ")
                client_socket.send(request)
                response = client_socket.recv(1024)

                speed= binascii.hexlify(response)[-4:]
                speed = int(speed, 16)
                print("车速:", speed)

                # #实时电量
                request = bytes.fromhex("00 20 00 00 00 06 01 03 00 5F 00 02 ")
                client_socket.send(request)
                response = client_socket.recv(1024)

                value96 = response[-4:]
                value96 = struct.unpack('>f', value96)[0]
                value96=value96*10.00
                value96=round(value96,2)
                print("实时电量 单精度浮点数: {:.2f}".format(value96))

                #充放电状态

                #超速报警

                #低电量报警

                #温度过高1

                #温度过高2

                #00 18 00 00 00 06 01 03 00 28 00 01
                request = bytes.fromhex("00 33 00 00 00 06 01 03 00 28 00 01 ")
                client_socket.send(request)
                response = client_socket.recv(1024)

                value40 = response[-2:]
                value40= bin(int.from_bytes(value40, byteorder='big'))[2:].zfill(8)[::-1]
                print("充放电状态:",value40[4])
                print("超速报警:", value40[0])
                print("低电量报警:", value40[2])
                print("温度1过高:", value40[3])
                print("温度2过高:", value40[7])


                #车牌号
                #
                request = bytes.fromhex("00 00 00 00 00 06 01 03 00 1E 00 02 ")  # 车牌号
                client_socket.send(request)
                response = client_socket.recv(1024)

                car_num= binascii.hexlify(response)[-8:-4]
                car_num = int(car_num, 16)
                print("车牌号:", car_num)

                #人员卡号
                request = bytes.fromhex("00 00 00 00 00 06 01 03 00 42 00 02 ")  # 人员卡号
                client_socket.send(request)
                response = client_socket.recv(1024)

                card = binascii.hexlify(response)[-8:-4]
                card = int(card, 16)
                print("人员卡号:", card)

            except socket.timeout:
                print('TIMEOUT ERROR: 服务器未及时响应')
    except Exception as e:
        print('CONNECT ERROR:', e)
DEMO结果
E:\software\python\python.exe E:/projects/Forklift/t2.py

实时电压 单精度浮点数: 48.85

实时电流 单精度浮点数: 0.26

实时温度1 单精度浮点数: 31.10

实时温度2 单精度浮点数: 30.85

车速: 0

实时电量 单精度浮点数: 68.52

充放电状态: 0

超速报警: 0

低电量报警: 0

温度1过高: 0

温度2过高: 0

车牌号: 15172

人员卡号: 10763
其他:地址表
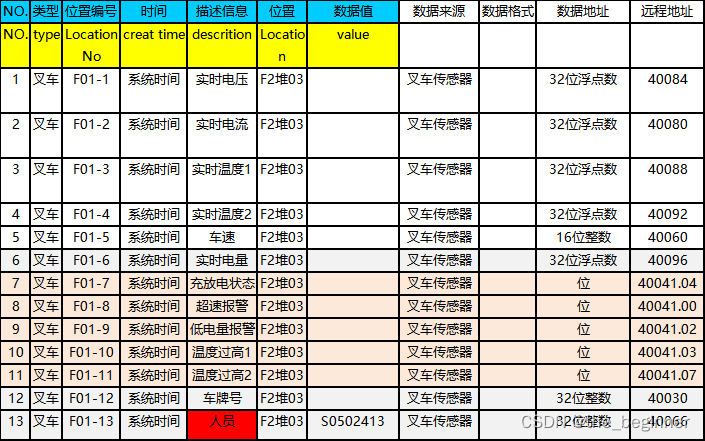
附带数据库&log存储的代码:
#!D:/workplace/python
# -*- coding: utf-8 -*-
# @File  : main0523_04.py
# @Author:Romulushe
# @Time    : 2023/5/23 10:38
# @Software: PyCharm
# @Use: PyCharm
import socket
import struct
import time
import binascii
import pymysql
import os,sys,datetime,logging

interval = 5
ip_address = ''#根据实际情况自定义
port_number = ''#根据实际情况自定义
polling_interval = float(interval)


base_path = os.path.dirname(os.path.realpath(sys.argv[0]))


def get_log_path():
    return os.path.join(base_path, 'logs')


def cleanup_logs():
    log_path = get_log_path()
    current_time = time.time()
    for file_name in os.listdir(log_path):
        file_path = os.path.join(log_path, file_name)
        if os.path.isfile(file_path):
            creation_time = os.path.getctime(file_path)
            if current_time - creation_time > (3 * 24 * 60 * 60):
                os.remove(file_path)


def configure_logging():
    log_path = get_log_path()
    os.makedirs(log_path, exist_ok=True)
    log_filename = get_log_filename()
    log_file = os.path.join(log_path, log_filename)
    logging.basicConfig(level=logging.DEBUG, format='%(asctime)s - %(levelname)s - %(message)s', filename=log_file)


def get_log_filename():
    now = datetime.datetime.now()
    return now.strftime("%Y-%m-%d_%H-%M.log")


def create_new_log():
    log_path = get_log_path()
    log_files = os.listdir(log_path)
    if len(log_files) >= 20:
        oldest_file = min(log_files)
        os.remove(os.path.join(log_path, oldest_file))
    log_filename = get_log_filename()
    log_filepath = os.path.join(log_path, log_filename)
    return log_filepath


def check_log_size(log_filepath):
    log_size = os.path.getsize(log_filepath)
    if log_size > 2 * 1024 * 1024:
        # 创建新的日志文件
        new_log_filepath = create_new_log()
        try:
            shutil.move(log_filepath, new_log_filepath)
            return new_log_filepath
        except PermissionError:
            insert_log(logger, f'{log_filepath} {PermissionError}', log_filepath)
            time.sleep(0.1)
            return log_filepath
    return log_filepath

def insert_log(logger, log_message, log_filepath):
    log_filepath = check_log_size(log_filepath)

    # 创建文件处理器
    file_handler = RotatingFileHandler(log_filepath, maxBytes=2 * 1024 * 1024, backupCount=1)
    file_handler.setLevel(logging.DEBUG)
    formatter = logging.Formatter('%(asctime)s - %(levelname)s - %(message)s')
    file_handler.setFormatter(formatter)

    # 添加文件处理器到日志记录器
    logger.addHandler(file_handler)

    try:
        logger.debug(log_message)
    except PermissionError:
        insert_log(logger, f'{log_message} {PermissionError}', log_filepath)
        time.sleep(0.1)  # 延迟0.1秒

    # 移除文件处理器
    logger.removeHandler(file_handler)
# 连接数据库
def connect_database(host, port, user, password, db_name):
    try:
        conn = pymysql.connect(host=host, port=port, user=user, password=password, db=db_name)
        # print("成功连接到数据库")
        return conn
    except pymysql.Error as e:
        insert_log(logger, f'DATABASE CONNECT FAILED', log_filepath)
        # print(f"数据库连接失败: {e}")

# 插入数据
def insert_data(conn, types,table_name, create_time, location_no, parameter_desc, location, param_value):
    try:
        cursor = conn.cursor()
        sql = f"INSERT INTO {table_name} (TYPE, CREATE_TIME, LOCATION_NO, PARAMETER_DESC, LOCATION, PARAMVALUE) " \
              f"VALUES (%s, %s, %s, %s, %s, %s)"
        cursor.execute(sql, (types,create_time, location_no, parameter_desc, location, param_value))
        conn.commit()
        # print(f"数据插入成功: {create_time}, {parameter_desc}: {param_value}")
        cursor.close()
    except pymysql.Error as e:
        insert_log(logger, f'DATABASE INSERT DATA FAILED', log_filepath)
        # print(f"数据插入失败: {e}")


with socket.socket(socket.AF_INET, socket.SOCK_STREAM) as client_socket:
    configure_logging()
    cleanup_logs()

    log_filepath = create_new_log()

    logger = logging.getLogger()
    logger.setLevel(logging.DEBUG)

    try:
        client_socket.settimeout(3)
        client_socket.connect((ip_address, port_number))

        # 连接数据库
        host = ''#根据实际情况自定义
        port = 3306
        user = ''#根据实际情况自定义
        password = ''#根据实际情况自定义
        db_name = ''#根据实际情况自定义
        table_name =''#根据实际情况自定义
        try:
            # 连接数据库
            conn = connect_database(host, port, user, password, db_name)
        except Exception as e:
            print("COON ERROR:",e)

        while True:

            try:
                types ='叉车'
                location ='F2堆02'


                ##电压
                request = bytes.fromhex("00 22 00 00 00 06 01 03 00 53 00 02 ")
                client_socket.send(request)
                response = client_socket.recv(1024)

                value84 = response[-4:]
                value84= struct.unpack('>f', value84)[0]
                # value84 = value84 * 10.00
                value84 = round(value84, 2)
                print("实时电压 单精度浮点数: {:.2f}".format(value84))

                location_no ='F01-1'
                parameter_desc ='实时电压'
                param_value=value84

                insert_data(conn, types, table_name, create_time, location_no, parameter_desc, location, param_value)

                ##电流
                request = bytes.fromhex("00 24 00 00 00 06 01 03 00 4F 00 02  ")
                client_socket.send(request)
                response = client_socket.recv(1024)

                value80 = response[-4:]
                value80 = struct.unpack('>f', value80)[0]
                # value84 = value80 * 10.00
                value80 = round(value80, 2)
                print("实时电流 单精度浮点数: {:.2f}".format(value80))
                location_no = 'F01-2'
                parameter_desc = '实时电流'
                param_value=value80

                insert_data(conn, types, table_name, create_time, location_no, parameter_desc, location, param_value)

                ##实时温度1
                request = bytes.fromhex("00 2E 00 00 00 06 01 03 00 57 00 02 ")
                client_socket.send(request)
                response = client_socket.recv(1024)

                value88 = response[-4:]
                value88 = struct.unpack('>f', value88)[0]
                # value88 = value88 * 10.00
                value88 = round(value88, 2)
                print("实时温度1 单精度浮点数: {:.2f}".format(value88))
                location_no = 'F01-3'
                parameter_desc = '实时温度1'
                param_value = value88

                insert_data(conn, types, table_name, create_time, location_no, parameter_desc, location, param_value)

               #实时温度2
                request = bytes.fromhex("00 2C 00 00 00 06 01 03 00 5B 00 02 ")
                client_socket.send(request)
                response = client_socket.recv(1024)

                value92 = response[-4:]
                value92 = struct.unpack('>f', value92)[0]
                # value92 = value92 * 10.00
                value92 = round(value92, 2)
                print("实时温度2 单精度浮点数: {:.2f}".format(value92))
                location_no = 'F01-4'
                parameter_desc = '实时温度2'
                param_value = value92

                insert_data(conn, types, table_name, create_time, location_no, parameter_desc, location, param_value)

                ##车速
                request = bytes.fromhex("00 31 00 00 00 06 01 03 00 3B 00 01 ")
                client_socket.send(request)
                response = client_socket.recv(1024)

                speed= binascii.hexlify(response)[-4:]
                speed = int(speed, 16)
                print("车速:", speed)
                location_no = 'F01-5'
                parameter_desc = '车速'
                param_value = speed

                insert_data(conn, types, table_name, create_time, location_no, parameter_desc, location, param_value)

                # #实时电量
                request = bytes.fromhex("00 20 00 00 00 06 01 03 00 5F 00 02 ")
                client_socket.send(request)
                response = client_socket.recv(1024)

                value96 = response[-4:]
                value96 = struct.unpack('>f', value96)[0]
                value96=value96*10.00
                value96=round(value96,2)
                print("实时电量 单精度浮点数: {:.2f}".format(value96))
                location_no = 'F01-6'
                parameter_desc = '实时电量'
                param_value = value96

                insert_data(conn, types, table_name, create_time, location_no, parameter_desc, location, param_value)

                #充放电状态

                #超速报警

                #低电量报警

                #温度过高1

                #温度过高2

                #00 18 00 00 00 06 01 03 00 28 00 01
                request = bytes.fromhex("00 33 00 00 00 06 01 03 00 28 00 01 ")
                client_socket.send(request)
                response = client_socket.recv(1024)

                value40 = response[-2:]
                value40= bin(int.from_bytes(value40, byteorder='big'))[2:].zfill(8)[::-1]
                print("充放电状态:",value40[4])
                print("超速报警:", value40[0])
                print("低电量报警:", value40[2])
                print("温度1过高:", value40[3])
                print("温度2过高:", value40[7])
                location_no = 'F01-7'
                parameter_desc = '充放电状态'
                param_value = value40[4]
                insert_data(conn, types, table_name, create_time, location_no, parameter_desc, location, param_value)

                location_no = 'F01-8'
                parameter_desc = '超速报警'
                param_value = value40[0]
                insert_data(conn, types, table_name, create_time, location_no, parameter_desc, location, param_value)

                location_no = 'F01-9'
                parameter_desc = '低电量报警'
                param_value = value40[2]
                insert_data(conn, types, table_name, create_time, location_no, parameter_desc, location, param_value)

                location_no = 'F01-10'
                parameter_desc = '温度1过高'
                param_value = value40[3]
                insert_data(conn, types, table_name, create_time, location_no, parameter_desc, location, param_value)

                location_no = 'F01-11'
                parameter_desc = '温度2过高'
                param_value = value40[7]
                insert_data(conn, types, table_name, create_time, location_no, parameter_desc, location, param_value)

                # 车牌号
                #
                request = bytes.fromhex("00 00 00 00 00 06 01 03 00 1E 00 02 ")  # 车牌号
                client_socket.send(request)
                response = client_socket.recv(1024)

                car_num = binascii.hexlify(response)[-8:-4]
                car_num = int(car_num, 16)
                print("车牌号:", car_num)
                location_no = 'F01-12'
                parameter_desc = '车牌号'
                param_value = car_num
                insert_data(conn, types, table_name, create_time, location_no, parameter_desc, location, param_value)

                # 人员卡号
                request = bytes.fromhex("00 00 00 00 00 06 01 03 00 42 00 02 ")  # 人员卡号
                client_socket.send(request)
                response = client_socket.recv(1024)

                card = binascii.hexlify(response)[-8:-4]
                card = int(card, 16)
                print("人员卡号:", card)
                location_no = 'F01-13'
                parameter_desc = '人员卡号'
                param_value = card
                insert_data(conn, types, table_name, create_time, location_no, parameter_desc, location, param_value)

            except socket.timeout:
                print('TIMEOUT ERROR: 服务器未及时响应')
    except Exception as e:
        print('CONNECT ERROR:', e)
