本文参考了网上搜索到的内容总结了一下,感谢大神们的无私奉献。
在App中的build.gradle中的android{}下添加:
android{
    ...

    gradle.projectsEvaluated {
        tasks.withType(JavaCompile) {
            Set<File> fileSet = options.bootstrapClasspath.getFiles()
            List<File> newFileList =  new ArrayList<>();
            //JAVA语法,可连续调用,输入参数建议为相对路径
            newFileList.add(new File("libs/framework.jar"))
            //最后将原始参数添加
            newFileList.addAll(fileSet)
            options.bootstrapClasspath = files(
                    newFileList.toArray()
            )
        }
    }
}
此时可以编译出apk,但是android studio的代码检查还是标红的。
需要在setting -> build -> build tools --> gradle 选中iml
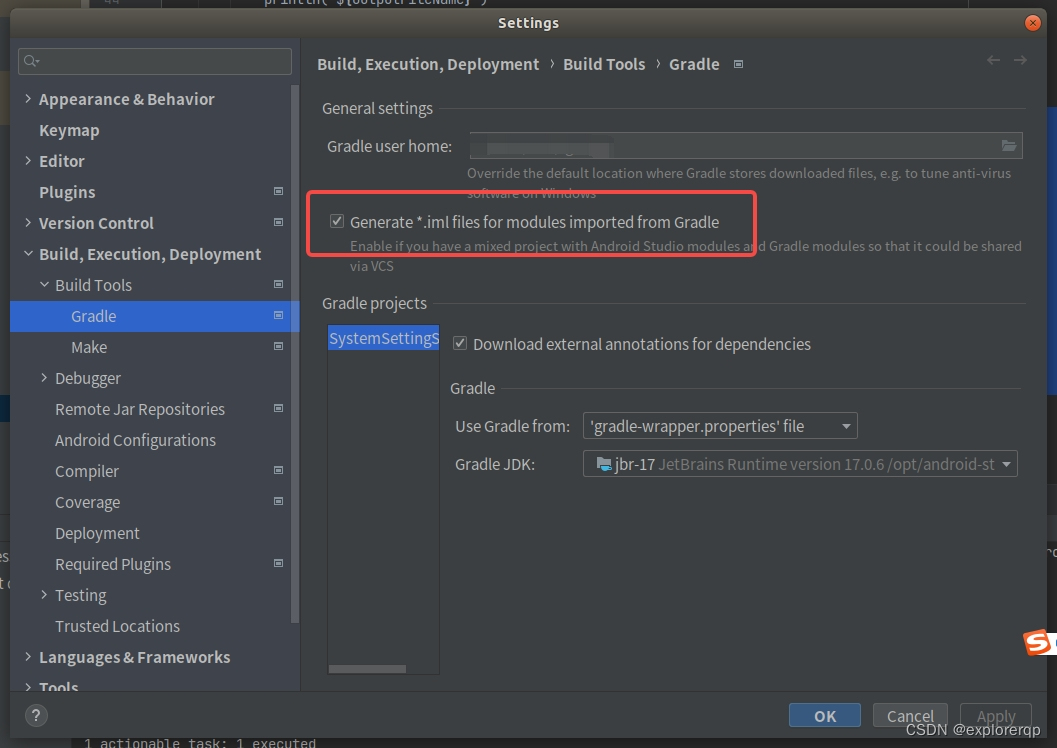
此时,在工程.idea目录下会生成../.idea/modules/app/xxx.app.main.iml。
在App中的build.gradle中添加task,并执行命令:
android{
......
}

 task preBuild1 {
    doLast {
        //此处文件名根据实际情况修改:
        def imlFile = file("../.idea/modules/app/xxx.app.main.iml")
        try {
            println "123456"
            def parsedXml = (new XmlParser()).parse(imlFile)
            def jdkNode = parsedXml.component[1].orderEntry.find { it.'@type' == 'jdk' }
            parsedXml.component[1].remove(jdkNode)
            def sdkString = "Android API " + android.compileSdkVersion.substring("android-".length()) + " Platform"
            new Node(parsedXml.component[1], 'orderEntry', ['type': 'jdk', 'jdkName': sdkString, 'jdkType': 'Android SDK'])
            groovy.xml.XmlUtil.serialize(parsedXml, new FileOutputStream(imlFile))
        } catch (FileNotFoundException e) {
            // nop, iml not found
            println "no iml found"
        }
    }
}
//路径 ../.idea/modules/app/xxx.app.main.iml 是项目中.idea中对应生成的iml
这个命令的目的是将源指向lib下的framework.jar
