Sentinel详解
- Docker安装
- 1、拉取镜像
- 2、运行容器
- 访问
- 整合 spring-cloud-alibaba
- 1、引入Maven依赖
- 2、配置控制台
- 3、编写控制器
- 4、启动Sentinel访问
- 自定义异常处理
- 统一异常处理
- 整合 OpenFeign
- 引入Maven依赖:
- 配置:
- 编写 Feign 实现
- 指定 Feign 容错类
- 控制器
- 运行测试:
- Sentinel 规则持久
- push模式
- 1、添加依赖:
- 2、nacos配置中心配置流控规则
- 3、配置Nacos地址
指路:
Sentinel服务器容错简介
Sentinel规则详解
Docker安装
1、拉取镜像
docker pull bladex/sentinel-dashboard:1.8.0
2、运行容器
docker run --name sentinel -p 8858:8858 --ulimit nofile=1024 -d bladex/sentinel-dashboard:1.8.0
- 如果启动报 library initialization failed - unable to allocate file descriptor table - out of memory 错误,也可以修改 docker 服务的默认设置vim/usr/lib/systemd/system/docker.service 然后添加如下内容:
[Service]
LimitNOFILE=1048576
LimitNPROC=1048576
LimitCORE=infinity
访问
- 浏览器访问 http://你的虚拟机IP/ ,就可以看到sentinel的控制台了。
- 需要输入账号和密码,默认都是:sentinel,就可以登录。
整合 spring-cloud-alibaba
- 为微服务集成 Sentinel 非常简单, 只需要加入 Sentinel 的依赖即可。
- 在order-sentinel-service中整合sentinel,并连接sentinel的控制台,步骤如下:
1、引入Maven依赖
<dependency>
    <groupId>com.alibaba.cloud</groupId>
    <artifactId>spring-cloud-starter-alibaba-sentinel</artifactId>
</dependency>
2、配置控制台
- 修改application.yaml文件,添加下面内容:
- clientIp:跟实际项目运行的主机的某一ip地址(sentinel所在虚拟机能ping通的)
- 若实际项目所运行的主机的所有ip都能ping通,则可以忽略
- clientIp:跟实际项目运行的主机的某一ip地址(sentinel所在虚拟机能ping通的)
spring:
  cloud:
    sentinel:
      transport:
        dashboard: 虚拟机ip:8858
3、编写控制器
- 案例:我们在 OrderController 控制器类中添加 message1 和 message2 两个方法,用于测试服务容错。
@Slf4j
@RestController
@RequestMapping("/order")
public class OrderController {
    @GetMapping("/message1")
    public String message1() {
        return "message1";
    }
    @GetMapping("/message2")
    public String message2() {
        return "message2";
    }
}
4、启动Sentinel访问
- 打开浏览器,访问控制器接口 http://localhost:8072/order/message1。(需要先访问一遍接口才能出发 Sentinel 监控)
- 通过浏览器访问 http://虚拟机ip:8858/ 进入控制台进行流控设置 ( 默认用户名密码是 sentinel/sentinel )
- 如果监控不到,就试着增加 clientIp 的配置
自定义异常处理
- @SentinelResource :修饰资源(方法):
- value:设置 sentinel 资源名,默认为接口方法名。
- blockHandler: 指定异常处理函数的名称,报错后会进入该函数。
- 函数必须是本类的,若定义在其他类,则需设置 blockHandlerClass 属性。
- blockHandlerClass:指定异常处理函数所在的类,其值是 Class<?>[]。
- 此时异常处理函数必须是 static
- 设置之后将只会从 blockHandlerClass 值中寻找异常处理函数,忽略本类。
@GetMapping("/message1")
@SentinelResource(value = "message1", blockHandler =
        "message1BlockHandler")
public String message1() {
    return "message1";
}
// 此处需要注意:是 BlockException,而不是 BlockedException
public String message1BlockHandler(BlockException e) {
    return "被流控了.....";
}
- 异常处理函数注意:
- 必须是 public 修饰的方法
- 返回值必须要和源方法保持一致
- 参数也必须包含源方法的参数且顺序一致
- 参数最后需要增加一个 BlockException 类型的参数,通过它可以区分是什么样的异常
- 其他类中的异常处理函数必须是 static 的。
统一异常处理
- 如果使用 @SentinelResource 注解来自定义处理异常的结果都一样,那么就可以使用统一异常处理来简化代码编写。
- 创建统一异常处理类 GlobalExceptionHandler ,实现 BlockExceptionHandler 接口并注册为 Spring 容器组件。
- 重写 handle 方法,实现对于 sentinel 不同规则异常的处理。
- BlockException 异常有个五个是实现类,分别对应不同的规则异常:
- FlowException:流控;DegradeException:降级;ParamFlowException:热点;SystemBlockException:系统;AuthorityException:授权。
- BlockException 异常有个五个是实现类,分别对应不同的规则异常:
- 注意:被 @SentinelResource 修饰的资源不会进入同一异常处理。
@RestControllerAdvicepublic class GlobalExceptionHandler implements BlockExceptionHandler {

    @Override    public void handle(HttpServletRequest request, HttpServletResponse response, BlockException e) throws Exception {
        String s = null;
        if (e instanceof FlowException) {
            s = "流控限流....";
        } else if (e instanceof DegradeException) {
            s = "服务降级....";
        } else if (e instanceof ParamFlowException) {
            s = "热点参数限流....";
        } else if (e instanceof SystemBlockException) {
            s = "触发系统保护规则....";
        } else if (e instanceof AuthorityException) {
            s = "授权规则不通过....";
        }
        response.setStatus(500);
        response.setCharacterEncoding("utf-8");
        response.setContentType(MediaType.APPLICATION_JSON_VALUE);
        response.getWriter().print(s);
    }
}
整合 OpenFeign
引入Maven依赖:
<!--nacos注册中心客户端-->
<dependency>
    <groupId>com.alibaba.cloud</groupId>
    <artifactId>spring-cloud-starter-alibaba-nacos-discovery</artifactId>
</dependency>
<!--Rabbit负载均衡-->
<dependency>
    <groupId>org.springframework.cloud</groupId>
    <artifactId>spring-cloud-starter-loadbalancer</artifactId>
</dependency>
<!--feign组件-->
<dependency>
    <groupId>org.springframework.cloud</groupId>
    <artifactId>spring-cloud-starter-openfeign</artifactId>
</dependency>
配置:
- 开启 Feign 对 Sentinel 的支持。
- feign.sentinel.enabled=true
- 其他:
server:
  port: 8072
spring:
  application:
    name: order-service # 服务的名称,它会注册到注册中心中,这个名称唯一
  cloud:
    # 配置nacos地址
    nacos:
        discovery
          server-addr: 192.168.65.128:8848 # 指定注册中心中心地址
    # 配置Feign日志
    openfeign:
      client:
        config:
          order-service:
            logger-level: basic
    sentinel:
      transport:
        dashboard: 192.168.65.128:8858
        clientIp: 192.168.65.1
      webContextUnify: false # 关闭context收敛
feign:
  sentinel:
    enabled: true
编写 Feign 实现
- 为所有 Feign 接口编写 实现类,添加注解注入IOC,并重写所有方法。
- 实现类重写的方法就代表:当远端服务没找到、服务出错时的一个处理方法。
@Component
public class OpenFeignClientImpl implements OpenFeignClient {
    // 当远端服务没找到、服务出错时的一个处理方法。
    @Override
    public String reduce(String commodityCode, int count) {
        return "请求稍后再试......";
    }
}
指定 Feign 容错类
- 为所有 Feign 接口的 @FeignClient 注解设置 fallback 属性值。
- fallback:指定的 Feign 客户端接口的回退类。回退类必须实现由该注释注释的接口Class<?>,并且必须是一个有效的 spring bean。
控制器
- 控制器正常书写调用 feign 等。
@RestController@RequestMapping("/order")
public class OrderController {
    @Resource    private OpenFeignClient openFeignClient;
    @GetMapping("/add/{commodityCode}/{count}")
    public Map<String, Object> add(@PathVariable String commodityCode, @PathVariable int count) {
        String result = openFeignClient.reduce(commodityCode, count);
        Order order = Order.builder()
                .commodityCode(commodityCode)
                .count(count)
                .money(300)
                .build();
        Map<String, Object> map = new HashMap<>();
        map.put("order", order);
        map.put("storage", result);
        return map;
    }
}
运行测试:
- 启动两个服务,正常调用运行,一切OK
- 尝试关闭被OpenFeign的那个服务,再次访问,发现执行了 fallback 的容错处理方法。

Sentinel 规则持久
每次重启服务都要重新在 Sentinel客户端设置规则,太麻烦了。
push模式
-
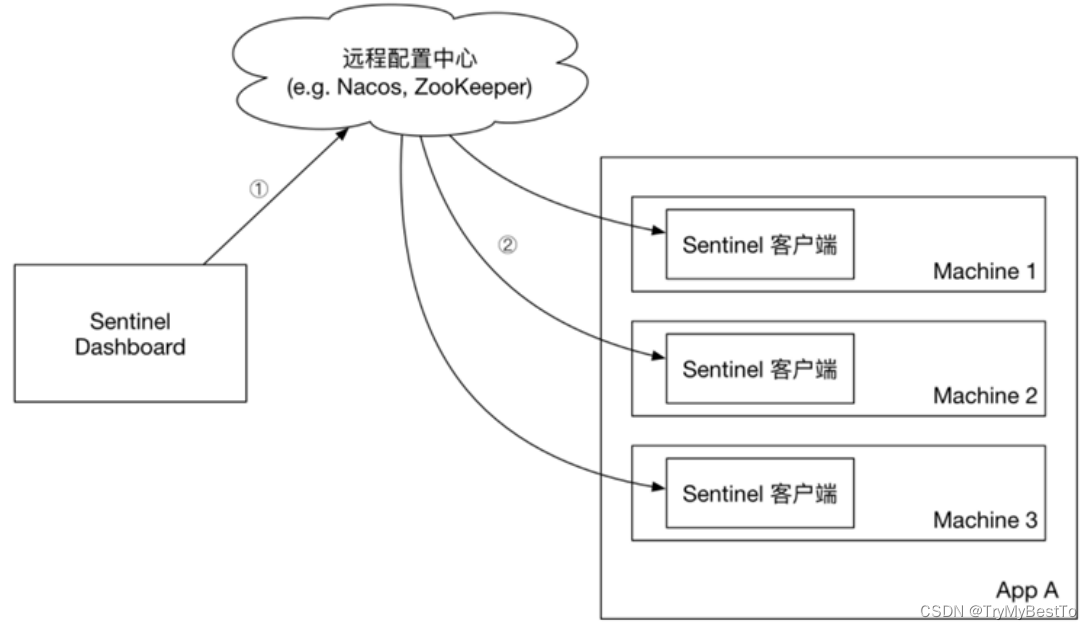
生产环境下一般更常用的是 push 模式的数据源,如远程配置中心(Zookeeper、Nacos、Apollo等),推送的操作不应由 Sentinel 客户端进行,而应该经控制台统一进行管理,直接进行推送。数据源仅负责获取配置中心推送的配置并更新到本地。
-
因此推送规则正确做法应该是 配置中心控制台 > 配置中心 > Sentinel数据源 > Sentinel,而不是经 Sentinel 数据源推送至配置中心。
-
其原理就是使用 nacos 配置中心编写 json配置文件,其中配置了 Sentinel 规则;启动 Spring 是由Spring 导入配置,Sentinel 便能自动识别到配置文件,并生成规则。
1、添加依赖:
<dependency>
    <groupId>com.alibaba.csp</groupId>
    <artifactId>sentinel-datasource-nacos</artifactId>
</dependency>
2、nacos配置中心配置流控规则
- Data ID: order-sentinel-flow-rule
- Group: DEFAULT_GROUP
- 配置格式: JSON
- 配置内容示例:
[
    {
        "resource": "/order/message1",
        "limitApp": "default",
        "grade": 1,
        "count": 2,
        "strategy": 0,
        "controlBehavior": 0
    }
]
3、配置Nacos地址
server:
  port: 8072
spring:
  application:
    name: order-service # 服务的名称,它会注册到注册中心中,这个名称唯一
  cloud:
    sentinel:
      transport:
        dashboard: 192.168.65.128:8858
        clientIp: 192.168.65.1
      webContextUnify: false # 关闭context收敛
      datasource:
        flow-rule:  # 此名称可以自定义
          nacos:
            server-addr: 192.168.65.128:8848  # nacoc地址
            dataId: order-sentinel-flow-rule
            groupId: DEFAULT_GROUP
            rule-type: flow # 还可以是:degrade、authority、param-flow 等
- 运行程序,访问服务接口,此时就能在 Sentinel 客户端中看见配置的规则了,并且是处于生效状态。
- 缺点:在 Sentinel 控制台中修改规则后不会自动配置到 nacos 中。
