1.时间选择器Time Picker
和Data Picker类似,Time Picker允许用户选择相应的时间。
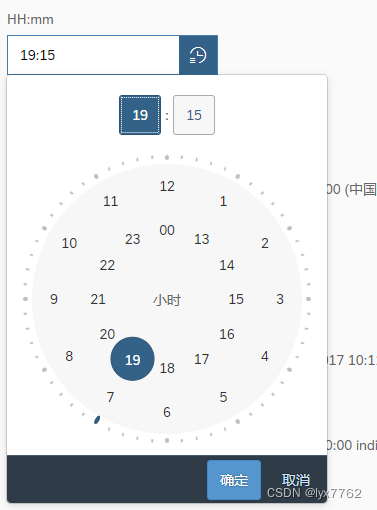
它有以下一些比较常用的属性。
value用于显示Input中的时间的值,这个属性只能接受字符串的值,如果是UI5.getInstance()获取到的时间,需要转化成相应的字符串才可以valueFormat用于设置显示日期的格式,这个格式会影响Input框中的格式,也会影响Time Picker显示的格式placeholder用于显示提示信息maskMode这个通常设置为true,这样用户就只能在输入框中输入指定格式的时间,如果输入字母等其他字符,是不可以输入进去的。
关于
valueFormat的格式
HH24小时制的小时hh12小时制的小时mm分钟ss秒a12小时制的情况下使用,用于显示上午还是下午
相关事件change
当用户选择了日期后,会触发这个事件,可以在这个事件中获取到用户选择的事件
handleChange: function (oEvent) {
	var sValue = oEvent.getParameter("value"),
	MessageToast.show("The selected time is  " + sValue);
}
具体代码如下:
<mvc:View
	controllerName="sap.ui5.walkthrough.controller.App"
	xmlns:core="sap.ui.core"
	xmlns:mvc="sap.ui.core.mvc"
	xmlns:form="sap.ui.layout.form"
	xmlns="sap.m"
	xmlns:l="sap.ui.layout"
>
	<Panel
		width="auto"
		class="sapUiResponsiveMargin"
	>
		<headerToolbar>
			<OverflowToolbar>
				<Title text="maskMode"/>
			</OverflowToolbar>
		</headerToolbar>
		<content>
			<HBox alignItems="Center">
				<Text
					renderWhitespace="true"
					text="maskMode is  "
				/>
				<Switch state="{/maskMode/state}"/>
				<Text
					renderWhitespace="true"
					text="  for all TimePickers below"
				/>
			</HBox>
			<Text
				class="sapUiSmallMarginTop"
				visible="{/maskMode/state}"
				text="When maskMode is 'On', the TimePicker field accepts only the time format predefined by the mask."
			/>
			<Text
				class="sapUiSmallMarginTop"
				visible="{= !${/maskMode/state}}"
				text="When maskMode is 'Off', the users can enter anything in the TimePicker field. The field is still validated. The 'change' event returns two parameters - 'value' (that is entered) and 'valid' (true or false depending on the validity of the 'value')
					."
			/>
		</content>
	</Panel>
	<VBox class="sapUiSmallMargin">
		<Label
			class="sapUiSmallMarginTop"
			text="{/timePickers/TP1/format}"
		/>
		<TimePicker
			id="TP1"
			value="{/timePickers/TP1/value}"
			valueFormat="{/timePickers/TP1/format}"
			displayFormat="{/timePickers/TP1/format}"
			change="handleChange"
			maskMode="{= ${/maskMode/state} ? 'On' : 'Off'}"
			placeholder="{/timePickers/TP1/placeholder}"
		/>
		<Label
			class="sapUiSmallMarginTop"
			text="{/timePickers/TP2/format}, showCurrentTimeButton: {/timePickers/TP2/showCurrentTimeButton}"
		/>
		<TimePicker
			id="TP2"
			valueFormat="{/timePickers/TP2/format}"
			displayFormat="{/timePickers/TP2/format}"
			showCurrentTimeButton="true"
			change="handleChange"
			maskMode="{= ${/maskMode/state} ? 'On' : 'Off'}"
			placeholder="{/timePickers/TP2/placeholder}"
		/>
		<Label
			class="sapUiSmallMarginTop"
			text="hh:mm a,
				value: {/timePickers/TP3/value}"
		/>
		<TimePicker
			id="TP3"
			change="handleChange"
			value="{/timePickers/TP3/value}"
			maskMode="{= ${/maskMode/state} ? 'On' : 'Off'}"
			placeholder="{/timePickers/TP3/placeholder}"
		/>
		<Label
			class="sapUiSmallMarginTop"
			text="{/timePickers/TP4/format}"
		/>
		<TimePicker
			id="TP4"
			valueFormat="{/timePickers/TP4/format}"
			displayFormat="{/timePickers/TP4/format}"
			change="handleChange"
			maskMode="{= ${/maskMode/state} ? 'On' : 'Off'}"
			placeholder="{/timePickers/TP4/placeholder}"
		/>
		<Label
			class="sapUiSmallMarginTop"
			text="{/timePickers/TP5/format}, initialFocusedDateValue: {/timePickers/TP5/initialFocusedDateValue}"
		/>
		<TimePicker
			id="TP5"
			valueFormat="{/timePickers/TP5/format}"
			displayFormat="{/timePickers/TP5/format}"
			change="handleChange"
			initialFocusedDateValue="{/timePickers/TP5/initialFocusedDateValue}"
			maskMode="{= ${/maskMode/state} ? 'On' : 'Off'}"
			placeholder="{/timePickers/TP5/placeholder}"
		/>
		<Label
			class="sapUiSmallMarginTop"
			text="{/timePickers/TP6/format}, support2400: {/timePickers/TP6/support2400} (for cases where 24:00:00 indicates the end of the day)"
		/>
		<TimePicker
			id="TP6"
			valueFormat="{/timePickers/TP6/format}"
			displayFormat="{/timePickers/TP6/format}"
			change="handleChange"
			support2400="{/timePickers/TP6/support2400}"
			maskMode="{= ${/maskMode/state} ? 'On' : 'Off'}"
			value="{/timePickers/TP6/value}"
			placeholder="{/timePickers/TP6/placeholder}"
		/>
		<Toolbar class="sapUiSmallMarginTop">
			<content>
				<Title text="change event result"/>
			</content>
		</Toolbar>
		<Text
			id="T1"
			class="sapUiSmallMarginTop"
		/>
	</VBox>
</mvc:View>
值得注意的两个细节
1. TP3的value为什么需要使用格式化器?
根据提供的代码和JSON Model,Id为TP3的元素的value属性为UI5Date.getInstance(),这里使用的是一个UI5的日期实例。然而,UI5的日期实例并不能直接在界面上显示,因为它不是一个可显示的字符串。
要在界面上显示日期值,需要将日期实例转换为字符串格式,以便TimePicker能够正确显示。你可以使用格式化器(Formatter)或者绑定到另一个字符串属性来实现。
使用格式化器的示例:
在控制器中定义一个格式化函数:
formatDate: function(value) {
    if (value instanceof Date) {
        var oDateFormat = sap.ui.core.format.DateFormat.getDateTimeInstance({ pattern: "yyyy-MM-dd" });
        return oDateFormat.format(value);
    }
    return value;
}
然后在XML视图中的TimePicker控件中使用格式化器:
<TimePicker
    id="TP3"
    change="handleChange"
    value="{
        path: '/timePickers/TP3/value',
        formatter: '.formatDate'
    }"
    maskMode="{= ${/maskMode/state} ? 'On' : 'Off'}"
    placeholder="{/timePickers/TP3/placeholder}"
/>
这样可以将日期实例转换为指定格式的字符串,并显示在界面上。
另一种方法是在JSON Model中添加一个新的属性,用于存储日期的字符串格式。在更新日期时,同时更新这个字符串属性,并绑定到TimePicker的value属性。
希望这能帮到你解决问题。如果还有其他疑问,请随时提问。
2. 那TP5对应的VALUE也是UI5Date.getInstance(),为什么不需要格式化器
TP5对应的VALUE也是UI5Date.getInstance(2017, 8, 9, 10, 11, 12),在这种情况下不需要使用格式化器的原因是因为TP5指定了initialFocusedDateValue属性,该属性接受一个UI5日期实例作为初始值,并且TimePicker控件会自动将其转换为正确的显示格式。
initialFocusedDateValue属性用于在打开TimePicker时设置初始的选定日期和时间。UI5会自动将UI5日期实例转换为适当的显示格式,并在TimePicker控件中显示。
因此,对于TP5,你无需使用格式化器,因为TimePicker会自动处理日期实例的显示。
希望这解答了你的疑问。如果还有其他问题,请随时提问。
2.Action List控件
Action List控件可以用于显示一系列的按钮操作聚合在一起,方便用户选择和使用。
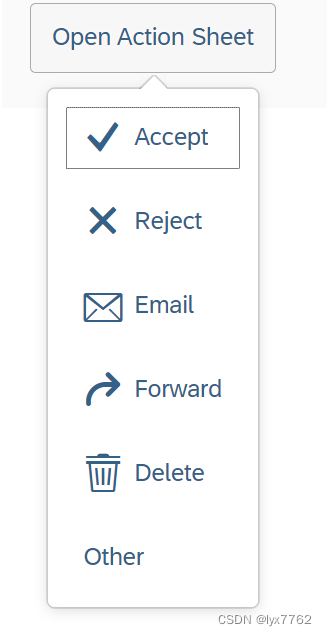
具体代码如下:
<mvc:View
	controllerName="sap.ui5.walkthrough.controller.App"
	xmlns:core="sap.ui.core"
	xmlns:mvc="sap.ui.core.mvc"
	xmlns:form="sap.ui.layout.form"
	xmlns="sap.m"
	xmlns:l="sap.ui.layout"
>
	<Button
		text="Open Action Sheet"
		class="sapUiSmallMargin"
		press=".onButtonPress"
		ariaHasPopup="Menu" >
		<dependents>
			<core:Fragment
				fragmentName="sap.ui5.walkthrough.view.ValueHelpDialog"
				type="XML" />
		</dependents>
	</Button>
</mvc:View>
<ActionSheet id="actionSheet"
	xmlns="sap.m"
	xmlns:core="sap.ui.core"
	core:require="{ MessageToast: 'sap/m/MessageToast' }"
	title="Choose Your Action"
	showCancelButton="true"
	placement="Bottom"
	showScrollbar="false">
	<Button
		text="Accept"
		icon="sap-icon://accept"
		press="handleButtonPress" />
	<Button
		text="Reject"
		icon="sap-icon://decline"
		press="handleButtonPress" />
	<Button
		text="Email"
		icon="sap-icon://email"
		press="handleButtonPress" />
	<Button
		text="Forward"
		icon="sap-icon://forward"
		press="handleButtonPress" />
	<Button
		text="Delete"
		icon="sap-icon://delete"
		press="handleButtonPress" />
	<Button
		text="Other"
		press="handleButtonPress" />
</ActionSheet>
sap.ui.define([
	'sap/ui/core/mvc/Controller',
	'sap/ui/model/json/JSONModel',
	"sap/ui/core/Core",
	"sap/ui/core/library",
	"sap/ui/unified/DateTypeRange",
	"sap/ui/core/date/UI5Date",
	'sap/m/MessageToast',
	"sap/ui/core/Fragment",
	"sap/ui/model/Filter",
	"sap/ui/model/FilterOperator",
], function (Controller,
	JSONModel,
	Core,
	library,
	DateTypeRange,
	UI5Date,
	MessageToast,
	Fragment,
	Filter,
	FilterOperator,
	) {
	"use strict";

	return Controller.extend("sap.ui5.walkthrough.controller.App", {

		onButtonPress: function(oEvent) {
			var oButton = oEvent.getSource();
			this.byId("actionSheet").openBy(oButton);
		},

		handleButtonPress: function(oEvent) {
			var oButton = oEvent.getSource();
			var sButtonText = oButton.getText();
			MessageToast.show('Selected action is ' + sButtonText);
		}

	});
});
3.NavigationList控件
这个控件用于实现导航栏,还提供了各种特效。
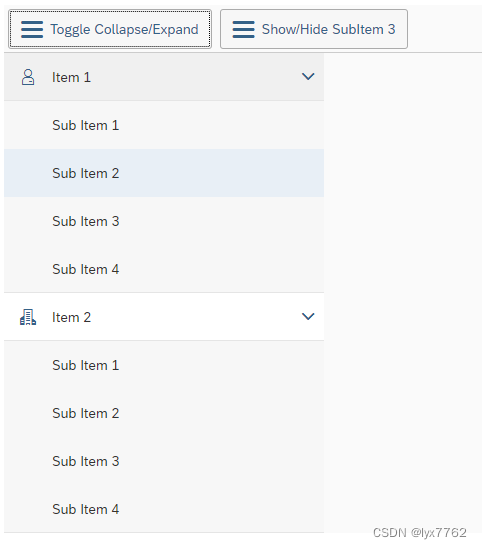
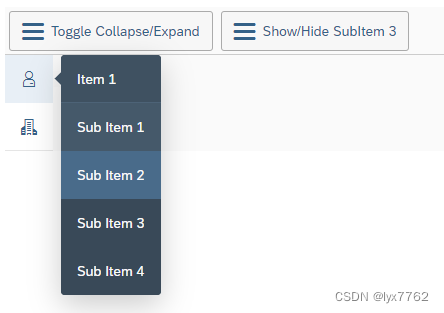
具体代码如下:
<mvc:View
	controllerName="sap.ui5.walkthrough.controller.App"
	xmlns="sap.m"
	xmlns:mvc="sap.ui.core.mvc"
	xmlns:tnt="sap.tnt"
	height="100%"
>
	<OverflowToolbar>
		<Button
			text="Toggle Collapse/Expand"
			icon="sap-icon://menu2"
			press=".onCollapseExpandPress"
		/>
		<Button
			text="Show/Hide SubItem 3"
			icon="sap-icon://menu2"
			press=".onHideShowSubItemPress"
		/>
	</OverflowToolbar>
	<tnt:NavigationList
		id="navigationList"
		width="320px"
		selectedKey="subItem3"
	>
		<tnt:NavigationListItem
			text="Item 1"
			key="rootItem1"
			icon="sap-icon://employee"
		>
			<tnt:NavigationListItem text="Sub Item 1" select="onPress"/>
			<tnt:NavigationListItem text="Sub Item 2" />
			<tnt:NavigationListItem
				text="Sub Item 3"
				id="subItemThree"
				key="subItem3"
			/>
			<tnt:NavigationListItem text="Sub Item 4"/>
			<tnt:NavigationListItem
				text="Invisible Sub Item 5"
				visible="false"
			/>
			<tnt:NavigationListItem
				text="Invisible Sub Item 6"
				visible="false"
			/>
		</tnt:NavigationListItem>
		<tnt:NavigationListItem
			text="Invisible Section"
			icon="sap-icon://employee"
			visible="false"
		>
			<tnt:NavigationListItem text="Sub Item 1"/>
			<tnt:NavigationListItem text="Sub Item 2"/>
			<tnt:NavigationListItem text="Sub Item 3"/>
			<tnt:NavigationListItem text="Sub Item 4"/>
		</tnt:NavigationListItem>
		<tnt:NavigationListItem
			text="Item 2"
			icon="sap-icon://building"
		>
			<tnt:NavigationListItem text="Sub Item 1"/>
			<tnt:NavigationListItem text="Sub Item 2"/>
			<tnt:NavigationListItem text="Sub Item 3"/>
			<tnt:NavigationListItem text="Sub Item 4"/>
		</tnt:NavigationListItem>
	</tnt:NavigationList>
</mvc:View>
如果想实现点击某一个Item会执行某一个事件,请使用select事件
例如
<tnt:NavigationListItem text="Sub Item 1" select="onPress"/>
sap.ui.define([
	'sap/ui/core/mvc/Controller',
	'sap/ui/model/json/JSONModel',
	"sap/ui/core/Core",
	"sap/ui/core/library",
	"sap/ui/unified/DateTypeRange",
	"sap/ui/core/date/UI5Date",
	'sap/m/MessageToast',
	"sap/ui/core/Fragment",
	"sap/ui/model/Filter",
	"sap/ui/model/FilterOperator",
], function (Controller,
	JSONModel,
	Core,
	library,
	DateTypeRange,
	UI5Date,
	MessageToast,
	Fragment,
	Filter,
	FilterOperator,
) {
	"use strict";

	return Controller.extend("sap.ui5.walkthrough.controller.App", {

		onCollapseExpandPress: function () {
			var oNavigationList = this.byId("navigationList");
			// 获取导航栏是否是Expand,然后取反即可
			var bExpanded = oNavigationList.getExpanded();

			oNavigationList.setExpanded(!bExpanded);
		},

		onHideShowSubItemPress: function () {
			var oNavListItem = this.byId("subItemThree");
			oNavListItem.setVisible(!oNavListItem.getVisible());
		},

		onPress: function (oEvent) {
			var text = oEvent.getSource().getText();
			MessageToast.show(text + " is selected");
		}

	});
});
