关于务注册中⼼服
服务注册中⼼本质上是为了解耦服务提供者和服务消费者,尽可能量使两者联系可控在一定的范围外
1.在父项目下下引入
Spring Cloud
依赖
<dependencyManagement><dependencies><!-- SCN --><dependency><groupId> org.springframework.cloud </groupId><artifactId> spring-cloud-dependencies </artifactId><version> Greenwich.RELEASE </version><type> pom </type><scope> import </scope></dependency></dependencies></dependencyManagement>
2.
在⽗⼯程【
yx-parent
】的
pom.xml
⽂件中⼿动引⼊
jaxb
的依赖。因为
JDK9
之后默认没有加载该模块,⽽
EurekaServer依赖
jaxb
,所以需要⼿动导⼊,否则
Eureka Server
服务⽆法启动。
<!-- 引⼊ Jaxb 开始 --><dependency><groupId> com.sun.xml.bind </groupId><artifactId> jaxb-core </artifactId><version> 2.2.11 </version></dependency><dependency><groupId> javax.xml.bind </groupId><artifactId> jaxb-api </artifactId></dependency><dependency><groupId> com.sun.xml.bind </groupId><artifactId> jaxb-impl </artifactId><version> 2.2.11 </version></dependency><dependency><groupId> org.glassfish.jaxb </groupId><artifactId> jaxb-runtime </artifactId><version> 2.2.10-b140310.1920 </version></dependency><dependency><groupId> javax.activation </groupId><artifactId> activation </artifactId><version> 1.1.1 </version></dependency><!-- 引⼊ Jaxb 结束 -->
3.在父工程创建一个yx-cloud-eureka-9200工程,并引入依赖

<dependencies><!-- Eureka Server 依赖 --><dependency><groupId> org.springframework.cloud </groupId><artifactId> spring-cloud-starter-netflix-eureka-server </artifactId></dependency></dependencies>
4.在创建yx-cloud-eureka-9200的工程下的的resources⽬录下创建application.yml配置⽂件,配置Eureka Server服务端⼝, 服务名等信息。
server:
  port: 9200  # Eureka Server服务端口
spring:
  application:
    name: yx-service-eureka #应用名称,在Eureka中服务的唯一标识id
eureka:
  client: #Eureka Server本身也是Eureka的一个客户端,因为在集群下需要与其他Eureka Server进行数据的同步
    service-url:  # 客户端与Eureka Server交互的地址,如果是集群情况下defaultZone设置为集群下其他的Eureka Server地址,多个地址使用","隔开
      defaultZone: http://YXCloudEurekaServerC:9200/eureka,http://YXCloudEurekaServerD:9201/eureka
    register-with-eureka: true  # 表示是否向Eureka中心注册自己的信息,因为自己就是Eureka Server所以不进行注册,默认为true
    fetch-registry: true # 是否查询/拉取Eureka Server服务注册列表,默认为true
  instance:
    #hostname: localhost # 当前Eureka实例的主机名
    # 使用ip注册,否则会使用主机名注册(此处考虑到对老版本的兼容,新版本经过实验都是ip)
    prefer-ip-address: true
    # 自定义实例显示格式,加上版本号,便于多版本管理,注意是ip-address早期版本是ipAddress
    instance-id: ${spring.cloud.client.ip-address}:${spring.application.name}:${server.port}:@project.version@
6.
在
com.yx.eureka
包下,创建
EurekaApplication9200
启动类

@EnableEurekaServer 此注解是申明项目是一个Eureka Server

微服务注册到Eureka\
1.向服务提供者的项目中添加Eureka Client依赖。
<!-- Eureka Client --><dependency><groupId> org.springframework.cloud </groupId><artifactId> spring-cloud-starter-netflix-eureka-client </artifactId></dependency>
2.向消费者的项目的application.yml⽂件中配置Eureka服务端信息
eureka:
  client: #Eureka Server本身也是Eureka的一个客户端,因为在集群下需要与其他Eureka Server进行数据的同步
    service-url:  # 客户端与Eureka Server交互的地址,如果是集群情况下defaultZone设置为集群下其他的Eureka Server地址,多个地址使用","隔开
      defaultZone: http://localhost:9200/eureka
    register-with-eureka: true  # 表示是否向Eureka中心注册自己的信息,因为自己就是Eureka Server所以不进行注册,默认为true
    fetch-registry: true # 是否查询/拉取Eureka Server服务注册列表,默认为true
  instance:
    #hostname: localhost # 当前Eureka实例的主机名
    # 使用ip注册,否则会使用主机名注册(此处考虑到对老版本的兼容,新版本经过实验都是ip)
    prefer-ip-address: true
    # 自定义实例显示格式,加上版本号,便于多版本管理,注意是ip-address早期版本是ipAddress
    instance-id: ${spring.cloud.client.ip-address}:${spring.application.name}:${server.port}:@project.version@
3.
修改
yx-service-page(消费者)
项⽬的启动类
ProductApplication
,添加
@EnableDiscoveryClient
注解
package com . yx . page ;import org . springframework . boot . SpringApplication ;import org . springframework . boot . autoconfigure . SpringBootApplication ;import org . springframework . cloud . client . discovery . EnableDiscoveryClient ;import org . springframework . context . annotation . Bean ;import org . springframework . web . client . RestTemplate ;@EnableDiscoveryClient// @EnableEurekaClient@SpringBootApplicationpublic class PageApplication {public static void main ( String [] args ) {SpringApplication . run ( PageApplication . class , args );}@Beanpublic RestTemplate restTemplate () {return new RestTemplate ();}}

搭建Eureka Server⾼可⽤集群
Win11
操作系统
1.
打开
C
盘下的
C:\Windows\System32\drivers\etc\hosts
⽂件
2.
在
hosts
⽂件中添加
Eureka Server
集群地址的配置
127.0.0.1 YXCloudEurekaServerC127.0.0.1 YXCloudEurekaServerD
搭建
Eureka Server
服务【
yx-cloud-eureka-9201
】,把之前搭建好的单个赋值出一份并修改信息
1.导入坐标
<dependencies><!-- Eureka Server 依赖 --><dependency><groupId> org.springframework.cloud </groupId><artifactId> spring-cloud-starter-netflix-eureka-server </artifactId></dependency></dependencies>
2.两份eureka的项目的配置的不同点,及相同点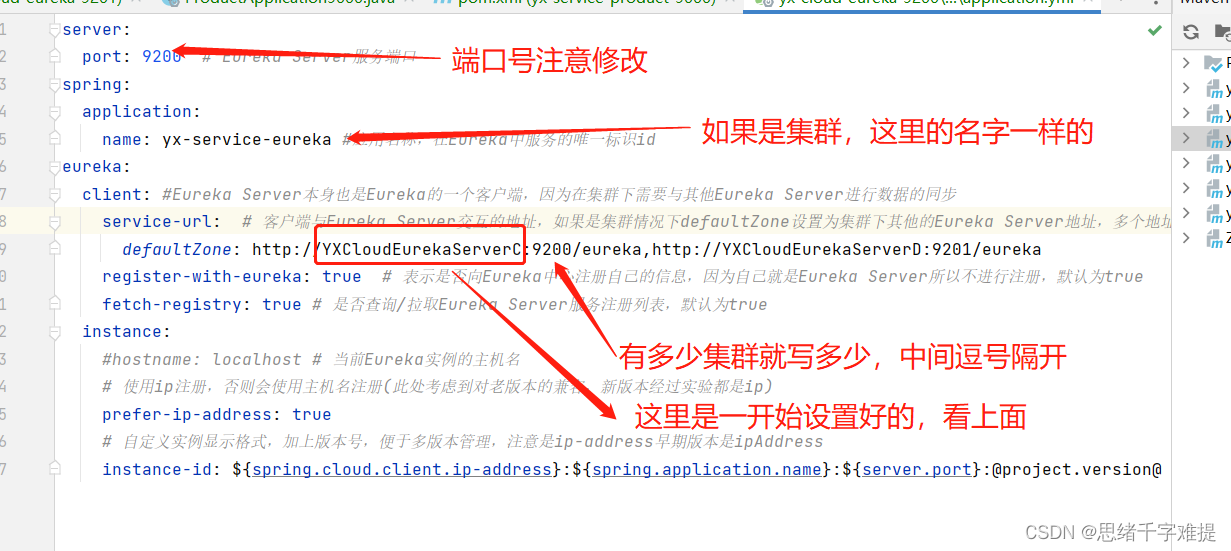
声明当前服务为Eureka注册中⼼

6.修改连接集群的提供者的项目的配置文件
也改为这个


Ribbon负载均衡
Ribbon
开发代码
实现
多创建两个提供者,在所有提供者项目下
创建ServerConfigController
类定,定义 ⽅法返回当前微服务端⼝号。
package com . yx . product . controller ;import org . springframework . beans . factory . annotation . Value ;import org . springframework . web . bind . annotation . RequestMapping ;import org . springframework . web . bind . annotation . RestController ;@RestController@RequestMapping ( "server" )public class ServerConfigController {@Value ( "${server.port}" )private String serverPort ;@RequestMapping ( "query_port" )public String findServerPort () {return serverPort ;}}
在所有提供者的主启动类上,加上注解
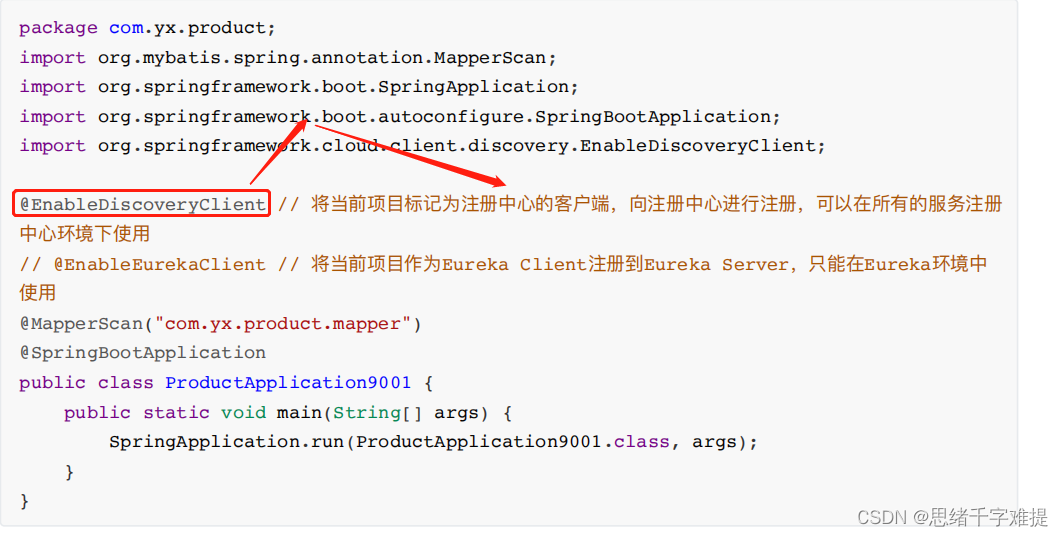
注意提供者的端口号不一样但是名称要一样
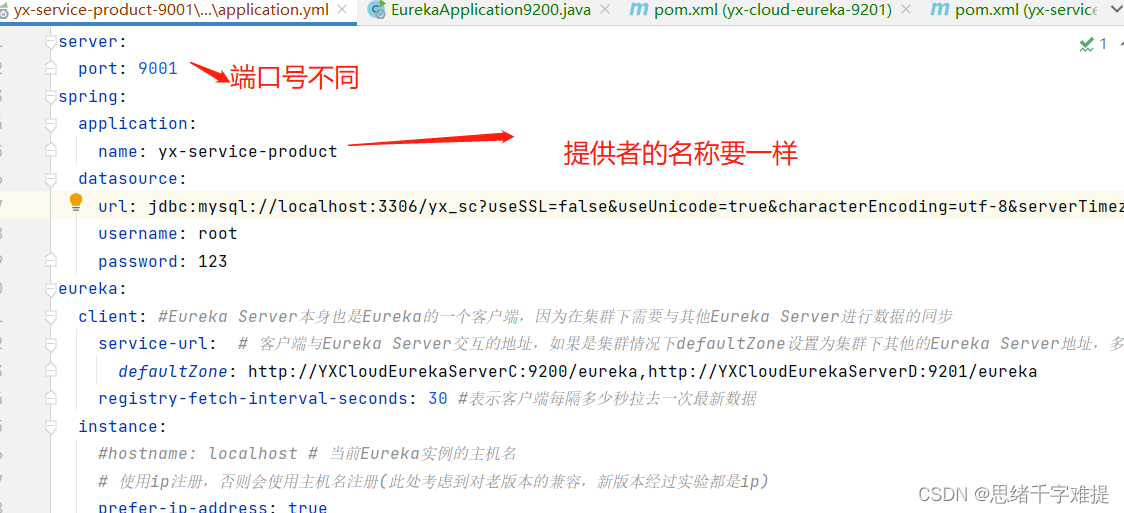
在消费者(page)的项目中的restTemplate()⽅法上添加启动Ribbon负载均衡的注解

4.
在
yx-service-page
⻚⾯静态化微服务中定义调⽤
yx-server-product
服务获取端⼝信息的
queryProductServerPort()
⽅法,同时重构
queryProductById()
⽅法。

以上负载均衡就配置完了,以下是各种配置信息
消费者的配置一览
server:
  port: 9100
spring:
  application:
    name: yx-service-page
  datasource:
    url: jdbc:mysql://localhost:3306/yx_sc?useSSL=false&useUnicode=true&characterEncoding=utf-8&serverTimezone=UTC
    username: root
    password: 123
eureka:
  client: #Eureka Server本身也是Eureka的一个客户端,因为在集群下需要与其他Eureka Server进行数据的同步
    service-url:  # 客户端与Eureka Server交互的地址,如果是集群情况下defaultZone设置为集群下其他的Eureka Server地址,多个地址使用","隔开
      defaultZone: http://YXCloudEurekaServerC:9200/eureka,http://YXCloudEurekaServerD:9201/eureka
  instance:
    #hostname: localhost # 当前Eureka实例的主机名
    # 使用ip注册,否则会使用主机名注册(此处考虑到对老版本的兼容,新版本经过实验都是ip)
    prefer-ip-address: true
    # 自定义实例显示格式,加上版本号,便于多版本管理,注意是ip-address早期版本是ipAddress
    instance-id: ${spring.cloud.client.ip-address}:${spring.application.name}:${server.port}:@project.version@
## 针对的被调⽤⽅微服务名称,不加就是全局⽣效
#yx-service-product:
#  ribbon:
##    NFLoadBalancerRuleClassName: com.netflix.loadbalancer.RandomRule  # 随机策略
#    NFLoadBalancerRuleClassName: com.netflix.loadbalancer.RoundRobinRule # 轮询策略
#    NFLoadBalancerRuleClassName: com.netflix.loadbalancer.RetryRule # 重试策略
提供者的配置一览
server:
  port: 9001
spring:
  application:
    name: yx-service-product
  datasource:
    url: jdbc:mysql://localhost:3306/yx_sc?useSSL=false&useUnicode=true&characterEncoding=utf-8&serverTimezone=UTC
    username: root
    password: 123
eureka:
  client: #Eureka Server本身也是Eureka的一个客户端,因为在集群下需要与其他Eureka Server进行数据的同步
    service-url:  # 客户端与Eureka Server交互的地址,如果是集群情况下defaultZone设置为集群下其他的Eureka Server地址,多个地址使用","隔开
      defaultZone: http://YXCloudEurekaServerC:9200/eureka,http://YXCloudEurekaServerD:9201/eureka
    registry-fetch-interval-seconds: 30 #表示客户端每隔多少秒拉去一次最新数据
  instance:
    #hostname: localhost # 当前Eureka实例的主机名
    # 使用ip注册,否则会使用主机名注册(此处考虑到对老版本的兼容,新版本经过实验都是ip)
    prefer-ip-address: true
    # 自定义实例显示格式,加上版本号,便于多版本管理,注意是ip-address早期版本是ipAddress
    instance-id: ${spring.cloud.client.ip-address}:${spring.application.name}:${server.port}:@project.version@
    metadata-map:
      username: admin
      password: 123456
      telphone: 1301112222
      #每隔30秒向注册中心汇报心跳
    lease-renewal-interval-in-seconds: 30
    #超过90秒还没汇报心跳Eureka Server会将该服务信息移除
    lease-expiration-duration-in-seconds: 90