1 AMS简介
AMS(Activity Manager Service)是Android中最核心的服务,管理着四大组件的启动、切换、调度及应用进程的管理和调度等工作。AndroidQ将Activity移到了ActivityTaskManagerService中,但也和AMS相关联。
AMS通过使用一些系统资源和数据结构(如进程、任务栈、记录四大组件生命周期的状态机等)来管理Activity、Service、Broadcast、ContentProvider四大组件的生命周期管理。其职责与操作系统中的进程管理和调度模块相类似,因此它在Android中非常重要。
本文基于Android10(Q)的源码做分析
2 AMS启动流程
我们上一章节【Android Framework系列】第4章 PMS原理对PMS进行了讲解,我们知道PMS会在开机/安装app时解析APK的AndroidManifest.xml文件,并将解析的结果缓存在PMS中。
下面同样我们对AMS进行分析。
PMS和AMS的启动都是在SystemServer进程,系统启动后Zygote进程第一个fork出SystemServer进程,进入到SystemServer:main()->run()->startBootstrapServices() 启动引导服务,进而完成PMS和AMS等核心服务的启动。
在Android系统所有的核心服务都会经过SystemServer启动,AMS和PMS都是一样。SystemServer会在手机开机时启动运行。关于SystemServer是如何启动的可以查看文章【Android Framework系列】第3章 Zygote进程相关和【Android车载系列】第10章 系统服务-SystemServer源码分析(API28)
2.1 AMS被启动
我们知道AMS是在SystemServer进程中被启动,下面我们来看看具体是怎么启动的AMS:
/frameworks/base/services/java/com/android/server/SystemServer.java
348      public static void main(String[] args) {
349          new SystemServer().run();
350      }
......
370      private void run() {
......
507          // Start services.
508          try {
509              traceBeginAndSlog("StartServices");
				 // 引导服务
510              startBootstrapServices();
				 // 核心服务
511              startCoreServices();
				 // 其他服务
512              startOtherServices();
513              SystemServerInitThreadPool.shutdown();
514          } catch (Throwable ex) {
515              Slog.e("System", "******************************************");
516              Slog.e("System", "************ Failure starting system services", ex);
517              throw ex;
518          } finally {
519              traceEnd();
520          }
......
543      }

......
623      private void startBootstrapServices() {
......
658          ActivityTaskManagerService atm = mSystemServiceManager.startService(
659                  ActivityTaskManagerService.Lifecycle.class).getService();
660          mActivityManagerService = ActivityManagerService.Lifecycle.startService(
661                  mSystemServiceManager, atm);
662          mActivityManagerService.setSystemServiceManager(mSystemServiceManager);
663          mActivityManagerService.setInstaller(installer);
664          mWindowManagerGlobalLock = atm.getGlobalLock();
......
779          mActivityManagerService.setSystemProcess();
......
818      }
......
874      /**
875       * Starts a miscellaneous grab bag of stuff that has yet to be refactored and organized.
876       */
877      private void startOtherServices() {
......
			  // 安装ContentProvider
982           mActivityManagerService.installSystemProviders();
......
1023          wm = WindowManagerService.main(context, inputManager, !mFirstBoot, mOnlyCore,
1024                      new PhoneWindowManager(), mActivityManagerService.mActivityTaskManager);
1025          ServiceManager.addService(Context.WINDOW_SERVICE, wm, /* allowIsolated= */ false,
1026                      DUMP_FLAG_PRIORITY_CRITICAL | DUMP_FLAG_PROTO);
1027          ServiceManager.addService(Context.INPUT_SERVICE, inputManager,
1028                      /* allowIsolated= */ false, DUMP_FLAG_PRIORITY_CRITICAL);
			  // WMS与AMS/ATMS关联起来
1032          mActivityManagerService.setWindowManager(wm);
......
			  // 所有的服务已经准备就绪
2035          mActivityManagerService.systemReady(() -> {
......
				  // 启动阶段500
2038              mSystemServiceManager.startBootPhase(
2039                      SystemService.PHASE_ACTIVITY_MANAGER_READY);
......
2042              try {
					  // 监测Native Crash
2043                  mActivityManagerService.startObservingNativeCrashes();
2044              } catch (Throwable e) {
2045                  reportWtf("observing native crashes", e);
2046              }
......
2051              final String WEBVIEW_PREPARATION = "WebViewFactoryPreparation";
2052              Future<?> webviewPrep = null;
2053              if (!mOnlyCore && mWebViewUpdateService != null) {
2054                  webviewPrep = SystemServerInitThreadPool.get().submit(() -> {
2055                      Slog.i(TAG, WEBVIEW_PREPARATION);
2056                      TimingsTraceLog traceLog = new TimingsTraceLog(
2057                              SYSTEM_SERVER_TIMING_ASYNC_TAG, Trace.TRACE_TAG_SYSTEM_SERVER);
2058                      traceLog.traceBegin(WEBVIEW_PREPARATION);
2059                      ConcurrentUtils.waitForFutureNoInterrupt(mZygotePreload, "Zygote preload");
2060                      mZygotePreload = null;
						  // 启动WebView相关
2061                      mWebViewUpdateService.prepareWebViewInSystemServer();
2062                      traceLog.traceEnd();
2063                  }, WEBVIEW_PREPARATION);
2064              }
......
2073              try {
					  // 启动SystemUi
2074                  startSystemUi(context, windowManagerF);
2075              } catch (Throwable e) {
2076                  reportWtf("starting System UI", e);
2077              }
......
				  // 启动阶段600
2154              mSystemServiceManager.startBootPhase(
2155                      SystemService.PHASE_THIRD_PARTY_APPS_CAN_START);

......
2249          }, BOOT_TIMINGS_TRACE_LOG);
2250      }
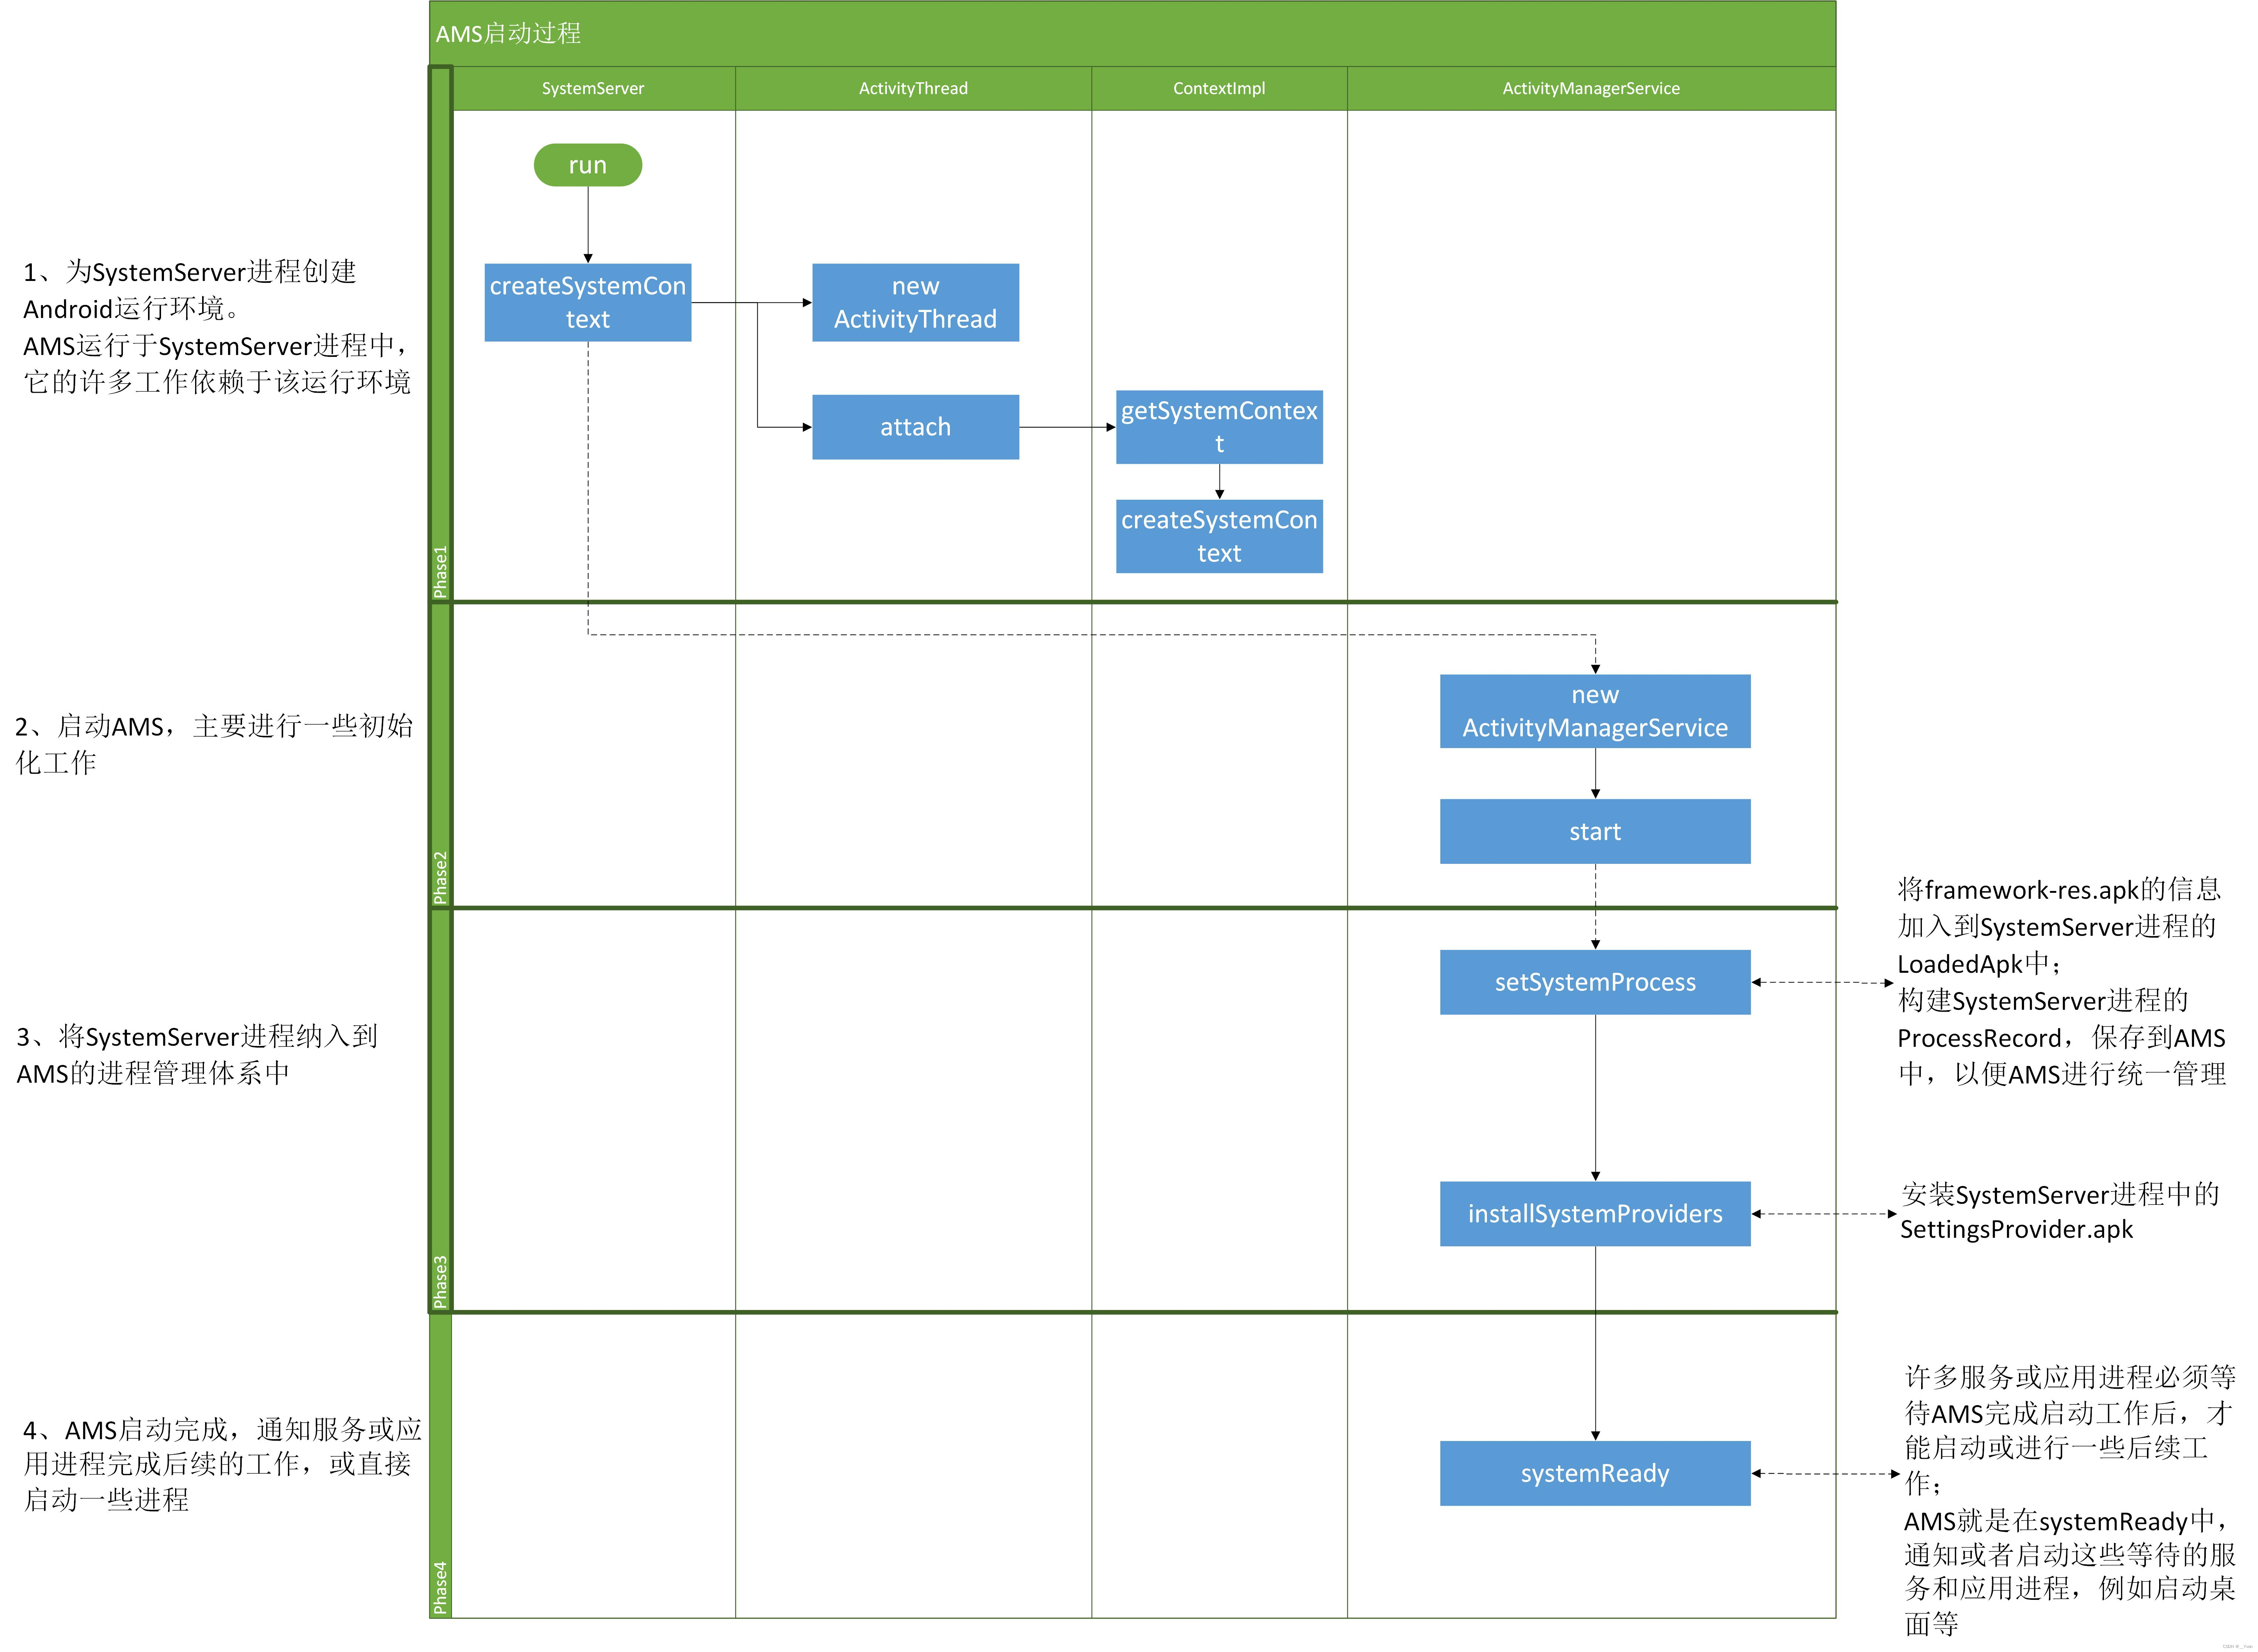
SystemServer将AMS启动并初始化主要两大阶段:
第一阶段:startBootstrapServices()方法中启动引导服务:
- 创建
ActivityTaskManagerService(ATMS)对象,用于管理Activity - 创建
AMS对象,并启动服务 - 将
AMS所在的系统进程SystemServer,纳入到AMS的进程管理体系中
setSystemProcess():将framewok-res.apk信息加入到SystemServer进程的LoadedApk中,构建SystemServe进程的ProcessRecord,保存到AMS中,以便AMS进程统一管理
第二阶段:startOtherServices()方法中启动其他服务:
- 为系统进程安装ContentProvider对象
installSystemProviders():安装SystemServer进程中的SettingsProvider.apk, - 初始化WMS,并关联AMS及ATMS两个服务。
setWindowManager()方法将AMS与WMS关联起来,通过ATMS来管理Activity - AMS启动完成,通知服务或应用完成后续工作,或直接启动新进程。
AMS.systemReady():许多服务或应用进程必须等待AMS完成启动工作后,才能启动或进行一些后续工作,AMS就是在SystemReady()中,通知或启动这些等待的服务和应用进程,例如启动桌面等。
我们看到在第一阶段中,对AMS和ATMS进行创建时都是调用的startService()方法。其中AMS创建调用ActivityManagerService.Lifecycle.startService(),而ATMS创建是mSystemServiceManager.startService()实际上mSystemServiceManager内部也是调用的ActivityManagerService.Lifecycle.startService()对服务进行创建。下面我们通过AMS的Lifecycle来看看AMS的初始化。
2.2 AMS初始化
/frameworks/base/services/core/java/com/android/server/am/ActivityManagerService.java
......
2209      public static final class Lifecycle extends SystemService {
2210          private final ActivityManagerService mService;
2211          private static ActivityTaskManagerService sAtm;
2212
2213          public Lifecycle(Context context) {
2214              super(context);
2215              mService = new ActivityManagerService(context, sAtm);
2216          }
2217
2218          public static ActivityManagerService startService(
2219                  SystemServiceManager ssm, ActivityTaskManagerService atm) {
2220              sAtm = atm;
2221              return ssm.startService(ActivityManagerService.Lifecycle.class).getService();
2222          }
2223
2224          @Override
2225          public void onStart() {
2226              mService.start();
2227          }
2228
2229          @Override
2230          public void onBootPhase(int phase) {
2231              mService.mBootPhase = phase;
2232              if (phase == PHASE_SYSTEM_SERVICES_READY) {
2233                  mService.mBatteryStatsService.systemServicesReady();
2234                  mService.mServices.systemServicesReady();
2235              } else if (phase == PHASE_ACTIVITY_MANAGER_READY) {
2236                  mService.startBroadcastObservers();
2237              } else if (phase == PHASE_THIRD_PARTY_APPS_CAN_START) {
2238                  mService.mPackageWatchdog.onPackagesReady();
2239              }
2240          }
2241
2242          @Override
2243          public void onCleanupUser(int userId) {
2244              mService.mBatteryStatsService.onCleanupUser(userId);
2245          }
2246
2247          public ActivityManagerService getService() {
2248              return mService;
2249          }
2250      }
......
ATMS(ActivityTaskManagerService)是Android 10新引入的变化,也是系统服务,用来管理Activity启动和调度,包括其容器(task、stacks、displays等)。这篇主要关于AMS的启动,因此ActivityTaskManagerService这里不赘述。
Android 10将原先AMS中对activity的管理和调度移到了ATMS中,位置放到了frameworks/base/services/core/java/com/android/server/wm/下,因此AMS负责四大组件中另外3个(service, broadcast, contentprovider)的管理和调度。
这里的Lifecycle是AMS的内部类。ActivityManagerService.Lifecycle.startService()最终返回的是mService,即创建的AMS对象,上面我们也知道ATMS最终也是通过这种方式创建。
AMS 创建流程简述:
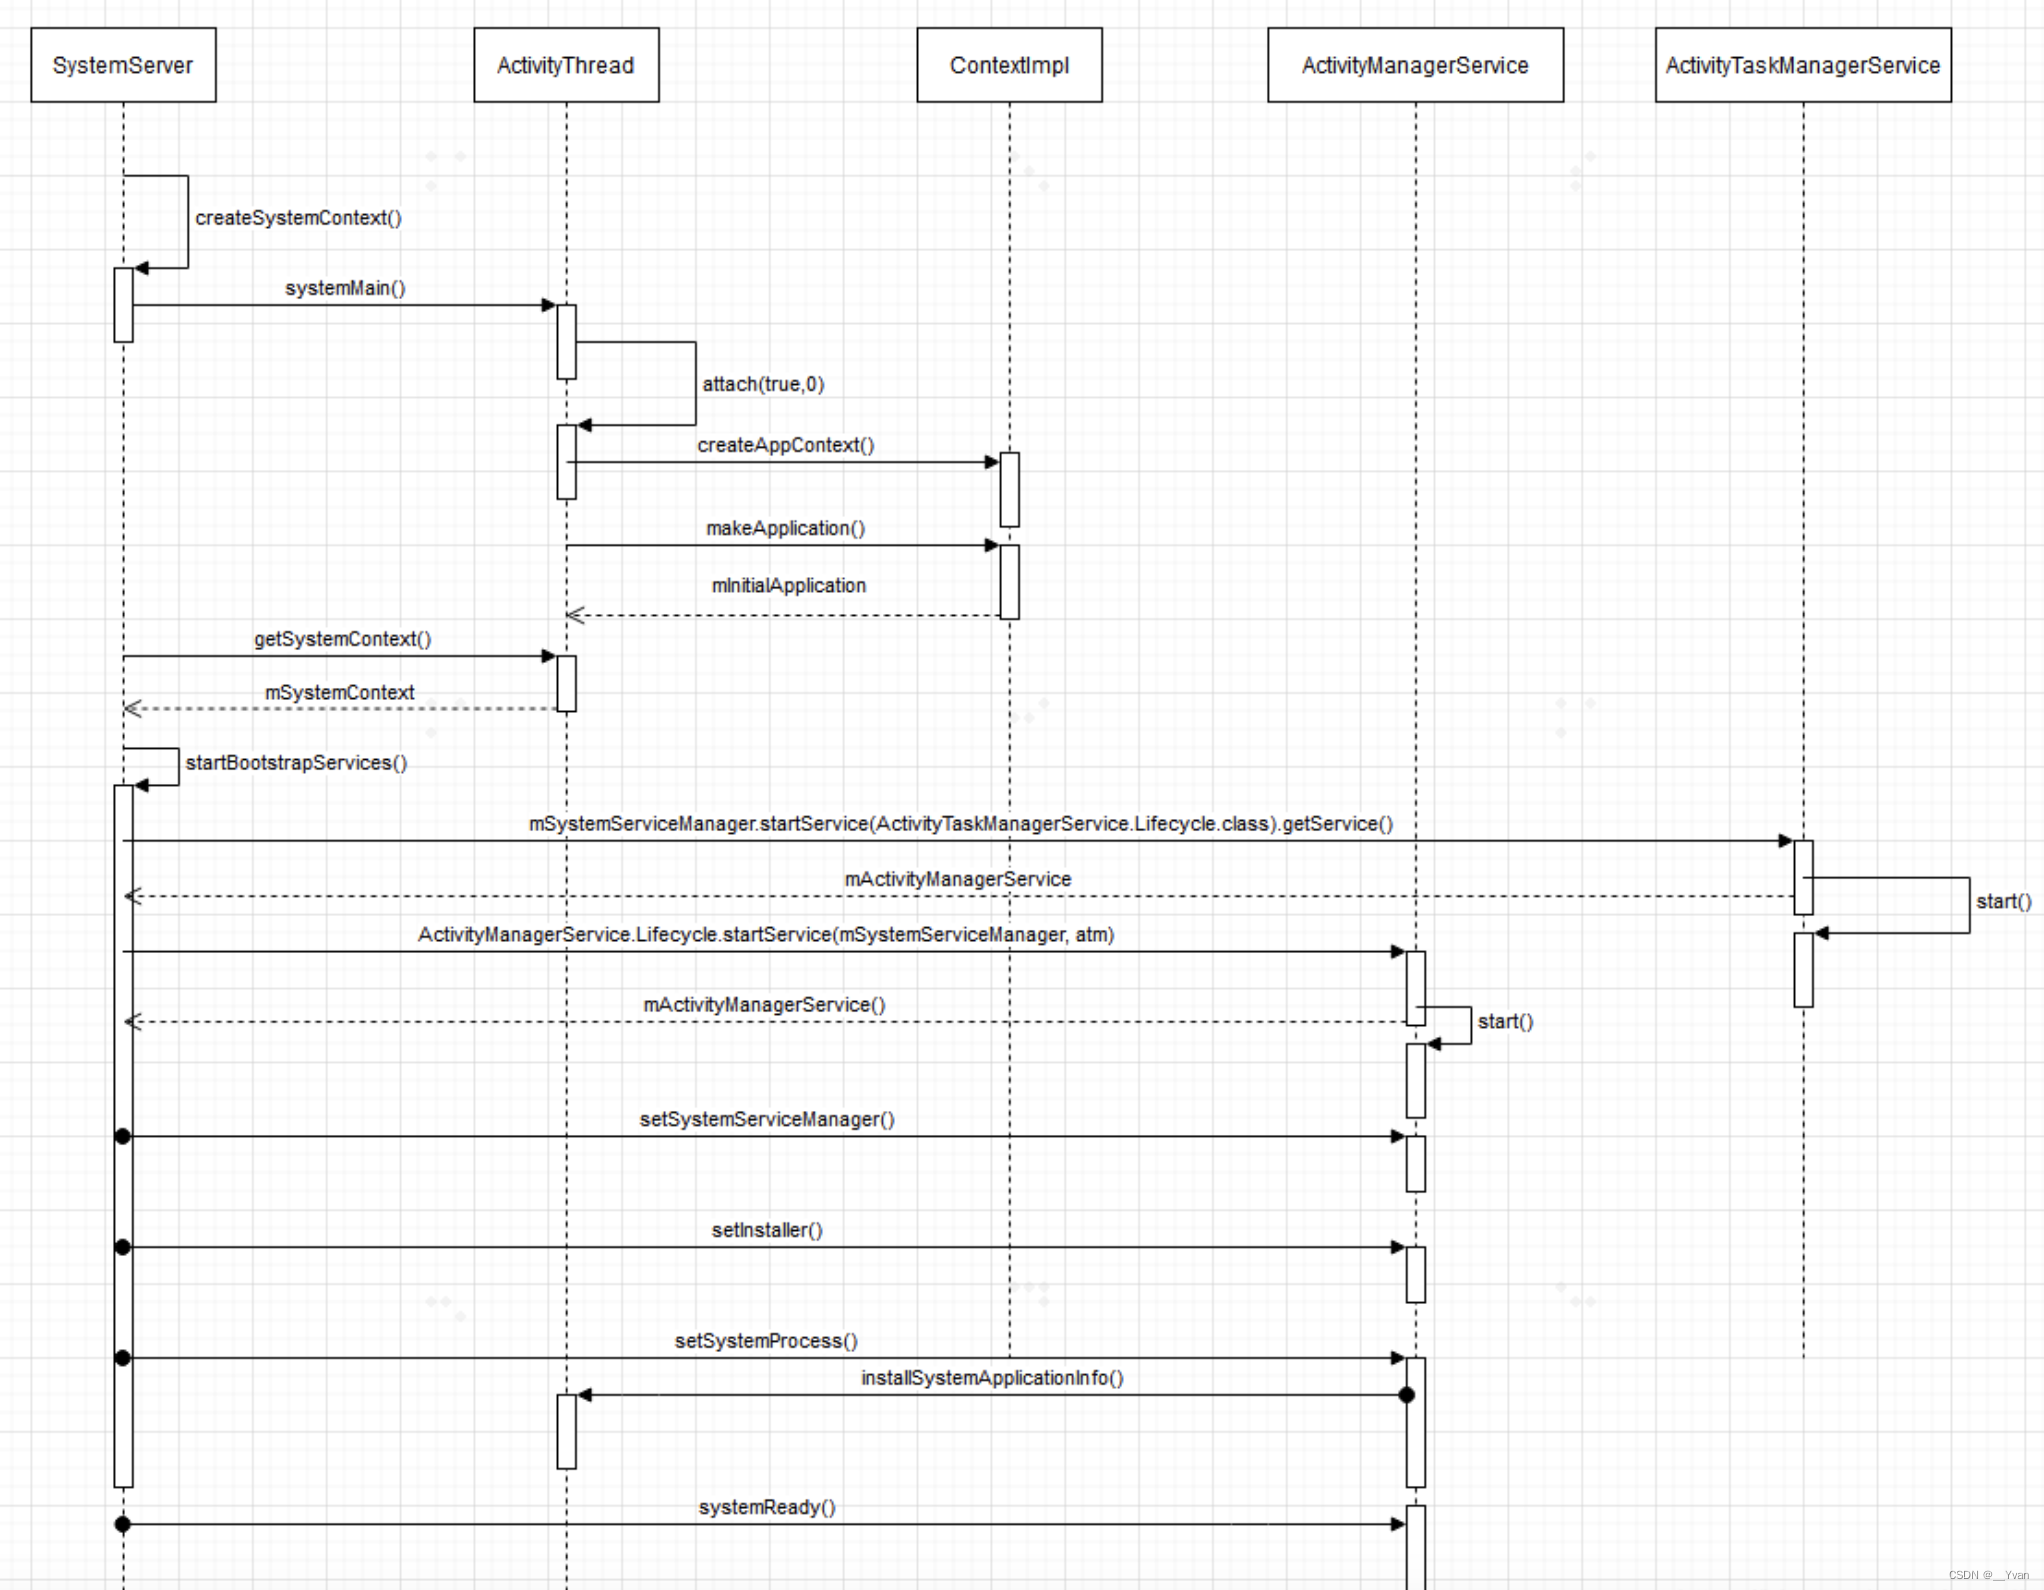
1.SystemServer:依次调用main()、run()、startBootstrapServices(),再调用Lifecyle的startService()方法;
2.Lifecyle:startService()方法中调用SystemServiceManager的startService()方法,并将Lifecyle.class传入;
3.SystemServiceManager:startService()方法通过反射调用Lifecyle的构造方法,生成Lifecyle对象;
4.Lifecyle:构造方法中调用AMS的构造方法创建AMS对象,并通过getService()方法返回AMS对象。
下面我们继续看看AMS的构造函数:
/frameworks/base/services/core/java/com/android/server/am/ActivityManagerService.java
......
2435      public ActivityManagerService(Context systemContext, ActivityTaskManagerService atm) {
2436          LockGuard.installLock(this, LockGuard.INDEX_ACTIVITY);
2437          mInjector = new Injector();
			  // 系统上下文,是在SystemServer进程fork出来后通过createSystemContext()创建的,即与SystemServer进程是一一致
2438          mContext = systemContext;
2439
2440          mFactoryTest = FactoryTest.getMode();
			  // 系统进程的主线程 sCurrentActivityThread,这里是systemMain()中创建的ActivityThread对象。即也与SystemServer一样的。
2441          mSystemThread = ActivityThread.currentActivityThread();
2442          mUiContext = mSystemThread.getSystemUiContext();
2443
2444          Slog.i(TAG, "Memory class: " + ActivityManager.staticGetMemoryClass());
2445
2446          mHandlerThread = new ServiceThread(TAG,
2447                  THREAD_PRIORITY_FOREGROUND, false /*allowIo*/);
2448          mHandlerThread.start();
			  // 处理AMS消息的handler
2449          mHandler = new MainHandler(mHandlerThread.getLooper());
			  // UiHandler对应于Android中的Ui线程
2450          mUiHandler = mInjector.getUiHandler(this);
2451
2452          mProcStartHandlerThread = new ServiceThread(TAG + ":procStart",
2453                  THREAD_PRIORITY_FOREGROUND, false /* allowIo */);
2454          mProcStartHandlerThread.start();
2455          mProcStartHandler = new Handler(mProcStartHandlerThread.getLooper());
2456
2457          mConstants = new ActivityManagerConstants(mContext, this, mHandler);
2458          final ActiveUids activeUids = new ActiveUids(this, true /* postChangesToAtm */);
2459          mProcessList.init(this, activeUids);
2460          mLowMemDetector = new LowMemDetector(this);
2461          mOomAdjuster = new OomAdjuster(this, mProcessList, activeUids);
2462
2463          // Broadcast policy parameters
2464          final BroadcastConstants foreConstants = new BroadcastConstants(
2465                  Settings.Global.BROADCAST_FG_CONSTANTS);
2466          foreConstants.TIMEOUT = BROADCAST_FG_TIMEOUT;
2467
2468          final BroadcastConstants backConstants = new BroadcastConstants(
2469                  Settings.Global.BROADCAST_BG_CONSTANTS);
2470          backConstants.TIMEOUT = BROADCAST_BG_TIMEOUT;
2471
2472          final BroadcastConstants offloadConstants = new BroadcastConstants(
2473                  Settings.Global.BROADCAST_OFFLOAD_CONSTANTS);
2474          offloadConstants.TIMEOUT = BROADCAST_BG_TIMEOUT;
2475          // by default, no "slow" policy in this queue
2476          offloadConstants.SLOW_TIME = Integer.MAX_VALUE;
2477
2478          mEnableOffloadQueue = SystemProperties.getBoolean(
2479                  "persist.device_config.activity_manager_native_boot.offload_queue_enabled", false);
2480
			  //创建几种广播相关对象,前台广播、后台广播、offload。
2481          mFgBroadcastQueue = new BroadcastQueue(this, mHandler,
2482                  "foreground", foreConstants, false);
2483          mBgBroadcastQueue = new BroadcastQueue(this, mHandler,
2484                  "background", backConstants, true);
2485          mOffloadBroadcastQueue = new BroadcastQueue(this, mHandler,
2486                  "offload", offloadConstants, true);
2487          mBroadcastQueues[0] = mFgBroadcastQueue;
2488          mBroadcastQueues[1] = mBgBroadcastQueue;
2489          mBroadcastQueues[2] = mOffloadBroadcastQueue;
2490
			  // 创建ActiveServices对象,管理 ServiceRecord
2491          mServices = new ActiveServices(this);
			  // 创建ProviderMap对象,管理ContentProviderRecord
2492          mProviderMap = new ProviderMap(this);
2493          mPackageWatchdog = PackageWatchdog.getInstance(mUiContext);
2494          mAppErrors = new AppErrors(mUiContext, this, mPackageWatchdog);
2495
2496          final File systemDir = SystemServiceManager.ensureSystemDir();
2497
2498          // TODO: Move creation of battery stats service outside of activity manager service.
2499          mBatteryStatsService = new BatteryStatsService(systemContext, systemDir,
2500                  BackgroundThread.get().getHandler());
2501          mBatteryStatsService.getActiveStatistics().readLocked();
2502          mBatteryStatsService.scheduleWriteToDisk();
2503          mOnBattery = DEBUG_POWER ? true
2504                  : mBatteryStatsService.getActiveStatistics().getIsOnBattery();
2505          mBatteryStatsService.getActiveStatistics().setCallback(this);
2506          mOomAdjProfiler.batteryPowerChanged(mOnBattery);
2507
2508          mProcessStats = new ProcessStatsService(this, new File(systemDir, "procstats"));
2509
2510          mAppOpsService = mInjector.getAppOpsService(new File(systemDir, "appops.xml"), mHandler);
2511
2512          mUgmInternal = LocalServices.getService(UriGrantsManagerInternal.class);
2513
2514          mUserController = new UserController(this);
2515
2516          mPendingIntentController = new PendingIntentController(
2517                  mHandlerThread.getLooper(), mUserController);
2518
2519          if (SystemProperties.getInt("sys.use_fifo_ui", 0) != 0) {
2520              mUseFifoUiScheduling = true;
2521          }
2522
2523          mTrackingAssociations = "1".equals(SystemProperties.get("debug.track-associations"));
2524          mIntentFirewall = new IntentFirewall(new IntentFirewallInterface(), mHandler);
2525
			  //得到ActivityTaskManagerService的对象,调用ATM.initialize
2526          mActivityTaskManager = atm;
2527          mActivityTaskManager.initialize(mIntentFirewall, mPendingIntentController,
2528                  DisplayThread.get().getLooper());
2529          mAtmInternal = LocalServices.getService(ActivityTaskManagerInternal.class);
2530
2531          mProcessCpuThread = new Thread("CpuTracker") {
2532              @Override
2533              public void run() {
2534                  synchronized (mProcessCpuTracker) {
2535                      mProcessCpuInitLatch.countDown();
2536                      mProcessCpuTracker.init();
2537                  }
2538                  while (true) {
2539                      try {
2540                          try {
2541                              synchronized(this) {
2542                                  final long now = SystemClock.uptimeMillis();
2543                                  long nextCpuDelay = (mLastCpuTime.get()+MONITOR_CPU_MAX_TIME)-now;
2544                                  long nextWriteDelay = (mLastWriteTime+BATTERY_STATS_TIME)-now;
2545                                  //Slog.i(TAG, "Cpu delay=" + nextCpuDelay
2546                                  //        + ", write delay=" + nextWriteDelay);
2547                                  if (nextWriteDelay < nextCpuDelay) {
2548                                      nextCpuDelay = nextWriteDelay;
2549                                  }
2550                                  if (nextCpuDelay > 0) {
2551                                      mProcessCpuMutexFree.set(true);
2552                                      this.wait(nextCpuDelay);
2553                                  }
2554                              }
2555                          } catch (InterruptedException e) {
2556                          }
2557                          updateCpuStatsNow();
2558                      } catch (Exception e) {
2559                          Slog.e(TAG, "Unexpected exception collecting process stats", e);
2560                      }
2561                  }
2562              }
2563          };
2564
2565          mHiddenApiBlacklist = new HiddenApiSettings(mHandler, mContext);
2566
2567          Watchdog.getInstance().addMonitor(this);
2568          Watchdog.getInstance().addThread(mHandler);
2569
2570          // bind background threads to little cores
2571          // this is expected to fail inside of framework tests because apps can't touch cpusets directly
2572          // make sure we've already adjusted system_server's internal view of itself first
2573          updateOomAdjLocked(OomAdjuster.OOM_ADJ_REASON_NONE);
2574          try {
2575              Process.setThreadGroupAndCpuset(BackgroundThread.get().getThreadId(),
2576                      Process.THREAD_GROUP_SYSTEM);
2577              Process.setThreadGroupAndCpuset(
2578                      mOomAdjuster.mAppCompact.mCompactionThread.getThreadId(),
2579                      Process.THREAD_GROUP_SYSTEM);
2580          } catch (Exception e) {
2581              Slog.w(TAG, "Setting background thread cpuset failed");
2582          }
2583
2584      }
AMS的构造方法主要是在做一些初始化的先关操作:
- 保存了自己的运行环境的
Context和ActivityThread AMS负责调度四大组件,初始化broadcast,service和contentProvider相关的变量,负责三大大组件的(service、broadcast、provider)管理和调度(activity移到了ActivityTaskManagerService中,但此处也绑定了ActivityTaskManagerService对象),- 接着初始化了
电量统计服务,监控内存、电池、权限(可以了解下appops.xml)以及性能相关的对象或变量。mLowMemDetector、mBatteryStatsService、mProcessStats、mAppOpsService、mProcessCpuThread等。创建了系统的第一个用户,初始化了基本的配置信息 - 创建了Activity调度的核心类,因为Activity调度比较复杂,Activity相关的信息初始化会在
ActivityStackSupervisor中
下面我们继续看一下ActivityManagerService的start()方法:
2.2.1 ActivityManagerService的start()
/frameworks/base/services/core/java/com/android/server/am/ActivityManagerService.java
2594      private void start() {
			  // 移除所有的进程组
2595          removeAllProcessGroups();
			  // 启动CPU进程
2596          mProcessCpuThread.start();
2597
			  // 启动电池状态服务
2598          mBatteryStatsService.publish();
2599          mAppOpsService.publish(mContext);
2600          Slog.d("AppOps", "AppOpsService published");
2601          LocalServices.addService(ActivityManagerInternal.class, new LocalService());
			  // 创建本地服务并注册,将创建的本地服务放入本地服务集合完成注册
2602          mActivityTaskManager.onActivityManagerInternalAdded();
2603          mUgmInternal.onActivityManagerInternalAdded();
2604          mPendingIntentController.onActivityManagerInternalAdded();
2605          // Wait for the synchronized block started in mProcessCpuThread,
2606          // so that any other access to mProcessCpuTracker from main thread
2607          // will be blocked during mProcessCpuTracker initialization.
2608          try {
				  // 等待mProcessCpuThread完成初始化后,释放锁
2609              mProcessCpuInitLatch.await();
2610          } catch (InterruptedException e) {
2611              Slog.wtf(TAG, "Interrupted wait during start", e);
2612              Thread.currentThread().interrupt();
2613              throw new IllegalStateException("Interrupted wait during start");
2614          }
2615      }
AMS的start()方法很简单,只是启动了几个服务,并把AMS服务自己保存到localService中供程序内部调用;
AMS的构造方法和start()方法中做了AMS服务一些变量的初始化和相关服务的初始化。
接着看下一个重要的方法setSystemProcess:
2.2.2 ActivityManagerService的setSystemProcess()方法
/frameworks/base/services/core/java/com/android/server/am/ActivityManagerService.java
2040      public void setSystemProcess() {
2041          try {
				  // 将AMS注册到ServiceManager中
2042              ServiceManager.addService(Context.ACTIVITY_SERVICE, this, /* allowIsolated= */ true,
2043                      DUMP_FLAG_PRIORITY_CRITICAL | DUMP_FLAG_PRIORITY_NORMAL | DUMP_FLAG_PROTO);
				  // 注册进程状态服务
2044              ServiceManager.addService(ProcessStats.SERVICE_NAME, mProcessStats);
				  // 注册内存Binder
2045              ServiceManager.addService("meminfo", new MemBinder(this), /* allowIsolated= */ false,
2046                      DUMP_FLAG_PRIORITY_HIGH);
				  // 注册图像信息Binder
2047              ServiceManager.addService("gfxinfo", new GraphicsBinder(this));
				  // 注册数据库Binder
2048              ServiceManager.addService("dbinfo", new DbBinder(this));
2049              if (MONITOR_CPU_USAGE) {
					  // 注册监控CPU使用状态Binder
2050                  ServiceManager.addService("cpuinfo", new CpuBinder(this),
2051                          /* allowIsolated= */ false, DUMP_FLAG_PRIORITY_CRITICAL);
2052              }
				  // 注册权限控制Binder
2053              ServiceManager.addService("permission", new PermissionController(this));
				  // 注册进程服务Binder
2054              ServiceManager.addService("processinfo", new ProcessInfoService(this));
2055
				  // 查询并处理ApplicationInfo
2056              ApplicationInfo info = mContext.getPackageManager().getApplicationInfo(
2057                      "android", STOCK_PM_FLAGS | MATCH_SYSTEM_ONLY);
				  // 将Application信息配置到ActivityThread中
2058              mSystemThread.installSystemApplicationInfo(info, getClass().getClassLoader());
2059
2060              synchronized (this) {
					  // 创建并处理ProcessRecord
2061                  ProcessRecord app = mProcessList.newProcessRecordLocked(info, info.processName,
2062                          false,
2063                          0,
2064                          new HostingRecord("system"));
2065                  app.setPersistent(true);
2066                  app.pid = MY_PID;
2067                  app.getWindowProcessController().setPid(MY_PID);
2068                  app.maxAdj = ProcessList.SYSTEM_ADJ;
2069                  app.makeActive(mSystemThread.getApplicationThread(), mProcessStats);
2070                  mPidsSelfLocked.put(app);
2071                  mProcessList.updateLruProcessLocked(app, false, null);
2072                  updateOomAdjLocked(OomAdjuster.OOM_ADJ_REASON_NONE);
2073              }
2074          } catch (PackageManager.NameNotFoundException e) {
2075              throw new RuntimeException(
2076                      "Unable to find android system package", e);
2077          }
2078
2079          // Start watching app ops after we and the package manager are up and running.
2080          mAppOpsService.startWatchingMode(AppOpsManager.OP_RUN_IN_BACKGROUND, null,
2081                  new IAppOpsCallback.Stub() {
2082                      @Override public void opChanged(int op, int uid, String packageName) {
2083                          if (op == AppOpsManager.OP_RUN_IN_BACKGROUND && packageName != null) {
2084                              if (mAppOpsService.checkOperation(op, uid, packageName)
2085                                      != AppOpsManager.MODE_ALLOWED) {
2086                                  runInBackgroundDisabled(uid);
2087                              }
2088                          }
2089                      }
2090                  });
2091      }
setSystemProcess()方法中,首先将自己AMS服务注册到了ServiceManager中,然后又注册了权限服务等其他的系统服务;- 通过先前创建的Context,得到
PMS服务,检索framework-res的Application信息,然后将它配置到系统的ActivityThread中; - 为了能让
AMS同样可以管理调度系统进程,也创建了一个关于系统进程的ProcessRecord对象,ProcessRecord对象保存一个进程的相关信息; - 然后将它保存到
mPidsSelfLocked集合中方便管理; AMS具体是如何将检索到的framework-res的application信息,配置到ActivityThread中的,需要继续分析ActivityThread的installSystemApplicationInfo(ApplicationInfo info, ClassLoader classLoader))方法;
我们继续往下看ActivityThread类中的installSystemApplicationInfo()方法:
2.2.3 ActivityThread的installSystemApplicationInfo
/frameworks/base/core/java/android/app/ActivityThread.java
2417      public void installSystemApplicationInfo(ApplicationInfo info, ClassLoader classLoader) {
2418          synchronized (this) {
2419              getSystemContext().installSystemApplicationInfo(info, classLoader);
2420              getSystemUiContext().installSystemApplicationInfo(info, classLoader);
2421
2422              // give ourselves a default profiler
2423              mProfiler = new Profiler();
2424          }
2425      }
这个方法中最终调用上面创建的SystemContext和SystemUiContext的installSystemApplicationInfo()方法。
那就接着看ConxtextImpl的installSystemApplicationInfo()方法:
/frameworks/base/core/java/android/app/ContextImpl.java
......
2427      /**
2428       * System Context to be used for UI. This Context has resources that can be themed.
2429       * Make sure that the created system UI context shares the same LoadedApk as the system context.
2430       * @param systemContext The system context which created by
2431       *                      {@link #createSystemContext(ActivityThread)}.
2432       * @param displayId The ID of the display where the UI is shown.
2433       */
2434      static ContextImpl createSystemUiContext(ContextImpl systemContext, int displayId) {
2435          final LoadedApk packageInfo = systemContext.mPackageInfo;
2436          ContextImpl context = new ContextImpl(null, systemContext.mMainThread, packageInfo, null,
2437                  null, null, 0, null, null);
2438          context.setResources(createResources(null, packageInfo, null, displayId, null,
2439                  packageInfo.getCompatibilityInfo()));
2440          context.updateDisplay(displayId);
2441          return context;
2442      }
2443
2444      /**
2445       * The overloaded method of {@link #createSystemUiContext(ContextImpl, int)}.
2446       * Uses {@Code Display.DEFAULT_DISPLAY} as the target display.
2447       */
2448      static ContextImpl createSystemUiContext(ContextImpl systemContext) {
2449          return createSystemUiContext(systemContext, Display.DEFAULT_DISPLAY);
2450      }
......
2581      void installSystemApplicationInfo(ApplicationInfo info, ClassLoader classLoader) {
2582          mPackageInfo.installSystemApplicationInfo(info, classLoader);
2583      }
......
它有最终调用了mPackageInfo的installSystemApplication()方法:
/frameworks/base/core/java/android/app/LoadedApk.java
240      /**
241       * Sets application info about the system package.
242       */
243      void installSystemApplicationInfo(ApplicationInfo info, ClassLoader classLoader) {
244          assert info.packageName.equals("android");
245          mApplicationInfo = info;
246          mDefaultClassLoader = classLoader;
247          mAppComponentFactory = createAppFactory(info, mDefaultClassLoader);
248          mClassLoader = mAppComponentFactory.instantiateClassLoader(mDefaultClassLoader,
249                  new ApplicationInfo(mApplicationInfo));
250      }
mPackageInfo就是在创建Context对象的时候传进来的LoadedApk,里面保存了一个应用程序的基本信息;
setSystemProcess()主要就是设置系统集成的一些信息,在这里设置了系统进程的Application信息,创建了系统进程的ProcessRecord对象将其保存在进程集合中,方便AMS管理调度;
到这里,我们第一阶段startBootstrapServices()方法中启动引导服务里对AMS做了初始化已经结束,下面我继续看第二阶段startOtherServices()方法中启动其他服务中对AMS的初始化。
我们从上面可以看到startOtherServices()方法中调用了AMS的installSystemProviders()方法,我们来卡一下这个方法做了什么:
2.2.4 ActivityManagerService的installSystemProviders
ActivityManagerService的installSystemProviders()方法;
Android系统中有很多配置信息都需要保存,这些信息是保存在SettingsProvider中,而这个SettingsProvider也是运行在SystemServer进程中的,由于SystemServer进程依赖SettingsProvider,放在一个进程中可以减少进程间通信的效率损失;
下面就来分析下如何将SettingsProvider.apk也加载到SystemServer进程中;
/frameworks/base/services/core/java/com/android/server/am/ActivityManagerService.java
7543      public final void installSystemProviders() {
7544          List<ProviderInfo> providers;
7545          synchronized (this) {
				  // 找到名为"system"的进程,就是setSystemProcess中创建的ProcessRecord对象
7546              ProcessRecord app = mProcessList.mProcessNames.get("system", SYSTEM_UID);
7547              providers = generateApplicationProvidersLocked(app);
7548              if (providers != null) {
7549                  for (int i=providers.size()-1; i>=0; i--) {
7550                      ProviderInfo pi = (ProviderInfo)providers.get(i);
7551                      if ((pi.applicationInfo.flags&ApplicationInfo.FLAG_SYSTEM) == 0) {
7552                          Slog.w(TAG, "Not installing system proc provider " + pi.name
7553                                  + ": not system .apk");
							  // 移除非系统provider
7554                          providers.remove(i);
7555                      }
7556                  }
7557              }
7558          }
7559          if (providers != null) {
				  // 安装所有的系统provider
7560              mSystemThread.installSystemProviders(providers);
7561          }
7562
7563          synchronized (this) {
7564              mSystemProvidersInstalled = true;
7565          }
7566          mConstants.start(mContext.getContentResolver());
			  // 创建核心Settings Observer,用于监听Settings的改变
7567          mCoreSettingsObserver = new CoreSettingsObserver(this);
7568          mActivityTaskManager.installSystemProviders();
			  // 开发者权限
7569          mDevelopmentSettingsObserver = new DevelopmentSettingsObserver();
7570          SettingsToPropertiesMapper.start(mContext.getContentResolver());
7571          mOomAdjuster.initSettings();
7572
7573          // Now that the settings provider is published we can consider sending
7574          // in a rescue party.
7575          RescueParty.onSettingsProviderPublished(mContext);
7576
7577          //mUsageStatsService.monitorPackages();
7578      }
找到名称为system的进程对象,就是SystemServer进程,然后根据进程对象去查询所有有关的ContentProvider,调用系统进程的主线程ActivityThread安装所有相关的ContentProvider,具体是如何查找相关的ContentProvider和如何安装ContentProvider到系统主线程。
generateApplicationProvidersLocked()函数:返回一个ProviderInfo List。
installSystemProviders()函数:ActivityThread可以看做是进程的Android运行环境,那么该方法表示为该进程安装ContentProvider。
接着分析下面两个方法;
2.2.5 ActivityManagerService的generateApplicationProvidersLocked()
首先来看generateApplicationProvidersLocked()方法:
/frameworks/base/services/core/java/com/android/server/am/ActivityManagerService.java
......
6409      private final List<ProviderInfo> generateApplicationProvidersLocked(ProcessRecord app) {
6410          List<ProviderInfo> providers = null;
6411          try {
				  // 向PMS查询满足要求的ProviderInfo,最重要的查询条件包括:进程名和进程uid
6412              providers = AppGlobals.getPackageManager()
6413                      .queryContentProviders(app.processName, app.uid,
6414                              STOCK_PM_FLAGS | PackageManager.GET_URI_PERMISSION_PATTERNS
6415                                      | MATCH_DEBUG_TRIAGED_MISSING, /*metadastaKey=*/ null)
6416                      .getList();
6417          } catch (RemoteException ex) {
6418          }
6419          if (DEBUG_MU) Slog.v(TAG_MU,
6420                  "generateApplicationProvidersLocked, app.info.uid = " + app.uid);
6421          int userId = app.userId;
6422          if (providers != null) {
6423              int N = providers.size();
6424              app.pubProviders.ensureCapacity(N + app.pubProviders.size());
6425              for (int i=0; i<N; i++) {
......
					  // AMS对ContentProvider的管理
6427                  ProviderInfo cpi =
6428                      (ProviderInfo)providers.get(i);
6429                  boolean singleton = isSingleton(cpi.processName, cpi.applicationInfo,
6430                          cpi.name, cpi.flags);
6431                  if (singleton && UserHandle.getUserId(app.uid) != UserHandle.USER_SYSTEM) {
6432                      // This is a singleton provider, but a user besides the
6433                      // default user is asking to initialize a process it runs
6434                      // in...  well, no, it doesn't actually run in this process,
6435                      // it runs in the process of the default user.  Get rid of it.
6436                      providers.remove(i);
6437                      N--;
6438                      i--;
6439                      continue;
6440                  }
6441
6442                  ComponentName comp = new ComponentName(cpi.packageName, cpi.name);
6443                  ContentProviderRecord cpr = mProviderMap.getProviderByClass(comp, userId);
6444                  if (cpr == null) {
						  // ContentProvider在AMS中用ContentProviderRecord来表示
6445                      cpr = new ContentProviderRecord(this, cpi, app.info, comp, singleton);
						  // 保存到AMS的mProvidersByClass中
6446                      mProviderMap.putProviderByClass(comp, cpr);
6447                  }
6448                  if (DEBUG_MU) Slog.v(TAG_MU,
6449                          "generateApplicationProvidersLocked, cpi.uid = " + cpr.uid);
					  // 将信息也保存到ProcessRecord中
6450                  app.pubProviders.put(cpi.name, cpr);
6451                  if (!cpi.multiprocess || !"android".equals(cpi.packageName)) {
......
						  // 保存PackageName到ProcessRecord中
6456                      app.addPackage(cpi.applicationInfo.packageName,
6457                              cpi.applicationInfo.longVersionCode, mProcessStats);
6458                  }
6459                  notifyPackageUse(cpi.applicationInfo.packageName,
6460                                   PackageManager.NOTIFY_PACKAGE_USE_CONTENT_PROVIDER);
6461              }
6462          }
6463          return providers;
6464      }
- 这个方法就是从
PMS中查询和SystemServer进程相关的Provider,也就是SettingsProvder,然后将它保存到AMS的ContentProvider列表中; - 同时也将它保存到系统进程对象
ProcessRecord的变量pubProviders列表中,保存到AMS的provider列表中是因为AMS需要管理所有的ContentProvder; - 保存到进程对象的
pubProviders列表中是因为,每个ContentProvider都需要对应到一个进程中去;
2.2.6 ActivityThread的installSystemProviders()
接着看如何将SettingsProvider安装到系统的主进程中去:
/frameworks/base/core/java/android/app/ActivityThread.java
......
6515      private void installContentProviders(
6516              Context context, List<ProviderInfo> providers) {
6517          final ArrayList<ContentProviderHolder> results = new ArrayList<>();
6518
6519          for (ProviderInfo cpi : providers) {
6520              if (DEBUG_PROVIDER) {
6521                  StringBuilder buf = new StringBuilder(128);
6522                  buf.append("Pub ");
6523                  buf.append(cpi.authority);
6524                  buf.append(": ");
6525                  buf.append(cpi.name);
6526                  Log.i(TAG, buf.toString());
6527              }
				  // 调用installProvider函数,得到一个ContentProviderHolder对象
6528              ContentProviderHolder cph = installProvider(context, null, cpi,
6529                      false /*noisy*/, true /*noReleaseNeeded*/, true /*stable*/);
6530              if (cph != null) {
6531                  cph.noReleaseNeeded = true;
					  // 将返回的cph保存到results数组中
6532                  results.add(cph);
6533              }
6534          }
6535
6536          try {
				  // 调用AMS的publishContentProviders注册这些ContentProvider
6537              ActivityManager.getService().publishContentProviders(
6538                  getApplicationThread(), results);
6539          } catch (RemoteException ex) {
6540              throw ex.rethrowFromSystemServer();
6541          }
6542      }
......
7167      public final void installSystemProviders(List<ProviderInfo> providers) {
7168          if (providers != null) {
7169              installContentProviders(mInitialApplication, providers);
7170          }
7171      }
- 该方法将得到的
ContentProvder对象封装成了contentProviderHolder对象,其实就是Binder对象,这样就可以进程间传输了,然后跨进程调用AMS服务注册Provider; AMS负责管理ContentProvider,只有将ContentProvider注册到AMS服务其他进程才能访问;
接着看AMS如何注册Provider:
2.2.7 ActivityManagerService的publishContentProviders()注册Provider
/frameworks/base/services/core/java/com/android/server/am/ActivityManagerService.java
7342
7343      public final void publishContentProviders(IApplicationThread caller,
7344              List<ContentProviderHolder> providers) {
7345          if (providers == null) {
7346              return;
7347          }
7348
7349          enforceNotIsolatedCaller("publishContentProviders");
7350          synchronized (this) {
7351              final ProcessRecord r = getRecordForAppLocked(caller);
7352              if (DEBUG_MU) Slog.v(TAG_MU, "ProcessRecord uid = " + r.uid);
7353              if (r == null) {
7354                  throw new SecurityException(
7355                          "Unable to find app for caller " + caller
7356                        + " (pid=" + Binder.getCallingPid()
7357                        + ") when publishing content providers");
7358              }
7359
7360              final long origId = Binder.clearCallingIdentity();
7361
7362              final int N = providers.size();
7363              for (int i = 0; i < N; i++) {
7364                  ContentProviderHolder src = providers.get(i);
7365                  if (src == null || src.info == null || src.provider == null) {
7366                      continue;
7367                  }
7368                  ContentProviderRecord dst = r.pubProviders.get(src.info.name);
7369                  if (DEBUG_MU) Slog.v(TAG_MU, "ContentProviderRecord uid = " + dst.uid);
7370                  if (dst != null) {
7371                      ComponentName comp = new ComponentName(dst.info.packageName, dst.info.name);
7372                      mProviderMap.putProviderByClass(comp, dst);
7373                      String names[] = dst.info.authority.split(";");
7374                      for (int j = 0; j < names.length; j++) {
7375                          mProviderMap.putProviderByName(names[j], dst);
7376                      }
7377
7378                      int launchingCount = mLaunchingProviders.size();
7379                      int j;
7380                      boolean wasInLaunchingProviders = false;
7381                      for (j = 0; j < launchingCount; j++) {
7382                          if (mLaunchingProviders.get(j) == dst) {
7383                              mLaunchingProviders.remove(j);
7384                              wasInLaunchingProviders = true;
7385                              j--;
7386                              launchingCount--;
7387                          }
7388                      }
7389                      if (wasInLaunchingProviders) {
7390                          mHandler.removeMessages(CONTENT_PROVIDER_PUBLISH_TIMEOUT_MSG, r);
7391                      }
7392                      // Make sure the package is associated with the process.
7393                      // XXX We shouldn't need to do this, since we have added the package
7394                      // when we generated the providers in generateApplicationProvidersLocked().
7395                      // But for some reason in some cases we get here with the package no longer
7396                      // added...  for now just patch it in to make things happy.
7397                      r.addPackage(dst.info.applicationInfo.packageName,
7398                              dst.info.applicationInfo.longVersionCode, mProcessStats);
7399                      synchronized (dst) {
7400                          dst.provider = src.provider;
7401                          dst.setProcess(r);
7402                          dst.notifyAll();
7403                      }
7404                      updateOomAdjLocked(r, true, OomAdjuster.OOM_ADJ_REASON_GET_PROVIDER);
7405                      maybeUpdateProviderUsageStatsLocked(r, src.info.packageName,
7406                              src.info.authority);
7407                  }
7408              }
7409
7410              Binder.restoreCallingIdentity(origId);
7411          }
7412      }
AMS的注册服务就是根据参数传过来的provider信息,找到原先进程中pubProviders列表中保存的ContentProviderRecord,然后将它分别以类为key保存在mProviderMap中,和以authority为key保存在mProviderMap中- 即
AMS提供了多种方案来查找一个ContentProvider,一种是通过authority来查找,一种是指明CompomentName来查找 - 此刻位置一个
SettingsProvider就正式注册到SystemServer进程中了,所以可以看出installSystemProvider方法的主要工作就是按照普通进程类似的方式,将SettingsProvider注册到系统进程中,方便系统进程对settings的配置数据进行调用
我们继续看第二阶段startOtherServices()方法往下走,有一个非常关键的方法systemReady()
2.2.8 ActivityManagerService的systemReady
/frameworks/base/services/core/java/com/android/server/am/ActivityManagerService.java
8967
8968      public void systemReady(final Runnable goingCallback, TimingsTraceLog traceLog) {
8969          traceLog.traceBegin("PhaseActivityManagerReady");
8970          synchronized(this) {
				  // 第一次进入mSystemReady为false
8971              if (mSystemReady) {
8972                  // If we're done calling all the receivers, run the next "boot phase" passed in
8973                  // by the SystemServer
8974                  if (goingCallback != null) {
8975                      goingCallback.run();
8976                  }
8977                  return;
8978              }
8979
				  // 关键服务等待systemReady,继续完成一些初始化或进一步的工作
8980              mLocalDeviceIdleController
8981                      = LocalServices.getService(DeviceIdleController.LocalService.class);
				  // 调用各种服务的Ready方法
8982              mActivityTaskManager.onSystemReady();
8983              // Make sure we have the current profile info, since it is needed for security checks.
8984              mUserController.onSystemReady();
8985              mAppOpsService.systemReady();
8986              mSystemReady = true;
8987          }
8988
8989          try {
				  //获取设备识别字符串
8990              sTheRealBuildSerial = IDeviceIdentifiersPolicyService.Stub.asInterface(
8991                      ServiceManager.getService(Context.DEVICE_IDENTIFIERS_SERVICE))
8992                      .getSerial();
8993          } catch (RemoteException e) {}
8994
			  // 收集目前已经存在的进程(mPidsSelfLocked中保留了当前正在运行的所有进程信息)
8995          ArrayList<ProcessRecord> procsToKill = null;
8996          synchronized(mPidsSelfLocked) {
8997              for (int i=mPidsSelfLocked.size()-1; i>=0; i--) {
8998                  ProcessRecord proc = mPidsSelfLocked.valueAt(i);
					  // 已启动的进程,若进程没有FLAG_PERSISTENT标志,则会被加入到procsToKill中
8999                  if (!isAllowedWhileBooting(proc.info)){
9000                      if (procsToKill == null) {
9001                          procsToKill = new ArrayList<ProcessRecord>();
9002                      }
9003                      procsToKill.add(proc);
9004                  }
9005              }
9006          }
9007
			  // 销毁在AMS启动之前存在的进程(关闭procsToKill中的所有进程)
9008          synchronized(this) {
9009              if (procsToKill != null) {
9010                  for (int i=procsToKill.size()-1; i>=0; i--) {
9011                      ProcessRecord proc = procsToKill.get(i);
9012                      Slog.i(TAG, "Removing system update proc: " + proc);
9013                      mProcessList.removeProcessLocked(proc, true, false, "system update done");
9014                  }
9015              }
9016
9017              // Now that we have cleaned up any update processes, we
9018              // are ready to start launching real processes and know that
9019              // we won't trample on them any more.
				  // 到这里系统准备完毕
9020              mProcessesReady = true;
9021          }
9022
9023          Slog.i(TAG, "System now ready");
9024          EventLog.writeEvent(EventLogTags.BOOT_PROGRESS_AMS_READY, SystemClock.uptimeMillis());
9025
9026          mAtmInternal.updateTopComponentForFactoryTest();
9027          mAtmInternal.getLaunchObserverRegistry().registerLaunchObserver(mActivityLaunchObserver);
9028
9029          watchDeviceProvisioning(mContext);
9030
			  // 初始化Settings变量
9031          retrieveSettings();
9032          mUgmInternal.onSystemReady();
9033
9034          final PowerManagerInternal pmi = LocalServices.getService(PowerManagerInternal.class);
9035          if (pmi != null) {
9036              pmi.registerLowPowerModeObserver(ServiceType.FORCE_BACKGROUND_CHECK,
9037                      state -> updateForceBackgroundCheck(state.batterySaverEnabled));
9038              updateForceBackgroundCheck(
9039                      pmi.getLowPowerState(ServiceType.FORCE_BACKGROUND_CHECK).batterySaverEnabled);
9040          } else {
9041              Slog.wtf(TAG, "PowerManagerInternal not found.");
9042          }
9043
			  // 运行goingCallback,SystemServer调用时传入的
9044          if (goingCallback != null) goingCallback.run();
9045          // Check the current user here as a user can be started inside goingCallback.run() from
9046          // other system services.
9047          final int currentUserId = mUserController.getCurrentUserId();
9048          Slog.i(TAG, "Current user:" + currentUserId);
			  // 获取UserId
9049          if (currentUserId != UserHandle.USER_SYSTEM && !mUserController.isSystemUserStarted()) {
9050              // User other than system user has started. Make sure that system user is already
9051              // started before switching user.
9052              throw new RuntimeException("System user not started while current user is:"
9053                      + currentUserId);
9054          }
9055          traceLog.traceBegin("ActivityManagerStartApps");
			  // 给BatteryStatsService发送状态
9056          mBatteryStatsService.noteEvent(BatteryStats.HistoryItem.EVENT_USER_RUNNING_START,
9057                  Integer.toString(currentUserId), currentUserId);
9058          mBatteryStatsService.noteEvent(BatteryStats.HistoryItem.EVENT_USER_FOREGROUND_START,
9059                  Integer.toString(currentUserId), currentUserId);
			  // SystemServiceManager设置UserId
9060          mSystemServiceManager.startUser(currentUserId);
9061
9062          synchronized (this) {
9063              // Only start up encryption-aware persistent apps; once user is
9064              // unlocked we'll come back around and start unaware apps
9065              startPersistentApps(PackageManager.MATCH_DIRECT_BOOT_AWARE);
9066
9067              // Start up initial activity.
9068              mBooting = true;
9069              // Enable home activity for system user, so that the system can always boot. We don't
9070              // do this when the system user is not setup since the setup wizard should be the one
9071              // to handle home activity in this case.
9072              if (UserManager.isSplitSystemUser() &&
9073                      Settings.Secure.getInt(mContext.getContentResolver(),
9074                           Settings.Secure.USER_SETUP_COMPLETE, 0) != 0) {
9075                  ComponentName cName = new ComponentName(mContext, SystemUserHomeActivity.class);
9076                  try {
9077                      AppGlobals.getPackageManager().setComponentEnabledSetting(cName,
9078                              PackageManager.COMPONENT_ENABLED_STATE_ENABLED, 0,
9079                              UserHandle.USER_SYSTEM);
9080                  } catch (RemoteException e) {
9081                      throw e.rethrowAsRuntimeException();
9082                  }
9083              }
				  // 调用ActivityTaskManagerService的startHomeOnAllDisplays方法(就是启动Launcher的Activity)
9084              mAtmInternal.startHomeOnAllDisplays(currentUserId, "systemReady");
9085
9086              mAtmInternal.showSystemReadyErrorDialogsIfNeeded();
9087
9088              final int callingUid = Binder.getCallingUid();
9089              final int callingPid = Binder.getCallingPid();
9090              long ident = Binder.clearCallingIdentity();
9091              try {
					  // 发送一些广播ACTION_USER_STARTED 和 ACTION_USER_STARTING
9092                  Intent intent = new Intent(Intent.ACTION_USER_STARTED);
9093                  intent.addFlags(Intent.FLAG_RECEIVER_REGISTERED_ONLY
9094                          | Intent.FLAG_RECEIVER_FOREGROUND);
9095                  intent.putExtra(Intent.EXTRA_USER_HANDLE, currentUserId);
9096                  broadcastIntentLocked(null, null, intent,
9097                          null, null, 0, null, null, null, OP_NONE,
9098                          null, false, false, MY_PID, SYSTEM_UID, callingUid, callingPid,
9099                          currentUserId);
9100                  intent = new Intent(Intent.ACTION_USER_STARTING);
9101                  intent.addFlags(Intent.FLAG_RECEIVER_REGISTERED_ONLY);
9102                  intent.putExtra(Intent.EXTRA_USER_HANDLE, currentUserId);
9103                  broadcastIntentLocked(null, null, intent,
9104                          null, new IIntentReceiver.Stub() {
9105                              @Override
9106                              public void performReceive(Intent intent, int resultCode, String data,
9107                                      Bundle extras, boolean ordered, boolean sticky, int sendingUser)
9108                                      throws RemoteException {
9109                              }
9110                          }, 0, null, null,
9111                          new String[] {INTERACT_ACROSS_USERS}, OP_NONE,
9112                          null, true, false, MY_PID, SYSTEM_UID, callingUid, callingPid,
9113                          UserHandle.USER_ALL);
9114              } catch (Throwable t) {
9115                  Slog.wtf(TAG, "Failed sending first user broadcasts", t);
9116              } finally {
9117                  Binder.restoreCallingIdentity(ident);
9118              }
9119              mAtmInternal.resumeTopActivities(false /* scheduleIdle */);
9120              mUserController.sendUserSwitchBroadcasts(-1, currentUserId);
9121
9122              BinderInternal.nSetBinderProxyCountWatermarks(BINDER_PROXY_HIGH_WATERMARK,
9123                      BINDER_PROXY_LOW_WATERMARK);
9124              BinderInternal.nSetBinderProxyCountEnabled(true);
9125              BinderInternal.setBinderProxyCountCallback(
9126                      new BinderInternal.BinderProxyLimitListener() {
9127                          @Override
9128                          public void onLimitReached(int uid) {
9129                              Slog.wtf(TAG, "Uid " + uid + " sent too many Binders to uid "
9130                                      + Process.myUid());
9131                              BinderProxy.dumpProxyDebugInfo();
9132                              if (uid == Process.SYSTEM_UID) {
9133                                  Slog.i(TAG, "Skipping kill (uid is SYSTEM)");
9134                              } else {
9135                                  killUid(UserHandle.getAppId(uid), UserHandle.getUserId(uid),
9136                                          "Too many Binders sent to SYSTEM");
9137                              }
9138                          }
9139                      }, mHandler);
9140
9141              traceLog.traceEnd(); // ActivityManagerStartApps
9142              traceLog.traceEnd(); // PhaseActivityManagerReady
9143          }
9144      }
systemReady()方法也是比较长,大致可以分为:
- 在
systemReady()的时候初始化了deviceIdleController等对象 - 移除并杀死了那些不该在AMS之前启动的进程(进程没有FLAG_PERSISTENT标志,则会被kill掉)
- 运行goingCallback,执行了参数传入的回调函数
- 启动Launcher的Activity,即桌面应用
- 启动那些persistent配置为1的进程
从前面SystemServer的startOtherServices()中,我们知道systemReady()方法回调后,也做了一些列逻辑,回调函数做了以下工作:
- 主要就是启动systemUI并调用其他服务的systemReady方法
- SystemReady函数完成了系统就绪的必要的工作
- 启动了HomeActivity和SystemUI
- 然后Android系统就全部启动了
3 总结
到这里AMS的启动我们再来总结一下:
- 系统启动后
Zygote进程第一个fork出SystemServer进程 SystemServer->run()->createSystemContext():
创建了系统的ActivityThread对象,运行环境mSystemContext、systemUiContext。SystemServer->run()->startBootstrapServices()->ActivityManagerService.Lifecycle.startService():
AMS在引导服务启动方法中,通过构造函数new ActivityManagerService()进行了一些对象创建和初始化(除activity外3大组件的管理和调度对象创建;内存、电池、权限、性能、cpu等的监控等相关对象创建),start()启动服务(移除进程组、启动cpu线程、注册权限、电池等服务)。SystemServer->run()->startBootstrapServices()->setSystemServiceManager()、setInstaller()、initPowerManagement()、setSystemProcess():
AMS创建后进行了一系列相关的初始化和设置。
setSystemProcess():将framework-res.apk的信息加入到SystemServer进程的LoadedApk中,并创建了SystemServer进程的ProcessRecord,加入到mPidsSelfLocked,由AMS统一管理。SystemServer->run()->startOtherServices():
AMS启动后的后续工作,主要调用systemReady()和运行调用时传入的goingCallback。
systemReady()/goingCallback:各种服务或进程等AMS启动完成后需进一步完成的工作及系统相关初始化。 桌面应用在systemReady()方法中启动,systemui在goingCallback中完成。当桌面应用启动完成后,发送开机广播ACTION_BOOT_COMPLETED
到此为止,整个AMS启动完成。下一章节我们将讲解Activity的启动流程
下面附上AMS启动过程图:
