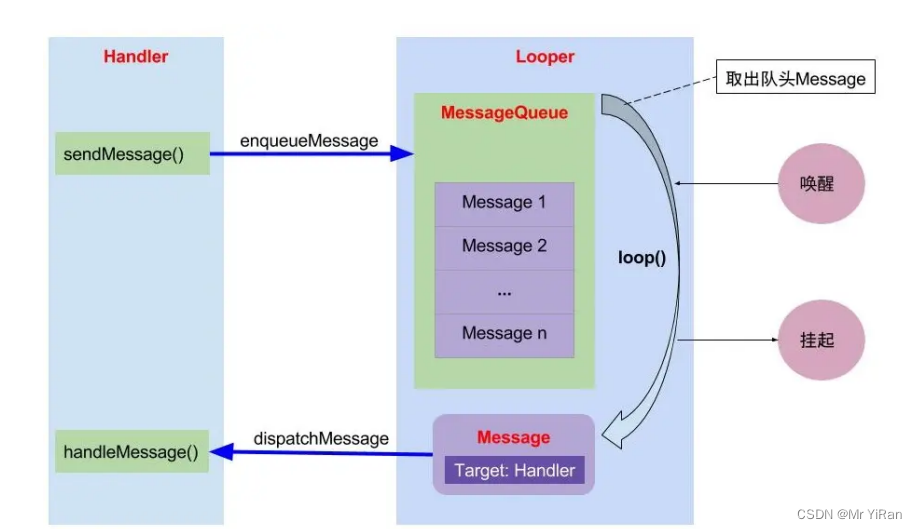
Android中的Handler是一个用于处理消息和线程间通信的机制。它可以将Runnable对象或Message对象发送到特定的线程中进行处理。
使用Handler的主要目的是在不同的线程之间进行通信,特别是在后台线程中执行一些任务后,将结果发送到UI线程进行更新。
流程图:
下面是一个示例代码,演示如何创建Message对象并发送给Handler:
 // 创建一个Handler对象
Handler handler = new Handler() {
    @Override
    public void handleMessage(Message msg) {
        // 在UI线程中处理接收到的消息
        switch (msg.what) {
            case 1:
                // 处理消息类型为1的情况
                String messageText = (String) msg.obj;
                // 执行相应的操作
                break;
            case 2:
                // 处理消息类型为2的情况
                // 执行相应的操作
                break;
            // 可以根据需要处理其他消息类型
        }
    }
};

// 在其他线程中创建并发送Message对象
Thread thread = new Thread(new Runnable() {
    @Override
    public void run() {
        // 创建一个Message对象
        Message message = handler.obtainMessage();

        // 设置消息类型
        message.what = 1;

        // 设置消息内容
        message.obj = "Hello, Handler!";

        // 发送消息给Handler所关联的线程
        handler.sendMessage(message);
    }
});

// 启动线程
thread.start();
Handler源码分析
第一条主线:入队(谁入的队?怎么入的?入的什么队?)
首先进入handler.sendMessage(msg);
    /**
     * Pushes a message onto the end of the message queue after all pending messages
     * before the current time. It will be received in {@link #handleMessage},
     * in the thread attached to this handler.
     *
     * @return Returns true if the message was successfully placed in to the
     *         message queue.  Returns false on failure, usually because the
     *         looper processing the message queue is exiting.
     */
    public final boolean sendMessage(@NonNull Message msg) {
        return sendMessageDelayed(msg, 0);
    }
再点进来sendMessageDelayed(msg, 0);
    /**
     * Enqueue a message into the message queue after all pending messages
     * before (current time + delayMillis). You will receive it in
     * {@link #handleMessage}, in the thread attached to this handler.
     *
     * @return Returns true if the message was successfully placed in to the
     *         message queue.  Returns false on failure, usually because the
     *         looper processing the message queue is exiting.  Note that a
     *         result of true does not mean the message will be processed -- if
     *         the looper is quit before the delivery time of the message
     *         occurs then the message will be dropped.
     */
    public final boolean sendMessageDelayed(@NonNull Message msg, long delayMillis) {
        if (delayMillis < 0) {
            delayMillis = 0;
        }
        return sendMessageAtTime(msg, SystemClock.uptimeMillis() + delayMillis);
    }
再进来sendMessageAtTime(msg, SystemClock.uptimeMillis() + delayMillis)
    public boolean sendMessageAtTime(@NonNull Message msg, long uptimeMillis) {
        MessageQueue queue = mQueue;
        if (queue == null) {
            RuntimeException e = new RuntimeException(
                    this + " sendMessageAtTime() called with no mQueue");
            Log.w("Looper", e.getMessage(), e);
            return false;
        }
        return enqueueMessage(queue, msg, uptimeMillis);
    }
进入enqueueMessage(queue, msg, uptimeMillis)
    private boolean enqueueMessage(@NonNull MessageQueue queue, @NonNull Message msg,
            long uptimeMillis) {
        msg.target = this;
        msg.workSourceUid = ThreadLocalWorkSource.getUid();

        if (mAsynchronous) {
            msg.setAsynchronous(true);
        }
        return queue.enqueueMessage(msg, uptimeMillis);
    }
queue.enqueueMessage(msg, uptimeMillis)其实执行的是Message的enqueueMessage方法
 boolean enqueueMessage(Message msg, long when) {
        if (msg.target == null) {
            throw new IllegalArgumentException("Message must have a target.");
        }

        synchronized (this) {
            if (msg.isInUse()) {
                throw new IllegalStateException(msg + " This message is already in use.");
            }

            if (mQuitting) {
                IllegalStateException e = new IllegalStateException(
                        msg.target + " sending message to a Handler on a dead thread");
                Log.w(TAG, e.getMessage(), e);
                msg.recycle();
                return false;
            }
            //对msg进入标记
            msg.markInUse();
            msg.when = when;
            Message p = mMessages;
            boolean needWake;
            //如果队列中没有数据,将消息放入头部
            if (p == null || when == 0 || when < p.when) {
                // New head, wake up the event queue if blocked.
                msg.next = p;
                mMessages = msg;
                needWake = mBlocked;
            } else {
                // Inserted within the middle of the queue.  Usually we don't have to wake
                // up the event queue unless there is a barrier at the head of the queue
                // and the message is the earliest asynchronous message in the queue.
                needWake = mBlocked && p.target == null && msg.isAsynchronous();
                Message prev;
                for (;;) {
                    prev = p;
                    p = p.next;
                    if (p == null || when < p.when) {
                        break;
                    }
                    if (needWake && p.isAsynchronous()) {
                        needWake = false;
                    }
                }
                msg.next = p; // invariant: p == prev.next
                prev.next = msg;
            }

            // We can assume mPtr != 0 because mQuitting is false.
            if (needWake) {
                nativeWake(mPtr);
            }
        }
        return true;
    }
说明了入队的过程是:Handler.sendMessage()->sendMessageDelayed()->sendMessageAtTime()->enqueueMessage()->MessageQueue类的enqueueMessage()
Handler发送消息(message)进行入队(MessageQueue)
入队时,如果队列中没有数据,直接将msg放到头部;如果有,则需要遍历队列中的数据,进入插入操作;
第二条主线出队(消费)
app启动的时候会调用ActivityThread这个类
会调用ActivityThread类中的main方法
 public static void main(String[] args) {
        Trace.traceBegin(Trace.TRACE_TAG_ACTIVITY_MANAGER, "ActivityThreadMain");

        // Install selective syscall interception
        AndroidOs.install();

        // CloseGuard defaults to true and can be quite spammy.  We
        // disable it here, but selectively enable it later (via
        // StrictMode) on debug builds, but using DropBox, not logs.
        CloseGuard.setEnabled(false);

        Environment.initForCurrentUser();

        // Make sure TrustedCertificateStore looks in the right place for CA certificates
        final File configDir = Environment.getUserConfigDirectory(UserHandle.myUserId());
        TrustedCertificateStore.setDefaultUserDirectory(configDir);

        // Call per-process mainline module initialization.
        initializeMainlineModules();

        Process.setArgV0("<pre-initialized>");

        Looper.prepareMainLooper();

        // Find the value for {@link #PROC_START_SEQ_IDENT} if provided on the command line.
        // It will be in the format "seq=114"
        long startSeq = 0;
        if (args != null) {
            for (int i = args.length - 1; i >= 0; --i) {
                if (args[i] != null && args[i].startsWith(PROC_START_SEQ_IDENT)) {
                    startSeq = Long.parseLong(
                            args[i].substring(PROC_START_SEQ_IDENT.length()));
                }
            }
        }
        ActivityThread thread = new ActivityThread();
        thread.attach(false, startSeq);

        if (sMainThreadHandler == null) {
            sMainThreadHandler = thread.getHandler();
        }

        if (false) {
            Looper.myLooper().setMessageLogging(new
                    LogPrinter(Log.DEBUG, "ActivityThread"));
        }

        // End of event ActivityThreadMain.
        Trace.traceEnd(Trace.TRACE_TAG_ACTIVITY_MANAGER);
        Looper.loop();

        throw new RuntimeException("Main thread loop unexpectedly exited");
    }
点进去看Looper.loop();
  /**
     * Run the message queue in this thread. Be sure to call
     * {@link #quit()} to end the loop.
     */
    public static void loop() {
        final Looper me = myLooper();
        if (me == null) {
            throw new RuntimeException("No Looper; Looper.prepare() wasn't called on this thread.");
        }
        if (me.mInLoop) {
            Slog.w(TAG, "Loop again would have the queued messages be executed"
                    + " before this one completed.");
        }

        me.mInLoop = true;
        final MessageQueue queue = me.mQueue;

        // Make sure the identity of this thread is that of the local process,
        // and keep track of what that identity token actually is.
        Binder.clearCallingIdentity();
        final long ident = Binder.clearCallingIdentity();

        // Allow overriding a threshold with a system prop. e.g.
        // adb shell 'setprop log.looper.1000.main.slow 1 && stop && start'
        final int thresholdOverride =
                SystemProperties.getInt("log.looper."
                        + Process.myUid() + "."
                        + Thread.currentThread().getName()
                        + ".slow", 0);

        boolean slowDeliveryDetected = false;

        for (;;) {
            Message msg = queue.next(); // might block
            if (msg == null) {
                // No message indicates that the message queue is quitting.
                return;
            }

            // This must be in a local variable, in case a UI event sets the logger
            final Printer logging = me.mLogging;
            if (logging != null) {
                logging.println(">>>>> Dispatching to " + msg.target + " " +
                        msg.callback + ": " + msg.what);
            }
            // Make sure the observer won't change while processing a transaction.
            final Observer observer = sObserver;

            final long traceTag = me.mTraceTag;
            long slowDispatchThresholdMs = me.mSlowDispatchThresholdMs;
            long slowDeliveryThresholdMs = me.mSlowDeliveryThresholdMs;
            if (thresholdOverride > 0) {
                slowDispatchThresholdMs = thresholdOverride;
                slowDeliveryThresholdMs = thresholdOverride;
            }
            final boolean logSlowDelivery = (slowDeliveryThresholdMs > 0) && (msg.when > 0);
            final boolean logSlowDispatch = (slowDispatchThresholdMs > 0);

            final boolean needStartTime = logSlowDelivery || logSlowDispatch;
            final boolean needEndTime = logSlowDispatch;

            if (traceTag != 0 && Trace.isTagEnabled(traceTag)) {
                Trace.traceBegin(traceTag, msg.target.getTraceName(msg));
            }

            final long dispatchStart = needStartTime ? SystemClock.uptimeMillis() : 0;
            final long dispatchEnd;
            Object token = null;
            if (observer != null) {
                token = observer.messageDispatchStarting();
            }
            long origWorkSource = ThreadLocalWorkSource.setUid(msg.workSourceUid);
            try {
                msg.target.dispatchMessage(msg);
                if (observer != null) {
                    observer.messageDispatched(token, msg);
                }
                dispatchEnd = needEndTime ? SystemClock.uptimeMillis() : 0;
            } catch (Exception exception) {
                if (observer != null) {
                    observer.dispatchingThrewException(token, msg, exception);
                }
                throw exception;
            } finally {
                ThreadLocalWorkSource.restore(origWorkSource);
                if (traceTag != 0) {
                    Trace.traceEnd(traceTag);
                }
            }
            if (logSlowDelivery) {
                if (slowDeliveryDetected) {
                    if ((dispatchStart - msg.when) <= 10) {
                        Slog.w(TAG, "Drained");
                        slowDeliveryDetected = false;
                    }
                } else {
                    if (showSlowLog(slowDeliveryThresholdMs, msg.when, dispatchStart, "delivery",
                            msg)) {
                        // Once we write a slow delivery log, suppress until the queue drains.
                        slowDeliveryDetected = true;
                    }
                }
            }
            if (logSlowDispatch) {
                showSlowLog(slowDispatchThresholdMs, dispatchStart, dispatchEnd, "dispatch", msg);
            }

            if (logging != null) {
                logging.println("<<<<< Finished to " + msg.target + " " + msg.callback);
            }

            // Make sure that during the course of dispatching the
            // identity of the thread wasn't corrupted.
            final long newIdent = Binder.clearCallingIdentity();
            if (ident != newIdent) {
                Log.wtf(TAG, "Thread identity changed from 0x"
                        + Long.toHexString(ident) + " to 0x"
                        + Long.toHexString(newIdent) + " while dispatching to "
                        + msg.target.getClass().getName() + " "
                        + msg.callback + " what=" + msg.what);
            }

            msg.recycleUnchecked();
        }
    }
在for循环中有Message msg = queue.next();在MessageQueue的next()可以发现
 @UnsupportedAppUsage
    Message next() {
        // Return here if the message loop has already quit and been disposed.
        // This can happen if the application tries to restart a looper after quit
        // which is not supported.
        final long ptr = mPtr;
        if (ptr == 0) {
            return null;
        }

        int pendingIdleHandlerCount = -1; // -1 only during first iteration
        int nextPollTimeoutMillis = 0;
        for (;;) {
            if (nextPollTimeoutMillis != 0) {
                Binder.flushPendingCommands();
            }

            nativePollOnce(ptr, nextPollTimeoutMillis);

            synchronized (this) {
                // Try to retrieve the next message.  Return if found.
                final long now = SystemClock.uptimeMillis();
                Message prevMsg = null;
                Message msg = mMessages;
                if (msg != null && msg.target == null) {
                    // Stalled by a barrier.  Find the next asynchronous message in the queue.
                    do {
                        prevMsg = msg;
                        msg = msg.next;
                    } while (msg != null && !msg.isAsynchronous());
                }
                if (msg != null) {
                    if (now < msg.when) {
                        // Next message is not ready.  Set a timeout to wake up when it is ready.
                        nextPollTimeoutMillis = (int) Math.min(msg.when - now, Integer.MAX_VALUE);
                    } else {
                        // Got a message.
                        mBlocked = false;
                        if (prevMsg != null) {
                            prevMsg.next = msg.next;
                        } else {
                            mMessages = msg.next;
                        }
                        msg.next = null;
                        if (DEBUG) Log.v(TAG, "Returning message: " + msg);
                        msg.markInUse();
                        return msg;
                    }
                } else {
                    // No more messages.
                    nextPollTimeoutMillis = -1;
                }

                // Process the quit message now that all pending messages have been handled.
                if (mQuitting) {
                    dispose();
                    return null;
                }

                // If first time idle, then get the number of idlers to run.
                // Idle handles only run if the queue is empty or if the first message
                // in the queue (possibly a barrier) is due to be handled in the future.
                if (pendingIdleHandlerCount < 0
                        && (mMessages == null || now < mMessages.when)) {
                    pendingIdleHandlerCount = mIdleHandlers.size();
                }
                if (pendingIdleHandlerCount <= 0) {
                    // No idle handlers to run.  Loop and wait some more.
                    mBlocked = true;
                    continue;
                }

                if (mPendingIdleHandlers == null) {
                    mPendingIdleHandlers = new IdleHandler[Math.max(pendingIdleHandlerCount, 4)];
                }
                mPendingIdleHandlers = mIdleHandlers.toArray(mPendingIdleHandlers);
            }

            // Run the idle handlers.
            // We only ever reach this code block during the first iteration.
            for (int i = 0; i < pendingIdleHandlerCount; i++) {
                final IdleHandler idler = mPendingIdleHandlers[i];
                mPendingIdleHandlers[i] = null; // release the reference to the handler

                boolean keep = false;
                try {
                    keep = idler.queueIdle();
                } catch (Throwable t) {
                    Log.wtf(TAG, "IdleHandler threw exception", t);
                }

                if (!keep) {
                    synchronized (this) {
                        mIdleHandlers.remove(idler);
                    }
                }
            }

            // Reset the idle handler count to 0 so we do not run them again.
            pendingIdleHandlerCount = 0;

            // While calling an idle handler, a new message could have been delivered
            // so go back and look again for a pending message without waiting.
            nextPollTimeoutMillis = 0;
        }
    }
MessageQueue中for循环取对象,将对象找到返回,此时Looper方法里的msg 就是返回的对象。
并利用msg去调用loop()方法中的dispatchMessage方法
msg.target.dispatchMessage(msg);
说明了第二条主线的流程是:ActivityThread类的main()->looper.loop()->queue.next()
通过next()找到msg对象,然后通过msg绑定target,也就是handler,调用dispatchMessage回调handleMessage方法
    /**
     * Handle system messages here.
     */
    public void dispatchMessage(@NonNull Message msg) {
        if (msg.callback != null) {
            handleCallback(msg);
        } else {
            if (mCallback != null) {
                if (mCallback.handleMessage(msg)) {
                    return;
                }
            }
            handleMessage(msg);
        }
    }
第三条主线:Handler,MessageQueue,Message,Looper四个类是什么关系,怎么串联?
- 在mHandler.obtainMessage()中Handler创建Message对象
- 在MessageQueue中的enqueueMessage方法中Handler将创建的对象放入MessageQueue中
- Looper是通过ActivityThread的main()方法进行创建,MessageQueue在创建Looper的时会同时创建
ActivityThread类中
Looper.prepareMainLooper();
prepareMainLooper()点进来
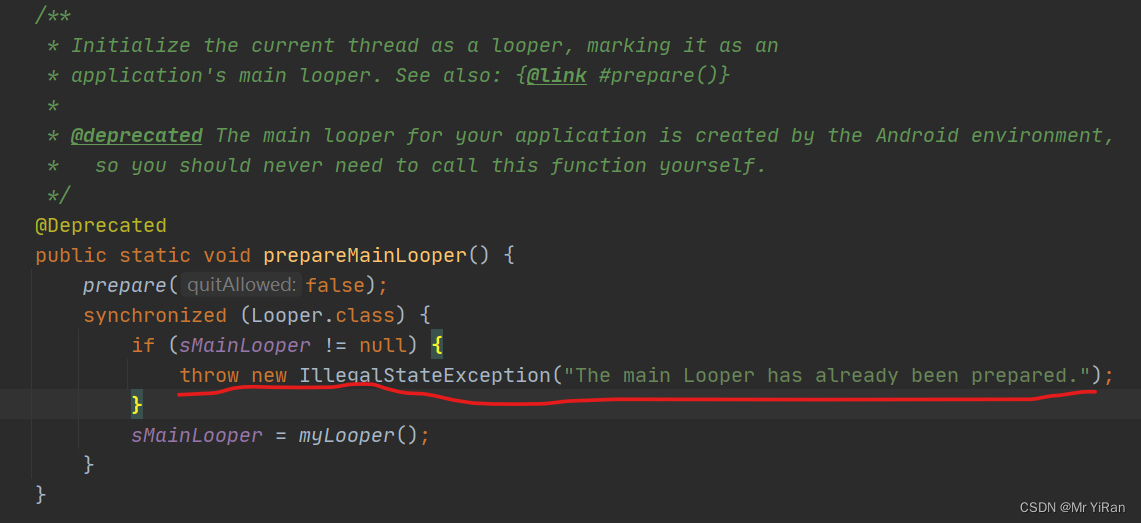
    @Deprecated
    public static void prepareMainLooper() {
        prepare(false);
        synchronized (Looper.class) {
            if (sMainLooper != null) {
                throw new IllegalStateException("The main Looper has already been prepared.");
            }
            sMainLooper = myLooper();
        }
    }
进来 prepare(false);
    private static void prepare(boolean quitAllowed) {
        if (sThreadLocal.get() != null) {
            throw new RuntimeException("Only one Looper may be created per thread");
        }
        sThreadLocal.set(new Looper(quitAllowed));
    }
sThreadLocal.set方法中创建了Looper对象
    private Looper(boolean quitAllowed) {
        mQueue = new MessageQueue(quitAllowed);
        mThread = Thread.currentThread();
    }
在创建Looper对象的同时,构造方法里也创建了MessageQueue对象
- 在Handler的enqueueMessage方法中,通过msg.target=this将Handler赋值给msg.target对象
而我们在调用mHandler.obtainMessage()中
Message msg= mHandler.obtainMessage();
点进去obtainMessage
    /**
     * Returns a new {@link android.os.Message Message} from the global message pool. More efficient than
     * creating and allocating new instances. The retrieved message has its handler set to this instance (Message.target == this).
     *  If you don't want that facility, just call Message.obtain() instead.
     */
    @NonNull
    public final Message obtainMessage()
    {
        return Message.obtain(this);
    }
进来 Message.obtain(this)
    /**
     * Same as {@link #obtain()}, but sets the value for the <em>target</em> member on the Message returned.
     * @param h  Handler to assign to the returned Message object's <em>target</em> member.
     * @return A Message object from the global pool.
     */
    public static Message obtain(Handler h) {
        Message m = obtain();
        m.target = h;

        return m;
    }
进行obtain()方法
    /**
     * Return a new Message instance from the global pool. Allows us to
     * avoid allocating new objects in many cases.
     */
    public static Message obtain() {
        synchronized (sPoolSync) {
            if (sPool != null) {
                Message m = sPool;
                sPool = m.next;
                m.next = null;
                m.flags = 0; // clear in-use flag
                sPoolSize--;
                return m;
            }
        }
        return new Message();
    }
可以看到在Message.obtain()中message对象采用了复用池,避免资源的浪费;
常见问题解答?如果有错误欢迎指正!
1. 为什么Message需要使用复用机制?每次直接new一个不好么?
当我需要主线程和子线程直接进行沟通的时候一般都使用handler,发送Message对象一般都比较多,如果每发送一次就创建一次的话,会造成资源的浪费,在每次创建Message对象时,都需要分配内存和进行垃圾回收。而使用复用池可以避免频繁地创建和销毁Message对象,从而减少内存的分配和垃圾回收的开销。
Message:单链表结果,链表是非线性,非顺序的物理结构,由N个节点组成;
2. message为什么使用单链表?为啥不使用其他类型:arrayList
- arrayList每次创建的时候会创建一个默认大小的空间,如果超过默认大小的空间就需要进行扩容,就需要对这个ArrayList的内存空间重新进行计算和排列,这可能会导致频繁的内存拷贝和垃圾回收。
- 由于arrayList需要连续的内存块来存储元素,当我们一个arrayList的内存块不够用的时候,重新去创建一个的话又需要开辟一个内存块,当我们这个内存不够用的时候,我们就会去进行gc操作,而且内存中容易出现内存碎片,如果再存放内存容易奔溃。而单链表只需要分配新的节点,不需要进行大规模的数据迁移,而当我们存放的是一个对象的时候,对内存要求不高,只要有合适的空间都可以存放。
3. 子线程能不能new handler?怎么能在子线程new Handler?
子线程不能直接创建Handler对象,如果需要在子线程new Handler需要调用Looper.prepare()
4 .子线程维护Looper的时候需要注意什么?
注意内存泄露的问题;使用完毕后 记得调用quitSafely的方法
5 .MessageQueue是怎么保证线程安全的
通过synchronized同步关键字来对入队操作进行限定
6 .removeMessage的时候是移除队列中的还是队列外的
remove的时候只能移除队列中的数据
7 .Looper能够prepare两次,为什么?
不能prepare两次,因为Looper在创建过程中就加了约束,如果prepare两次会报错。