文章目录
- samba smb.conf配置文档
- smb.conf重要配置参数讲解
- 1. `workgroup`:指定Samba服务器所在的工作组名称。
- 2. `server string`:指定Samba服务器的描述信息。
- 3. `security`:指定Samba服务器的安全模式,可以是`user`、`share`或`domain`。
- 4. `map to guest`:指定当访问未授权共享时,Samba服务器如何处理。可以是`bad user`、`guest`或`none`。
- 5. `guest ok`:指定是否允许匿名访问共享。
- 6. `guest account`:指定匿名访问共享时使用的用户账号。
- 7. `valid users`:指定允许访问共享的用户列表。
- 8. `read only`:指定共享是否只读。
- 9. `writeable`:指定共享是否可写。
- 10. `browseable`:指定共享是否可浏览。
- 11. `path`:指定共享的路径。
- 12. `create mask`:指定新创建文件的权限掩码。
- 13. `directory mask`:指定新创建目录的权限掩码。
- 14. `hosts allow`:指定允许访问Samba服务器的主机列表。
- 15. `hosts deny`:指定禁止访问Samba服务器的主机列表。
- 16. `printable`:用于指定共享的打印机是否可打印
- 17. `public`用来设置共享目录是否为公共访问的选项(设置是否任何人都可访问)
- public与guest ok区别
- ”匿名访问“跟”任何人都可访问“区别
- smb.conf原始文件
- 英文
- 中文翻译
- 示例
- 配置1(没太搞懂guest ok和public区别)
samba smb.conf配置文档
通常,我们可以在Samba官方文档中找到详细的配置参数教程。
以下是Samba官方文档的链接:
Samba官方文档
在官方文档中,可以找到关于Samba的各种配置参数的详细说明和用法示例。可以根据自己的需求查找相应的配置参数,并按照文档中的说明进行配置。

我们可以从中进入到smb.conf的配置文档页面:
https://www.samba.org/samba/docs/current/man-html/smb.conf.5.html
内容比较多,容易让人看花眼。我们从中提取一些重要的信息。
smb.conf重要配置参数讲解
smb.conf是一个重要的配置文件,它包含了Samba服务器的各种配置参数。下面是一些常用的重要配置参数及其配置方法:
1. workgroup:指定Samba服务器所在的工作组名称。
workgroup = WORKGROUP
指定Samba服务器所在的工作组名称是为了使Samba服务器能够与其他计算机在同一工作组中进行通信和共享资源。工作组是一个逻辑上的组织单位,它将多台计算机组织在一起,使它们能够方便地进行网络通信和资源共享。
以下是指定Samba服务器工作组名称的一些用途:
-
身份验证:工作组名称用于标识一组计算机,这些计算机可以相互进行身份验证。当Samba服务器接收到来自其他计算机的连接请求时,它会使用工作组名称来确定是否接受该请求,并进行相应的身份验证。
-
资源共享:工作组名称用于标识一组计算机,这些计算机可以共享资源。当Samba服务器共享文件夹或打印机时,它会将这些共享资源添加到工作组中,使其他计算机能够方便地找到和访问这些资源。
-
网络浏览:工作组名称用于在网络浏览器或文件管理器中显示可用的计算机和共享资源。当用户浏览网络时,他们可以通过工作组名称来查找和选择所需的计算机和共享资源。
2. server string:指定Samba服务器的描述信息。
server string = Samba Server
指定Samba服务器的描述信息是为了向客户端提供有关服务器的信息,以便客户端能够更好地识别和连接到正确的服务器。描述信息通常会显示在网络浏览器或文件管理器中,以帮助用户识别和选择正确的共享资源。
以下是指定Samba服务器描述信息的一些用途:
-
识别服务器:当局域网中存在多个Samba服务器时,通过不同的描述信息,用户可以更容易地识别和区分这些服务器。描述信息可以包含服务器的名称、用途、位置等信息,帮助用户快速找到所需的服务器。
-
提供信息:描述信息可以向用户提供有关服务器的相关信息,如服务器的功能、所提供的共享资源类型、服务器管理员的联系方式等。这些信息可以帮助用户了解服务器的特点和使用方式。
-
增加可用性:通过提供清晰的描述信息,用户可以更好地了解服务器的用途和功能,从而选择合适的服务器进行连接。这有助于提高服务器的可用性和用户体验。
3. security:指定Samba服务器的安全模式,可以是user、share或domain。
security = user
指定安全模式是为了控制Samba服务器对用户身份验证和访问权限的管理方式。不同的安全模式提供了不同的身份验证和访问控制机制,以满足不同的安全需求。
以下是常见的安全模式及其用途:
-
user:这是最常用的安全模式。在这种模式下,Samba服务器会使用系统上的用户账号和密码进行身份验证。只有经过身份验证的用户才能访问共享资源。这种模式提供了较高的安全性,可以对每个用户进行细粒度的访问控制。 -
share:在这种模式下,Samba服务器不会进行用户身份验证,而是使用预定义的共享密码进行访问控制。所有知道共享密码的用户都可以访问共享资源。这种模式适用于一些公共共享场景,如公共文件夹或打印机。 -
domain:这种模式适用于与Windows域控制器集成的情况。Samba服务器会将用户身份验证请求转发给域控制器进行处理。这种模式可以实现与Windows域的集成,使得Samba服务器可以与Windows域中的用户和组进行身份验证和访问控制。
通过指定适当的安全模式,可以根据实际需求来管理Samba服务器的用户身份验证和访问权限。这样可以确保只有经过授权的用户才能访问共享资源,提高系统的安全性。
4. map to guest:指定当访问未授权共享时,Samba服务器如何处理。可以是bad user、guest或none。
map to guest = bad user
在smb.conf文件中,map to guest是一个参数,用于指定当Samba服务器无法验证客户端用户身份时,如何处理客户端的访问请求。
当map to guest设置为bad user时,表示如果客户端用户无法通过身份验证,Samba服务器将将其映射为一个特殊的"bad user"用户,该用户没有访问权限。
当map to guest设置为guest时,表示如果客户端用户无法通过身份验证,Samba服务器将将其映射为一个特殊的"guest"用户,该用户具有有限的访问权限。
当map to guest设置为never时,表示如果客户端用户无法通过身份验证,Samba服务器将拒绝其访问请求,不进行任何映射。
map to guest参数的设置可以根据实际需求来配置Samba服务器的访问控制策略。
5. guest ok:指定是否允许匿名访问共享。
guest ok = yes
smb.conf文件中的guest ok参数用于指定是否允许匿名访问Samba共享。当设置为yes时,允许未经身份验证的用户以匿名方式访问共享资源。当设置为no时,只有经过身份验证的用户才能访问共享资源。
以下是guest ok参数的一些用途:
-
公共共享:在某些情况下,你可能希望提供一些公共共享资源,供任何人都可以访问,而无需进行身份验证。例如,你可以创建一个公共文件夹,用于存放公告、文档或其他公共信息。通过将
guest ok设置为yes,允许任何人以匿名方式访问这些共享资源。 -
临时访问:有时,你可能需要临时允许某些用户以匿名方式访问共享资源,而无需为他们创建专门的用户账号。通过将
guest ok设置为yes,可以临时允许这些用户以匿名方式访问共享资源。 -
访问控制:在某些情况下,你可能希望限制匿名访问共享资源的权限。通过将
guest ok设置为no,只有经过身份验证的用户才能访问共享资源,从而提高资源的安全性。
需要注意的是,当允许匿名访问共享资源时,建议对共享资源进行适当的访问控制,以确保只有授权的用户能够访问敏感信息。
在smb.conf文件中,可以通过以下方式配置guest ok参数:
guest ok = yes
通过设置适当的guest ok参数,可以控制是否允许匿名访问Samba共享资源,以满足不同的访问需求。
6. guest account:指定匿名访问共享时使用的用户账号。
guest account = nobody
7. valid users:指定允许访问共享的用户列表。
valid users = user1, user2
8. read only:指定共享是否只读。
read only = yes
9. writeable:指定共享是否可写。
writeable = yes
10. browseable:指定共享是否可浏览。
browseable = yes
在Samba中,可以通过指定共享是否可浏览来控制是否在网络浏览器或文件管理器中显示该共享。当共享设置为可浏览时,其他计算机上的用户可以在网络浏览器中看到该共享,并能够浏览其中的文件和文件夹。当共享设置为不可浏览时,其他计算机上的用户无法在网络浏览器中看到该共享。
以下是指定共享是否可浏览的一些用途:
-
可见性控制:通过将共享设置为可浏览,可以使其他计算机上的用户能够在网络浏览器中看到该共享。这对于共享一些公共资源或重要信息的情况非常有用,以便其他用户能够方便地找到和访问这些资源。
-
隐私保护:有时,你可能希望将某些共享资源隐藏起来,以保护其隐私和安全性。通过将共享设置为不可浏览,可以防止其他计算机上的用户在网络浏览器中看到该共享,从而增加共享资源的隐私保护。
-
简化浏览器视图:当你有许多共享资源时,将一些不常用的共享设置为不可浏览可以简化网络浏览器中的视图,使用户更容易找到和访问常用的共享资源。
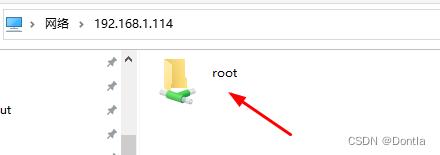
注意,如果将browseable = no,windows上就看不到目录了:
比如,如果设置为no,下面root目录就看不到了。。。
11. path:指定共享的路径。
path = /path/to/share
12. create mask:指定新创建文件的权限掩码。
create mask = 0664
13. directory mask:指定新创建目录的权限掩码。
directory mask = 0775
14. hosts allow:指定允许访问Samba服务器的主机列表。
hosts allow = 192.168.1.0/24
在Samba中,可以通过指定允许访问Samba服务器的主机列表来限制哪些主机可以连接和访问Samba共享资源。这是一种访问控制的机制,可以增加共享资源的安全性。
通过指定允许访问的主机列表,你可以限制只有列表中的主机才能连接和访问Samba服务器。这可以防止未经授权的主机访问共享资源,从而保护共享资源的安全性。
掩码(mask)是一种用于指定网络地址范围的方法。在Samba中,当指定允许访问的主机列表时,可以使用掩码来指定一个网络地址范围。掩码24表示使用了24位的网络地址,即前24位是网络地址,后8位是主机地址。
例如,如果你想允许192.168.0.0/24网段的主机访问Samba服务器,你可以这样配置:
hosts allow = 192.168.0.0/24
这将允许192.168.0.0到192.168.0.255之间的所有主机访问Samba服务器。
使用掩码可以方便地指定一个网络地址范围,而不需要逐个列出每个允许访问的主机。这样可以简化配置,并提高可维护性。
同时,如果要设置多个IP地址允许访问Samba服务器,你可以在hosts allow参数中使用逗号分隔的IP地址列表。以下是设置多个IP地址的示例:
hosts allow = 192.168.0.100, 192.168.0.101, 192.168.0.102
这将允许IP地址为192.168.0.100、192.168.0.101和192.168.0.102的主机访问Samba服务器。
除此之外,还可以使用通配符来设置多个IP地址。例如,要允许192.168.0.0到192.168.0.255之间的所有主机以及192.168.1.0到192.168.1.255之间的所有主机访问Samba服务器,你可以这样配置:
hosts allow = 192.168.0.*, 192.168.1.*
这将允许上述两个IP地址范围内的所有主机访问Samba服务器。
15. hosts deny:指定禁止访问Samba服务器的主机列表。
hosts deny = 192.168.1.100
16. printable:用于指定共享的打印机是否可打印
printable = yes
在smb.conf文件中,printable是一个参数,用于指定共享的打印机是否可打印。当设置为yes时,表示该打印机是可打印的,允许其他计算机通过SMB协议访问并打印文件。当设置为no时,表示该打印机不可打印,其他计算机将无法通过SMB协议访问该打印机。
17. public用来设置共享目录是否为公共访问的选项(设置是否任何人都可访问)
当public = yes时,表示该共享目录是公共访问的,任何人都可以访问该共享目录,无需进行身份验证。这意味着任何人都可以读取、写入和执行该共享目录中的文件。
当public = no时,表示该共享目录是私有访问的,访问该共享目录需要进行身份验证。只有经过身份验证的用户才能访问该共享目录,并且只能访问其具有权限的文件和目录。
以下是一个示例的smb.conf配置文件片段,其中设置了一个公共访问的共享目录:
[public_share]
    path = /path/to/public_share
    public = yes
    writable = yes
    guest ok = yes
在上述配置中,[public_share]是共享目录的名称,path指定了共享目录的路径,public = yes表示该共享目录是公共访问的,writable = yes表示可以对共享目录进行写操作,guest ok = yes表示允许匿名用户访问该共享目录。
public与guest ok区别
在smb.conf配置文件中,public = yes和guest ok = yes都与共享目录的访问权限有关,但它们有一些区别。
-
public = yes: 这个选项用于设置共享目录是否为公共访问的。当设置为public = yes时,任何人都可以访问该共享目录,无需进行身份验证。这意味着任何人都可以读取、写入和执行该共享目录中的文件。
-
guest ok = yes: 这个选项用于设置是否允许匿名用户访问共享目录。当设置为guest ok = yes时,即允许匿名用户访问该共享目录。匿名用户是指没有提供用户名和密码进行身份验证的用户。如果设置为guest ok = no,则只有经过身份验证的用户才能访问该共享目录。
需要注意的是,public = yes和guest ok = yes可以同时设置,以实现公共访问且允许匿名用户访问的共享目录。例如:
[public_share]
    path = /path/to/public_share
    public = yes
    writable = yes
    guest ok = yes
在上述配置中,设置了一个公共访问的共享目录,任何人都可以访问该共享目录,同时允许匿名用户访问,并且可以对共享目录进行写操作。
”匿名访问“跟”任何人都可访问“区别
"匿名访问"和"任何人都可访问"在含义上有一些区别。
-
匿名访问:指的是允许用户以匿名身份访问共享资源,即无需提供用户名和密码进行身份验证。匿名用户可以是任何人,无需提供任何凭据。这意味着任何人都可以访问共享资源,但是访问权限可能会受到其他限制,如只读权限或特定的访问控制列表(ACL)。
-
任何人都可访问:指的是共享资源对所有用户开放,无需进行身份验证。这意味着任何人都可以访问共享资源,无论是否提供凭据。与匿名访问不同,任何人都可访问的共享资源不会对访问权限进行任何限制,所有用户都具有完全的读写权限。
在SMB/CIFS协议中,这两个概念可以根据具体的配置进行区分。通过设置guest ok = yes可以允许匿名访问,而通过设置public = yes可以允许任何人都可访问。这两个选项可以单独使用,也可以同时使用,具体取决于配置的需求和安全策略。
smb.conf原始文件
英文
#
# Sample configuration file for the Samba suite for Debian GNU/Linux.
#
#
# This is the main Samba configuration file. You should read the
# smb.conf(5) manual page in order to understand the options listed
# here. Samba has a huge number of configurable options most of which
# are not shown in this example
#
# Some options that are often worth tuning have been included as
# commented-out examples in this file.
# - When such options are commented with ";", the proposed setting
# differs from the default Samba behaviour
# - When commented with "#", the proposed setting is the default
# behaviour of Samba but the option is considered important
# enough to be mentioned here
#
# NOTE: Whenever you modify this file you should run the command
# "testparm" to check that you have not made any basic syntactic
# errors.
#======================= Global Settings =======================
[global]
## Browsing/Identification ###
# Change this to the workgroup/NT-domain name your Samba server will part of
workgroup = WORKGROUP
# server string is the equivalent of the NT Description field
server string = %h server (Samba, Ubuntu)
#### Networking ####
# The specific set of interfaces / networks to bind to
# This can be either the interface name or an IP address/netmask;
# interface names are normally preferred
; interfaces = 127.0.0.0/8 eth0
# Only bind to the named interfaces and/or networks; you must use the
# 'interfaces' option above to use this.
# It is recommended that you enable this feature if your Samba machine is
# not protected by a firewall or is a firewall itself. However, this
# option cannot handle dynamic or non-broadcast interfaces correctly.
; bind interfaces only = yes
#### Debugging/Accounting ####
# This tells Samba to use a separate log file for each machine
# that connects
log file = /var/log/samba/log.%m
# Cap the size of the individual log files (in KiB).
max log size = 1000
# We want Samba to only log to /var/log/samba/log.{smbd,nmbd}.
# Append syslog@1 if you want important messages to be sent to syslog too.
logging = file
# Do something sensible when Samba crashes: mail the admin a backtrace
panic action = /usr/share/samba/panic-action %d
####### Authentication #######
# Server role. Defines in which mode Samba will operate. Possible
# values are "standalone server", "member server", "classic primary
# domain controller", "classic backup domain controller", "active
# directory domain controller".
#
# Most people will want "standalone server" or "member server".
# Running as "active directory domain controller" will require first
# running "samba-tool domain provision" to wipe databases and create a
# new domain.
server role = standalone server
obey pam restrictions = yes
# This boolean parameter controls whether Samba attempts to sync the Unix
# password with the SMB password when the encrypted SMB password in the
# passdb is changed.
unix password sync = yes
# For Unix password sync to work on a Debian GNU/Linux system, the following
# parameters must be set (thanks to Ian Kahan <<kahan@informatik.tu-muenchen.de> for
# sending the correct chat script for the passwd program in Debian Sarge).
passwd program = /usr/bin/passwd %u
passwd chat = *Enter\snew\s*\spassword:* %n\n *Retype\snew\s*\spassword:* %n\n *password\supdated\ssuccessfully* .
# This boolean controls whether PAM will be used for password changes
# when requested by an SMB client instead of the program listed in
# 'passwd program'. The default is 'no'.
pam password change = yes
# This option controls how unsuccessful authentication attempts are mapped
# to anonymous connections
map to guest = bad user
########## Domains ###########
#
# The following settings only takes effect if 'server role = primary
# classic domain controller', 'server role = backup domain controller'
# or 'domain logons' is set
#
# It specifies the location of the user's
# profile directory from the client point of view) The following
# required a [profiles] share to be setup on the samba server (see
# below)
; logon path = \\%N\profiles\%U
# Another common choice is storing the profile in the user's home directory
# (this is Samba's default)
# logon path = \\%N\%U\profile
# The following setting only takes effect if 'domain logons' is set
# It specifies the location of a user's home directory (from the client
# point of view)
; logon drive = H:
# logon home = \\%N\%U
# The following setting only takes effect if 'domain logons' is set
# It specifies the script to run during logon. The script must be stored
# in the [netlogon] share
# NOTE: Must be store in 'DOS' file format convention
; logon script = logon.cmd
# This allows Unix users to be created on the domain controller via the SAMR
# RPC pipe. The example command creates a user account with a disabled Unix
# password; please adapt to your needs
; add user script = /usr/sbin/adduser --quiet --disabled-password --gecos "" %u
# This allows machine accounts to be created on the domain controller via the
# SAMR RPC pipe.
# The following assumes a "machines" group exists on the system
; add machine script = /usr/sbin/useradd -g machines -c "%u machine account" -d /var/lib/samba -s /bin/false %u
# This allows Unix groups to be created on the domain controller via the SAMR
# RPC pipe.
; add group script = /usr/sbin/addgroup --force-badname %g
############ Misc ############
# Using the following line enables you to customise your configuration
# on a per machine basis. The %m gets replaced with the netbios name
# of the machine that is connecting
; include = /home/samba/etc/smb.conf.%m
# Some defaults for winbind (make sure you're not using the ranges
# for something else.)
; idmap config * : backend = tdb
; idmap config * : range = 3000-7999
; idmap config YOURDOMAINHERE : backend = tdb
; idmap config YOURDOMAINHERE : range = 100000-999999
; template shell = /bin/bash
# Setup usershare options to enable non-root users to share folders
# with the net usershare command.
# Maximum number of usershare. 0 means that usershare is disabled.
# usershare max shares = 100
# Allow users who've been granted usershare privileges to create
# public shares, not just authenticated ones
usershare allow guests = yes
#======================= Share Definitions =======================
# Un-comment the following (and tweak the other settings below to suit)
# to enable the default home directory shares. This will share each
# user's home directory as \\server\username
;[homes]
; comment = Home Directories
; browseable = no
# By default, the home directories are exported read-only. Change the
# next parameter to 'no' if you want to be able to write to them.
; read only = yes
# File creation mask is set to 0700 for security reasons. If you want to
# create files with group=rw permissions, set next parameter to 0775.
; create mask = 0700
# Directory creation mask is set to 0700 for security reasons. If you want to
# create dirs. with group=rw permissions, set next parameter to 0775.
; directory mask = 0700
# By default, \\server\username shares can be connected to by anyone
# with access to the samba server.
# Un-comment the following parameter to make sure that only "username"
# can connect to \\server\username
# This might need tweaking when using external authentication schemes
; valid users = %S
# Un-comment the following and create the netlogon directory for Domain Logons
# (you need to configure Samba to act as a domain controller too.)
;[netlogon]
; comment = Network Logon Service
; path = /home/samba/netlogon
; guest ok = yes
; read only = yes
# Un-comment the following and create the profiles directory to store
# users profiles (see the "logon path" option above)
# (you need to configure Samba to act as a domain controller too.)
# The path below should be writable by all users so that their
# profile directory may be created the first time they log on
;[profiles]
; comment = Users profiles
; path = /home/samba/profiles
; guest ok = no
; browseable = no
; create mask = 0600
; directory mask = 0700
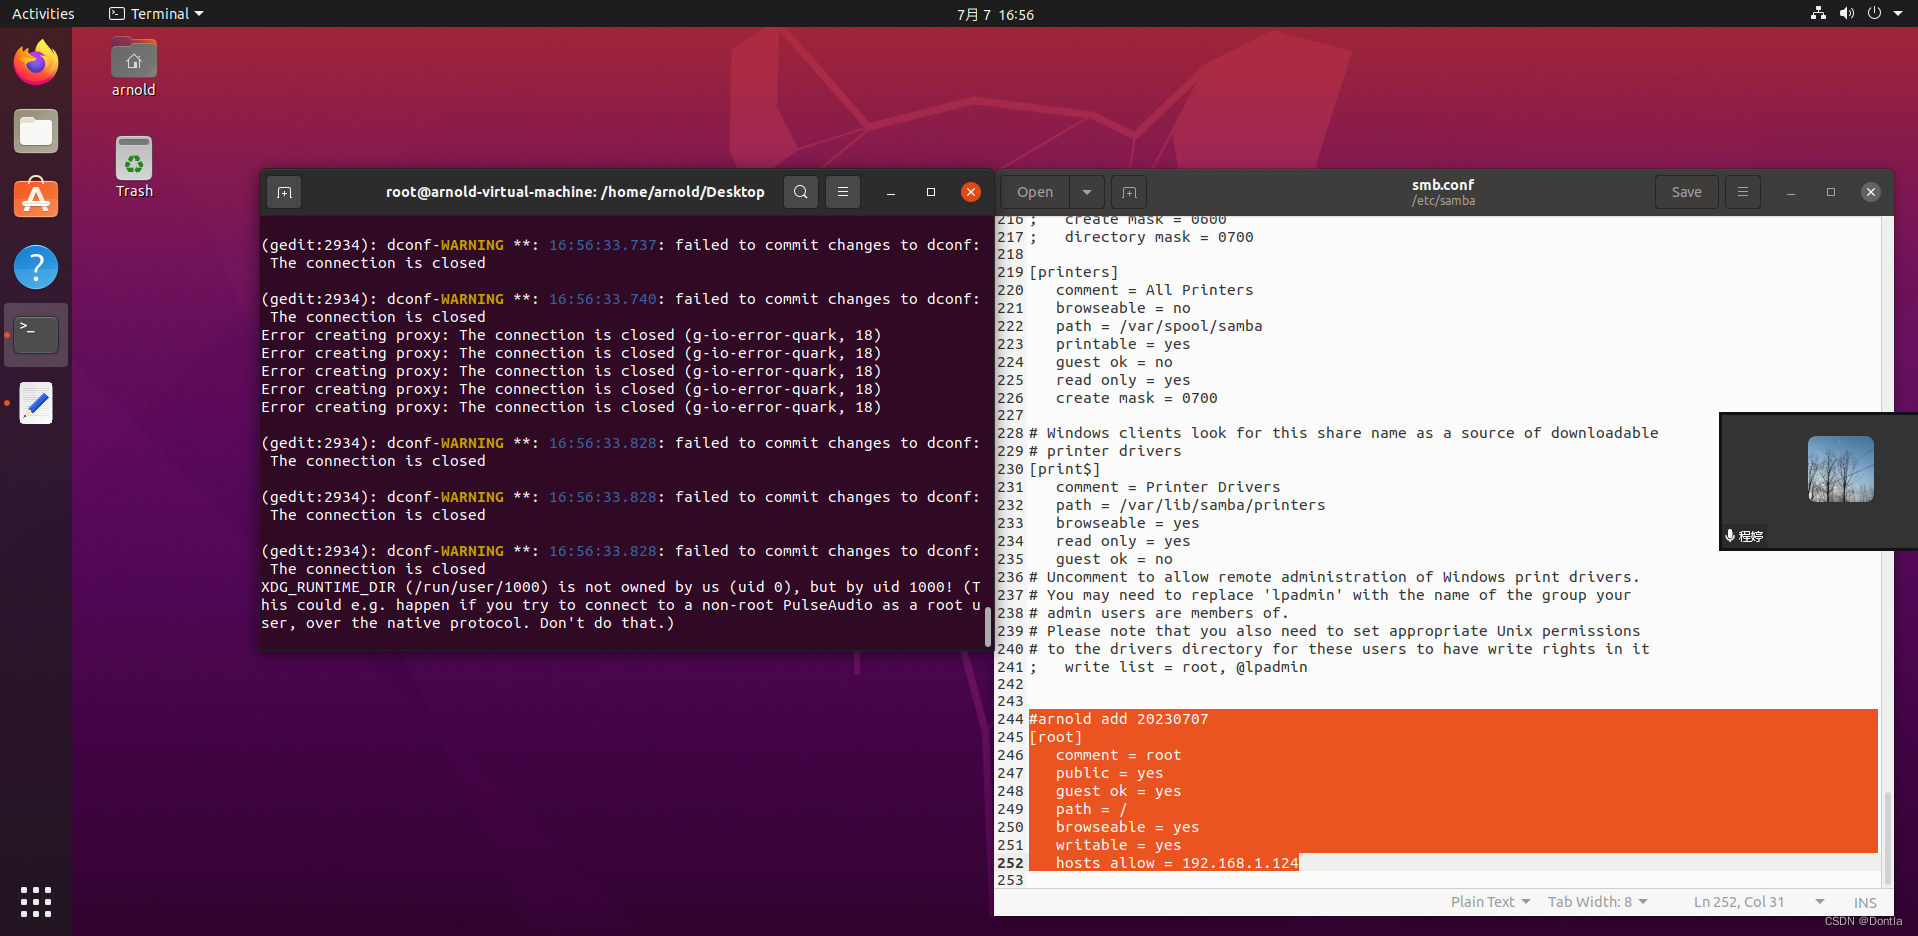
[printers]
comment = All Printers
browseable = no
path = /var/spool/samba
printable = yes
guest ok = no
read only = yes
create mask = 0700
# Windows clients look for this share name as a source of downloadable
# printer drivers
[print$]
comment = Printer Drivers
path = /var/lib/samba/printers
browseable = yes
read only = yes
guest ok = no
# Uncomment to allow remote administration of Windows print drivers.
# You may need to replace 'lpadmin' with the name of the group your
# admin users are members of.
# Please note that you also need to set appropriate Unix permissions
# to the drivers directory for these users to have write rights in it
; write list = root, @lpadmin
中文翻译
#
# Debian GNU/Linux的Samba套件的示例配置文件。
#
#
# 这是主要的Samba配置文件。您应该阅读
# smb.conf(5)手册页以了解列出的选项
# 这里。Samba有大量可配置的选项,其中大多数
# 在此示例中未显示
#
# 在此文件中,一些经常值得调整的选项已经包含
# 作为注释的示例。
#  - 当这些选项用“;”注释时,建议的设置
#    与默认的Samba行为不同
#  - 当用“#”注释时,建议的设置是默认的
#    Samba行为,但该选项被认为很重要
#    足够在这里提到
#
# 注意:每当您修改此文件时,都应运行命令
# “testparm”来检查是否有任何基本的语法错误。

#======================= 全局设置 =======================

[global]

## 浏览/识别 ###

# 将此更改为您的Samba服务器所属的工作组/NT域名
   workgroup = WORKGROUP

# server string是NT描述字段的等效项
   server string = %h服务器(Samba,Ubuntu)

#### 网络 ####

# 要绑定到的特定接口/网络集
# 这可以是接口名称或IP地址/子网掩码;
# 通常首选接口名称
;   interfaces = 127.0.0.0/8 eth0

# 仅绑定到指定的接口和/或网络;您必须使用
# 上面的“interfaces”选项来使用此功能。
# 如果您的Samba机器没有受防火墙保护或是防火墙本身,则建议启用此功能。
# 但是,此选项无法正确处理动态或非广播接口。
;   bind interfaces only = yes


#### 调试/记账 ####

# 这告诉Samba为每个连接的机器使用单独的日志文件
   log file = /var/log/samba/log.%m

# 限制单个日志文件的大小(以KiB为单位)。
   max log size = 1000

# 我们希望Samba仅记录到/var/log/samba/log.{smbd,nmbd}。
# 如果您希望将重要消息发送到syslog,请附加syslog@1。
   logging = file

# Samba崩溃时执行合理的操作:向管理员发送回溯
   panic action = /usr/share/samba/panic-action %d


####### 认证 #######

# 服务器角色。定义Samba将以哪种模式运行。可能的
# 值为“独立服务器”,“成员服务器”,“经典主
# 域控制器”,“经典备份域控制器”,“活动
# 目录域控制器”。
#
# 大多数人都希望是“独立服务器”或“成员服务器”。
# 作为“活动目录域控制器”运行将需要首先
# 运行“samba-tool domain provision”来擦除数据库并创建一个
# 新的域。
   server role = standalone server

   obey pam restrictions = yes

# 此布尔参数控制Samba在更改加密的SMB密码时是否尝试将Unix
# 密码与SMB密码同步。
   unix password sync = yes

# 在Debian GNU/Linux系统上使Unix密码同步工作,必须设置以下参数(感谢Ian Kahan <<kahan@informatik.tu-muenchen.de>提供了Debian Sarge中passwd程序的正确聊天脚本)。
   passwd program = /usr/bin/passwd %u
   passwd chat = *输入新密码:* %n\n *重新输入新密码:* %n\n *密码更新成功* .

# 此布尔值控制在SMB客户端请求密码更改时是否使用PAM而不是'passwd program'中列出的程序。默认值为'no'。
   pam password change = yes

# 此选项控制如何将不成功的身份验证尝试映射到匿名连接
   map to guest = bad user

########## 域 ###########

#
# 以下设置仅在设置了'server role = primary classic domain controller'、'server role = backup domain controller'或'domain logons'时生效
#

# 它指定了用户的配置文件目录(从客户端的角度来看)。以下所需的[profiles]共享必须在samba服务器上设置(参见下文)
;   logon path = \\%N\profiles\%U
# 另一个常见的选择是将配置文件存储在用户的主目录中(这是Samba的默认设置)
#   logon path = \\%N\%U\profile

# 仅在设置了'domain logons'时才生效
# 它指定了用户主目录的位置(从客户端的角度来看)
;   logon drive = H:
#   logon home = \\%N\%U

# 仅在设置了'domain logons'时才生效
# 它指定了登录时要运行的脚本。脚本必须存储在[netlogon]共享中
# 注意:必须以'DOS'文件格式约定存储
;   logon script = logon.cmd

# 这允许通过SAMR RPC管道在域控制器上创建Unix用户。示例命令创建一个带有禁用的Unix密码的用户帐户;请根据您的需求进行调整
; add user script = /usr/sbin/adduser --quiet --disabled-password --gecos "" %u

# 这允许通过SAMR RPC管道在域控制器上创建机器帐户。
# 以下假设系统上存在一个"machines"组
; add machine script  = /usr/sbin/useradd -g machines -c "%u machine account" -d /var/lib/samba -s /bin/false %u

# 这允许通过SAMR RPC管道在域控制器上创建Unix组。
; add group script = /usr/sbin/addgroup --force-badname %g

############ 其他 ############

# 使用以下行可以根据每台机器自定义配置
# %m将被替换为连接的机器的NetBIOS名称
;   include = /home/samba/etc/smb.conf.%m

# 一些winbind的默认值(确保您没有使用这些范围进行其他操作。)
;   idmap config * :              backend = tdb
;   idmap config * :              range   = 3000-7999
;   idmap config YOURDOMAINHERE : backend = tdb
;   idmap config YOURDOMAINHERE : range   = 100000-999999
;   template shell = /bin/bash

# 设置usershare选项以使非root用户能够使用net usershare命令共享文件夹。

# 最大用户共享数。0表示禁用用户共享。
#   usershare max shares = 100

# 允许获得用户共享权限的用户创建公共共享,而不仅仅是经过身份验证的用户
   usershare allow guests = yes

#======================= 共享定义 =======================

# 取消以下注释(并调整下面的其他设置)以启用默认的主目录共享。这将共享每个用户的主目录作为 \\server\username
;[homes]
;   comment = 主目录
;   browseable = no

# 默认情况下,主目录是只读的。如果要能够对其进行写操作,请将下一个参数设置为 'no'。
;   read only = yes

# 文件创建掩码设置为 0700 以提高安全性。如果要创建具有组读写权限的文件,请将下一个参数设置为 0775。
;   create mask = 0700

# 目录创建掩码设置为 0700 以提高安全性。如果要创建具有组读写权限的目录,请将下一个参数设置为 0775。
;   directory mask = 0700

# 默认情况下,\\server\username 共享可以被任何具有对 Samba 服务器的访问权限的人连接。
# 取消以下参数的注释以确保只有 "username" 可以连接到 \\server\username
# 在使用外部身份验证方案时,可能需要进行调整
;   valid users = %S

# 取消以下注释并创建 netlogon 目录以用于域登录
# (您还需要将 Samba 配置为充当域控制器。)
;[netlogon]
;   comment = 网络登录服务
;   path = /home/samba/netlogon
;   guest ok = yes
;   read only = yes

# 取消以下注释并创建 profiles 目录以存储用户配置文件
# (请参阅上面的 "logon path" 选项)
# (您还需要将 Samba 配置为充当域控制器。)
# 下面的路径应该对所有用户都具有可写权限,以便在首次登录时创建他们的配置文件目录
;[profiles]
;   comment = 用户配置文件
;   path = /home/samba/profiles
;   guest ok = no
;   browseable = no
;   create mask = 0600
;   directory mask = 0700

[printers]
   comment = 所有打印机
   browseable = no
   path = /var/spool/samba
   printable = yes
   guest ok = no
   read only = yes
   create mask = 0700

# Windows 客户端将查找此共享名称作为可下载的打印机驱动程序的来源
[print$]
   comment = 打印机驱动程序
   path = /var/lib/samba/printers
   browseable = yes
   read only = yes
   guest ok = no
# 取消注释以允许远程管理Windows打印驱动程序。
# 您可能需要将'lpadmin'替换为您的管理员用户所属的组的名称。
# 请注意,您还需要为这些用户在驱动程序目录中设置适当的Unix权限,以便他们具有写入权限。
;   write list = root, @lpadmin
示例
配置1(没太搞懂guest ok和public区别)
以下是我的一个可用配置,方便我在windows上访问ubuntu虚拟机上的文件:
#arnold add 20230707
[root]
   comment = root
   public = yes
   guest ok = yes
   path = /
   browseable = yes
   writable = yes
   hosts allow = 192.168.1.124
保存后,执行samba restart使设置生效。
我没太搞懂guest ok和public区别,这里就先全部打开了。