一、yaml的初步了解
YAML 是一个被广泛使用的数据序列化和配置语言,后缀可以为yaml或yml, 支持#注释,通过缩进表示层级,区分大小写,读取出来之后是一个字典列表
yaml 的用途:
- 用于做配置文件 (yaml )
在k8s集群中要使用kubectl部署一个应用,哪些应用都使用的yaml格式的文件 - 用于编写自动化测试用例
yaml的数据组成:
- map对象, 键:(空格)值
name: 晴雯
- 数组(list),用‘’-‘’表示列表
mylist:
  - name1: 李白
  - name2: 杜甫
  - age:
      - libai: 55
      - dufu: 56
二、在python中处理yaml文件
1、用面向对象方法,将yaml的处理封装起来,在其他模块就可以直接使用
导入yaml库
import json
import random
import re
import yaml

class YamlUtil:
    '''
    本类是操作yaml文件的一些方法,包括读写,和解析yaml 中的随机数字和随机字符串
    '''
2、写一个读yaml的方法,该方法只读取只含有键值对的yaml,根据关键字读取出值,如:
name: 黛玉
age: 16
def read_simple_yaml(self,path,key):
        '''
        读取简单的yaml文件,只有键值对的,根据key返回值
        :param path: yaml文件路径
        :param key: 要查找的key值
        :return: 返回key对应的value值
        '''
        with open(path,mode='r',encoding='utf-8') as f:
            value = yaml.load(stream=f,Loader=yaml.FullLoader)
            return value[key]
3、这也是一个读取yaml的方法,改方法读取的是包含嵌套的yaml文件,一直把整个yaml内容都读取出来。如:
mylist:
  - name1: 李白
  - name2: 杜甫
  - age:
      - libai: 55
      - dufu: 56
def read_complex_yaml(self,path):
        '''
        读取复杂的yaml文件类容,比如有嵌套的,直接返回列表
        :param path: yaml文件的路径
        :return: 返回读取到的yaml内容
        '''
        try:
            with open(path,mode='r',encoding='utf-8') as f:
                value = yaml.load(stream=f,Loader=yaml.FullLoader)
                return value
        except:
            print("No such file or directory")
4、将内容写入到yaml中。
def write_yaml(self,path,data,mode=None):
        '''
        :param path: yaml文件路径
        :param data: 要写入yaml文件的数据
        :param mode: 写入的模式,不传默认是追加
        :return: 无返回值
        '''
        try:
            if mode == None:
                mode='a'
            else:
                mode = mode
            with open(path,mode=mode,encoding='utf-8') as f:
                yaml.dump(data=data,stream=f,allow_unicode=True)
        except:
            print("No such file or directory")
5、清空yaml的方法
def clear_yaml(self,path):
        '''
        清空yaml文件
        :param path: 要清空的yaml文件路径
        :return: 无返回值
        '''
        try:
            with open(path,mode='w',encoding='utf-8') as f:
                f.truncate()
        except:
            print("No such file or directory")
三:读写ini的文件
配置文件以ini结尾,如下图
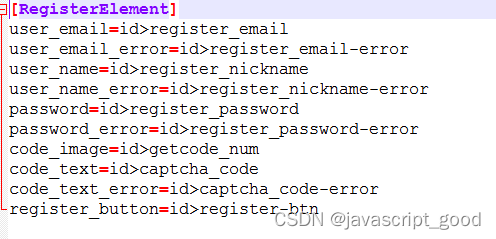
处理ini文件需要导入configparser
1、初始化对象,初始化给文件路径和要读取那个节点的,文件路径给了默认值,如果没有穿就去读默认的文件
#coding=utf-8
import configparser

class ReadIni(object):
    def __init__(self,file_name=None,node=None):
        if file_name == None:
            file_name = "F:\myfile\python\code\seleniumpython\config\LocalElement.ini"
        if node == None:
            self.node = "RegisterElement"
        else:
            self.node = node
        self.cf = self.load_ini(file_name)
2、加载文件
#加载文件
    def load_ini(self,file_name):
        cf = configparser.ConfigParser()
        cf.read(file_name)
        return cf
3、获取value值
 #获取value得值
    def get_value(self,key):
        data = self.cf.get(self.node,key)
        return data
四、处理execl文件
处理execl文件需要用到xlrd、xlutils.copy
1、初始化对象,传入文件路径,和index
#--coding:utf-8--

import xlrd
from xlutils.copy import copy
import time

class ExeclUtil(object):
	'''读取execl内容'''
	def __init__(self,file_path = None,index = None):
		self.file_path = file_path
		if self.file_path == None:
			self.file_path = "F:\\myfile\\python\\code\\selenium_project\\config\\casedata.xls"
		if index == None:
			index = 0
		self.data = xlrd.open_workbook(self.file_path)
		self.table = self.data.sheets()[index]
2、获取表中的数据,返回结果
def get_data(self):
		'''将表格中的数据读入到一个list中'''
		results = []
		rows = self.get_rows()
		if rows != None:
			for i in xrange(rows):
				col = self.table.row_values(i)
				results.append(col)
			return results
		else:
			return None
3、获取表中的行数
def get_rows(self):
		'''获取execl行数'''
		rows = self.table.nrows
		if rows >= 1:
			return rows
		else:
			return None
4、获取单元格的数据
ef get_col_value(self,row,col):
		'''获取单元格数据'''
		if self.get_rows() > row:
			data = self.table.cell(row,col).value
			return data
		else:
			return None
5、给单元格写入数据
def write_value(self,row,col,value):
		'''给单元格写入数据'''
		read_value = xlrd.open_workbook(self.file_path)
		write_data = copy(read_value)
		write_data.get_sheet(0).write(row,col,value)
		write_data.save(self.file_path)
		time.sleep(2)


