目录
- 一、Squid 代理服务器
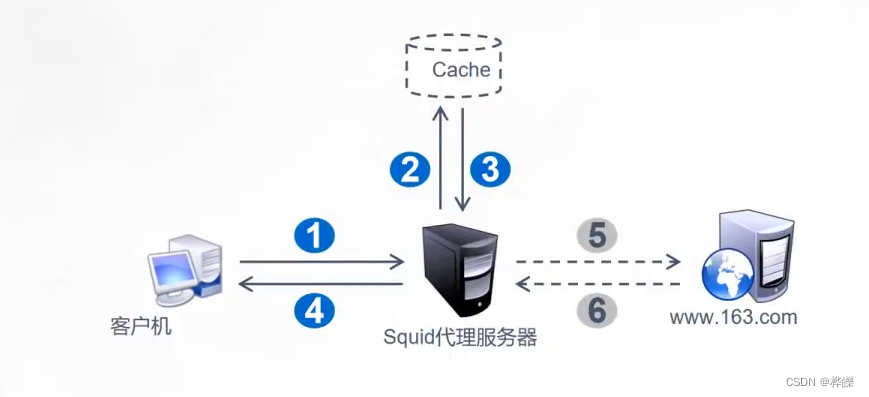
- 1、代理的工作机制
- 2、代理服务器的概念及其作用
- 3、Squid 代理的类型
- 二、安装 Squid 服务
- 1.编译安装 Squid
- 2.修改 Squid 的配置文件
- 3.Squid 的运行控制
- 1、检查配置文件语法是否正确
- 2、启动 Squid,第一次启动 Squid 服务时,会自动初始化缓存目录
- 4.supervisor使用详解
- 5、supervisor常用命令
- 6、构建传统代理服务器
- 7、设置web服务器
- 8、客户端配置(添加代理)
- 三、构建透明代理服务器
- 1、环境配置
- 2、在代理服务器上添加网卡
- 3、Squid服务器配置
- 4、开启路由转发,实现本机中不同网段的地址转发
- 5、web服务器配置
- 6、客户端关闭代理
- 7、查看 Squid 访问日志的新增记录
- 8、client1 主机设置外网访问
- 四、ACL访问控制
- 1.定义访问控制列表
- 2、启动对象列表管理
- 五、Squid 日志分析
- 1、安装图像处理软件包
- 2、添加不计入站点文件,添加的域名将不被显示在排序中
- 3、验证
- 4、运行
- 5、添加计划任务,执行每天生成报告
- 六、Squid 反向代理
- 1、工作机制
- 2、清空之前透明模式配置的 iptables 规则
- 3、后端节点服务器设置
- 4、客户机的域名映射配置
一、Squid 代理服务器
Squid 主要提供缓存加速、应用层过滤控制的功能。
1、代理的工作机制
1.代替客户机向网站请求数据,从而可以隐藏用户的真实IP地址。
2.将获得的网页数据(静态 Web 元素)保存到缓存中并发送给客户机,以便下次请求相同的数据时快速响应。
2、代理服务器的概念及其作用
代理服务器是一个位于客户端和原始(资源)服务器之间的服务器,为了从原始服务器取得内容,客户端向代理服务器发送一个请求并指定目标原始服务器,然后代理服务器向原始服务器转交请求并将获得的内容返回给客户端。
缓存代理对于Web至关重要,尤其对于大型高负载Web站点。缓存可作为性能优化的一个重要手段,可以极大减轻后端服务器的负载。通常对于静态资源,即较少经常更新的资源,如图片,css或js等进行缓存,从而在每次刷新浏览器的时候,不用重新请求,而是从缓存里面读取,这样就可以减轻服务器的压力。
其主要作用有:
资源获取:代替客户端实现从原始服务器的资源获取;
加速访问:代理服务器可能离原始服务器更近,从而起到一定的加速作用;
缓存作用:代理服务器保存从原始服务器所获取的资源,从而实现客户端快速的获取;
隐藏真实地址:代理服务器代替客户端去获取原始服务器资源,从而隐藏客户端真实信息。
3、Squid 代理的类型
1、传统代理:适用于Internet 正向代理,需在客户机指定代理服务器的地址和端口。
2、透明代理:客户机不需指定代理服务器的地址和端口,而是通过默认路由、防火墙策略将Web访问重定向给代理服务器处理。
3、反向代理:如果 Squid 反向代理服务器中缓存了该请求的资源,则将该请求的资源直接返回给客户端;否则反向代理服务器将向后台的 WEB 服务器请求资源,然后将请求的应答返回给客户端,同时也将该应答缓存在本地,供下一个请求者使用。
二、安装 Squid 服务
关闭服务器的防火墙
systemctl stop firewalld
systemctl disable firewalld
setenforce 0
1.编译安装 Squid
将源码包放入opt目录下,并进行解压文件
yum -y install gcc gcc-c++ make
tar zxvf squid-3.5.28.tar.gz -C /opt/
cd /opt/squid-3.5.28
./configure --prefix=/usr/local/squid \				#指定安装目录路径
--sysconfdir=/etc \									#指定配置文件路径
--enable-arp-acl \									#MAC地址管控,防止客户端使用IP欺骗
--enable-linux-netfilter \							#使用内核过滤
--enable-linux-tproxy \								#支持透明模式
--enable-async-io=100 \								#异步IO,提升存储性能
--enable-err-language="Simplify_Chinese" \			#错误信息的显示语言
--enable-underscore \								#允许URL中有下划线
--disable-poll \									#关闭默认使用 poll 模式
--enable-epoll \									#开启epoll模式提升性能
--enable-gnuregex									#使用GNU正则表达式
----------------------------------------------------------------------------------------------------------

./configure --prefix=/usr/local/squid \
--sysconfdir=/etc \
--enable-arp-acl \
--enable-linux-netfilter \
--enable-linux-tproxy \
--enable-async-io=100 \
--enable-err-language="Simplify_Chinese" \
--enable-underscore \
--disable-poll \
--enable-epoll \
--enable-gnuregex
进行编译安装
make && make install
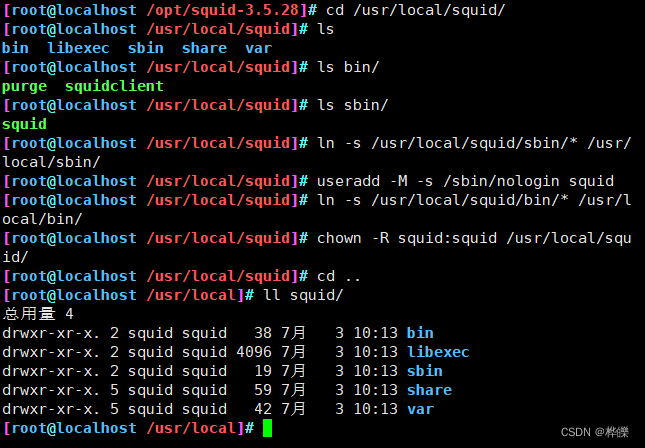
设置软连接创建用户和加权
ln -s /usr/local/squid/sbin/* /usr/local/sbin/

ln -s /usr/local/squid/bin/* /usr/local/bin/

useradd -M -s /sbin/nologin squid

chown -R squid:squid /usr/local/squid/var/		#此目录用于存放缓存文件
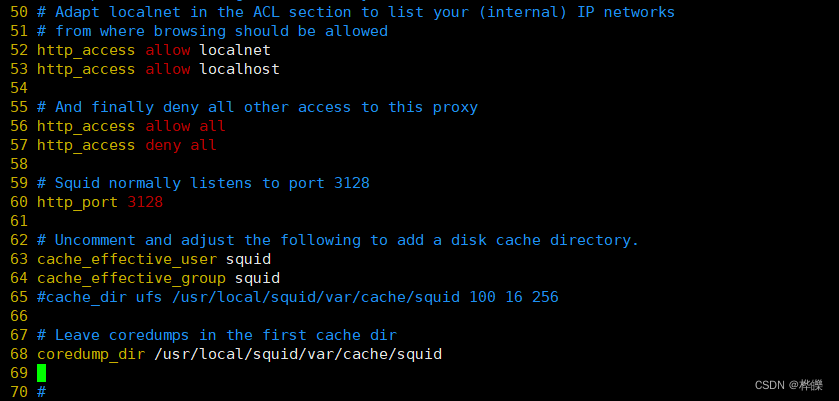
2.修改 Squid 的配置文件
vim /etc/squid.conf
......
--56行--插入
http_access allow all				#放在 http_access deny all 之前,允许任意客户机使用代理服务,控制规则自上而下匹配
http_access deny all
http_port 3128						#用来指定代理服务监听的地址和端口(默认的端口号为 3128)
--61行--插入
cache_effective_user squid			#添加,指定程序用户,用来设置初始化、运行时缓存的账号,否则启动不成功
cache_effective_group squid			#添加,指定账号基本组

coredump_dir /usr/local/squid/var/cache/squid		#指定缓存文件目录
3.Squid 的运行控制
1、检查配置文件语法是否正确
squid -k parse

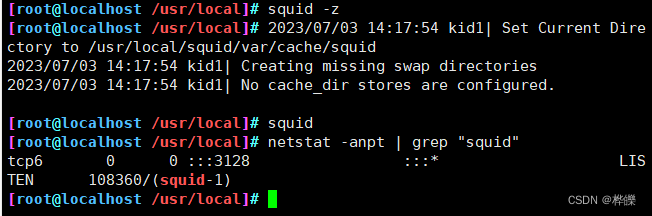
2、启动 Squid,第一次启动 Squid 服务时,会自动初始化缓存目录
squid -z 					#-z 选项用来初始化缓存目录
squid						#启动 squid 服务

netstat -anpt | grep "squid"
4.supervisor使用详解
简介
使用文档:http://supervisord.org/

supervisor是Python开发的c/s服务,是Linux系统下的进程管理工具。

可以监听、启动、停止、重启一个或多个进程
用supervisor管理的进程,当一个进程意外被杀死,supervisor监听到进程死后,会自动将它重启,很方便的做到进程的自动恢复的功能,不在需要自己写脚本来控制
[unix_http_server]
file=/var/run/supervisor.sock    ;UNIX socket 文件,supervisorctl 会使用
;chmod=0700                      ;socket文件的mode,默认是0700
chmod=0766
;chown=nobody:nogroup            ;socket文件的owner,格式:uid:gid

;[inet_http_server]              ;HTTP服务器,提供web管理界面
;port=0.0.0.0:9001               ;Web管理后台运行的IP和端口,如果开放到公网,需要注意安全性
;username=user                   ;登录管理后台的用户名
;password=123                    ;登录管理后台的密码

[supervisord]
logfile=/var/log/supervisord.log    ;日志文件,默认是 $CWD/supervisord.log
logfile_maxbytes=50MB               ;日志文件大小,超出会rotate,默认 50MB,如果设成0,表示不限制大小
logfile_backups=10                  ;日志文件保留备份数量默认10,设为0表示不备份
loglevel=info                       ;日志级别,默认info,其它: debug,warn,trace
pidfile=/var/run/supervisord.pid    ;pid 文件
nodaemon=false                      ;是否在前台启动,默认是false,即以 daemon 的方式启动
minfds=1024                         ;可以打开的文件描述符的最小值,默认 1024
minprocs=200                        ;可以打开的进程数的最小值,默认 200

[supervisorctl]
serverurl=unix:///tmp/supervisor.sock  ;通过UNIX socket连接supervisord,路径与unix_http_server部分的file一致
;serverurl=http://127.0.0.1:9001       ;通过HTTP的方式连接supervisord

; [program:xx]是被管理的进程配置参数,xx是进程的名称
[program:tomcat]
command=/usr/local/apache-tomcat-8.0.35/bin/catalina.sh run  ;程序启动命令
autostart=true          ;在supervisord启动的时候也自动启动
startsecs=10            ;启动10秒后没有异常退出,就表示进程正常启动了,默认为1秒
autorestart=true        ;程序退出后自动重启,可选值:[unexpected,true,false],默认为unexpected,表示进程意外杀死后才重启
startretries=3          ;启动失败自动重试次数,默认是3
user=tomcat             ;用哪个用户启动进程,默认是root
priority=999            ;进程启动优先级,默认999,值小的优先启动
redirect_stderr=true    ;把stderr重定向到stdout,默认false
stdout_logfile_maxbytes=200MB    ;stdout 日志文件大小,默认50MB
stdout_logfile_backups=20        ;stdout 日志文件备份数,默认是10
; stdout 日志文件,需要注意当指定目录不存在时无法正常启动,所以需要手动创建目录(supervisord 会自动创建日志文件)
stdout_logfile=/var/log/supervisor/logs/catalina.out
stopasgroup=false     ;默认为false,进程被杀死时,是否向这个进程组发送stop信号,包括子进程
killasgroup=false     ;默认为false,向进程组发送kill信号,包括子进程

;包含其它配置文件
[include]
# files = /etc/supervisord.d/*.ini    ;可以指定一个或多个以.ini结束的配置文件
files = /etc/supervisord.d/*.conf     ;也可以写成以.conf结尾的配置文件
; Sample supervisor config file.

[unix_http_server]
file=/var/run/supervisor/supervisor.sock   ; (the path to the socket file)
;chmod=0700                 ; sockef file mode (default 0700)
chmod=0766
;chown=nobody:nogroup       ; socket file uid:gid owner
;username=user              ; (default is no username (open server))
;password=123               ; (default is no password (open server))

;[inet_http_server]         ; inet (TCP) server disabled by default
;port=127.0.0.1:9001        ; (ip_address:port specifier, *:port for all iface)
;username=user              ; (default is no username (open server))
;password=123               ; (default is no password (open server))

[supervisord]
logfile=/var/log/supervisor/supervisord.log  ; (main log file;default $CWD/supervisord.log)
logfile_maxbytes=50MB       ; (max main logfile bytes b4 rotation;default 50MB)
logfile_backups=10          ; (num of main logfile rotation backups;default 10)
loglevel=info               ; (log level;default info; others: debug,warn,trace)
pidfile=/var/run/supervisord.pid ; (supervisord pidfile;default supervisord.pid)
nodaemon=false              ; (start in foreground if true;default false)
minfds=1024                 ; (min. avail startup file descriptors;default 1024)
minprocs=200                ; (min. avail process descriptors;default 200)
;umask=022                  ; (process file creation umask;default 022)
;user=chrism                 ; (default is current user, required if root)
;identifier=supervisor       ; (supervisord identifier, default is 'supervisor')
;directory=/tmp              ; (default is not to cd during start)
;nocleanup=true              ; (don't clean up tempfiles at start;default false)
;childlogdir=/tmp            ; ('AUTO' child log dir, default $TEMP)
;environment=KEY=value       ; (key value pairs to add to environment)
;strip_ansi=false            ; (strip ansi escape codes in logs; def. false)

; the below section must remain in the config file for RPC
; (supervisorctl/web interface) to work, additional interfaces may be
; added by defining them in separate rpcinterface: sections
[rpcinterface:supervisor]
supervisor.rpcinterface_factory = supervisor.rpcinterface:make_main_rpcinterface

[supervisorctl]
serverurl=unix:///var/run/supervisor/supervisor.sock ; use a unix:// URL  for a unix socket
;serverurl=http://127.0.0.1:9001 ; use an http:// url to specify an inet socket
;username=chris              ; should be same as http_username if set
;password=123                ; should be same as http_password if set
;prompt=mysupervisor         ; cmd line prompt (default "supervisor")
;history_file=~/.sc_history  ; use readline history if available

; The below sample program section shows all possible program subsection values,
; create one or more 'real' program: sections to be able to control them under
; supervisor.

;[program:theprogramname]
;command=/bin/cat              ; the program (relative uses PATH, can take args)
;process_name=%(program_name)s ; process_name expr (default %(program_name)s)
;numprocs=1                    ; number of processes copies to start (def 1)
;directory=/tmp                ; directory to cwd to before exec (def no cwd)
;umask=022                     ; umask for process (default None)
;priority=999                  ; the relative start priority (default 999)
;autostart=true                ; start at supervisord start (default: true)
;autorestart=true              ; retstart at unexpected quit (default: true)
;startsecs=10                  ; number of secs prog must stay running (def. 1)
;startretries=3                ; max # of serial start failures (default 3)
;exitcodes=0,2                 ; 'expected' exit codes for process (default 0,2)
;stopsignal=QUIT               ; signal used to kill process (default TERM)
;stopwaitsecs=10               ; max num secs to wait b4 SIGKILL (default 10)
;user=chrism                   ; setuid to this UNIX account to run the program
;redirect_stderr=true          ; redirect proc stderr to stdout (default false)
;stdout_logfile=/a/path        ; stdout log path, NONE for none; default AUTO
;stdout_logfile_maxbytes=1MB   ; max # logfile bytes b4 rotation (default 50MB)
;stdout_logfile_backups=10     ; # of stdout logfile backups (default 10)
;stdout_capture_maxbytes=1MB   ; number of bytes in 'capturemode' (default 0)
;stdout_events_enabled=false   ; emit events on stdout writes (default false)
;stderr_logfile=/a/path        ; stderr log path, NONE for none; default AUTO
;stderr_logfile_maxbytes=1MB   ; max # logfile bytes b4 rotation (default 50MB)
;stderr_logfile_backups=10     ; # of stderr logfile backups (default 10)
;stderr_capture_maxbytes=1MB   ; number of bytes in 'capturemode' (default 0)
;stderr_events_enabled=false   ; emit events on stderr writes (default false)
;environment=A=1,B=2           ; process environment additions (def no adds)
;serverurl=AUTO                ; override serverurl computation (childutils)

; The below sample eventlistener section shows all possible
; eventlistener subsection values, create one or more 'real'
; eventlistener: sections to be able to handle event notifications
; sent by supervisor.

;[eventlistener:theeventlistenername]
;command=/bin/eventlistener    ; the program (relative uses PATH, can take args)
;process_name=%(program_name)s ; process_name expr (default %(program_name)s)
;numprocs=1                    ; number of processes copies to start (def 1)
;events=EVENT                  ; event notif. types to subscribe to (req'd)
;buffer_size=10                ; event buffer queue size (default 10)
;directory=/tmp                ; directory to cwd to before exec (def no cwd)
;umask=022                     ; umask for process (default None)
;priority=-1                   ; the relative start priority (default -1)
;autostart=true                ; start at supervisord start (default: true)
;autorestart=unexpected        ; restart at unexpected quit (default: unexpected)
;startsecs=10                  ; number of secs prog must stay running (def. 1)
;startretries=3                ; max # of serial start failures (default 3)
;exitcodes=0,2                 ; 'expected' exit codes for process (default 0,2)
;stopsignal=QUIT               ; signal used to kill process (default TERM)
;stopwaitsecs=10               ; max num secs to wait b4 SIGKILL (default 10)
;user=chrism                   ; setuid to this UNIX account to run the program
;redirect_stderr=true          ; redirect proc stderr to stdout (default false)
;stdout_logfile=/a/path        ; stdout log path, NONE for none; default AUTO
;stdout_logfile_maxbytes=1MB   ; max # logfile bytes b4 rotation (default 50MB)
;stdout_logfile_backups=10     ; # of stdout logfile backups (default 10)
;stdout_events_enabled=false   ; emit events on stdout writes (default false)
;stderr_logfile=/a/path        ; stderr log path, NONE for none; default AUTO
;stderr_logfile_maxbytes=1MB   ; max # logfile bytes b4 rotation (default 50MB)
;stderr_logfile_backups        ; # of stderr logfile backups (default 10)
;stderr_events_enabled=false   ; emit events on stderr writes (default false)
;environment=A=1,B=2           ; process environment additions
;serverurl=AUTO                ; override serverurl computation (childutils)

; The below sample group section shows all possible group values,
; create one or more 'real' group: sections to create "heterogeneous"
; process groups.

;[group:thegroupname]
;programs=progname1,progname2  ; each refers to 'x' in [program:x] definitions
;priority=999                  ; the relative start priority (default 999)

; The [include] section can just contain the "files" setting.  This
; setting can list multiple files (separated by whitespace or
; newlines).  It can also contain wildcards.  The filenames are
; interpreted as relative to this file.  Included files *cannot*
; include files themselves.

[include]
;files = supervisord.d/*.ini
files = /etc/supervisord.d/*.conf
进程管理配置参数,应该每个进程写一个配置文件放在include指定的目录下包含进supervisord.conf文件中。
[program:squid]
command=/usr/local/squid/sbin/squid -N -d1
stdout_logfile=/var/log/supervisor/logs/run.log
stderr_logfile=/var/log/supervisor/logs/error.log
autostart=true
startsecs=10
autorestart=true
startretries=3
user=squid
priority=998
redirect_stderr=true
stdout_logfile_maxbytes=200MB
stdout_logfile_backups=20
stopasgroup=true
killasgroup=true
redirect_stderr=true
注:supervisor不能监控后台进程,command不能为后台运行命令
supervisor服务启动
mkdir -p /var/log/supervisor/logs

systemctl start supervisord
systemctl enable supervisord

supervisord -c /etc/supervisor.conf
启动服务前要先将所有的端口号删除,在重新启动

5、supervisor常用命令
supervisorctl是supervisord的命令行工具
- supervisorctl status           查看所有进程的状态
- supervisorctl stop <name>      停止进程
- supervisorctl start <name>     启动进程
- supervisorctl restart <name>   重启进程
- supervisorctl update           配置文件修改后可以使用该命令加载新的配置
- supervisorctl reload           重新启动配置中的所有程序
supervisorctl status squid              #nginx状态
supervisorctl stop squid               #停止nginx
supervisorctl start squid                 #启动nginx
supervisorctl restart squid               #重启nginx
supervisorctl reload squid               #重载nginx
6、构建传统代理服务器
vim /etc/squid.conf
......
http_access allow all
http_access deny all
http_port 3128
cache_effective_user squid
cache_effective_group squid
--63行--插入
cache_mem 1024 MB				#指定缓存功能所使用的内存空间大小,便于保持访问较频繁的WEB对象,容量最好为4的倍数,单位为MB,一般设为物理内存的1/3
cache_swap_high 95			#cache目录使用量大于95%时,开始清理旧的cache
cache_swap_low 90			#cache目录清理到90%时停止

reply_body_max_size 100 MB			#允许用户下载的最大文件大小,以字节为单位,当下载超过指定大小的Web对象时,浏览器的报错页面中会出现“请求或访问太大”的提示默认设置0表示不进行限制
maximum_object_size 512000 KB		#设置squid磁盘缓存最大文件,以KB为单位,超过的文件不保存到硬盘,而是直接转发给用户
maximum_object_size_in_memory 512 KB	#设置squid内存缓存最大文件,超过的文件不保存到内存
minimum_object_size 0 KB			设置squid磁盘缓存最小文件

重新启动服务
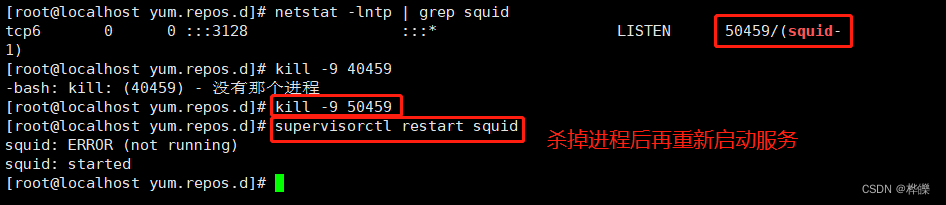
supervisorctl restart squid

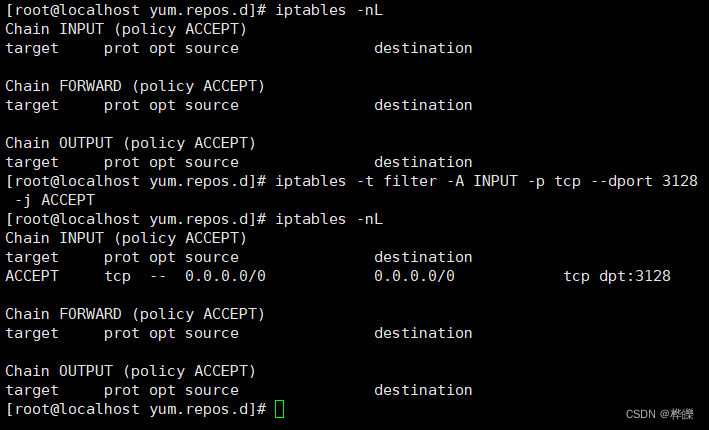
生产环境中还需要修改防火墙规则
iptables -t filter -A INPUT -p tcp --dport 3128 -j ACCEPT
7、设置web服务器
使用yum安装nginx服务进行网页访问
systemctl stop firewalld.service
setenforce 0
yum install -y nginx
 在nginx网页页面上添加网页内容

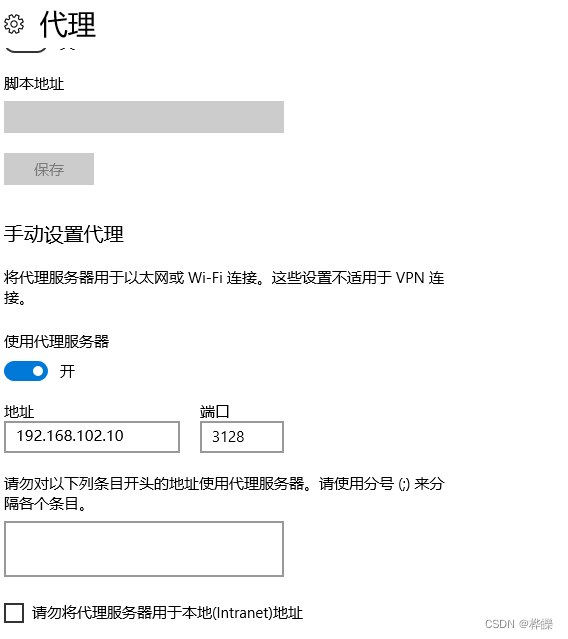
8、客户端配置(添加代理)
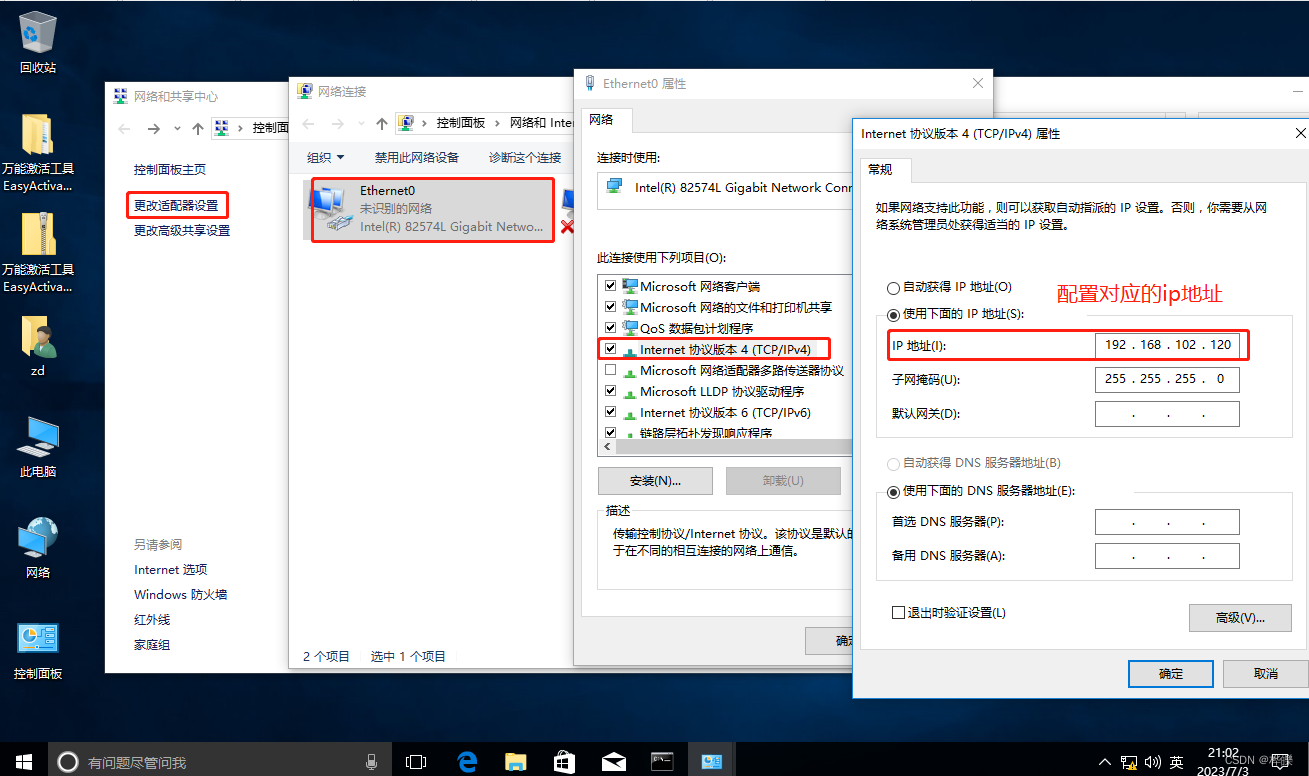
在浏览器上设置代理服务器的ip地址和端口号
在nginx服务器上的日志进行查看
使用另外一台主机进行查看网页
另一台主机也设置一下代理
三、构建透明代理服务器
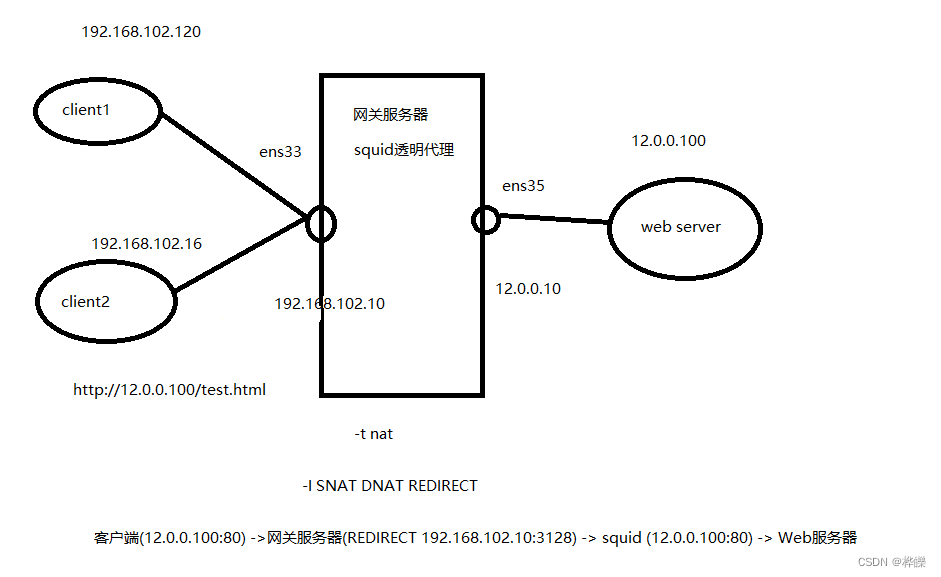
1、环境配置
| 主机 | 操作系统 | IP地址 | 工具 |
|---|---|---|---|
| Squid-Server | CentOS7 | ens33:192.168.102.10、 ens35:12.0.0.10 | squid-3.5.28.tar.gz |
| Web | CentOS7 | 12.0.0.100 | nginx |
| client2 | CentOS7 | 192.168.102.30 | – |
| client1 | Windows | 192.168.102.120 | —— |
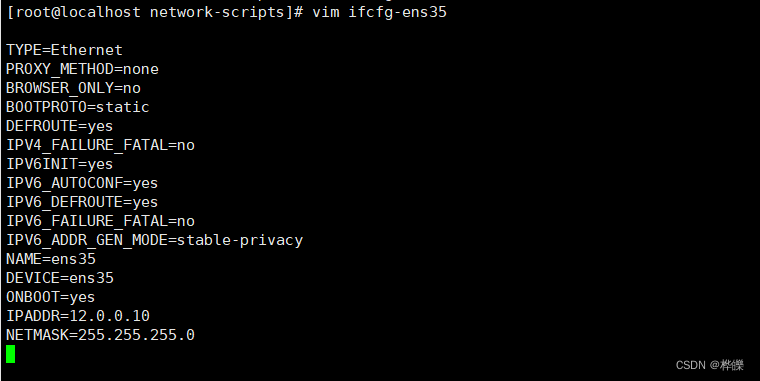
2、在代理服务器上添加网卡
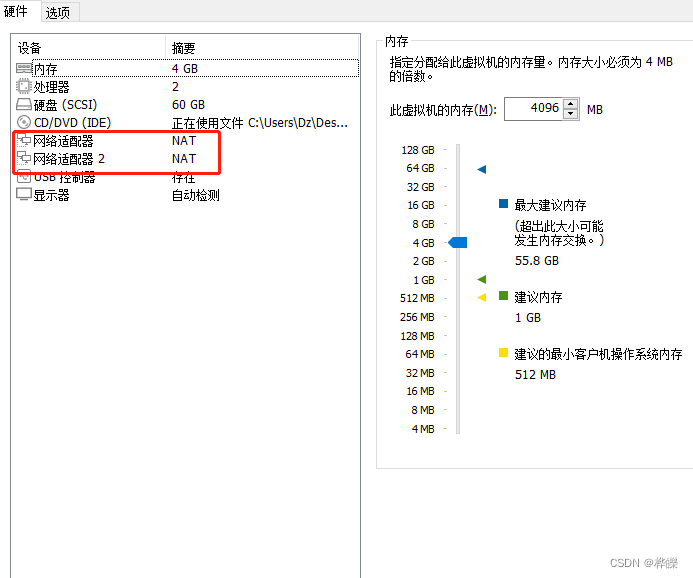
添加成功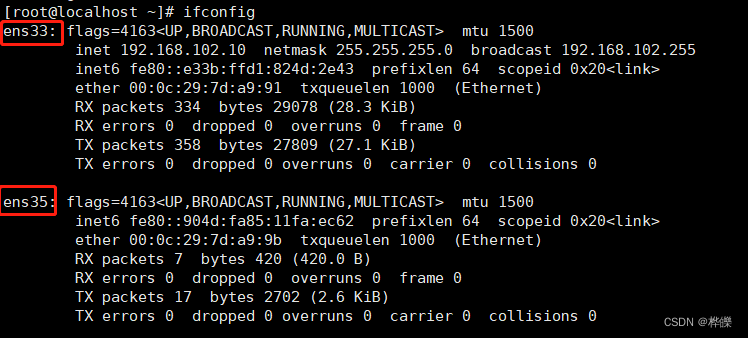
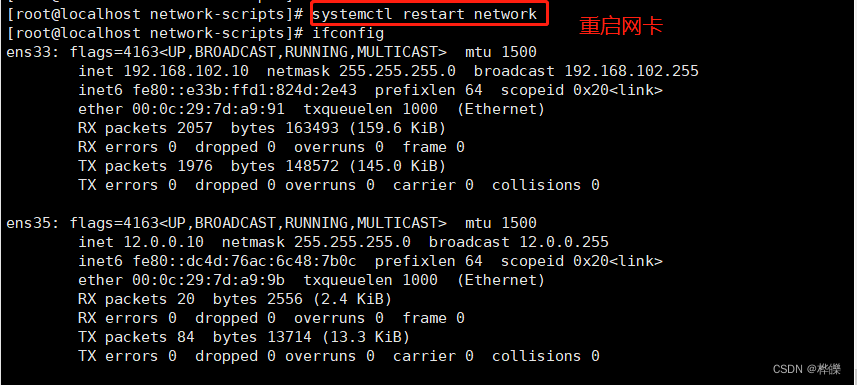
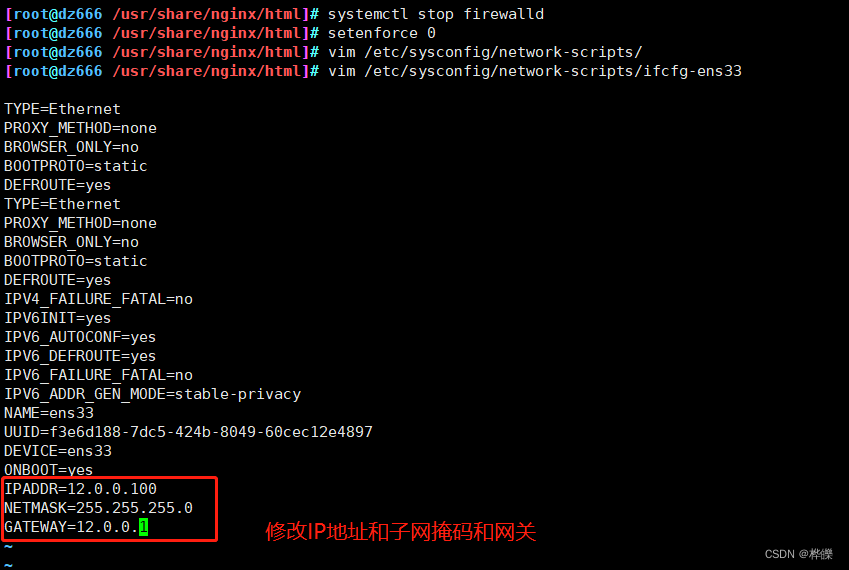
3、Squid服务器配置
cd /etc/sysconfig/network-scripts/
cp ifcfg-ens33 ifcfg-ens35
vim ifcfg-ens35

systemctl restart network
ifconfig
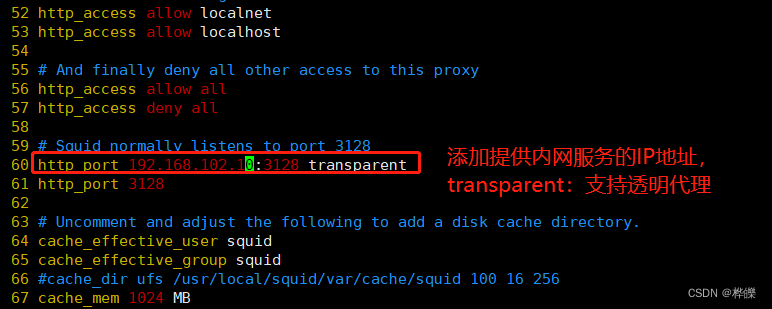
#60行修改添加提供内网服务的IP地址,和支持透明代理选项 transparent
vim /etc/squid.conf
......
http_access allow all
http_access deny all
http_port 192.168.102.10:3128 transparent
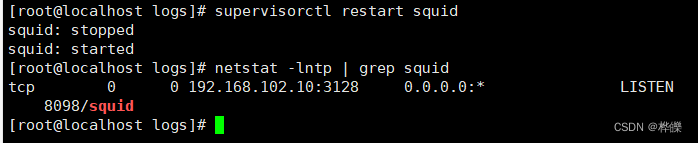
supervisorctl restart squid
netstat -natp | grep 3128
修改完配置文件后进行重新启动服务,查看服务有无启动
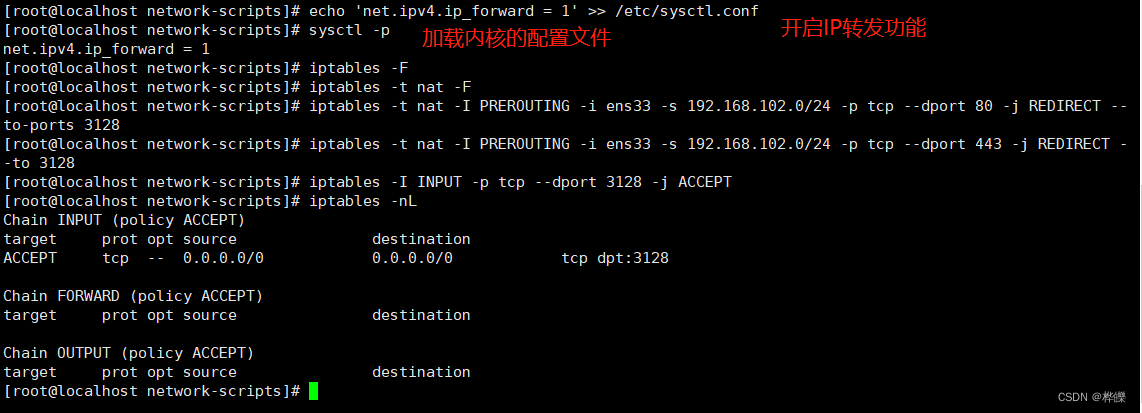
4、开启路由转发,实现本机中不同网段的地址转发
echo 'net.ipv4.ip_forward = 1' >> /etc/sysctl.conf
sysctl -p

#修改防火墙规则
iptables -F
iptables -t nat -F
iptables -t nat -I PREROUTING -i ens33 -s 192.168.102.0/24 -p tcp --dport 80 -j REDIRECT --to-ports 3128	#用于转发http协议
iptables -t nat -I PREROUTING -i ens33 -s 192.168.102.0/24 -p tcp --dport 443 -j REDIRECT --to 3128	#用于转发https协议
iptables -I INPUT -p tcp --dport 3128 -j ACCEPT
5、web服务器配置

6、客户端关闭代理
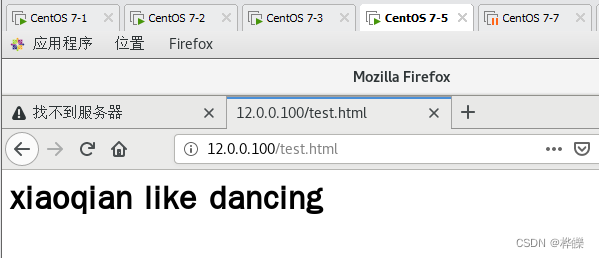
客户机测试(192.168.102.120)
关闭客户机的浏览器之前设置的代理服务器的功能后访问 http://12.0.0.100

访问web1服务器

使用浏览器访问web的ip地址

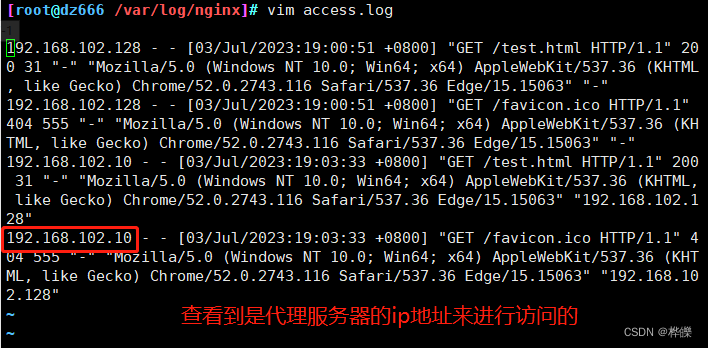
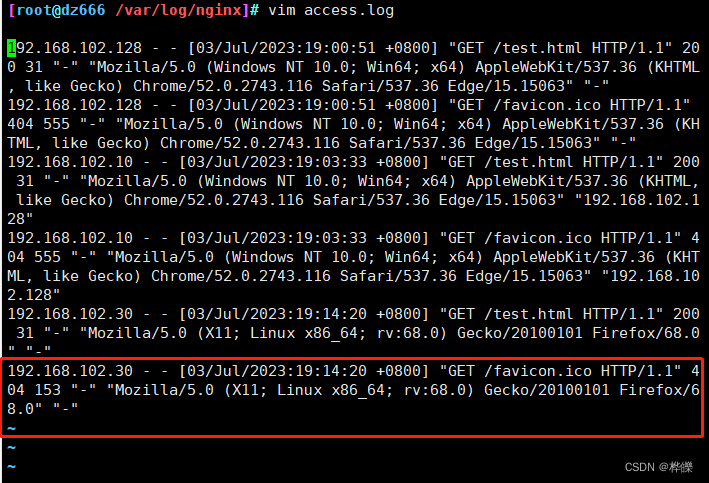
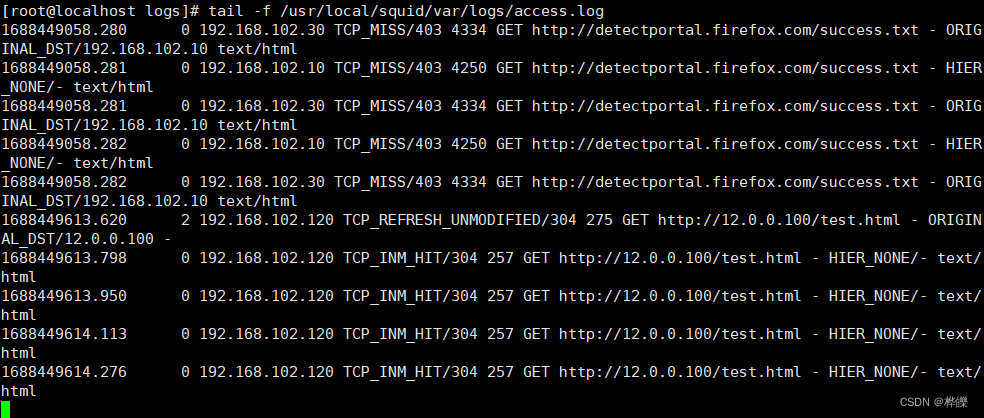
7、查看 Squid 访问日志的新增记录
tail -f /usr/local/squid/var/logs/access.log
#Squid代理服务器则是检测到客户机访问目标网站
1688449614.276 0 192.168.102.120 TCP_INM_HIT/304 257 GET http://12.0.0.100/test.html - HIER_NONE/- text/html
8、client1 主机设置外网访问
使用192.168.102.30主机进行访问
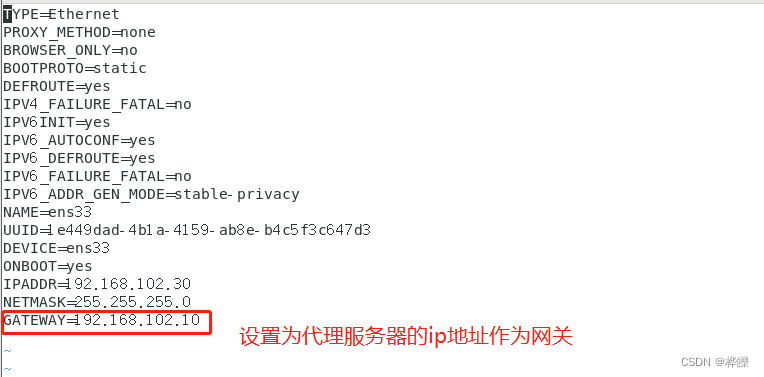
查看 Web 访问日志的新增记录,显示的是由代理服务器的外网口代替客户机在访问
tail -f access.log

四、ACL访问控制
在配置文件 squid.conf 中,ACL 访问控制通过以下两个步骤来实现
(1)使用 acl 配置项定义需要控制的条件
字号4
(2)通过 http_access 配置项对已定义的列表做“允许”或“拒绝”访问的控制。
字号4
1.定义访问控制列表
格式
acl 列表名称 列表类型 列表内容 …
vim /etc/squid.conf
acl localhost src 192.168.80.10/32 					#源地址为 192.168.80.10
acl MYLAN src 192.168.80.0/24 192.168.1.0/24		#客户机网段
acl destinationhost dst 192.168.80.13/32			#目标地址为 192.168.80.13
acl MC20 maxconn 20									#最大并发连接 20
acl PORT port 21									#目标端口 21
acl DMBLOCK dstdomain .qq.com						#目标域,匹配域内所有站点
acl BURL url_regex -i ^rtsp:// ^emule://			#以 rtsp://、emule:// 开头的目标 URL地址,-i表示忽略大小写
acl PURL urlpath_regex -i \.mp3$ \.mp4$ \.rmvb$		#以 .mp3、.mp4、.rmvb 结尾的目标 URL 路径
acl WORKTIME time MTWHF 08:30-17:30					#时间为周一至周五 8:30~17:30,“MTWHF”为每个星期的英文首字母
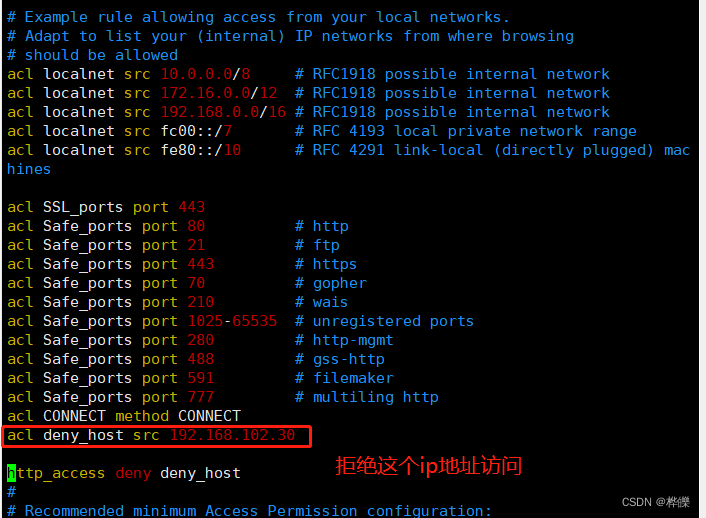
修改完后进行重新启动服务
设置后就可以看见192.168.102.30主机不能访问了,其余主机能访问

2、启动对象列表管理
mkdir /etc/squid
vim /etc/squid/dest.list
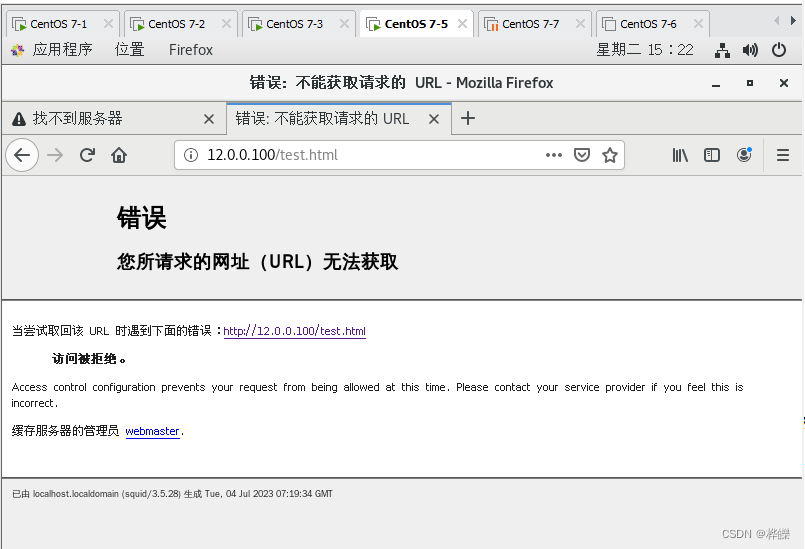
acl destinationhost dst "/etc/squid/dest.list"
http_access deny(或allow) destinationhost
#注意,如果是拒绝列表,需要放在http_access allow all前面

浏览器访问Web服务器 http://192.168.102.50 ,显示被访问被拒绝。
五、Squid 日志分析
1、安装图像处理软件包
yum install -y pcre-devel gd gd-devel
mkdir /usr/local/sarg
tar zxvf sarg-2.3.7.tar.gz -C /opt/
cd /opt/sarg-2.3.7
./configure --prefix=/usr/local/sarg \
--sysconfdir=/etc/sarg \							#配置文件目录,默认是/usr/local/etc
--enable-extraprotection							#额外安全防护
./configure --prefix=/usr/local/sarg --sysconfdir=/etc/sarg --enable-extraprotection
make && make install
vim /etc/sarg/sarg.conf
--7行--取消注释
access_log /usr/local/squid/var/logs/access.log		#指定访问日志文件
--25行--取消注释
title "Squid User Access Reports"					#网页标题
--120行--取消注释,修改
output_dir /var/www/html/sarg						#报告输出目录
--178行--取消注释
user_ip no											#使用用户名显示
--184行--取消注释,修改
topuser_sort_field connect reverse					#top排序中,指定连接次数采用降序排列,升序是normal
--190行--取消注释,修改
user_sort_field connect reverse						#对于用户访问记录,连接次数按降序排序
--206行--取消注释,修改
exclude_hosts /usr/local/sarg/noreport				#指定不计入排序的站点列表的文件
--257行--取消注释
overwrite_report no									#同名同日期的日志是否覆盖
--289行--取消注释,修改
mail_utility mailq.postfix							#发送邮件报告命令
--434行--取消注释,修改
charset UTF-8										#指定字符集UTF-8
--518行--取消注释
weekdays 0-6										#top排行的星期周期
--525行--取消注释
hours 0-23											#top排行的时间周期
--633行--取消注释
www_document_root /var/www/html						#指定网页根目录
2、添加不计入站点文件,添加的域名将不被显示在排序中
touch /usr/local/sarg/noreport

ln -s /usr/local/sarg/bin/sarg /usr/local/bin/
3、验证
安装一个阿帕奇的网页进行访问
yum install httpd -y
systemctl start httpd
4、运行
sarg #启动一次记录
使用代理服务器的ip地址进行访问,查看sarg报告网页。
http://192.168.102.10/squid-reports/

5、添加计划任务,执行每天生成报告
vim /usr/local/sarg/report.sh
#/bin/bash
#Get current date
TODAY=$(date +%d/%m/%Y)
#Get one week ago today
YESTERDAY=$(date -d "1 day ago" +%d/%m/%Y)
/usr/local/sarg/bin/sarg -l /usr/local/squid/var/logs/access.log -o /var/www/html/squid-reports -z -d $YESTERDAY-$TODAY &> /dev/null
find ./ -type d -a -name "$(env LANG=en_US.UTF-8 date -d "30 day ago" +%Y%b%d)-$(env LANG=en_US.UTF-8 date -d "29 day ago" +%Y%b%d)" | xargs rm -rf
exit 0
chmod +x /usr/local/sarg/report.sh
到执行每日任务的文件里进行配置
crontab -e
0 0 * * * /usr/local/sarg/report.sh
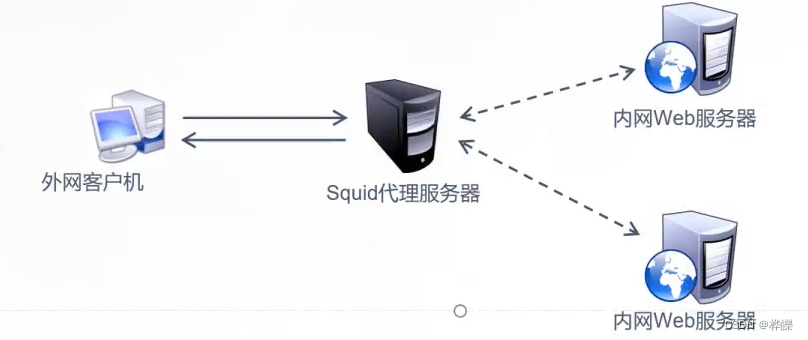
六、Squid 反向代理
如果 Squid 反向代理服务器中缓存了该请求的资源,则将该请求的资源直接返回给客户端;否则反向代理服务器将向后台的 Web 服务器请求资源,然后将请求的应答返回给客户端,同时也将该应答缓存在本地,供下一个请求者使用。

1、工作机制
●缓存网页对象,减少重复请求
●将互联网请求轮训或按权重分配到内网Web服务器
●代理用户请求,避免用户直接访问Web服务器,提高安全
vim /etc/squid.conf
http_port 192.168.102.10:80 accel vhost vport
cache_peer 192.168.102.20 parent 80 0 no-query originserver round-rob    in max_conn=5000 weight=1 name=web1
cache_peer 192.168.102.30 parent 80 0 no-query originserver round-rob    in max_conn=5000 weight=1 name=web2
cache_peer_domain web1 web2 www.dznb.com
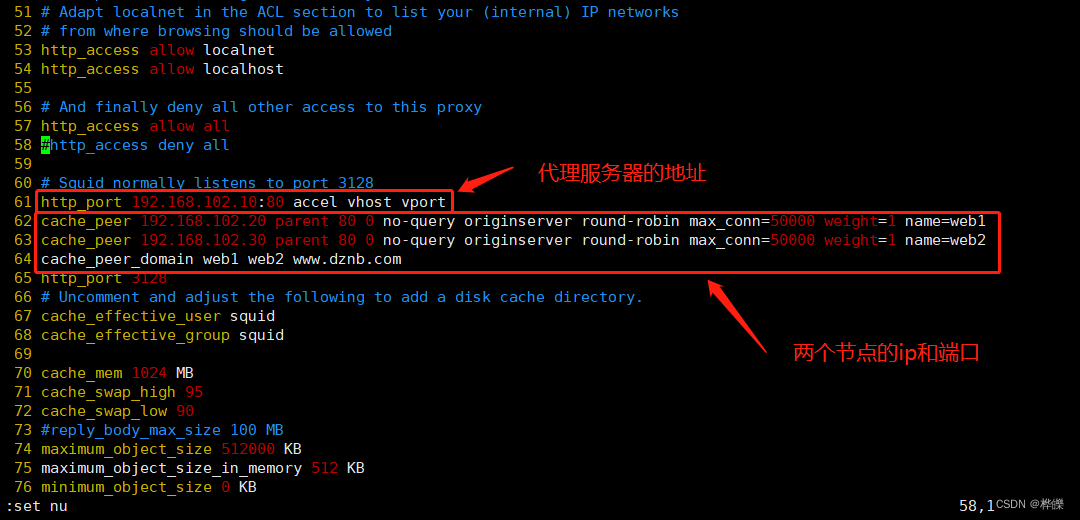
http_port 80 accel vhost vport #squid从一个缓存变成了一个Web服务器反向代理加速模式,这个时候squid在80端口监听请求,同时和web server的请求端口(vhost vport)绑定,这个时候请求到了squid,squid是不用转发请求的,而是直接要么从缓存中拿数据要么向绑定的端口直接请求数据。
accel :反向代理加速模式
vhost :支持域名或主机名来表示代理节点
vport :支持IP和端口来表示代理节点

parent :代表为父节点,上下关系,非平级关系
80 :代理内部web服务器的80端口
0 :没有使用icp(电信运营商),表示就一台squid服务器
no-query :不做查询操作,直接获取数据
originserver :指定是源服务器
round-robin :指定 squid 通过轮询方式将请求分发到其中一台父节点
max_conn :指定最大连接数
weight : 指定权重
name :设置别名
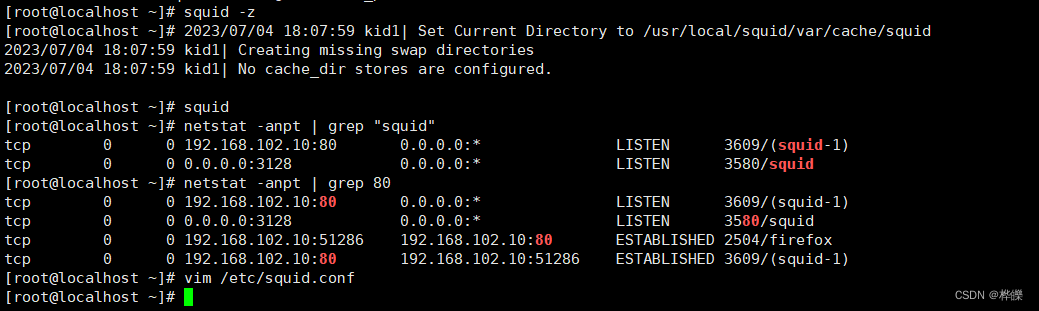
重新启动服务,并查看端口有没有打开
supervisorctl restart squid
netstat -natp | grep squid

2、清空之前透明模式配置的 iptables 规则
iptables -F
iptables -t nat -F
检查语法是否错误
squid -k parse
初始化缓存目录
squid -z 					#-z 选项用来初始化缓存目录
squid						#启动 squid 服务

netstat -anpt | grep "squid"
3、后端节点服务器设置
yum install -y httpd
systemctl start httpd
在两个节点上进行设置页面


4、客户机的域名映射配置
使用新的主机浏览器不开启代理访问
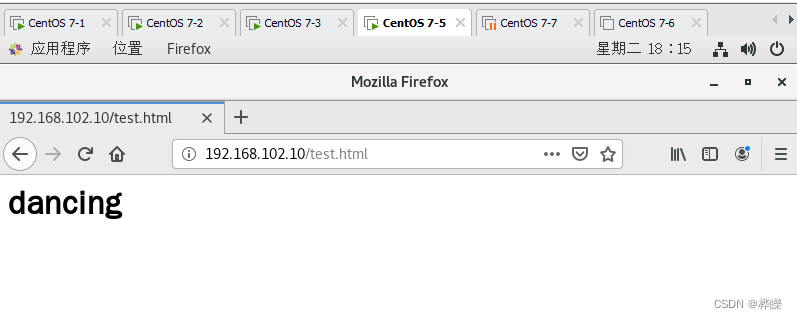
查看缓存命中情况
#在代理服务器上进行查看命中情况
tailf /usr/local/squid/var/logs/access.log

![[Visual Studio 报错] error 找不到指定的 SDK“Microsoft](https://img-blog.csdnimg.cn/img_convert/f453b0ee14720ffeb38cc9cf2febf1eb.png)