目录
30 多重采样
获得可用的样本数
设置一个渲染目标
添加新的附件
30 多重采样
我们的程序现在可以为纹理加载多层次的细节,这修复了在渲染离观众较远的物体时出现的假象。现在的图像平滑了许多,然而仔细观察,你会发现在绘制的几何图形的边缘有锯齿状的图案。在我们早期的一个程序中,当我们渲染一个四边形时,这一点尤其明显:

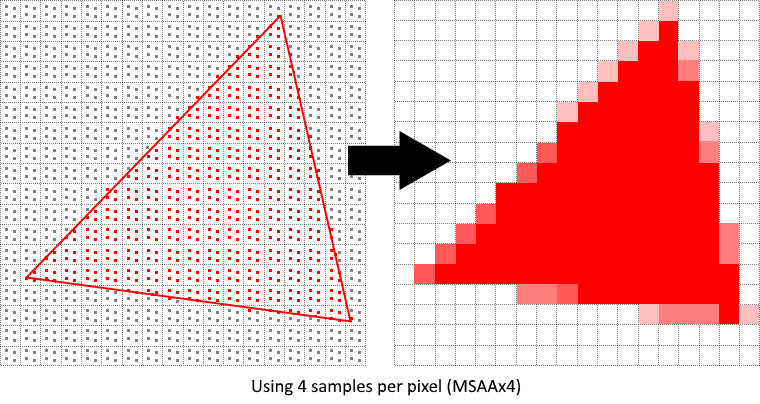
在普通的渲染中,像素的颜色是根据单个采样点确定的,在大多数情况下,这个采样点就是屏幕上目标像素的中心。如果绘制的线条有一部分穿过某个像素点,但没有覆盖到采样点,那么这个像素点就会留下空白,导致锯齿状的 “阶梯”效果。

MSAA所做的是,它使用每个像素的多个采样点(因此而得名)来确定其最终颜色。正如人们所期望的那样,更多的样本会带来更好的结果,但是它的计算成本也更高。
获得可用的样本数
让我们首先确定我们的硬件可以使用多少个样本。大多数现代GPU至少支持8个样本,但这个数字不能保证在任何地方都是一样的。我们将通过添加一个新的类成员来跟踪它:
...
VkSampleCountFlagBits msaaSamples = VK_SAMPLE_COUNT_1_BIT;
...


//。准确的最大样本数可以从与我们选定的物理设备相关的VkPhysicalDeviceProperties中提取。
//我们必须考虑到颜色和深度的样本数。两者都支持的最高采样数将是我们能支持的最大限度。
//添加一个函数,为我们获取这些信息:

VkSampleCountFlagBits getMaxUsableSampleCount() {
    VkPhysicalDeviceProperties physicalDeviceProperties;
    vkGetPhysicalDeviceProperties(physicalDevice, &physicalDeviceProperties);

    VkSampleCountFlags counts = physicalDeviceProperties.limits.framebufferColorSampleCounts & physicalDeviceProperties.limits.framebufferDepthSampleCounts;
    if (counts & VK_SAMPLE_COUNT_64_BIT) { return VK_SAMPLE_COUNT_64_BIT; }
    if (counts & VK_SAMPLE_COUNT_32_BIT) { return VK_SAMPLE_COUNT_32_BIT; }
    if (counts & VK_SAMPLE_COUNT_16_BIT) { return VK_SAMPLE_COUNT_16_BIT; }
    if (counts & VK_SAMPLE_COUNT_8_BIT) { return VK_SAMPLE_COUNT_8_BIT; }
    if (counts & VK_SAMPLE_COUNT_4_BIT) { return VK_SAMPLE_COUNT_4_BIT; }
    if (counts & VK_SAMPLE_COUNT_2_BIT) { return VK_SAMPLE_COUNT_2_BIT; }

    return VK_SAMPLE_COUNT_1_BIT;
}现在我们将在物理设备选择过程中使用这个函数来设置msaaSamples变量。为此,我们必须稍微修改pickPhysicalDevice函数:
void pickPhysicalDevice() {
    ...
    for (const auto& device : devices) {
        if (isDeviceSuitable(device)) {
            physicalDevice = device;
            msaaSamples = getMaxUsableSampleCount();
            break;
        }
    }
    ...
}
设置一个渲染目标
在MSAA中,每个像素在屏幕外的缓冲区中被采样,然后被渲染到屏幕上。这个新的缓冲区与我们一直在渲染的普通图像略有不同–它们必须能够存储每个像素的一个以上的样本。一旦多采样缓冲区被创建,它就必须被解析为默认的帧缓冲区(每个像素只存储一个样本)。
//必须创建一个额外的渲染目标并修改我们当前的绘图过程。我们只需要一个渲染目标,因为每次只有一个绘制操作是活动的,就像深度缓冲器一样。添加以下类成员:

...
VkImage colorImage;
VkDeviceMemory colorImageMemory;
VkImageView colorImageView;
...

//这个新图像将必须存储每个像素所需的样本数,所以我们需要在图像创建过程中把这个数字传给VkImageCreateInfo。修改createImage函数,增加一个numSamples参数:

void createImage(uint32_t width, uint32_t height, uint32_t mipLevels, VkSampleCountFlagBits numSamples, VkFormat format, VkImageTiling tiling, VkImageUsageFlags usage, VkMemoryPropertyFlags properties, VkImage& image, VkDeviceMemory& imageMemory) {
    ...
    imageInfo.samples = numSamples;
    ...

//使用`VK_SAMPLE_COUNT_1_BIT’更新对该函数的所有调用 - 我们将在实施过程中用适当的值替换它:

createImage(swapChainExtent.width, swapChainExtent.height, 1, VK_SAMPLE_COUNT_1_BIT, depthFormat, VK_IMAGE_TILING_OPTIMAL, VK_IMAGE_USAGE_DEPTH_STENCIL_ATTACHMENT_BIT, VK_MEMORY_PROPERTY_DEVICE_LOCAL_BIT, depthImage, depthImageMemory);
...
createImage(texWidth, texHeight, mipLevels, VK_SAMPLE_COUNT_1_BIT, VK_FORMAT_R8G8B8A8_SRGB, VK_IMAGE_TILING_OPTIMAL, VK_IMAGE_USAGE_TRANSFER_SRC_BIT | VK_IMAGE_USAGE_TRANSFER_DST_BIT | VK_IMAGE_USAGE_SAMPLED_BIT, VK_MEMORY_PROPERTY_DEVICE_LOCAL_BIT, textureImage, textureImageMemory);
我们现在将创建一个多采样的颜色缓冲区。添加一个createColorResources函数,注意我们在这里使用msaaSamples作为createImage的一个函数参数。我们也只使用一个mip级别,因为这是Vulkan规范在每个像素有一个以上的样本的情况下强制执行的。另外,这个颜色缓冲区不需要mipmaps,因为它不会被用作纹理:
void createColorResources() {
    VkFormat colorFormat = swapChainImageFormat;

    createImage(swapChainExtent.width, swapChainExtent.height, 1, msaaSamples, colorFormat, VK_IMAGE_TILING_OPTIMAL, VK_IMAGE_USAGE_TRANSIENT_ATTACHMENT_BIT | VK_IMAGE_USAGE_COLOR_ATTACHMENT_BIT, VK_MEMORY_PROPERTY_DEVICE_LOCAL_BIT, colorImage, colorImageMemory);
    colorImageView = createImageView(colorImage, colorFormat, VK_IMAGE_ASPECT_COLOR_BIT, 1);
}//在createDepthResources之前调用该函数:

//我们现在已经创建了几个新的Vulkan资源,所以我们不要忘记在必要时释放它们:

void cleanupSwapChain() {
    vkDestroyImageView(device, colorImageView, nullptr);
    vkDestroyImage(device, colorImage, nullptr);
    vkFreeMemory(device, colorImageMemory, nullptr);
    ...
}
添加新的附件
让我们先来处理一下渲染通道的问题。修改createRenderPass并更新颜色和深度附件创建信息结构:
void createRenderPass() {
    ...
    colorAttachment.samples = msaaSamples;
    colorAttachment.finalLayout = VK_IMAGE_LAYOUT_COLOR_ATTACHMENT_OPTIMAL;
//你会注意到,我们把最终布局从VK_IMAGE_LAYOUT_PRESENT_SRC_KHR改为VK_IMAGE_LAYOUT_COLOR_ATTACHMENT_OPTIMAL。
//这是因为多采样图像不能直接呈现。我们首先需要将它们解析为普通图像。
//这个要求并不适用于深度缓冲区,因为它不会在任何时候被呈现。
//因此,我们将不得不为颜色添加一个新的附件,这是一个所谓的解析附件:
    ...
    depthAttachment.samples = msaaSamples;
    ...

 VkAttachmentDescription colorAttachmentResolve{};
    colorAttachmentResolve.format = swapChainImageFormat;
    colorAttachmentResolve.samples = VK_SAMPLE_COUNT_1_BIT;
    colorAttachmentResolve.loadOp = VK_ATTACHMENT_LOAD_OP_DONT_CARE;
    colorAttachmentResolve.storeOp = VK_ATTACHMENT_STORE_OP_STORE;
    colorAttachmentResolve.stencilLoadOp = VK_ATTACHMENT_LOAD_OP_DONT_CARE;
    colorAttachmentResolve.stencilStoreOp = VK_ATTACHMENT_STORE_OP_DONT_CARE;
    colorAttachmentResolve.initialLayout = VK_IMAGE_LAYOUT_UNDEFINED;
    colorAttachmentResolve.finalLayout = VK_IMAGE_LAYOUT_PRESENT_SRC_KHR;
    ...

//现在必须指示渲染通道将多采样的彩色图像解析为常规附件。
//创建一个新的附件引用,它将指向作为解析目标的颜色缓冲区:

    ...
 VkAttachmentReference colorAttachmentResolveRef{};
    colorAttachmentResolveRef.attachment = 2;
    colorAttachmentResolveRef.layout = VK_IMAGE_LAYOUT_COLOR_ATTACHMENT_OPTIMAL;

//设置pResolveAttachments子通道结构成员,指向新创建的附件引用。

    subpass.pResolveAttachments = &colorAttachmentResolveRef;


    ...
现在用新的颜色附件更新渲染通道信息结构:
    ...
    std::array<VkAttachmentDescription, 3> attachments = {colorAttachment, depthAttachment, colorAttachmentResolve};
    ...

//渲染通道到位后,修改createFramebuffers并将新的图像视图添加到列表中:
std::array<VkImageView, 3> attachments = {
            colorImageView,
            depthImageView,
            swapChainImageViews[i]
        };

//修改createGraphicsPipeline,告诉新创建的管道使用一个以上的样本:

void createGraphicsPipeline() {
    ...
    multisampling.rasterizationSamples = msaaSamples;
    ...
}