Shiro和Spring Sercurity应该是我们比较常用的权限框架了,这篇文章教大家怎么通过springboot整合shiro从0开始搭建一个包含权限控制的后台管理系统。
第一步:创建一个springboot项目
创建springboot项目,这里项目就命名为shiro
第二步:pom.xml中添加maven的依赖
<?xml version="1.0" encoding="UTF-8"?>
<project xmlns="http://maven.apache.org/POM/4.0.0" xmlns:xsi="http://www.w3.org/2001/XMLSchema-instance"
         xsi:schemaLocation="http://maven.apache.org/POM/4.0.0 https://maven.apache.org/xsd/maven-4.0.0.xsd">
    <modelVersion>4.0.0</modelVersion>

    <parent>
        <groupId>org.springframework.boot</groupId>
        <artifactId>spring-boot-starter-parent</artifactId>
        <version>2.5.9</version>
        <relativePath/>
    </parent>

    <groupId>com.example</groupId>
    <artifactId>shiro</artifactId>
    <version>0.0.1-SNAPSHOT</version>

    <properties>
        <java.version>1.8</java.version>
        <shiro.version>1.3.2</shiro.version>
        <mysql.version>8.0.28</mysql.version>
        <druid.version>1.1.21</druid.version>
        <lombok.version>1.18.22</lombok.version>
        <fastjson.version>2.0.8</fastjson.version>
        <mybatis-boot.version>2.2.2</mybatis-boot.version>
    </properties>

    <dependencies>
        <dependency>
            <groupId>org.springframework.boot</groupId>
            <artifactId>spring-boot-starter-web</artifactId>
        </dependency>

        <dependency>
            <groupId>org.springframework.boot</groupId>
            <artifactId>spring-boot-starter-test</artifactId>
            <scope>test</scope>
        </dependency>

        <!--lombok-->
        <dependency>
            <groupId>org.projectlombok</groupId>
            <artifactId>lombok</artifactId>
            <version>${lombok.version}</version>
        </dependency>

        <!--mysql-->
        <dependency>
            <groupId>mysql</groupId>
            <artifactId>mysql-connector-java</artifactId>
            <version>${mysql.version}</version>
        </dependency>

        <!--mybatis-->
        <dependency>
            <groupId>org.mybatis.spring.boot</groupId>
            <artifactId>mybatis-spring-boot-starter</artifactId>
            <version>${mybatis-boot.version}</version>
        </dependency>

        <!--druid-->
        <dependency>
            <groupId>com.alibaba</groupId>
            <artifactId>druid</artifactId>
            <version>${druid.version}</version>
        </dependency>

        <!--fastjson-->
        <dependency>
            <groupId>com.alibaba</groupId>
            <artifactId>fastjson</artifactId>
            <version>${fastjson.version}</version>
        </dependency>

        <!-- shiro -->
        <dependency>
            <groupId>org.apache.shiro</groupId>
            <artifactId>shiro-spring</artifactId>
            <version>${shiro.version}</version>
        </dependency>
    </dependencies>

    <build>
        <plugins>
            <plugin>
                <groupId>org.springframework.boot</groupId>
                <artifactId>spring-boot-maven-plugin</artifactId>
            </plugin>
        </plugins>
    </build>
</project>
第三步:修改系统的配置文件application.yml
spring:
  # 激活profiles配置
  profiles:
    active: dev
  servlet:
    multipart:
      # 文件上传大小设置
      max-file-size: 1024MB
      max-request-size: 1024MB

# mybatis的mapper.xml文件的位置
mybatis:
  mapper-locations: classpath:mapper/*Mapper.xml
application-dev.yml
spring:
  # 配置数据源
  datasource:
    username: root
    password: root
    url: jdbc:mysql://localhost:3306/shiro
    driver-class-name: com.mysql.cj.jdbc.Driver
    type: com.alibaba.druid.pool.DruidDataSource
  # 只返回不为null的数据
  jackson:
    default-property-inclusion: non_null

# 设置启动端口号
server:
  port: 8080
第四步:新建数据库shiro,创建权限管理的五张表
/*
 Navicat Premium Data Transfer

 Source Server         : MariaDB
 Source Server Type    : MariaDB
 Source Server Version : 100605 (10.6.5-MariaDB)
 Source Host           : localhost:3306
 Source Schema         : shiro

 Target Server Type    : MariaDB
 Target Server Version : 100605 (10.6.5-MariaDB)
 File Encoding         : 65001

 Date: 02/07/2023 20:58:37
*/

SET NAMES utf8mb4;
SET FOREIGN_KEY_CHECKS = 0;

-- ----------------------------
-- Table structure for permission
-- ----------------------------
DROP TABLE IF EXISTS `permission`;
CREATE TABLE `permission`  (
  `id` varchar(255) CHARACTER SET utf8mb4 COLLATE utf8mb4_general_ci NOT NULL,
  `name` varchar(255) CHARACTER SET utf8mb4 COLLATE utf8mb4_general_ci NOT NULL COMMENT '名称',
  `type` tinyint(3) UNSIGNED NOT NULL COMMENT '权限类型(父权限/子权限)',
  `url` varchar(255) CHARACTER SET utf8mb4 COLLATE utf8mb4_general_ci NOT NULL COMMENT '接口路径',
  `method` tinyint(3) UNSIGNED NOT NULL DEFAULT 0 COMMENT '请求方式(0-get;1-post)',
  `service` varchar(255) CHARACTER SET utf8mb4 COLLATE utf8mb4_general_ci NOT NULL DEFAULT 'mhxysy' COMMENT '服务名',
  `parent_id` varchar(255) CHARACTER SET utf8mb4 COLLATE utf8mb4_general_ci NULL DEFAULT NULL COMMENT '父级权限id',
  PRIMARY KEY (`id`) USING BTREE
) ENGINE = InnoDB CHARACTER SET = utf8mb4 COLLATE = utf8mb4_general_ci COMMENT = '系统权限表' ROW_FORMAT = Dynamic;

-- ----------------------------
-- Records of permission
-- ----------------------------

-- ----------------------------
-- Table structure for role
-- ----------------------------
DROP TABLE IF EXISTS `role`;
CREATE TABLE `role`  (
  `id` int(10) UNSIGNED NOT NULL AUTO_INCREMENT,
  `name` varchar(50) CHARACTER SET utf8mb4 COLLATE utf8mb4_general_ci NOT NULL DEFAULT '' COMMENT '名称',
  `description` varchar(255) CHARACTER SET utf8mb4 COLLATE utf8mb4_general_ci NULL DEFAULT NULL COMMENT '描述',
  `sort` int(10) UNSIGNED NULL DEFAULT 0 COMMENT '自定义排序序号',
  PRIMARY KEY (`id`) USING BTREE
) ENGINE = InnoDB AUTO_INCREMENT = 7 CHARACTER SET = utf8mb4 COLLATE = utf8mb4_general_ci COMMENT = '系统角色表' ROW_FORMAT = Dynamic;

-- ----------------------------
-- Records of role
-- ----------------------------
INSERT INTO `role` VALUES (1, '超级管理员', '最高权限,拥有系统所有权限', 0);
INSERT INTO `role` VALUES (2, '系统管理员', '拥有系统设置相关权限', 100);

-- ----------------------------
-- Table structure for role_permission
-- ----------------------------
DROP TABLE IF EXISTS `role_permission`;
CREATE TABLE `role_permission`  (
  `id` int(10) UNSIGNED NOT NULL AUTO_INCREMENT,
  `role_id` int(10) UNSIGNED NOT NULL COMMENT '角色id',
  `permission_id` varchar(255) CHARACTER SET utf8mb4 COLLATE utf8mb4_general_ci NOT NULL COMMENT '权限id',
  PRIMARY KEY (`id`) USING BTREE
) ENGINE = InnoDB AUTO_INCREMENT = 1 CHARACTER SET = utf8mb4 COLLATE = utf8mb4_general_ci COMMENT = '角色-权限关联表' ROW_FORMAT = Dynamic;

-- ----------------------------
-- Records of role_permission
-- ----------------------------

-- ----------------------------
-- Table structure for user
-- ----------------------------
DROP TABLE IF EXISTS `user`;
CREATE TABLE `user`  (
  `id` varchar(255) CHARACTER SET utf8mb4 COLLATE utf8mb4_general_ci NOT NULL,
  `name` varchar(255) CHARACTER SET utf8mb4 COLLATE utf8mb4_general_ci NOT NULL COMMENT '姓名',
  `username` varchar(255) CHARACTER SET utf8mb4 COLLATE utf8mb4_general_ci NOT NULL COMMENT '用户名',
  `password` varchar(255) CHARACTER SET utf8mb4 COLLATE utf8mb4_general_ci NOT NULL DEFAULT '12345' COMMENT '密码',
  `phone` varchar(11) CHARACTER SET utf8mb4 COLLATE utf8mb4_general_ci NOT NULL COMMENT '手机号',
  `gender` tinyint(4) UNSIGNED NOT NULL COMMENT '性别,数据来源于性别代码表(gender)的主键',
  `is_enable` tinyint(4) UNSIGNED NOT NULL COMMENT '是否启用(0-未启用;1-启用中)',
  `last_login_time` datetime NULL DEFAULT NULL COMMENT '上一次登录时间',
  PRIMARY KEY (`id`) USING BTREE
) ENGINE = InnoDB CHARACTER SET = utf8mb4 COLLATE = utf8mb4_general_ci COMMENT = '用户表' ROW_FORMAT = Dynamic;

-- ----------------------------
-- Records of user
-- ----------------------------
INSERT INTO `user` VALUES ('2023', '系统管理员', 'system', '', '18888888888', 2, 1, '2022-11-25 00:15:42');
INSERT INTO `user` VALUES ('mhxy1218', '沐雨橙风ιε', 'mumu', 'mhxy1218', '16666666666', 1, 1, '2023-07-02 00:00:29');

-- ----------------------------
-- Table structure for user_role
-- ----------------------------
DROP TABLE IF EXISTS `user_role`;
CREATE TABLE `user_role`  (
  `id` int(10) UNSIGNED NOT NULL AUTO_INCREMENT,
  `role_id` int(10) UNSIGNED NOT NULL COMMENT '角色id,数据来源于role表的主键',
  `user_id` varchar(255) CHARACTER SET utf8mb4 COLLATE utf8mb4_general_ci NOT NULL COMMENT '用户id,数据来源于user表的主键',
  PRIMARY KEY (`id`) USING BTREE
) ENGINE = InnoDB AUTO_INCREMENT = 6 CHARACTER SET = utf8mb4 COLLATE = utf8mb4_general_ci COMMENT = '用户-角色关系表表' ROW_FORMAT = Dynamic;

-- ----------------------------
-- Records of user_role
-- ----------------------------
INSERT INTO `user_role` VALUES (1, 1, 'mhxy1218');
INSERT INTO `user_role` VALUES (2, 3, '2023');

SET FOREIGN_KEY_CHECKS = 1;
第五步:创建5张表对应的实体类、mapper、service和controller,以及mapper.xml
可以在启动类或者配置类上使用注解@MapperScan开启mapper包扫描
@MapperScan("com.example.shiro.mapper")第六步:创建UserRealm
项目根目录下创建realm包,在realm包下创建UserRealm.java,并继承AuthorizingRealm
package com.example.shiro.realm;

import com.example.shiro.entity.User;
import com.example.shiro.exception.GlobalException;
import com.example.shiro.mapper.UserMapper;
import com.example.shiro.restful.ResponseCode;
import org.apache.shiro.authc.*;
import org.apache.shiro.authz.AuthorizationInfo;
import org.apache.shiro.realm.AuthorizingRealm;
import org.apache.shiro.subject.PrincipalCollection;
import org.springframework.beans.factory.annotation.Autowired;
import org.springframework.stereotype.Component;

/**
 * @author heyunlin
 * @version 1.0
 */
@Component
public class UserRealm extends AuthorizingRealm {
    private final UserMapper mapper;

    @Autowired
    public UserRealm(UserMapper mapper) {
        this.mapper = mapper;
    }

    /**
     * 认证
     */
    @Override
    protected AuthenticationInfo doGetAuthenticationInfo(AuthenticationToken authenticationToken) throws AuthenticationException {
        UsernamePasswordToken token = (UsernamePasswordToken) authenticationToken;

        // 得到用户名
        String username = token.getUsername();
        // 根据用户名查询用户信息
        User user = mapper.selectByUsername(username);

        if (user == null) {
            throw new GlobalException(ResponseCode.BAD_REQUEST, "登录失败,用户不存在~");
        }
        if (user.getIsEnable()) {
            String password = new String(token.getPassword());

            if (user.getPassword().equals(password)) {
                return new SimpleAuthenticationInfo(user, password, username);
            }
        }

        return null;
    }

    /**
     * 授权
     */
    @Override
    protected AuthorizationInfo doGetAuthorizationInfo(PrincipalCollection principalCollection) {
        return null;
    }

}
第七步:创建Shiro的配置类
项目根目录下创建config包,在config包下创建ShiroConfig.java
package com.example.shiro.config;

import com.example.shiro.realm.UserRealm;
import org.apache.shiro.spring.web.ShiroFilterFactoryBean;
import org.apache.shiro.web.mgt.DefaultWebSecurityManager;
import org.springframework.beans.factory.annotation.Qualifier;
import org.springframework.context.annotation.Bean;
import org.springframework.context.annotation.Configuration;

import java.util.LinkedHashMap;
import java.util.Map;

/**
 * shiro配置类
 */
@Configuration
public class ShiroConfig {
    /**
     * 配置安全管理器
     * @param userRealm UserRealm
     * @return DefaultWebSecurityManager
     */
    @Bean(name = "securityManager")
    public DefaultWebSecurityManager securityManager(@Qualifier("userRealm") UserRealm userRealm) {
        DefaultWebSecurityManager securityManager = new DefaultWebSecurityManager();

        securityManager.setRealm(userRealm);

        return securityManager;
    }

    /**
     * 配置Shiro过滤器工厂
     * @param securityManager 安全管理器
     * @return ShiroFilterFactoryBean
     */
    @Bean
    public ShiroFilterFactoryBean shiroFilter(@Qualifier("securityManager") DefaultWebSecurityManager securityManager) {
        ShiroFilterFactoryBean shiroFilterFactoryBean = new ShiroFilterFactoryBean();

        // 注册安全管理器
        shiroFilterFactoryBean.setSecurityManager(securityManager);

        // 当用户访问认证资源的时候,如果用户没有登录,那么就会跳转到该属性指定的页面
        shiroFilterFactoryBean.setLoginUrl("/login.html");

        // 定义资源访问规则
        Map<String, String> map = new LinkedHashMap<>();

        map.put("/", "authc");
        map.put("/html/*", "authc");
        map.put("/index.html", "authc");
        // 登录接口不需要鉴权
        map.put("/user/login", "anon");

        shiroFilterFactoryBean.setFilterChainDefinitionMap(map);

        return shiroFilterFactoryBean;
    }

}
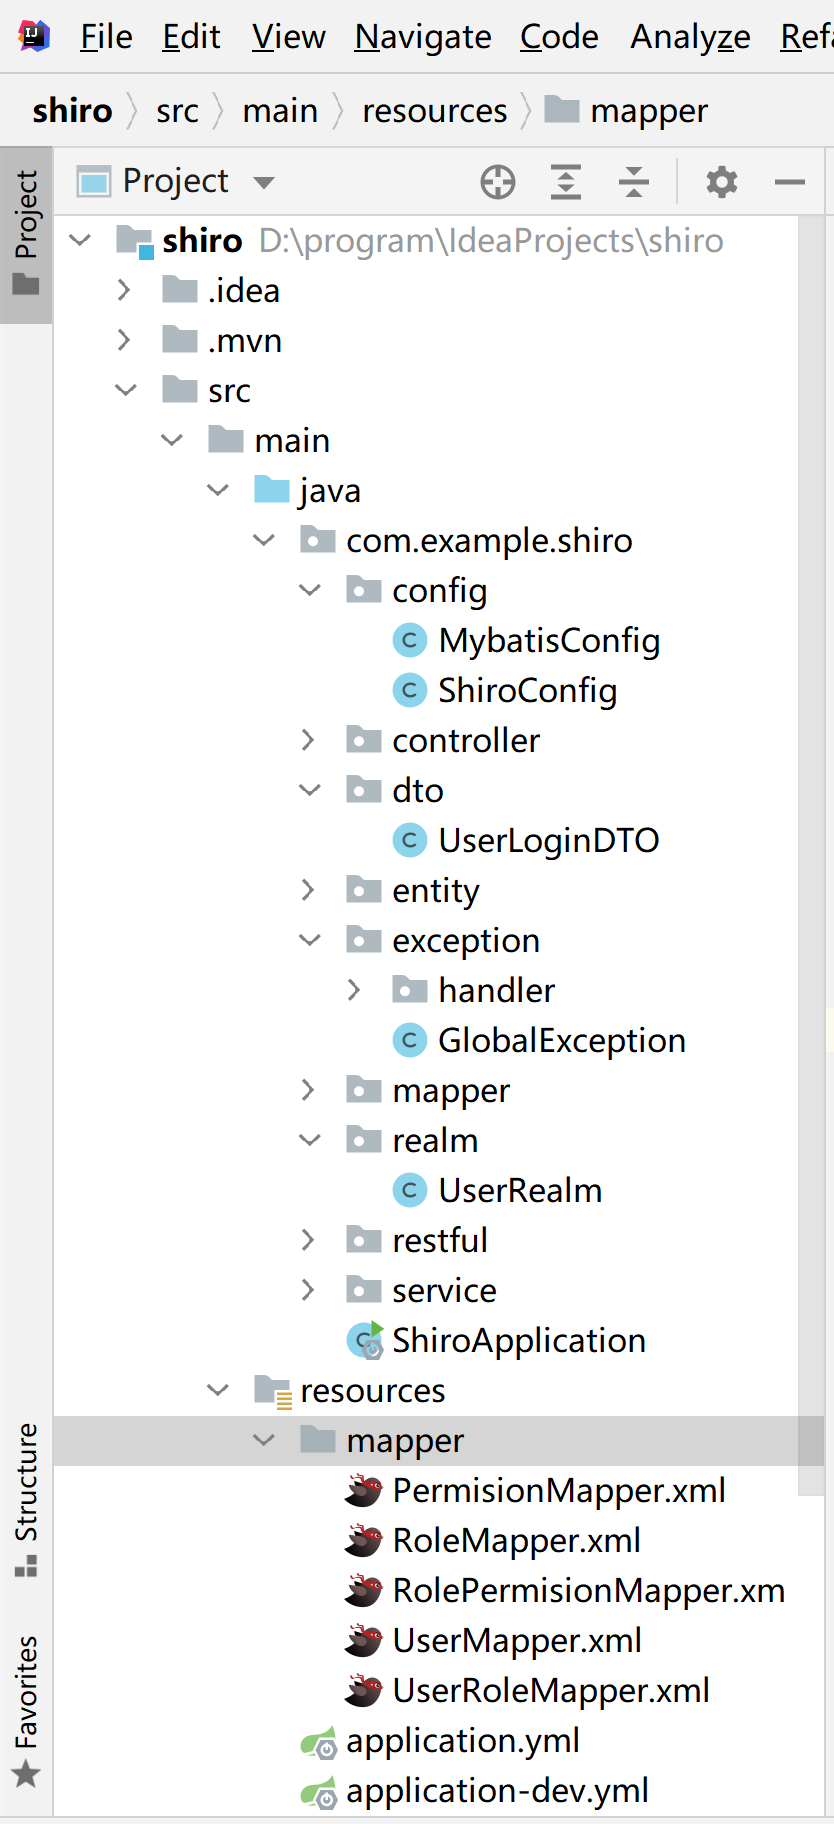
经过以上步骤之后,整个项目的包结构如下
第八步:实现用户登录功能
在UserController类中添加一个login()方法,使用UserLoginDTO对象接收前端传来的用户名和密码。
package com.example.shiro.controller;

import com.example.shiro.dto.UserLoginDTO;
import com.example.shiro.restful.JsonResult;
import com.example.shiro.service.UserService;
import org.springframework.beans.factory.annotation.Autowired;
import org.springframework.web.bind.annotation.RequestMapping;
import org.springframework.web.bind.annotation.RequestMethod;
import org.springframework.web.bind.annotation.RestController;

/**
 * @author heyunlin
 * @version 1.0
 */
@RestController
@RequestMapping(path = "/user", produces = "application/json;charset=utf-8")
public class UserController {
    private final UserService service;

    @Autowired
    public UserController(UserService service) {
        this.service = service;
    }

    @RequestMapping(path = "/login", method = RequestMethod.POST)
    public JsonResult<Void> login(UserLoginDTO loginDTO) {
        service.login(loginDTO);

        return JsonResult.success();
    }

}
UserServiceImpl中实现用户登录的业务代码,当我们调用Subject的login()方法时,会执行UserRealm下面的认证方法doGetAuthenticationInfo()
package com.example.shiro.service.impl;

import com.example.shiro.dto.UserLoginDTO;
import com.example.shiro.entity.User;
import com.example.shiro.exception.GlobalException;
import com.example.shiro.mapper.UserMapper;
import com.example.shiro.restful.ResponseCode;
import com.example.shiro.service.UserService;
import org.apache.shiro.SecurityUtils;
import org.apache.shiro.authc.UsernamePasswordToken;
import org.apache.shiro.subject.Subject;
import org.springframework.beans.factory.annotation.Autowired;
import org.springframework.stereotype.Service;

import java.time.LocalDateTime;

/**
 * @author heyunlin
 * @version 1.0
 */
@Service
public class UserServiceImpl implements UserService {
    private final UserMapper mapper;

    @Autowired
    public UserServiceImpl(UserMapper mapper) {
        this.mapper = mapper;
    }

    @Override
    public void login(UserLoginDTO loginDTO) {
        String username = loginDTO.getUsername();

        // 查询用户信息
        User user = mapper.selectByUsername(username);

        if (user != null) {
            // 如果用户被锁定,提前退出
            if (user.getIsEnable()) {
                // shiro登录认证
                UsernamePasswordToken token = new UsernamePasswordToken(username, loginDTO.getPassword());
                Subject subject = SecurityUtils.getSubject();

                subject.login(token);
                // 设置session失效时间:永不超时
                subject.getSession().setTimeout(-1001);

                // 修改管理员上一次登录时间
                user.setLastLoginTime(LocalDateTime.now());
                mapper.updateById(user);
            } else {
                throw new GlobalException(ResponseCode.FORBIDDEN, "账号已被锁定,禁止登录!");
            }
        } else {
            throw new GlobalException(ResponseCode.NOT_FOUND, "用户名不存在~");
        }
    }

}
第九步:创建几个简单的页面试一下效果
准备工作:在resources目录下创建static目录,存放静态资源文件,在static目录下创建js和html目录,把jquery复制到js目录下。
static目录下创建一个登录页面login.html
<!DOCTYPE html>
<html>
    <head>
        <meta charset="UTF-8" />
        <title>登录页面</title>
    </head>

    <body>
        <form id="loginForm">
            <table>
                <tr>
                    <td>用户名</td>
                    <td><input id="username" /></td>
                </tr>

                <tr>
                    <td>密码</td>
                    <td><input type="password" id="password" /></td>
                </tr>

                <tr>
                    <td>
                        <button type="button" id="login">登录</button>
                    </td>
                    <td>
                        <button type="reset">重置</button>
                    </td>
                </tr>
            </table>
        </form>

        <script src="/js/jquery.min.js"></script>
        <script src="/js/login.js"></script>
    </body>
</html>
js目录下创建login.js,点击登录按钮时提交用户的数据到接口/user/login,完成登录操作
$(document).ready(function () {
    $("#login").click(function () {
        let username = $("#username").val();
        let password = $("#password").val();

        $.post("/user/login", {
            username: username,
            password: password
        }, function (res) {
           if (res.code === 200) {
               location.href = "/html/home.html";
           }
        });
    });

});
当我们访问localhost:8080/login.html时,输入mumu/mhxy1218,点击登录时,会跳转到/html/home.html。然后我们清空浏览器缓存,刷新以下页面,发现跳回了/login.html。这是因为在shiro配置类里配置了html目录下所有的资源都要身份认证之后才能访问。
map.put("/html/*", "authc");
第十步:实现授权
接下来,讲解如何通过shiro完成鉴权,在UserRealm里的doGetAuthorizationInfo()方法中实现鉴权的代码,查询用户的权限保存到shiro中,为了方便演示效果,我们模拟几条数据。
package com.example.shiro.realm;

import com.example.shiro.entity.User;
import com.example.shiro.exception.GlobalException;
import com.example.shiro.mapper.UserMapper;
import com.example.shiro.restful.ResponseCode;
import org.apache.shiro.authc.*;
import org.apache.shiro.authz.AuthorizationInfo;
import org.apache.shiro.authz.SimpleAuthorizationInfo;
import org.apache.shiro.realm.AuthorizingRealm;
import org.apache.shiro.subject.PrincipalCollection;
import org.springframework.beans.factory.annotation.Autowired;
import org.springframework.stereotype.Component;

import java.util.HashSet;
import java.util.Set;

/**
 * @author heyunlin
 * @version 1.0
 */
@Component
public class UserRealm extends AuthorizingRealm {
    private final UserMapper mapper;

    @Autowired
    public UserRealm(UserMapper mapper) {
        this.mapper = mapper;
    }

    /**
     * 认证
     */
    @Override
    protected AuthenticationInfo doGetAuthenticationInfo(AuthenticationToken authenticationToken) throws AuthenticationException {
        UsernamePasswordToken token = (UsernamePasswordToken) authenticationToken;

        // 得到用户名
        String username = token.getUsername();
        // 根据用户名查询用户信息
        User user = mapper.selectByUsername(username);

        if (user == null) {
            throw new GlobalException(ResponseCode.BAD_REQUEST, "登录失败,用户不存在~");
        }
        if (user.getIsEnable()) {
            String password = new String(token.getPassword());

            if (user.getPassword().equals(password)) {
                return new SimpleAuthenticationInfo(user, password, username);
            } else {
                throw new GlobalException(ResponseCode.BAD_REQUEST, "用户名或密码错误,登录失败!");
            }
        }

        return null;
    }

    /**
     * 授权
     */
    @Override
    protected AuthorizationInfo doGetAuthorizationInfo(PrincipalCollection principals) {
        SimpleAuthorizationInfo authorizationInfo = new SimpleAuthorizationInfo();
        User user = (User) principals.getPrimaryPrincipal();
        String username = user.getUsername();

        // todo 通过用户名获取用户的权限
        Set<String> permissions = new HashSet<>();

        permissions.add("/user/delete");
        permissions.add("/user/update");

        authorizationInfo.setStringPermissions(permissions);

        return authorizationInfo;
    }

}
在UserController中添加两个方法delete()和update()
package com.example.shiro.controller;

import com.example.shiro.dto.UserLoginDTO;
import com.example.shiro.restful.JsonResult;
import com.example.shiro.service.UserService;
import org.springframework.beans.factory.annotation.Autowired;
import org.springframework.web.bind.annotation.RequestMapping;
import org.springframework.web.bind.annotation.RequestMethod;
import org.springframework.web.bind.annotation.RestController;

/**
 * @author heyunlin
 * @version 1.0
 */
@RestController
@RequestMapping(path = "/user", produces = "application/json;charset=utf-8")
public class UserController {
    private final UserService service;

    @Autowired
    public UserController(UserService service) {
        this.service = service;
    }

    @RequestMapping(path = "/login", method = RequestMethod.POST)
    public JsonResult<Void> login(UserLoginDTO loginDTO) {
        service.login(loginDTO);

        return JsonResult.success();
    }

    @RequestMapping(path = "/delete", method = RequestMethod.GET)
    public JsonResult<Void> delete() {
        return JsonResult.success("删除成功");
    }

    @RequestMapping(path = "/update", method = RequestMethod.POST)
    public JsonResult<Void> update() {
        return JsonResult.success("修改成功");
    }

}
home.html新增两个按钮
<!DOCTYPE html>
<html>
    <head>
        <meta charset="UTF-8" />
        <title>系统首页</title>
    </head>

    <body>
        <h1>欢迎来到系统首页!</h1>
        <a href="/user/delete">删除</a> | <button type="button" id="update">修改</button>

        <script>
            $(function () {
                $("#update").click(function () {
                    $.post("/user/update", function (res) {
                        if (res.code === 200) {
                            alert(res.message);
                        }
                    });
                });
            });
        </script>
    </body>
</html>
自定义过滤器,实现鉴权功能
没有权限访问时抛出异常会有一个问题:过滤器中抛出的异常是不会被统一异常处理器处理的。把抛出异常的代码改成直接返回响应对象JsonResult
package com.example.shiro.filter;

import com.alibaba.fastjson.JSON;
import com.example.shiro.restful.JsonResult;
import com.example.shiro.restful.ResponseCode;
import org.apache.shiro.SecurityUtils;
import org.apache.shiro.subject.Subject;

import javax.servlet.*;
import javax.servlet.annotation.WebFilter;
import javax.servlet.http.HttpServletRequest;
import javax.servlet.http.HttpServletResponse;
import java.io.IOException;
import java.util.ArrayList;
import java.util.List;

/**
 * 鉴权过滤器
 * @author heyunlin
 * @version 1.0
 */
@WebFilter("authorizationFilter")
public class AuthorizationFilter implements Filter {
    /**
     * 静态资源文件/文件夹
     */
    private static final List<String> STATIC_RESOURCES;

    static {
        STATIC_RESOURCES = new ArrayList<>();

        STATIC_RESOURCES.add("/index.html");
        STATIC_RESOURCES.add("/login.html");
        STATIC_RESOURCES.add("/images/");
        STATIC_RESOURCES.add("/html/");
        STATIC_RESOURCES.add("/css/");
        STATIC_RESOURCES.add("/js/");
    }

    @Override
    public void doFilter(ServletRequest req, ServletResponse resp, FilterChain chain) throws ServletException, IOException {
        HttpServletRequest request = (HttpServletRequest) req;
        String requestURI = request.getRequestURI();

        if ("/".equals(requestURI) || "/user/login".equals(requestURI)) {
            chain.doFilter(req, resp);
        }
        for (String resource : STATIC_RESOURCES) {
            if (requestURI.contains(resource)) {
                chain.doFilter(req, resp);
            }
        }

        Subject subject = SecurityUtils.getSubject();

        if (subject != null && !subject.isPermitted(requestURI)) {
            HttpServletResponse response = (HttpServletResponse) resp;
            response.setContentType("application/json;charset=utf-8");

            // 构建返回对象
            JsonResult<Void> jsonResult= JsonResult.error(ResponseCode.UNAUTHORIZED, "正在访问未授权的资源~");
            String data = JSON.toJSONString(jsonResult);

            response.getWriter().write(data);
            return;
        }

        chain.doFilter(req, resp);
    }

}
好了,文章就分享到这里了,创作不易,如果看完这篇文章感觉对你有所帮助,不要忘了点赞+收藏哦~
文章相关的项目代码已开源,可按需获取:
springboot整合shiro实现认证和授权![]() https://gitee.com/he-yunlin/shiro.git
https://gitee.com/he-yunlin/shiro.git
