问题描述
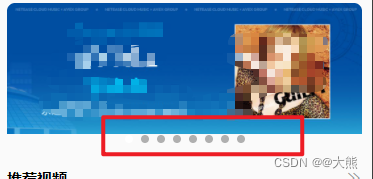
最近在写小程序的时候使用了swiper组件,但是发现一个很奇怪的现象,如果给image组件设置mode=“widthFix”的话,那么图片的高度是不够撑满swiper-item的这样就会导致swiper的指示器往下偏移(其实没有偏移,只是图片没有撑满swiper-item的高度罢了)效果如下:
解决方案
方案一
这个方案我自己想出来的,但是会有一个缺点,如果图片过小的话,强行拉伸会导致图片变样,但是这种情况一般不会存在,ui在设计banner图的时候肯定不会给你那么小的,但是万一呢,哈哈哈,所以如果方案二看不懂的铁铁们,也可以使用这个,如果ui给你的图很小直接拉出出打死哈哈哈哈~~
- 不要给image设置mode属性
- 利用css找到image组件设置宽高都为100%
<swiper
	indicator-dots
	indicator-active-color="#fff"
	circular
	bindtap="onBannerClick"
    >
      <block wx:for="{{swiperList}}" wx:key="index">
        <swiper-item>
          <image
          	bindload="onSwipperImageLoad"
          	class="banner-img"
          	src="{{item.imageUrl}}"
            >
          </image>
        </swiper-item>
      </block>
</swiper>
.main-music .banner .banner-img {
  width: 100%;
  height: 100%;
}
方案二
这个方案是看coderwhy大神讲解的,稍微有些许麻烦,其实还好,就是小程序的api有点反人类 哈哈哈
- 当图片加载完毕后,然后获取到当前图片的高度,
- 然后给swiper组件设置高度
- image组件有个事件是当图片加载完毕后触发的
- 小程序有个api是选择组件的的,使用这个api可以获取到当前选择的组件的宽高等一系列信息
- 有了这些信息之后我们就可以做对应的操作了
- 等等,因为图片每次加载完毕都会触发,这里用到了节流函数,这个是自己封装的(也是学code大神的),也可以使用三方库(lodash…),或者干脆不用节流
<swiper
	indicator-dots
	indicator-active-color="#fff"
	circular
	bindtap="onBannerClick"
	style="height:{{bannerHeight}}px;"
	>
	<block wx:for="{{swiperList}}" wx:key="index">
		<swiper-item>
			<image
				bindload="onSwipperImageLoad"
				class="banner-img"
				mode="widthFix"
				src="{{item.imageUrl}}"
				>
			</image>
		</swiper-item>
	</block>
</swiper>
xxx.js
import { querySelect, ymThrottle } from '../../utils/util'
// 不使用节流的话记得把这个干掉哦
const querySelectThrottle = ymThrottle(querySelect)
Page({
  data: {
    swiperList: [],
    bannerHeight: 130
  },
  // 图片加载完毕后触发
   async onSwipperImageLoad() {
    const res = await querySelectThrottle('.banner-img')
    // 不使用节流
    // const res = await querySelect('.banner-img')
    this.setData({
      bannerHeight: res.height
    })
  }
})
util.js
// 获取矩形框的宽高等信息
export function querySelect(selector) {
  return new Promise((resolve, reject) => {
    const query = wx.createSelectorQuery()
    query.select(selector).boundingClientRect()
    query.exec((res) => {
     resolve(...res)
    })
  })
}


// 节流
export  function ymThrottle(
cb,
interval = 100,
{ leading = true, traling = false } = {}
) {
  let startTime = 0;
  let timer = null;
  const _throttle = function (...args) {
      return new Promise((resolve, reject) => {
          try {
              const nowTime = Date.now();

              if (!leading && startTime === 0) {
                  startTime = nowTime;
              }

              const waitTime = interval - (nowTime - startTime);

              if (waitTime <= 0) {
                  if (timer) clearTimeout(timer);
                  const res = cb.apply(this, args);
                  resolve(res);
                  startTime = nowTime;
                  timer = null;
                  return;
              }
              // 实现尾部取消
              // 在间隔点之后添加一个定时器
              // 如果是间隔点那么就会取消这个定时器
              if (traling && !timer) {
                  timer = setTimeout(() => {
                      const res = cb.apply(this, args);
                      resolve(res);
                      startTime = Date.now();
                      timer = null;
                  }, waitTime);
              }
          } catch (error) {
              reject(error);
          }
      });
  };
  // 取消
  _throttle.cancel = function () {
      if (timer) clearTimeout(timer);
  };
  return _throttle;
}
结尾
都看到这了,如果对君有帮助的话,劳烦君给个双击么么哒吧 哈哈哈!!!


![[附源码]Python计算机毕业设计SSM佳音大学志愿填报系统(程序+LW)](https://img-blog.csdnimg.cn/4182f76000b2409c8fddc4ec4e217516.png)



![[附源码]Python计算机毕业设计Django招聘系统](https://img-blog.csdnimg.cn/400b9778b97948faa33881ce97bf82ff.png)
