直通滤波
就是设置一个x、y、z方向的一个取值范围,以过滤掉明显不在测试距离范围的点云;使用Intel RealSense或者激光雷达采集的数据,可设置一个x,y,z合理的范围,过滤掉我们不需要的点云。
pcl::PassThrough 是点云库(PCL)中的一个滤波器类,用于通过设置阈值来过滤点云数据。在这个类中,你可以使用多个参数来控制滤波的行为。
以下是
pcl::PassThrough类中常用的几个参数:
setFilterFieldName:设置要过滤的字段名称。例如,pass.setFilterFieldName("z")设置要过滤的字段为 z 坐标。
以下是一些常见的字段名称,你可以使用setFilterFieldName方法对它们进行设置:
1)"x":点云数据中的 x 坐标。
2)"y":点云数据中的 y 坐标。
3)"z":点云数据中的 z 坐标。
4)"intensity":点云数据中的强度值(通常表示激光传感器返回的信号强度)。
5)"rgb" 或 "rgba":点云数据中的颜色信息(通常是 RGB 或 RGBA 值)。
setFilterLimits:设置过滤的阈值范围。使用该函数可以设置最小和最大允许的值。例如,pass.setFilterLimits(0.0, 1.0)将只保留 z 坐标在 0 到 1 之间的点云数据。
setFilterLimitsNegative:设置是否对过滤结果取反。当设置为 true 时,将保留在阈值之外的点云数据;当设置为 false 时,将保留在阈值之内的点云数据。默认值为 false。
setInputCloud:设置输入的点云数据。你需要将待过滤的点云数据传递给该函数进行处理。
filter:执行过滤操作。该函数将应用设定的过滤条件,并返回过滤后的点云数据。
以上是一些常用的参数,还有其他一些可选参数可以进一步调整滤波器的行为,例如设置滤波的坐标轴、输出点云数据类型等。
#include <iostream>
#include <pcl/point_types.h>
#include <pcl/filters/passthrough.h>
#include <pcl/visualization/cloud_viewer.h>
typedef pcl::PointXYZ PointT;
int main(int argc, char** argv) {
pcl::PointCloud<pcl::PointXYZ>::Ptr cloud(new pcl::PointCloud<pcl::PointXYZ>);
pcl::PointCloud<pcl::PointXYZ>::Ptr cloud_filtered(new pcl::PointCloud<pcl::PointXYZ>);
// Fill in the cloud data
cloud->width = 500;
cloud->height = 1;
cloud->points.resize(cloud->width * cloud->height);
for (size_t i = 0; i < cloud->points.size(); ++i) {
cloud->points[i].x = 1024 * rand() / (RAND_MAX + 1.0f);
cloud->points[i].y = 1024 * rand() / (RAND_MAX + 1.0f);
cloud->points[i].z = 1024 * rand() / (RAND_MAX + 1.0f);
}
std::cerr << "Cloud before filtering: " << std::endl;
for (size_t i = 0; i < cloud->points.size(); ++i)
std::cerr << " " << cloud->points[i].x << " "
<< cloud->points[i].y << " "
<< cloud->points[i].z << std::endl;
// Create the filtering object
pcl::PassThrough<pcl::PointXYZ> pass;
pass.setInputCloud(cloud); // 1. 设置输入源
pass.setFilterFieldName("z"); // 2. 设置过滤域名
pass.setFilterLimits(10, 35); // 3. 设置过滤范围
//pass.setFilterLimitsNegative(true); // 设置获取Limits之外的内容
pass.filter(*cloud_filtered); // 4. 执行过滤,并将结果输出到cloud_filtered
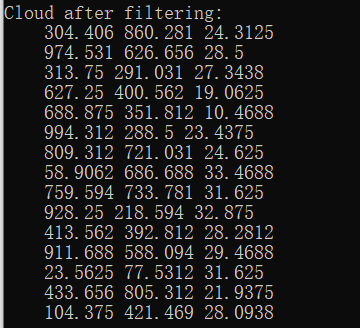
std::cerr << "Cloud after filtering: " << std::endl;
for (size_t i = 0; i < cloud_filtered->points.size(); ++i)
std::cerr << " " << cloud_filtered->points[i].x << " "
<< cloud_filtered->points[i].y << " "
<< cloud_filtered->points[i].z << std::endl;
pcl::visualization::CloudViewer viewer("Cloud Viewer");
//这里会一直阻塞直到点云被渲染
viewer.showCloud(cloud);
while (!viewer.wasStopped()) {
}
return (0);
} |  |
体素滤波器
如果使用高分辨率相机等设备对点云进行采集,往往点云会较为密集。过多的点云数量会对后续分割工作带来困难。体素格滤波器可以达到向下采样同时不破坏点云本身几何结构的功能。点云几何结构不仅是宏观的几何外形,也包括其微观的排列方式,比如横向相似的尺寸,纵向相同的距离。
通过体素网格实现降采样,可以减少点数量的同时,保证点云的形状特征,可以提高配准、曲面重建、形状识别等算法的速度,并保证准确性。
#include <iostream>
#include <pcl/io/pcd_io.h>
#include <pcl/point_types.h>
#include <pcl/filters/voxel_grid.h>
int main(int argc, char** argv)
{
pcl::PCLPointCloud2::Ptr cloud(new pcl::PCLPointCloud2());
pcl::PCLPointCloud2::Ptr cloud_filtered(new pcl::PCLPointCloud2());
// 从文件读取点云图
// Fill in the cloud data
pcl::PCDReader reader;
// Replace the path below with the path where you saved your file
reader.read("../data/table_scene_mug_stereo_textured.pcd", *cloud); // Remember to download the file first!
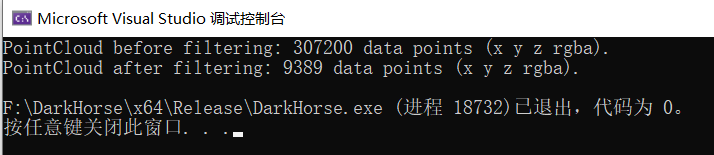
std::cerr << "PointCloud before filtering: " << cloud->width * cloud->height
<< " data points (" << pcl::getFieldsList(*cloud) << ")." << std::endl;
// 创建一个长宽高分别是1cm的体素过滤器,cloud作为输入数据,cloud_filtered作为输出数据
float leftSize = 0.01f;
// Create the filtering object
pcl::VoxelGrid<pcl::PCLPointCloud2> sor;
sor.setInputCloud(cloud);
sor.setLeafSize(leftSize, leftSize, leftSize);
sor.filter(*cloud_filtered);
std::cerr << "PointCloud after filtering: " << cloud_filtered->width * cloud_filtered->height
<< " data points (" << pcl::getFieldsList(*cloud_filtered) << ")." << std::endl;
// 将结果输出到文件
pcl::PCDWriter writer;
writer.write("../output_data/table_downsampled.pcd", *cloud_filtered);
return (0);
}
| 原pcd文件 | 降采样后pcd文件 |
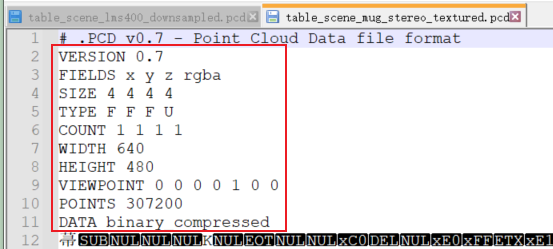 |  |
可以看到POINTS个数从原来的307200个减少为9389个
- 双屏对比查看实现效果
进入pcl的安装路径下的Bin文件夹pcl_viewer.exe -multiview 1 F:\DarkHorse\data\table_scene_mug_stereo_textured.pcd F:\DarkHorse\output_data\table_scene_lms40_downsampled.pcd

pcl::getFieldsList(*cloud)pcl::getFieldsList 是一个函数,返回一个 std::string 对象,用于获取给定 pcl::PCLPointCloud2 对象中包含的字段列表。
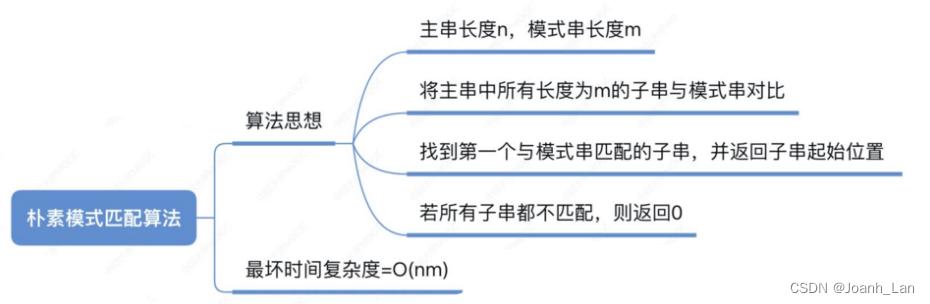
统计滤波器
用于去除明显离群点(离群点往往由测量噪声引入)。其特征是在空间中分布稀疏,可以理解为:每个点都表达一定信息量,某个区域点越密集则可能信息量越大。噪声信息属于无用信息,信息量较小。所以离群点表达的信息可以忽略不计。考虑到离群点的特征,则可以定义某处点云小于某个密度,既点云无效。计算每个点到其最近的k个点平均距离。则点云中所有点的距离应构成高斯分布。
稀疏离群值的消除基于输入数据集中点到邻居距离的分布的计算。对于每个点,我们计算从它到所有相邻点的平均距离。通过假设结果分布是具有均值和标准差的高斯分布,可以将其平均距离在由全局距离均值和标准差定义的区间之外的所有点视为离群值并从数据集中进行修剪。 下图显示了稀疏离群值分析和删除的效果:原始数据集显示在左侧,结果数据集显示在右侧。数据集图显示了滤波前后每个点的邻域中平均K最近邻距离。
- 创建过滤器,每个点分析计算时考虑的最近邻居个数为50个;
- 设置标准差阈值为1,这意味着所有距离查询点的平均距离的标准偏差均大于1个标准偏差的所有点都将被标记为离群值并删除。
- 计算输出并将其存储在cloud_filtered中
/* 使用StatisticalOutlierRemoval统计学离群点移除过滤器移除噪点 */
#include <iostream>
#include <pcl/io/pcd_io.h>
#include <pcl/point_types.h>
#include <pcl/filters/statistical_outlier_removal.h>

int main(int argc, char** argv)
{
    pcl::PointCloud<pcl::PointXYZ>::Ptr cloud(new pcl::PointCloud<pcl::PointXYZ>);
    pcl::PointCloud<pcl::PointXYZ>::Ptr cloud_filtered(new pcl::PointCloud<pcl::PointXYZ>);

    // 从文件读取点云
    // Fill in the cloud data
    pcl::PCDReader reader;
    // Replace the path below with the path where you saved your file
    reader.read<pcl::PointXYZ>("../data/table_scene_lms400.pcd", *cloud);

    std::cerr << "Cloud before filtering: " << std::endl;
    std::cerr << *cloud << std::endl << std::endl;

    // Create the filtering object
    pcl::StatisticalOutlierRemoval<pcl::PointXYZ> sor;
    sor.setInputCloud(cloud);
    // 设置平均距离估计的最近邻居的数量K
    sor.setMeanK(50);
    // 设置标准差阈值系数
    sor.setStddevMulThresh(1.0);
    // 执行过滤
    sor.filter(*cloud_filtered);

    std::cerr << "Cloud after filtering: " << std::endl ;
    std::cerr << *cloud_filtered << std::endl;
    // 将留下来的点保存到后缀为_inliers.pcd的文件
    pcl::PCDWriter writer;
    writer.write<pcl::PointXYZ>("./output_data/table_scene_lms400_inliers.pcd", *cloud_filtered, false);

    // 使用个相同的过滤器,但是对输出结果取反,则得到那些被过滤掉的点,保存到_outliers.pcd文件
    sor.setNegative(true);
    sor.filter(*cloud_filtered);
    writer.write<pcl::PointXYZ>("./output_data/table_scene_lms400_outliers.pcd", *cloud_filtered, false);

    return (0);
}
输出结果:

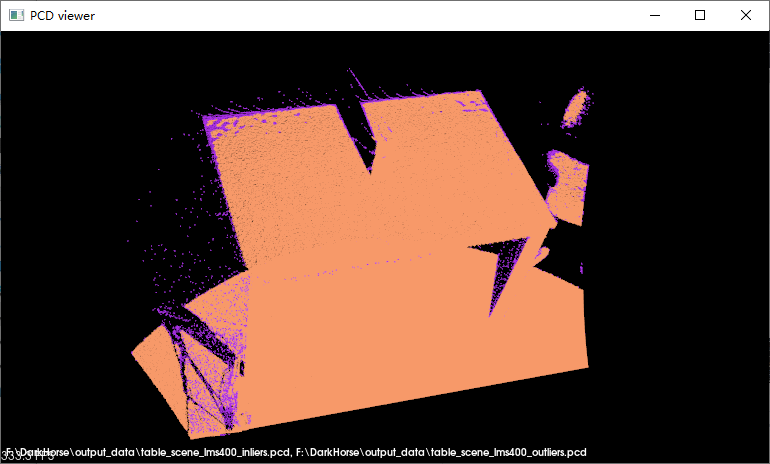
实现效果
- 单图对比:紫色部分为移除的离群点,橙绿色部分为保留的点
pcl_viewer.exe F:\DarkHorse\output_data\table_scene_lms400_inliers.pcd F:\DarkHorse\output_data\table_scene_lms400_outliers.pcd |
 |
- 双图对比:左图为已处理群点后的点云,右图为被移除的点云
pcl_viewer.exe -multiview 1 F:\DarkHorse\output_data\table_scene_lms400_inliers.pcd F:\DarkHorse\output_data\table_scene_lms400_outliers.pcd |
 |
条件滤波
条件滤波(ConditionalRemoval)设置不同维度滤波规则进行滤波
#include <iostream>
#include <pcl/point_types.h>
#include <pcl/filters/radius_outlier_removal.h>
#include <pcl/filters/conditional_removal.h>
#include <pcl/visualization/pcl_visualizer.h>

typedef pcl::PointXYZ PointType;

void showPointClouds(const pcl::PointCloud<PointType>::Ptr& cloud, const pcl::PointCloud<PointType>::Ptr& cloud2) {// 创建PCLVisualizer
    pcl::visualization::PCLVisualizer::Ptr viewer(new pcl::visualization::PCLVisualizer("3D Viewer"));

    // 设置背景色为灰色
    viewer->setBackgroundColor(0.05, 0.05, 0.05, 0);

    // 添加一个普通点云 (可以设置指定颜色,也可以去掉single_color参数不设置)
    pcl::visualization::PointCloudColorHandlerCustom<PointType> single_color(cloud, 0, 255, 0); //红色
    viewer->addPointCloud<PointType>(cloud, single_color, "sample cloud");
    viewer->setPointCloudRenderingProperties(pcl::visualization::PCL_VISUALIZER_POINT_SIZE, 2, "sample cloud");

    // 添加一个第二个点云 (可以设置指定颜色,也可以去掉single_color2参数不设置)
    pcl::visualization::PointCloudColorHandlerCustom<PointType> single_color2(cloud, 255, 0, 0); //绿色
    viewer->addPointCloud<PointType>(cloud2, single_color2, "sample cloud 2");
    viewer->setPointCloudRenderingProperties(pcl::visualization::PCL_VISUALIZER_POINT_SIZE, 4, "sample cloud 2");
    viewer->addCoordinateSystem(1.0);

    while (!viewer->wasStopped()) {
        viewer->spinOnce();
    }
}

int main() {
    pcl::PointCloud<pcl::PointXYZ>::Ptr cloud(new pcl::PointCloud<pcl::PointXYZ>);
    pcl::PointCloud<pcl::PointXYZ>::Ptr cloud_filtered(new pcl::PointCloud<pcl::PointXYZ>);

    // Fill in the cloud data
    cloud->width = 10;
    cloud->height = 1;
    cloud->points.resize(cloud->width * cloud->height);

    for (size_t i = 0; i < cloud->points.size(); ++i) {
        cloud->points[i].x = 1024 * rand() / (RAND_MAX + 1.0f);
        cloud->points[i].y = 1024 * rand() / (RAND_MAX + 1.0f);
        cloud->points[i].z = 1024 * rand() / (RAND_MAX + 1.0f);
    }

    std::cerr << "Cloud before filtering: "<< cloud->points.size() << std::endl;
    for (size_t i = 0; i < cloud->points.size(); ++i)
        std::cerr << "    " << cloud->points[i].x << " "
        << cloud->points[i].y << " "
        << cloud->points[i].z << std::endl;

    pcl::ConditionAnd<pcl::PointXYZ>::Ptr range_cond(new pcl::ConditionAnd<pcl::PointXYZ>());
    range_cond->addComparison(pcl::FieldComparison<pcl::PointXYZ>::ConstPtr(
        new pcl::FieldComparison<pcl::PointXYZ>("z", pcl::ComparisonOps::GT, 50))); //大于50
    range_cond->addComparison(pcl::FieldComparison<pcl::PointXYZ>::ConstPtr(
        new pcl::FieldComparison<pcl::PointXYZ>("z", pcl::ComparisonOps::LT, 500))); //小于500

    // build the filter
    pcl::ConditionalRemoval<pcl::PointXYZ> condrem;
    condrem.setCondition(range_cond);
    condrem.setInputCloud(cloud);
    // apply filter
    condrem.filter(*cloud_filtered); //50<z<500的保留


    // display pointcloud after filtering
    std::cerr << "Cloud after filtering: " << cloud_filtered->points.size() << std::endl;
    for (size_t i = 0; i < cloud_filtered->points.size(); ++i)

        {
            std::cerr << "    " << cloud_filtered->points[i].x << " "
            << cloud_filtered->points[i].y << " "
            << cloud_filtered->points[i].z << std::endl;
        }

    showPointClouds(cloud, cloud_filtered);

    return 0;
}
红色的保留的结果,绿色是被滤掉的点云
 | 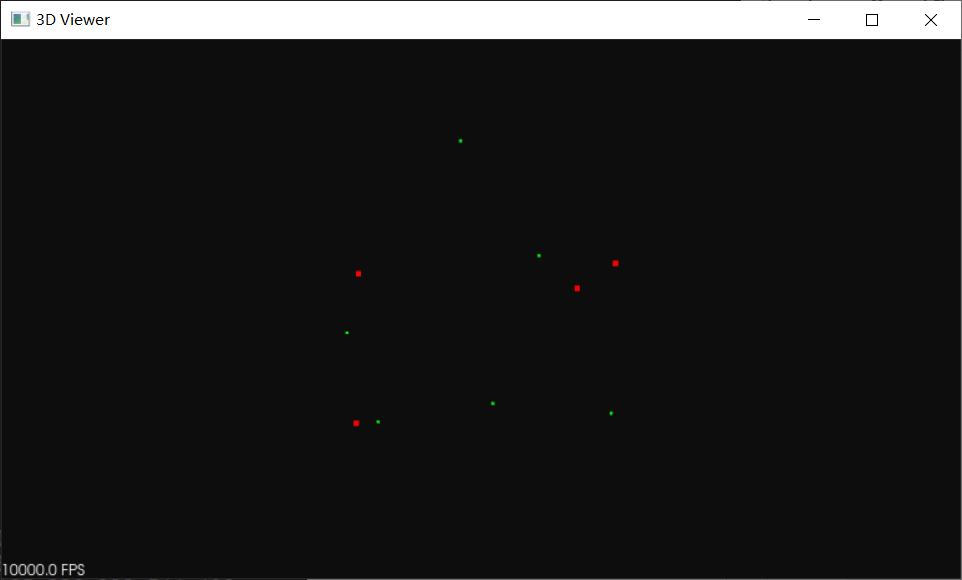 |
半径离群值滤波
半径滤波器(RadiusOutlierRemoval)与统计滤波器相比更加简单粗暴。以某点为中心画一个圆计算落在该圆中点的数量,当数量大于给定值时,则保留该点,数量小于给定值则剔除该点。此算法运行速度快,依序迭代留下的点一定是最密集的,但是圆的半径和圆内点的数目都需要人工指定。
#include <iostream>
#include <pcl/point_types.h>
#include <pcl/filters/radius_outlier_removal.h>
#include <pcl/filters/conditional_removal.h>
#include <pcl/visualization/pcl_visualizer.h>

typedef pcl::PointXYZ PointType;

void showPointClouds(const pcl::PointCloud<PointType>::Ptr& cloud, const pcl::PointCloud<PointType>::Ptr& cloud2) {// 创建PCLVisualizer
    pcl::visualization::PCLVisualizer::Ptr viewer(new pcl::visualization::PCLVisualizer("3D Viewer"));

    // 设置背景色为灰色
    viewer->setBackgroundColor(0.05, 0.05, 0.05, 0);

    // 添加一个普通点云 (可以设置指定颜色,也可以去掉single_color参数不设置)
    pcl::visualization::PointCloudColorHandlerCustom<PointType> single_color(cloud, 0, 255, 0);
    viewer->addPointCloud<PointType>(cloud, single_color, "sample cloud");
    viewer->setPointCloudRenderingProperties(pcl::visualization::PCL_VISUALIZER_POINT_SIZE, 2, "sample cloud");

    // 添加一个第二个点云 (可以设置指定颜色,也可以去掉single_color2参数不设置)
    pcl::visualization::PointCloudColorHandlerCustom<PointType> single_color2(cloud, 255, 0, 0);
    viewer->addPointCloud<PointType>(cloud2, single_color2, "sample cloud 2");
    viewer->setPointCloudRenderingProperties(pcl::visualization::PCL_VISUALIZER_POINT_SIZE, 4, "sample cloud 2");
    viewer->addCoordinateSystem(1.0);

    while (!viewer->wasStopped()) {
        viewer->spinOnce();
    }
}

int main() {
    pcl::PointCloud<pcl::PointXYZ>::Ptr cloud(new pcl::PointCloud<pcl::PointXYZ>);
    pcl::PointCloud<pcl::PointXYZ>::Ptr cloud_filtered(new pcl::PointCloud<pcl::PointXYZ>);

    // Fill in the cloud data
    cloud->width = 1000;
    cloud->height = 1;
    cloud->points.resize(cloud->width * cloud->height);

    for (size_t i = 0; i < cloud->points.size(); ++i) {
        cloud->points[i].x = 1024 * rand() / (RAND_MAX + 1.0f);
        cloud->points[i].y = 1024 * rand() / (RAND_MAX + 1.0f);
        cloud->points[i].z = 1024 * rand() / (RAND_MAX + 1.0f);
    }

    pcl::RadiusOutlierRemoval<pcl::PointXYZ> outrem;
    // build the filter
    outrem.setInputCloud(cloud);
    outrem.setRadiusSearch(30);
    outrem.setMinNeighborsInRadius(2);
    // apply filter
    outrem.filter(*cloud_filtered);

    std::cerr << "Cloud before filtering: " << cloud->points.size() << std::endl;
#if 0
    for (size_t i = 0; i < cloud->points.size(); ++i)
        std::cerr << "    " << cloud->points[i].x << " "
        << cloud->points[i].y << " "
        << cloud->points[i].z << std::endl;
#endif
    // display pointcloud after filtering
    std::cerr << "Cloud after filtering: " << cloud_filtered->points.size() << std::endl;
    for (size_t i = 0; i < cloud_filtered->points.size(); ++i)
        std::cerr << "    " << cloud_filtered->points[i].x << " "
        << cloud_filtered->points[i].y << " "
        << cloud_filtered->points[i].z << std::endl;

    showPointClouds(cloud, cloud_filtered);

    return 0;
} |  |
相关工具使用
对一个点云进行降采样:在pcl安装目录的Bin文件夹下找到pcl_voxel_grid.exe
pcl_voxel_grid F:\pcl_tests\input_cloud\20230605_132512.pcd F:\pcl_tests\output_cloud\pcl_voxel_grid_test.pcd -leaf 3 3 3
参考:点云数据滤波处理(PCL实现)