文章目录
- 可视化
- CloudViewer 可视化
- PCLVisualizer 可视化
- 可视化单个云
- 添加一些颜色
- RGB点云
- 指定颜色
- 法线和其他信息
- 绘制形状
- 多个窗口
- 交互自定义
可视化
CloudViewer 可视化
将【PCL】(一)PCL基本数据结构PointCloud与原生文件格式PCD末尾的数据保存到my_point_cloud.pcd,将以下代码复制到cloud_viewer.cpp
#include <pcl/visualization/cloud_viewer.h>
#include <pcl/io/pcd_io.h>

int user_data;

int main ()
{
    pcl::PointCloud<pcl::PointXYZRGBA>::Ptr cloud (new pcl::PointCloud<pcl::PointXYZRGBA>);
    pcl::io::loadPCDFile ("my_point_cloud.pcd", *cloud);

    pcl::visualization::CloudViewer viewer("Cloud Viewer");


    viewer.showCloud(cloud);
    while (!viewer.wasStopped ())
    {
    }
    return 0;
}
cmake_minimum_required(VERSION 3.5 FATAL_ERROR)

project(cloud_viewer)

find_package(PCL 1.2 REQUIRED)

include_directories(${PCL_INCLUDE_DIRS})
link_directories(${PCL_LIBRARY_DIRS})
add_definitions(${PCL_DEFINITIONS})

add_executable (cloud_viewer cloud_viewer.cpp)
target_link_libraries (cloud_viewer ${PCL_LIBRARIES})
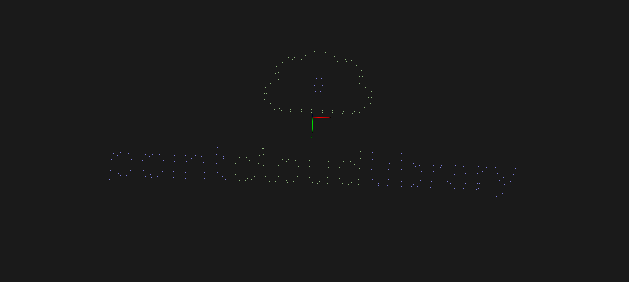
得到可执行文件后用鼠标点击并缩放会看到:
PCLVisualizer 可视化
PCLVisualizer是PCL功能更全的可视化类。虽然使用起来比CloudViewer更复杂,但它也更强大,提供了显示法线、绘制形状和多个视口等更多的功能。
以下代码为一些可视化功能的模板,我们首先将其复制到名为pcl_visualizer_demo.cpp的文件中。
/* \author Geoffrey Biggs */

#include <iostream>
#include <thread>

#include <pcl/common/angles.h> // for pcl::deg2rad
#include <pcl/features/normal_3d.h>
#include <pcl/io/pcd_io.h>
#include <pcl/visualization/pcl_visualizer.h>
#include <pcl/console/parse.h>

using namespace std::chrono_literals;

// --------------
// -----Help-----
// --------------
void
printUsage (const char* progName)
{
  std::cout << "\n\nUsage: "<<progName<<" [options]\n\n"
            << "Options:\n"
            << "-------------------------------------------\n"
            << "-h           this help\n"
            << "-s           Simple visualisation example\n"
            << "-r           RGB colour visualisation example\n"
            << "-c           Custom colour visualisation example\n"
            << "-n           Normals visualisation example\n"
            << "-a           Shapes visualisation example\n"
            << "-v           Viewports example\n"
            << "-i           Interaction Customization example\n"
            << "\n\n";
}


pcl::visualization::PCLVisualizer::Ptr simpleVis (pcl::PointCloud<pcl::PointXYZ>::ConstPtr cloud)
{
  // --------------------------------------------
  // -----Open 3D viewer and add point cloud-----
  // --------------------------------------------
  pcl::visualization::PCLVisualizer::Ptr viewer (new pcl::visualization::PCLVisualizer ("3D Viewer"));
  viewer->setBackgroundColor (0, 0, 0);
  viewer->addPointCloud<pcl::PointXYZ> (cloud, "sample cloud");
  viewer->setPointCloudRenderingProperties (pcl::visualization::PCL_VISUALIZER_POINT_SIZE, 1, "sample cloud");
  viewer->addCoordinateSystem (1.0);
  viewer->initCameraParameters ();
  return (viewer);
}


pcl::visualization::PCLVisualizer::Ptr rgbVis (pcl::PointCloud<pcl::PointXYZRGB>::ConstPtr cloud)
{
  // --------------------------------------------
  // -----Open 3D viewer and add point cloud-----
  // --------------------------------------------
  pcl::visualization::PCLVisualizer::Ptr viewer (new pcl::visualization::PCLVisualizer ("3D Viewer"));
  viewer->setBackgroundColor (0, 0, 0);
  pcl::visualization::PointCloudColorHandlerRGBField<pcl::PointXYZRGB> rgb(cloud);
  viewer->addPointCloud<pcl::PointXYZRGB> (cloud, rgb, "sample cloud");
  viewer->setPointCloudRenderingProperties (pcl::visualization::PCL_VISUALIZER_POINT_SIZE, 3, "sample cloud");
  viewer->addCoordinateSystem (1.0);
  viewer->initCameraParameters ();
  return (viewer);
}


pcl::visualization::PCLVisualizer::Ptr customColourVis (pcl::PointCloud<pcl::PointXYZ>::ConstPtr cloud)
{
  // --------------------------------------------
  // -----Open 3D viewer and add point cloud-----
  // --------------------------------------------
  pcl::visualization::PCLVisualizer::Ptr viewer (new pcl::visualization::PCLVisualizer ("3D Viewer"));
  viewer->setBackgroundColor (0, 0, 0);
  pcl::visualization::PointCloudColorHandlerCustom<pcl::PointXYZ> single_color(cloud, 0, 255, 0);
  viewer->addPointCloud<pcl::PointXYZ> (cloud, single_color, "sample cloud");
  viewer->setPointCloudRenderingProperties (pcl::visualization::PCL_VISUALIZER_POINT_SIZE, 3, "sample cloud");
  viewer->addCoordinateSystem (1.0);
  viewer->initCameraParameters ();
  return (viewer);
}


pcl::visualization::PCLVisualizer::Ptr normalsVis (
    pcl::PointCloud<pcl::PointXYZRGB>::ConstPtr cloud, pcl::PointCloud<pcl::Normal>::ConstPtr normals)
{
  // --------------------------------------------------------
  // -----Open 3D viewer and add point cloud and normals-----
  // --------------------------------------------------------
  pcl::visualization::PCLVisualizer::Ptr viewer (new pcl::visualization::PCLVisualizer ("3D Viewer"));
  viewer->setBackgroundColor (0, 0, 0);
  pcl::visualization::PointCloudColorHandlerRGBField<pcl::PointXYZRGB> rgb(cloud);
  viewer->addPointCloud<pcl::PointXYZRGB> (cloud, rgb, "sample cloud");
  viewer->setPointCloudRenderingProperties (pcl::visualization::PCL_VISUALIZER_POINT_SIZE, 3, "sample cloud");
  viewer->addPointCloudNormals<pcl::PointXYZRGB, pcl::Normal> (cloud, normals, 10, 0.05, "normals");
  viewer->addCoordinateSystem (1.0);
  viewer->initCameraParameters ();
  return (viewer);
}


pcl::visualization::PCLVisualizer::Ptr shapesVis (pcl::PointCloud<pcl::PointXYZRGB>::ConstPtr cloud)
{
  // --------------------------------------------
  // -----Open 3D viewer and add point cloud-----
  // --------------------------------------------
  pcl::visualization::PCLVisualizer::Ptr viewer (new pcl::visualization::PCLVisualizer ("3D Viewer"));
  viewer->setBackgroundColor (0, 0, 0);
  pcl::visualization::PointCloudColorHandlerRGBField<pcl::PointXYZRGB> rgb(cloud);
  viewer->addPointCloud<pcl::PointXYZRGB> (cloud, rgb, "sample cloud");
  viewer->setPointCloudRenderingProperties (pcl::visualization::PCL_VISUALIZER_POINT_SIZE, 3, "sample cloud");
  viewer->addCoordinateSystem (1.0);
  viewer->initCameraParameters ();

  //------------------------------------
  //-----Add shapes at cloud points-----
  //------------------------------------
  viewer->addLine<pcl::PointXYZRGB> ((*cloud)[0],
                                     (*cloud)[cloud->size() - 1], "line");
  viewer->addSphere ((*cloud)[0], 0.2, 0.5, 0.5, 0.0, "sphere");

  //---------------------------------------
  //-----Add shapes at other locations-----
  //---------------------------------------
  pcl::ModelCoefficients coeffs;
  coeffs.values.push_back (0.0);
  coeffs.values.push_back (0.0);
  coeffs.values.push_back (1.0);
  coeffs.values.push_back (0.0);
  viewer->addPlane (coeffs, "plane");
  coeffs.values.clear ();
  coeffs.values.push_back (0.3);
  coeffs.values.push_back (0.3);
  coeffs.values.push_back (0.0);
  coeffs.values.push_back (0.0);
  coeffs.values.push_back (1.0);
  coeffs.values.push_back (0.0);
  coeffs.values.push_back (5.0);
  viewer->addCone (coeffs, "cone");

  return (viewer);
}


pcl::visualization::PCLVisualizer::Ptr viewportsVis (
    pcl::PointCloud<pcl::PointXYZRGB>::ConstPtr cloud, pcl::PointCloud<pcl::Normal>::ConstPtr normals1, pcl::PointCloud<pcl::Normal>::ConstPtr normals2)
{
  // --------------------------------------------------------
  // -----Open 3D viewer and add point cloud and normals-----
  // --------------------------------------------------------
  pcl::visualization::PCLVisualizer::Ptr viewer (new pcl::visualization::PCLVisualizer ("3D Viewer"));
  viewer->initCameraParameters ();

  int v1(0);
  viewer->createViewPort(0.0, 0.0, 0.5, 1.0, v1);
  viewer->setBackgroundColor (0, 0, 0, v1);
  viewer->addText("Radius: 0.01", 10, 10, "v1 text", v1);
  pcl::visualization::PointCloudColorHandlerRGBField<pcl::PointXYZRGB> rgb(cloud);
  viewer->addPointCloud<pcl::PointXYZRGB> (cloud, rgb, "sample cloud1", v1);

  int v2(0);
  viewer->createViewPort(0.5, 0.0, 1.0, 1.0, v2);
  viewer->setBackgroundColor (0.3, 0.3, 0.3, v2);
  viewer->addText("Radius: 0.1", 10, 10, "v2 text", v2);
  pcl::visualization::PointCloudColorHandlerCustom<pcl::PointXYZRGB> single_color(cloud, 0, 255, 0);
  viewer->addPointCloud<pcl::PointXYZRGB> (cloud, single_color, "sample cloud2", v2);

  viewer->setPointCloudRenderingProperties (pcl::visualization::PCL_VISUALIZER_POINT_SIZE, 3, "sample cloud1");
  viewer->setPointCloudRenderingProperties (pcl::visualization::PCL_VISUALIZER_POINT_SIZE, 3, "sample cloud2");
  viewer->addCoordinateSystem (1.0);

  viewer->addPointCloudNormals<pcl::PointXYZRGB, pcl::Normal> (cloud, normals1, 10, 0.05, "normals1", v1);
  viewer->addPointCloudNormals<pcl::PointXYZRGB, pcl::Normal> (cloud, normals2, 10, 0.05, "normals2", v2);

  return (viewer);
}


unsigned int text_id = 0;
void keyboardEventOccurred (const pcl::visualization::KeyboardEvent &event,
                            void* viewer_void)
{
  pcl::visualization::PCLVisualizer *viewer = static_cast<pcl::visualization::PCLVisualizer *> (viewer_void);
  if (event.getKeySym () == "r" && event.keyDown ())
  {
    std::cout << "r was pressed => removing all text" << std::endl;

    char str[512];
    for (unsigned int i = 0; i < text_id; ++i)
    {
      sprintf (str, "text#%03d", i);
      viewer->removeShape (str);
    }
    text_id = 0;
  }
}

void mouseEventOccurred (const pcl::visualization::MouseEvent &event,
                         void* viewer_void)
{
  pcl::visualization::PCLVisualizer *viewer = static_cast<pcl::visualization::PCLVisualizer *> (viewer_void);
  if (event.getButton () == pcl::visualization::MouseEvent::LeftButton &&
      event.getType () == pcl::visualization::MouseEvent::MouseButtonRelease)
  {
    std::cout << "Left mouse button released at position (" << event.getX () << ", " << event.getY () << ")" << std::endl;

    char str[512];
    sprintf (str, "text#%03d", text_id ++);
    viewer->addText ("clicked here", event.getX (), event.getY (), str);
  }
}

pcl::visualization::PCLVisualizer::Ptr interactionCustomizationVis ()
{
  pcl::visualization::PCLVisualizer::Ptr viewer (new pcl::visualization::PCLVisualizer ("3D Viewer"));
  viewer->setBackgroundColor (0, 0, 0);
  viewer->addCoordinateSystem (1.0);

  viewer->registerKeyboardCallback (keyboardEventOccurred, (void*)viewer.get ());
  viewer->registerMouseCallback (mouseEventOccurred, (void*)viewer.get ());

  return (viewer);
}


// --------------
// -----Main-----
// --------------
int
main (int argc, char** argv)
{
  // --------------------------------------
  // -----Parse Command Line Arguments-----
  // --------------------------------------
  if (pcl::console::find_argument (argc, argv, "-h") >= 0)
  {
    printUsage (argv[0]);
    return 0;
  }
  bool simple(false), rgb(false), custom_c(false), normals(false),
    shapes(false), viewports(false), interaction_customization(false);
  if (pcl::console::find_argument (argc, argv, "-s") >= 0)
  {
    simple = true;
    std::cout << "Simple visualisation example\n";
  }
  else if (pcl::console::find_argument (argc, argv, "-c") >= 0)
  {
    custom_c = true;
    std::cout << "Custom colour visualisation example\n";
  }
  else if (pcl::console::find_argument (argc, argv, "-r") >= 0)
  {
    rgb = true;
    std::cout << "RGB colour visualisation example\n";
  }
  else if (pcl::console::find_argument (argc, argv, "-n") >= 0)
  {
    normals = true;
    std::cout << "Normals visualisation example\n";
  }
  else if (pcl::console::find_argument (argc, argv, "-a") >= 0)
  {
    shapes = true;
    std::cout << "Shapes visualisation example\n";
  }
  else if (pcl::console::find_argument (argc, argv, "-v") >= 0)
  {
    viewports = true;
    std::cout << "Viewports example\n";
  }
  else if (pcl::console::find_argument (argc, argv, "-i") >= 0)
  {
    interaction_customization = true;
    std::cout << "Interaction Customization example\n";
  }
  else
  {
    printUsage (argv[0]);
    return 0;
  }

  // ------------------------------------
  // -----Create example point cloud-----
  // ------------------------------------
  pcl::PointCloud<pcl::PointXYZ>::Ptr basic_cloud_ptr (new pcl::PointCloud<pcl::PointXYZ>);
  pcl::PointCloud<pcl::PointXYZRGB>::Ptr point_cloud_ptr (new pcl::PointCloud<pcl::PointXYZRGB>);
  std::cout << "Generating example point clouds.\n\n";
  // We're going to make an ellipse extruded along the z-axis. The colour for
  // the XYZRGB cloud will gradually go from red to green to blue.
  std::uint8_t r(255), g(15), b(15);
  for (float z(-1.0); z <= 1.0; z += 0.05)
  {
    for (float angle(0.0); angle <= 360.0; angle += 5.0)
    {
      pcl::PointXYZ basic_point;
      basic_point.x = 0.5 * std::cos (pcl::deg2rad(angle));
      basic_point.y = sinf (pcl::deg2rad(angle));
      basic_point.z = z;
      basic_cloud_ptr->points.push_back(basic_point);

      pcl::PointXYZRGB point;
      point.x = basic_point.x;
      point.y = basic_point.y;
      point.z = basic_point.z;
      point.r = r;
      point.g = g;
      point.b = b;
      point_cloud_ptr->points.push_back (point);
    }
    if (z < 0.0)
    {
      r -= 12;
      g += 12;
    }
    else
    {
      g -= 12;
      b += 12;
    }
  }
  basic_cloud_ptr->width = basic_cloud_ptr->size ();
  basic_cloud_ptr->height = 1;
  point_cloud_ptr->width = point_cloud_ptr->size ();
  point_cloud_ptr->height = 1;

  // ----------------------------------------------------------------
  // -----Calculate surface normals with a search radius of 0.05-----
  // ----------------------------------------------------------------
  pcl::NormalEstimation<pcl::PointXYZRGB, pcl::Normal> ne;
  ne.setInputCloud (point_cloud_ptr);
  pcl::search::KdTree<pcl::PointXYZRGB>::Ptr tree (new pcl::search::KdTree<pcl::PointXYZRGB> ());
  ne.setSearchMethod (tree);
  pcl::PointCloud<pcl::Normal>::Ptr cloud_normals1 (new pcl::PointCloud<pcl::Normal>);
  ne.setRadiusSearch (0.05);
  ne.compute (*cloud_normals1);

  // ---------------------------------------------------------------
  // -----Calculate surface normals with a search radius of 0.1-----
  // ---------------------------------------------------------------
  pcl::PointCloud<pcl::Normal>::Ptr cloud_normals2 (new pcl::PointCloud<pcl::Normal>);
  ne.setRadiusSearch (0.1);
  ne.compute (*cloud_normals2);

  pcl::visualization::PCLVisualizer::Ptr viewer;
  if (simple)
  {
    viewer = simpleVis(basic_cloud_ptr);
  }
  else if (rgb)
  {
    viewer = rgbVis(point_cloud_ptr);
  }
  else if (custom_c)
  {
    viewer = customColourVis(basic_cloud_ptr);
  }
  else if (normals)
  {
    viewer = normalsVis(point_cloud_ptr, cloud_normals2);
  }
  else if (shapes)
  {
    viewer = shapesVis(point_cloud_ptr);
  }
  else if (viewports)
  {
    viewer = viewportsVis(point_cloud_ptr, cloud_normals1, cloud_normals2);
  }
  else if (interaction_customization)
  {
    viewer = interactionCustomizationVis();
  }

  //--------------------
  // -----Main loop-----
  //--------------------
  while (!viewer->wasStopped ())
  {
    viewer->spinOnce (100);
    std::this_thread::sleep_for(100ms);
  }
}
讲以下内容复制到CMakeLists.txt。
cmake_minimum_required(VERSION 3.5 FATAL_ERROR)

project(pcl_visualizer_viewports)

find_package(PCL 1.2 REQUIRED)

include_directories(${PCL_INCLUDE_DIRS})
link_directories(${PCL_LIBRARY_DIRS})
add_definitions(${PCL_DEFINITIONS})

add_executable (pcl_visualizer_demo pcl_visualizer_demo.cpp)
target_link_libraries (pcl_visualizer_demo ${PCL_LIBRARIES})
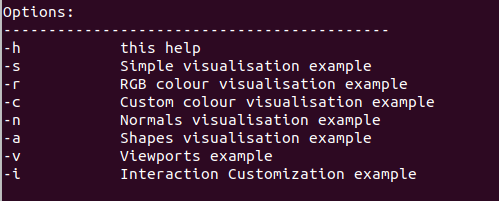
生成可执行文件后,可以按如下方式运行:
$ ./pcl_visualizer_demo -h
可以得到帮助信息。
更改选项以更改要执行的演示
要退出查看器应用程序,请按q。按r居中并缩放查看器,使整个云可见。使用鼠标通过单击和拖动旋转视点。可以使用滚轮,也可以右键单击并上下拖动来放大和缩小。单击鼠标中键并拖动将移动相机。
可视化单个云
pcl::visualization::PCLVisualizer::Ptr simpleVis (pcl::PointCloud<pcl::PointXYZ>::ConstPtr cloud)
{
  // --------------------------------------------
  // -----Open 3D viewer and add point cloud-----
  // --------------------------------------------
  pcl::visualization::PCLVisualizer::Ptr viewer (new pcl::visualization::PCLVisualizer ("3D Viewer"));
  viewer->setBackgroundColor (0, 0, 0);
  viewer->addPointCloud<pcl::PointXYZ> (cloud, "sample cloud");
  viewer->setPointCloudRenderingProperties (pcl::visualization::PCL_VISUALIZER_POINT_SIZE, 1, "sample cloud");
  viewer->addCoordinateSystem (1.0);
  viewer->initCameraParameters ();
  return (viewer);
}
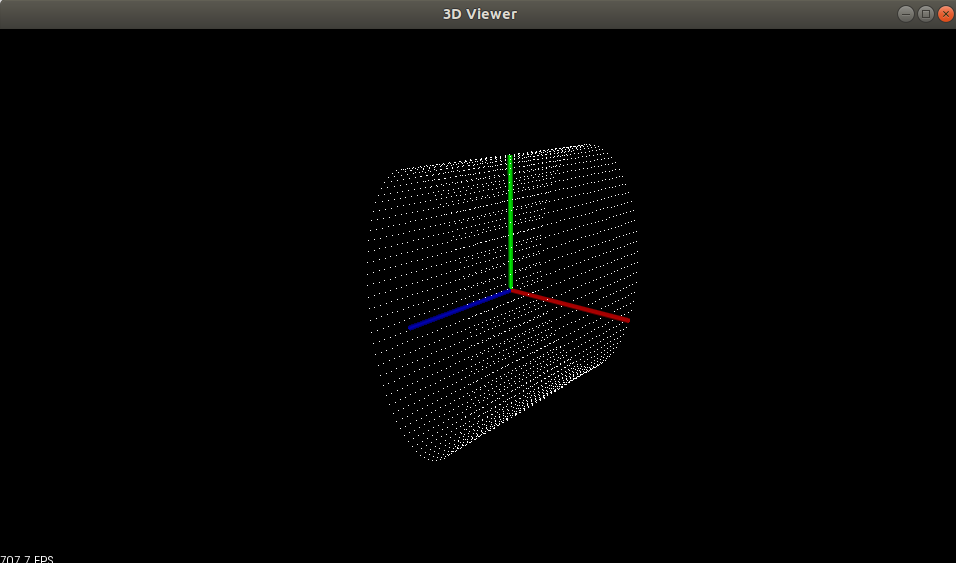
simpleVis函数显示了如何对点云进行最基本的可视化。让我们逐行看一下函数。
...
pcl::visualization::PCLVisualizer::Ptr viewer (new pcl::visualization::PCLVisualizer ("3D Viewer"));
...
这将创建查看器对象,为其提供一个很好的名称"3D Viewer"以显示在标题栏中。我们将它存储在一个智能指针中,这样它就可以在演示程序中传递。可以选择不这样做。
...
viewer->setBackgroundColor (0, 0, 0);
...
查看器的背景颜色可以设置为你喜欢的任何RGB颜色。这一行代码将其设置为黑色。
...
viewer->addPointCloud<pcl::PointXYZ> (cloud, "sample cloud");
...
这是最重要的一行。我们将点云添加到查看器中,为其提供一个ID字符串,该字符串可用于在其他方法中识别点云。可以通过多次调用addPointCloud()来添加多个点云,每次都提供一个新的ID。如果要更新已显示的点云,则必须首先调用removePointCloud()并提供要更新的云的ID。(注意:PCL 1.1及更高版本提供了一个新的API方法updatePointCloud()该方法允许更新云,而无需先手动调用removePointClouds()。)
...
viewer->setPointCloudRenderingProperties (pcl::visualization::PCL_VISUALIZER_POINT_SIZE, 1, "sample cloud");
...
这一行将更改渲染点的大小。使用此方法可以调整渲染的点云的属性。
...
viewer->addCoordinateSystem (1.0);
...
这将显示沿X(红色)、Y(绿色)和Z(蓝色)轴的三个圆柱体形成的坐标系。可以使用比例参数控制圆柱体的大小。该例子设置为1.0(如果没有给定值,这也是默认值)。
...
viewer->initCameraParameters ();
...
这个用于设置了一些相机参数。
...
while (!viewer->wasStopped ())
{
  viewer->spinOnce (100);
  std::this_thread::sleep_for(100ms);
}
...
这一段可以说是固定的。
添加一些颜色
通常,点云不会使用简单的PointXYZ类型。一种常见的点类型是PointXYZRGB,它也包含颜色数据。除此之外,你可能希望为特定的点云着色,以使它们在查看器中可区分。PCLVizualizer提供了显示点云中存储的颜色数据的设施,或为点云指定颜色的设施。
RGB点云
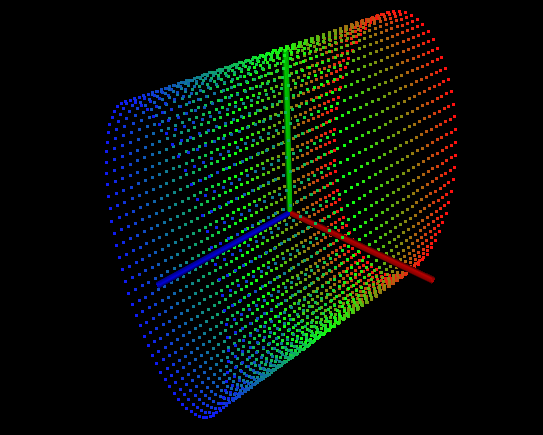
许多设备,如Microsoft Kinect,都会使用生成包含RGB属性的点云数据。PCLVisualizer可以使用这些数据为每个点着色。rgbVis函数中的代码展示了如何执行此操作。
pcl::visualization::PCLVisualizer::Ptr rgbVis (pcl::PointCloud<pcl::PointXYZRGB>::ConstPtr cloud)
{
  // --------------------------------------------
  // -----Open 3D viewer and add point cloud-----
  // --------------------------------------------
  pcl::visualization::PCLVisualizer::Ptr viewer (new pcl::visualization::PCLVisualizer ("3D Viewer"));
  viewer->setBackgroundColor (0, 0, 0);
  pcl::visualization::PointCloudColorHandlerRGBField<pcl::PointXYZRGB> rgb(cloud);
  viewer->addPointCloud<pcl::PointXYZRGB> (cloud, rgb, "sample cloud");
  viewer->setPointCloudRenderingProperties (pcl::visualization::PCL_VISUALIZER_POINT_SIZE, 3, "sample cloud");
  viewer->addCoordinateSystem (1.0);
  viewer->initCameraParameters ();
  return (viewer);
}
代码解释:
这个示例中的代码与上一节的简单示例simpleVis相比没有太多变化。
...
pcl::visualization::PCLVisualizer::Ptr rgbVis (pcl::PointCloud<pcl::PointXYZRGB>::ConstPtr cloud)
...
首先,请注意,这里的点类型与simpleVis不同。我们现在使用的点类型也为RGB数据提供了空间。这很重要;如果点中没有RGB字段(点类型不一定必须是PointXYZRGB,只要它有三个颜色字段),PCLVisualizer将不知道要使用什么颜色。
...
pcl::visualization::PointCloudColorHandlerRGB<pcl::PointXYZRGB> rgb(point_cloud_ptr);
...
接下来,在设置了查看器的背景颜色之后,我们创建了一个颜色处理程序对象(colour handler object)。PCLVisualizer使用类似这样的对象来显示自定义数据。在这种情况下,对象将从每个点获得RGB颜色场,供查看器在绘制时使用。
...
viewer->addPointCloud<pcl::PointXYZRGB> (cloud, rgb, "sample cloud");
...
最后,我们在将点云添加到查看器的同时指定颜色处理程序rgb。
指定颜色
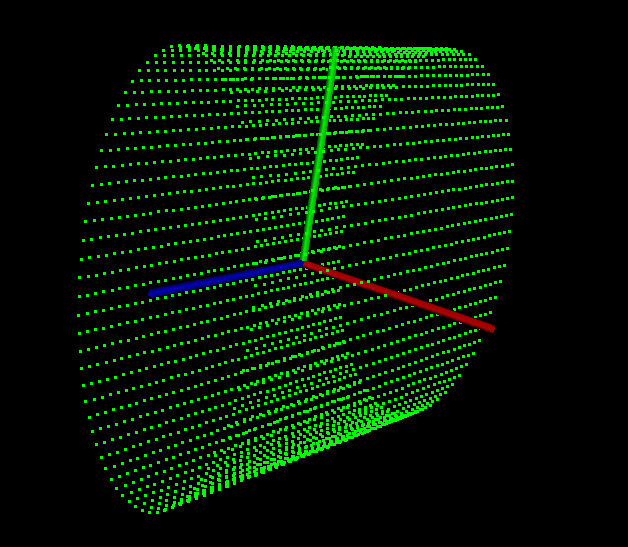
第二个代码示例演示了为点云指定单一的颜色。在customColourVis函数中,我们将点云的颜色设置为绿色。(我们还增加了点的大小,使颜色更显眼。)
pcl::visualization::PCLVisualizer::Ptr customColourVis (pcl::PointCloud<pcl::PointXYZ>::ConstPtr cloud)
{
  // --------------------------------------------
  // -----Open 3D viewer and add point cloud-----
  // --------------------------------------------
  pcl::visualization::PCLVisualizer::Ptr viewer (new pcl::visualization::PCLVisualizer ("3D Viewer"));
  viewer->setBackgroundColor (0, 0, 0);
  pcl::visualization::PointCloudColorHandlerCustom<pcl::PointXYZ> single_color(cloud, 0, 255, 0);
  viewer->addPointCloud<pcl::PointXYZ> (cloud, single_color, "sample cloud");
  viewer->setPointCloudRenderingProperties (pcl::visualization::PCL_VISUALIZER_POINT_SIZE, 3, "sample cloud");
  viewer->addCoordinateSystem (1.0);
  viewer->initCameraParameters ();
  return (viewer);
}
代码解释:
同样,这个示例中的代码与前面的示例相比没有太多变化。
...
pcl::visualization::PCLVisualizer::Ptr customColourVis (pcl::PointCloud<pcl::PointXYZ>::ConstPtr cloud)
...
这次使用的点类型再次返回到PointXYZ。为点云设置自定义颜色处理程序时,底层数据类型是什么并不重要。没有任何点字段用于自定义颜色处理的颜色。
...
pcl::visualization::PointCloudColorHandlerCustom<pcl::PointXYZ> single_color (cloud, 0, 255, 0);
...
我们创建了一个自定义的颜色处理程序,并为其分配了一个绿色RGB值。
...
viewer->addPointCloud<pcl::PointXYZ> (cloud, single_color, "sample cloud");
...
与前面的示例一样,我们在调用addPointCloud<>()时传入颜色处理程序。
法线和其他信息

PCLVisualizer类能够绘制法线以及其他点云信息,例如主曲率和几何图形。
normalsVis展示了如何显示点云的法线。
pcl::visualization::PCLVisualizer::Ptr normalsVis (
    pcl::PointCloud<pcl::PointXYZRGB>::ConstPtr cloud, pcl::PointCloud<pcl::Normal>::ConstPtr normals)
{
  // --------------------------------------------------------
  // -----Open 3D viewer and add point cloud and normals-----
  // --------------------------------------------------------
  pcl::visualization::PCLVisualizer::Ptr viewer (new pcl::visualization::PCLVisualizer ("3D Viewer"));
  viewer->setBackgroundColor (0, 0, 0);
  pcl::visualization::PointCloudColorHandlerRGBField<pcl::PointXYZRGB> rgb(cloud);
  viewer->addPointCloud<pcl::PointXYZRGB> (cloud, rgb, "sample cloud");
  viewer->setPointCloudRenderingProperties (pcl::visualization::PCL_VISUALIZER_POINT_SIZE, 3, "sample cloud");
  viewer->addPointCloudNormals<pcl::PointXYZRGB, pcl::Normal> (cloud, normals, 10, 0.05, "normals");
  viewer->addCoordinateSystem (1.0);
  viewer->initCameraParameters ();
  return (viewer);
}
代码解释:
...
viewer->addPointCloudNormals<pcl::PointXYZRGB, pcl::Normal> (cloud, normals, 10, 0.05, "normals");
...
一旦获得了法线,只需多出一行代码即可在查看器中显示它们。此方法的参数设置要显示的法线数(此处显示每十分之一的法线)和为每个法线绘制的线的长度(此处为0.05)。
绘制形状
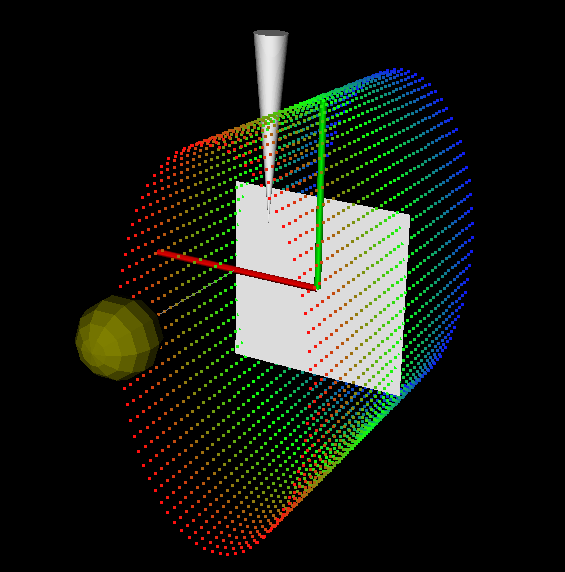
PCLVisualizer允许你在视图中绘制各种基本形状。这通常用于可视化点云处理算法的结果,例如,通过在点周围绘制透明球体来可视化哪些点簇已被识别为地标。
shapesVis函数中的示例代码说明了用于向查看器添加形状的一些方法。它添加了四种形状:从云中第一个点到云中最后一个点的直线。原点处的平面。以云中第一个点为中心的球体。沿Y轴的圆锥体。
pcl::visualization::PCLVisualizer::Ptr shapesVis (pcl::PointCloud<pcl::PointXYZRGB>::ConstPtr cloud)
{
  // --------------------------------------------
  // -----Open 3D viewer and add point cloud-----
  // --------------------------------------------
  pcl::visualization::PCLVisualizer::Ptr viewer (new pcl::visualization::PCLVisualizer ("3D Viewer"));
  viewer->setBackgroundColor (0, 0, 0);
  pcl::visualization::PointCloudColorHandlerRGBField<pcl::PointXYZRGB> rgb(cloud);
  viewer->addPointCloud<pcl::PointXYZRGB> (cloud, rgb, "sample cloud");
  viewer->setPointCloudRenderingProperties (pcl::visualization::PCL_VISUALIZER_POINT_SIZE, 3, "sample cloud");
  viewer->addCoordinateSystem (1.0);
  viewer->initCameraParameters ();

  //------------------------------------
  //-----Add shapes at cloud points-----
  //------------------------------------
  viewer->addLine<pcl::PointXYZRGB> ((*cloud)[0],
                                     (*cloud)[cloud->size() - 1], "line");
  viewer->addSphere ((*cloud)[0], 0.2, 0.5, 0.5, 0.0, "sphere");

  //---------------------------------------
  //-----Add shapes at other locations-----
  //---------------------------------------
  pcl::ModelCoefficients coeffs;
  coeffs.values.push_back (0.0);
  coeffs.values.push_back (0.0);
  coeffs.values.push_back (1.0);
  coeffs.values.push_back (0.0);
  viewer->addPlane (coeffs, "plane");
  coeffs.values.clear ();
  coeffs.values.push_back (0.3);
  coeffs.values.push_back (0.3);
  coeffs.values.push_back (0.0);
  coeffs.values.push_back (0.0);
  coeffs.values.push_back (1.0);
  coeffs.values.push_back (0.0);
  coeffs.values.push_back (5.0);
  viewer->addCone (coeffs, "cone");

  return (viewer);
}
代码解释:
...
viewer->addLine<pcl::PointXYZRGB> ((*cloud)[0], (*cloud)[cloud->size() - 1], "line");
...
这一行代码添加了从云中的第一个点到最后一个点的连线。
...
viewer->addSphere ((*cloud)[0], 0.2, 0.5, 0.5, 0.0, "sphere");
...
这一行代码添加一个以云中第一个点为中心、半径为0.2的球体。它还赋予球体一种颜色。
...
pcl::ModelCoefficients coeffs;
coeffs.values.push_back(0.0);
coeffs.values.push_back(0.0);
coeffs.values.push_back(1.0);
coeffs.values.push_back(0.0);
viewer->addPlane (coeffs, "plane");
...
这里将一个平面添加到图形中。使用的是标准平面方程(ax+by+cz+d=0)。该例子中a=0.0,b=0.0,c=1.0,d=0.0
...
coeffs.values.clear();
coeffs.values.push_back(0.3);
coeffs.values.push_back(0.3);
coeffs.values.push_back(0.0);
coeffs.values.push_back(0.0);
coeffs.values.push_back(1.0);
coeffs.values.push_back(0.0);
coeffs.values.push_back(5.0);
viewer->addCone (coeffs, "cone");
...
最后,我们添加一个圆锥体。与平面类似地指定参数。
多个窗口
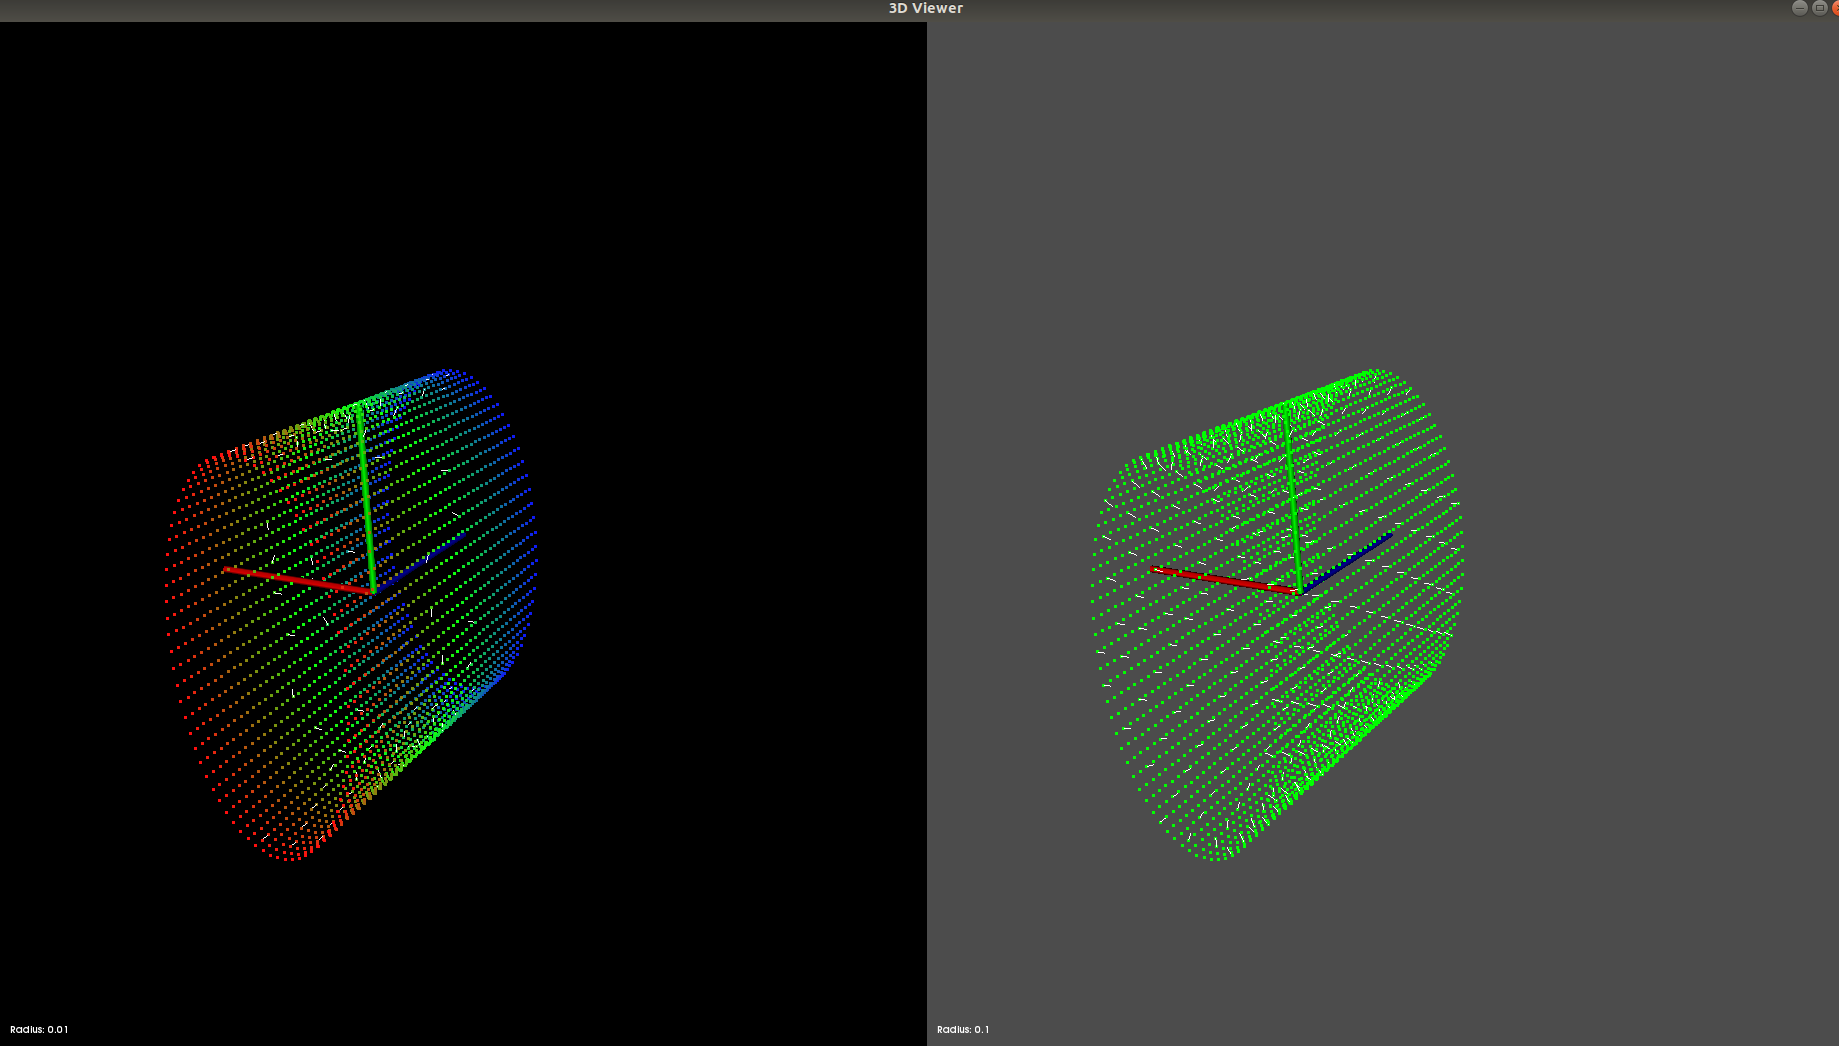
PCLVisualizer允许你在单独的视口并排可视化并比较多个点云。
viewportsVis函数中的代码使用视口来演示比较为点云计算的法线。为相同的云计算两组法线,但使用不同的搜索半径。第一次,搜索半径为0.05。第二次是0.1。0.05半径搜索的法线显示在具有黑色背景的视口中。0.1半径搜索的法线显示在带有灰色背景的视口中。
将两组法线并排进行比较,可以立即看出不同算法参数的影响。通过这种方式,你可以对算法的参数进行实验,以找到良好的设置,快速查看结果。
pcl::visualization::PCLVisualizer::Ptr viewportsVis (
    pcl::PointCloud<pcl::PointXYZRGB>::ConstPtr cloud, pcl::PointCloud<pcl::Normal>::ConstPtr normals1, pcl::PointCloud<pcl::Normal>::ConstPtr normals2)
{
  // --------------------------------------------------------
  // -----Open 3D viewer and add point cloud and normals-----
  // --------------------------------------------------------
  pcl::visualization::PCLVisualizer::Ptr viewer (new pcl::visualization::PCLVisualizer ("3D Viewer"));
  viewer->initCameraParameters ();

  int v1(0);
  viewer->createViewPort(0.0, 0.0, 0.5, 1.0, v1);
  viewer->setBackgroundColor (0, 0, 0, v1);
  viewer->addText("Radius: 0.01", 10, 10, "v1 text", v1);
  pcl::visualization::PointCloudColorHandlerRGBField<pcl::PointXYZRGB> rgb(cloud);
  viewer->addPointCloud<pcl::PointXYZRGB> (cloud, rgb, "sample cloud1", v1);

  int v2(0);
  viewer->createViewPort(0.5, 0.0, 1.0, 1.0, v2);
  viewer->setBackgroundColor (0.3, 0.3, 0.3, v2);
  viewer->addText("Radius: 0.1", 10, 10, "v2 text", v2);
  pcl::visualization::PointCloudColorHandlerCustom<pcl::PointXYZRGB> single_color(cloud, 0, 255, 0);
  viewer->addPointCloud<pcl::PointXYZRGB> (cloud, single_color, "sample cloud2", v2);

  viewer->setPointCloudRenderingProperties (pcl::visualization::PCL_VISUALIZER_POINT_SIZE, 3, "sample cloud1");
  viewer->setPointCloudRenderingProperties (pcl::visualization::PCL_VISUALIZER_POINT_SIZE, 3, "sample cloud2");
  viewer->addCoordinateSystem (1.0);

  viewer->addPointCloudNormals<pcl::PointXYZRGB, pcl::Normal> (cloud, normals1, 10, 0.05, "normals1", v1);
  viewer->addPointCloudNormals<pcl::PointXYZRGB, pcl::Normal> (cloud, normals2, 10, 0.05, "normals2", v2);

  return (viewer);
}


unsigned int text_id = 0;
void keyboardEventOccurred (const pcl::visualization::KeyboardEvent &event,
                            void* viewer_void)
{
  pcl::visualization::PCLVisualizer *viewer = static_cast<pcl::visualization::PCLVisualizer *> (viewer_void);
  if (event.getKeySym () == "r" && event.keyDown ())
  {
    std::cout << "r was pressed => removing all text" << std::endl;

    char str[512];
    for (unsigned int i = 0; i < text_id; ++i)
    {
      sprintf (str, "text#%03d", i);
      viewer->removeShape (str);
    }
    text_id = 0;
  }
}

void mouseEventOccurred (const pcl::visualization::MouseEvent &event,
                         void* viewer_void)
{
  pcl::visualization::PCLVisualizer *viewer = static_cast<pcl::visualization::PCLVisualizer *> (viewer_void);
  if (event.getButton () == pcl::visualization::MouseEvent::LeftButton &&
      event.getType () == pcl::visualization::MouseEvent::MouseButtonRelease)
  {
    std::cout << "Left mouse button released at position (" << event.getX () << ", " << event.getY () << ")" << std::endl;

    char str[512];
    sprintf (str, "text#%03d", text_id ++);
    viewer->addText ("clicked here", event.getX (), event.getY (), str);
  }
}
代码解释:
...
pcl::visualization::PCLVisualizer::Ptr viewer (new pcl::visualization::PCLVisualizer ("3D Viewer"));
viewer->initCameraParameters ();
...
这是创建查看器的标准代码。
...
int v1(0);
viewer->createViewPort (0.0, 0.0, 0.5, 1.0, v1);
viewer->setBackgroundColor (0, 0, 0, v1);
viewer->addText ("Radius: 0.01", 10, 10, "v1 text", v1);
pcl::visualization::PointCloudColorHandlerRGBField<pcl::PointXYZRGB> rgb (cloud);
viewer->addPointCloud<pcl::PointXYZRGB> (cloud, rgb, "sample cloud1", v1);
...
这里是创建一个新视口,四个参数是视口在X轴和Y轴上的最小和最大范围,介于0和1之间。我们正在创建一个视口,该视口将填充窗口的左半部分。我们必须存储在第五个参数中返回的视图端口ID号,并在所有其他只想影响该视口的调用中使用它。
我们还设置了该视口的背景颜色,根据我们使用视口进行区分的内容为其提供标签,并使用RGB颜色处理程序将点云添加到其中。
...
int v2(0);
viewer->createViewPort (0.5, 0.0, 1.0, 1.0, v2);
viewer->setBackgroundColor (0.3, 0.3, 0.3, v2);
viewer->addText ("Radius: 0.1", 10, 10, "v2 text", v2);
pcl::visualization::PointCloudColorHandlerCustom<pcl::PointXYZRGB> single_color (cloud, 0, 255, 0);
viewer->addPointCloud<pcl::PointXYZRGB> (cloud, single_color, "sample cloud2", v2);
...
然后,我们对第二个视口再次执行相同的操作,使其占据窗口的右半部分。我们将此视口设置为灰色阴影,以便在演示程序中很容易区分。我们添加了相同的点云,但这次我们为其提供了一个自定义的颜色处理程序。
...
viewer->setPointCloudRenderingProperties (pcl::visualization::PCL_VISUALIZER_POINT_SIZE, 3, "sample cloud1");
viewer->setPointCloudRenderingProperties (pcl::visualization::PCL_VISUALIZER_POINT_SIZE, 3, "sample cloud2");
viewer->addCoordinateSystem (1.0);
...
这三行为所有视口全局设置了一些特性。大多数PCLVisualizer方法都接受可选的视口ID参数。指定后,它们仅影响该视口。如果不是,如本例所示,它们会影响所有视口。
...
viewer->addPointCloudNormals<pcl::PointXYZRGB, pcl::Normal> (cloud, normals1, 10, 0.05, "normals1", v1);
viewer->addPointCloudNormals<pcl::PointXYZRGB, pcl::Normal> (cloud, normals2, 10, 0.05, "normals2", v2);
...
最后,我们将法线添加到每个视口中。
交互自定义
有时你会觉得默认的鼠标和键绑定提供的交互选项无法满足你的需求,你可能希望通过一些功能来扩展功能,例如在按下按钮或用鼠标注释渲染窗口上的某些位置时保存当前显示的点云的可能性等。interactionCustomizationVis方法中提供了一个非常简单的例子。
在本文的例子中,你将看到如何捕捉鼠标和键盘事件。右键单击窗口,将显示一个二维文本,你可以按“r”擦除所有文本实例。

pcl::visualization::PCLVisualizer::Ptr interactionCustomizationVis ()
{
  pcl::visualization::PCLVisualizer::Ptr viewer (new pcl::visualization::PCLVisualizer ("3D Viewer"));
  viewer->setBackgroundColor (0, 0, 0);
  viewer->addCoordinateSystem (1.0);

  viewer->registerKeyboardCallback (keyboardEventOccurred, (void*)viewer.get ());
  viewer->registerMouseCallback (mouseEventOccurred, (void*)viewer.get ());

  return (viewer);
}
...
pcl::visualization::PCLVisualizer::Ptr viewer (new pcl::visualization::PCLVisualizer ("3D Viewer"));
viewer->initCameraParameters ();
...
这是用于实例化查看器的标准代码。
...
viewer->registerKeyboardCallback (keyboardEventOccurred, (void*)&viewer);
viewer->registerMouseCallback (mouseEventOccurred, (void*)&viewer);
...
这两行代码将把keyboardEventOccurred和mouseEventOccured这两个方法分别注册到键盘和鼠标事件回调中。这两个方法调用的第二个参数是所谓的cookie。这些是你可能希望传递给回调函数的任何参数。在我们的例子中,我们希望传递查看器本身,以便在用户交互的情况下对其进行修改。请注意,这些参数必须是单个void*实例的形式,因此我们需要将指向智能指针的指针强制转换为void*。
...
void mouseEventOccurred (const pcl::visualization::MouseEvent &event,
                     void* viewer_void)
{
  pcl::visualization::PCLVisualizer::Ptr viewer = *static_cast<pcl::visualization::PCLVisualizer::Ptr *> (viewer_void);
  if (event.getButton () == pcl::visualization::MouseEvent::LeftButton && event.getType () == pcl::visualization::MouseEvent::MouseButtonRelease)
  {
    std::cout << "Left mouse button released at position (" << event.getX () << ", " << event.getY () << ")" << std::endl;
    char str[512];

    sprintf (str, "text#%03d", text_id ++);
    viewer->addText ("clicked here", event.getX (), event.getY (), str);
  }
}
...
这是处理鼠标事件的方法。每次注册任何类型的鼠标事件时,都会调用此函数。为了准确地了解该事件是什么,我们需要从事件实例中提取该信息。在我们的案例中,我们正在寻找鼠标左键释放。每当发生这样的事件时,我们都会在鼠标点击的位置写一个小文本。
...
void keyboardEventOccurred (const pcl::visualization::KeyboardEvent &event,
                        void* viewer_void)
{
  pcl::visualization::PCLVisualizer::Ptr viewer = *static_cast<pcl::visualization::PCLVisualizer::Ptr *> (viewer_void);
  if (event.getKeySym () == "r" && event.keyDown ())
  {
    std::cout << "r was pressed => removing all text" << std::endl;

    char str[512];
    for (unsigned int i = 0; i < text_id; ++i)
    {
      sprintf (str, "text#%03d", i);
      viewer->removeShape (str);
    }
    text_id = 0;
  }
}
...
同样的方法也适用于键盘事件。我们检查按下了什么键,我们所做的操作是删除所有由鼠标点击创建的文本。请注意,当按下“r”时,3D相机仍会按照PCLVisualizer内“r”的原始绑定进行重置。因此,我们的键盘事件不会覆盖基类的功能。
翻译/参考
https://pcl.readthedocs.io/projects/tutorials/en/master/cloud_viewer.html#cloud-viewer
https://pcl.readthedocs.io/projects/tutorials/en/master/pcl_visualizer.html#pcl-visualizer
