EvenBus 是 Guava 中 Pub/Sub 模式的轻量级实现。平时开发如果我们要实现自己的 Pub/Sub 模型,要写不少类,设计也挺复杂,对业务代码也有一定的侵入,但是在使用了 EventBus 之后就很方便了。
在 Pub/Sub 模式中有 push 和 pull 两种实现,比如 ActiveMQ 就是 push,Kafka 就是 pull,而 EventBus 就是 push 这种方式,也可以把 EventBus 看成一个简易版的消息中间件吧。我个人感觉所谓的 Publisher 和 Subscriber 其实没有必要强制分的,当然也不是说不分,主要想表达的是 Publisher 也可以做 Subscriber 的事,同样的,Subscriber 也可以做 Publisher 的事。
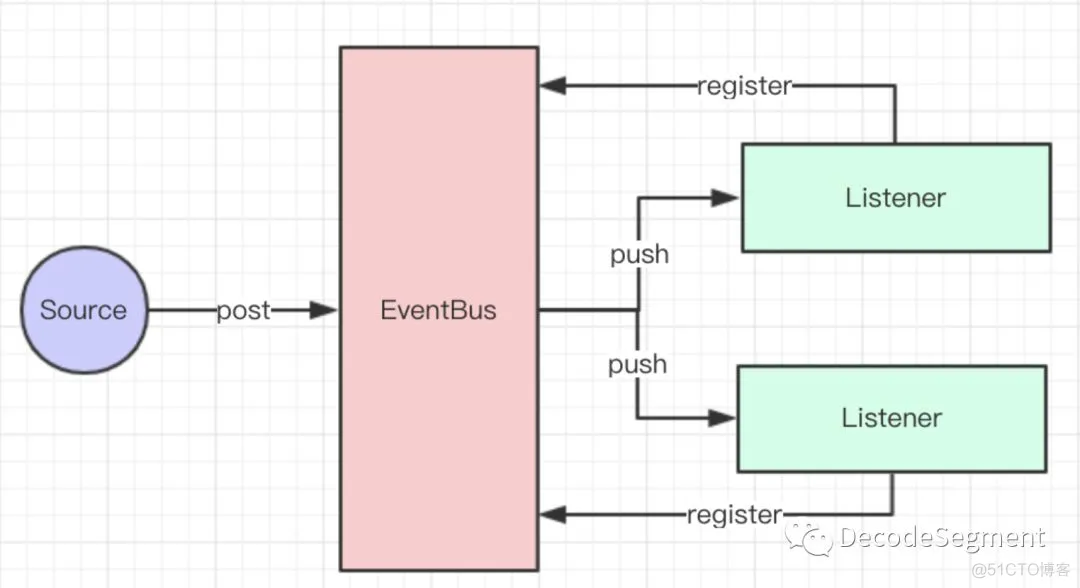
先看一个简单的 Demo,看看 EventBus 是怎么玩的。
初识 Demo
两个 Listener:
/**
 * @author dongguabai
 * @date 2019-03-18 18:09
 * Listener1
 */
public class Listener1 {

    @Subscribe  //监听 参数为 String 的消息
    public void doSth(String info) {
        System.out.println("Listener1 接收到了消息:" + info);
    }
}
/**
 * @author dongguabai
 * @date 2019-03-18 18:09
 * Listener2
 */
public class Listener2 {

    @Subscribe  //监听 参数为 Date 的消息
    public void doSth(Date info) {
        System.out.println("Listener2 接收到了消息:" + info.toLocaleString());
    }
}
Source:
/**
 * @author dongguabai
 * @date 2019-03-18 18:15
 */
public class EventBusSource {

    public static void main(String[] args) {
        EventBus eventBus = new EventBus();
        eventBus.register(new Listener1());
        eventBus.register(new Listener2());
        eventBus.post("EventBus 发送的 String 消息");
        eventBus.post(new Date());
    }
}
运行结果:
在上面的 Demo 中有两个 Listener,一个监听 String 类型的事件消息,一个监听 Date 类型的事件消息。这两个 Listener 都被注册到了 EventBus 中,通过这个 Demo 非常简单的实现了一个 Pub/Sub 模型。
要注意的是 EventBus 的 post() 方法只能传入一个参数,如果有多个参数的需求那就只能自己根据需要进行封装了。这里是 @Subscribe 的官方注释,说的也很详细:
/**
 * Marks a method as an event subscriber.
 *
 * <p>The type of event will be indicated by the method's first (and only) parameter. If this annotation is applied to methods with zero parameters, or more than one parameter, the object containing the method will not be able to register for event delivery from the {@link EventBus}.
 *
 * <p>Unless also annotated with @{@link AllowConcurrentEvents}, event subscriber methods will be invoked serially by each event bus that they are registered with.
 *
 * @author Cliff Biffle
 * @since 10.0
 */
@Retention(RetentionPolicy.RUNTIME)
@Target(ElementType.METHOD)
@Beta
public @interface Subscribe {}
上面提到了 @AllowConcurrentEvents,可以看看这个注解,说白了就是让 Subscribers 的 Method 是线程安全的,即串行执行:
/**
 * Marks an event subscriber method as being thread-safe. This annotation indicates that EventBus
 * may invoke the event subscriber simultaneously from multiple threads.
 *
 * <p>This does not mark the method, and so should be used in combination with {@link Subscribe}.
 *
 * @author Cliff Biffle
 * @since 10.0
 */
@Retention(RetentionPolicy.RUNTIME)
@Target(ElementType.METHOD)
@Beta
public @interface AllowConcurrentEvents {}
其实保证线程安全就是使用的 synchronized,可以看 com.google.common.eventbus.Subscriber.SynchronizedSubscriber#invokeSubscriberMethod:
@Override
void invokeSubscriberMethod(Object event) throws InvocationTargetException {
  synchronized (this) {
    super.invokeSubscriberMethod(event);
  }
}
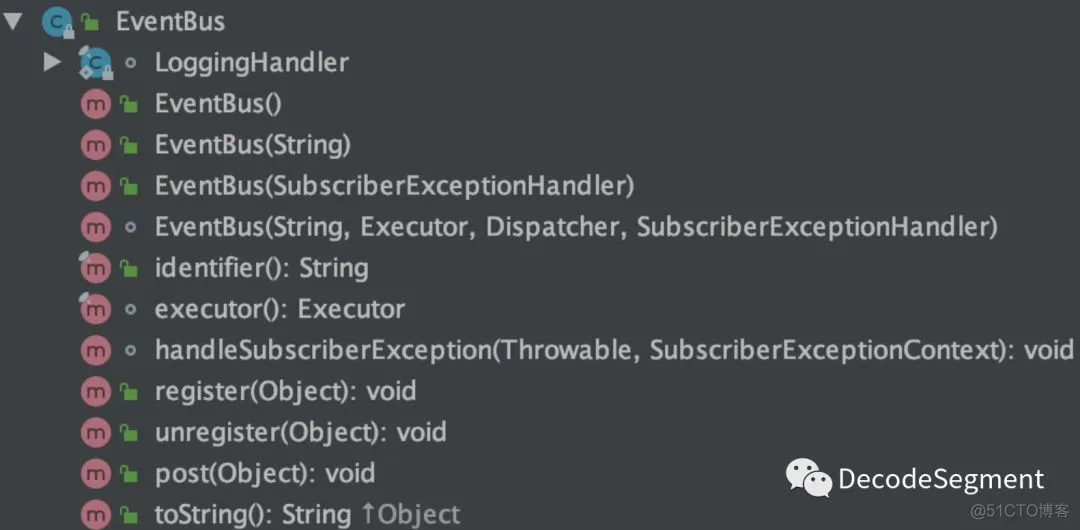
而且 EventBus 没有无法获取执行结果的返回值,EventBus 并未提供相应的方法获取执行结果:
DeadEvent
其实 DeadEvent 源码很简单,它的具体使用场景我也不知道咋说,说白了,它可以帮你封装一下 event,让你给你可以获取 EventBus 的一些信息。官方注释是这么说的:
/**
 * Wraps an event that was posted, but which had no subscribers and thus could not be delivered.
 *
 * <p>Registering a DeadEvent subscriber is useful for debugging or logging, as it can detect misconfigurations in a system's event distribution.
 *
 * @author Cliff Biffle
 * @since 10.0
 */
@Beta
public class DeadEvent {

  private final Object source;
  private final Object event;
  ...
  ...
}
DeadEvent 就是对 post() 方法中的 event 的一个包装。在 com.google.common.eventbus.EventBus#post 中有这样一段描述:
* <p>If no subscribers have been subscribed for {@code event}'s class, and {@code event} is * not already a {@link DeadEvent}, it will be wrapped in a DeadEvent and reposted.
使用也很简单,就是 @Subscribe 标注的方法的参数要是 DeadEvent。
public class DeadEventListener {

    @Subscribe
    public void deadEventMethod(DeadEvent deadEvent){
        System.out.println("DeadEvent_Source_Class:"+deadEvent.getSource().getClass());
        System.out.println("DeadEvent_Source:"+deadEvent.getSource());
        System.out.println("DeadEvent_Event:"+deadEvent.getEvent());
    }
}
public class DeadEventEventBusSource {

    public static void main(String[] args) {
        EventBus eventBus = new EventBus();
        eventBus.register(new DeadEventListener());
        eventBus.post("EventBus 发送的 String 消息");
    }
}
运行结果:
DeadEvent_Source_Class:class com.google.common.eventbus.EventBus
DeadEvent_Source:EventBus{default}
DeadEvent_Event:EventBus 发送的 String 消息
可以看到 DeadEvent 就是将 event 进行了一层封装。运行结果第二行输出的 default 是因为 EventBus 默认名称为 default:
/** Creates a new EventBus named "default". */
public EventBus() {
  this("default");
}
异常处理
如果 @Subscribe 标注的方法出现了异常怎么办呢,这里先测试一下:
两个 Listener:
/**
 * @author dongguabai
 * @date 2019-03-18 18:09
 * ExceptionListener1
 */
public class ExceptionListener1 {

    @Subscribe  //监听 参数为 String 的消息
    public void exceptionMethod(String info) {
        System.out.println("ExceptionListener1 接收到了消息:" + info);
        int i = 1/0;
    }
}
/**
 * @author dongguabai
 * @date 2019-03-18 18:09
 * Listener2
 */
public class Listener2 {

    @Subscribe  //监听 参数为 Date 的消息
    public void doSth(Date info) {
        System.out.println("Listener2 接收到了消息:" + info.toLocaleString());
    }
}
Source:
public class ExceptionEventBusSource {

    public static void main(String[] args) {
        EventBus eventBus = new EventBus();
        eventBus.register(new ExceptionListener1());
        eventBus.register(new Listener2());
        eventBus.post("EventBus 发送的 String 消息");
        eventBus.post(new Date());
    }
}
运行结果:
根据异常信息的提示去 com.google.common.eventbus.Subscriber#invokeSubscriberMethod 方法看看:
/**
 * Invokes the subscriber method. This method can be overridden to make the invocation
 * synchronized.
 */
@VisibleForTesting
void invokeSubscriberMethod(Object event) throws InvocationTargetException {
  try {
    method.invoke(target, checkNotNull(event));
  } catch (IllegalArgumentException e) {
    throw new Error("Method rejected target/argument: " + event, e);
  } catch (IllegalAccessException e) {
    throw new Error("Method became inaccessible: " + event, e);
  } catch (InvocationTargetException e) {
    if (e.getCause() instanceof Error) {
      throw (Error) e.getCause();
    }
    throw e;
  }
}
从这个方法也可以看出本质还是在通过反射调用相应的 subscribe 方法。其实如果再往上琢磨的话还可以看出这个方法是这么执行的:
/** Dispatches {@code event} to this subscriber using the proper executor. */
final void dispatchEvent(final Object event) {
  executor.execute(
      new Runnable() {
        @Override
        public void run() {
          try {
            invokeSubscriberMethod(event);
          } catch (InvocationTargetException e) {
            bus.handleSubscriberException(e.getCause(), context(event));
          }
        }
      });
}
看到 executor 是不是就有一种眼前一亮的感觉了,就是使用线程池去执行的,额,不能这么说,只能说我们可以根据构造传入 Executor 的实现,自定义方法执行的方式,当然也可以使用 JUC 中的线程池,这个在 AsyncEventBus 中会进一步介绍。这里异常也使用了 try…catch 处理,在 catch 中调用了 handleSubscriberException() 方法:
/** Handles the given exception thrown by a subscriber with the given context. */
void handleSubscriberException(Throwable e, SubscriberExceptionContext context) {
  checkNotNull(e);
  checkNotNull(context);
  try {
    exceptionHandler.handleException(e, context);
  } catch (Throwable e2) {
    // if the handler threw an exception... well, just log it
    logger.log(
        Level.SEVERE,
        String.format(Locale.ROOT, "Exception %s thrown while handling exception: %s", e2, e),
        e2);
  }
}
很自然要去看看这个 exceptionHandler 是个啥东东,因为出现异常怎么处理就是它来操作的。
原来就是个接口,我们可以通过 EventBus 的构造传入:
public EventBus(SubscriberExceptionHandler exceptionHandler) {
  this(
      "default",
      MoreExecutors.directExecutor(),
      Dispatcher.perThreadDispatchQueue(),
      exceptionHandler);
}
这也是一种让代码可扩展的思路,是不是有一种好多源码都是这个套路的感觉,而且这里还使用了 context 去封装一些相应的参数:
/**
 * Context for an exception thrown by a subscriber.
 *
 * @since 16.0
 */
public class SubscriberExceptionContext {
  private final EventBus eventBus;
  private final Object event;
  private final Object subscriber;
  private final Method subscriberMethod;
}
自定义异常处理
既然可扩展,那我们就扩展一个来玩玩:
/**
 * @author dongguabai
 * @date 2019-04-01 13:21
 * 自定义异常处理
 */
public class ExceptionHandler implements SubscriberExceptionHandler {
    @Override
    public void handleException(Throwable exception, SubscriberExceptionContext context) {
        System.out.println("自定义异常处理....");
        System.out.println(exception.getLocalizedMessage());
        System.out.println("异常方法名称:"+context.getSubscriberMethod().getName());
        System.out.println("异常方法参数:"+context.getSubscriberMethod().getParameters()[0]);
    }
}
在构造 EventBus 的时候传入自定义的 Handler:
public class ExceptionEventBusSource {

    public static void main(String[] args) {
        //传入自定义异常处理 Handler
        EventBus eventBus = new EventBus(new ExceptionHandler());
        eventBus.register(new ExceptionListener1());
        eventBus.register(new Listener2());
        eventBus.post("EventBus 发送的 String 消息");
        eventBus.post(new Date());
    }
}
执行结果:
ExceptionListener1 接收到了消息:EventBus 发送的 String 消息
自定义异常处理…
/ by zero
异常方法名称:exceptionMethod
异常方法参数:java.lang.String info
Listener2 接收到了消息:2019-4-1 13:27:15
AsyncEventBus
AsyncEventBus 是 EventBus 的子类。看名称就能猜出可以异步执行 subscribe 方法。先看一个 Demo:
public class Listener1 {

    @Subscribe  //监听 参数为 String 的消息
    public void doSth0(String info) {
        System.out.println(LocalDateTime.now()+"   方法0 执行完毕");
    }


    @Subscribe  //监听 参数为 String 的消息
    public void doSth1(String info) {
        System.out.println(LocalDateTime.now()+"   方法1 执行开始");

        try {
            Thread.sleep(1000);
        } catch (InterruptedException e) {
            e.printStackTrace();
        }
        System.out.println(LocalDateTime.now()+"   方法1 执行完毕");
    }

    @Subscribe  //监听 参数为 String 的消息
    public void doSth2(String info) {
        System.out.println(LocalDateTime.now()+"   方法2 执行开始");

        try {
            Thread.sleep(2000);
        } catch (InterruptedException e) {
            e.printStackTrace();
        }
        System.out.println(LocalDateTime.now()+"   方法2 执行完毕");
    }

    @Subscribe  //监听 参数为 String 的消息
    public void doSth3(String info) {
        System.out.println(LocalDateTime.now()+"   方法3 执行开始");
        try {
            Thread.sleep(3000);
        } catch (InterruptedException e) {
            e.printStackTrace();
        }
        System.out.println(LocalDateTime.now()+"   方法3 执行完毕");
    }

    @Subscribe  //监听 参数为 String 的消息
    public void doSth4(String info) {
        System.out.println(LocalDateTime.now()+"   方法4 执行开始");
        try {
            Thread.sleep(4000);
        } catch (InterruptedException e) {
            e.printStackTrace();
        }
        System.out.println(LocalDateTime.now()+"   方法4 执行完毕");
    }
}
public class EventBusSource {

    public static void main(String[] args) {
        EventBus eventBus = new AsyncEventBus(Executors.newFixedThreadPool(10));
        eventBus.register(new Listener1());
        eventBus.post("EventBus 发送的 String 消息");
    }
}
运行结果:
2019-04-01T16:35:56.223   方法3 执行开始
2019-04-01T16:35:56.223   方法0 执行完毕
2019-04-01T16:35:56.223   方法1 执行开始
2019-04-01T16:35:56.223   方法4 执行开始
2019-04-01T16:35:56.223   方法2 执行开始
2019-04-01T16:35:57.226   方法1 执行完毕
2019-04-01T16:35:58.226   方法2 执行完毕
2019-04-01T16:35:59.224   方法3 执行完毕
2019-04-01T16:36:00.225   方法4 执行完毕
可以看到的确是异步执行了。其实 AsyncEventBus 和 EventBus 所谓的异步和同步主要是跟 executor 有关。从 post() 方法一路进去到 com.google.common.eventbus.Subscriber#dispatchEvent 方法:
/** Dispatches {@code event} to this subscriber using the proper executor. */
final void dispatchEvent(final Object event) {
  executor.execute(
      new Runnable() {
        @Override
        public void run() {
          try {
            invokeSubscriberMethod(event);
          } catch (InvocationTargetException e) {
            bus.handleSubscriberException(e.getCause(), context(event));
          }
        }
      });
}
本质是通过 executor 去执行的,那么这个 executor 是个啥呢:
/** Executor to use for dispatching events to this subscriber. */
private final Executor executor;

private Subscriber(EventBus bus, Object target, Method method) {
  this.bus = bus;
  this.target = checkNotNull(target);
  this.method = method;
  method.setAccessible(true);

  this.executor = bus.executor();
}
就是 Subscriber 中的 EventBus 的 executor,是 Executor 接口。在同步的 EventBus 中的 executor 是 Guava 自己提供的:
@GwtCompatible
enum DirectExecutor implements Executor {
  INSTANCE;

  @Override
  public void execute(Runnable command) {
    command.run();
  }

  @Override
  public String toString() {
    return "MoreExecutors.directExecutor()";
  }
}
说白了就是一个很普通的 Executor 实现。
在 AsyncEventBus 中 executor 我们可以自行传入:
public AsyncEventBus(Executor executor) {
  super("default", executor, Dispatcher.legacyAsync(), LoggingHandler.INSTANCE);
}
其实这个地方设计就不太好,前面也分析过了所谓的同步和异步主要与 executor 有关。如果我传入的是一个同步的 executor 那怎么办呢,这里测试一下(这里偷个懒,直接用 EventBus 中的同步的 Executor 实现):
public class EventBusSource {

    public static void main(String[] args) {
        AsyncEventBus eventBus = new AsyncEventBus(MoreExecutors.directExecutor());
        eventBus.register(new Listener1());
        eventBus.post("EventBus 发送的 String 消息");
    }
}
运行结果:
2019-04-01T17:13:23.158   方法4 执行开始
2019-04-01T17:13:27.162   方法4 执行完毕
2019-04-01T17:13:27.162   方法0 执行完毕
2019-04-01T17:13:27.162   方法1 执行开始
2019-04-01T17:13:28.166   方法1 执行完毕
2019-04-01T17:13:28.166   方法2 执行开始
2019-04-01T17:13:30.171   方法2 执行完毕
2019-04-01T17:13:30.171   方法3 执行开始
2019-04-01T17:13:33.175   方法3 执行完毕
可以发现居然同步执行了。这个地方也是设计不严谨的地方,估计作者本意是让我们传入一个线程池,如果是这样的话可以把 executor 级别调低点,比如使用 ThreadPoolExecutor。
