【测试效率提升技巧】xmind测试用例转换为excel工具使用手册
- 一、前置环境配置
- 二、执行
- Xmind2testcase的转换方法
- 1.在控制台输入xmind2testcase [path/xmind文件路径] [-csv] [-xml] [-json],例:xmind2testcase /root/homin/XX测试点.xmind -csv ##在当前目录下会转换为对应的csv类型文件。
- 2.在控制台输入 xmind2testcase webtool 8000 ,定义好本地端口后访问http://127.0.0.1:8000/,可通过web端进行文件转换,之后可通过点击“Get Zentao CSV / Get TestLink XML / Go Back”,生成对应的文件类型。
- 三、xmind书写模板和规则
- 四.xmind2testcase转换库针对禅道代码改良
- 4.1修改优先级,修改zentao.py
- 4.2.修改用例类型,修改zentao.py
- 4.3.修改适应阶段,修改zentao.py
- 4.4.导出文件有空行,修改zentao.py
- 4.5.用例步骤、预期结果序号后多一个空格,修改zentao.py
- 4.6.每导出一个用例步骤和预期结果都会多一个换行符,修改zentao.py
- 4.7.填写默认关键词,修改zentao.py
- 4.8.去掉用例标题中的空格,修改parser.py
- 4.9.增加需求字段
- 4.9.1修改metadata.py
- 4.9.2 修改utils.py
- 4.10.把原先的产品名(中心主题)改为功能模块名,输出文件名字一致,修改parser.py
- 五.修改xmind2testcase支持导出xlsx文档
- 5.1 使用pandas库
- 5.1.1在zentao.py文件中添加函数:xmind_to_zentao_xlsx_file_by_pandas,如下:
- 5.1.2在application.py中添加路由
- 5.1.3在index.html添加xlsx的访问路径
- 5.1.4在ipreview.html添加xlsx的访问路径
- 5.2 使用openpyxl
- 六.编写规则
一、前置环境配置
1.在命令行执行pip install xmind2testcase -U
2.到python中xmind2testcase的安装路径(我的路径是D:\python\Lib\site-packages\xmind2testcase)下新建一个文件夹,命名为web
3.在命令行cd到刚刚创建的web文件夹,执行pip freeze > requirements.txt
4.命令行执行pip install -r requirements.txt -U
PS:请尽量使用xMind8 Update9版本编写测试用例,否则可能出现无法转换的情况
二、执行
运行python安装目录下的application.py文件(我的文件位置在D:\python\Lib\site-packages\webtool\application.py)
命令行会显示本地生成的网页网址,直接复制到浏览器进入即可
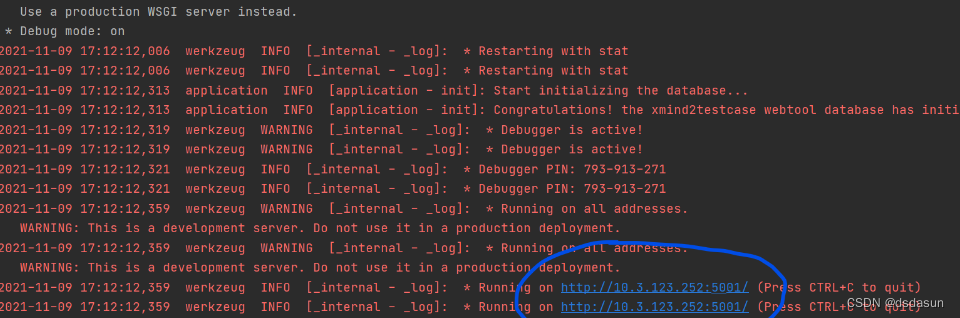
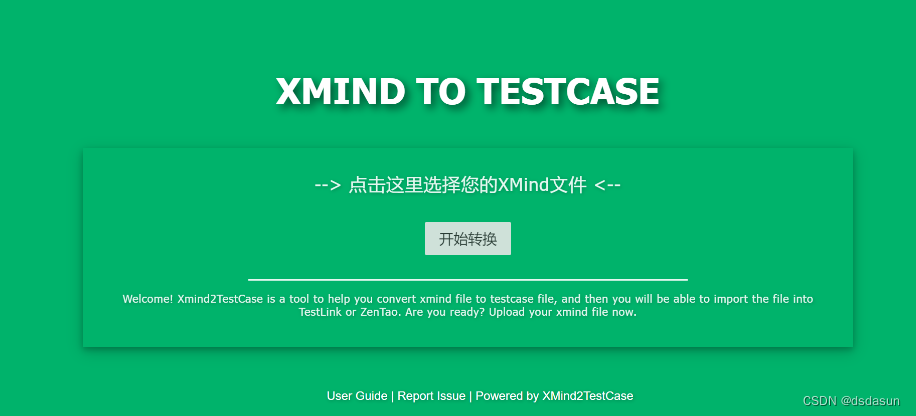
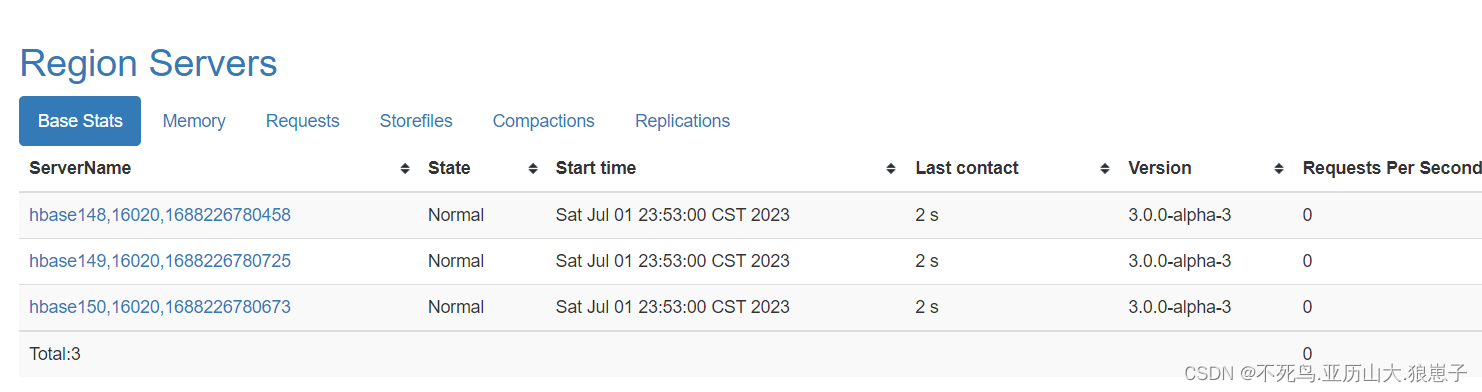
实现效果如下:
Xmind2testcase的转换方法
1.在控制台输入xmind2testcase [path/xmind文件路径] [-csv] [-xml] [-json],例:xmind2testcase /root/homin/XX测试点.xmind -csv ##在当前目录下会转换为对应的csv类型文件。
2.在控制台输入 xmind2testcase webtool 8000 ,定义好本地端口后访问http://127.0.0.1:8000/,可通过web端进行文件转换,之后可通过点击“Get Zentao CSV / Get TestLink XML / Go Back”,生成对应的文件类型。
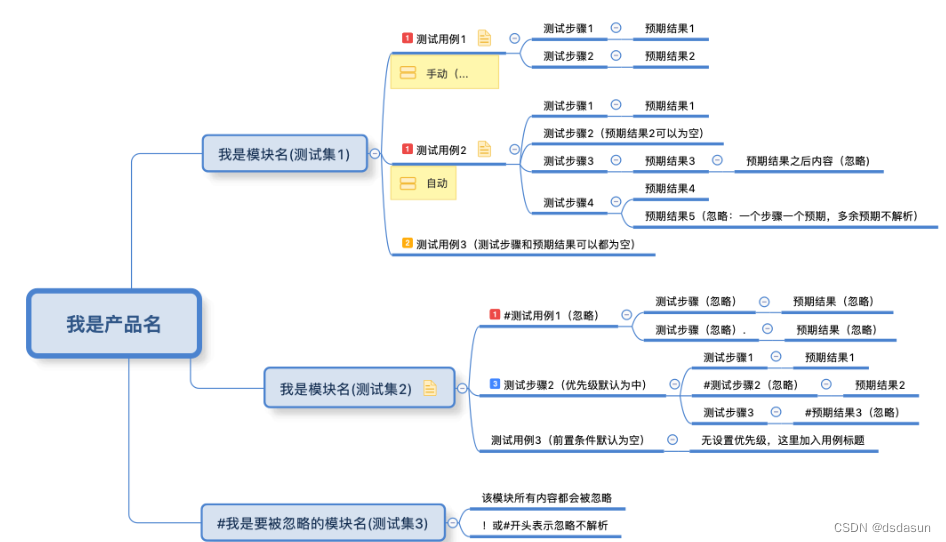
三、xmind书写模板和规则
这里是标准的xmind转换库所要求的xming用例格式
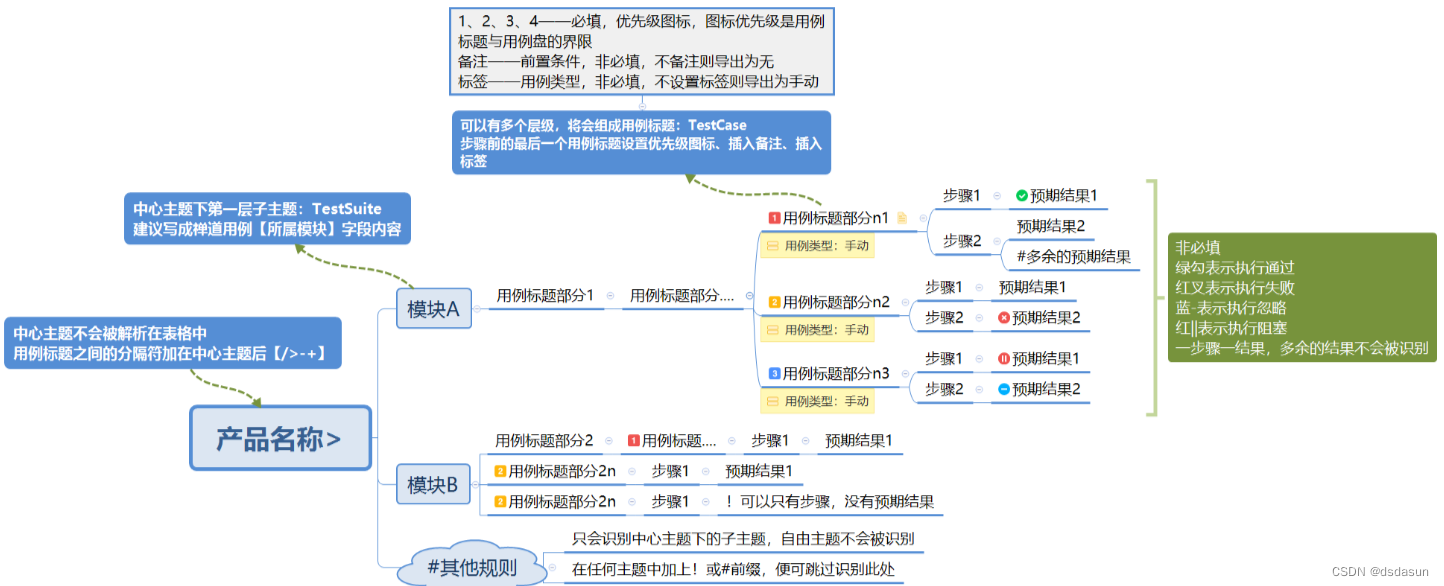
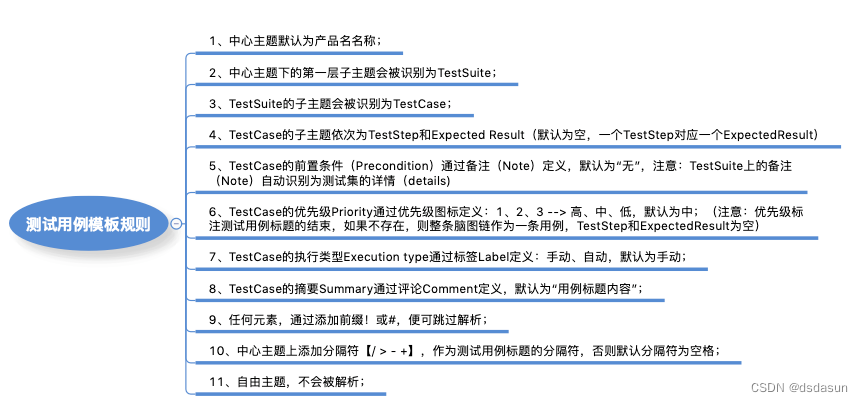
第六条规则,我们使用标注优先级图标作为”测试标题”与”测试步骤”界线,如果解析过程没有遇到优先级图标,则TestSuite后面的子主题链作为一条测试用例。
一条测试用例支持只有标题,没有测试步骤和预期结果,因为实际测试过程中,我们常常通过用例标题就可以明确测试点了。
之所以有第六条规则这样设计,因为实际测试用例设计过程中,我们所测产品往往有非常多的模块和层级。
四.xmind2testcase转换库针对禅道代码改良
默认下xmind2testcase转换的csv文件导入禅道时,不会添加用例类型和测试阶段。这里通过修改代码的方式使其导入时具有默认值,免去了导入后还要手动填写的麻烦。
4.1修改优先级,修改zentao.py
def gen_case_priority(priority):
    # 修改前
    # mapping = {1: '高', 2: '中', 3: '低'}
    # 修改后
    mapping = {1: '1', 2: '2', 3: '3', 4: '4'}
    if priority in mapping.keys():
        return mapping[priority]
    else:
        # 修改前
        return '中'
        # 修改后
        return '2'
4.2.修改用例类型,修改zentao.py
# 用例类型 用星星实现
def gen_case_type(case_type):
    mapping = {'star-red': "功能", "star-orange": "UI自动化", "star-blue": "接口自动化", "star-green": "性能",
               "star-purple": "安全", "star-dark-green": "安装部署", "star-dark-gray": "其他"}
    if case_type in mapping.keys():
        return mapping[case_type]
    else:
        return '功能'
4.3.修改适应阶段,修改zentao.py
def gen_a_testcase_row(testcase_dict):
    # ['所属模块', '相关需求', '用例标题', '前置条件', '步骤', '预期', '关键词', '优先级', '用例类型', '适用阶段']
    case_module = gen_case_module(testcase_dict['suite'])
    case_demand_name = gen_case_demand_name(testcase_dict['demand_name'])
    case_title = testcase_dict['name']
    case_precontion = testcase_dict['preconditions']  # 前置条件
    case_step, case_expected_result = gen_case_step_and_expected_result(testcase_dict['steps'])  # 测试步骤和预期
    case_keyword = gen_case_keyword(testcase_dict['demand_name'])  #关键词
    case_priority = gen_case_priority(testcase_dict['importance'])
    case_type = gen_case_type(testcase_dict['execution_type'])  # 用例类型 默认功能 标签实现
    # 修改前
    # case_apply_phase = '迭代测试'
    # 修改后
    case_apply_phase = '功能测试阶段'
    row = [case_module, case_demand_name, case_title, case_precontion, case_step, case_expected_result, case_keyword,
           case_priority, case_type, case_apply_phase]
    return row
4.4.导出文件有空行,修改zentao.py
zentao.py文件找到xmind_to_zentao_csv_file函数,写入文件方法加上newline=''
# 修改前
# with open(zentao_file, 'w', encoding='utf8') as f:
# 修改后
with open(zentao_file, 'w', encoding='utf8', newline='') as f:
4.5.用例步骤、预期结果序号后多一个空格,修改zentao.py
def gen_case_step_and_expected_result(steps):
    case_step = ''
    case_expected_result = ''
    # 修改后,把+ '. ' + 后的空格去掉  + '.' +
    for step_dict in steps:
        case_step += str(step_dict['step_number']) + '.' + step_dict['actions'].replace('\n', '').strip() + '\n'
        case_expected_result += str(step_dict['step_number']) + '.' + \
                                step_dict['expectedresults'].replace('\n', '').strip() + '\n' \
4.6.每导出一个用例步骤和预期结果都会多一个换行符,修改zentao.py

需要去除最后一个换行符
def gen_case_step_and_expected_result(steps):
    case_step = ''
    case_expected_result = ''
    # 修改后,把+ '. ' + 后的空格去掉  + '.' +
    for step_dict in steps:
        case_step += str(step_dict['step_number']) + '.' + step_dict['actions'].replace('\n', '').strip() + '\n'
        case_expected_result += str(step_dict['step_number']) + '.' + \
                                step_dict['expectedresults'].replace('\n', '').strip() + '\n' \
            if step_dict.get('expectedresults', '') else ''
    # 添加,去除每个单元格里最后一个换行符
    case_step = case_step.rstrip('\n')
    case_expected_result = case_expected_result.rstrip('\n')
    return case_step, case_expected_result
4.7.填写默认关键词,修改zentao.py
def gen_a_testcase_row(testcase_dict):
    case_module = gen_case_module(testcase_dict['suite'])
    case_title = testcase_dict['name']
    case_precontion = testcase_dict['preconditions']
    case_step, case_expected_result = gen_case_step_and_expected_result(testcase_dict['steps'])
    # 此处可填写默认关键词
    case_keyword = ''
4.8.去掉用例标题中的空格,修改parser.py
def gen_testcase_title(topics):
    """Link all topic's title as testcase title"""
    titles = [topic['title'] for topic in topics]
    titles = filter_empty_or_ignore_element(titles)

    # when separator is not blank, will add space around separator, e.g. '/' will be changed to ' / '
    separator = config['sep']
    if separator != ' ':
        # 修改前
        # separator = ' {} '.format(separator)
        # 修改后
        separator = ' {} '.format(separator)
    return separator.join(titles)
4.9.增加需求字段
4.9.1修改metadata.py
    def __init__(self, name='', demand_name='', details='', testcase_list=None, sub_suites=None, statistics=None):
        """
        TestSuite
        :param name: test suite name 模块名
        :param name: test suite demand_name 需求名
        :param details: test suite detail infomation
        :param testcase_list: test case list
        :param sub_suites: sub test suite list
        :param statistics: testsuite statistics info {'case_num': 0, 'non_execution': 0, 'pass': 0, 'failed': 0, 'blocked': 0, 'skipped': 0}
        """
        self.name = name
        self.demand_name = demand_name
        self.details = details
        self.testcase_list = testcase_list
        self.sub_suites = sub_suites
        self.statistics = statistics
    def to_dict(self):
        data = {
            'name': self.name,
            'demand_name': self.demand_name,
            'details': self.details,
            'testcase_list': [],
            'sub_suites': []
        }
4.9.2 修改utils.py
def get_xmind_testcase_list(xmind_file):
    """Load the XMind file and get all testcase in it

    :param xmind_file: the target XMind file
    :return: a list of testcase data
    """
    xmind_file = get_absolute_path(xmind_file)
    testsuites = get_xmind_testsuites(xmind_file)
    testcases = []

    for testsuite in testsuites:
        product = testsuite.name
        for suite in testsuite.sub_suites:
            for case in suite.testcase_list:
                case_data = case.to_dict()
                case_data['product'] = product
                case_data['suite'] = suite.name
                case_data['demand_name'] = suite.demand_name
                testcases.append(case_data)
    return testcases
4.10.把原先的产品名(中心主题)改为功能模块名,输出文件名字一致,修改parser.py
def xmind_to_testsuites(xmind_content_dict):
    """convert xmind file to `xmind2testcase.metadata.TestSuite` list"""
    suites = []
    for sheet in xmind_content_dict:
        root_topic = sheet['topic']
        for i in range(len(root_topic['topics'])):
            suite = sheet_to_suite(root_topic['topics'][i])
            suites.append(suite)
    return suites


def filter_empty_or_ignore_element(values):
    """Filter all empty or ignore XMind elements, especially notes、comments、labels element"""
    result = []
    for value in values:
        if isinstance(value, str) and not value.strip() == '' and not value[0] in config['ignore_char']:
            result.append(value.strip())
    return result


def sheet_to_suite(root_topic):
    """convert a xmind sheet to a `TestSuite` instance"""
    suite = TestSuite()
    root_title = []

    def x(data):
        root_title.append(data['title'])
        if 'topics' in data.keys():
            data = data['topics'][0]
            x(data)
    x(root_topic)
    global module_name, demand_name
    module_name = root_title[1]  # 模块名
    demand_name = root_title[0] # 需求名


    suite.name = module_name  # 模块名
    suite.demand_name = demand_name  # 需求名
    suite.details = root_topic['note']
    suite.sub_suites = []

    for suite_dict in [root_topic]:
        suite.sub_suites.append(parse_testsuite(suite_dict))

    return suite


def parse_testsuite(suite_dict):
    testsuite = TestSuite()
    testsuite.name = module_name  # 模块名
    testsuite.demand_name = demand_name  # 需求名
    testsuite.details = suite_dict['note']
    testsuite.testcase_list = []

    for cases_dict in suite_dict.get('topics', []):
        for case in recurse_parse_testcase(cases_dict):
            testsuite.testcase_list.append(case)
    return testsuite


def recurse_parse_testcase(case_dict, parent=None):
    if is_testcase_topic(case_dict):
        case = parse_a_testcase(case_dict, parent)
        yield case
    else:
        if not parent:
            parent = []

        parent.append(case_dict)

        for child_dict in case_dict.get('topics', []):
            for case in recurse_parse_testcase(child_dict, parent):
                yield case

        parent.pop()


def is_testcase_topic(case_dict):
    """A topic with a priority marker, or no subtopic, indicates that it is a testcase"""
    priority = get_priority(case_dict)
    if priority:
        return True

    children = case_dict.get('topics', [])
    if children:
        return False

    return True


# 用例数据组合
def parse_a_testcase(case_dict, parent):
    testcase = TestCase()
    topics = parent + [case_dict] if parent else [case_dict]
    # 用例名称
    testcase.name = gen_testcase_title(topics)
    # 前置条件
    preconditions = gen_testcase_preconditions(topics)
    testcase.preconditions = preconditions if preconditions else ' '
    summary = gen_testcase_summary(topics)
    testcase.summary = summary if summary else testcase.name
    testcase.execution_type = get_execution_type(case_dict)  # 用例类型
    testcase.importance = get_priority(case_dict) or 2  # 优先级 1 2 3 4

    step_dict_list = case_dict.get('topics', [])
    if step_dict_list:
        testcase.steps = parse_test_steps(step_dict_list)
    testcase.result = get_test_result(case_dict['markers'])

    if testcase.result == 0 and testcase.steps:
        for step in testcase.steps:
            if step.result == 2:
                testcase.result = 2
                break
            if step.result == 3:
                testcase.result = 3
                break
            testcase.result = step.result
    return testcase


# 用例类型
def get_execution_type(case_dict):
    if isinstance(case_dict['markers'], list):
        for marker in case_dict['markers']:
            if marker.startswith('star'):
                return marker


# 优先级
def get_priority(case_dict):
    """Get the topic's priority(equivalent to the importance of the testcase)"""
    if isinstance(case_dict['markers'], list):
        for marker in case_dict['markers']:
            if marker.startswith('priority'):
                return int(marker[-1])


# 用例名称
def gen_testcase_title(topics):
    """Link all topic's title as testcase title"""
    titles = [topic['title'] for topic in topics]
    titles = filter_empty_or_ignore_element(titles)
    return titles[-1]


# 前置条件 修改成标签
def gen_testcase_preconditions(topics):
    labels = [topic.get('label', '') for topic in topics]
    labels = filter_empty_or_ignore_element(labels)
    for item in labels[::-1]:
        return item


def gen_testcase_summary(topics):
    comments = [topic['comment'] for topic in topics]
    comments = filter_empty_or_ignore_element(comments)
    return config['summary_sep'].join(comments)


# 用例步骤
def parse_test_steps(step_dict_list):
    steps = []
    for step_num, step_dict in enumerate(step_dict_list, 1):
        test_step = parse_a_test_step(step_dict)
        test_step.step_number = step_num
        steps.append(test_step)
    return steps


# 预期结果
def parse_a_test_step(step_dict):
    test_step = TestStep()
    test_step.actions = step_dict['title']
    expected_topics = step_dict.get('topics', [])
    if expected_topics:
        # 预期结果获取
        expected_topic = expected_topics[0]
        expected_result = expected_topic['title']
        if expected_result is None:  # 如果预期结果为空 使用空格占位
            expected_result = ' '
        test_step.expectedresults = expected_result
        markers = expected_topic['markers']
        test_step.result = get_test_result(markers)
    else:
        markers = step_dict['markers']
        test_step.result = get_test_result(markers)
    return test_step
五.修改xmind2testcase支持导出xlsx文档
默认只能导出csv格式的,而公司用的禅道版本又只支持xlsx格式的导入
5.1 使用pandas库
5.1.1在zentao.py文件中添加函数:xmind_to_zentao_xlsx_file_by_pandas,如下:
import pandas as pd    #使用pandas包来写入excel的,需要引入
def xmind_to_zentao_xlsx_file_by_pandas(xmind_file): #xmind导出禅道用例模板的xlsx格式
    """Convert XMind file to a zentao xlsx file"""
    xmind_file = get_absolute_path(xmind_file)
    logging.info('Start converting XMind file(%s) to zentao file...', xmind_file)
    testcases = get_xmind_testcase_list(xmind_file)

    fileheader = ["所属模块", "相关需求", "用例标题", "前置条件", "步骤", "预期", "关键词", "优先级", "用例类型", "适用阶段"]  # zd:添加“相关需求”字段
    zentao_testcase_rows = []
    for testcase in testcases:
        row = gen_a_testcase_row(testcase)
        zentao_testcase_rows.append(row)

    zentao_file = xmind_file[:-6] + '.xlsx'
    df = pd.DataFrame(data=zentao_testcase_rows, columns=fileheader) #构造数据
    df.to_excel(zentao_file, index=False)  #写入文件,设置不需要索引
    logging.info('Convert XMind file(%s) to a zentao csv file(%s) successfully!', xmind_file, zentao_file)
    return zentao_file
5.1.2在application.py中添加路由
@app.route('/<filename>/to/zentao_xlsx')
def download_zentao_xlsx_file(filename):
    full_path = join(app.config['UPLOAD_FOLDER'], filename)

    if not exists(full_path):
        abort(404)

    zentao_xlsx_file = xmind_to_zentao_xlsx_file_by_pandas(full_path)
    filename = os.path.basename(zentao_xlsx_file) if zentao_xlsx_file else abort(404)

    return send_from_directory(app.config['UPLOAD_FOLDER'], filename, as_attachment=True)
5.1.3在index.html添加xlsx的访问路径
<a href="{{ url_for('download_zentao_xlsx_file',filename=record[1]) }}">xlsx</a> |
5.1.4在ipreview.html添加xlsx的访问路径
<a href="{{ url_for('download_zentao_xlsx_file',filename= name) }}">Get Zentao xlsx</a>
运行application.py,即可看到此项目以运行,访问后则可以看到添加的xlsx导出链接

5.2 使用openpyxl
def xmind_to_zentao_xlsx_file(xmind_file):
    xmind_file = get_absolute_path(xmind_file)
    testcases = get_xmind_testcase_list(xmind_file)
    # print(testcases)

    fileheader = ["所属模块", "相关需求", "用例标题", "前置条件", "步骤", "预期", "关键词", "优先级", "用例类型", "适用阶段"]
    zentao_testcase_rows = [fileheader]
    for testcase in testcases:
        row = gen_a_testcase_row(testcase)
        zentao_testcase_rows.append(row)

    zentao_file = xmind_file[:-6] + '.xlsx'
    if os.path.exists(zentao_file):
        os.remove(zentao_file)
    xl = openpyxl.Workbook()
    xls = xl.create_sheet(index=0)
    for i in zentao_testcase_rows:
        xls.append(i)
    xl.save(zentao_file)
    return zentao_file
六.编写规则


![[前端]JS语法——检测数据类型typeof](https://img-blog.csdnimg.cn/65166a724bcc4bba8fc0f8332c92d137.png)
