个人博客地址: https://cxx001.gitee.io
一、Threejs中如何创建物理场景
threejs中创建物理场景我们用它的扩展库:Physijs。它可以使场景中的对象有重力效果,可以相互碰撞,施加力之后可以移动,还可以通过合页和滑块在移动过程中在对象上施加约束。这个库是基于另一个著名物理引擎ammo.js实现的,它只是为了适配threejs对其包装了一层,因此Physijs只是一个包装器,所以它也可以与其它的物理引擎一起工作,在它的github代码仓中你也可以发现一个使用不同的物理引擎Cannon.js的分支版本。
创建物理场景步骤:
- 配置物理引擎,指定工作线程和使用的物理引擎。
- 创建物理场景并设置重力。
- 创建物理场景里的对象(使用Physijs包装的各种网格对象创建)。
- 执行物理场景。
<!-- chapter-12-01.html -->
<!DOCTYPE html>
<html>
<style>
    body {
        margin: 0;
        overflow: hidden;
    }
</style>

<head>
    <title>Physijs</title>
    <script type="text/javascript" src="../libs/three.js"></script>
    <script type="text/javascript" src="../libs/stats.js"></script>
    <script type="text/javascript" src="../libs/physi.js"></script>
    <script type="text/javascript" src="../libs/chroma.js"></script>
    <script type="text/javascript" src="../libs/dat.gui.js"></script>

    <script type="text/javascript">
        'use strict';
        var scale = chroma.scale(['green', 'white']); // 指定的颜色之间创建色阶
		// 1. 配置物理引擎
        Physijs.scripts.worker = '../libs/physijs_worker.js'; // 指定后台worker线程,做CPU密集的物理计算,为了不卡主渲染线程。
        Physijs.scripts.ammo = '../libs/ammo.js'; // 指定使用的物理引擎

        var initScene, render, applyForce, setMousePosition, mouse_position,
                ground_material, box_material,
                renderer, render_stats, scene, ground, light, camera, box, boxes = [];

        initScene = function () {
            renderer = new THREE.WebGLRenderer({antialias: true});
            renderer.setSize(window.innerWidth, window.innerHeight);
            renderer.setClearColor(new THREE.Color(0x000000));
            document.getElementById('viewport').appendChild(renderer.domElement);

            render_stats = new Stats();
            render_stats.domElement.style.position = 'absolute';
            render_stats.domElement.style.top = '1px';
            render_stats.domElement.style.zIndex = 100;
            document.getElementById('viewport').appendChild(render_stats.domElement);
			// 2. 创建物理场景并设置重力
            scene = new Physijs.Scene;
            scene.setGravity(new THREE.Vector3(0, -50, 0));

            camera = new THREE.PerspectiveCamera(
                    35,
                    window.innerWidth / window.innerHeight,
                    1,
                    1000
            );
            camera.position.set(50, 30, 50);
            camera.lookAt(new THREE.Vector3(10, 0, 10));
            scene.add(camera);

            light = new THREE.SpotLight(0xFFFFFF);
            light.position.set(20, 100, 50);
            scene.add(light);

            // 3. 创建物理场景里的对象
            createGround();

            requestAnimationFrame(render);

            var points = getPoints();
            var stones = [];
            var controls = new function () {
                this.gravityX = 0;
                this.gravityY = -50;
                this.gravityZ = 0;

                this.resetScene = function () {
                    scene.setGravity(new THREE.Vector3(controls.gravityX, controls.gravityY, controls.gravityZ));
                    stones.forEach(function (st) {
                        scene.remove(st)
                    });
                    stones = [];
                    points.forEach(function (point) {
                        var stoneGeom = new THREE.BoxGeometry(0.6, 6, 2);
                        var stone = new Physijs.BoxMesh(stoneGeom, Physijs.createMaterial(new THREE.MeshPhongMaterial(
                                {
                                    color: scale(Math.random()).hex(),
                                    transparent: true, opacity: 0.8,
                                })));
                        console.log(stone.position);
                        stone.position.copy(point);
                        stone.lookAt(scene.position);  // 设置骨牌的朝向
                        stone.__dirtyRotation = true;  // 告诉Physijs,骨牌对象的角度更新了
                        stone.position.y = 3.5;
                        scene.add(stone);
                        stones.push(stone);
                    });

                    // 推倒第一块骨牌
                    stones[0].rotation.x = 0.2;
                    stones[0].__dirtyRotation = true;
                };
            };

            var gui = new dat.GUI();
            gui.add(controls, 'gravityX', -100, 100);
            gui.add(controls, 'gravityY', -100, 100);
            gui.add(controls, 'gravityZ', -100, 100);
            gui.add(controls, 'resetScene');
            controls.resetScene();
        };

        render = function () {
            requestAnimationFrame(render);
            renderer.render(scene, camera);
            render_stats.update();
            // 4. 执行物理场景
            scene.simulate();
        };

		// 得到骨牌的位置点
        function getPoints() {
            var points = [];
            var r = 27;
            var cX = 0;
            var cY = 0;

            var circleOffset = 0;
            for (var i = 0; i < 1000; i += 6 + circleOffset) {

                circleOffset = 4.5 * (i / 360);

                var x = (r / 1440) * (1440 - i) * Math.cos(i * (Math.PI / 180)) + cX;
                var z = (r / 1440) * (1440 - i) * Math.sin(i * (Math.PI / 180)) + cY;
                var y = 0;

                points.push(new THREE.Vector3(x, y, z));
            }

            return points;
        }

		// 5个物理网格盒子拼起来的地面
        function createGround() {
            var ground_material = Physijs.createMaterial(
                    new THREE.MeshPhongMaterial({map: THREE.ImageUtils.loadTexture('../assets/textures/general/wood-2.jpg')}),
                    .9, .3);

            var ground = new Physijs.BoxMesh(new THREE.BoxGeometry(60, 1, 60), ground_material, 0); // 最后一个参数是重力,设置为0,是不然地面受重力影响下落。

            var borderLeft = new Physijs.BoxMesh(new THREE.BoxGeometry(2, 3, 60), ground_material, 0);
            borderLeft.position.x = -31;
            borderLeft.position.y = 2;
            ground.add(borderLeft);

            var borderRight = new Physijs.BoxMesh(new THREE.BoxGeometry(2, 3, 60), ground_material, 0);
            borderRight.position.x = 31;
            borderRight.position.y = 2;
            ground.add(borderRight);

            var borderBottom = new Physijs.BoxMesh(new THREE.BoxGeometry(64, 3, 2), ground_material, 0);
            borderBottom.position.z = 30;
            borderBottom.position.y = 2;
            ground.add(borderBottom);

            var borderTop = new Physijs.BoxMesh(new THREE.BoxGeometry(64, 3, 2), ground_material, 0);
            borderTop.position.z = -30;
            borderTop.position.y = 2;
            ground.add(borderTop);
            scene.add(ground);
        }
        window.onload = initScene;
    </script>
</head>

<body>
<div id="viewport"></div>
</body>
</html>

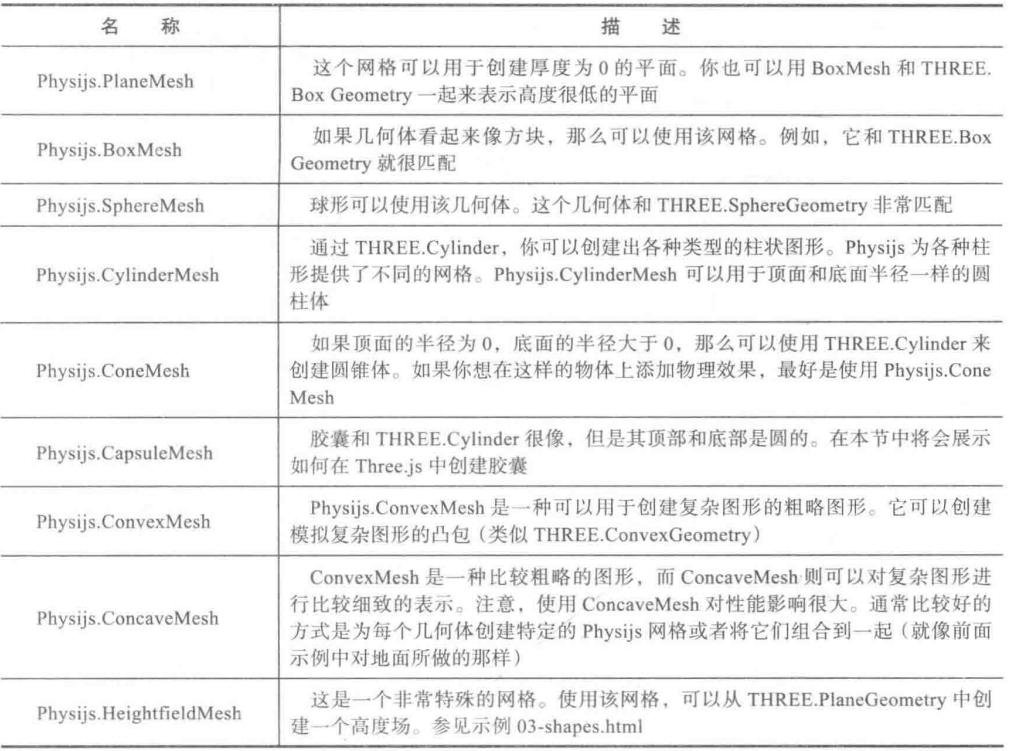
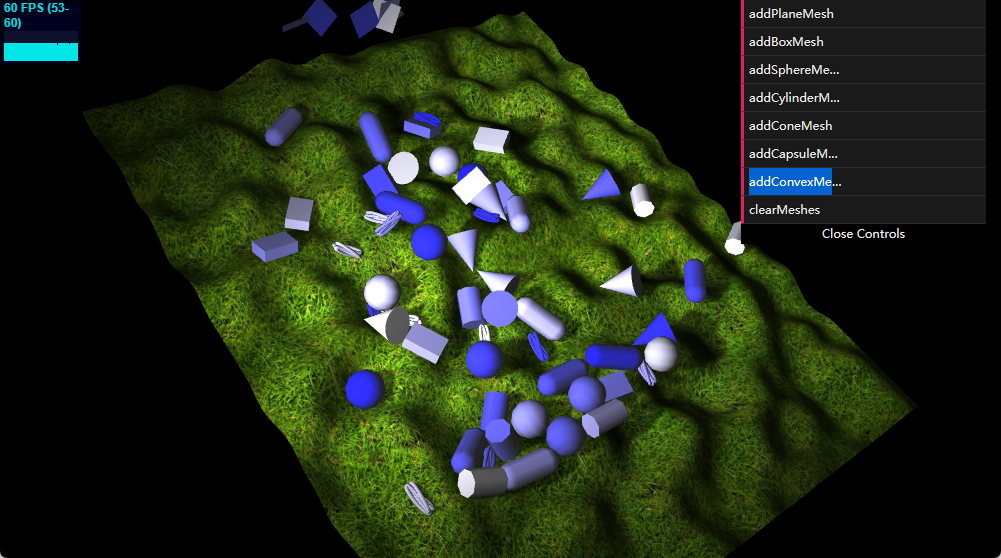
二、Physijs提供的包装几何体对象
物理场景中添加网格对象,就是把THREE.Mesh换成Physijs.xxx包装的几何体网格,这样对象就会受物理的影响了。
<!-- chapter-12-02.html -->
<!DOCTYPE html>
<html>
<head>
    <style>
        body {
            margin: 0;
            overflow: hidden;
            background-color: #000000;
        }
    </style>

    <title>Physijs shapes</title>
    <script type="text/javascript" src="../libs/three.js"></script>
    <script type="text/javascript" src="../libs/stats.js"></script>
    <script type="text/javascript" src="../libs/physi.js"></script>
    <script type="text/javascript" src="../libs/dat.gui.js"></script>
    <script type="text/javascript" src="../libs/chroma.js"></script>
    <script type="text/javascript" src="../libs/perlin.js"></script>

    <script type="text/javascript">
        'use strict';
        Physijs.scripts.worker = '../libs/physijs_worker.js';
        Physijs.scripts.ammo = '../libs/ammo.js';
        var scale = chroma.scale(['blue', 'white']);

        var initScene, render, applyForce, setMousePosition, mouse_position,
                ground_material, box_material,
                projector, renderer, render_stats, physics_stats, scene, ground, light, camera, box, boxes = [];

        initScene = function () {
            renderer = new THREE.WebGLRenderer({antialias: true});
            renderer.setSize(window.innerWidth, window.innerHeight);
            renderer.setClearColor(new THREE.Color(0x000000));
            renderer.shadowMapEnabled = true;
            document.getElementById('viewport').appendChild(renderer.domElement);

            render_stats = new Stats();
            render_stats.domElement.style.position = 'absolute';
            render_stats.domElement.style.top = '1px';
            render_stats.domElement.style.left = '1px';
            render_stats.domElement.style.zIndex = 100;
            document.getElementById('viewport').appendChild(render_stats.domElement);

            scene = new Physijs.Scene({reportSize: 10, fixedTimeStep: 1 / 60});
            scene.setGravity(new THREE.Vector3(0, -20, 0));

            camera = new THREE.PerspectiveCamera(
                    35,
                    window.innerWidth / window.innerHeight,
                    1,
                    1000
            );
            camera.position.set(105, 85, 85);
            camera.lookAt(new THREE.Vector3(0, 0, 0));
            scene.add(camera);

            var ambi = new THREE.AmbientLight(0x222222);
            scene.add(ambi);

            light = new THREE.SpotLight(0xFFFFFF);
            light.position.set(40, 50, 100);
            light.castShadow = true;
            light.shadowMapDebug = true;
            light.shadowCameraNear = 10;
            light.shadowCameraFar = 200;
            light.intensity = 1.5;
            scene.add(light);

            // 添加物理对象
			var meshes = [];
            var controls = new function () {
                // 添加包装的球体几何体
                this.addSphereMesh = function () {
                    var sphere = new Physijs.SphereMesh(
                            new THREE.SphereGeometry(3, 20),
                            getMaterial()
                    );
                    setPosAndShade(sphere);
                    meshes.push(sphere);
                    scene.add(sphere);
                };
                // 添加包装的盒子几何体
                this.addBoxMesh = function () {
                    var cube = new Physijs.BoxMesh(
                            new THREE.BoxGeometry(4, 2, 6),
                            getMaterial()
                    );
                    setPosAndShade(cube);
                    meshes.push(cube);
                    scene.add(cube);
                };
				// 添加包装的圆柱几何体
                this.addCylinderMesh = function () {
                    var cylinder = new Physijs.CylinderMesh(
                            new THREE.CylinderGeometry(2, 2, 6),
                            getMaterial()
                    );
                    setPosAndShade(cylinder);

                    meshes.push(cylinder);
                    scene.add(cylinder);
                };
                // 添加包装的圆锥几何体
                this.addConeMesh = function () {
                    var cone = new Physijs.ConeMesh(
                            new THREE.CylinderGeometry(0, 3, 7, 20, 10),
                            getMaterial()
                    );
                    setPosAndShade(cone);
                    meshes.push(cone);
                    scene.add(cone);
                };
                // 添加包装的平面几何体(固定重量为0,不受重力影响)
                this.addPlaneMesh = function () {
                    var plane = new Physijs.PlaneMesh(
                            new THREE.PlaneGeometry(5, 5, 10, 10),
                            getMaterial()
                    );
                    setPosAndShade(plane);
                    meshes.push(plane);
                    scene.add(plane);
                };
                // 添加包装的胶囊几何体
                this.addCapsuleMesh = function () {
                    var merged = new THREE.Geometry();
                    var cyl = new THREE.CylinderGeometry(2, 2, 6);
                    var top = new THREE.SphereGeometry(2);
                    var bot = new THREE.SphereGeometry(2);

                    var matrix = new THREE.Matrix4();
                    matrix.makeTranslation(0, 3, 0);
                    top.applyMatrix(matrix);

                    var matrix = new THREE.Matrix4();
                    matrix.makeTranslation(0, -3, 0);
                    bot.applyMatrix(matrix);

                    merged.merge(top);
                    merged.merge(bot);
                    merged.merge(cyl);

                    var capsule = new Physijs.CapsuleMesh(
                            merged,
                            getMaterial()
                    );
                    setPosAndShade(capsule);
                    meshes.push(capsule);
                    scene.add(capsule);
                };
                // 添加包装的复杂图形几何体
                this.addConvexMesh = function () {
                    var convex = new Physijs.ConvexMesh(
                            new THREE.TorusKnotGeometry(0.5, 0.3, 64, 8, 2, 3, 10),
                            getMaterial()
                    );
                    setPosAndShade(convex);
                    meshes.push(convex);
                    scene.add(convex);
                };

                // 清除场景中添加的包装几何体
                this.clearMeshes = function () {
                    meshes.forEach(function (e) {
                        scene.remove(e);
                    });
                    meshes = [];
                }
            };

            var gui = new dat.GUI();
            gui.add(controls, 'addPlaneMesh');
            gui.add(controls, 'addBoxMesh');
            gui.add(controls, 'addSphereMesh');
            gui.add(controls, 'addCylinderMesh');
            gui.add(controls, 'addConeMesh');
            gui.add(controls, 'addCapsuleMesh');
            gui.add(controls, 'addConvexMesh');
            gui.add(controls, 'clearMeshes');

            // 创建高度场
            var date = new Date();
            var pn = new Perlin('rnd' + date.getTime()); // 噪声生成器生成地形
            var map = createHeightMap(pn); // 遍历几何体每个顶点,并随机设置顶点的z属性
            scene.add(map);

            requestAnimationFrame(render);
            scene.simulate();
        };

        function createHeightMap(pn) {
            var ground_material = Physijs.createMaterial(
                    new THREE.MeshLambertMaterial(
                            {
                                map: THREE.ImageUtils.loadTexture('../assets/textures/ground/grasslight-big.jpg')
                            }),
                    .3, // high friction
                    .8 // low restitution
            );

            var ground_geometry = new THREE.PlaneGeometry(120, 100, 100, 100);
            for (var i = 0; i < ground_geometry.vertices.length; i++) {
                var vertex = ground_geometry.vertices[i];
                var value = pn.noise(vertex.x / 10, vertex.y / 10, 0);
                vertex.z = value * 10;
            }
            ground_geometry.computeFaceNormals();
            ground_geometry.computeVertexNormals();

            var ground = new Physijs.HeightfieldMesh(
                    ground_geometry,
                    ground_material,
                    0, // mass
                    100,
                    100
            );
            ground.rotation.x = Math.PI / -2;
            ground.rotation.y = 0.4;
            ground.receiveShadow = true;
            return ground;
        }

        function setPosAndShade(obj) {
            obj.position.set(
                    Math.random() * 20 - 45,
                    40,
                    Math.random() * 20 - 5
            );
            obj.rotation.set(Math.random() * 2 * Math.PI, Math.random() * 2 * Math.PI, Math.random() * 2 * Math.PI);
            obj.castShadow = true;
        }

        function getMaterial() {
            var material = Physijs.createMaterial(
                    new THREE.MeshLambertMaterial(
                            {
                                color: scale(Math.random()).hex(),
                            }), 0.5, 0.7);
            return material;
        }

        render = function () {
            requestAnimationFrame(render);
            renderer.render(scene, camera);
            render_stats.update();
            scene.simulate();
        };
        window.onload = initScene;
    </script>
</head>

<body>
<div id="viewport"></div>
</body>
</html>
三、Physijs使用约束限制对象的移动
Physijs提供的约束对象如下:
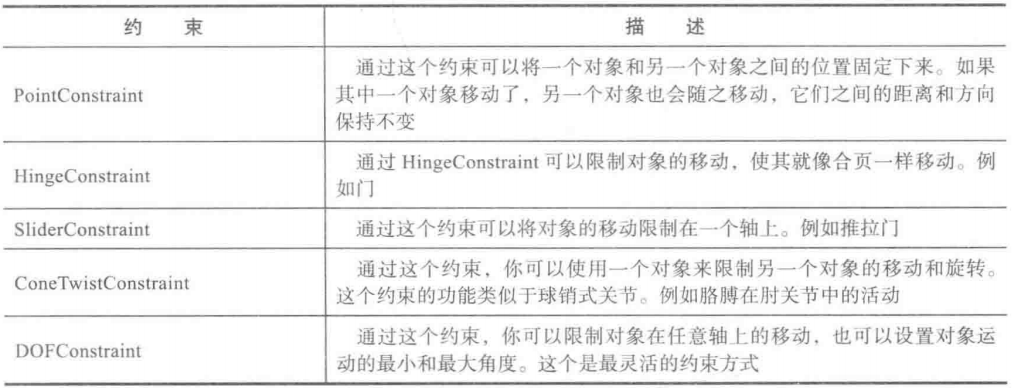
前面4个约束示例:
<!DOCTYPE html>
<html>
<head>
<style>
body {
/* set margin to 0 and overflow to hidden, to go fullscreen */
margin: 0;
overflow: hidden;
background-color: #000000;
}
</style>
<title>Physijs Constraints</title>
<script type="text/javascript" src="../libs/three.js"></script>
<script type="text/javascript" src="../libs/stats.js"></script>
<script type="text/javascript" src="../libs/physi.js"></script>
<script type="text/javascript" src="../libs/dat.gui.js"></script>
<script type="text/javascript" src="../libs/chroma.js"></script>
<script type="text/javascript">
'use strict';
Physijs.scripts.worker = '../libs/physijs_worker.js';
Physijs.scripts.ammo = '../libs/ammo.js';
var scale = chroma.scale(['white', 'blue', 'red', 'yellow']);
var initScene, render, applyForce, setMousePosition, mouse_position,
ground_material, box_material,
projector, renderer, render_stats, physics_stats, scene, ground, light, camera, box, boxes = [];
initScene = function () {
projector = new THREE.Projector;
renderer = new THREE.WebGLRenderer({antialias: true});
renderer.setSize(window.innerWidth, window.innerHeight);
renderer.setClearColor(new THREE.Color(0x000000));
renderer.shadowMapEnabled = true;
document.getElementById('viewport').appendChild(renderer.domElement);
render_stats = new Stats();
render_stats.domElement.style.position = 'absolute';
render_stats.domElement.style.top = '1px';
render_stats.domElement.style.right = '1px';
render_stats.domElement.style.zIndex = 100;
document.getElementById('viewport').appendChild(render_stats.domElement);
scene = new Physijs.Scene({reportSize: 10, fixedTimeStep: 1 / 60});
scene.setGravity(new THREE.Vector3(0, -10, 0));
camera = new THREE.PerspectiveCamera(
35,
window.innerWidth / window.innerHeight,
1,
1000
);
camera.position.set(85, 65, 65);
camera.lookAt(new THREE.Vector3(0, 0, 0));
scene.add(camera);
// Light
light = new THREE.SpotLight(0xFFFFFF);
light.position.set(20, 50, 50);
light.castShadow = true;
light.shadowMapDebug = true;
light.shadowCameraNear = 10;
light.shadowCameraFar = 100;
scene.add(light);
var meshes = [];
createGround();
var flipperLeftConstraint = createLeftFlipper();
var flipperRightConstraint = createRightFlipper();
var sliderBottomConstraint = createSliderBottom();
var sliderTopConstraint = createSliderTop();
var coneTwistConstraint = createConeTwist();
var point2point = createPointToPoint(true);
var controls = new function () {
this.enableMotor = false;
this.acceleration = 2;
this.velocity = -10;
this.enableConeTwistMotor = false;
this.motorTargetX = 0;
this.motorTargetY = 0;
this.motorTargetZ = 0;
this.updateCone = function () {
if (controls.enableConeTwistMotor) {
coneTwistConstraint.enableMotor();
coneTwistConstraint.setMotorTarget(new THREE.Vector3(controls.motorTargetX, controls.motorTargetY, controls.motorTargetZ));
} else {
coneTwistConstraint.disableMotor();
}
};
this.updateMotor = function () {
if (controls.enableMotor) {
// velocity is the velocity we are going for.
// acceleration is how fast we're going to reach it
flipperLeftConstraint.disableMotor();
flipperLeftConstraint.enableAngularMotor(controls.velocity, controls.acceleration);
flipperRightConstraint.disableMotor();
flipperRightConstraint.enableAngularMotor(-1 * controls.velocity, controls.acceleration);
} else {
flipperLeftConstraint.disableMotor();
flipperRightConstraint.disableMotor();
}
};
this.sliderLeft = function () {
sliderBottomConstraint.disableLinearMotor();
sliderBottomConstraint.enableLinearMotor(controls.velocity, controls.acceleration);
sliderTopConstraint.disableLinearMotor();
sliderTopConstraint.enableLinearMotor(controls.velocity, controls.acceleration);
};
this.sliderRight = function () {
sliderBottomConstraint.disableLinearMotor();
sliderBottomConstraint.enableLinearMotor(-1 * controls.velocity, controls.acceleration);
sliderTopConstraint.disableLinearMotor();
sliderTopConstraint.enableLinearMotor(-1 * controls.velocity, controls.acceleration);
};
this.clearMeshes = function () {
meshes.forEach(function (e) {
scene.remove(e);
});
meshes = [];
};
this.addSpheres = function () {
var colorSphere = scale(Math.random()).hex();
for (var i = 0; i < 5; i++) {
box = new Physijs.SphereMesh(
new THREE.SphereGeometry(2, 20),
Physijs.createMaterial(
new THREE.MeshPhongMaterial(
{
color: colorSphere,
opacity: 0.8,
transparent: true
// map: THREE.ImageUtils.loadTexture( '../assets/textures/general/floor-wood.jpg' )
}),
controls.sphereFriction,
controls.sphereRestitution
)
, 0.1);
box.castShadow = true;
box.receiveShadow = true;
box.position.set(
Math.random() * 50 - 25,
20 + Math.random() * 5,
Math.random() * 5
);
meshes.push(box);
scene.add(box);
}
};
};
controls.updateMotor();
var gui = new dat.GUI();
gui.domElement.style.position = 'absolute';
gui.domElement.style.top = '20px';
gui.domElement.style.left = '20px';
var generalFolder = gui.addFolder('general');
generalFolder.add(controls, "acceleration", 0, 15).onChange(controls.updateMotor);
generalFolder.add(controls, "velocity", -10, 10).onChange(controls.updateMotor);
var hingeFolder = gui.addFolder('hinge');
hingeFolder.add(controls, "enableMotor").onChange(controls.updateMotor);
var sliderFolder = gui.addFolder('sliders');
sliderFolder.add(controls, "sliderLeft").onChange(controls.sliderLeft);
sliderFolder.add(controls, "sliderRight").onChange(controls.sliderRight);
var coneTwistFolder = gui.addFolder('coneTwist');
coneTwistFolder.add(controls, "enableConeTwistMotor").onChange(controls.updateCone);
coneTwistFolder.add(controls, "motorTargetX", -Math.PI / 2, Math.PI / 2).onChange(controls.updateCone);
coneTwistFolder.add(controls, "motorTargetY", -Math.PI / 2, Math.PI / 2).onChange(controls.updateCone);
coneTwistFolder.add(controls, "motorTargetZ", -Math.PI / 2, Math.PI / 2).onChange(controls.updateCone);
var spheresFolder = gui.addFolder('spheres');
spheresFolder.add(controls, "clearMeshes").onChange(controls.updateMotor);
spheresFolder.add(controls, "addSpheres").onChange(controls.updateMotor);
requestAnimationFrame(render);
scene.simulate();
};
function createGround() {
// Materials
ground_material = Physijs.createMaterial(
new THREE.MeshPhongMaterial(
{
// color: 0xaaaaaa,
map: THREE.ImageUtils.loadTexture('../assets/textures/general/floor-wood.jpg')
}),
.9, // high friction
.7 // low restitution
);
// Ground
ground = new Physijs.BoxMesh(
new THREE.BoxGeometry(60, 1, 65),
ground_material,
0 // mass
);
ground.receiveShadow = true;
var borderLeft = new Physijs.BoxMesh(
new THREE.BoxGeometry(2, 6, 65),
ground_material,
0 // mass
);
borderLeft.position.x = -31;
borderLeft.position.y = 2;
borderLeft.receiveShadow = true;
ground.add(borderLeft);
var borderRight = new Physijs.BoxMesh(new THREE.BoxGeometry(2, 6, 65),
ground_material,
0 // mass
);
borderRight.position.x = 31;
borderRight.position.y = 2;
borderRight.receiveShadow = true;
ground.add(borderRight);
var borderBottom = new Physijs.BoxMesh(
new THREE.BoxGeometry(64, 6, 2),
ground_material,
0 // mass
);
borderBottom.position.z = 32;
borderBottom.position.y = 1.5;
borderBottom.receiveShadow = true;
ground.add(borderBottom);
var borderTop = new Physijs.BoxMesh(
new THREE.BoxGeometry(64, 6, 2),
ground_material,
0 // mass
);
borderTop.position.z = -32;
borderTop.position.y = 2;
borderTop.receiveShadow = true;
ground.add(borderTop);
ground.receiveShadow = true;
scene.add(ground);
}
function createConeTwist() {
var baseMesh = new THREE.SphereGeometry(1);
var armMesh = new THREE.BoxGeometry(2, 12, 3);
var objectOne = new Physijs.BoxMesh(baseMesh, Physijs.createMaterial(
new THREE.MeshPhongMaterial({color: 0x4444ff, transparent: true, opacity: 0.7}), 0, 0), 0);
objectOne.position.z = 0;
objectOne.position.x = 20;
objectOne.position.y = 15.5;
objectOne.castShadow = true;
scene.add(objectOne);
var objectTwo = new Physijs.SphereMesh(armMesh, Physijs.createMaterial(
new THREE.MeshPhongMaterial({color: 0x4444ff, transparent: true, opacity: 0.7}), 0, 0), 10);
objectTwo.position.z = 0;
objectTwo.position.x = 20;
objectTwo.position.y = 7.5;
scene.add(objectTwo);
objectTwo.castShadow = true;
//position is the position of the axis, relative to the ref, based on the current position
var constraint = new Physijs.ConeTwistConstraint(objectOne, objectTwo, objectOne.position);
scene.addConstraint(constraint);
// set limit to quarter circle for each axis
constraint.setLimit(0.5 * Math.PI, 0.5 * Math.PI, 0.5 * Math.PI);
constraint.setMaxMotorImpulse(1);
constraint.setMotorTarget(new THREE.Vector3(0, 0, 0)); // desired rotation
return constraint;
}
function createPointToPoint() {
var obj1 = new THREE.SphereGeometry(2);
var obj2 = new THREE.SphereGeometry(2);
var objectOne = new Physijs.SphereMesh(obj1, Physijs.createMaterial(
new THREE.MeshPhongMaterial({color: 0xff4444, transparent: true, opacity: 0.7}), 0, 0));
objectOne.position.z = -18;
objectOne.position.x = -10;
objectOne.position.y = 2;
objectOne.castShadow = true;
scene.add(objectOne);
var objectTwo = new Physijs.SphereMesh(obj2, Physijs.createMaterial(
new THREE.MeshPhongMaterial({color: 0xff4444, transparent: true, opacity: 0.7}), 0, 0));
objectTwo.position.z = -5;
objectTwo.position.x = -20;
objectTwo.position.y = 2;
objectTwo.castShadow = true;
scene.add(objectTwo);
// if no position two, its fixed to a position. Else fixed to objectTwo and both will move
var constraint = new Physijs.PointConstraint(objectOne, objectTwo, objectTwo.position);
scene.addConstraint(constraint);
}
function createSliderBottom() {
var sliderCube = new THREE.BoxGeometry(12, 2, 2);
var sliderMesh = new Physijs.BoxMesh(sliderCube, Physijs.createMaterial(
new THREE.MeshPhongMaterial({color: 0x44ff44, opacity: 0.6, transparent: true}), 0, 0), 0.01);
sliderMesh.position.z = 20;
sliderMesh.position.x = 6;
sliderMesh.position.y = 1.5;
sliderMesh.castShadow = true;
scene.add(sliderMesh);
var constraint = new Physijs.SliderConstraint(sliderMesh, new THREE.Vector3(0, 0, 0), new THREE.Vector3(0, 1, 0));
scene.addConstraint(constraint);
constraint.setLimits(-10, 10, 0, 0);
constraint.setRestitution(0.1, 0.1);
return constraint;
}
function createSliderTop() {
var sliderSphere = new THREE.BoxGeometry(7, 2, 7);
var sliderMesh = new Physijs.BoxMesh(sliderSphere, Physijs.createMaterial(
new THREE.MeshPhongMaterial({color: 0x44ff44, transparent: true, opacity: 0.5}), 0, 0), 10);
sliderMesh.position.z = -15;
sliderMesh.position.x = -20;
sliderMesh.position.y = 1.5;
scene.add(sliderMesh);
sliderMesh.castShadow = true;
//position is the position of the axis, relative to the ref, based on the current position
var constraint = new Physijs.SliderConstraint(sliderMesh, new THREE.Vector3(-10, 0, 20), new THREE.Vector3(Math.PI / 2, 0, 0));
scene.addConstraint(constraint);
constraint.setLimits(-20, 10, 0.5, -0, 5);
constraint.setRestitution(0.2, 0.1);
return constraint;
}
function createLeftFlipper() {
var flipperLeft = new Physijs.BoxMesh(
new THREE.BoxGeometry(12, 2, 2), Physijs.createMaterial(new THREE.MeshPhongMaterial(
{opacity: 0.6, transparent: true}
)), 0.3
);
flipperLeft.position.x = -6;
flipperLeft.position.y = 2;
flipperLeft.position.z = 0;
flipperLeft.castShadow = true;
scene.add(flipperLeft);
var flipperLeftPivot = new Physijs.SphereMesh(
new THREE.BoxGeometry(1, 1, 1), ground_material, 0);
flipperLeftPivot.position.y = 1;
flipperLeftPivot.position.x = -15;
flipperLeftPivot.position.z = 0;
flipperLeftPivot.rotation.y = 1.4;
flipperLeftPivot.castShadow = true;
scene.add(flipperLeftPivot);
// when looking at the axis, the axis of object two are used.
// so as long as that one is the same as the scene, no problems
// rotation and axis are relative to object2. If position == cube2.position it works as expected
var constraint = new Physijs.HingeConstraint(flipperLeft, flipperLeftPivot, flipperLeftPivot.position, new THREE.Vector3(0, 1, 0));
scene.addConstraint(constraint);
constraint.setLimits(
-2.2, // minimum angle of motion, in radians, from the point object 1 starts (going back)
-0.6, // maximum angle of motion, in radians, from the point object 1 starts (going forward)
0.1, // applied as a factor to constraint error, how big the kantelpunt is moved when a constraint is hit
0 // controls bounce at limit (0.0 == no bounce)
);
return constraint;
}
function createRightFlipper() {
var flipperright = new Physijs.BoxMesh(
new THREE.BoxGeometry(12, 2, 2), Physijs.createMaterial(new THREE.MeshPhongMaterial(
{opacity: 0.6, transparent: true}
)), 0.3
);
flipperright.position.x = 8;
flipperright.position.y = 2;
flipperright.position.z = 0;
flipperright.castShadow = true;
scene.add(flipperright);
var flipperLeftPivot = new Physijs.SphereMesh(
new THREE.BoxGeometry(1, 1, 1), ground_material, 0);
flipperLeftPivot.position.y = 2;
flipperLeftPivot.position.x = 15;
flipperLeftPivot.position.z = 0;
flipperLeftPivot.rotation.y = 1.4;
flipperLeftPivot.castShadow = true;
scene.add(flipperLeftPivot);
// when looking at the axis, the axis of object two are used.
// so as long as that one is the same as the scene, no problems
// rotation and axis are relative to object2. If position == cube2.position it works as expected
var constraint = new Physijs.HingeConstraint(flipperright, flipperLeftPivot, flipperLeftPivot.position, new THREE.Vector3(0, 1, 0));
// var constraint = new Physijs.HingeConstraint(cube1, new THREE.Vector3(0,0,0), new THREE.Vector3(0,1,0));
scene.addConstraint(constraint);
constraint.setLimits(
-2.2, // minimum angle of motion, in radians, from the point object 1 starts (going back)
-0.6, // maximum angle of motion, in radians, from the point object 1 starts (going forward)
0.1, // applied as a factor to constraint error, how big the kantelpunt is moved when a constraint is hit
0 // controls bounce at limit (0.0 == no bounce)
);
return constraint;
}
var direction = 1;
render = function () {
requestAnimationFrame(render);
renderer.render(scene, camera);
render_stats.update();
ground.__dirtyRotation = true;
scene.simulate(undefined, 2);
};
window.onload = initScene;
</script>
</head>
<body>
<div id="viewport"></div>
</body>
</html>

最后一个DOFConstraint约束示例(可以准确的控制对象的线性方向和角度方向的移动):
<!DOCTYPE html>

<html>

<head>
    <style>
        body {
            /* set margin to 0 and overflow to hidden, to go fullscreen */
            margin: 0;
            overflow: hidden;
            background-color: #000000;
        }
    </style>

    <title>Physijs Constraints</title>

    <script type="text/javascript" src="../libs/three.js"></script>
    <script type="text/javascript" src="../libs/stats.js"></script>
    <script type="text/javascript" src="../libs/physi.js"></script>
    <script type="text/javascript" src="../libs/dat.gui.js"></script>
    <script type="text/javascript" src="../libs/chroma.js"></script>

    <script type="text/javascript">

        'use strict';

        Physijs.scripts.worker = '../libs/physijs_worker.js';
        Physijs.scripts.ammo = '../libs/ammo.js';

        var scale = chroma.scale(['white', 'blue', 'red', 'yellow']);

        var initScene, render, applyForce, setMousePosition, mouse_position,
                ground_material, box_material,
                projector, renderer, render_stats, physics_stats, scene, ground, light, camera, box, boxes = [];

        initScene = function () {

            renderer = new THREE.WebGLRenderer({antialias: true});
            renderer.setSize(window.innerWidth, window.innerHeight);

            renderer.setClearColor(new THREE.Color(0x000000));
            renderer.shadowMapEnabled = true;


            document.getElementById('viewport').appendChild(renderer.domElement);

            render_stats = new Stats();
            render_stats.domElement.style.position = 'absolute';
            render_stats.domElement.style.top = '1px';
            render_stats.domElement.style.left = '1px';
            render_stats.domElement.style.zIndex = 100;
            document.getElementById('viewport').appendChild(render_stats.domElement);


            scene = new Physijs.Scene({reportSize: 10, fixedTimeStep: 1 / 60});

            scene.setGravity(new THREE.Vector3(0, -40, 0));

            camera = new THREE.PerspectiveCamera(
                    35,
                    window.innerWidth / window.innerHeight,
                    1,
                    1000
            );
            camera.position.set(90, 90, 90);
            camera.lookAt(new THREE.Vector3(30, 0, -20));
            scene.add(camera);

            // Light
            light = new THREE.SpotLight(0xFFFFFF);
            light.position.set(120, 70, 100);
            light.castShadow = true;
            light.shadowMapDebug = true;
            light.shadowCameraNear = 10;
            light.shadowCameraFar = 200;


            scene.add(light);


            var meshes = [];


            createGround();
            var car = createCar();


            var controls = new function () {
                this.velocity = -2;
                this.wheelAngle = 0.5;

                this.loosenXRight = 0.0001;
                this.loosenXLeft = 0.0001;

                this.changeVelocity = function () {
                    // if you add a motor, the current constraint is overridden
                    // if you want to rotate set min higher then max
                    car.flConstraint.configureAngularMotor(2, 0.1, 0, controls.velocity, 15000);
                    car.frConstraint.configureAngularMotor(2, 0.1, 0, controls.velocity, 15000);

                    // motor one is for left and right
//                frConstraint.enableAngularMotor(1);

                    // motor two is forward and backwards
                    car.flConstraint.enableAngularMotor(2);
                    car.frConstraint.enableAngularMotor(2);
                };

                this.changeOrientation = function () {
                    car.rrConstraint.setAngularLowerLimit({x: 0, y: controls.wheelAngle, z: 0.1});
                    car.rrConstraint.setAngularUpperLimit({x: controls.loosenXRight, y: controls.wheelAngle, z: 0});
                    car.rlConstraint.setAngularLowerLimit({x: controls.loosenXLeft, y: controls.wheelAngle, z: 0.1});
                    car.rlConstraint.setAngularUpperLimit({x: 0, y: controls.wheelAngle, z: 0});
                }

            };

            var gui = new dat.GUI();
            gui.add(controls, 'velocity', -10, 10).onChange(controls.changeVelocity);
            gui.add(controls, 'wheelAngle', -1, 1).onChange(controls.changeOrientation);
            gui.add(controls, 'loosenXRight', 0, 0.5).step(0.01).onChange(controls.changeOrientation);
            gui.add(controls, 'loosenXLeft', 0, 0.6).step(-0.01).onChange(controls.changeOrientation);
            controls.loosenXLeft = 0;
            controls.loosenXRight = 0;


            requestAnimationFrame(render);
            scene.simulate();
        };


        function createWheel(position) {
            var wheel_material = Physijs.createMaterial(
                    new THREE.MeshLambertMaterial({color: 0x444444, opacity: 0.9, transparent: true}),
                    1.0, // high friction
                    .5 // medium restitution
            );

            var wheel_geometry = new THREE.CylinderGeometry(4, 4, 2, 10);
            var wheel = new Physijs.CylinderMesh(
                    wheel_geometry,
                    wheel_material,
                    100
            );

            wheel.rotation.x = Math.PI / 2;
            wheel.castShadow = true;
            wheel.position.copy(position);
            return wheel;
        }


        function createCar() {
            var car = {};
            var car_material = Physijs.createMaterial(
                    new THREE.MeshLambertMaterial({color: 0xff4444, opacity: 0.9, transparent: true}),
                    .5, // high friction
                    .5 // medium restitution
            );

            // create the car body
            var geom = new THREE.BoxGeometry(15, 4, 4);
            var body = new Physijs.BoxMesh(geom, car_material, 500);
            body.position.set(5, 5, 5);
            body.castShadow = true;
            scene.add(body);

            // create the wheels
            var fr = createWheel(new THREE.Vector3(0, 4, 10));
            var fl = createWheel(new THREE.Vector3(0, 4, 0));
            var rr = createWheel(new THREE.Vector3(10, 4, 10));
            var rl = createWheel(new THREE.Vector3(10, 4, 0));

            // add the wheels to the scene
            scene.add(fr);
            scene.add(fl);
            scene.add(rr);
            scene.add(rl);

            var frConstraint = createWheelConstraint(fr, body, new THREE.Vector3(0, 4, 8));
            scene.addConstraint(frConstraint);

            var flConstraint = createWheelConstraint(fl, body, new THREE.Vector3(0, 4, 2));
            scene.addConstraint(flConstraint);

            var rrConstraint = createWheelConstraint(rr, body, new THREE.Vector3(10, 4, 8));
            scene.addConstraint(rrConstraint);

            var rlConstraint = createWheelConstraint(rl, body, new THREE.Vector3(10, 4, 2));
            scene.addConstraint(rlConstraint);


            // backwheels don't move themselves and are restriced in their
            // movement. They should be able to rotate along the z-axis
            // same here, if the complete angle is allowed set lower higher
            // than upper.
            // by setting the lower and upper to the same value you can
            // fix the position
            // we can set the x position to 'loosen' the axis for the directional
            rrConstraint.setAngularLowerLimit({x: 0, y: 0.5, z: 0.1});
            rrConstraint.setAngularUpperLimit({x: 0, y: 0.5, z: 0});
            rlConstraint.setAngularLowerLimit({x: 0, y: 0.5, z: 0.1});
            rlConstraint.setAngularUpperLimit({x: 0, y: 0.5, z: 0});


            // front wheels should only move along the z axis.
            // we don't need to specify anything here, since
            // that value is overridden by the motors
            frConstraint.setAngularLowerLimit({x: 0, y: 0, z: 0});
            frConstraint.setAngularUpperLimit({x: 0, y: 0, z: 0});
            flConstraint.setAngularLowerLimit({x: 0, y: 0, z: 0});
            flConstraint.setAngularUpperLimit({x: 0, y: 0, z: 0});

            // if you add a motor, the current constraint is overridden
            // if you want to rotate set min higher then max
            flConstraint.configureAngularMotor(2, 0.1, 0, -2, 1500);
            frConstraint.configureAngularMotor(2, 0.1, 0, -2, 1500);

            // motor one is for left and right
//                frConstraint.enableAngularMotor(1);

            // motor two is forward and backwards
            flConstraint.enableAngularMotor(2);
            frConstraint.enableAngularMotor(2);

            car.flConstraint = flConstraint;
            car.frConstraint = frConstraint;
            car.rlConstraint = rlConstraint;
            car.rrConstraint = rrConstraint;

            return car;
        }

        function createWheelConstraint(wheel, body, position) {
            var constraint = new Physijs.DOFConstraint(
                    wheel, body, position);

            return constraint;
        }

        function createGround() {
            var length = 120;
            var width = 120;
            // Materials
            ground_material = Physijs.createMaterial(
                    new THREE.MeshPhongMaterial(
                            {
//                                color: 0xaaaaaa,
                                map: THREE.ImageUtils.loadTexture('../assets/textures/general/floor-wood.jpg')
                            }),
                    1, // high friction
                    .7 // low restitution
            );

            // Ground
            ground = new Physijs.BoxMesh(
                    new THREE.BoxGeometry(length, 1, width),
                    ground_material,
                    0 // mass
            );

            ground.receiveShadow = true;


            var borderLeft = new Physijs.BoxMesh(
                    new THREE.BoxGeometry(2, 6, width),
                    ground_material,
                    0 // mass
            );

            borderLeft.position.x = -1 * length / 2 - 1;
            borderLeft.position.y = 2;
            borderLeft.receiveShadow = true;


            ground.add(borderLeft);

            var borderRight = new Physijs.BoxMesh(new THREE.BoxGeometry(2, 6, width),
                    ground_material,
                    0 // mass
            );
            borderRight.position.x = length / 2 + 1;
            borderRight.position.y = 2;
            borderRight.receiveShadow = true;

            ground.add(borderRight);


            var borderBottom = new Physijs.BoxMesh(
                    new THREE.BoxGeometry(width - 1, 6, 2),
                    ground_material,
                    0 // mass
            );

            borderBottom.position.z = width / 2;
            borderBottom.position.y = 1.5;
            borderBottom.receiveShadow = true;
            ground.add(borderBottom);

            var borderTop = new Physijs.BoxMesh(
                    new THREE.BoxGeometry(width, 6, 2),
                    ground_material,
                    0 // mass
            );

            borderTop.position.z = -width / 2;
            borderTop.position.y = 2;

            borderTop.receiveShadow = true;

            ground.position.x = 20;
            ground.position.z = -20;
            ground.add(borderTop);

            ground.receiveShadow = true;

            scene.add(ground);
        }


        render = function () {
            requestAnimationFrame(render);
            renderer.render(scene, camera);
            render_stats.update();
            scene.simulate(undefined, 2);
        };


        window.onload = initScene;

    </script>
</head>

<body>
<div id="viewport"></div>
</body>

</html>

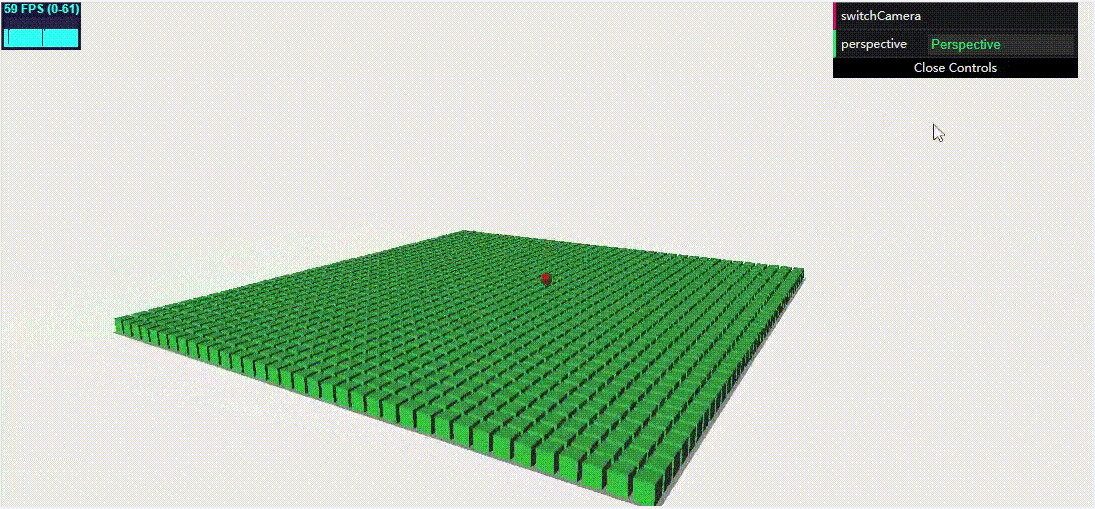
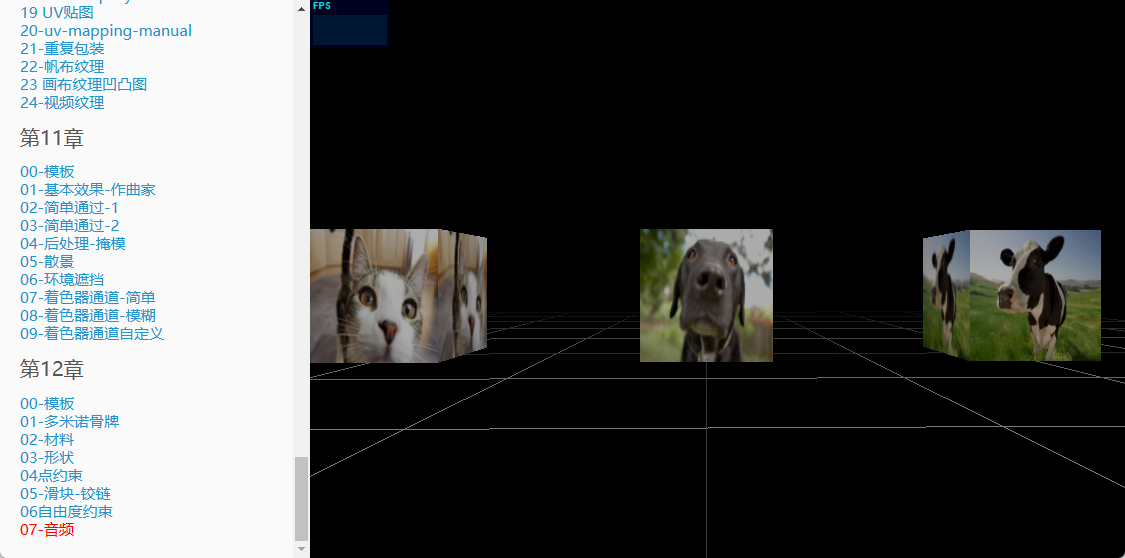
四、在场景中添加声源
Threejs中声音很有意思,因为它会受到摄像机距离的影响:
- 声源离摄像机的距离决定着声音的大小
- 摄像机左右侧的位置分别决定着左右侧扬声器声音的大小。
下面示例展示了一个第一人视角,你会发现离哪个方块近,哪个动物的声音就会大。如果将摄像机放在狗和牛之间,你会听到牛的声音来自右侧,狗的声音来自左侧。
function init() {
  var stats = initStats();
  var renderer = initRenderer();
  var camera = initCamera(new THREE.Vector3(10, 10, 10));
  var clock = new THREE.Clock();
  scene = new THREE.Scene();

  initDefaultLighting(scene);
  camera = new THREE.PerspectiveCamera(50, window.innerWidth / window.innerHeight, 1, 10000);
  camera.position.set(-200, 25, 0);
  // 1. 定义声音监听对象,并添加到摄像机
  var listener1 = new THREE.AudioListener();
  camera.add(listener1);
  var listener2 = new THREE.AudioListener();
  camera.add(listener2);
  var listener3 = new THREE.AudioListener();
  camera.add(listener3);

  // 第一人称视角
  controls = new THREE.FirstPersonControls(camera);
  controls.movementSpeed = 70;
  controls.lookSpeed = 0.15;
  controls.noFly = true;
  controls.lookVertical = false;

  scene = new THREE.Scene();
  scene.fog = new THREE.FogExp2(0x000000, 0.0035);

  light = new THREE.DirectionalLight(0xffffff);
  light.position.set(0, 0.5, 1).normalize();
  scene.add(light);

  var cube = new THREE.BoxGeometry(40, 40, 40);
  var material_1 = new THREE.MeshBasicMaterial({
      color: 0xffffff,
      map: THREE.ImageUtils.loadTexture("../../assets/textures/animals/cow.png")
  });

  var material_2 = new THREE.MeshBasicMaterial({
      color: 0xffffff,
      map: THREE.ImageUtils.loadTexture("../../assets/textures/animals/dog.jpg")
  });

  var material_3 = new THREE.MeshBasicMaterial({
      color: 0xffffff,
      map: THREE.ImageUtils.loadTexture("../../assets/textures/animals/cat.jpg")
  });
  var mesh1 = new THREE.Mesh(cube, material_1);
  mesh1.position.set(0, 20, 100);
  var mesh2 = new THREE.Mesh(cube, material_2);
  mesh2.position.set(0, 20, 0);
  var mesh3 = new THREE.Mesh(cube, material_3);
  mesh3.position.set(0, 20, -100);
  scene.add(mesh1);
  scene.add(mesh2);
  scene.add(mesh3);

  // 2. 绑定声音监听对象,并添加到对应的物体上
  var posSound1 = new THREE.PositionalAudio( listener1 );
  var posSound2 = new THREE.PositionalAudio( listener2 );
  var posSound3 = new THREE.PositionalAudio( listener3 );
  mesh1.add(posSound1);
  mesh2.add(posSound2);
  mesh3.add(posSound3);

  // 3. 加载声音并设置属性
  var audioLoader = new THREE.AudioLoader();
  audioLoader.load('../../assets/audio/cow.ogg', function(buffer) {
    posSound1.setBuffer( buffer );
    posSound1.setRefDistance( 30 ); // 决定距离物体多远时声音开始降低
    posSound1.play();
    posSound1.setRolloffFactor(10); // 决定远离物体多远时声音开始降低
    posSound1.setLoop(true);
  });

  audioLoader.load('../../assets/audio/dog.ogg', function(buffer) {
    posSound2.setBuffer( buffer );
    posSound2.setRefDistance( 30 );
    posSound2.play();
    posSound2.setRolloffFactor(10);
    posSound2.setLoop(true);
  });

  audioLoader.load('../../assets/audio/cat.ogg', function(buffer) {
    posSound3.setBuffer( buffer );
    posSound3.setRefDistance( 30 );
    posSound3.play();
    posSound3.setRolloffFactor(10);
    posSound3.setLoop(true);
  });

  // 辅助对象GridHelper创建网格地面
  var helper = new THREE.GridHelper(500, 10);
  helper.position.y = 0.1;
  scene.add(helper);

  animate();
  function animate() {
    requestAnimationFrame(animate);
    render();
  }

  function render() {
    var delta = clock.getDelta(), time = clock.getElapsedTime() * 5;
    controls.update(delta);
    renderer.render(scene, camera);
  }
}
五、第3版最新案例代码
代码是基于Threejs的r95版本,相比本系列教程使用的第二版,在示例代码质量和渲染效果上都有一定提升。
第三版案例代码资源下载