个人博客地址: https://cxx001.gitee.io
前言
- 对象添加到场景里才能被渲染,场景是整个画面的容器。场景要显示任何东西,一般要有摄像机、光源、渲染对象。本章主要介绍场景类里常用的方法和属性,以及构建场景的基本组件。
- 几何体和网格:网格可以添加到场景中渲染,网格由几何体和材质组成。几何体由顶点和面(一般是三角形,也有四边形)组成。几何体决定网格的形状,材质决定网格的样式。
- 场景中摄像机对象,分为透视投影摄像机和正交投影摄像机。
示例
1. 场景中对象的增删、雾化、强制改变场景对象的材质
<!-- chapter-02-01.html -->
<!DOCTYPE html>

<html>

<head>
    <title>Basic Scene</title>
    <script type="text/javascript" src="../libs/three.js"></script>
    <script type="text/javascript" src="../libs/stats.js"></script>
    <script type="text/javascript" src="../libs/dat.gui.js"></script>
    <style>
        body {
            margin: 0;
            overflow: hidden;
        }
    </style>
</head>
<body>

<div id="Stats-output">
</div>

<div id="WebGL-output">
</div>

<script type="text/javascript">
    function init() {
    	// 初始化fps显示插件
        var stats = initStats();

    	// 创建场景
        var scene = new THREE.Scene();

    	// 创建雾化效果
        // scene.fog = new THREE.Fog(0xffffff, 0.015, 100); // 添加0xffffff白色雾化效果,0.015~100是设定由近到远雾的加深程度,是线性变化的。
    	// scene.fog=new THREE.FogExp2( 0xffffff, 0.015 ); // 同上,添加雾的另一个接口,只需要指定雾颜色和浓度,浓度变化不再是线性的,而是随着距离呈指数增长。

    	// 覆盖场景中对象的材质
    	// scene.overrideMaterial = new THREE.MeshLambertMaterial({color: 0xffffff}); // 全部用这个黑色材质,即使场景中对象设置了材质也会被这个替换。

    	// 添加摄像机到场景
        var camera = new THREE.PerspectiveCamera(45, window.innerWidth / window.innerHeight, 0.1, 1000);
        scene.add(camera);

    	// 创建渲染器
        var renderer = new THREE.WebGLRenderer();
        renderer.setClearColor(new THREE.Color(0xEEEEEE, 1.0));
        renderer.setSize(window.innerWidth, window.innerHeight);
        renderer.shadowMapEnabled = true;  // 开启阴影

    	// 创建平面
        var planeGeometry = new THREE.PlaneGeometry(60, 40, 1, 1);
        var planeMaterial = new THREE.MeshLambertMaterial({color: 0xffffff});
        var plane = new THREE.Mesh(planeGeometry, planeMaterial); // 创建网格,由几何体和材质组成
        plane.receiveShadow = true;  // 让平面接受阴影

        // 平面旋转和位置设置,并添加进场景
        plane.rotation.x = -0.5 * Math.PI;
        plane.position.x = 0;
        plane.position.y = 0;
        plane.position.z = 0;
        scene.add(plane);

        // 设置摄像机位置
        camera.position.x = -30;
        camera.position.y = 40;
        camera.position.z = 30;
        // 设置摄像机镜头朝哪里看
        camera.lookAt(scene.position);

        // 在场景中添加环境光(关于光源后续再详细介绍)
        var ambientLight = new THREE.AmbientLight(0x0c0c0c);
        scene.add(ambientLight);

        // 在场景中添加聚光灯
        var spotLight = new THREE.SpotLight(0xffffff);
        spotLight.position.set(-40, 60, -10);
        spotLight.castShadow = true;  // 让光源投射阴影
        scene.add(spotLight);

        // 将渲染器DOM添加到页面
        document.getElementById("WebGL-output").appendChild(renderer.domElement);

        // 设置dat.GUI插件属性
        var step = 0;
        var controls = new function () {
            this.rotationSpeed = 0.02;   // 对象旋转速度
            this.numberOfObjects = scene.children.length;  // 当前场景中对象的数量

            // 移除场景对象数组里最后一个对象,并更新场景对象数量
            this.removeCube = function () {
                var allChildren = scene.children;  // scene.children 获取场景中对象数组
                var lastObject = allChildren[allChildren.length - 1];
                if (lastObject instanceof THREE.Mesh) {
                    scene.remove(lastObject);
                    this.numberOfObjects = scene.children.length;
                }
            };

            // 场景中添加立方体对象
            this.addCube = function () {
                var cubeSize = Math.ceil((Math.random() * 3));
                var cubeGeometry = new THREE.BoxGeometry(cubeSize, cubeSize, cubeSize);
                var cubeMaterial = new THREE.MeshLambertMaterial({color: Math.random() * 0xffffff});
                var cube = new THREE.Mesh(cubeGeometry, cubeMaterial);
                cube.castShadow = true; // 开启投射阴影
                cube.name = "cube-" + scene.children.length; // 设置名字后,可以通过getObjectByName(name)方法获取这个对象

                // 随机设置对象位置
                cube.position.x = -30 + Math.round((Math.random() * planeGeometry.parameters.width));
                cube.position.y = Math.round((Math.random() * 5));
                cube.position.z = -20 + Math.round((Math.random() * planeGeometry.parameters.height));

                // 添加进场景并刷新场景中对象数量属性
                scene.add(cube);
                this.numberOfObjects = scene.children.length;
            };

            // 打印当前场景中对象信息
            this.outputObjects = function () {
                console.log(scene.children);
            }
        };

    	// 相关属性添加到dat.GUI插件界面显示
        var gui = new dat.GUI();
        gui.add(controls, 'rotationSpeed', 0, 0.5);  // 拖动进度条改变rotationSpeed属性,取值范围0~0.5
        gui.add(controls, 'addCube');    // 点击执行addCube方法
        gui.add(controls, 'removeCube');
        gui.add(controls, 'outputObjects');
        gui.add(controls, 'numberOfObjects').listen();  // 监听numberOfObjects字段的变化

    	// 开始渲染
        render();

        function render() {
            // 更新fps显示
            stats.update();

            // 深度遍历场景中所有对象
            scene.traverse(function (e) {
                if (e instanceof THREE.Mesh && e != plane) {
					// 排除平面对象,其余所有对象做旋转
                    e.rotation.x += controls.rotationSpeed;
                    e.rotation.y += controls.rotationSpeed;
                    e.rotation.z += controls.rotationSpeed;
                }
            });

            // 重新渲染场景
            requestAnimationFrame(render);
            renderer.render(scene, camera);
        }

    	// 初始化显示fps插件
        function initStats() {
            var stats = new Stats();
            stats.setMode(0); // 0: fps, 1: ms

            stats.domElement.style.position = 'absolute';
            stats.domElement.style.left = '0px';
            stats.domElement.style.top = '0px';
            document.getElementById("Stats-output").appendChild(stats.domElement);
            return stats;
        }
    }

    window.onload = init;

	// 改变窗口大小后适配
	function onResize() {
        camera.aspect = window.innerWidth / window.innerHeight;
        camera.updateProjectionMatrix();
        renderer.setSize(window.innerWidth, window.innerHeight);
    }
	window.addEventListener('resize', onResize, false);
</script>
</body>
</html>
这个示例程序主要学习了对场景对象scene,如下几个方法/属性的使用:
| 方法(属性) | 描述 |
|---|---|
| add(object) | 向场景中添加对象。 |
| children | 返回场景中所有对象的列表,包括摄像机和光源。 |
| getObjectByName(name, recursive) | 在创建对象时可以指定唯一的标识name,使用该方法可以查找特定名字的对象。当参数recursive设置为false时,在调用者子元素上查找,当设置为true时,在调用者的所有后代对象上查找。 |
| remove(object) | 将对象从场景中移除。 |
| traverse(function) | 遍历场景中所有物体,回调函数function被场景中所有对象调用。 |
| fog | 使用该属性可以为场景添加雾化效果,可以产生隐藏远处物体的浓雾效果。 |
| overrideMaterial | 使用该属性可以强制场景中的所有物体使用相同的材质。 |
效果1-添加/删除对象:

效果2-雾化 :上面scene.fog = new THREE.Fog(0xffffff, 0.015, 100)注释代码放开

效果3-覆盖材质:上面scene.overrideMaterial = new THREE.MeshLambertMaterial({color: 0xffffff})注释代码放开

2. 标准几何体
<!-- chapter-02-02.html -->
<!DOCTYPE html>

<html>

<head>
    <title>标准几何体示例</title>
    <script type="text/javascript" src="../libs/three.js"></script>
    <script type="text/javascript" src="../libs/ParametricGeometries.js"></script>
    <script type="text/javascript" src="../libs/ConvexGeometry.js"></script>
    <script type="text/javascript" src="../libs/stats.js"></script>
    <script type="text/javascript" src="../libs/dat.gui.js"></script>
    <style>
        body {
            margin: 0;
            overflow: hidden;
        }
    </style>
</head>
<body>

<div id="Stats-output">
</div>

<div id="WebGL-output">
</div>

<script type="text/javascript">
    function init() {
        var stats = initStats();

        // create a scene, that will hold all our elements such as objects, cameras and lights.
        var scene = new THREE.Scene();

        // create a camera, which defines where we're looking at.
        var camera = new THREE.PerspectiveCamera(45, window.innerWidth / window.innerHeight, 0.1, 1000);

        // create a render and set the size
        var renderer = new THREE.WebGLRenderer();
        renderer.setClearColor(new THREE.Color(0xEEEEEE, 1.0));
        renderer.setSize(window.innerWidth, window.innerHeight);
        renderer.shadowMapEnabled = true;

        // create the ground plane
        var planeGeometry = new THREE.PlaneGeometry(60, 40, 1, 1);
        var planeMaterial = new THREE.MeshLambertMaterial({color: 0xffffff});
        var plane = new THREE.Mesh(planeGeometry, planeMaterial);
        plane.receiveShadow = true;

        // rotate and position the plane
        plane.rotation.x = -0.5 * Math.PI;
        plane.position.x = 0;
        plane.position.y = 0;
        plane.position.z = 0;

        // add the plane to the scene
        scene.add(plane);

        // position and point the camera to the center of the scene
        camera.position.x = -50;
        camera.position.y = 30;
        camera.position.z = 20;
        camera.lookAt(new THREE.Vector3(-10, 0, 0));

        // add subtle ambient lighting
        var ambientLight = new THREE.AmbientLight(0x090909);
        scene.add(ambientLight);

        // add spotlight for the shadows
        var spotLight = new THREE.SpotLight(0xffffff);
        spotLight.position.set(-40, 40, 50);
        spotLight.castShadow = true;
        scene.add(spotLight);

        // 添加threejs库可用的标准几何体
        addGeometries(scene);

        // add the output of the renderer to the html element
        document.getElementById("WebGL-output").appendChild(renderer.domElement);

        render();

		// call the render function
        var step = 0;
        function addGeometries(scene) {
            var geoms = [];
			// 圆柱体/圆锥体
            geoms.push(new THREE.CylinderGeometry(1, 4, 4));

            // 立方体/长方体
            geoms.push(new THREE.BoxGeometry(2, 2, 2));

            // 球体
            geoms.push(new THREE.SphereGeometry(2));

            // 二十面体
            geoms.push(new THREE.IcosahedronGeometry(4));

            // 用点创建凸形状,如立方体
            var points = [
                new THREE.Vector3(2, 2, 2),
                new THREE.Vector3(2, 2, -2),
                new THREE.Vector3(-2, 2, -2),
                new THREE.Vector3(-2, 2, 2),
                new THREE.Vector3(2, -2, 2),
                new THREE.Vector3(2, -2, -2),
                new THREE.Vector3(-2, -2, -2),
                new THREE.Vector3(-2, -2, 2)
            ];
            geoms.push(new THREE.ConvexGeometry(points));

            // 车床图形,围绕某个轴旋转而来
            //http://en.wikipedia.org/wiki/Lathe_(graphics)
            var pts = [];//points array - the path profile points will be stored here
            var detail = .1;//half-circle detail - how many angle increments will be used to generate points
            var radius = 3;//radius for half_sphere
            for (var angle = 0.0; angle < Math.PI; angle += detail)//loop from 0.0 radians to PI (0 - 180 degrees)
                pts.push(new THREE.Vector3(Math.cos(angle) * radius, 0, Math.sin(angle) * radius));//angle/radius to x,z
            geoms.push(new THREE.LatheGeometry(pts, 12));

            // 八面体
            geoms.push(new THREE.OctahedronGeometry(3));

            // 自定义几何体
            geoms.push(new THREE.ParametricGeometry(THREE.ParametricGeometries.mobius3d, 20, 10));

            // 四面体(4个顶点4个面,场景中如果只看到一个面,看起来就是一个三角形)
            geoms.push(new THREE.TetrahedronGeometry(3));

            // 圆环
            geoms.push(new THREE.TorusGeometry(3, 1, 10, 10));

            // 圆环结
            geoms.push(new THREE.TorusKnotGeometry(3, 0.5, 50, 20));

            var j = 0;
            for (var i = 0; i < geoms.length; i++) {
                // 数组材质,和前面使用1个材质有点区别,创建网格时会为数组中每个材质都创建一个实例
                var materials = [
                    new THREE.MeshLambertMaterial({color: Math.random() * 0xffffff, shading: THREE.FlatShading}),
                    new THREE.MeshBasicMaterial({color: 0x000000, wireframe: true})  // 线框材质
                ];

                // 使用数组材质创建网格,返回的也是一个对应的数组网格对象
                var mesh = THREE.SceneUtils.createMultiMaterialObject(geoms[i], materials);
                mesh.traverse(function (e) {
                    e.castShadow = true // 为数组网格对象开启投射阴影
                });

                //var mesh = new THREE.Mesh(geoms[i],materials[i]);
                //mesh.castShadow=true;
                mesh.position.x = -24 + ((i % 4) * 12);
                mesh.position.y = 4;
                mesh.position.z = -8 + (j * 12);

                if ((i + 1) % 4 == 0) j++;
                scene.add(mesh);
            }
        }

        function render() {
            stats.update();

            // render using requestAnimationFrame
            requestAnimationFrame(render);
            renderer.render(scene, camera);
        }

        function initStats() {
            var stats = new Stats();
            stats.setMode(0); // 0: fps, 1: ms

            // Align top-left
            stats.domElement.style.position = 'absolute';
            stats.domElement.style.left = '0px';
            stats.domElement.style.top = '0px';
            document.getElementById("Stats-output").appendChild(stats.domElement);
            return stats;
        }
    }

    window.onload = init;

	// 改变窗口大小后适配
	function onResize() {
        camera.aspect = window.innerWidth / window.innerHeight;
        camera.updateProjectionMatrix();
        renderer.setSize(window.innerWidth, window.innerHeight);
    }
	window.addEventListener('resize', onResize, false);
</script>
</body>
</html>
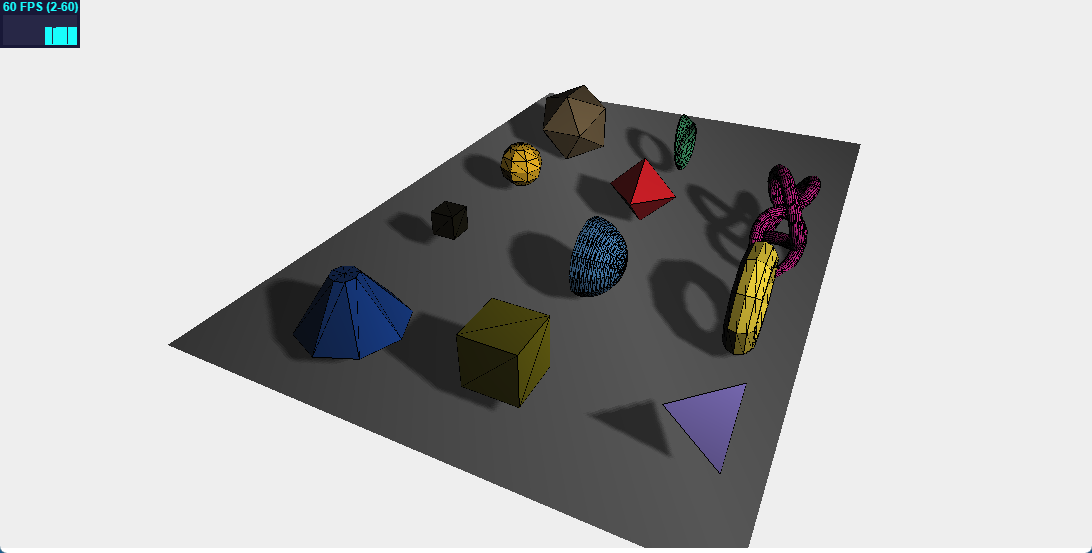
这个示例展示了标准几何体的创建方法,只需要指定长、宽、高、半径等,不需要关心几何体的顶点和面,它内部会帮我们计算好。
一个新的创建网格方式: createMultiMaterialObject使用多种材质来创建,这个方法创建的并不是一个mesh对象实例,而是为materials数组中每个指定的材质创建一个实例,并把这些实例存放在一个组里(THREE.Object3D对象)。你可以像使用场景中的对象那样使用这个组,如添加到场景、按名称获取对象等。但如果要为这个组中所有子对象添加阴影,我们要像上面示例一样遍历所有子对象了。
返回的其实是一个网格组对象,其中每个网格的几何体一样,不同的只是使用的材质不一样。可以通过children[i]取到子对象平移开就可以清楚看到了。
效果:
3. 自定义几何体
<!-- chapter-02-03.html -->
<!DOCTYPE html>

<html>

<head>
    <title>Custom geometry</title>
    <script type="text/javascript" src="../libs/three.js"></script>
    <script type="text/javascript" src="../libs/stats.js"></script>
    <script type="text/javascript" src="../libs/dat.gui.js"></script>
    <style>
        body {
            margin: 0;
            overflow: hidden;
        }
    </style>
</head>
<body>

<div id="Stats-output">
</div>

<div id="WebGL-output">
</div>

<script type="text/javascript">
    function init() {
        var stats = initStats();

        // create a scene, that will hold all our elements such as objects, cameras and lights.
        var scene = new THREE.Scene();

        // create a camera, which defines where we're looking at.
        var camera = new THREE.PerspectiveCamera(45, window.innerWidth / window.innerHeight, 0.1, 1000);

        // create a render and set the size
        var renderer = new THREE.WebGLRenderer();
        renderer.setClearColor(new THREE.Color(0xEEEEEE, 1.0));
        renderer.setSize(window.innerWidth, window.innerHeight);
        renderer.shadowMapEnabled = true;

        // create the ground plane
        var planeGeometry = new THREE.PlaneGeometry(60, 40, 1, 1);
        var planeMaterial = new THREE.MeshLambertMaterial({color: 0xffffff});
        var plane = new THREE.Mesh(planeGeometry, planeMaterial);
        plane.receiveShadow = true;

        // rotate and position the plane
        plane.rotation.x = -0.5 * Math.PI;
        plane.position.x = 0;
        plane.position.y = 0;
        plane.position.z = 0;

        // add the plane to the scene
        scene.add(plane);

        // position and point the camera to the center of the scene
        camera.position.x = -20;
        camera.position.y = 25;
        camera.position.z = 20;
        camera.lookAt(new THREE.Vector3(5, 0, 0));

        // add spotlight for the shadows
        var spotLight = new THREE.SpotLight(0xffffff);
        spotLight.position.set(-40, 60, 10);
        spotLight.castShadow = true;
        scene.add(spotLight);

        // add the output of the renderer to the html element
        document.getElementById("WebGL-output").appendChild(renderer.domElement);

       	// 立方体的8个顶点数据(初始数据,后面渲染使用dat.GUI绑定的数据更新顶点)
        var vertices = [
            new THREE.Vector3(1, 3, 1),
            new THREE.Vector3(1, 3, -1),
            new THREE.Vector3(1, -1, 1),
            new THREE.Vector3(1, -1, -1),
            new THREE.Vector3(-1, 3, -1),
            new THREE.Vector3(-1, 3, 1),
            new THREE.Vector3(-1, -1, -1),
            new THREE.Vector3(-1, -1, 1)
        ];

    	// 组成立方体6个面的12个三角形面(要注意顶点顺序,顺时针顺序则是面向摄像机,反之则是背向摄像机)
        var faces = [
            new THREE.Face3(0, 2, 1),
            new THREE.Face3(2, 3, 1),
            new THREE.Face3(4, 6, 5),
            new THREE.Face3(6, 7, 5),
            new THREE.Face3(4, 5, 1),
            new THREE.Face3(5, 0, 1),
            new THREE.Face3(7, 6, 2),
            new THREE.Face3(6, 3, 2),
            new THREE.Face3(5, 7, 0),
            new THREE.Face3(7, 2, 0),
            new THREE.Face3(1, 3, 4),
            new THREE.Face3(3, 6, 4),
        ];

    	// 创建自定义几何体对象
        var geom = new THREE.Geometry();
        geom.vertices = vertices; // 顶点数据
        geom.faces = faces; // 三角形面数据
        geom.computeFaceNormals(); // 确定每个面的法向量(决定不同光源下的颜色)

    	// 材质数组,一个外观颜色,一个线框
        var materials = [
            new THREE.MeshLambertMaterial({opacity: 0.6, color: 0x44ff44, transparent: true}),
            new THREE.MeshBasicMaterial({color: 0x000000, wireframe: true})
        ];

        var mesh = THREE.SceneUtils.createMultiMaterialObject(geom, materials);
        mesh.children.forEach(function (e) {
            e.castShadow = true
        });
    	// 展开这里可以看到由数组材质创建的mesh网格对应的两个子对象。
        // mesh.children[0].translateX(0.5); // 平移
        // mesh.children[0].translateZ(0.5);

        scene.add(mesh);

        var gui = new dat.GUI();
    	// gui添加clone属性, 点击clone按钮会复制一个新对象
        gui.add(new function () {
            this.clone = function () {
                var clonedGeometry = mesh.children[0].geometry.clone();
                var materials = [
                    new THREE.MeshLambertMaterial({opacity: 0.6, color: 0xff44ff, transparent: true}),
                    new THREE.MeshBasicMaterial({color: 0x000000, wireframe: true})

                ];

                var mesh2 = THREE.SceneUtils.createMultiMaterialObject(clonedGeometry, materials);
                mesh2.children.forEach(function (e) {
                    e.castShadow = true
                });

                // X/Z轴平移
                mesh2.translateX(5);
                mesh2.translateZ(5);
                mesh2.name = "clone";
                scene.remove(scene.getChildByName("clone")); // 如果存在则先删除场景中旧的对象
                scene.add(mesh2);
            }
        }, 'clone');

    	function addControl(x, y, z) {
            var controls = new function () {
                this.x = x;
                this.y = y;
                this.z = z;
            };

            return controls;
        }
		// gui插件关联8个顶点数据,并赋初值
        var controlPoints = [];
        controlPoints.push(addControl(3, 5, 3));
        controlPoints.push(addControl(3, 5, 0));
        controlPoints.push(addControl(3, 0, 3));
        controlPoints.push(addControl(3, 0, 0));
        controlPoints.push(addControl(0, 5, 0));
        controlPoints.push(addControl(0, 5, 3));
        controlPoints.push(addControl(0, 0, 0));
        controlPoints.push(addControl(0, 0, 3));
    	// gui添加8个顶点属性
        for (var i = 0; i < 8; i++) {
            f1 = gui.addFolder('Vertices ' + (i + 1)); // addFolder添加组
            f1.add(controlPoints[i], 'x', -10, 10);
            f1.add(controlPoints[i], 'y', -10, 10);
            f1.add(controlPoints[i], 'z', -10, 10);
        }

        render();

        function render() {
            stats.update();
			// 关联gui的顶点数据重新绘制
            var vertices = [];
            for (var i = 0; i < 8; i++) {
                vertices.push(new THREE.Vector3(controlPoints[i].x, controlPoints[i].y, controlPoints[i].z));
            }
			// 网格顶点更新重新渲染,(children.forEach遍历子对象和前面使用traverse方法遍历子对象类似)
            mesh.children.forEach(function (e) {
                e.geometry.vertices = vertices;
                e.geometry.verticesNeedUpdate = true;
                e.geometry.computeFaceNormals();
            });

            // render using requestAnimationFrame
            requestAnimationFrame(render);
            renderer.render(scene, camera);
        }

        function initStats() {
            var stats = new Stats();
            stats.setMode(0); // 0: fps, 1: ms

            // Align top-left
            stats.domElement.style.position = 'absolute';
            stats.domElement.style.left = '0px';
            stats.domElement.style.top = '0px';
            document.getElementById("Stats-output").appendChild(stats.domElement);
            return stats;
        }
    }
    window.onload = init;

	// 改变窗口大小后适配
	function onResize() {
        camera.aspect = window.innerWidth / window.innerHeight;
        camera.updateProjectionMatrix();
        renderer.setSize(window.innerWidth, window.innerHeight);
    }
	window.addEventListener('resize', onResize, false);
</script>
</body>
</html>
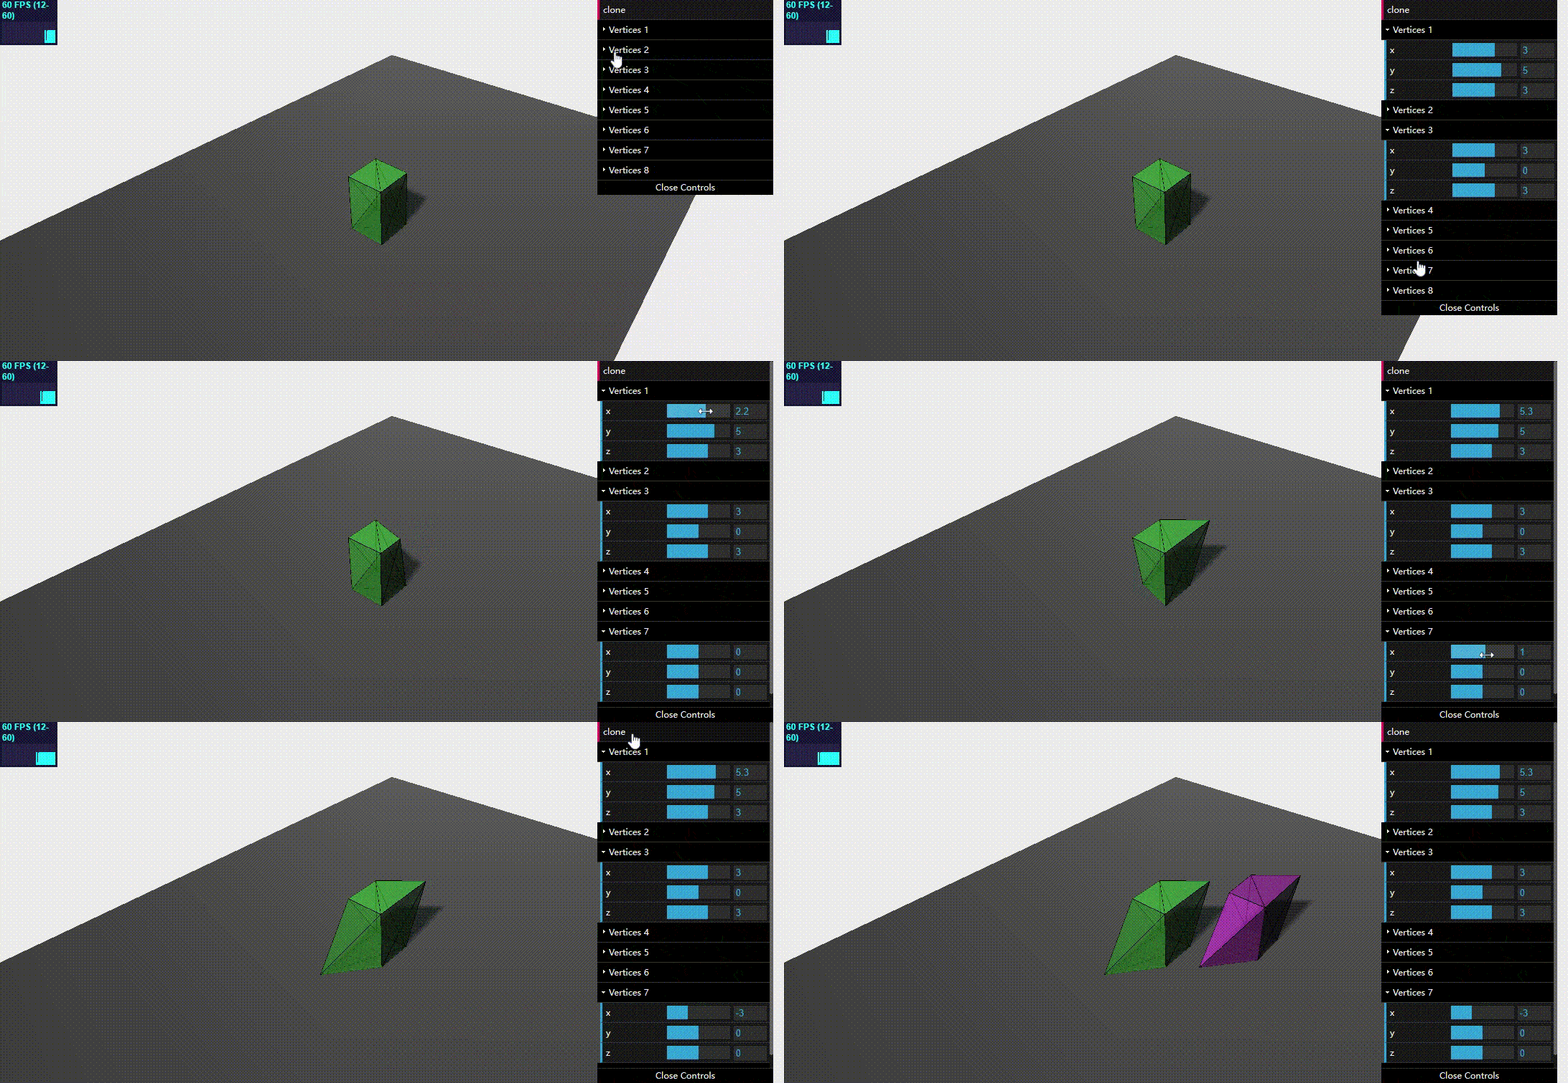
通过传统指定几何体的顶点和面来创建几何体。通过改变顶点数据,观察几何体的变化。
同时学习了一个复制几何体的方法clone的使用。
扩展:本章示例我们为几何体添加线框是通过数组材质,使用createMultiMaterialObject方法来添加的。threejs其实还有另一个方法:
var helper = new THREE.WireframeHelper(mesh, 0x000000);
scene.add(helper);
这样添加线框,helper其实是一个THREE.Line对象,你还可以设置线框如何显示,比如使用helper.material.linewidth = 2来指定线框的宽度。
效果:
4. 网格对象常用属性和方法
<!-- chapter-02-04.html -->
<!DOCTYPE html>

<html>

<head>
    <title>Mesh Properties</title>
    <script type="text/javascript" src="../libs/three.js"></script>
    <script type="text/javascript" src="../libs/stats.js"></script>
    <script type="text/javascript" src="../libs/dat.gui.js"></script>
    <style>
        body {
            margin: 0;
            overflow: hidden;
        }
    </style>
</head>
<body>

<div id="Stats-output">
</div>

<div id="WebGL-output">
</div>

<script type="text/javascript">
    function init() {
        var stats = initStats();

        var scene = new THREE.Scene();
        var camera = new THREE.PerspectiveCamera(45, window.innerWidth / window.innerHeight, 0.1, 1000);

        var renderer = new THREE.WebGLRenderer();
        renderer.setClearColor(new THREE.Color(0xEEEEEE, 1.0));
        renderer.setSize(window.innerWidth, window.innerHeight);
        renderer.shadowMapEnabled = true;

        var planeGeometry = new THREE.PlaneGeometry(60, 40, 1, 1);
        var planeMaterial = new THREE.MeshLambertMaterial({color: 0xffffff});
        var plane = new THREE.Mesh(planeGeometry, planeMaterial);
        plane.receiveShadow = true;
        plane.rotation.x = -0.5 * Math.PI;
        plane.position.x = 0;
        plane.position.y = 0;
        plane.position.z = 0;
        scene.add(plane);

        camera.position.x = -30;
        camera.position.y = 40;
        camera.position.z = 30;
        camera.lookAt(scene.position);

        var ambientLight = new THREE.AmbientLight(0x0c0c0c);
        scene.add(ambientLight);

        var spotLight = new THREE.SpotLight(0xffffff);
        spotLight.position.set(-40, 60, 020);
        spotLight.castShadow = true;
        scene.add(spotLight);
        document.getElementById("WebGL-output").appendChild(renderer.domElement);

    	// gui显示属性
        var controls = new function () {
            // 缩放
            this.scaleX = 1;
            this.scaleY = 1;
            this.scaleZ = 1;

            // 坐标(绝对坐标)
            this.positionX = 0;
            this.positionY = 4;
            this.positionZ = 0;

            // 旋转
            this.rotationX = 0;
            this.rotationY = 0;
            this.rotationZ = 0;
            this.scale = 1;

            // 平移(相对坐标)
            this.translateX = 0;
            this.translateY = 0;
            this.translateZ = 0;

            // 是否显示
            this.visible = true;

            // 设置平移后,点击translate按钮生效
            this.translate = function () {
                // 平移
                cube.translateX(controls.translateX);
                cube.translateY(controls.translateY);
                cube.translateZ(controls.translateZ);
				// 平移后更新gui坐标属性
                controls.positionX = cube.position.x;
                controls.positionY = cube.position.y;
                controls.positionZ = cube.position.z;
            }
        };

        var material = new THREE.MeshLambertMaterial({color: 0x44ff44});
        var geom = new THREE.BoxGeometry(5, 8, 3);
        var cube = new THREE.Mesh(geom, material);
        cube.position.y = 4;
        cube.castShadow = true;
        scene.add(cube);

        var gui = new dat.GUI();
        guiScale = gui.addFolder('scale');  // 添加组
        guiScale.add(controls, 'scaleX', 0, 5);
        guiScale.add(controls, 'scaleY', 0, 5);
        guiScale.add(controls, 'scaleZ', 0, 5);

        guiPosition = gui.addFolder('position');
        var contX = guiPosition.add(controls, 'positionX', -10, 10);
        var contY = guiPosition.add(controls, 'positionY', -4, 20);
        var contZ = guiPosition.add(controls, 'positionZ', -10, 10);

    	// 监听gui坐标属性变化
        contX.listen();
        contX.onChange(function (value) {
            cube.position.x = controls.positionX; // 更新坐标信息
        });

        contY.listen();
        contY.onChange(function (value) {
            cube.position.y = controls.positionY;
        });

        contZ.listen();
        contZ.onChange(function (value) {
            cube.position.z = controls.positionZ;
        });


        guiRotation = gui.addFolder('rotation');
        guiRotation.add(controls, 'rotationX', -4, 4);
        guiRotation.add(controls, 'rotationY', -4, 4);
        guiRotation.add(controls, 'rotationZ', -4, 4);

        guiTranslate = gui.addFolder('translate');

        guiTranslate.add(controls, 'translateX', -10, 10);
        guiTranslate.add(controls, 'translateY', -10, 10);
        guiTranslate.add(controls, 'translateZ', -10, 10);
        guiTranslate.add(controls, 'translate');

        gui.add(controls, 'visible');

        render();

        function render() {
            stats.update();
			// 是否显示
            cube.visible = controls.visible;
			// 旋转
            cube.rotation.x = controls.rotationX;
            cube.rotation.y = controls.rotationY;
            cube.rotation.z = controls.rotationZ;
			// 缩放
            cube.scale.set(controls.scaleX, controls.scaleY, controls.scaleZ);

            // 重新渲染
            requestAnimationFrame(render);
            renderer.render(scene, camera);
        }

        function initStats() {
            var stats = new Stats();
            stats.setMode(0); // 0: fps, 1: ms

            // Align top-left
            stats.domElement.style.position = 'absolute';
            stats.domElement.style.left = '0px';
            stats.domElement.style.top = '0px';
            document.getElementById("Stats-output").appendChild(stats.domElement);
            return stats;
        }
    }
    window.onload = init;

	// 改变窗口大小后适配
	function onResize() {
        camera.aspect = window.innerWidth / window.innerHeight;
        camera.updateProjectionMatrix();
        renderer.setSize(window.innerWidth, window.innerHeight);
    }
	window.addEventListener('resize', onResize, false);
</script>
</body>
</html>
dat.GUI插件使用流程:
- 定义gui显示属性,函数对象中定义。
- 使用gui.add方法将属性添加进gui。
- 将gui添加的属性和渲染对象对应属性关联。(1. render重新渲染时关联。2. listen监听属性变化时关联。3. gui属性绑定函数关联,即点击这个属性会回调这个函数。)
网格对象的属性和方法:
| 方法 | 描述 |
|---|---|
| position | 设置相对于父节点的坐标 |
| rotation | 设置绕x/y/z轴旋转 |
| scale | 设置沿x/y/z轴缩放 |
| translate | 设置沿x/y/z轴平移 |
| visible | 设置对象是否可见 |
效果:

5. 摄像机
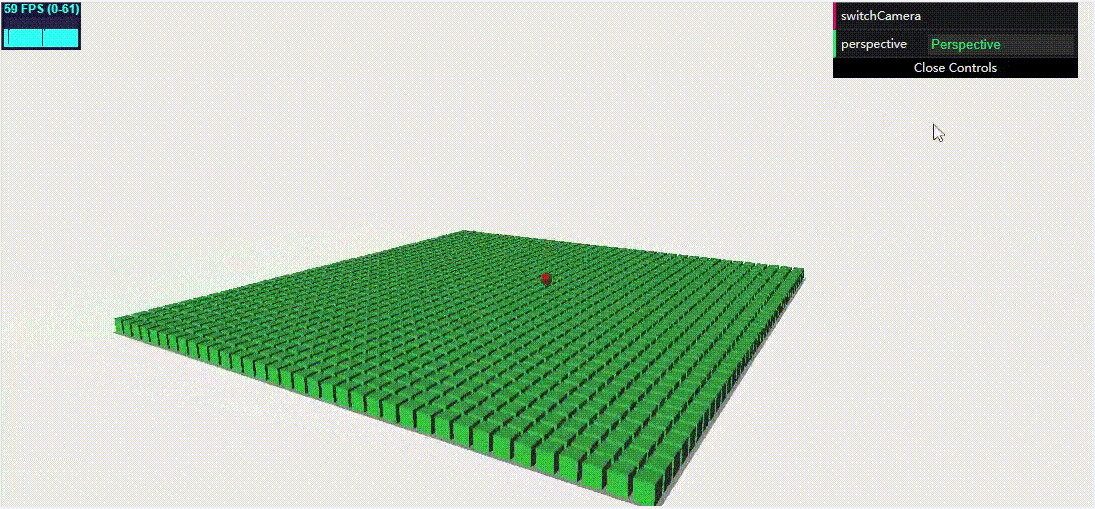
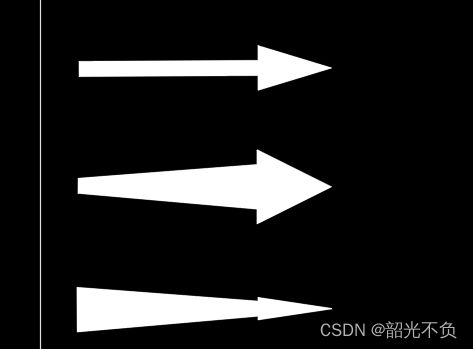
threejs库提供了两种摄像机:正交投影摄像机和透视投影摄像机。正交投影摄像机,没有近大远小效果,场景所有物体都是实际大小被渲染,这种摄像机一般用于二维场景中。而透视投影摄像机,场景中的物体表现为近大远小,更接近现实。
透视投影摄像机的创建方法:THREE.PerspectiveCamera(fov, aspect, near, far, zoom)

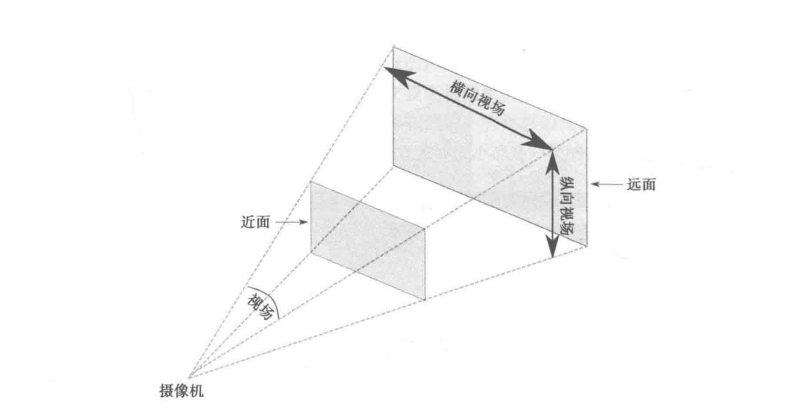
fov属性决定了横向视场。基于aspect属性,纵向视场也就相应地确定了。near属性决定了近面距离,far属性决定了远面距离。近面和远面之间的区域将会被渲染。
正交投影摄像机的创建方法:OrthographicCamera(left, right, top, bottom, near, far, zoom)
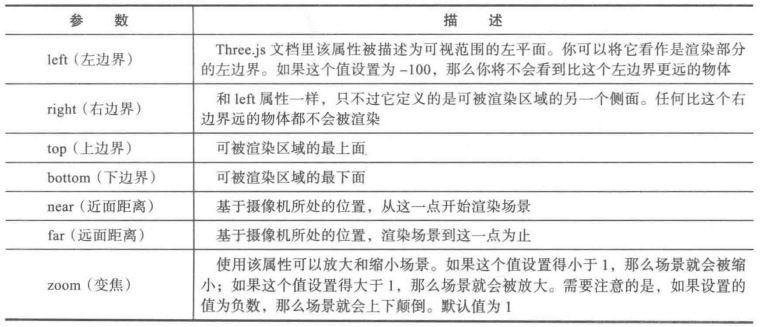
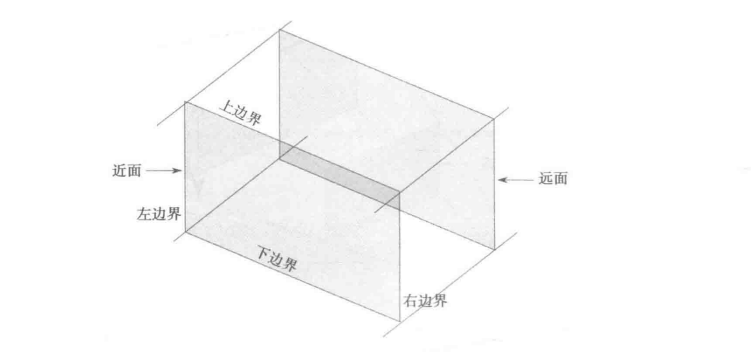
就是一个盒子。
示例:能够切换两种摄像机,并且在屏幕中间从左向右移动(屏幕中央的红点位置),看起来场景中物体在移动,其实它们没动,只是摄像机移动,在不同位置观察场景产生的效果。同时我们可以看到切换摄像机时,正交投影摄像机拍摄出来的所有立方体大小都一样,而透视投影摄像机拍摄出来的立方体表现为近大远小。
<!-- chapter-02-05.html -->
<!DOCTYPE html>

<html>

<head>
    <title>Cameras</title>
    <script type="text/javascript" src="../libs/three.js"></script>
    <script type="text/javascript" src="../libs/stats.js"></script>
    <script type="text/javascript" src="../libs/dat.gui.js"></script>
    <style>
        body {
            margin: 0;
            overflow: hidden;
        }
    </style>
</head>
<body>

<div id="Stats-output">
</div>

<div id="WebGL-output">
</div>

<script type="text/javascript">
    function init() {
        var stats = initStats();

        var scene = new THREE.Scene();
    	// 默认创建透视投影摄像机
        var camera = new THREE.PerspectiveCamera(45, window.innerWidth / window.innerHeight, 0.1, 1000);
        camera.position.x = 120;
        camera.position.y = 60;
        camera.position.z = 180;

        var renderer = new THREE.WebGLRenderer();
        renderer.setClearColor(new THREE.Color(0xEEEEEE, 1.0));
        renderer.setSize(window.innerWidth, window.innerHeight);

        var planeGeometry = new THREE.PlaneGeometry(180, 180);
        var planeMaterial = new THREE.MeshLambertMaterial({color: 0xffffff});
        var plane = new THREE.Mesh(planeGeometry, planeMaterial);
        plane.rotation.x = -0.5 * Math.PI;
        plane.position.x = 0;
        plane.position.y = 0;
        plane.position.z = 0;
        scene.add(plane);

    	// 创建立方体块平面
        var cubeGeometry = new THREE.BoxGeometry(4, 4, 4);
        var cubeMaterial = new THREE.MeshLambertMaterial({color: 0x00ee22});
        for (var j = 0; j < (planeGeometry.parameters.height / 5); j++) {
            for (var i = 0; i < planeGeometry.parameters.width / 5; i++) {
                var cube = new THREE.Mesh(cubeGeometry, cubeMaterial);
                cube.position.z = -((planeGeometry.parameters.height) / 2) + 2 + (j * 5);
                cube.position.x = -((planeGeometry.parameters.width) / 2) + 2 + (i * 5);
                cube.position.y = 2;
                scene.add(cube);
            }
        }

    	// 创建红点,和摄像机一起移动,标志摄像机当前移动的位置
        var lookAtGeom = new THREE.SphereGeometry(2);
        var lookAtMesh = new THREE.Mesh(lookAtGeom, new THREE.MeshLambertMaterial({color: 0xff0000}));
        scene.add(lookAtMesh);

    	// 光源下节再详细介绍
        var directionalLight = new THREE.DirectionalLight(0xffffff, 0.7);
        directionalLight.position.set(-20, 40, 60);
        scene.add(directionalLight);

        var ambientLight = new THREE.AmbientLight(0x292929);
        scene.add(ambientLight);
        document.getElementById("WebGL-output").appendChild(renderer.domElement);

        // 切换摄像机
        var step = 0;
        var controls = new function () {
            this.perspective = "Perspective";
            this.switchCamera = function () {
                if (camera instanceof THREE.PerspectiveCamera) {
                    camera = new THREE.OrthographicCamera(window.innerWidth / -16, window.innerWidth / 16, window.innerHeight / 16, window.innerHeight / -16, -200, 500);
                    camera.position.x = 120;
                    camera.position.y = 60;
                    camera.position.z = 180;
					// 设置摄像机位置
                    camera.lookAt(scene.position);
                    this.perspective = "Orthographic";
                } else {
                    camera = new THREE.PerspectiveCamera(45, window.innerWidth / window.innerHeight, 0.1, 1000);
                    camera.position.x = 120;
                    camera.position.y = 60;
                    camera.position.z = 180;
                    camera.lookAt(scene.position);
                    this.perspective = "Perspective";
                }
            };
        };

        var gui = new dat.GUI();
        gui.add(controls, 'switchCamera'); // 点击切换摄像机
        gui.add(controls, 'perspective').listen(); // 监听perspective字段变化,自动刷新text显示。不需要绑定回调方法。

        render();

        var step = 0;
        function render() {
            stats.update();
            // 移动摄像机和红点
            step += 0.02;
            if (camera instanceof THREE.Camera) {
                var x = 10 + ( 100 * (Math.sin(step)));
                camera.lookAt(new THREE.Vector3(x, 10, 0));
                lookAtMesh.position.copy(new THREE.Vector3(x, 10, 0));
            }
            //.position.x = 20+( 10*(Math.cos(step)));

            requestAnimationFrame(render);
            renderer.render(scene, camera);
        }

        function initStats() {
            var stats = new Stats();
            stats.setMode(0); // 0: fps, 1: ms

            // Align top-left
            stats.domElement.style.position = 'absolute';
            stats.domElement.style.left = '0px';
            stats.domElement.style.top = '0px';
            document.getElementById("Stats-output").appendChild(stats.domElement);
            return stats;
        }
    }
    window.onload = init;

	// 改变窗口大小后适配
	function onResize() {
        camera.aspect = window.innerWidth / window.innerHeight;
        camera.updateProjectionMatrix();
        renderer.setSize(window.innerWidth, window.innerHeight);
    }
	window.addEventListener('resize', onResize, false);
</script>
</body>
</html>
效果:
