写在前面
本文一起看下spring aop 和 IOC相关的内容。
1:spring bean核心原理
1.1:spring bean的生命周期
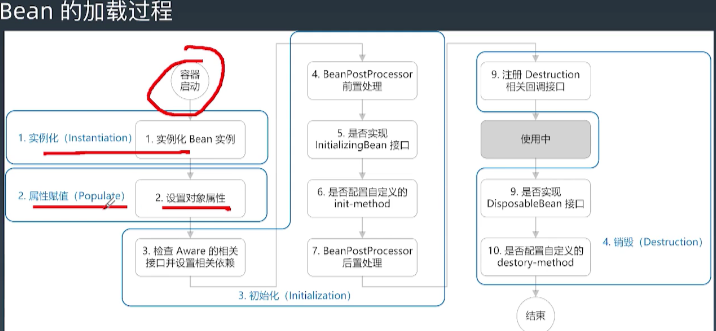
spring bean生命周期,参考下图:
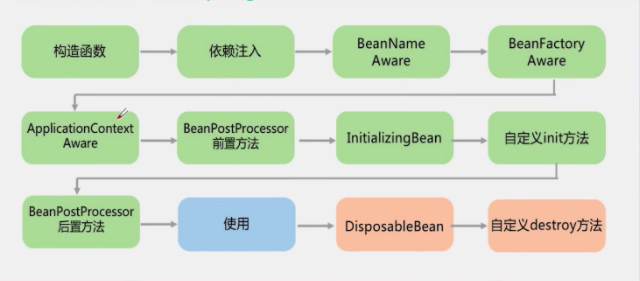
我们来一步步的看下。
1
其中1构造函数就是执行类的构造函数完成对象的创建,如下:
public User() {
    System.out.println("User 被实例化");
}
2
2是通过xml配置或者是@Resource等相关注入bean的注解,从容器中获取相关的spring bean进行赋值,如下:


3
3BeanNameAware,其中BeanNameAware是一个接口,只定义了一个唯一的方法void setBeanName(String name);,如果bean实现了该接口,则会回调setBeanName方法并将当前bean的beanName作为参数传递进去,这样,bean就能够获取自己的名称了,如下:
@Component
public class TestAware implements BeanNameAware {
    private String name;

    @Override
    public void setBeanName(String name) {
        this.name = name;
        System.out.println("TestAware.setBeanName, name is: " + this.name);
    }
}
4,5
4,5类似于3,也都分别定义了相关的xxxAware接口,以及对应的setXxx抽象方法,如下:
public class TestAware implements BeanFactoryAware, ApplicationContextAware {
    private BeanFactory beanFactory;
    private ApplicationContext applicationContext;

    @Override
    public void setBeanFactory(BeanFactory beanFactory) throws BeansException {
        this.beanFactory = beanFactory;
        System.out.println("TestAware.setBeanFactory");
    }

    @Override
    public void setApplicationContext(ApplicationContext applicationContext) throws BeansException {
        this.applicationContext = applicationContext;
        System.out.println("TestAware.setApplicationContext");
    }
}
6
6是spring留给我们的一个扩展的口,对应的接口是BeanPostProcessor,定义了初始化前执行的方法postProcessBeforeInitailization和初始化后执行的方法postProcessAfterInitialization如下:
public interface BeanPostProcessor {
    // 1:在InitailizingBean的afterProperties方法执行之前执行
    // 2:在自定义的init方法执行之前执行
    // 3:接收的参数是bean本身以及bean的名称
	@Nullable
	default Object postProcessBeforeInitialization(Object bean, String beanName) throws BeansException {
		return bean;
	}

	// 1:在InitailizingBean的afterProperties方法执行之后执行
    // 2:在自定义的init方法执行之后执行
    // 3:接收的参数是bean本身以及bean的名称
	@Nullable
	default Object postProcessAfterInitialization(Object bean, String beanName) throws BeansException {
		return bean;
	}
}
使用BeanPostProcessor的方式也比较简单,只需要实现该接口,对前置bean处理和后置bean处理两个方法提供具体实现后,将实现类注册为spring bean就可以了,如下可能实现:
public class MyBeanPostProcessor implements BeanPostProcessor {

	@Override
	public Object postProcessBeforeInitialization(Object bean, String beanName) throws BeansException {
		System.out.println("before--实例化的bean对象:"+bean+"\t"+beanName);
		// 可以根据beanName不同执行不同的处理操作
		return bean;
	}

	@Override
	public Object postProcessAfterInitialization(Object bean, String beanName) throws BeansException {
		System.out.println("after...实例化的bean对象:"+bean+"\t"+beanName);
		// 可以根据beanName不同执行不同的处理操作
		return bean;
	}
}
7
InitializingBean也是一个扩展接口,定义了一个方法afterProperties,是在bean的属性都设置完毕后调用的方法,可以在该接口检测不可为空属性是否有值等操作,接口定义如下:
package org.springframework.beans.factory;

// 1:在所有属性设置完毕后执行
// 2:可以检测强制属性是否设置完成
// 3:可以使用自定义的init方法作为该方式的替代品
public interface InitializingBean {
	void afterPropertiesSet() throws Exception;

}
使用实例如下:
public class MyInitializingBeanTest implements InitializingBean {
    private String name;
    private int age;

    @Override
    public void afterPropertiesSet() throws Exception {
        String newName = "李四的歌";
        System.out.println("修改name属性值从 " + this.name + " -> " + newName);
        // 修改name属性的值
        this.name = newName;
    }
    ...
}
8
自定义的初始化方法,在bean标签中通过init-method设置,如下:
public class MyBeanWithInitMethod {
    private String name;

    public void changeNameProp() {
        String newName = "李四的歌";
        System.out.println("通过init-method修改name属性值从 "
                + this.name + " -> " + newName);
        this.name = newName;
    }
    ...
}

<bean class="yudaosourcecode.studyhelp.MyBeanWithInitMethod"
        id="myBeanWithInitMethod" init-method="changeNameProp">
    <property name="name" value="张三的歌"/>
</bean>
9
参考6,只不过是在InitialiBean和自定义init初始化方法执行完毕之后执行。10
使用期。11
当容器关闭时执行操作的接口规范,一般用来执行一些释放资源,收尾等操作,接口定义如下
package org.springframework.beans.factory;

// 1:当bean销毁时想要释放资源可以让bean实现该接口
// 2:可以使用自定义销毁方法作为另一个选择
public interface DisposableBean {
	void destroy() throws Exception;
}
实例如下:
public class MyLifeCycleBean implements DisposableBean {
    @Override
    public void destroy() throws Exception {
        System.out.println("DisposableBean#destroy被调用了。。。");
    }
}
12
类似于11,自定义销毁方法,如下:
public class MyLifeCycleBean {

    public void destroyMethdo(){
        System.out.println("destroy-method 被调用...");
    }
}

<bean id="lifeCycle"
      class="yudaosourcecode.studyhelp.MyLifeCycleBean"
      destroy-method="destroyMethdo"/>
1.2:spring bean生命周期完整实例
- BeanPostProcessor
public class BeanPostProcessor123 implements BeanPostProcessor {

    @Override
    public Object postProcessBeforeInitialization(Object bean, String beanName) throws BeansException {
        System.out.println("6:BeanPostProcessor#postProcessBeforeInitialization被调用了。。。");
        return bean;
    }

    @Override
    public Object postProcessAfterInitialization(Object bean, String beanName) throws BeansException {
        System.out.println("9:BeanPostProcessor#postProcessAfterInitialization被调用了。。。");
        return bean;
    }

}
- bean
public class MyLifeCycleBean implements BeanNameAware,
        BeanFactoryAware,
        ApplicationContextAware,
//        BeanClassLoaderAware,
//        BeanPostProcessor,
        InitializingBean,
        DisposableBean {
    private String test;

    @Override
    public void setApplicationContext(ApplicationContext applicationContext) throws BeansException {
        System.out.println("5:ApplicationContextAware 被调用。。。");
    }

    // 普通方法
    public void display(){
//        System.out.println("普通类实例方法调用...");
        System.out.println("10:使用中。。。");
    }

    public String getTest() {
        return test;
    }

    public void setTest(String test) {
        System.out.println("2:依赖注入");
        this.test = test;
    }

    public MyLifeCycleBean() {
        System.out.println("1:构造函数");
    }
//    @Override
//    public void setBeanClassLoader(ClassLoader classLoader) {
//        System.out.println("BeanClassLoaderAware 被调用了。。。");
//    }

    @Override
    public void setBeanFactory(BeanFactory beanFactory) throws BeansException {
        System.out.println("4:BeanFactoryAware 被调用了。。。");
    }

    @Override
    public void setBeanName(String name) {
        System.out.println("3:BeanNameAware 被调用了。。。");
    }

    @Override
    public void destroy() throws Exception {
        System.out.println("11:DisposableBean#destroy被调用了。。。");
    }

    @Override
    public void afterPropertiesSet() throws Exception {
        System.out.println("7:InitializingBean#afterPropertiesSet被调用了。。。");
    }
//
//    @Override
//    public Object postProcessBeforeInitialization(Object bean, String beanName) throws BeansException {
//        System.out.println("BeanPostProcessor#postProcessBeforeInitialization被调用了。。。");
//        return bean;
//    }
//
//    @Override
//    public Object postProcessAfterInitialization(Object bean, String beanName) throws BeansException {
//        System.out.println("BeanPostProcessor#postProcessAfterInitialization被调用了。。。");
//        return bean;
//    }

    public void initMethod(){
        System.out.println("8: init-method 被调用...");
    }

    public void destroyMethdo(){
        System.out.println("12:destroy-method 被调用...");
    }
}
- xml配置
<?xml version="1.0" encoding="UTF-8"?>
<beans xmlns="http://www.springframework.org/schema/beans" xmlns:xsi="http://www.w3.org/2001/XMLSchema-instance"
       xsi:schemaLocation="http://www.springframework.org/schema/beans
       http://www.springframework.org/schema/beans/spring-beans.xsd">

    <bean id="lifeCycle" class="yudaosourcecode.studyhelp.MyLifeCycleBean"
          init-method="initMethod" destroy-method="destroyMethdo">
        <property name="test" value="test"/>
    </bean>

    <bean class="yudaosourcecode.studyhelp.BeanPostProcessor123"/>
</beans>
- 测试
@Test
public void mylifecyclebeantest111() {
//        ClassPathResource resource
//                = new ClassPathResource("mylifecyclebeantest.xml");
//        XmlBeanFactory xbf = new XmlBeanFactory(resource);
    AbstractApplicationContext ac = new ClassPathXmlApplicationContext("mylifecyclebeantest.xml");
//        Closeable
    // 手动添加后置bean处理器
//        xbf.addBeanPostProcessor(new MyLifeCycleBean());
//        ac.addBeanPostProcessor(new BeanPostProcessor123());
//        ac.
//        MyLifeCycleBean lifeCycle
//                =
    ac.getBean("lifeCycle", MyLifeCycleBean.class).display();
//        lifeCycle.display();
    // 销毁容器
    ac.close();
}
运行:
1:构造函数
2:依赖注入
3:BeanNameAware 被调用了。。。
4:BeanFactoryAware 被调用了。。。
5:ApplicationContextAware 被调用。。。
6:BeanPostProcessor#postProcessBeforeInitialization被调用了。。。
7:InitializingBean#afterPropertiesSet被调用了。。。
8: init-method 被调用...
9:BeanPostProcessor#postProcessAfterInitialization被调用了。。。
10:使用中。。。
11:DisposableBean#destroy被调用了。。。
12:destroy-method 被调用...
对比如下图:

1.3:spring xml配置原理
这部分来看看下我们在xml配置的<bean>标签是如何解析为spring bean的,我们会定义如下的xml配置文件:
<?xml version="1.0" encoding="UTF-8"?>
<beans xmlns="http://www.springframework.org/schema/beans" xmlns:xsi="http://www.w3.org/2001/XMLSchema-instance"
       xsi:schemaLocation="http://www.springframework.org/schema/beans
       http://www.springframework.org/schema/beans/spring-beans.xsd">

    <bean id="lifeCycle" class="yudaosourcecode.studyhelp.MyLifeCycleBean"
          init-method="initMethod" destroy-method="destroyMethdo">
        <property name="test" value="test"/>
    </bean>

    <bean class="yudaosourcecode.studyhelp.BeanPostProcessor123"/>
</beans>
其中在<beans中声明的我们叫做是命名空间,然后在命名空间中就可以定义各种各样的标签,并定义了校验xml的xsd,为了解决通过互联网直接加载xsd慢,或者是加载不到的问题,定义了配置文件spring.schemas,配置了命名空间和对应的本地xsd文件的对应关系:
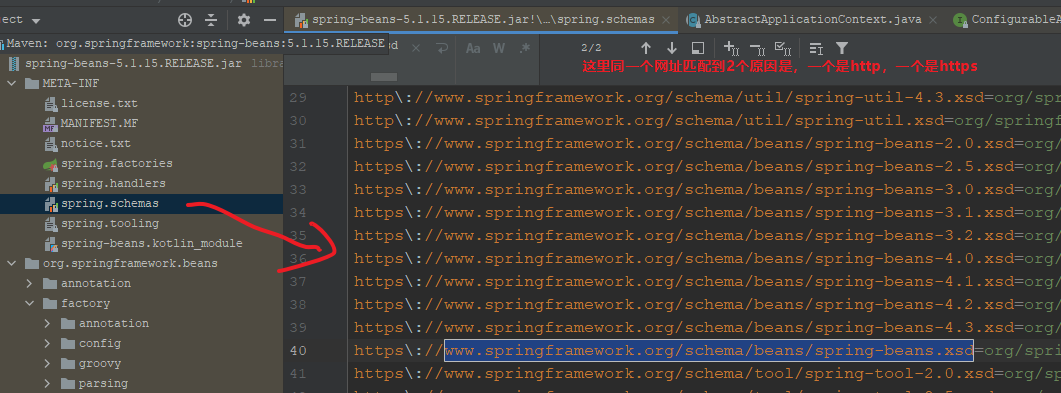
这样就可以直接从jar包中获取xsd文件了,那么标签如何解析呢?需要使用到spring.handlers,如下:

当然我们也可以自定义标签,同样也需要在spring.schemas中配置我们自己的xsd,以及并实现并配置解析对应标签的handler到spring.handles配置文件中,具体可以参考spring的自定义标签 一文。
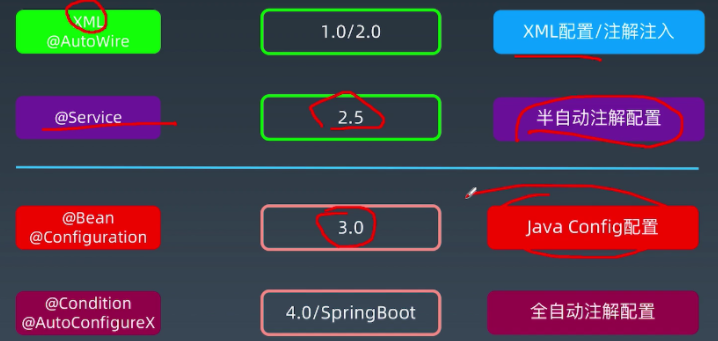
1.4:spring bean配置方式演进
1.0/2.0 XML配置bean,@Autowire注解注入bean
2.5 @Service xml配置和注解配置bean方式混用的半自动注解配置
3.0 @Bean,@Condition Javaconfig方式配置bean
4.0 @Condition,@AutoConfigureX 全自动注解配置
2:spring AOP
通过前面分析的spring bean的功能,我们已经能够灵活地定义各种对象实例,并设置其各种依赖关系了,此时假定我们现在有类似于下面这样的需求:
1:怀疑某个方法执行的慢,影响性能,但又无法直接修改源代码看其耗时
2:想要记录某一批方法的调用日志,因为方法很多,一个个改的话非常麻烦
3:程序有bug,但是程序年代久远,源程序早已经遗失,但又必须解决
该怎么做呢?在计算机领域有这样一个至理名言,计算机领域所有的问题都可以通过加一层来解决,这里的问题可以吗?可以的,我们只要在方法执行的前和后都加一层就行了,如下:
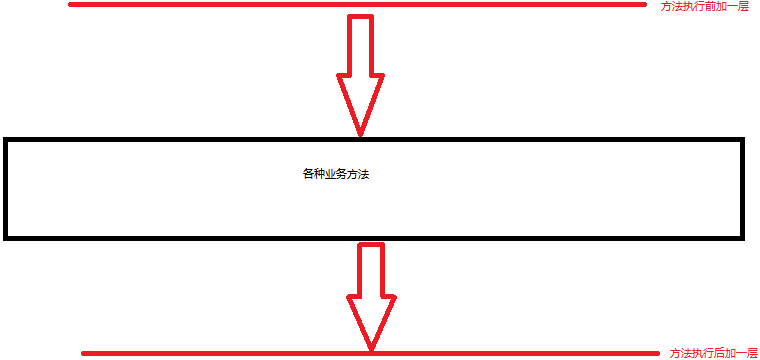
spring为了实现这个加一层的功能就提供了对应的功能实现,首先我们需要定义要对那些方法加一层,通过如下红框方式来表示:

spring给其起个一个专门的名称切点,即要切的点,要拦截的方法,这样还不够,知道要对哪些方法加一层了,但是需要做什么呢,这个时候就可以这样定义:

spring也给其起了一个专门的名称通知,其中在方法执行前执行的叫做前置通知,在方法执行后执行的叫做后置通知,所有的同志加在一起,spring也起了一个专门的名称切面。
以上这个实现加一层的功能,spring也提供了一个专门的名称,aspect oriented programming,即面向切面编程,即AOP。
写在后面
参考文章列表
Java 操作 XML(11)–XMLBeans 使用 。
spring的自定义标签 。

