1. 随笔提示文本:AutoCompleteTextView
1.1 知识点
(1)了解随笔提示功能的应用;
(2)可以使用AutoCompleteTextView类完成随笔提示功能的实现。
1.2 具体内容


这个组件就是提供了一个文本输入的功能,但是相对之前的EditText功能会更丰富一些。
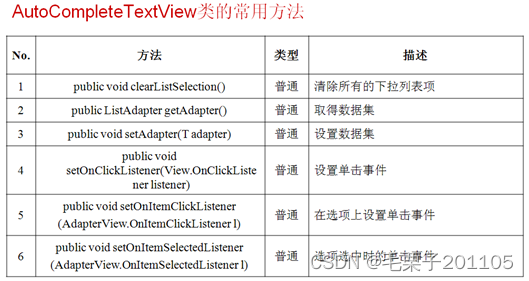
范例:
package com.example.autocompletetextview;

import android.app.Activity;
import android.os.Bundle;
import android.widget.ArrayAdapter;
import android.widget.AutoCompleteTextView;

public class AutoCompleteTextViewActivity extends Activity {
	private AutoCompleteTextView autoText = null;
	private String data[] = {"爱科技有限公司","xx理工大学","软件学院","Android实训","企业实训","中国人民"};
	private ArrayAdapter<String> adapter = null;
	@Override
	protected void onCreate(Bundle savedInstanceState) {
		super.onCreate(savedInstanceState);
		super.setContentView(R.layout.activity_auto_complete_text_view);
		this.autoText = (AutoCompleteTextView) super.findViewById(R.id.myautotext);
		//定义数据集
		adapter = new ArrayAdapter<String>(this,android.R.layout.simple_dropdown_item_1line,data);
		this.autoText.setAdapter(adapter);//设置数据集
	}
}
1.3 小结
(1)使用随笔提示功能可以很好的帮助用户进行文本信息的输入。
2. 拖动条:SeekBar
2.1 知识点
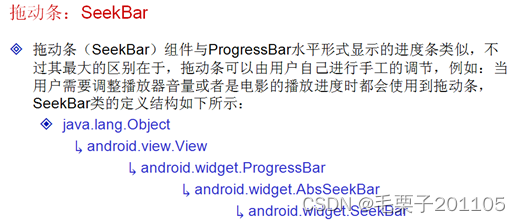
(1)掌握拖动条:SeekBar的主要作用;
(2)掌握SeekBar组件的事件处理操作;
(3)可以使用SeekBar组件控制手机的屏幕亮度;
2.2 具体内容


<LinearLayout
    xmlns:android="http://schemas.android.com/apk/res/android"
    xmlns:tools="http://schemas.android.com/tools"
    android:layout_width="match_parent"
    android:layout_height="match_parent"
    android:orientation="vertical">
	<SeekBar
	    android:id="@+id/seekbar"
	    android:layout_width="match_parent"
        android:layout_height="wrap_content"
	    />
    <TextView
        android:id="@+id/mytext"
        android:layout_width="match_parent"
        android:layout_height="wrap_content"/>
</LinearLayout>
之后就是这个拖动条在拖动的时候,在文本显示组件中显示拖动的位置。
package com.example.seekbarproject;

import android.app.Activity;
import android.os.Bundle;
import android.text.method.ScrollingMovementMethod;
import android.widget.SeekBar;
import android.widget.SeekBar.OnSeekBarChangeListener;
import android.widget.TextView;

public class SeekBarActivity extends Activity {
	private TextView text = null;
	private SeekBar seekbar = null;
	@Override
	protected void onCreate(Bundle savedInstanceState) {
		super.onCreate(savedInstanceState);
		super.setContentView(R.layout.activity_seek_bar);
		this.text = (TextView) super.findViewById(R.id.mytext);
		this.seekbar = (SeekBar) super.findViewById(R.id.seekbar);
		this.text.setMovementMethod(ScrollingMovementMethod.getInstance());//设置TextView滚动显示
		this.seekbar.setMax(100);//设置拖动的最大值
		this.seekbar.setOnSeekBarChangeListener(new OnSeekBarChangeListener() {

			/**
			 * 开始拖动
			 */
			@Override
			public void onStartTrackingTouch(SeekBar seekBar) {
				SeekBarActivity.this.text.append("开始拖动:"+ seekBar.getProgress()+"\n");
			}

			/**
			 * 拖动中
			 */
			@Override
			public void onProgressChanged(SeekBar seekBar, int progress,
					boolean fromUser) {
				SeekBarActivity.this.text.append("正在拖动:"+ seekBar.getProgress()+"\n");
			}

			/**
			 * 停止拖动
			 */
			@Override
			public void onStopTrackingTouch(SeekBar seekBar) {
				SeekBarActivity.this.text.append("停止拖动:"+ seekBar.getProgress()+"\n");
			}

		});
	}
}
那么对于我们的SeekBar来说,可以完成一些更有意义的实际操作,比如说在程序中使用拖动条进行拖动显示图片。
<LinearLayout
    xmlns:android="http://schemas.android.com/apk/res/android"
    xmlns:tools="http://schemas.android.com/tools"
    android:layout_width="match_parent"
    android:layout_height="match_parent"
    android:orientation="vertical">
    <ImageView
        android:id="@+id/img"
        android:layout_width="wrap_content"
        android:layout_height="wrap_content"
        android:layout_gravity="center_horizontal"
        android:src="@drawable/head0"/>
    <SeekBar
	    android:id="@+id/seekbar"
	    android:layout_width="match_parent"
        android:layout_height="wrap_content"
	    />
</LinearLayout>
package com.example.seekbarproject;

import android.app.Activity;
import android.os.Bundle;
import android.widget.ImageView;
import android.widget.SeekBar;
import android.widget.SeekBar.OnSeekBarChangeListener;

public class SeekBarActivity extends Activity {
	private ImageView img = null;
	private SeekBar seekbar = null;
	private int pic[] = { R.drawable.head0, R.drawable.head1, R.drawable.head2,
			R.drawable.head3, R.drawable.head4, R.drawable.head5,
			R.drawable.head6, R.drawable.head7, R.drawable.head8,
			R.drawable.head9,R.drawable.head10,R.drawable.head11};

	@Override
	protected void onCreate(Bundle savedInstanceState) {
		super.onCreate(savedInstanceState);
		super.setContentView(R.layout.activity_seek_bar);
		this.img = (ImageView) super.findViewById(R.id.img);
		this.seekbar = (SeekBar) super.findViewById(R.id.seekbar);
		this.seekbar.setMax(11);// 设置拖动的最大值
		this.seekbar.setOnSeekBarChangeListener(new OnSeekBarChangeListener() {

			/**
			 * 开始拖动
			 */
			@Override
			public void onStartTrackingTouch(SeekBar seekBar) {
			}

			/**
			 * 拖动中
			 */
			@Override
			public void onProgressChanged(SeekBar seekBar, int progress,
					boolean fromUser) {
				//再拖拽过程中修改显示的图片
				SeekBarActivity.this.img.setImageResource(SeekBarActivity.this.pic[progress]);

			}

			/**
			 * 停止拖动
			 */
			@Override
			public void onStopTrackingTouch(SeekBar seekBar) {
			}

		});
	}
}

要说的一点,对于这个程序,必须使用真机测试。
package com.example.seekbarproject;

import android.app.Activity;
import android.os.Bundle;
import android.view.WindowManager;
import android.widget.SeekBar;
import android.widget.SeekBar.OnSeekBarChangeListener;

public class SeekBarActivity extends Activity {
	private SeekBar seekbar = null;

	@Override
	protected void onCreate(Bundle savedInstanceState) {
		super.onCreate(savedInstanceState);
		super.setContentView(R.layout.activity_seek_bar);
		this.seekbar = (SeekBar) super.findViewById(R.id.seekbar);
		this.seekbar.setMax(100);// 设置拖动的最大值
		this.seekbar.setOnSeekBarChangeListener(new OnSeekBarChangeListener() {

			/**
			 * 开始拖动
			 */
			@Override
			public void onStartTrackingTouch(SeekBar seekBar) {
			}
			/**
			 * 拖动中
			 */
			@Override
			public void onProgressChanged(SeekBar seekBar, int progress,
					boolean fromUser) {
				//再拖拽过程中修改屏幕亮度
				SeekBarActivity.this.setScreenBrightness(progress);
			}
			/**
			 * 停止拖动
			 */
			@Override
			public void onStopTrackingTouch(SeekBar seekBar) {
			}

		});
	}
	private void setScreenBrightness(int num){
		WindowManager.LayoutParams layoutParams = getWindow().getAttributes();//取得Window属性
		layoutParams.screenBrightness = (float) (num/100.0);//改变属性值
		super.getWindow().setAttributes(layoutParams);//设置属性
	}
}
2.3 小结
(1)使用SeekBar组件可以进行拖动条的操作;
(2)通过WindowManager.LayoutParams可以进行屏幕亮度的调节;
3. 信息提示框:Toast
3.1 知识点
(1)掌握Toast信息提示框的基本使用方法;
(2)可以控制Toast信息提示框的显示内容及位置改变。
3.2 具体内容

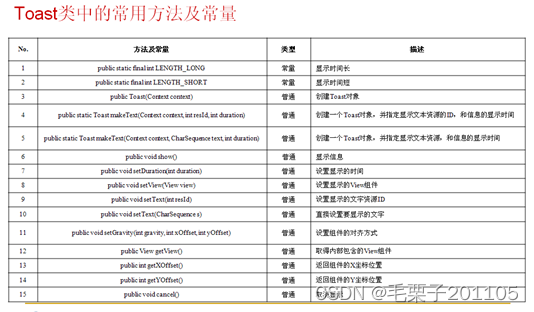
Toast是一个简短的信息提示框,可以在一定的时间内显示信息,而后会自动的隐藏。
<LinearLayout
    xmlns:android="http://schemas.android.com/apk/res/android"
    xmlns:tools="http://schemas.android.com/tools"
    android:layout_width="match_parent"
    android:layout_height="match_parent"
    android:orientation="vertical" >

    <Button
        android:id="@+id/longshow"
        android:layout_width="match_parent"
        android:layout_height="wrap_content"
        android:text="长时间显示信息提示框" />
    <Button
        android:id="@+id/shortshow"
        android:layout_width="match_parent"
        android:layout_height="wrap_content"
        android:text="短时间显示信息提示框" />

</LinearLayout>
package com.example.toastproject;

import android.app.Activity;
import android.os.Bundle;
import android.view.View;
import android.view.View.OnClickListener;
import android.widget.Button;
import android.widget.Toast;

public class ToastActivity extends Activity {
	private Button longBut = null;
	private Button shortBut = null;
	@Override
	protected void onCreate(Bundle savedInstanceState) {
		super.onCreate(savedInstanceState);
		super.setContentView(R.layout.activity_toast);
		this.longBut = (Button) super.findViewById(R.id.longshow);
		this.shortBut = (Button) super.findViewById(R.id.shortshow);
		this.longBut.setOnClickListener(new OnClickListenerLongImpl());
		this.shortBut.setOnClickListener(new OnClickListenerShortImpl());
	}
	class OnClickListenerLongImpl implements OnClickListener{
		@Override
		public void onClick(View v) {
			//显示信息提示框
			Toast.makeText(ToastActivity.this, "长时间显示的信息", Toast.LENGTH_LONG).show();
		}
	}
	class OnClickListenerShortImpl implements OnClickListener{
		@Override
		public void onClick(View v) {
			Toast.makeText(ToastActivity.this, "短时间显示的信息", Toast.LENGTH_SHORT).show();
		}
	}
}
在默认情况下,所有的信息提示都是在屏幕的底部居中显示,现在可以进行修改,第一是修改显示的位置,第二是修改显示内容。
<LinearLayout
    xmlns:android="http://schemas.android.com/apk/res/android"
    xmlns:tools="http://schemas.android.com/tools"
    android:layout_width="match_parent"
    android:layout_height="match_parent"
    android:orientation="vertical" >

    <Button
        android:id="@+id/longshow"
        android:layout_width="match_parent"
        android:layout_height="wrap_content"
        android:text="自定义的信息提示" />

</LinearLayout>
package com.example.toastproject;

import android.app.Activity;
import android.os.Bundle;
import android.view.Gravity;
import android.view.View;
import android.view.View.OnClickListener;
import android.widget.Button;
import android.widget.ImageView;
import android.widget.LinearLayout;
import android.widget.Toast;

public class ToastActivity extends Activity {
	private Button longBut = null;
	@Override
	protected void onCreate(Bundle savedInstanceState) {
		super.onCreate(savedInstanceState);
		super.setContentView(R.layout.activity_toast);
		this.longBut = (Button) super.findViewById(R.id.longshow);
		this.longBut.setOnClickListener(new OnClickListenerLongImpl());
	}
	class OnClickListenerLongImpl implements OnClickListener{
		@Override
		public void onClick(View v) {
			//显示信息提示框
			Toast toast = Toast.makeText(ToastActivity.this, "爱科技有限公司", Toast.LENGTH_LONG);
			toast.setGravity(Gravity.CENTER, 60, 10);//设置对其方式
			//往信息提示框添加图片
			LinearLayout myToastView = (LinearLayout)toast.getView();
			ImageView img = new ImageView(ToastActivity.this);
			img.setImageResource(R.drawable.logo);
			myToastView.addView(img,0);//添加图片,表示图片在文字的上方
			toast.show();
		}
	}
}
3.3 小结
(1)Toast组件一般都用于进行信息操作提示;
(2)Toast也可以自定义显示内容,但是一般不会使用。
4. 图片切换:ImageSwitcher
4.1 知识点
(1)掌握ImageSwitcher和ViewFactory的使用;
(2)了解Animation的基本使用。
4.2 具体内容
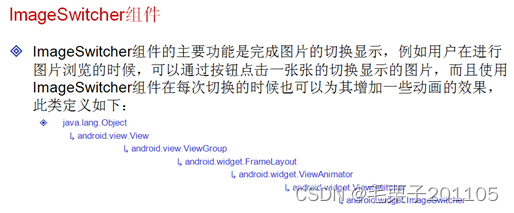
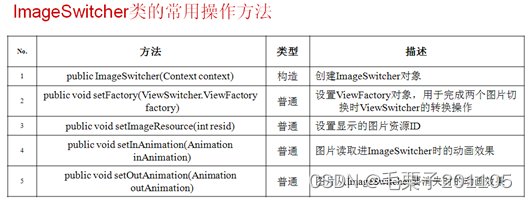
如果说想要完成图片切换的操作,关键的问题就在于ViewFactory工厂的实用上。此接口有一个方法:public abstract View makeView ()
这个方法返回值是一个View,下面我们通过一段程序来观察。
<LinearLayout xmlns:android="http://schemas.android.com/apk/res/android"
    xmlns:tools="http://schemas.android.com/tools"
    android:layout_width="match_parent"
    android:layout_height="match_parent"
    android:orientation="vertical" >

    <ImageSwitcher
        android:id="@+id/myImageSwitcher"
        android:layout_width="wrap_content"
        android:layout_height="wrap_content"
        android:layout_gravity="center_horizontal" />

    <LinearLayout
        android:layout_width="wrap_content"
        android:layout_height="wrap_content"
        android:orientation="horizontal" >
        <Button
            android:id="@+id/upImg"
            android:layout_width="wrap_content"
            android:layout_height="wrap_content"
            android:text="上一张图片" />
        <Button
            android:id="@+id/nextImg"
            android:layout_width="wrap_content"
            android:layout_height="wrap_content"
            android:text="下一张图片" />
    </LinearLayout>

</LinearLayout>
package com.example.imageswitcherproject;

import android.app.Activity;
import android.os.Bundle;
import android.view.View;
import android.view.View.OnClickListener;
import android.view.ViewGroup.LayoutParams;
import android.widget.Button;
import android.widget.ImageSwitcher;
import android.widget.ImageView;
import android.widget.ViewSwitcher.ViewFactory;

public class ImageSwitcherActivity extends Activity {
	private ImageSwitcher myImageSwitcher = null;
	private Button upBut = null;
	private Button nextBut = null;
	private int imgData[] = {R.drawable.head0,R.drawable.head1,R.drawable.head2,
			R.drawable.head3,R.drawable.head4,R.drawable.head5,
			R.drawable.head6,R.drawable.head7,R.drawable.head8,
			R.drawable.head9,R.drawable.head10,R.drawable.head11,};
	private int imageCurrent = 0;
	@Override
	protected void onCreate(Bundle savedInstanceState) {
		super.onCreate(savedInstanceState);
		super.setContentView(R.layout.activity_image_switcher);
		this.myImageSwitcher = (ImageSwitcher) super.findViewById(R.id.myImageSwitcher);
		this.upBut = (Button) super.findViewById(R.id.upImg);
		this.nextBut = (Button) super.findViewById(R.id.nextImg);
		this.checkButtonEnable();
		this.myImageSwitcher.setFactory(new ViewFactoryimpl());
		this.myImageSwitcher.setImageResource(imgData[imageCurrent]);
		this.upBut.setOnClickListener(new OnClickListener(){
			@Override
			public void onClick(View v) {
				// TODO Auto-generated method stub
				ImageSwitcherActivity.this.myImageSwitcher.setImageResource(ImageSwitcherActivity.this.imgData[--imageCurrent]);
				ImageSwitcherActivity.this.checkButtonEnable();
			}

		});
		this.nextBut.setOnClickListener(new OnClickListener(){
			@Override
			public void onClick(View v) {
				ImageSwitcherActivity.this.myImageSwitcher.setImageResource(ImageSwitcherActivity.this.imgData[++imageCurrent]);
				ImageSwitcherActivity.this.checkButtonEnable();
			}
		});
	}
	private void checkButtonEnable(){
		this.upBut.setEnabled(true);//设置按钮可用
		this.nextBut.setEnabled(true);
		if(imageCurrent==0){
			this.upBut.setEnabled(false);//设置按钮不可用
		}else if(imageCurrent == imgData.length-1){
			this.nextBut.setEnabled(false);//设置按钮不可用
		}
	}
	class ViewFactoryimpl implements ViewFactory{
		@Override
		public View makeView() {
			ImageView img = new ImageView(ImageSwitcherActivity.this);
			img.setScaleType(ImageView.ScaleType.CENTER);//设置居中显示
			img.setLayoutParams(new ImageSwitcher.LayoutParams(LayoutParams.WRAP_CONTENT,LayoutParams.WRAP_CONTENT));//设置布局参数
			return img;
		}

	}

}
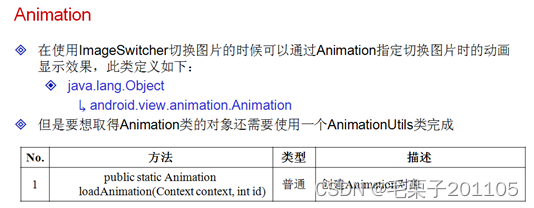
程序能够正常的运行,而且进行按钮的设置,就差动画效果。

<LinearLayout xmlns:android="http://schemas.android.com/apk/res/android"
    xmlns:tools="http://schemas.android.com/tools"
    android:layout_width="match_parent"
    android:layout_height="match_parent"
    android:orientation="vertical" >
    <ImageSwitcher
        android:id="@+id/myImageSwitcher"
        android:layout_width="wrap_content"
        android:layout_height="wrap_content"
        android:layout_gravity="center_horizontal"
        android:inAnimation="@android:anim/slide_in_left"
        android:outAnimation="@android:anim/slide_out_right"/>
    <LinearLayout
        android:layout_width="wrap_content"
        android:layout_height="wrap_content"
        android:orientation="horizontal"
        android:layout_gravity="center_horizontal" >
        <Button
            android:id="@+id/upImg"
            android:layout_width="wrap_content"
            android:layout_height="wrap_content"
            android:text="上一张图片" />
        <Button
            android:id="@+id/nextImg"
            android:layout_width="wrap_content"
            android:layout_height="wrap_content"
            android:text="下一张图片" />
    </LinearLayout>
</LinearLayout>
this.myImageSwitcher.setFactory(new ViewFactoryimpl());
		this.myImageSwitcher.setImageResource(imgData[imageCurrent]);
		this.myImageSwitcher.setAnimation( AnimationUtils.loadAnimation(this, android.R.anim.fade_in));//图片进入时的动画效果
		this.myImageSwitcher.setAnimation( AnimationUtils.loadAnimation(this, android.R.anim.fade_out));//图片出来时的动画效果
对于图片切换,关键的还是在于ViewFactory工厂的设置上,如果说不使用工厂的话,肯定会报错。
4.3 小结
(1)使用ImageSwitcher和ViewFactory可以实现图片的切换显示;
(2)用户可以使用Animation进行切换时的动画显示。

