前言
Moveit的robot_moveit_config包里有很多文件,在配置时容易搞不清关系,导致配置过程艰难、漫长。
同时互联网上的文档几乎没有详细介绍这部分配置包的,大神各有各的配法,比较混乱。
因此笔者整理了配置包内各个重要的文件,并梳理出了作用和调用的流程框架,希望对后来人有所帮助。
作者:Herman Ye @Auromix
Auromix是一个机器人爱好者组织,欢迎参与我们Github上的开源项目
框架
框架正在制作中…
配置包的文件解析
切片解析1: demo.launch
文件名为robot_moveit_config/launch/demo.launch,是Moveit的经典demo,在RViz中显示机器人模型并通过RViz的MotionPlanning插件来控制Moveit完成运动规划和轨迹控制。
以下为Moveit官方案例的panda_moveit_config/launch/demo.launch完整代码:
<launch>
  <arg name="arm_id" default="panda" />
  <!-- specify the planning pipeline -->
  <arg name="pipeline" default="ompl" />

  <!-- By default, we do not start a database (it can be large) -->
  <arg name="db" default="false" />
  <!-- Allow user to specify database location -->
  <arg name="db_path" default="$(find panda_moveit_config)/default_warehouse_mongo_db" />

  <!-- By default, we are not in debug mode -->
  <arg name="debug" default="false" />

  <!-- By default we will load the gripper -->
  <arg name="load_gripper" default="true" />

  <!-- By default, we will load or override the robot_description -->
  <arg name="load_robot_description" default="true"/>

  <!-- Choose controller manager: fake, simple, or ros_control -->
  <arg name="moveit_controller_manager" default="fake" />
  <!-- Set execution mode for fake execution controllers -->
  <arg name="fake_execution_type" default="interpolate" />
  <!-- Transmission used for joint control: position, velocity, or effort -->
  <arg name="transmission" />

  <!-- By default, hide joint_state_publisher's GUI in 'fake' controller_manager mode -->
  <arg name="use_gui" default="false" />
  <arg name="use_rviz" default="true" />
  <!-- Use rviz config for MoveIt tutorial -->
  <arg name="rviz_tutorial" default="false" />

  <!-- If needed, broadcast static tf for robot root -->
  <node pkg="tf2_ros" type="static_transform_publisher" name="virtual_joint_broadcaster_0" args="0 0 0 0 0 0 world $(arg arm_id)_link0" />


  <group if="$(eval arg('moveit_controller_manager') == 'fake')">
    <!-- We do not have a real robot connected, so publish fake joint states via a joint_state_publisher
         MoveIt's fake controller's joint states are considered via the 'source_list' parameter -->
    <node name="joint_state_publisher" pkg="joint_state_publisher" type="joint_state_publisher" unless="$(arg use_gui)">
      <rosparam param="source_list">[move_group/fake_controller_joint_states]</rosparam>
    </node>
    <!-- If desired, a GUI version is available allowing to move the simulated robot around manually
         This corresponds to moving around the real robot without the use of MoveIt. -->
    <node name="joint_state_publisher" pkg="joint_state_publisher_gui" type="joint_state_publisher_gui" if="$(arg use_gui)">
      <rosparam param="source_list">[move_group/fake_controller_joint_states]</rosparam>
    </node>

    <!-- Given the published joint states, publish tf for the robot links -->
    <node name="robot_state_publisher" pkg="robot_state_publisher" type="robot_state_publisher" respawn="true" output="screen" />
  </group>

  <!-- Run the main MoveIt executable without trajectory execution (we do not have controllers configured by default) -->
  <include file="$(dirname)/move_group.launch" pass_all_args="true">
    <arg name="allow_trajectory_execution" value="true" />
    <arg name="info" value="true" />
  </include>

  <!-- Run Rviz and load the default config to see the state of the move_group node -->
  <include file="$(dirname)/moveit_rviz.launch" if="$(arg use_rviz)">
    <arg name="rviz_tutorial" value="$(arg rviz_tutorial)"/>
    <arg name="rviz_config" value="$(dirname)/moveit.rviz"/>
    <arg name="debug" value="$(arg debug)"/>
  </include>

  <!-- If database loading was enabled, start mongodb as well -->
  <include file="$(dirname)/default_warehouse_db.launch" if="$(arg db)">
    <arg name="moveit_warehouse_database_path" value="$(arg db_path)"/>
  </include>

</launch>
对于代码中的各个部分,有以下解析:
arm_id
  <arg name="arm_id" default="panda" />
  # 机器人的标识符。这个参数指定在机器人有多个实现时使用哪一个。
  # 当多机器人协同时,标识符可以用来区分它们。默认值设置为“panda”
pipeline
  <arg name="pipeline" default="ompl" />
  # 机器人运动规划的管道。
  # MoveIt提供了几种规划算法,例如OMPL、SBPL等。此参数允许用户选择使用哪种算法进行运动规划。默认值为“ompl”。
关于OMPL(Open Motion Planning Library)算法,可参考OMPL官方文档、OMPL Primer
db&db_path
  <!-- By default, we do not start a database (it can be large) -->
  <arg name="db" default="false" />
  <!-- Allow user to specify database location -->
  <arg name="db_path" default="$(find panda_moveit_config)/default_warehouse_mongo_db" />
  # db:指定是否启动运动规划数据库。
  # 如果设为true,MoveIt会启动MongoDB数据库来存储或检索运动规划数据。默认值为false。
  # db_path:指定运动规划数据库的路径。
  # 这个参数允许用户指定MongoDB数据库的位置。默认值设置为“$(find panda_moveit_config)/default_warehouse_mongo_db”。
运动规划数据通常是指用于机器人或移动设备规划运动路径的数据,例如,目标位置、机器人当前位置、避障信息等。
在MoveIt中,Warehouse的作用是提供持久化的存储方式,以保存完整的计划场景和机器人状态。通过使用适当的存储插件(如warehouse_ros_mongo或warehouse_ros_sqlite),用户可以将场景和状态保存到MongoDB或SQLite等不同的后端数据库中。这使得用户可以在不同的时间和地点重新加载和使用保存的场景和状态。
除了提供持久化存储的功能之外,Warehouse还可以用于数据查询、过滤和排序。通过使用MoveIt提供的接口,用户可以方便地从Warehouse中检索和获取他们所需要的场景和状态。这对于机器人操作中的实时计划和决策非常有用,因为它可以快速地检索到特定的场景和状态,而无需每次都重新计算或重新生成它们。
MongoDB是一个流行的文档式(NoSQL)数据库,它以二进制JSON格式存储数据。与传统的关系型数据库不同,MongoDB的结构灵活,适合存储半结构化数据或任意类型的文档。
关于在Moveit中使用数据库来存储和调用运动规划数据,可参考Moveit1 Warehouse MangoDB
debug
  <!-- By default, we are not in debug mode -->
  <arg name="debug" default="false" />
  # debug:指定是否启用RViz调试模式。如果设为true,则启用RViz中的调试模式。默认为false。
  # 该参数也会被传递给move_group.launch,用于开启move_group的GDB调试。
RViz debug mode可以帮助开发人员诊断和解决问题。在调试模式下,Rviz可以显示更多的调试信息,例如ROS消息的内容和接收频率,帧率信息,以及RViz可视化中使用的资源和内存使用情况等。
这些信息可以帮助开发人员快速定位和解决问题,例如调试节点之间的通信问题、可视化资源的使用情况等。同时,调试模式还可以显式地显示Rviz中各种可视化元素的名称,标签和坐标信息, 以便更好的理解和调整要素的位置动态。
load_gripper
  <!-- By default we will load the gripper -->
  <arg name="load_gripper" default="true" />
  # load_gripper:指定是否加载机器人夹爪的控制器。此参数用于加载和配置夹爪的运动控制器。默认值为true。
  # 该参数将通过 pass_all_args="true" 属性被传递给move_group.launch
load_robot_description
  <!-- By default, we will load or override the robot_description -->
  <arg name="load_robot_description" default="true"/>
  # 指定是否加载或覆盖机器人描述。MoveIt需要知道机器人的描述才能进行规划和控制。
  # 这个参数用于加载机器人的URDF文件或覆盖已有的机器人描述。默认值为true。
  # 该参数将通过 pass_all_args="true" 属性被传递给move_group.launch
load_robot_description将机器人的描述文件(通常为urdf或sdf格式)加载到ROS参数服务器中。如果load_robot_description参数为true,则会加载或覆盖先前设置的机器人描述文件。如果为false,则使用先前加载的机器人描述文件。
在move_group中robot_description的发布通过robot_state_publisher节点来实现。该节点从参数服务器中获取机器人的描述信息,计算机器人每个联动部件的变换,并发布机器人的tf树和关节状态信息。 move_group节点接收tf和关节状态信息,用于运动规划和执行。
moveit_controller_manager
  <!-- Choose controller manager: fake, simple, or ros_control -->
  <arg name="moveit_controller_manager" default="fake" />
  # moveit_controller_manager:选择控制器管理器的类型。
  # 控制器管理器用于加载和配置机器人的控制器。
  # MoveIt提供了几种类型的控制器管理器,包括“fake”,“simple”和“ros_control”。默认值为“fake”。
MoveIt提供的控制器管理器包括以下三种类型:
-
fake: 这种类型的控制器仅模拟运动,不与真实机器人进行通信。它通常用于快速测试和演示,对于仿真,通常使用fake控制器来模拟运动。 -
simple: 这种类型的控制器与机器人进行通信,但仅提供了基本控制,例如直线/圆弧插值等。它适用于一些较简单的机器人。 -
ros_control: 这是一种更灵活的控制器类型,可支持各种机器人和控制器硬件。它提供了更高级别的控制接口,例如电机控制器接口和传感器读取接口。
根据应用场景和机器人的要求,使用不同类型的控制器管理器。
ros_control是机器人强大的控制器,可参考ros_control WIKI文档和ros_control源代码
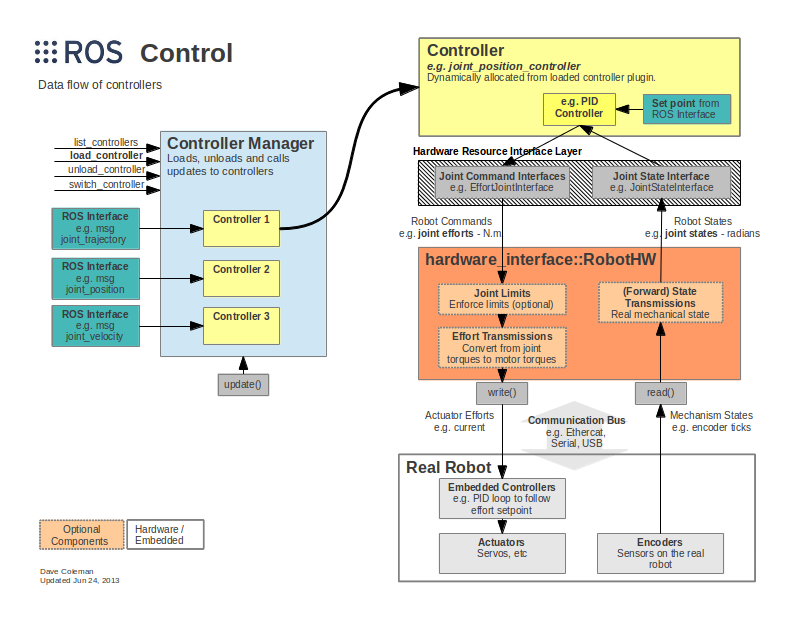
图片来源:ROS WIKI ros_control
fake_execution_type
  <!-- Set execution mode for fake execution controllers -->
  <arg name="fake_execution_type" default="interpolate" />
  # fake_execution_type:设置虚拟控制器的执行模式。
  # 如果选择“fake”控制器管理器,则使用虚拟控制器进行模拟运动。
  # 此参数指定用于虚拟运动的执行模式,包括“interpolate”和“step”。默认值为“interpolate”。
在Moveit官方文档中有关于fake controller的描述,可参考Moveit1 Noetic官方文档
MoveIt提供了一系列虚拟轨迹控制器,可用于模拟。其中,虚拟控制器的配置文件位于 config/fake_controllers.yaml 。
可以根据需要调整以下控制器类型:
interpolate: 在经过关键点时执行平稳插补,默认用于可视化。via points: 遍历关键点,但不插补它们之间的点,用于可视化调试。last point: 直接跳转到轨迹的最后一个点,用于离线基准测试。
虚拟控制器类型信息可在 fake_controllers.yaml 文件中配置。对于每个控制器,都需要指定名称、类型和涉及的关节。其中,频率为 rate: 10,可用于插补控制器。但在对夹爪进行控制时,关节为空列表 []。
示例:
rate: 10
controller_list:
  - name: fake_arm_controller
    type: interpolate
    joints:
      - joint_1
      - joint_2
      - joint_3
      - joint_4
      - joint_5
      - joint_6
  - name: fake_gripper_controller
    joints:
      []
transmission
  <!-- Transmission used for joint control: position, velocity, or effort -->
  <arg name="transmission" />
  # 设置用于关节控制的传输类型。这个参数用来选择传输类型,例如position、velocity或effort。
  # 默认情况下,这个参数未设置,不用理会。
use_gui
  <!-- By default, hide joint_state_publisher's GUI in 'fake' controller_manager mode -->
  <arg name="use_gui" default="false" />

  # use_gui:指定是否显示joint_state_publisher的GUI界面。
  # 如果设为true,则会在启动期间打开一个窗口,显示机器人的关节姿态。默认值为false。
在MoveIt的demo.launch中,设置了一个默认的假控制器管理器(fake controller manager)模式,这意味着没有实际的控制器与机械臂连接。
在这种模式下,joint_state_publisher发布的关节状态信息是通过fake_controller_joint_states话题获得,隐藏其图形用户界面(GUI)可以避免用户误操作。因此,默认情况下隐藏joint_state_publisher的GUI可以增加系统的可靠性。
use_rviz
  <arg name="use_rviz" default="true" />
  # use_rviz:指定是否启用RViz。如果此参数设为true,则MoveIt将启动RViz进行可视化。默认值为true。
  <!-- Use rviz config for MoveIt tutorial -->
  <arg name="rviz_tutorial" default="false" />
  # rviz_tutorial:指定是否使用RViz配置进行MoveIt教程演示。
  # 如果设为true,则MoveIt将加载RViz演示配置。默认值为false。
虚拟关节静态TF节点
  <!-- If needed, broadcast static tf for robot root -->
  <node pkg="tf2_ros" type="static_transform_publisher" name="virtual_joint_broadcaster_0" args="0 0 0 0 0 0 world $(arg arm_id)_link0" />
  # 广播虚拟关节的静态变换
  # 将world坐标系映射到机器人的物理坐标系中的起点$(arg arm_id)_link0
通过使用虚拟关节,引入一个虚拟的“基准”点,来描述机器人在其环境中的位置,可以将机器人的关节状态映射到物理世界中的位置和姿态,以便进行逆运动学计算,规划器可以使用这些信息来规划运动轨迹或生成机器人姿态。
关节状态及机器人整体状态
  <group if="$(eval arg('moveit_controller_manager') == 'fake')">
    <!-- We do not have a real robot connected, so publish fake joint states via a joint_state_publisher
         MoveIt's fake controller's joint states are considered via the 'source_list' parameter -->
    <node name="joint_state_publisher" pkg="joint_state_publisher" type="joint_state_publisher" unless="$(arg use_gui)">
      <rosparam param="source_list">[move_group/fake_controller_joint_states]</rosparam>
    </node>
    <!-- If desired, a GUI version is available allowing to move the simulated robot around manually
         This corresponds to moving around the real robot without the use of MoveIt. -->
    <node name="joint_state_publisher" pkg="joint_state_publisher_gui" type="joint_state_publisher_gui" if="$(arg use_gui)">
      <rosparam param="source_list">[move_group/fake_controller_joint_states]</rosparam>
    </node>

    <!-- Given the published joint states, publish tf for the robot links -->
    <node name="robot_state_publisher" pkg="robot_state_publisher" type="robot_state_publisher" respawn="true" output="screen" />
  </group>
 # 如果moveit_controller_manager的类型是fake
 # 则启动joint_state_publisher和robot_state_publisher
 # 默认不启用joint_state_publisher_gui,以防用户在图形化窗口不小心调节了关节状态值
roslaunch xml
如果不熟悉这个代码片段里用到的ROS1 launch XML语言,可参考ROS1 Launch文档
group的作用
这一个节点组group的作用是当Moveit的控制器管理器被设为fake类型时,该节点组会发布虚拟的机器人的关节状态/joint_states,然后通过机器人状态发布器发布虚拟机器人的/tf话题,以便在 RViz 订阅该/tf话题并在RViz中显示虚拟机器人的状态。
在这个group中,与robot_state_publisher一起使用的还有joint_state_publisher节点,它用于模拟发布关节状态信息。joint_state_publisher会定期发布sensor_msgs/JointState类型的/joint_states话题,其中包含机器人各个关节的状态信息。robot_state_publisher会订阅这些消息,并根据机器人的URDF模型计算机器人各个部件的位姿信息,并发布/tf话题,最终完成机器人状态的更新和发布。
图解各节点关系
由rqt_graph可知在这个demo中的各个节点及话题关系:
/move_group节点发布/move_group/fake_controller_joint_states话题/joint_state_publisher节点订阅/move_group/fake_controller_joint_states话题/joint_state_publisher节点发布/joint_state话题/robot_state_publisher节点订阅/joint_state话题/robot_state_publisher节点发布/tf话题- 虚拟关节静态TF节点发布
/tf话题 /move_group订阅/tf话题,类型为- RViz订阅
/tf话题

joint_state_publisher
Joint State Publisher是一个 ROS 包,用于发布机器人非固定关节的关节状态/joint_states, 话题类型为sensor_msgs/JointState 。
在读取机器人的URDF 描述 robot_description 参数后,它会识别所有非固定关节,创建具有这些非固定关节的 JointState 消息,来设置和发布机器人关节状态值joint state values。
它可以与 robot_state_publisher 一起使用,以发布所有关节状态的变换。
joint_state_publisher的输入
joint_state_publisher订阅来自参数服务器的robot_description,找到机器人描述中的所有非固定关节,并发布带有这些关节状态值的sensor_msgs/JointState类型消息。
joint_state_publisher可将source_list作为输入,这是一个带有多个话题名的字符串列表,默认为空,将需要订阅的各个话题名填入其中,这些要订阅的话题是关于关节状态值的,话题类型也为sensor_msgs/JointState
在GUI模式下,joint_state_publisher_gui能够接收来自joint_state_publisher_gui图形化窗口工具的直接关节状态值(比如角度),这个状态值由用户拖动角度条来赋予。
在这个Moveit的案例中,/joint_state_publisher节点订阅了来自/move_group的/move_group/fake_controller_joint_states话题,source_list参数的内容为[move_group/fake_controller_joint_states]
joint_state_publisher的输出
joint_state_publisher节点发布包含机器人关节name,位置position,速度velocity和力度级别effort等的/joint_states话题,话题类型为sensor_msgs/JointState
robot_state_publisher
Robot State Publisher是一个ROS包,负责发布机器人整体运动学链的状态信息,包括关节和链路名称、父子关系以及每个链路的位置和方向等信息。该包对于在 RViz 或其他可视化工具中可视化机器人姿态至关重要。
它利用参数服务器中的robot_description 参数指定的通用机器人描述格式(URDF)和来自 /joint_states 话题,话题类型为sensor_msgs/msg/JointState的关节状态值组,来计算机器人的正向运动学,并发布/tf话题。
robot_state_publisher的输入
robot_state_publisher在启动时会从参数服务器中的robot_description 加载机器人的运动学树模型URDF,可以通过启动文件传递robot_description参数,其值为机器人的URDF描述字符串。
同时,robot_state_publisher要订阅joint_states话题,获取每个关节的状态值信息。
这些关节状态信息joint states用于更新运动学树模型,进而计算出机器人各个杆件Link的3D位姿信息Pose
robot_state_publisher的输出
对于固定关节,robot_state_publisher将发布/tf_static话题,类型为tf2_msgs/msg/TFMessage
对于可动关节,robot_state_publisher发布/tf话题,类型为tf2_msgs/msg/TFMessage
固定关节的位姿信息会在节点启动时发布到/tf_static话题,这些信息将在历史记录中保存。而可动关节的位姿信息会在/joint_states话题接收到相应关节状态的更新时,及时发布到/tf话题中。
关于具体的使用例子,可以查看Gihub robot_state_publisher
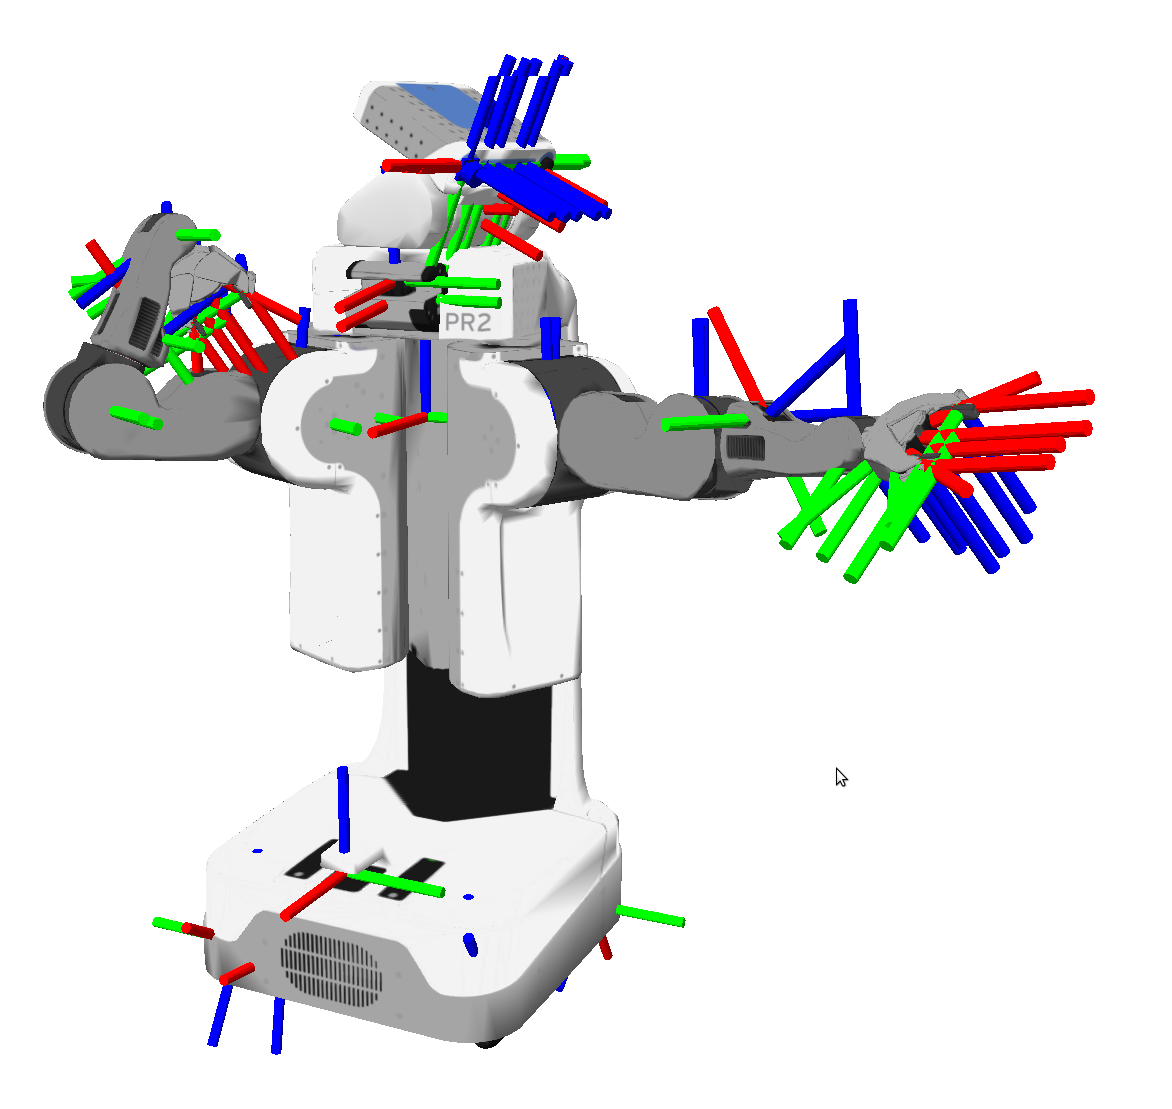
图片来源:ROS WIKI robot_state_publisher
加载move_group
  <!-- Run the main MoveIt executable without trajectory execution (we do not have controllers configured by default) -->
  <include file="$(dirname)/move_group.launch" pass_all_args="true">
    <arg name="allow_trajectory_execution" value="true" />
    <arg name="info" value="true" />
  </include>
  # 启动move_group.launch来加载move_group相关内容
  # 通过pass_all_args="true" 将demo.launch文件的所有arg参数传递给move_group.launch作为参数
  # 设置 allow_trajectory_execution 为 true,
  # 可以让 move_group 在运行过程中尝试让机器人执行这些预定义的轨迹
  # 但如果该参数设置为 false,则只会规划但不会执行规划的轨迹,机器人将保持静止
  # 此功能对于测试和调试非常有用,因为它允许操纵轨迹,而无需在机器人上实际执行它们
  # 它在关注安全的情况下也很有用,因为它提供了一种防止意外执行危险轨迹的方法
  # 如果将 info 设置为 true,则 move_group 会在控制台输出调试信息
pass_all_args="true"是将所有的Father Launch传入的参数都传递给Child Launch的一个属性。
在MoveIt的demo.launch文件中,pass_all_args="true"被用于将Father Launch的所有arg参数传递给Child Launch,这意味着,Child Launch可以获取到来自Father Launch的所有参数,并继承它们。
在这个案例中,也就是将demo.launch的所有arg内参传递给move_group.launch。
注意,如果不设置pass_all_args="true",Child Launch将只接收在include标记中明确列举的参数。只传递include标记中明确列举的参数有助于在Launch嵌套时控制参数不发生混乱。
加载RViz
  <!-- Run Rviz and load the default config to see the state of the move_group node -->
  <include file="$(dirname)/moveit_rviz.launch" if="$(arg use_rviz)">
    <arg name="rviz_tutorial" value="$(arg rviz_tutorial)"/>
    <arg name="rviz_config" value="$(dirname)/moveit.rviz"/>
    <arg name="debug" value="$(arg debug)"/>
  </include>
  # 当use_rviz=true时运行moveit_rviz.launch文件
  # 并传递参数rviz_tutorial用于选择是否使用Moveit RViz教学模式
  # rviz_config的值用于打开同目录下的/moveit.rviz配置文件
  # debug的值用来设置是否开启RViz的debug模式
加载数据库
  <!-- If database loading was enabled, start mongodb as well -->
  <include file="$(dirname)/default_warehouse_db.launch" if="$(arg db)">
    <arg name="moveit_warehouse_database_path" value="$(arg db_path)"/>
  </include>
  # 当参数db=true时,运行default_warehouse_db.launch
  # 向default_warehouse_db.launch传入参数moveit_warehouse_database_path,参数值为该数据库的路径
切片解析2: move_group.launch
文件名为robot_moveit_config/launch/move_group.launch,用于启动move_group节点和相关的功能,它在panda_moveit_config/launch/demo.launch中作为Child Launch文件被启动。
以下为Moveit官方案例的panda_moveit_config/launch/move_group.launch完整代码:
<launch>

  <!-- GDB Debug Option -->
  <arg name="debug" default="false" />
  <arg unless="$(arg debug)" name="launch_prefix" value="" />
  <arg     if="$(arg debug)" name="launch_prefix"
           value="gdb -x $(dirname)/gdb_settings.gdb --ex run --args" />

  <!-- Verbose Mode Option -->
  <arg name="info" default="$(arg debug)" />
  <arg unless="$(arg info)" name="command_args" value="" />
  <arg     if="$(arg info)" name="command_args" value="--debug" />

  <!-- move_group settings -->
  <arg name="pipeline" default="ompl" />
  <arg name="allow_trajectory_execution" default="true"/>
  <arg name="moveit_controller_manager" default="simple" />
  <arg name="fake_execution_type" default="interpolate"/>
  <arg name="max_safe_path_cost" default="1"/>
  <arg name="publish_monitored_planning_scene" default="true"/>

  <arg name="capabilities" default=""/>
  <arg name="disable_capabilities" default=""/>

  <!--Other settings-->
  <arg name="load_gripper" default="true" />
  <arg name="transmission" default="effort" />
  <arg name="arm_id" default="panda" />

  <arg name="load_robot_description" default="true" />
  <!-- load URDF, SRDF and joint_limits configuration -->
  <include file="$(dirname)/planning_context.launch">
    <arg name="load_robot_description" value="$(arg load_robot_description)" />
    <arg name="load_gripper" value="$(arg load_gripper)" />
    <arg name="arm_id" value="$(arg arm_id)" />
  </include>

  <!-- Planning Pipelines -->
  <group ns="move_group/planning_pipelines">

    <!-- OMPL -->
    <include file="$(dirname)/planning_pipeline.launch.xml">
      <arg name="pipeline" value="ompl" />
      <arg name="arm_id" value="$(arg arm_id)" />
    </include>

    <!-- CHOMP -->
    <include file="$(dirname)/planning_pipeline.launch.xml">
      <arg name="pipeline" value="chomp" />
      <arg name="arm_id" value="$(arg arm_id)" />
    </include>

    <!-- Pilz Industrial Motion -->
    <include file="$(dirname)/planning_pipeline.launch.xml">
      <arg name="pipeline" value="pilz_industrial_motion_planner" />
      <arg name="arm_id" value="$(arg arm_id)" />
    </include>

    <!-- Support custom planning pipeline -->
    <include if="$(eval arg('pipeline') not in ['ompl', 'chomp', 'pilz_industrial_motion_planner'])"
             file="$(dirname)/planning_pipeline.launch.xml">
      <arg name="pipeline" value="$(arg pipeline)" />
      <arg name="arm_id" value="$(arg arm_id)" />
    </include>
  </group>

  <!-- Trajectory Execution Functionality -->
  <include ns="move_group" file="$(dirname)/trajectory_execution.launch.xml" pass_all_args="true" if="$(arg allow_trajectory_execution)">
    <arg name="moveit_manage_controllers" value="true" />
  </include>

  <!-- Sensors Functionality -->
  <include ns="move_group" file="$(dirname)/sensor_manager.launch.xml" if="$(arg allow_trajectory_execution)">
    <arg name="moveit_sensor_manager" value="panda" />
  </include>

  <!-- Start the actual move_group node/action server -->
  <node name="move_group" launch-prefix="$(arg launch_prefix)" pkg="moveit_ros_move_group" type="move_group" respawn="false" output="screen" args="$(arg command_args)">
    <!-- Set the display variable, in case OpenGL code is used internally -->
    <env name="DISPLAY" value="$(optenv DISPLAY :0)" />

    <param name="allow_trajectory_execution" value="$(arg allow_trajectory_execution)"/>
    <param name="sense_for_plan/max_safe_path_cost" value="$(arg max_safe_path_cost)"/>
    <param name="default_planning_pipeline" value="$(arg pipeline)" />
    <param name="capabilities" value="$(arg capabilities)" />
    <param name="disable_capabilities" value="$(arg disable_capabilities)" />

    <!-- Publish the planning scene of the physical robot so that rviz plugin can know actual robot -->
    <param name="planning_scene_monitor/publish_planning_scene" value="$(arg publish_monitored_planning_scene)" />
    <param name="planning_scene_monitor/publish_geometry_updates" value="$(arg publish_monitored_planning_scene)" />
    <param name="planning_scene_monitor/publish_state_updates" value="$(arg publish_monitored_planning_scene)" />
    <param name="planning_scene_monitor/publish_transforms_updates" value="$(arg publish_monitored_planning_scene)" />
  </node>

</launch>
GDB
  <!-- GDB Debug Option -->
  <arg name="debug" default="false" />
  <arg unless="$(arg debug)" name="launch_prefix" value="" />
  <arg     if="$(arg debug)" name="launch_prefix"
           value="gdb -x $(dirname)/gdb_settings.gdb --ex run --args" />
  # GDB Debug Option:用于设置是否启用GDB调试。
  # 当 GDB debug模式关闭时,launch_prefix值为空
  # 当 GDB debug模式开启时,launch_launch_prefix为GDB相关命令
GNU symbolic debugger(GDB),是 Linux 平台下最常用的一款程序调试器。GDB 编译器通常以 gdb 命令的形式在终端(Shell)中使用。
调试工具可使被调试程序在指定代码处暂停运行,并查看当前程序的运行状态(例如当前变量的值,函数的执行结果等),也就是断点调试。
通过调试可以了解程序中出现的逻辑错误。
ubuntu是自带GDB调试工具的:
test@ubuntu:~$ gdb -v  # Check the version of GDB
GNU gdb (Ubuntu 9.2-0ubuntu1~20.04.1) 9.2
Copyright (C) 2020 Free Software Foundation, Inc.
License GPLv3+: GNU GPL version 3 or later <http://gnu.org/licenses/gpl.html>
This is free software: you are free to change and redistribute it.
There is NO WARRANTY, to the extent permitted by law.
在这个代码片段中
gdb: 是 GNU 调试器(GDB)的命令,它用于调试程序并跟踪其执行过程。
gdb_settings.gdb包含一系列的GDB命令和调试设置,用于在调试过程中自动执行一些操作。
这些命令脚本文件可以包含启动GDB会话时要执行的初始化命令,设置断点,指定观察点,配置调试选项,执行一系列的调试操作以及其他自定义的GDB命令。通过编写调试脚本,可以自动执行一系列的调试操作,以节省手动输入命令的时间和精力。
在panda_moveit_config/launch/文件夹下并未发现该文件,可能会自动生成或者Moveit的开发者不希望用户使用
gdb -x $(dirname)/gdb_settings.gdb中的-x使得gdb_settings.gdb脚本文件被加载到GDB中,这将使GDB执行gdb_settings.gdb脚本文件文件中定义的命令和操作。
--ex run选项告诉 GDB 在启动调试器后立即执行 run 命令,使需要调试的程序开始运行。
--args 选项后面可以跟随要调试的程序及其参数。
在这个案例中,通过启用debug模式,使得launch_prefix为GDB相关内容,这个前缀将在 <node name="move_group" launch-prefix="$(arg launch_prefix)" pkg="moveit_ros_move_group" type="move_group" respawn="false" output="screen" args="$(arg command_args)">中被使用,也就是在启动move_group节点时会被作为launch-prefix传入。
info模式
  <!-- Verbose Mode Option -->
  <arg name="info" default="$(arg debug)" />
  <arg unless="$(arg info)" name="command_args" value="" />
  <arg     if="$(arg info)" name="command_args" value="--debug" />
  # Verbose Mode Option:用于设置是否启用详细模式。
  # 当开启详细模式时,move_group会在console输出更多信息,帮助用户了解move_group中发生的事情
  # info:用于指示是否启用详细模式的参数,默认与debug参数相同。
  # 当开启debug时,verbose详细模式也将被默认开启
  # 如果详细模式开启,则command_args参数值为--debug
在这个案例中,move_group节点启动时将使用command_args参数作为参数传入move_group节点:
<node name="move_group" launch-prefix="$(arg launch_prefix)" pkg="moveit_ros_move_group" type="move_group" respawn="false" output="screen" args="$(arg command_args)">。
info参数在demo.launch中作为参数被pass_all_args="true"传入到move_group.launch中作为参数。
pipeline
  <!-- move_group settings -->
  <arg name="pipeline" default="ompl" />
  # 机器人运动规划的管道。
  # MoveIt提供了几种规划算法,例如OMPL、SBPL等。此参数允许用户选择使用哪种算法进行运动规划。默认值为“ompl”。
关于OMPL(Open Motion Planning Library)算法,可参考OMPL官方文档、OMPL Primer
在这个案例中,pipeline参数在demo.launch中作为参数被pass_all_args="true"传入到move_group.launch中作为参数。
allow_trajectory_execution
  <arg name="allow_trajectory_execution" default="true"/>
  # 设置 allow_trajectory_execution 为 true,
  # 可以让 move_group 在运行过程中尝试让机器人执行这些预定义的轨迹
  # 但如果该参数设置为 false,则只会规划但不会执行规划的轨迹,机器人将保持静止
  # 此功能对于测试和调试非常有用,因为它允许操纵轨迹,而无需在机器人上实际执行它们
  # 它在关注安全的情况下也很有用,因为它提供了一种防止意外执行危险轨迹的方法
在这个案例中,allow_trajectory_execution参数在demo.launch中作为include file="$(dirname)/move_group.launch"的arg参数被传入到move_group.launch中作为参数。
moveit_controller_manager
  <arg name="moveit_controller_manager" default="simple" />
  # moveit_controller_manager:选择控制器管理器的类型,在move_group中默认值为“simple”。
  # 控制器管理器用于加载和配置机器人的控制器。
  # MoveIt提供了几种类型的控制器管理器,包括“fake”,“simple”和“ros_control”。
MoveIt提供的控制器管理器包括以下三种类型:
-
fake: 这种类型的控制器仅模拟运动,不与真实机器人进行通信。它通常用于快速测试和演示,对于仿真,通常使用fake控制器来模拟运动。 -
simple: 这种类型的控制器与机器人进行通信,但仅提供了基本控制,例如直线/圆弧插值等。它适用于一些较简单的机器人。 -
ros_control: 这是一种更灵活的控制器类型,可支持各种机器人和控制器硬件。它提供了更高级别的控制接口,例如电机控制器接口和传感器读取接口。
根据应用场景和机器人的要求,使用不同类型的控制器管理器。
在这个案例中,moveit_controller_manager参数在demo.launch中通过pass_all_args="true"被传入到move_group.launch中作为参数。
在move_group.launch中这个参数默认为simple,而在demo.launch中为fake,这是因为demo.launch是单纯用于RViz中测试MotionPlanning插件的,通过demo.launch来启动move_group.launch时,控制器的类型为fake。
fake_execution_type
  <arg name="fake_execution_type" default="interpolate"/>
  # fake_execution_type:设置虚拟控制器的执行模式。
  # 如果选择“fake”控制器管理器,则使用虚拟控制器进行模拟运动。
  # 此参数指定用于虚拟运动的执行模式,包括“interpolate”和“step”。默认值为“interpolate”。
在Moveit官方文档中有关于fake controller的描述,可参考Moveit1 Noetic官方文档
MoveIt提供了一系列虚拟轨迹控制器,可用于模拟。其中,虚拟控制器的配置文件位于 config/fake_controllers.yaml 。
可以根据需要调整以下控制器类型:
interpolate: 在经过关键点时执行平稳插补,默认用于可视化。via points: 遍历关键点,但不插补它们之间的点,用于可视化调试。last point: 直接跳转到轨迹的最后一个点,用于离线基准测试。
虚拟控制器类型信息可在 fake_controllers.yaml 文件中配置。对于每个控制器,都需要指定名称、类型和涉及的关节。其中,频率为 rate: 10,可用于插补控制器。但在对夹爪进行控制时,关节为空列表 []。
示例:
rate: 10
controller_list:
  - name: fake_arm_controller
    type: interpolate
    joints:
      - joint_1
      - joint_2
      - joint_3
      - joint_4
      - joint_5
      - joint_6
  - name: fake_gripper_controller
    joints:
      []
max_safe_path_cost
  <arg name="max_safe_path_cost" default="1"/>
  # max_safe_path_cost:最大安全路径成本,默认为1。
  # 作为参数sense_for_plan/max_safe_path_cost的值被传入move_group节点
  # 这个参数值将影响move_group路径规划的行为。
  # 目前没有发现该值的使用标准和方式,可以不理会。
max_safe_path_cost参数用于设置移动组(MoveGroup)中的最大安全路径成本参数sense_for_plan/max_safe_path_cost。这个参数定义了移动组在规划机器人路径时所能接受的最大路径成本。路径成本是基于路径上的障碍物、碰撞风险等因素计算得出的。
当进行路径规划时,MoveIt会根据给定的目标设置和约束条件尝试找到一条满足安全性要求的路径。如果生成的路径的总成本(代价)超过了max_safe_path_cost参数指定的阈值,那么MoveIt将认为该路径不是安全的,将停止搜索更多的路径。这有助于避免规划出不安全或代价过高的路径。
较低的最大安全路径成本阈值会导致规划器更加谨慎并更多地考虑避免碰撞和障碍物,因为很容易到达最大的安全成本阈值,变得不安全。
而较高的最大安全路径成本可以帮助增加规划器生成有效路径的能力,因为有更加宽容的安全路径成本范围可供规划器去生成路径。
通过设置max_safe_path_cost参数,可以限制规划器为机器人生成的路径选择最安全的路径。
publish_monitored_planning_scene
  <arg name="publish_monitored_planning_scene" default="true"/>
  # 是否发布监视的规划场景,默认为true。
在MoveIt的move_group.launch中,<arg name="publish_monitored_planning_scene" default="true"/>用于设置是否发布监视的规划场景。如果该参数被设置为true,则MoveIt的move_group节点会在规划过程中发布一个监视的规划场景。
发布监视的规划场景允许其他组件或用户监控当前的规划场景状态。这对于可视化、调试和其他用途非常有用。监视的规划场景包含有关机器人、障碍物、规划请求和其他相关信息的实时数据。
在MoveIt的move_group节点中,当启用了发布监视的规划场景,它会将当前的规划场景发布到特定的话题,其他节点或工具可以通过订阅该话题以获取最新的规划场景信息。这样,用户或系统可以实时监视、分析和响应规划场景的变化,从而进行相应的处理。
在MoveGroup中,<arg name="transmission" default="effort" />是一个参数,用于指定机械臂的传动类型。此参数指定了机械臂控制器(controller)使用的传动系统类型,默认为"effort"(力/扭矩传动)。
传动类型的选择会影响机械臂在MoveGroup中的控制方式。具体的传动类型包括:
-
Effort Transmission(力/扭矩传动):该传动类型假定机械臂的控制输入是力/扭矩,用于控制关节的扭矩或力。适用于需要对关节施加特定力或扭矩来实现精确控制和力感知的应用。
-
其他传动类型(如速度传动和位置传动):除了"effort"传动类型,还可以使用其他传动类型,如"velocity"(速度传动)和"position"(位置传动),具体取决于机械臂硬件和控制器的支持。速度传动适用于控制关节的速度,位置传动适用于控制关节的位置。
选择合适的传动类型取决于机械臂的具体配置和要求。在配置MoveGroup时,可以根据机械臂的传动系统设置相应的参数,以确保正确的控制信号传递给机械臂。
- capabilities:功能选项,默认为空。
- disable_capabilities:禁用的功能选项,默认为空。
- Other settings:其他设置参数。
- load_gripper:是否加载夹爪模型,默认为true。
- transmission:机器人的传输科学,默认为"effort"。
- arm_id:机器人的ID,默认为"panda"。
- load_robot_description:加载机器人描述参数。
- load_robot_description:是否加载URDF、SRDF和关节限制配置的参数,默认为true。
- 嵌套的include指令会调用planning_context.launch文件,并将load_robot_description、load_gripper和arm_id参数传递给它。
- Planning Pipelines:加载规划器管道的配置。
- 通过多个include指令加载了不同的规划管道配置,包括OMPL、CHOMP、Pilz Industrial Motion以及自定义规划管道。
- Trajectory Execution Functionality:轨迹执行功能配置。
- 通过include指令加载trajectory_execution.launch.xml文件,用于启动与轨迹执行相关的功能。
- Sensors Functionality:传感器功能配置。
- 通过include指令加载sensor_manager.launch.xml文件,用于启动与传感器相关的功能。
- Start the actual move_group node/action server:启动move_group节点和动作服务器。
- 通过node指令启动move_group节点,并设置相关参数。
- launch-prefix:根据之前的debug参数设置的值,添加启动前缀。
- pkg:指定节点所属的软件包。
- type:指定要启动的节点类型。
- respawn:设置节点是否在终止时重新启动。
- output:设置节点的输出选项。
- args:根据之前的command_args参数设置的值,添加命令参数。
- 通过param指令设置move_group节点的参数。
这段代码的作用是配置并启动move_group节点以及与之相关的功能,包括规划器管道、轨迹执行和传感器功能。

