组件允许我们将 UI 划分为独立的、可重用的部分,并且可以对每个部分进行单独的思考。
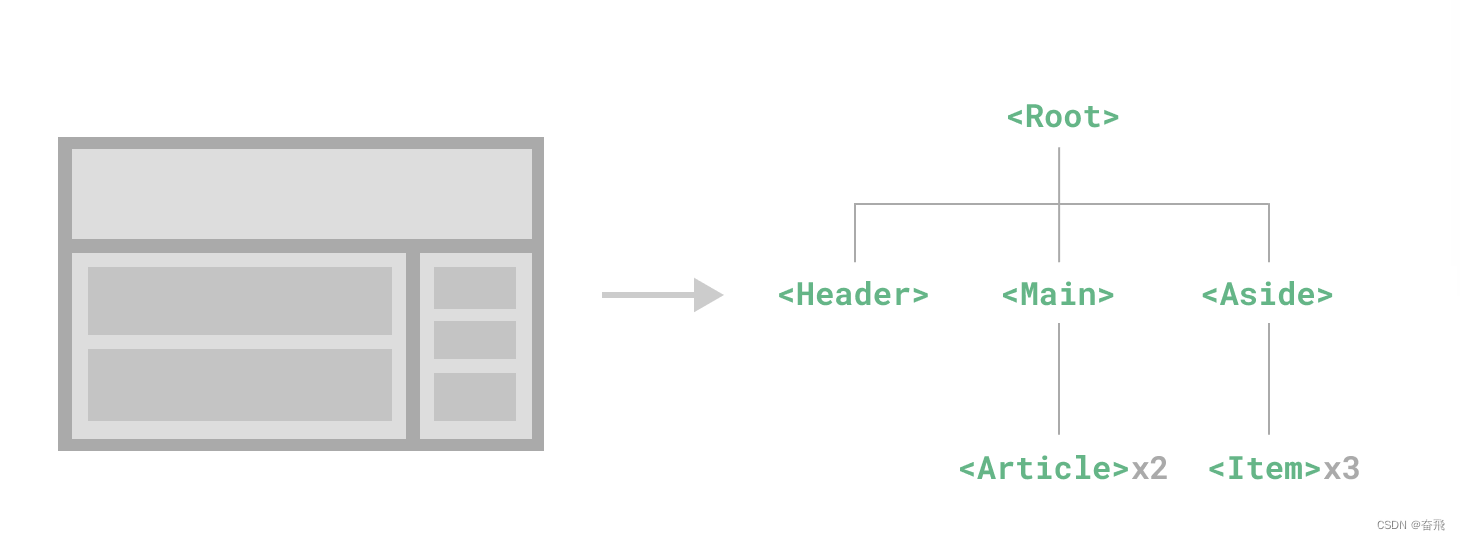
组件在日常开发的重要性不言而喻,掌握下述细则,可以让你在开发中事半功倍!
Props
defineProps() 宏中的参数不可以访问 <script setup> 中定义的其他变量,因为在编译时整个表达式都会被移到外部的函数中。
- 除
Boolean外的未传递的可选 prop 将会有一个默认值undefined。 Boolean类型的未传递 prop 将被转换为false。这可以通过为它设置default来更改——例如:设置为default: undefined将与非布尔类型的 prop 的行为保持一致。
事件
组件触发的事件没有冒泡机制。只能监听直接子组件触发的事件。平级组件或是跨越多层嵌套的组件间通信,应使用一个外部的事件总线,或是使用一个全局状态管理方案。
我们在 <template> 中使用的 $emit 方法不能在组件的 <script setup> 部分中使用,需要通过 defineEmits() :
<script setup>
const emit = defineEmits(['inFocus', 'submit'])

function buttonClick() {
  emit('submit')
}
</script>
注意:defineEmits() 宏不能在子函数中使用。必须直接放置在 <script setup> 的顶级作用域下。
事件校验
可以通过返回一个布尔值,来表明事件是否合法。
<script setup>
const emit = defineEmits({
  // 没有校验
  click: null,

  // 校验 submit 事件
  submit: ({ email, password }) => {
    if (email && password) {
      return true
    } else {
      console.warn('Invalid submit event payload!')
      return false
    }
  }
})

function submitForm(email, password) {
  emit('submit', { email, password })
}
</script>
v-model
单个组件上,需要创建多个双向绑定值时,我们可以采用多个 v-model 。
<CustomInput v-model:title="title" v-model:msg="msg" />
<!-- CustomInput.vue -->
<script setup>
import { computed } from 'vue'

const props = defineProps(['title', 'msg'])
const emit = defineEmits(['update:title', 'update:msg'])

const titleValue = computed({
  get() {
    return props.title
  },
  set(value) {
    emit('update:title', value)
  }
})
const msgValue = computed({})
</script>

<template>
  <input v-model="titleValue" />
</template>
注意,子组件 v-model 不能直接绑定 title/msg。
v-model cannot be used on a prop, because local prop bindings are not writable.
透传 Attributes
透传Attributes,是指由父组件传入,且没有被子组件声明为 props 或是组件自定义事件的 attributes 和事件处理函数。
<MyButton class="large" @click="onClick"/>
想要所有像 class 和 v-on 监听器这样的透传 attribute 都应用在内部的 <button> 上而不是外层的 <div> 上。使用 inheritAttrs: false 来禁用 attribute 继承。
<!-- MyButton -->
<div class="btn-wrapper">
  <button class="btn" v-bind="$attrs">click me</button>
</div>

<script>
// 使用普通的 <script> 来声明选项
export default {
  inheritAttrs: false
}
</script>
需要注意的是,虽然这里的 attrs 对象总是反映为最新的透传 attribute,但它并不是响应式的 (考虑到性能因素)。你不能通过侦听器去监听它的变化。如果你需要响应性,可以使用 prop。
作用域插槽
场景:数据源自子组件,样式等希望父组件自己控制。
<!-- FancyList -->
<ul>
  <li v-for="item in items">
    <slot name="item" v-bind="item"></slot>
  </li>
</ul>
<FancyList> 封装一些加载远端数据的逻辑、使用数据进行列表渲染、或者是像分页或无限滚动这样更进阶的功能
注意,我们这里使用了 v-bind 来传递插槽的 props。
<FancyList :api-url="url" :per-page="10">
  <template #item="{ body, username, likes }">
    <div class="item">
      <p>{{ body }}</p>
      <p>by {{ username }} | {{ likes }} likes</p>
    </div>
  </template>
</FancyList>
对单个列表元素内容和样式的控制权留给使用它的父组件。
依赖注入
- 使用 Symbol 作注入名以避免潜在的冲突(推荐在一个单独的文件中导出这些注入名 Symbol);
- 任何对响应式状态的变更都保持在供给方组件中;
- 为确保提供的数据不能被注入方的组件更改,可以使用
readonly()来包装提供的值
// keys.js
export const location = Symbol()
<!-- 在供给方组件内 -->
<script setup>
import { provide, ref } from 'vue'
import { location } from './keys.js'

const locationRef = ref('North Pole')

function updateLocation() {
  locationRef.value = 'South Pole'
}

provide(location, {
  // 确保注入方不可以更改
  readonly(location),
  updateLocation
})
</script>
<!-- 在注入方组件 -->
<script setup>
import { inject } from 'vue'
import { location } from './keys.js'

const { locationRef, updateLocation } = inject(location)
</script>

<template>
  <button @click="updateLocation">{{ locationRef }}</button>
</template>
