Spring Security系列文章
- 认证与授权之Cookie、Session、Token、JWT
- 基于Session的认证与授权实践
基于Session的认证方式
基于 session 的认证方式如下图:

基于 Session 的认证机制由 Servlet 规范定制,Servlet 容器已实现,用户通过 HttpSession 的操作方法即可实现,如下是 HttpSession 相关的操作API。

创建工程
本项目使用 maven 搭建,使用 SpringMVC、Servlet3.0 实现。
创建maven工程
1、导入依赖
<?xml version="1.0" encoding="UTF-8"?>
<project xmlns="http://maven.apache.org/POM/4.0.0"
  xmlns:xsi="http://www.w3.org/2001/XMLSchema-instance"
  xsi:schemaLocation="http://maven.apache.org/POM/4.0.0 http://maven.apache.org/xsd/maven-4.0.0.xsd">
  <parent>
    <artifactId>spring-security-study</artifactId>
    <groupId>com.msdn.security</groupId>
    <version>1.0-SNAPSHOT</version>
  </parent>
  <modelVersion>4.0.0</modelVersion>

  <artifactId>springmvc-session</artifactId>

  <packaging>war</packaging>
  <properties>
    <project.build.sourceEncoding>UTF-8</project.build.sourceEncoding>
  </properties>


  <dependencies>
    <dependency>
      <groupId>org.springframework</groupId>
      <artifactId>spring-webmvc</artifactId>
      <version>5.3.23</version>
    </dependency>
    <dependency>
      <groupId>javax.servlet</groupId>
      <artifactId>javax.servlet-api</artifactId>
      <version>4.0.1</version>
      <scope>provided</scope>
    </dependency>
    <dependency>
      <groupId>org.projectlombok</groupId>
      <artifactId>lombok</artifactId>
      <version>1.18.20</version>
    </dependency>
    <dependency>
      <groupId>cn.hutool</groupId>
      <artifactId>hutool-all</artifactId>
      <version>5.8.5</version>
    </dependency>
  </dependencies>

  <build>
    <plugins>
      <plugin>
        <groupId>org.apache.maven.plugins</groupId>
        <artifactId>maven-compiler-plugin</artifactId>
        <configuration>
          <source>8</source>
          <target>8</target>
        </configuration>
      </plugin>
    </plugins>
  </build>
</project>
Servlet Context配置
本案例采用 Servlet3.0 无 web.xml 方式,在 config 包下定义 WebConfig.java,它对应于 DispatcherServlet 配置。
@Configuration//就相当于springmvc.xml文件
@EnableWebMvc
@ComponentScan(basePackages = "com.msdn.security"
        ,includeFilters = {@ComponentScan.Filter(type = FilterType.ANNOTATION,value = Controller.class)})
public class WebConfig implements WebMvcConfigurer {

    //视图解析器
    @Bean
    public InternalResourceViewResolver viewResolver(){
        InternalResourceViewResolver viewResolver = new InternalResourceViewResolver();
        viewResolver.setPrefix("/WEB-INF/view/");
        viewResolver.setSuffix(".jsp");
        return viewResolver;
    }

}
加载Spring容器
在 init 包下定义 Spring 容器初始化类 SpringApplicationInitializer,此类实现 WebApplicationInitializer 接口,Spring 容器启动时加载WebApplicationInitializer 接口的所有实现类。
public class SpringApplicationInitializer extends AbstractAnnotationConfigDispatcherServletInitializer {

    @Override
    protected Class<?>[] getRootConfigClasses() {
        return null;
    }

    //servletContext,相当于加载springmvc.xml
    @Override
    protected Class<?>[] getServletConfigClasses() {
        return new Class[]{WebConfig.class};
    }

    //url-mapping
    @Override
    protected String[] getServletMappings() {
        return new String[]{"/"};
    }
}
SpringApplicationInitializer 相当于 web.xml,使用了servlet3.0开发则不需要再定义 web.xml,WebConfig.class 对应以下配置的 spring-mvc.xml,web.xml的内容参考:
<web‐app>
    <listener>
        <listener‐class>org.springframework.web.context.ContextLoaderListener</listener‐class>
    </listener>
    <context‐param>
        <param‐name>contextConfigLocation</param‐name>
        <param‐value>/WEB‐INF/application‐context.xml</param‐value>
    </context‐param>

    <servlet>
        <servlet‐name>springmvc</servlet‐name>
        <servlet‐class>org.springframework.web.servlet.DispatcherServlet</servlet‐class>
        <init‐param>
            <param‐name>contextConfigLocation</param‐name>
            <param‐value>/WEB‐INF/spring‐mvc.xml</param‐value>
        </init‐param>
        <load‐on‐startup>1</load‐on‐startup>
    </servlet>
    <servlet‐mapping>
        <servlet‐name>springmvc</servlet‐name>
        <url‐pattern>/</url‐pattern>
    </servlet‐mapping>

</web‐app>
实现认证功能
认证页面
在 webapp/WEB-INF/view 下定义认证页面 login.jsp,本案例只是测试认证流程,页面没有添加css样式,页面实现可填入用户名,密码,触发登录将提交表单信息至/login,内容如下:
<%@ page contentType="text/html;charset=UTF-8" pageEncoding="utf-8" %>
<html>
<head>
<title>用户登录</title>
</head>
<body>
<p style="color: red">${msg }</p>
<form action="login" method="post">
用户名:<input type="text" name="username"><br>
密 码:
<input type="password" name="password"><br>
<input type="submit" value="登录">
</form>
</body>
</html>
在 WebConfig 中新增如下配置,将/直接导向 login.jsp 页面:
@Override
public void addViewControllers(ViewControllerRegistry registry) {
  registry.addViewController("/").setViewName("login");
}
启动项目,配置 tomcat


认证接口
用户进入认证页面,输入账号和密码,点击登录,请求/login 进行身份认证。
1、定义认证接口,此接口用于对传来的用户名、密码校验,若成功则返回该用户的详细信息,否则抛出错误异常:
public interface AuthenticationService {

  /**
   * 用户认证
   *
   * @param userRequest
   * @return
   */
  User authentication(UserRequest userRequest);
}
2、表单请求参数封装为实体类
@Data
public class UserRequest {

  private String username;
  private String password;
}
3、认证成功后返回的用户详细信息
@Data
@AllArgsConstructor
@NoArgsConstructor
public class User implements Serializable {

  private Long id;
  private String username;
  private String password;
  private String fullname;
  private String mobile;
}
4、认证服务具体实现类
@Service
public class AuthenticationServiceImpl implements AuthenticationService {

  private static Map<String, User> userMap = new HashMap<>();

  static {
    userMap.put("zhangsan", new UserDTO(1010L, "zhangsan", "123", "张三", "133443"));
    userMap.put("lisi", new UserDTO(1011L, "lisi", "456", "李四", "144553"));
  }

  @Override
  public User authentication(UserRequest userRequest) {
    User user = getUserByName(userRequest.getUsername());
    if (Objects.isNull(user)) {
      throw new RuntimeException("查询不到该用户");
    }

    if (!Objects.equals(user.getPassword(), userRequest.getPassword())) {
      throw new RuntimeException("账号或密码错误");
    }

    return user;
  }

  /**
     * 模仿从表中根据用户名查询用户信息
     *
     * @param username
     * @return
     */
  public User getUserByName(String username) {
    return userMap.get(username);
  }
}
5、controller 对 login 请求做处理
@RestController
public class LoginController {

  @Autowired
  private AuthenticationService authenticationService;

  @PostMapping(value = "/login")
  public String login(UserRequest request, Model model) {
    if (Objects.isNull(request) || isBlank(request.getUsername()) ||
        isBlank(request.getPassword())) {
      model.addAttribute("msg", "账号或密码为空");
      return "login";
    }
    try {
      User user = authenticationService.authentication(request);

      return "redirect:hello";
    } catch (Exception e) {
      model.addAttribute("msg", e.getMessage());
    }
    return "login";
  }

}
6、测试,重新启动 tomcat
输入正确的用户名和密码,则提示登录成功,如果账号或密码不输入,则会提示报错信息;如果账号或密码校验不通过,会提示具体报错。
实现会话功能
会话是指用户登入系统后,系统会记住该用户的登录状态,他可以在系统连续操作直到退出系统的过程。
认证的目的是对系统资源的保护,每次对资源的访问,系统必须得知道是谁在访问资源,才能对该请求进行合法性拦截。因此,在认证成功后,一般会把认证成功的用户信息放入 Session中,在后续的请求中,系统能够从 Session 中获取到当前用户,用这样的方式来实现会话机制。
在上一节我们详细介绍了 Cookie 和 Session,我们此处创建的项目启动后就作为临时服务器,存储 session 信息,而客户端通常是将 sessionId 存放在 cookie 中的,所以我们还需要设置 cookie 返回给客户端。
1、cookie 操作工具类
public class CookieUtil {


  public static Cookie addUserCookie(String cookieValue) {
    return addCookie("user_session_id", cookieValue);
  }

  public static Cookie addCookie(String cookieName, String cookieValue) {
    Cookie cookie = new Cookie(cookieName, cookieValue);
    cookie.setMaxAge(3600);
    cookie.setPath("/");
    return cookie;
  }

  public static String getUserCookie(HttpServletRequest request) {
    return getCookie(request, "user_session_id");
  }

  public static String getCookie(HttpServletRequest request, String cookieName) {
    Cookie[] cookies = request.getCookies();
    String cookieValue = "";
    for (Cookie cookie : cookies) {
      if (cookieName.equals(cookie.getName())) {
        cookieValue = cookie.getValue();
      }
    }
    return cookieValue;
  }

}
2、修改 controller 中 login 方法,当认证成功后,将用户信息放入当前会话,并将 sessionId 放入 cookie 中。并增加用户登出方法,登出时将 session 置为失效。
@PostMapping(value = "/login")
public String login(UserRequest request, HttpSession session, Model model,
                    HttpServletResponse response) {
  if (Objects.isNull(request) || isBlank(request.getUsername()) ||
      isBlank(request.getPassword())) {
    model.addAttribute("msg", "账号或密码为空");
    return "login";
  }
  try {
    User user = authenticationService.authentication(request);
    String userSessionId = RandomUtil.getRandom().nextInt(10000) + "_user";
    session.setAttribute(userSessionId, user);
    Cookie cookie = CookieUtil.addUserCookie(userSessionId);
    response.addCookie(cookie);

    return "redirect:hello";
  } catch (Exception e) {
    model.addAttribute("msg", e.getMessage());
  }
  return "login";
}


@RequestMapping(value = "logout")
public String logout(HttpSession session) {
  session.invalidate();
  return "login";
}
3、在 controller 中增加资源访问测试接口,判断 session 中是否有用户
  @RequestMapping(value = "/r/r1")
  public String r1(HttpServletRequest request, Model model) {
    String userSessionId = CookieUtil.getUserCookie(request);
    HttpSession session = request.getSession();
    User user = (User) session.getAttribute(userSessionId);
    String fullName = Objects.nonNull(user) ? user.getFullname() : "匿名";
    model.addAttribute("text", fullName + " 访问资源1");

    return "resource";
  }
4、重启 tomcat,未登录情况下直接访问测试资源 r/r1,具体路径为:http://localhost:8080/r/r1
实现授权功能
现在我们已经完成了用户身份凭证的校验以及登录的状态保持,并且我们也知道了如何获取当前登录用户(从Session中获取)的信息,接下来,用户访问系统需要经过授权,即需要完成如下功能:
- 匿名用户(未登录用户)访问拦截:禁止匿名用户访问某些资源。
- 登录用户访问拦截:根据用户的权限决定是否能访问某些资源。
1、增加权限数据
实际工作中,用户和角色关联,然后角色又和权限表关联,在本次测试阶段,为了方便操作,我们直接在 User 里增加权限属性。
@Data
@AllArgsConstructor
@NoArgsConstructor
public class User implements Serializable {

  private Long id;
  private String username;
  private String password;
  private String fullname;
  private String mobile;

  // 用户权限
  private Set<String> authorities;
}
2、并在 AuthenticationServiceImpl 认证服务具体实现类中给用户初始化权限,实际应用中肯定不会这样,会从数据库中获取用户信息。
  private static Map<String, User> userMap = new HashMap<>();

  static {
    Set<String> authoritie1 = new HashSet<>();
    authoritie1.add("p1");
    Set<String> authoritie2 = new HashSet<>();
    authoritie2.add("p2");
    userMap.put("zhangsan", new User(1010L, "zhangsan", "123", "张三", "133443", authoritie1));
    userMap.put("lisi", new User(1011L, "lisi", "456", "李四", "144553", authoritie2));
  }
3、增加测试资源
在 controller 文件中增加对资源 r1、r2 的访问
@RequestMapping(value = "/r/r1")
public String r1(HttpServletRequest request, Model model) {
  String userSessionId = CookieUtil.getUserCookie(request);
  HttpSession session = request.getSession();
  User user = (User) session.getAttribute(userSessionId);
  String fullName = Objects.nonNull(user) ? user.getFullname() : "匿名";
  model.addAttribute("text", fullName + " 访问资源1");

  return "resource";
}

@RequestMapping(value = "/r/r2")
public String r2(HttpServletRequest request, Model model) {
  String userSessionId = CookieUtil.getUserCookie(request);
  HttpSession session = request.getSession();
  User user = (User) session.getAttribute(userSessionId);
  String fullName = Objects.nonNull(user) ? user.getFullname() : "匿名";
  model.addAttribute("text", fullName + " 访问资源2");

  return "resource";
}
4、实现授权拦截器
在 interceptor 包下定义 SimpleAuthenticationInterceptor 拦截器,实现授权拦截:
- 校验用户是否登录
- 校验用户是否拥有操作权限
@Component
public class SimpleAuthenticationInterceptor implements HandlerInterceptor {

  @Override
  public boolean preHandle(HttpServletRequest request, HttpServletResponse response, Object handler)
      throws Exception {
    String userSessionId = CookieUtil.getUserCookie(request);
    Object attribute = request.getSession().getAttribute(userSessionId);
    if (Objects.isNull(attribute)) {
      writeContent(response, "请先登录");
    }
    User user = (User) attribute;
    String requestURI = request.getRequestURI();
    if (user.getAuthorities().contains("p1") && requestURI.contains("r1")) {
      return true;
    }
    if (user.getAuthorities().contains("p2") && requestURI.contains("r2")) {
      return true;
    }
    if (requestURI.contains("resource")) {
      return true;
    }

    writeContent(response, "权限不足,无法访问");
    return false;
  }

  private void writeContent(HttpServletResponse response, String msg) throws IOException {
    response.setContentType("text/html;charset=UTF-8");
    PrintWriter writer = response.getWriter();
    writer.print(msg);
    writer.close();
    response.resetBuffer();
  }
}
在 WebConfig 中配置拦截器,匹配 /r/**的资源为受保护的系统资源,访问该资源的请求进入 SimpleAuthenticationInterceptor 拦截器。
@Autowired
private SimpleAuthenticationInterceptor simpleAuthenticationInterceptor;

@Override
public void addInterceptors(InterceptorRegistry registry) {
  registry.addInterceptor(simpleAuthenticationInterceptor).addPathPatterns("/r/**");
}
4、重启 tomcat,张三登录后,分别访问 r1 和 r2 资源,查看页面返回信息。
项目演示
1、登录
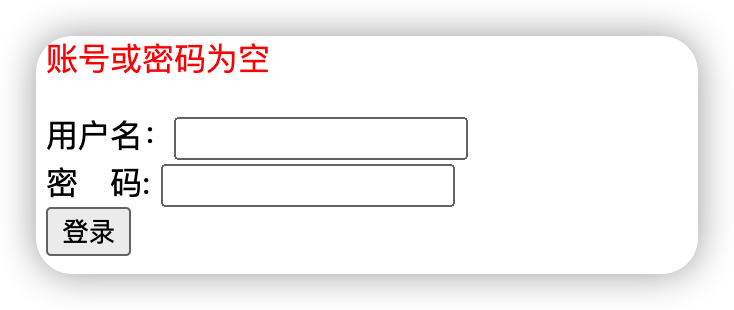
如果账号或密码为空,点击登录按钮,则会提示“账号或密码为空”。
如果账号或密码错误,点击登录按钮,页面展示如下:

如果账号和密码都正确,点击登录按钮,页面展示如下:
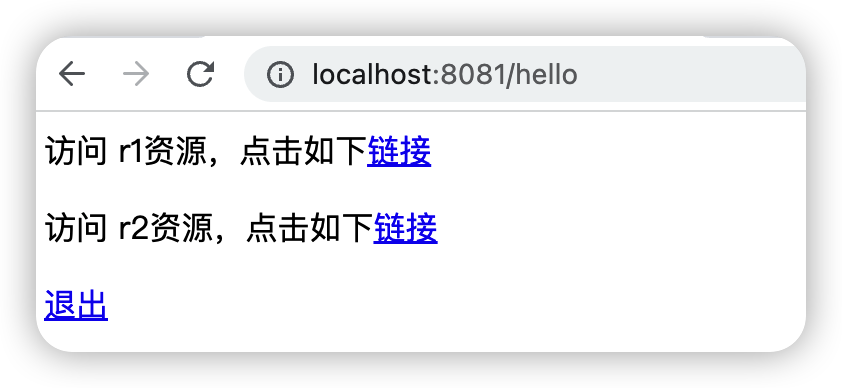
登录成功后,我们在浏览器上查看 cookie 中存储的 sessionId。

2、资源访问
张三可以访问 r1 资源,但无权访问 r2 资源。


李四可以访问 r2 资源,但无权访问 r1 资源。
小结
基于 session 的认证和授权方式比较简单,认证过程清晰明了,但是在大型项目中修改麻烦,不易扩展。所以实际生产中我们往往会考虑使用第三方安全框架(如 Spring Security,shiro等安全框架)来实现认证授权功能。
本文主要还是对上一篇文章中提到的知识点进行实操,方便大家直观理解,关于登录认证还有其他操作,比如记住密码等,这里就不过多介绍了。
![Matplotlib入门[05]——注释与标签](https://img-blog.csdnimg.cn/72b8144eed174762bc6d6d8cbf9a846b.png)

