自定义认证
- 自定义资源权限规则
- 资源分类
- 自定义资源权限规则
- 为什么我们要自定义呢?
- 如何去覆盖呢?
- WebSecurityConfigurerAdapter
- 它是干什么用的
- 实例
- 自定义登录界面
- 步骤
- 源码解析
- 自定义登录成功处理(前后端分离的情况)
- 项目环境
- successHandler
- 自定义AuthenticationSucccessHandler实现
- 配置AuthenticationSuccessHandler
- 显示登录失败处理
- 扩展:hideUserNotFoundExceptions
- 自定义登录失败处理
- AuthenticationFailureHandler
- AuthenticationFailureHandler自定义实现
- 配置自定类
- 注销登录配置
- LogoutSuccessHandler
- 获取用户认证信息
- SecurityContextHolder解析
- SecurityContextHolderStrategy解析
- 例子
- 总结一下
- 页面中获取用户认证信息
- 结尾
自定义资源权限规则
资源分类
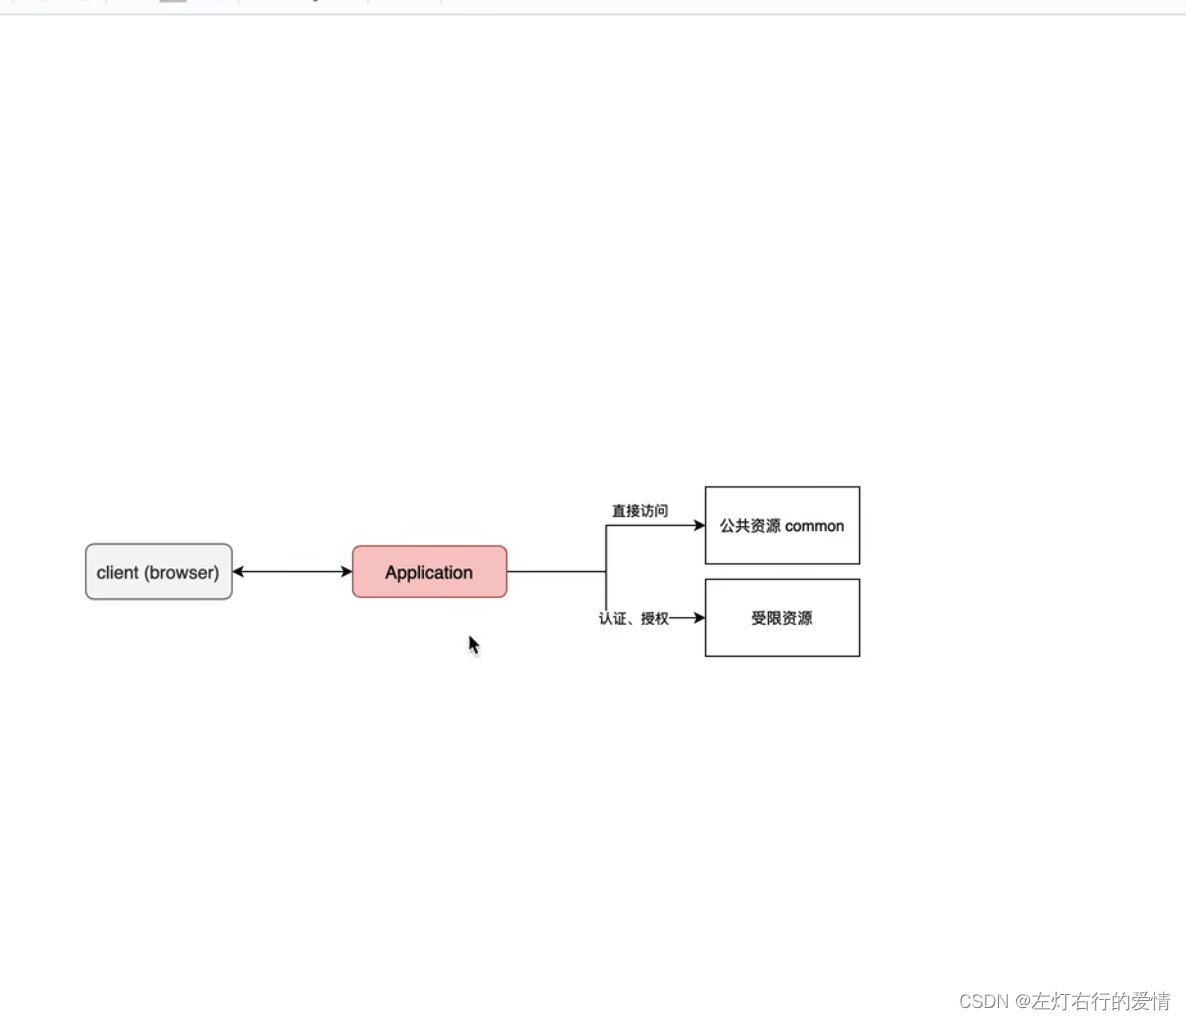
对于资源来说,并不是所有的资源都需要认证和授权,有些公共的资源是可以直接访问的,所以我们要对资源有一个分类。
自定义资源权限规则
为什么我们要自定义呢?
我们举个例子来说:
- /index 公共资源
- /hello … 受保护资源
我们之前看过源码:
@Configuration(proxyBeanMethods = false)
	@ConditionalOnDefaultWebSecurity
	static class SecurityFilterChainConfiguration {

		@Bean
		@Order(SecurityProperties.BASIC_AUTH_ORDER)
		SecurityFilterChain defaultSecurityFilterChain(HttpSecurity http) throws Exception {
			http.authorizeRequests().anyRequest().authenticated();
			http.formLogin();
			http.httpBasic();
			return http.build();
		}

	}
上面表示了对所有的http请求都开启了权限认证,并且任何请求都需要认证后才可以访问。
所以如果我们要根据不同的资源去划分不同的认证方式, 我们就要覆盖上面这个方法。
如何去覆盖呢?
看上面的注解:@ConditionalOnDefaultWebSecurity,找到里面的源码:
class DefaultWebSecurityCondition extends AllNestedConditions {

	DefaultWebSecurityCondition() {
		super(ConfigurationPhase.REGISTER_BEAN);
	}

	@ConditionalOnClass({ SecurityFilterChain.class, HttpSecurity.class })
	static class Classes {

	}

	@ConditionalOnMissingBean({
			org.springframework.security.config.annotation.web.configuration.WebSecurityConfigurerAdapter.class,
			SecurityFilterChain.class })
	@SuppressWarnings("deprecation")
	static class Beans {

	}

}
我们可以看到,要满足上面的两个注解条件:
@ConditionalOnClass({ SecurityFilterChain.class, HttpSecurity.class })
那么只要我们引入了Spring Security这个依赖,这两个就自动满足了。@ConditionalOnMissingBean({ WebSecurityConfigurerAdapter.class, SecurityFilterChain.class })
同时不能存在WebSecurityConfigurerAdapter.class或者SecurityFilterChain.class。
如果不满足上面的条件,那么DefaultWebSecurityCondition就会失效。
所以就很明显了,我们有两种方式就是去写WebSecurityConfigurerAdapter或SecurityFilterChain,这里先去写WebSecurityConfigurerAdapter,后面再说另一种。
WebSecurityConfigurerAdapter
它是干什么用的
WebSecurityConfigurerAdapter是Spring Security提供的一个方便的基类,用于配置和自定义Web应用程序的安全性。通过扩展WebSecurityConfigurerAdapter类并覆盖其方法,您可以定义应用程序的安全规则、访问权限和身份验证配置。
WebSecurityConfigurerAdapter提供了一组可覆盖的方法,让我们进行以下配置:
-
身份验证(Authentication)
可以通过覆盖configure(AuthenticationManagerBuilder auth)方法来配置用户身份验证的方式。可以定义自己的用户存储机制(如内存中的用户、数据库中的用户等),设置密码编码器,并配置用户的角色和权限。 -
授权(Authorization)
可以通过覆盖configure(HttpSecurity http)方法来配置请求的授权规则。我们可以定义哪些URL路径需要哪些角色或权限才能访问,配置登录页面、注销行为、错误处理等。 -
安全性(Security)
可以通过覆盖configure(WebSecurity web)方法来配置Web安全性。我们可以忽略某些URL路径的安全性检查,例如静态资源文件。
通过使用WebSecurityConfigurerAdapter,可以将Spring Security集成到Web应用程序中,并定义细粒度的安全规则和配置。它提供了一种简单且灵活的方式来自定义应用程序的安全性需求。
这里我们看一个要被覆盖的configure方法去实现授权:
	protected void configure(HttpSecurity http) throws Exception {
		this.logger.debug("Using default configure(HttpSecurity). "
				+ "If subclassed this will potentially override subclass configure(HttpSecurity).");
		http.authorizeRequests((requests) -> requests.anyRequest().authenticated());
		http.formLogin();
		http.httpBasic();
	}
我们可以看到,它的默认实现也是所有请求都必须认证,认证方式是表单或者Basic认证。
所以,我们只需要写这个类的实现,并且覆盖这个方法就可以了。
实例
新构建一个module模块,项目结构如下:
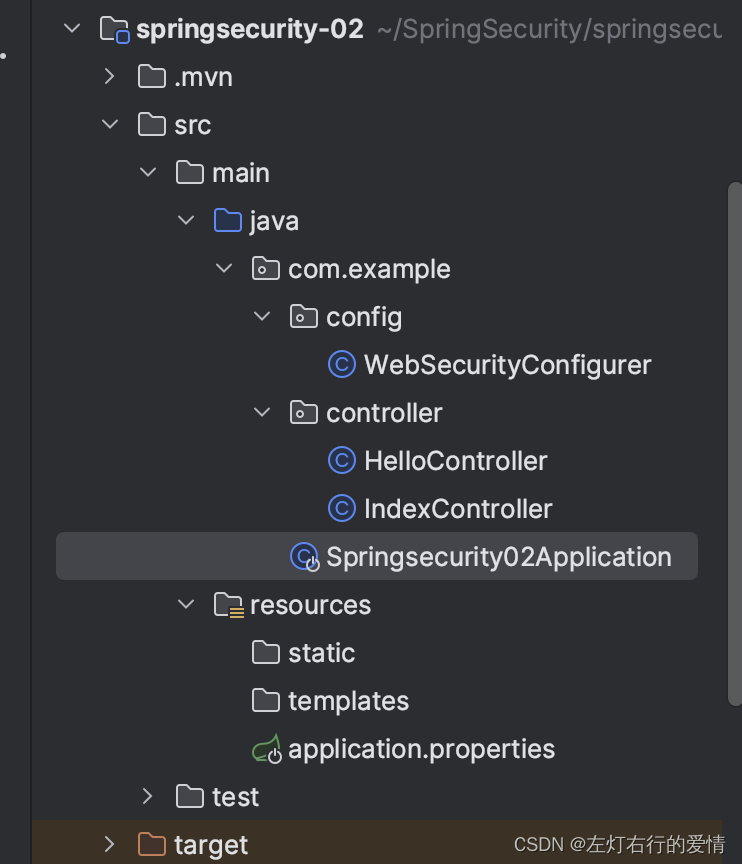
其中config包下的代码如下所示:
import org.springframework.context.annotation.Configuration;
import org.springframework.security.config.annotation.web.builders.HttpSecurity;
import org.springframework.security.config.annotation.web.configuration.WebSecurityConfigurerAdapter;

@Configuration
public class WebSecurityConfigurer extends WebSecurityConfigurerAdapter {

    @Override
     protected void configure(HttpSecurity http) throws Exception {
         http.authorizeRequests()
                 .mvcMatchers("/index").permitAll() //放行资源写在前面
                 .anyRequest().authenticated()
                 .and()
                 .formLogin();
     }


}
- permitAll() 代表放⾏该资源,该资源为公共资源 ⽆需认证和授权可以直接访问
- anyRequest().authenticated() 代表所有请求,必须认证之后才能访问
- formLogin() 代表开启表单认证
注意:放⾏资源必须放在所有认证请求之前!
自定义登录界面
步骤
- 引入模版依赖
      <dependency>
            <groupId>org.springframework.boot</groupId>
            <artifactId>spring-boot-starter-thymeleaf</artifactId>
        </dependency>
- 定义登陆页面 controller
import org.springframework.stereotype.Controller;
import org.springframework.web.bind.annotation.RequestMapping;
@Controller
public class LoginController {

    @RequestMapping("/login.html")
    public String login(){
        return "login";
    }
}
- 在templates 中定义登陆页面
<!DOCTYPE html>
<html lang="en" xmlns:th="http://www.thymeleaf.org">
<head>
    <meta charset="UTF-8">
    <title>User Login</title>
</head>
<body>
<h1>User Login</h1>
<form method=th:action="">
    UserName:<input name="uname" type="text"><br>
    PassWord:<input name="passwd" type="text"><br>
    <input type="submit" value="Login">
</form>

</body>
</html>
源码解析
如果按上面这么写的话,就会出问题,为什么呢?我们来看看formLogin里面的源码。
	public FormLoginConfigurer<HttpSecurity> formLogin() throws Exception {
		return getOrApply(new FormLoginConfigurer<>());
	}
进入到getOrApply方法参数中的FormLoginConfigurer里面去:
	public FormLoginConfigurer() {
		super(new UsernamePasswordAuthenticationFilter(), null);
		usernameParameter("username");
		passwordParameter("password");
	}
在这里里面我们发现了一个过滤器为UsernamePasswordAuthenticationFilter,进去看看,关键代码如下:
public class UsernamePasswordAuthenticationFilter extends AbstractAuthenticationProcessingFilter {

	public static final String SPRING_SECURITY_FORM_USERNAME_KEY = "username";

	public static final String SPRING_SECURITY_FORM_PASSWORD_KEY = "password";

	private static final AntPathRequestMatcher DEFAULT_ANT_PATH_REQUEST_MATCHER = new AntPathRequestMatcher("/login",
			"POST");

	private String usernameParameter = SPRING_SECURITY_FORM_USERNAME_KEY;

	private String passwordParameter = SPRING_SECURITY_FORM_PASSWORD_KEY;

	private boolean postOnly = true;

	public UsernamePasswordAuthenticationFilter() {
		super(DEFAULT_ANT_PATH_REQUEST_MATCHER);
	}

	public UsernamePasswordAuthenticationFilter(AuthenticationManager authenticationManager) {
		super(DEFAULT_ANT_PATH_REQUEST_MATCHER, authenticationManager);
	}
    //下面发现一个试图认证的方法。
	@Override
	public Authentication attemptAuthentication(HttpServletRequest request, HttpServletResponse response)
			throws AuthenticationException {
		//代码检查了请求的方法是否为POST,如果设置为仅接受POST请求并且当前请求不是POST方法,就会抛出一个AuthenticationServiceException异常,表示不支持该身份验证方法。
		if (this.postOnly && !request.getMethod().equals("POST")) {
			throw new AuthenticationServiceException("Authentication method not supported: " + request.getMethod());
		}
		//调用obtainUsername和obtainPassword方法从请求中获取用户名和密码。
		String username = obtainUsername(request);
		username = (username != null) ? username.trim() : "";
		String password = obtainPassword(request);
		password = (password != null) ? password : "";
		//使用获取到的用户名和密码创建一个UsernamePasswordAuthenticationToken对象,
		//该对象表示待验证的用户名和密码信息。这个对象被标记为未经验证状态。
		UsernamePasswordAuthenticationToken authRequest = UsernamePasswordAuthenticationToken.unauthenticated(username,
				password);
		// 调用setDetails方法,将请求的详细信息设置到UsernamePasswordAuthenticationToken对象中。
		setDetails(request, authRequest);
		//调用getAuthenticationManager方法获取AuthenticationManager对象,并使用该对象对UsernamePasswordAuthenticationToken对象进行身份验证。
		//注意:getAuthenticationManager方法是一个抽象方法,需要子类提供具体的实现。
		return this.getAuthenticationManager().authenticate(authRequest);
	}
obtainUsername和obtainPassword方法如下:
//obtainUsername方法用于从HTTP请求中获取用户名,由上面的代码我们可以知道,usernameParameter = SPRING_SECURITY_FORM_USERNAME_KEY = "username";
	protected String obtainUsername(HttpServletRequest request) {
		return request.getParameter(this.usernameParameter);
	}
	//同理。
		protected String obtainPassword(HttpServletRequest request) {
		return request.getParameter(this.passwordParameter);
	}
所以我们看过上面的源码后,在这里有四个要注意的点:
- 登陆表单method必须为post。
if (this.postOnly && !request.getMethod().equals("POST")) {
			throw new AuthenticationServiceException("Authentication method not supported: " + request.getMethod());
- action的请求路径为/login.
	private static final AntPathRequestMatcher DEFAULT_ANT_PATH_REQUEST_MATCHER = new AntPathRequestMatcher("/login",
			"POST");
- 用户名的name属性为username
String username = obtainUsername(request);
username = (username != null) ? username.trim() : "";
- 密码的name属性为password。
String password = obtainPassword(request);
password = (password != null) ? password : "";
- 配置 Spring Security 配置类
@Configuration
public class WebSecurityConfigurer extends WebSecurityConfigurerAdapter {

    @Override
     protected void configure(HttpSecurity http) throws Exception {
         http.authorizeRequests()
                 .mvcMatchers("/login.html").permitAll()
                 .mvcMatchers("/index").permitAll() //放行资源写在前面。
                 .anyRequest().authenticated()
                 .and()
                 .formLogin()
                 .loginPage("/login.html") //用来指定默认登陆页面,注意:一旦自定义登陆页面以后必须只能登陆URL。
                 .loginProcessingUrl("/doLogin")  //指定处理登陆请求URL。
                 .usernameParameter("uname"). //指定用户名的name属性
                 .passwordParameter("passwd") //指定密码的的name属性
                 //.successForwardUrl("/index") //认证成功, forward 跳转路径 始终在认证成功之后跳转到指定请求
                 //.defaultSuccessUrl("/index",true) //认证成功 redirect 之后跳转,根据上一保存请求进行成功跳转。
                 .and()
                 .csrf().disable(); //禁止csrf跨站请求保护。
     }

}
配置类有一些方法可以改变默认的配置,方法都有基本的解析,也不多赘述了。
- 最终login页面:
<!DOCTYPE html>
<html lang="en" xmlns:th="http://www.thymeleaf.org">
<head>
    <meta charset="UTF-8">
    <title>User Login</title>
</head>
<body>
<h1>User Login</h1>
<form method="post" th:action="@{/doLogin}">
    UserName:<input name="uname" type="text"><br>
    PassWord:<input name="passwd" type="text"><br>
    <input type="submit" value="Login">
</form>

</body>
</html>
自定义登录成功处理(前后端分离的情况)
项目环境
当我们项目是前后端分离开发时,上面WebSecurityConfigurer配置的 successForwardUrl和defaultSuccessUrl就失去了作用,因为后端项目没有网页去进行跳转,我们是通过ajax给前端传递信息,SpringSecurity设计了successHandler来解决这个问题。
successHandler
我们来看看这个它的代码:
	public final T successHandler(AuthenticationSuccessHandler successHandler) {
		this.successHandler = successHandler;
		return getSelf();
	}
它接受一个AuthenticationSuccessHandler,那么我们来看看这个:
它的结构图如下:
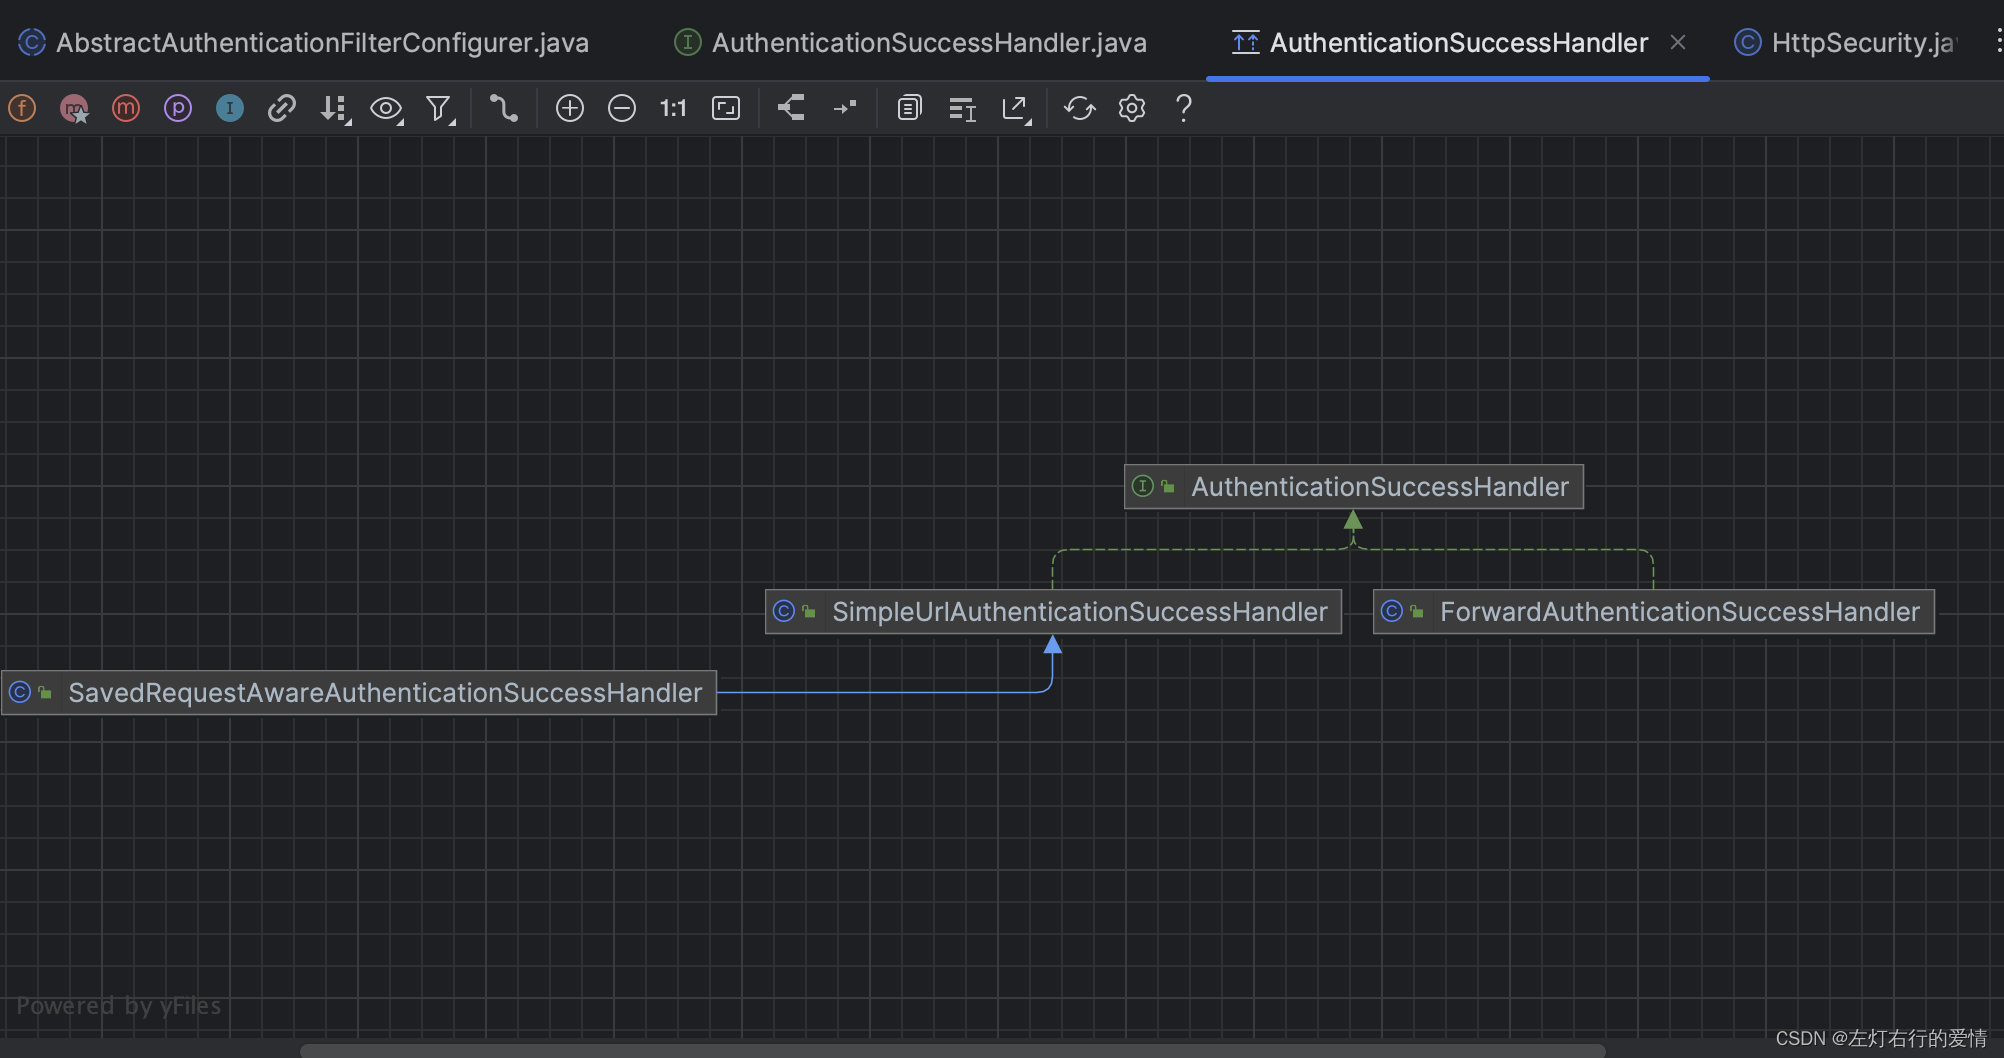
这里我们可以看到上面我们提到的successForwardUrl和defaultSuccessUrl分别是这里的ForwardAuthenticationSuccessHandler和SavedRequestAwareAuthenticationSuccessHandler。
public interface AuthenticationSuccessHandler {
	default void onAuthenticationSuccess(HttpServletRequest request, HttpServletResponse response, FilterChain chain,
			Authentication authentication) throws IOException, ServletException {
		onAuthenticationSuccess(request, response, authentication);
		chain.doFilter(request, response);
	}
	void onAuthenticationSuccess(HttpServletRequest request, HttpServletResponse response,
			Authentication authentication) throws IOException, ServletException;
}
这是一个接口类型,后面我们要写它的实现类,它的实现类默认是有3个,在上面的结构图里面都有介绍。
里面有两个默认方法:
第一个默认方法是处理一些特殊情况,这里我们先忽略就行。
第二个方法是提供了让我们实现类去实现的方法。
自定义AuthenticationSucccessHandler实现
在前后端分离开发中不需要成功之后跳转⻚⾯。
只需要给前端返回⼀个 JSON 通知登录成功还是失败与否。这个时候可以通过⾃定义
AuthenticationSucccessHandler实现。
/**
* 自定义认证成功之后处理
*/
public class MyAuthenticatioinSuccessHandler implements AuthenticationSuccessHandler {
    @Override
    public void onAuthenticationSuccess(HttpServletRequest request, HttpServletResponse response, Authentication authentication) throws IOException, ServletException {
        Map<String,Object> result = new HashMap<>();
        result.put("msg","登陆成功");
        result.put("status",200);
        result.put("authentication", authentication);
        response.setContentType("application/json;charset=UTF-8");
        String s = new ObjectMapper().writeValueAsString(request);
        response.getWriter().println(s);
    }
}
配置AuthenticationSuccessHandler
     protected void configure(HttpSecurity http) throws Exception {
         http.authorizeRequests()
                 .mvcMatchers("/login.html").permitAll()
                 .mvcMatchers("/index").permitAll() //放行资源写在前面。
                 .anyRequest().authenticated()
                 .and()
                 .formLogin()
                 .loginPage("/login.html") //用来指定默认登陆页面,注意:一旦自定义登陆页面以后必须只能登陆URL。
                 .loginProcessingUrl("/doLogin")  //指定处理登陆请求URL。
                 .usernameParameter("uname")
                 .passwordParameter("passwd")
                 .successHandler(new MyAuthenticatioinSuccessHandler()) //认证成功时处理,前后端分离解决方案。
                 .and()
                 .csrf().disable(); //禁止csrf跨站请求保护。
     }
显示登录失败处理
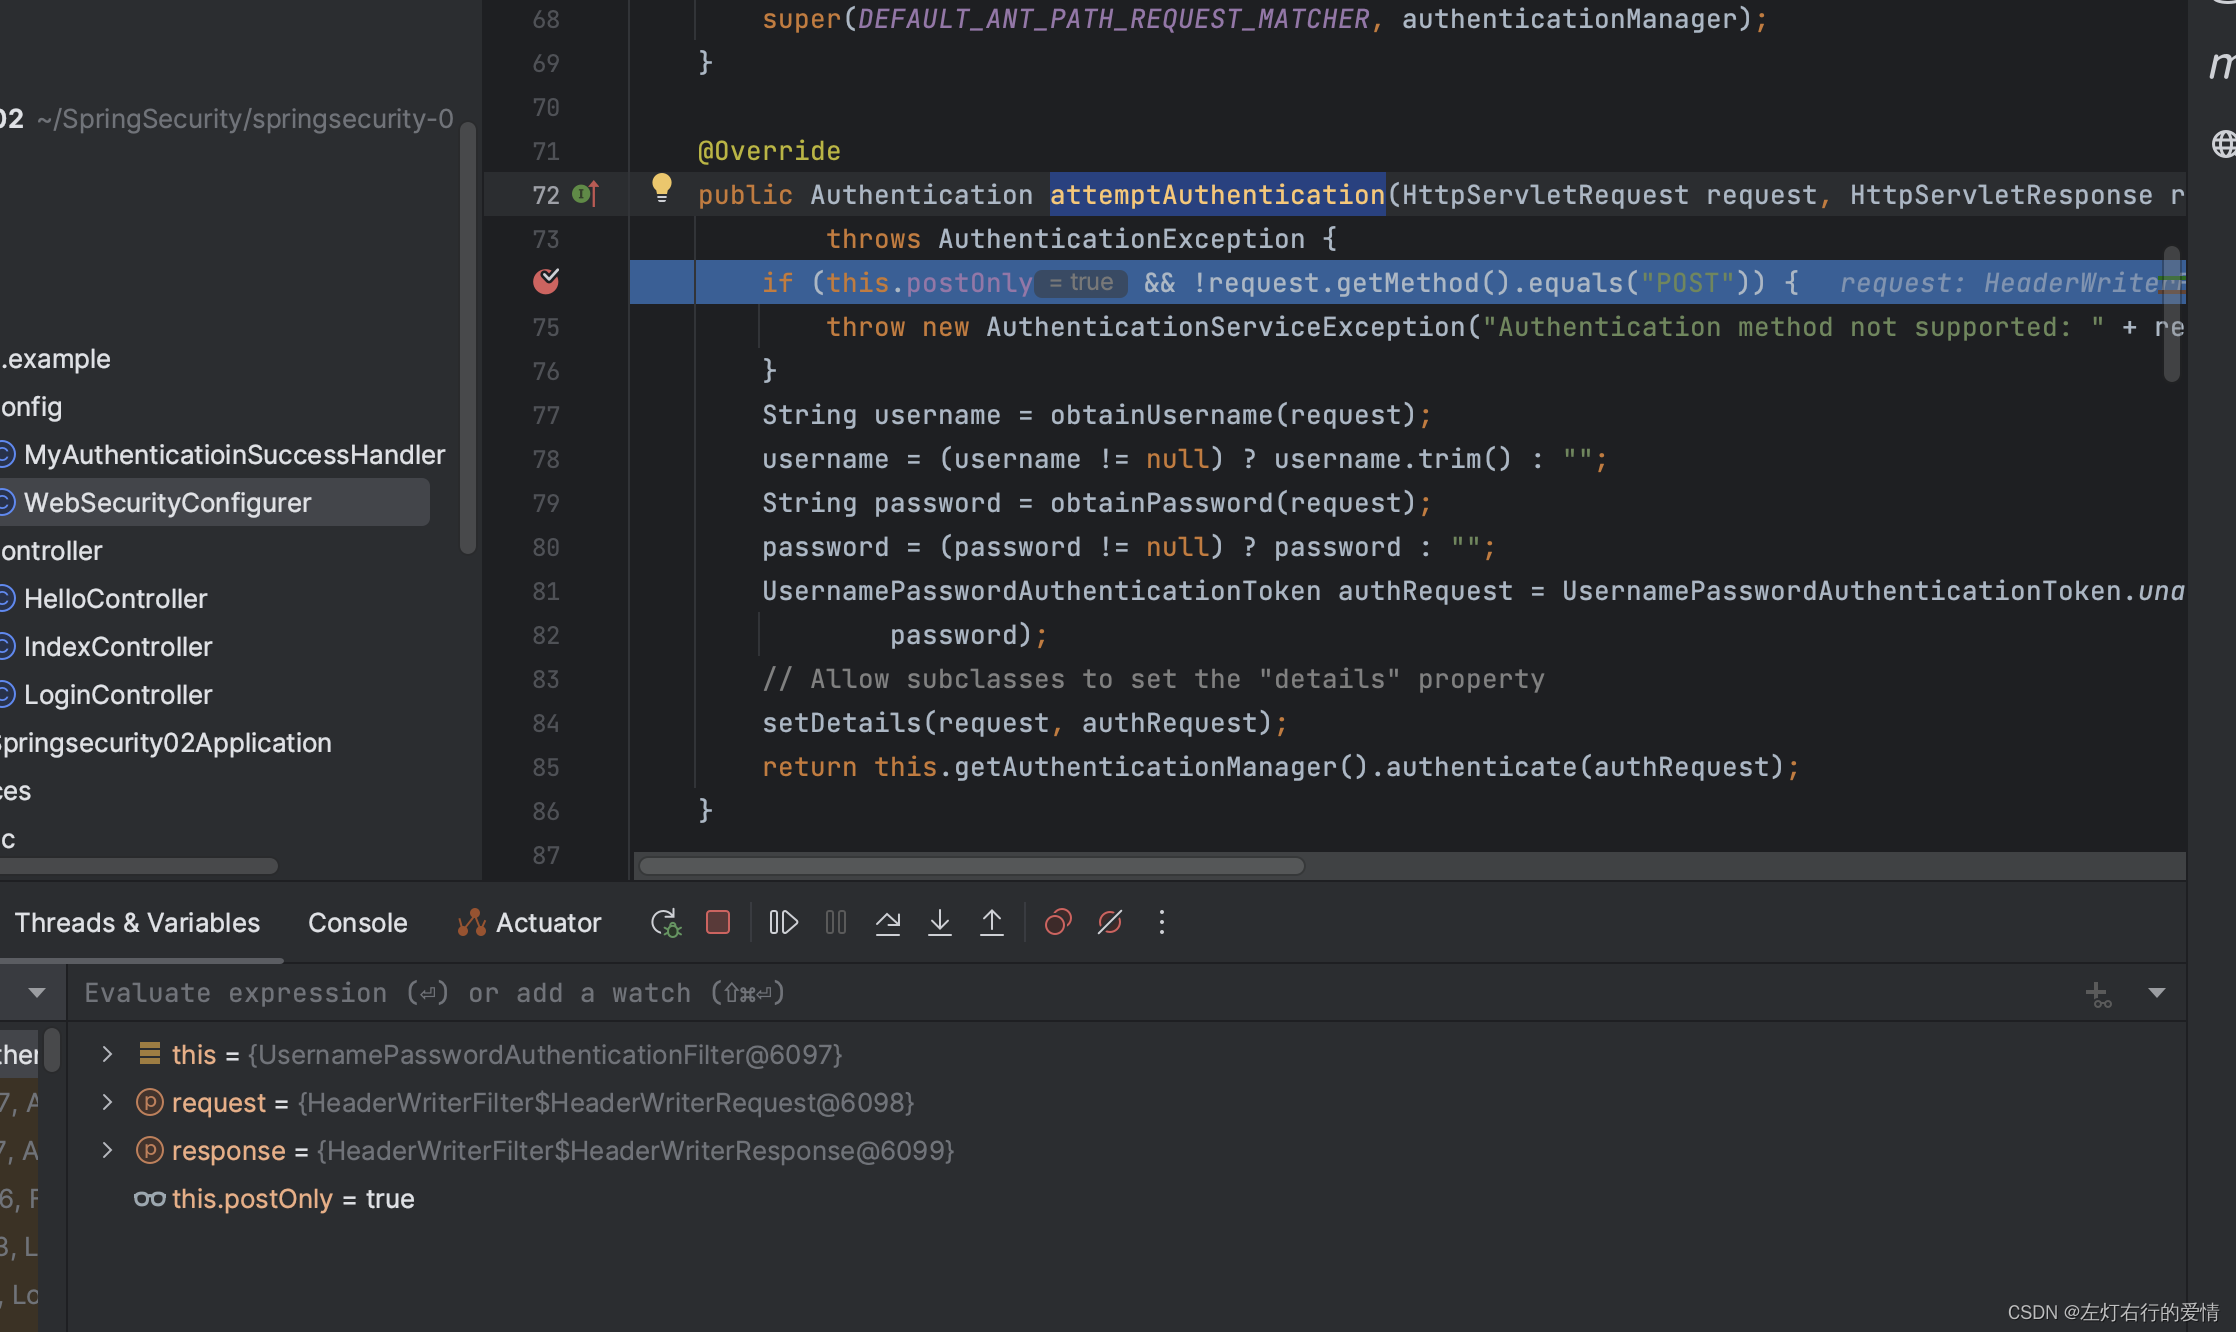
首先我们在登陆页面输入错误的信息,然后再进入到attemptAuthentication中,如下图:
然后我们进入到最后一行代码里的authenticate方法:
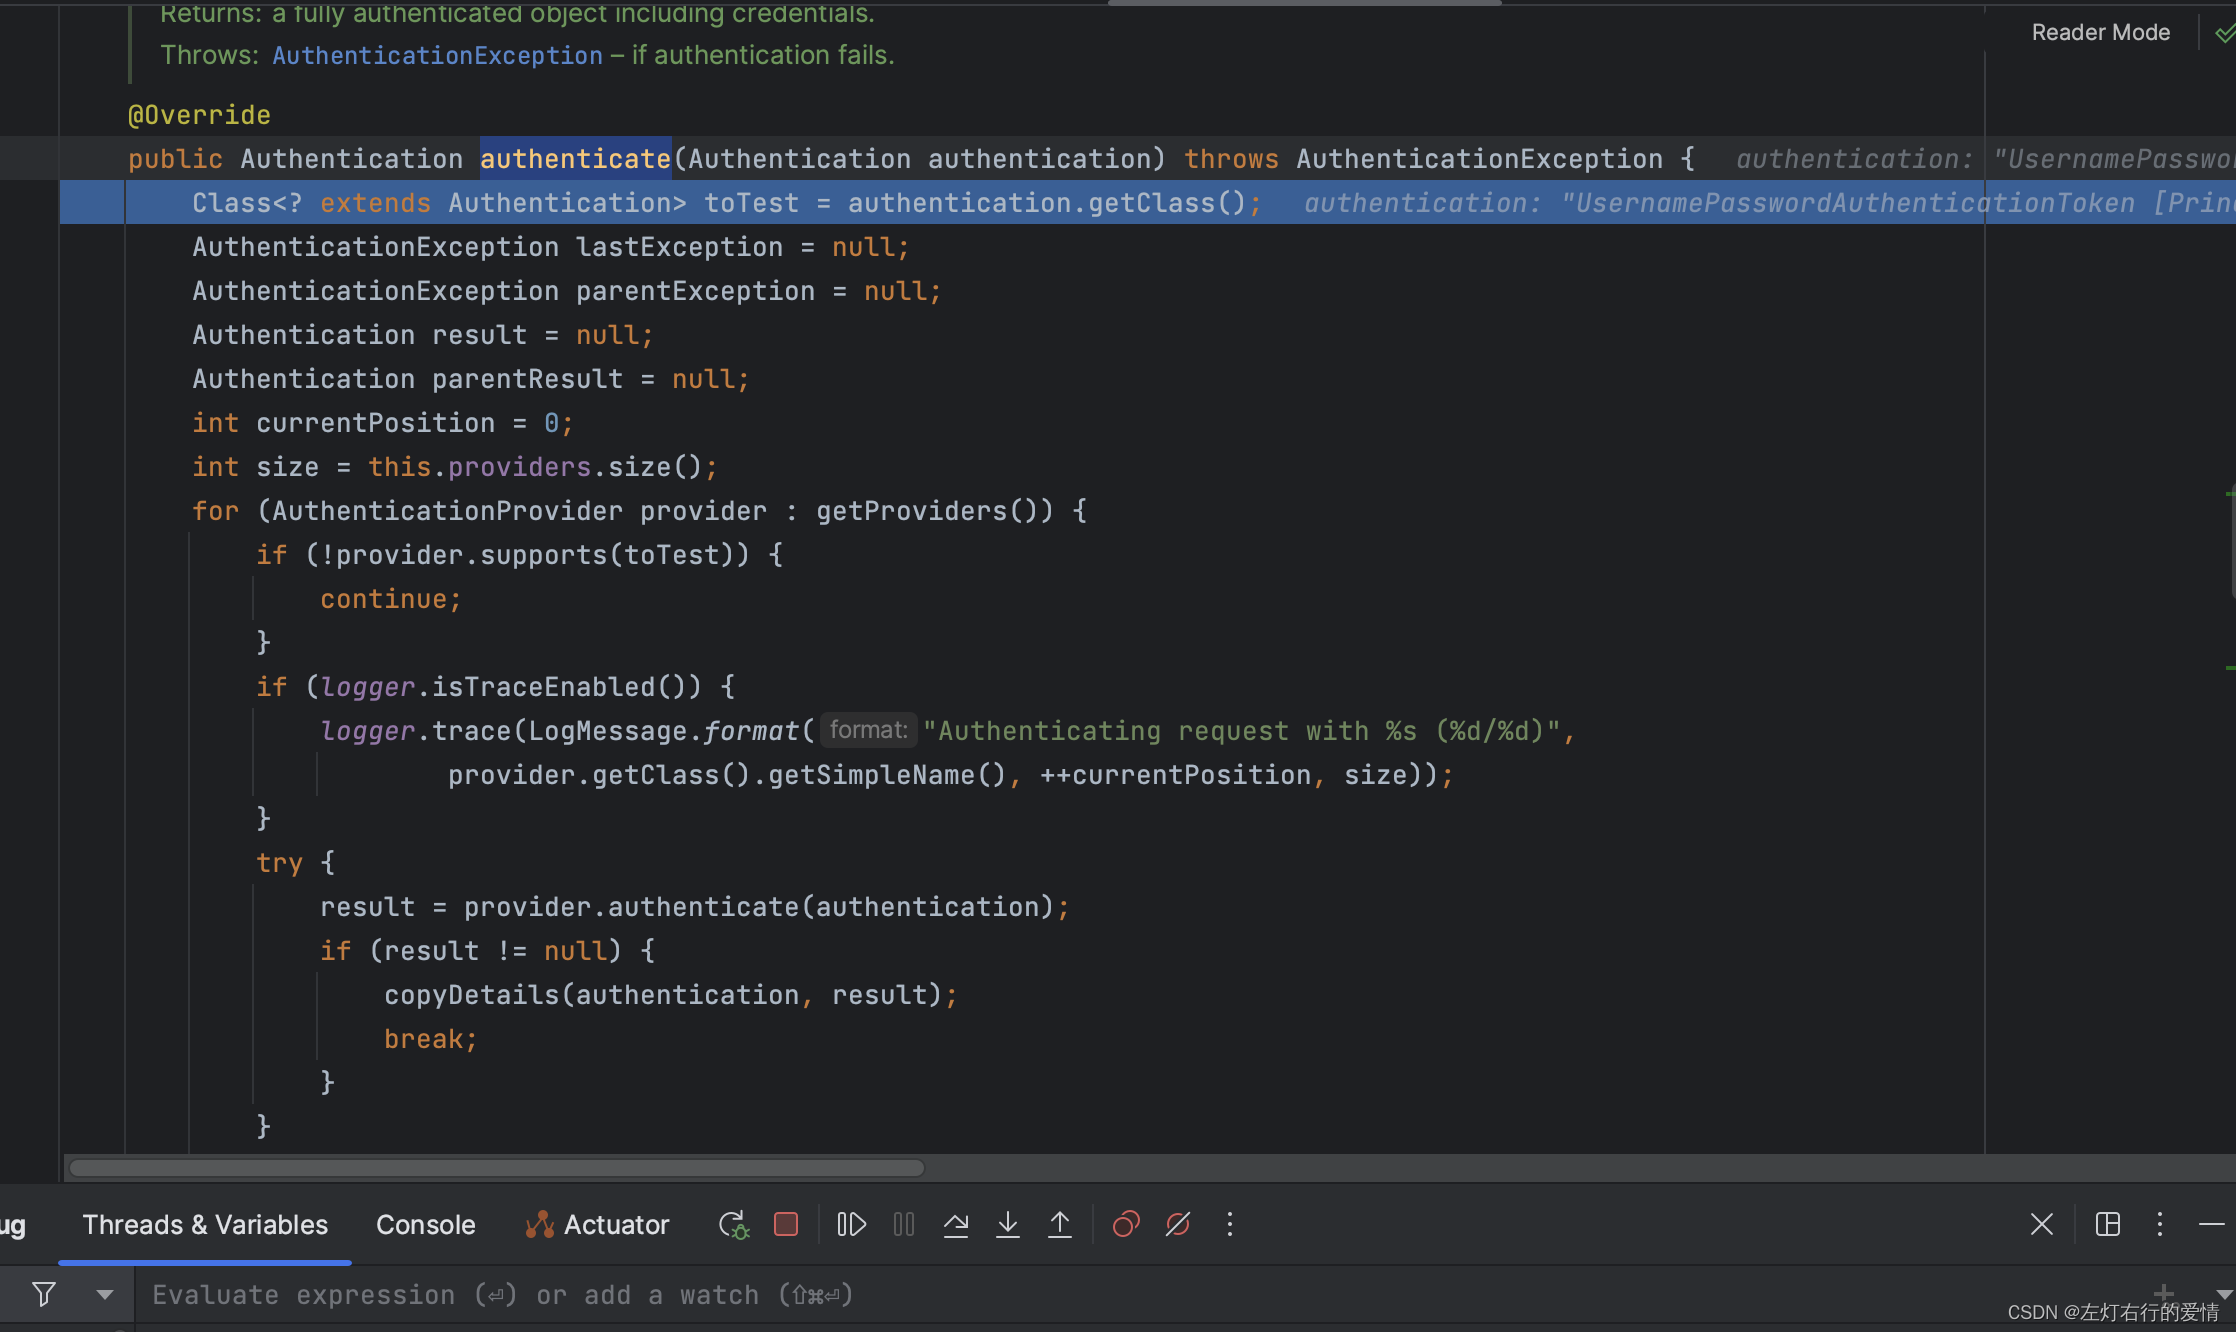
这个方法是在ProviderManager里面,上面有个变量:private List<AuthenticationProvider> providers = Collections.emptyList();
存储了AuthenticationProvider,那么在这里是存储了一个基于内存方式的一个认证AnonymousAuthenticationProvider
。
此时provider为:AnonymousAuthenticationProvider
解析一下这个方法:
public Authentication authenticate(Authentication authentication) throws AuthenticationException {
	// 获取待验证的Authentication对象的具体类
	Class<? extends Authentication> toTest = authentication.getClass();
	AuthenticationException lastException = null;
	AuthenticationException parentException = null;
	Authentication result = null;
	Authentication parentResult = null;
	int currentPosition = 0;
	int size = this.providers.size();

	// 遍历所有的AuthenticationProvider进行身份验证
	for (AuthenticationProvider provider : getProviders()) {
		// 检查当前Provider是否支持待验证的Authentication对象的类
		if (!provider.supports(toTest)) {
			continue;
		}
		// 输出日志,指示当前使用的AuthenticationProvider
		if (logger.isTraceEnabled()) {
			logger.trace(LogMessage.format("Authenticating request with %s (%d/%d)",
					provider.getClass().getSimpleName(), ++currentPosition, size));
		}
		try {
			// 调用Provider的authenticate方法进行身份验证
			result = provider.authenticate(authentication);
			if (result != null) {
				// 如果验证成功,将验证结果的详细信息复制到原始的Authentication对象中
				copyDetails(authentication, result);
				break;
			}
		}
		catch (AccountStatusException | InternalAuthenticationServiceException ex) {
			// 处理账户状态异常和内部认证服务异常
			prepareException(ex, authentication);
			// 如果身份验证失败是由于账户状态异常引起的,直接抛出异常,不再继续尝试其他Provider
			throw ex;
		}
		catch (AuthenticationException ex) {
			// 记录最后一个AuthenticationException,用于在没有找到合适的Provider时抛出异常
			lastException = ex;
		}
	}

	if (result == null && this.parent != null) {
		// 如果所有的Provider都无法验证通过,并且存在父级AuthenticationManager,则调用父级AuthenticationManager进行验证
		try {
			parentResult = this.parent.authenticate(authentication);
			result = parentResult;
		}
		catch (ProviderNotFoundException ex) {
			// 如果父级AuthenticationManager找不到合适的Provider,则忽略该异常,继续抛出下面的异常
		}
		catch (AuthenticationException ex) {
			// 记录父级AuthenticationManager抛出的异常
			parentException = ex;
			lastException = ex;
		}
	}

	if (result != null) {
		// 如果验证成功
		if (this.eraseCredentialsAfterAuthentication && (result instanceof CredentialsContainer)) {
			// 如果配置为在验证完成后擦除验证结果中的凭据信息,则执行擦除操作
			((CredentialsContainer) result).eraseCredentials();
		}
		// 如果父级AuthenticationManager存在并且验证成功,则父级AuthenticationManager会发布一个AuthenticationSuccessEvent事件。
		// 为避免重复发布事件,这里进行了检查。
		if (parentResult == null) {
			this.eventPublisher.publishAuthenticationSuccess(result);
		}
		return result;
	}

	// 如果所有的Provider都无法验证通过,抛出异常
	if (lastException == null) {
		lastException = new ProviderNotFoundException(this.messages.getMessage("ProviderManager.providerNotFound",
				new Object[] { toTest.getName() }, "No AuthenticationProvider found for {0}"));
	}
	// 如果父级AuthenticationManager存在并且验证失败,则父级AuthenticationManager会发布一个AbstractAuthenticationFailureEvent事件。
	// 为避免重复发布事件,这里进行了检查。
	if (parentException == null) {
		prepareException(lastException, authentication);
	}
	throw lastException;
}
我们debug流程走一遍,看看它如是如何存储失败的信息的。
进入到for循环里面: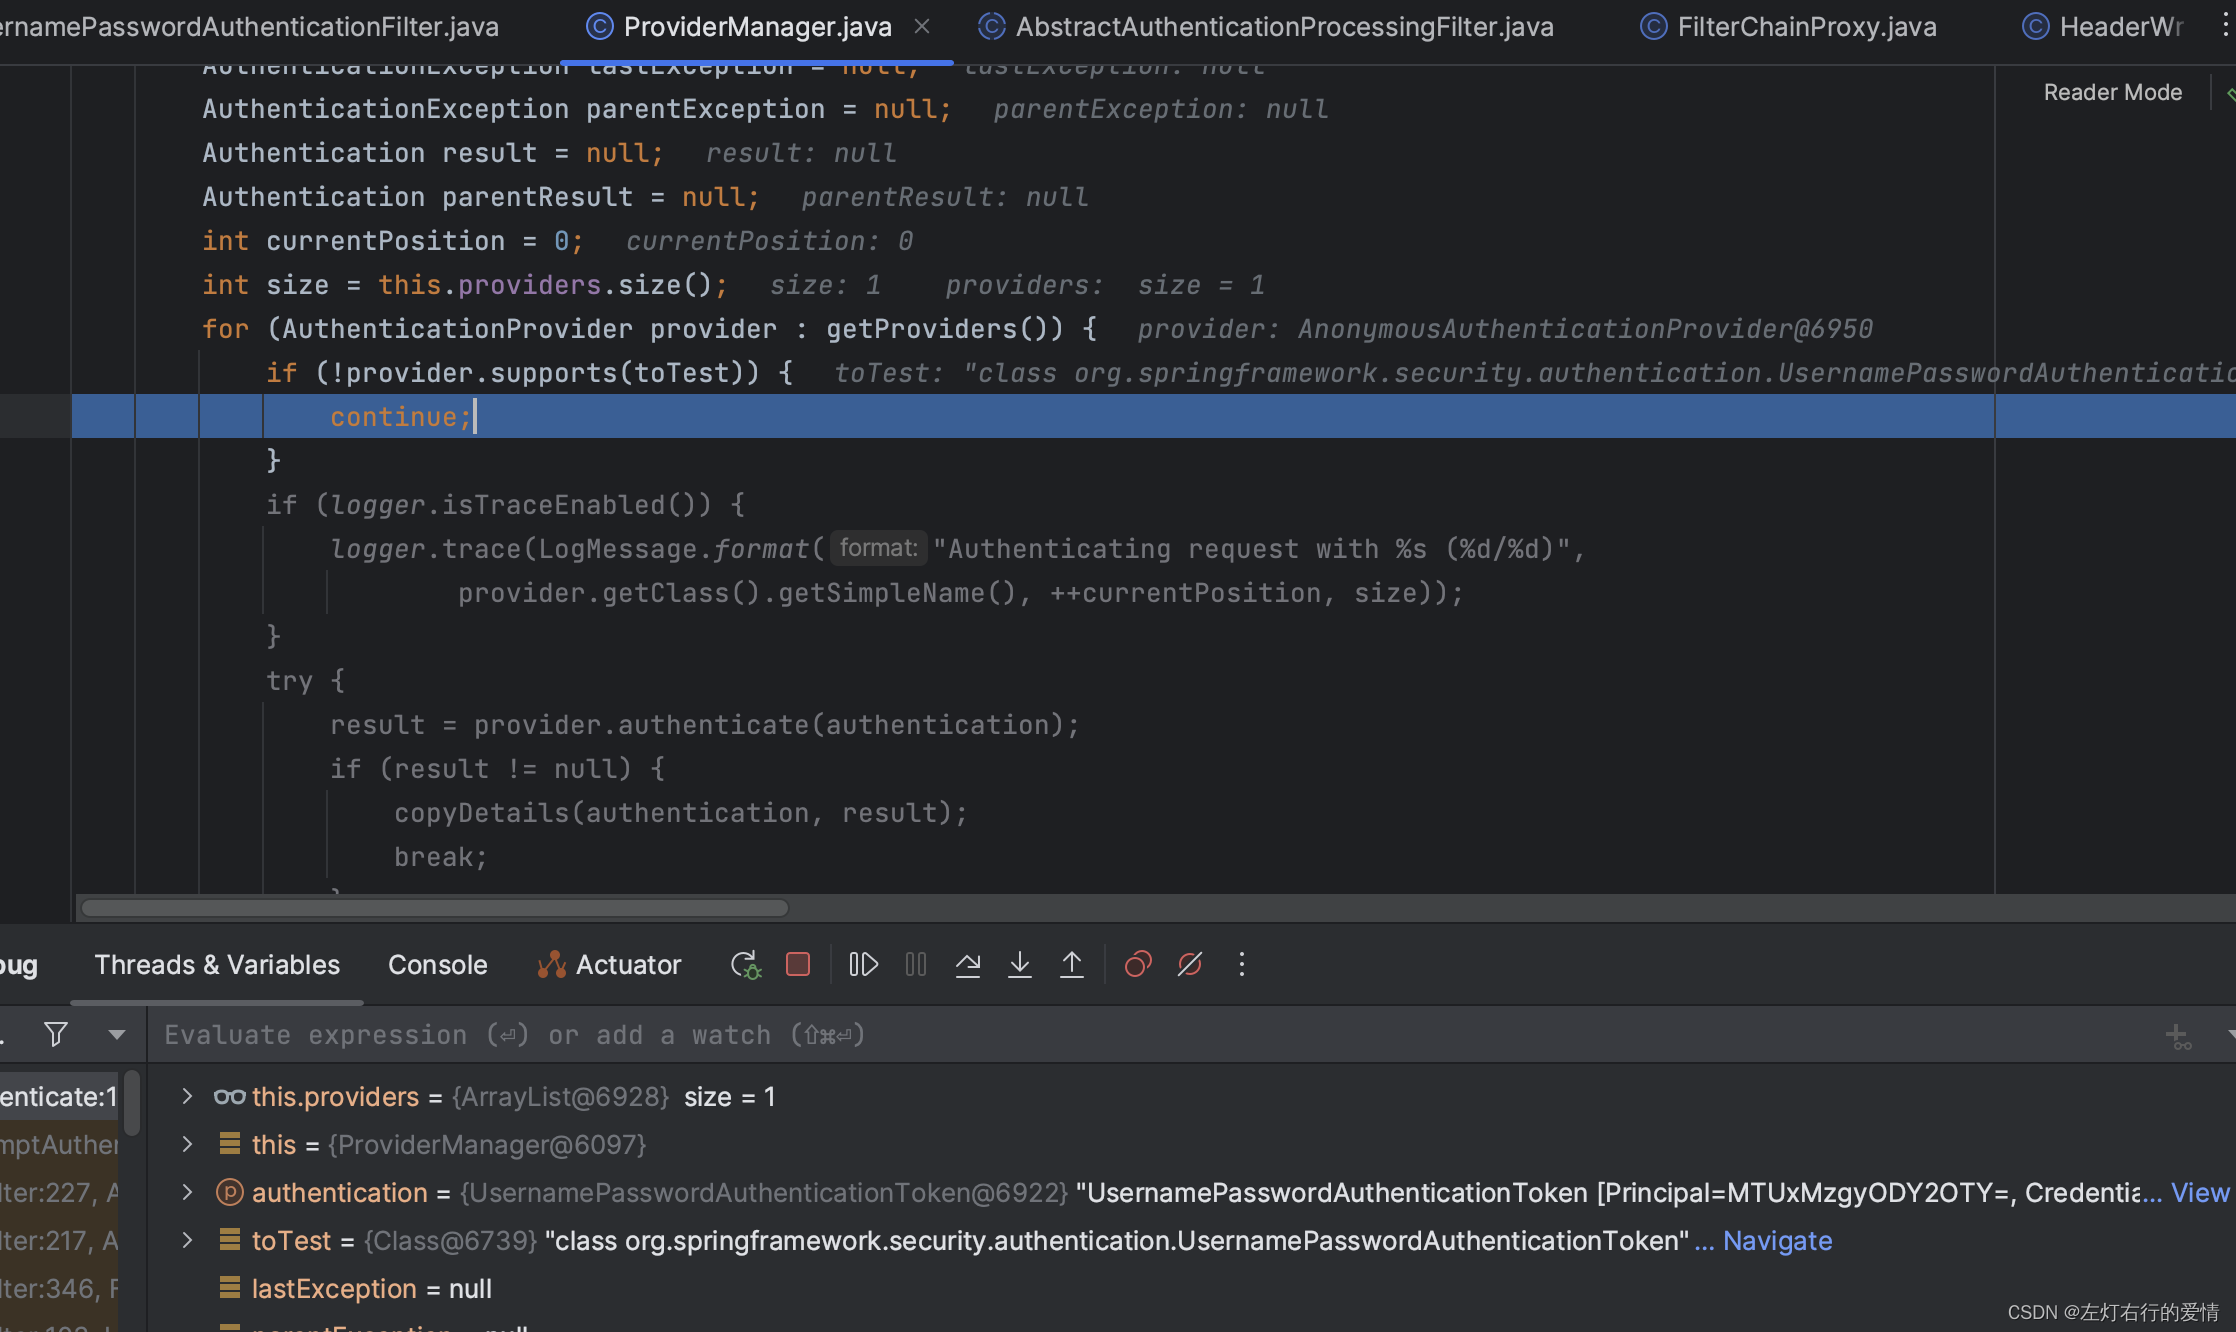
我们看到,唯一的AuthenticationProvider不支持待验证的Authentication对象的类,所以直接进入方法体里面执行continue。
然后因为只有一个,所以再次执行for循环时跳出for循环,执行下面的代码:
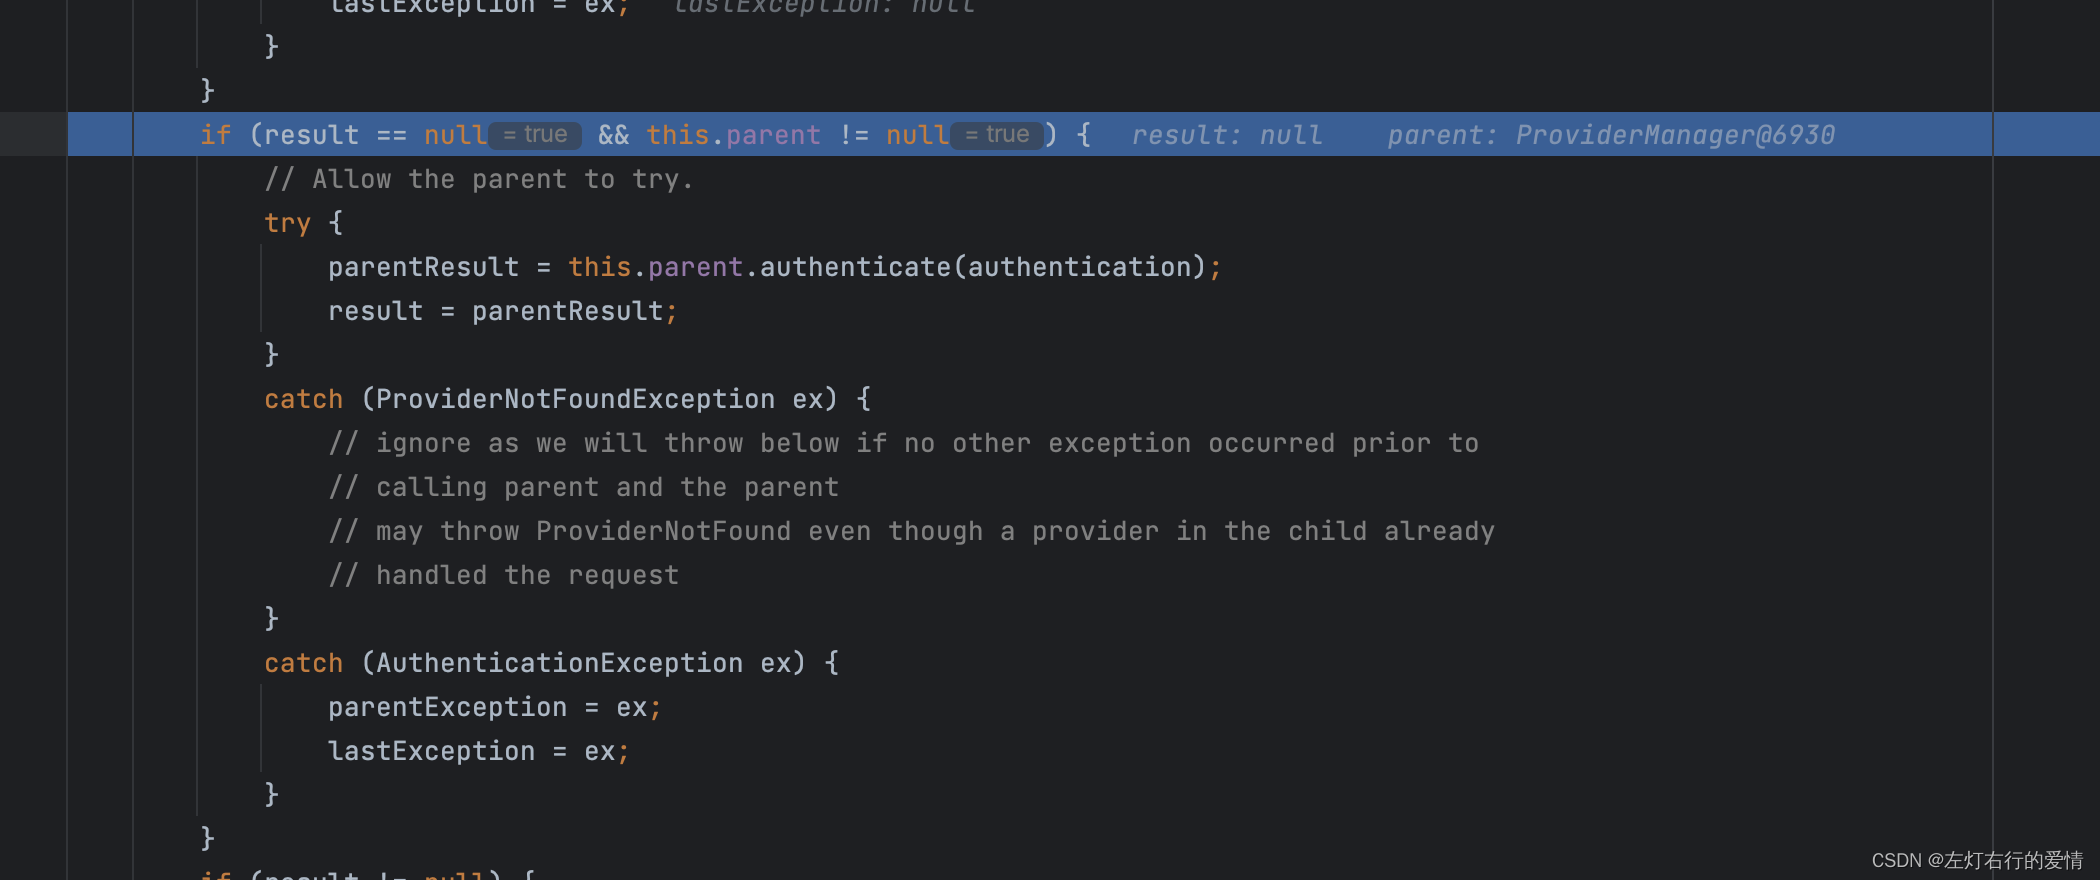
这个时候发现:所有的Provider在上面的for循环里都无法验证通过(因为执行continue了,根本没执行for循环里面的代码),并且存在父级AuthenticationManager,则调用父级AuthenticationManager进行验证。
接下来执行父级AuthenticationManager进行验证,依旧是走这个方法,注意下面的providers中只有DaoAuthticationProvider:
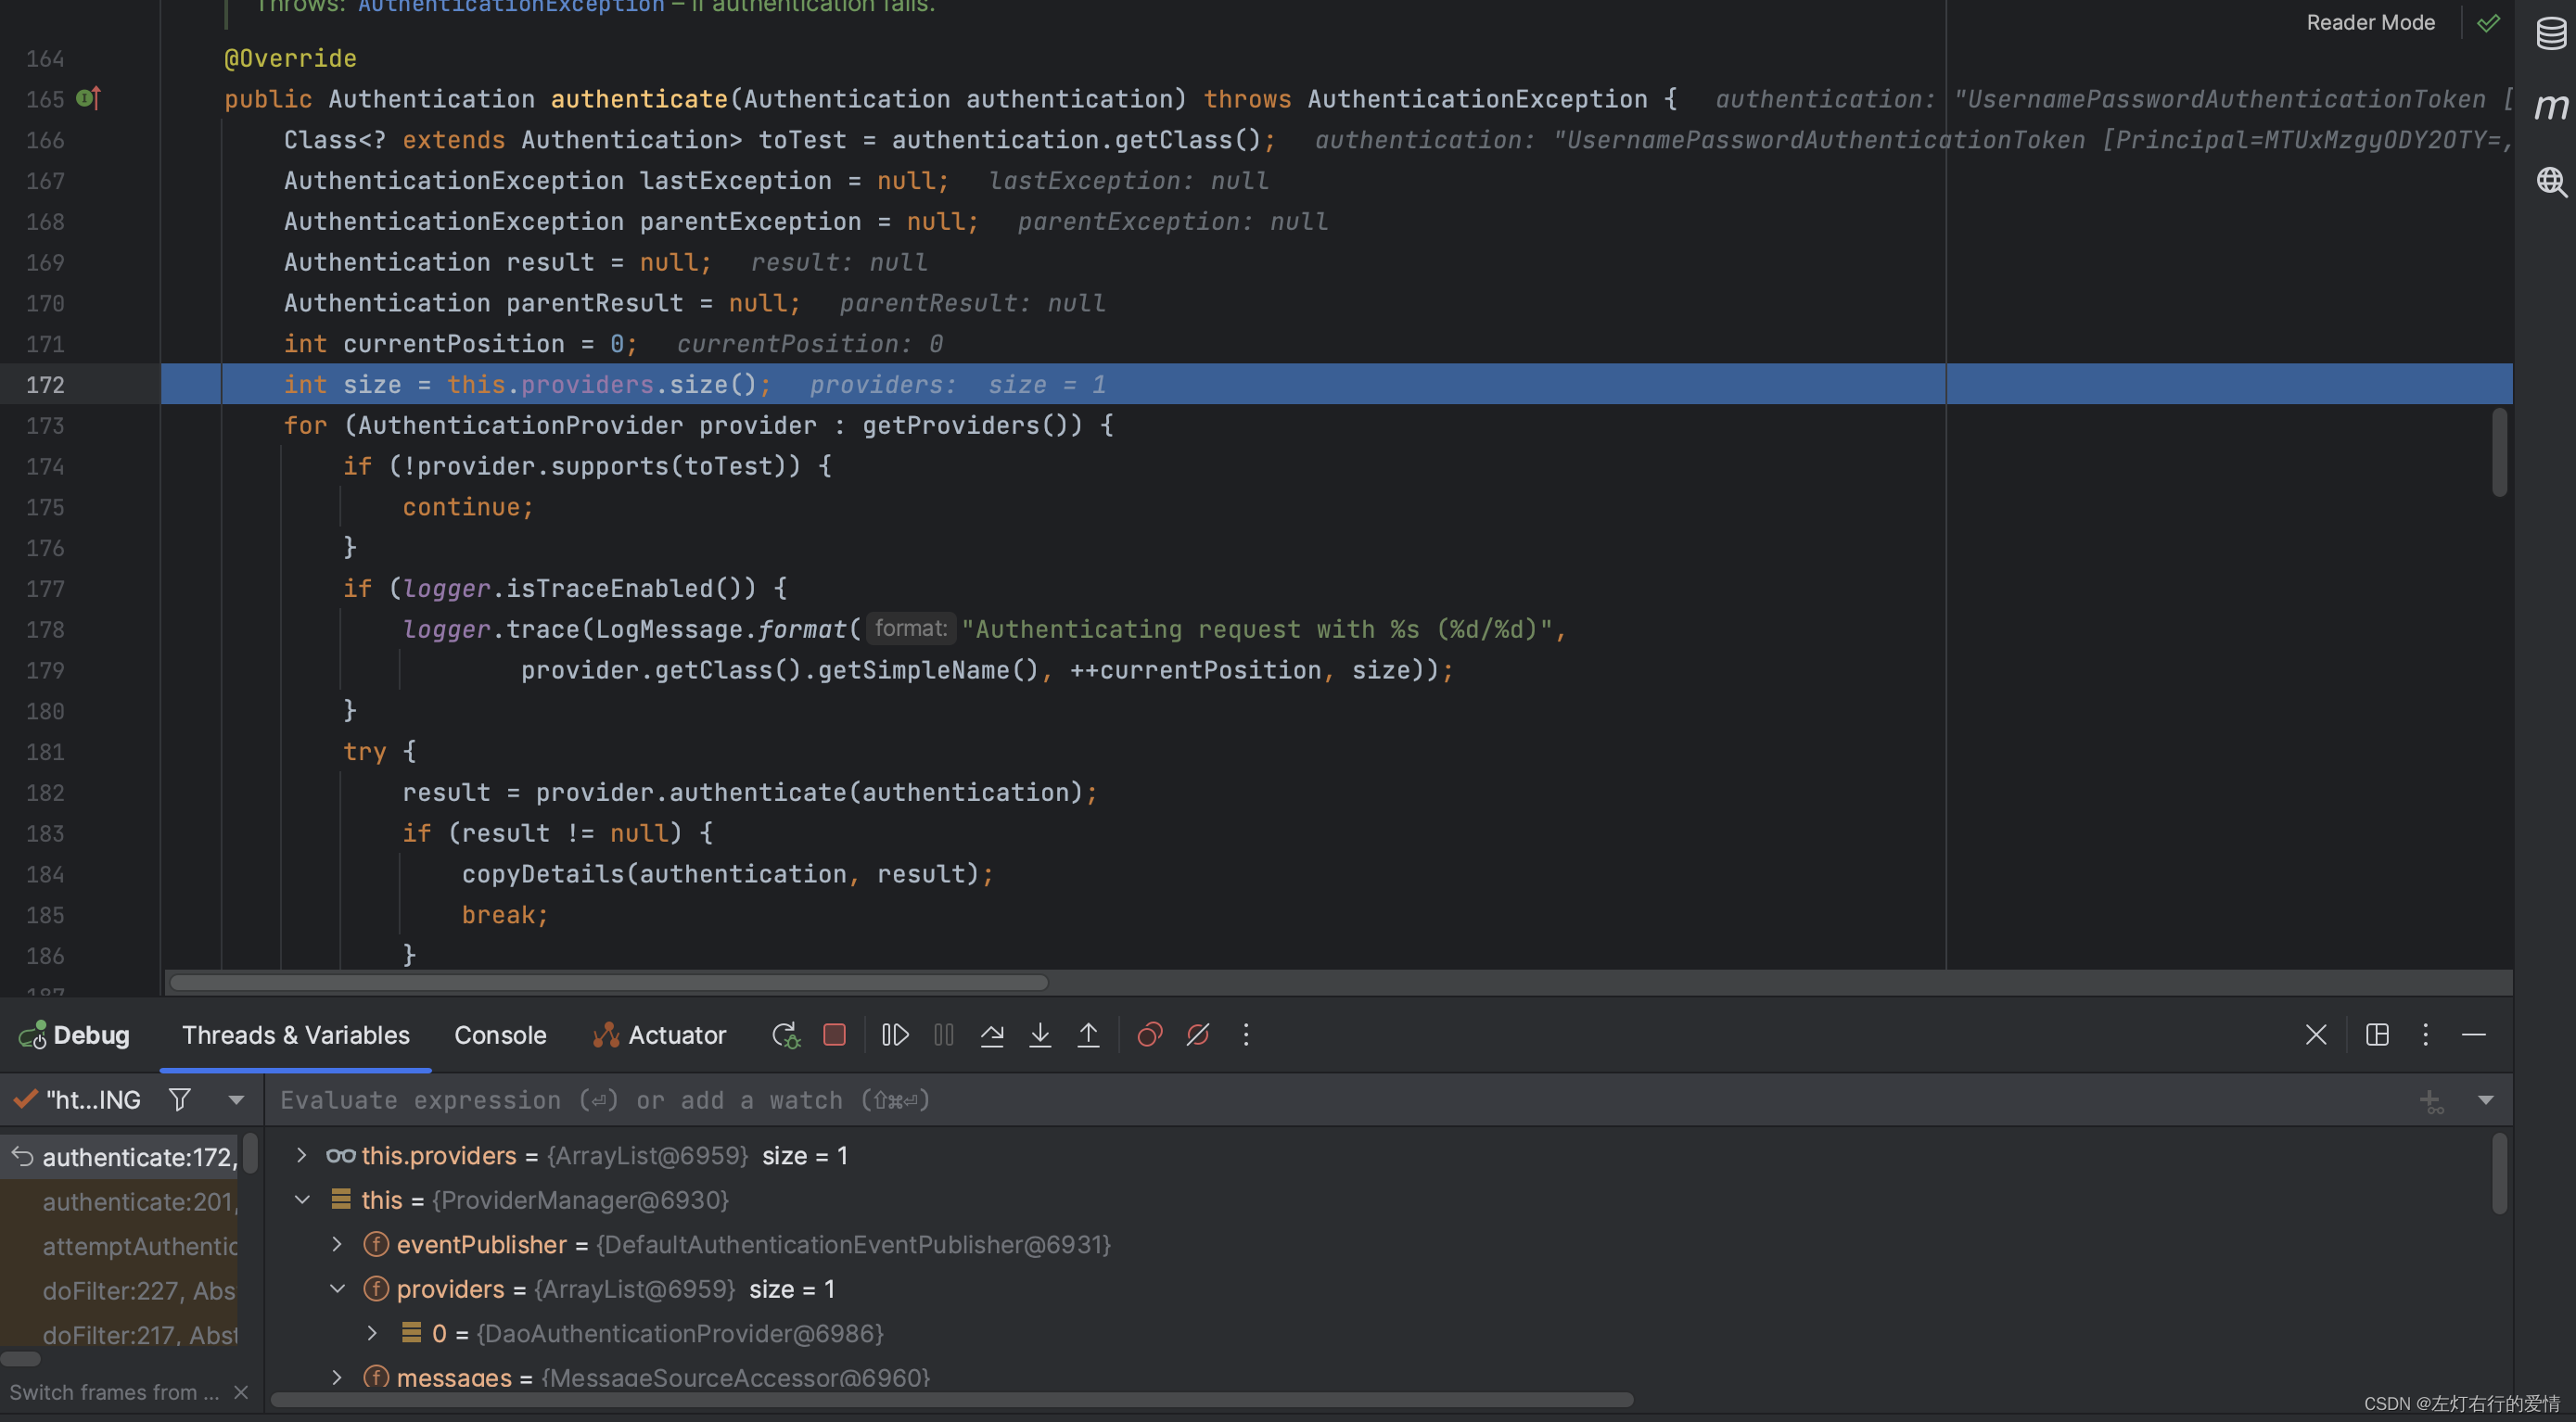
走到for循环的第一个if判断时,因为支持待验证的Authentication对象的类,所以不进去方法体,当走到下图时: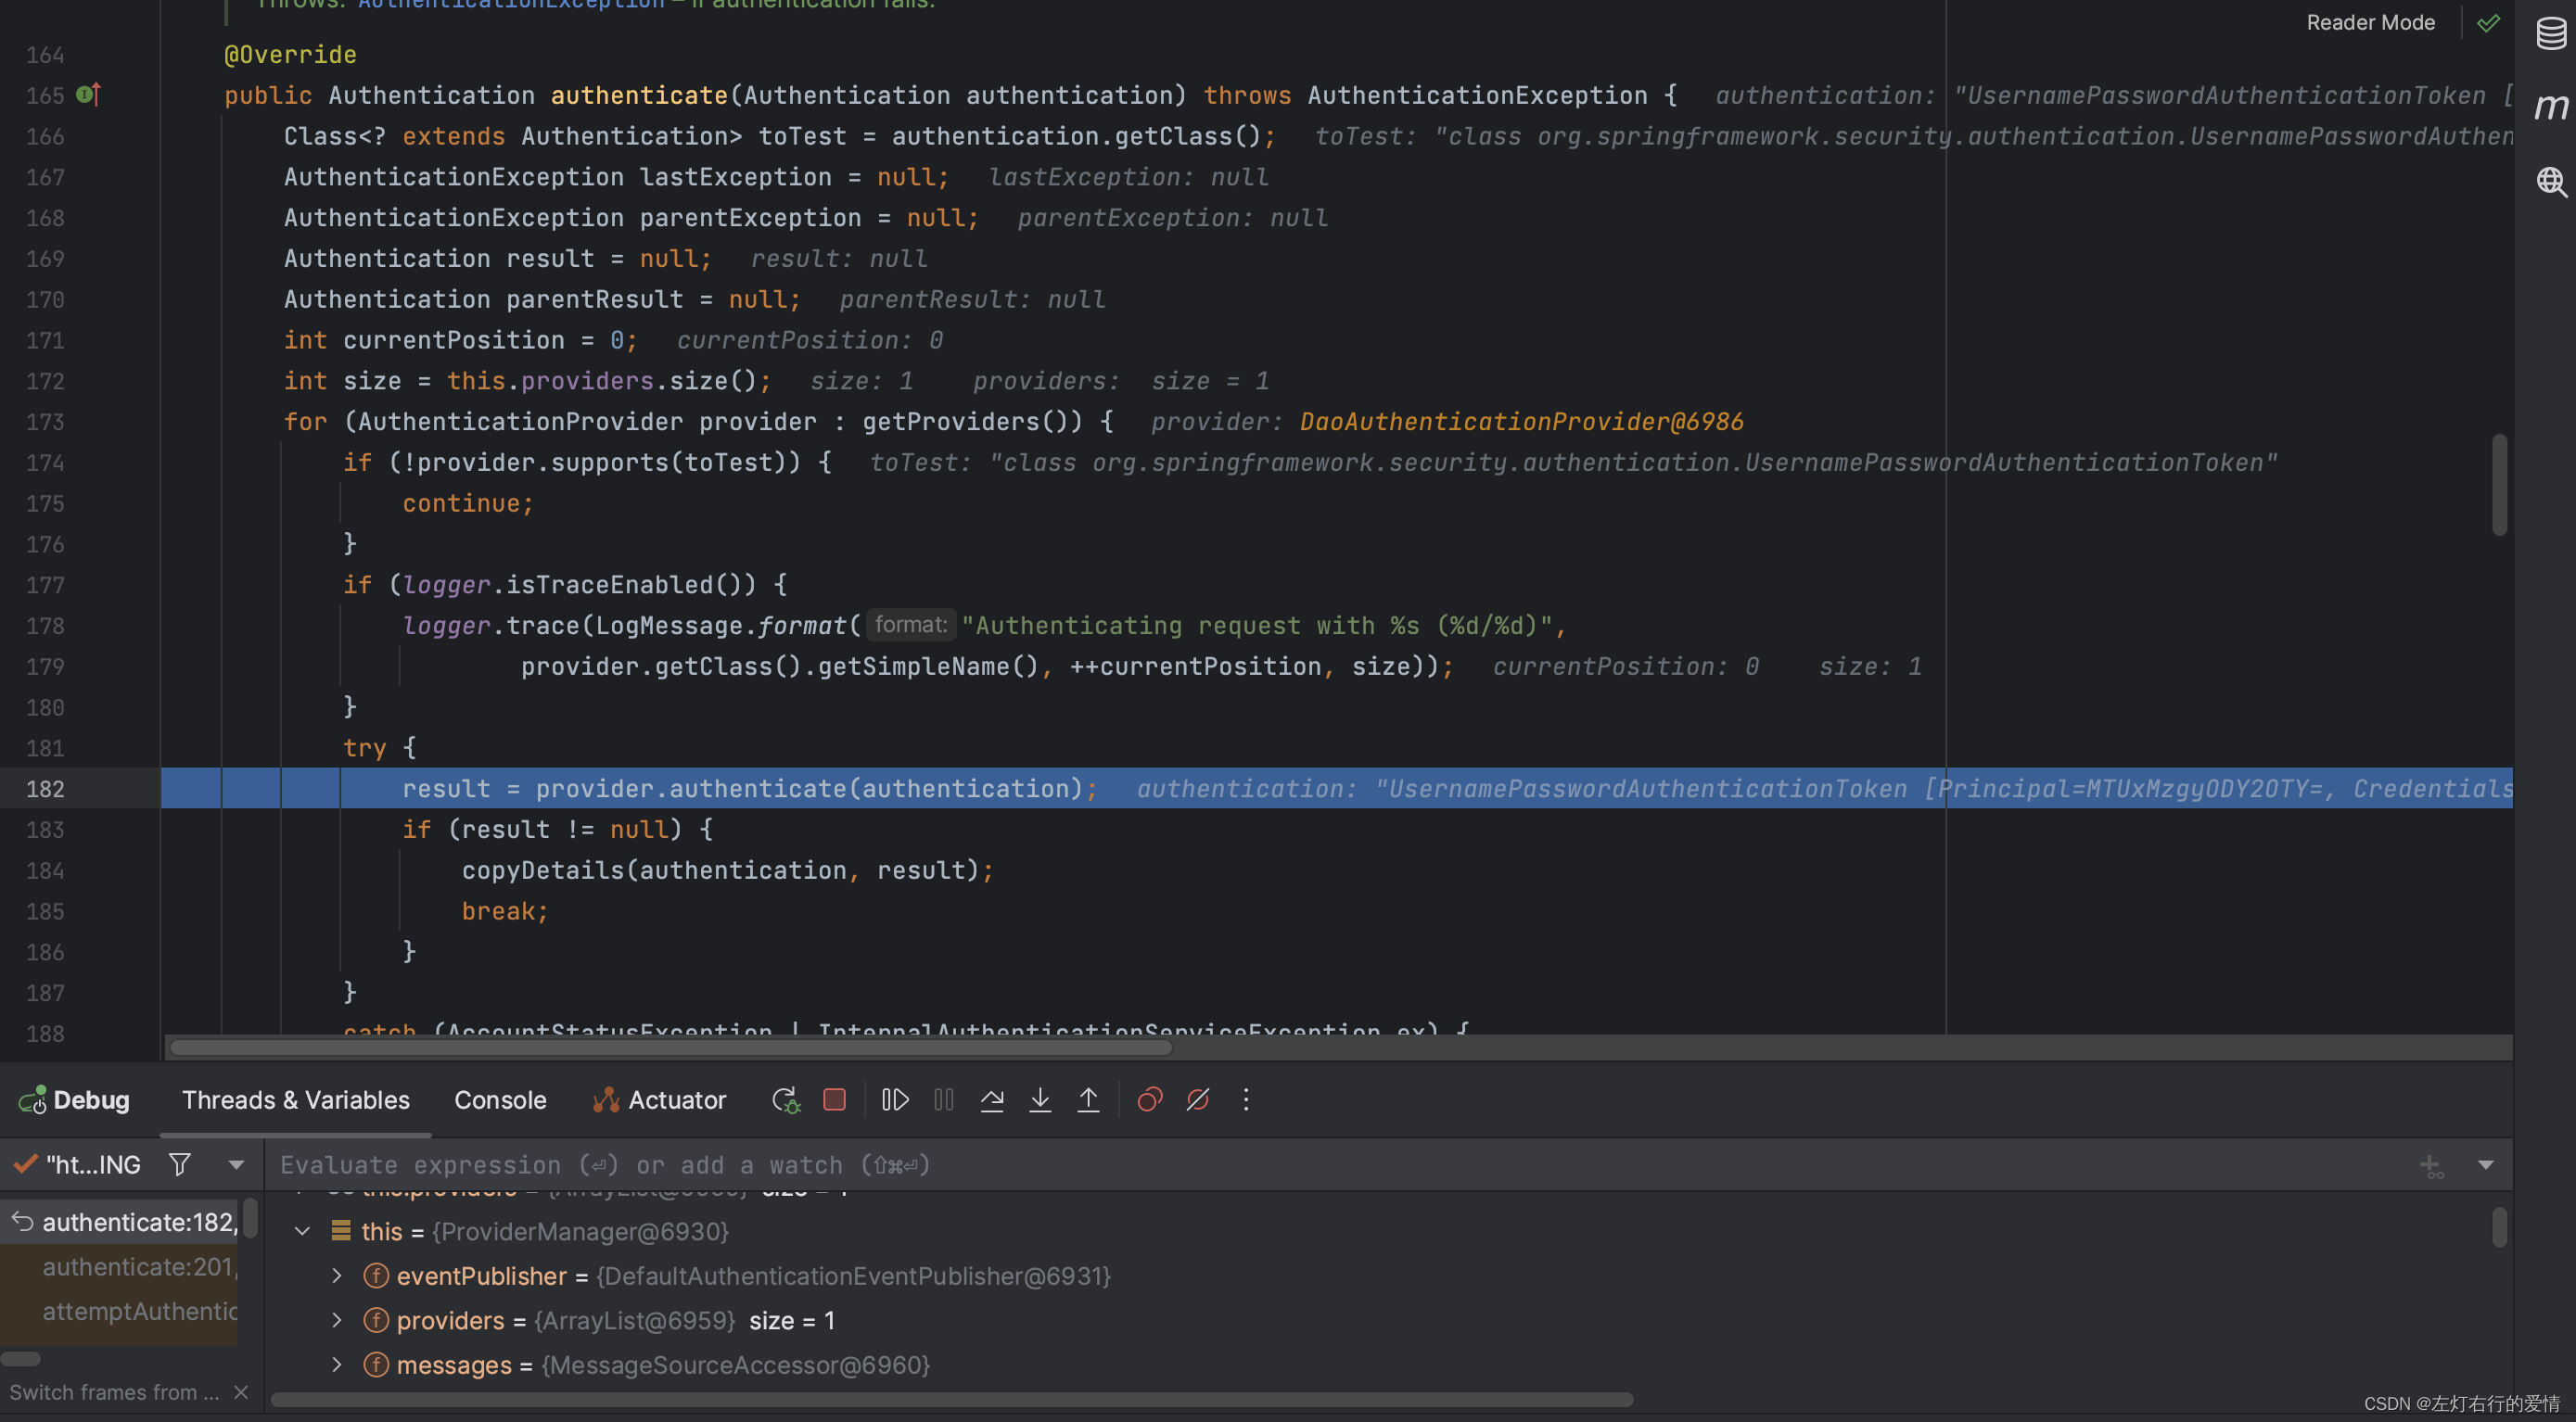
此时provider为DaoAuthticationProvider,进入验证方法,我们先解析方法:
public Authentication authenticate(Authentication authentication) throws AuthenticationException {
	// 验证传入的 authentication 参数是否为 UsernamePasswordAuthenticationToken 类型
	Assert.isInstanceOf(UsernamePasswordAuthenticationToken.class, authentication,
			() -> this.messages.getMessage("AbstractUserDetailsAuthenticationProvider.onlySupports",
					"Only UsernamePasswordAuthenticationToken is supported"));

	// 从 authentication 参数中获取用户名
	String username = determineUsername(authentication);

	// 判断是否从缓存中获取了用户信息
	boolean cacheWasUsed = true;
	UserDetails user = this.userCache.getUserFromCache(username);

	// 如果缓存中不存在用户信息,则从数据源中检索用户信息
	if (user == null) {
		cacheWasUsed = false;
		try {
			// 通过 retrieveUser 方法从数据源中检索用户信息
			user = retrieveUser(username, (UsernamePasswordAuthenticationToken) authentication);
		} catch (UsernameNotFoundException ex) {
			this.logger.debug("Failed to find user '" + username + "'");
			if (!this.hideUserNotFoundExceptions) {
				throw ex;
			}
			// 如果隐藏了用户未找到异常,则抛出 BadCredentialsException 异常
			throw new BadCredentialsException(this.messages
					.getMessage("AbstractUserDetailsAuthenticationProvider.badCredentials", "Bad credentials"));
		}
		Assert.notNull(user, "retrieveUser returned null - a violation of the interface contract");
	}

	try {
		// 对用户进行预验证,如账号是否过期等
		this.preAuthenticationChecks.check(user);
		// 对用户进行附加验证,如密码是否正确等
		additionalAuthenticationChecks(user, (UsernamePasswordAuthenticationToken) authentication);
	} catch (AuthenticationException ex) {
		if (!cacheWasUsed) {
			throw ex;
		}
		// 如果在缓存未使用的情况下发生了异常,则再次尝试检索用户信息并进行验证
		cacheWasUsed = false;
		user = retrieveUser(username, (UsernamePasswordAuthenticationToken) authentication);
		this.preAuthenticationChecks.check(user);
		additionalAuthenticationChecks(user, (UsernamePasswordAuthenticationToken) authentication);
	}

	// 对用户进行后验证,如账号是否锁定等
	this.postAuthenticationChecks.check(user);

	// 如果缓存未使用,则将用户信息存入缓存
	if (!cacheWasUsed) {
		this.userCache.putUserInCache(user);
	}

	Object principalToReturn = user;
	if (this.forcePrincipalAsString) {
		// 如果强制将 principal 返回为字符串,则返回用户名作为 principal
		principalToReturn = user.getUsername();
	}

	// 创建验证成功的 Authentication 对象并返回
	return createSuccessAuthentication(principalToReturn, authentication, user);
}
下面走debug的流程,执行到第一个判断,发现不是从缓存中拿到的用户数据:

然后进入try,执行retrieveUser,从数据源拿用户数据,发现拿不到(因为我们输入的是错误的数据),执行下面的catch方法: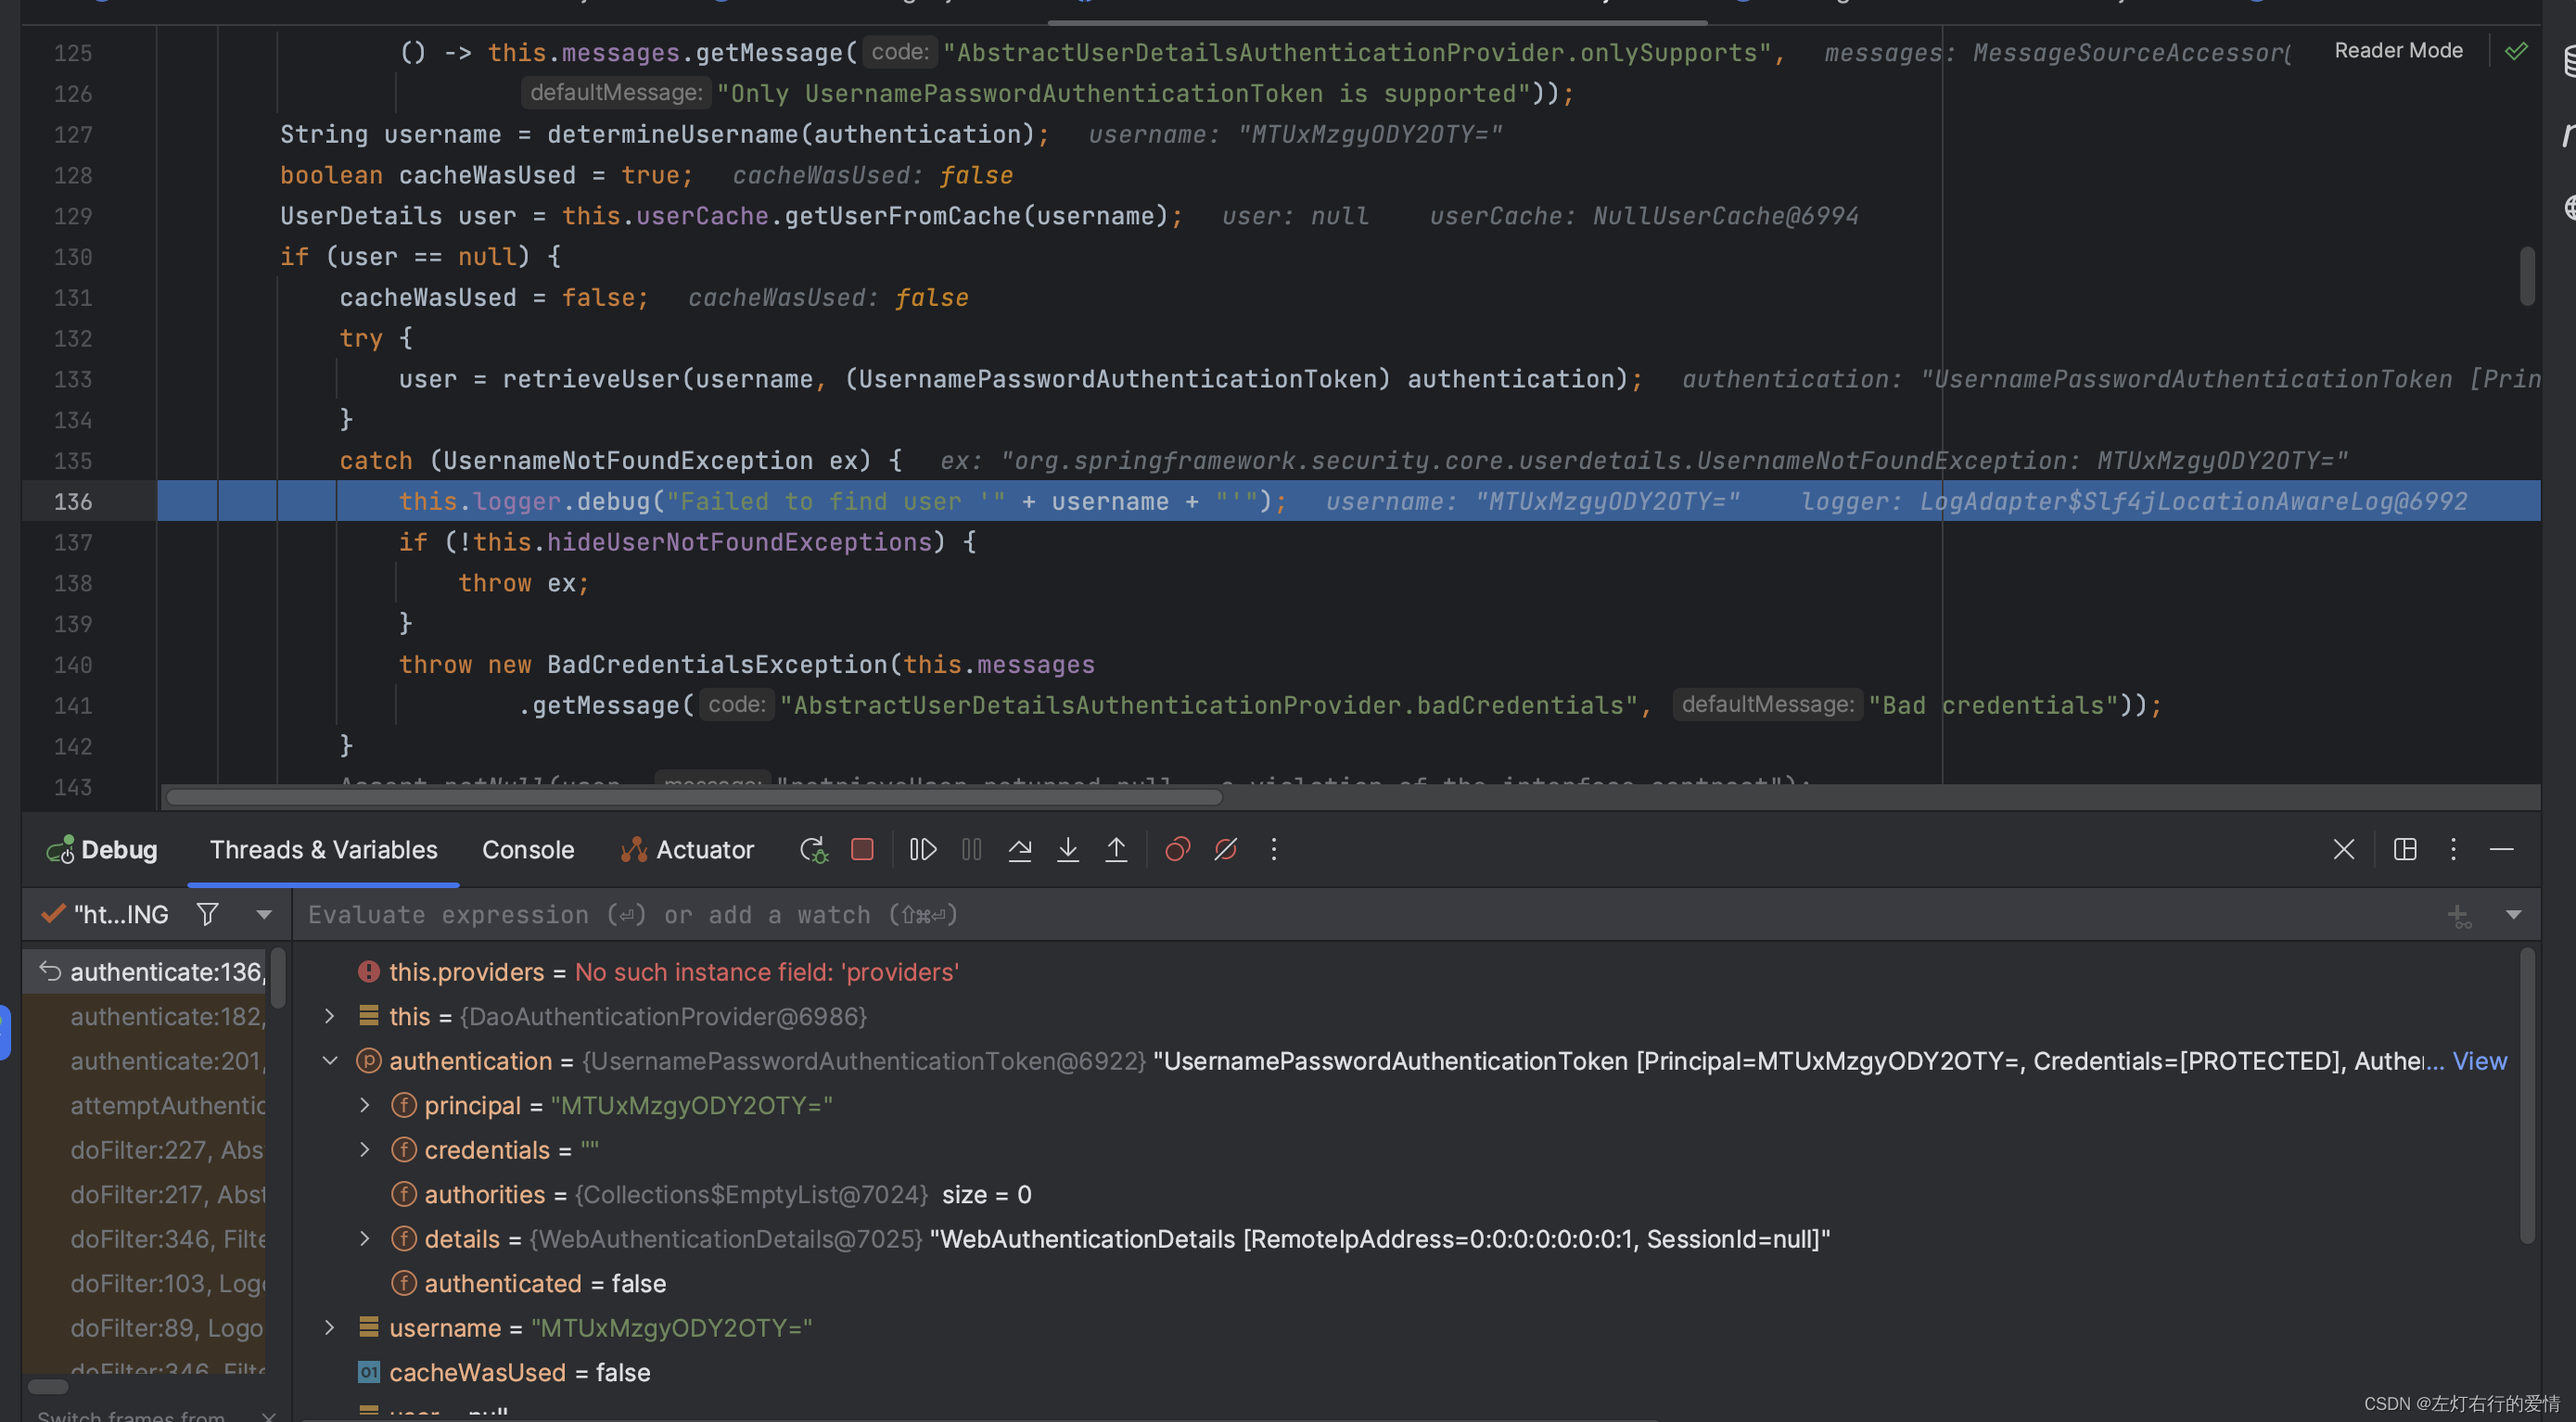
然后继续向下执行,看最后报错是哪个:
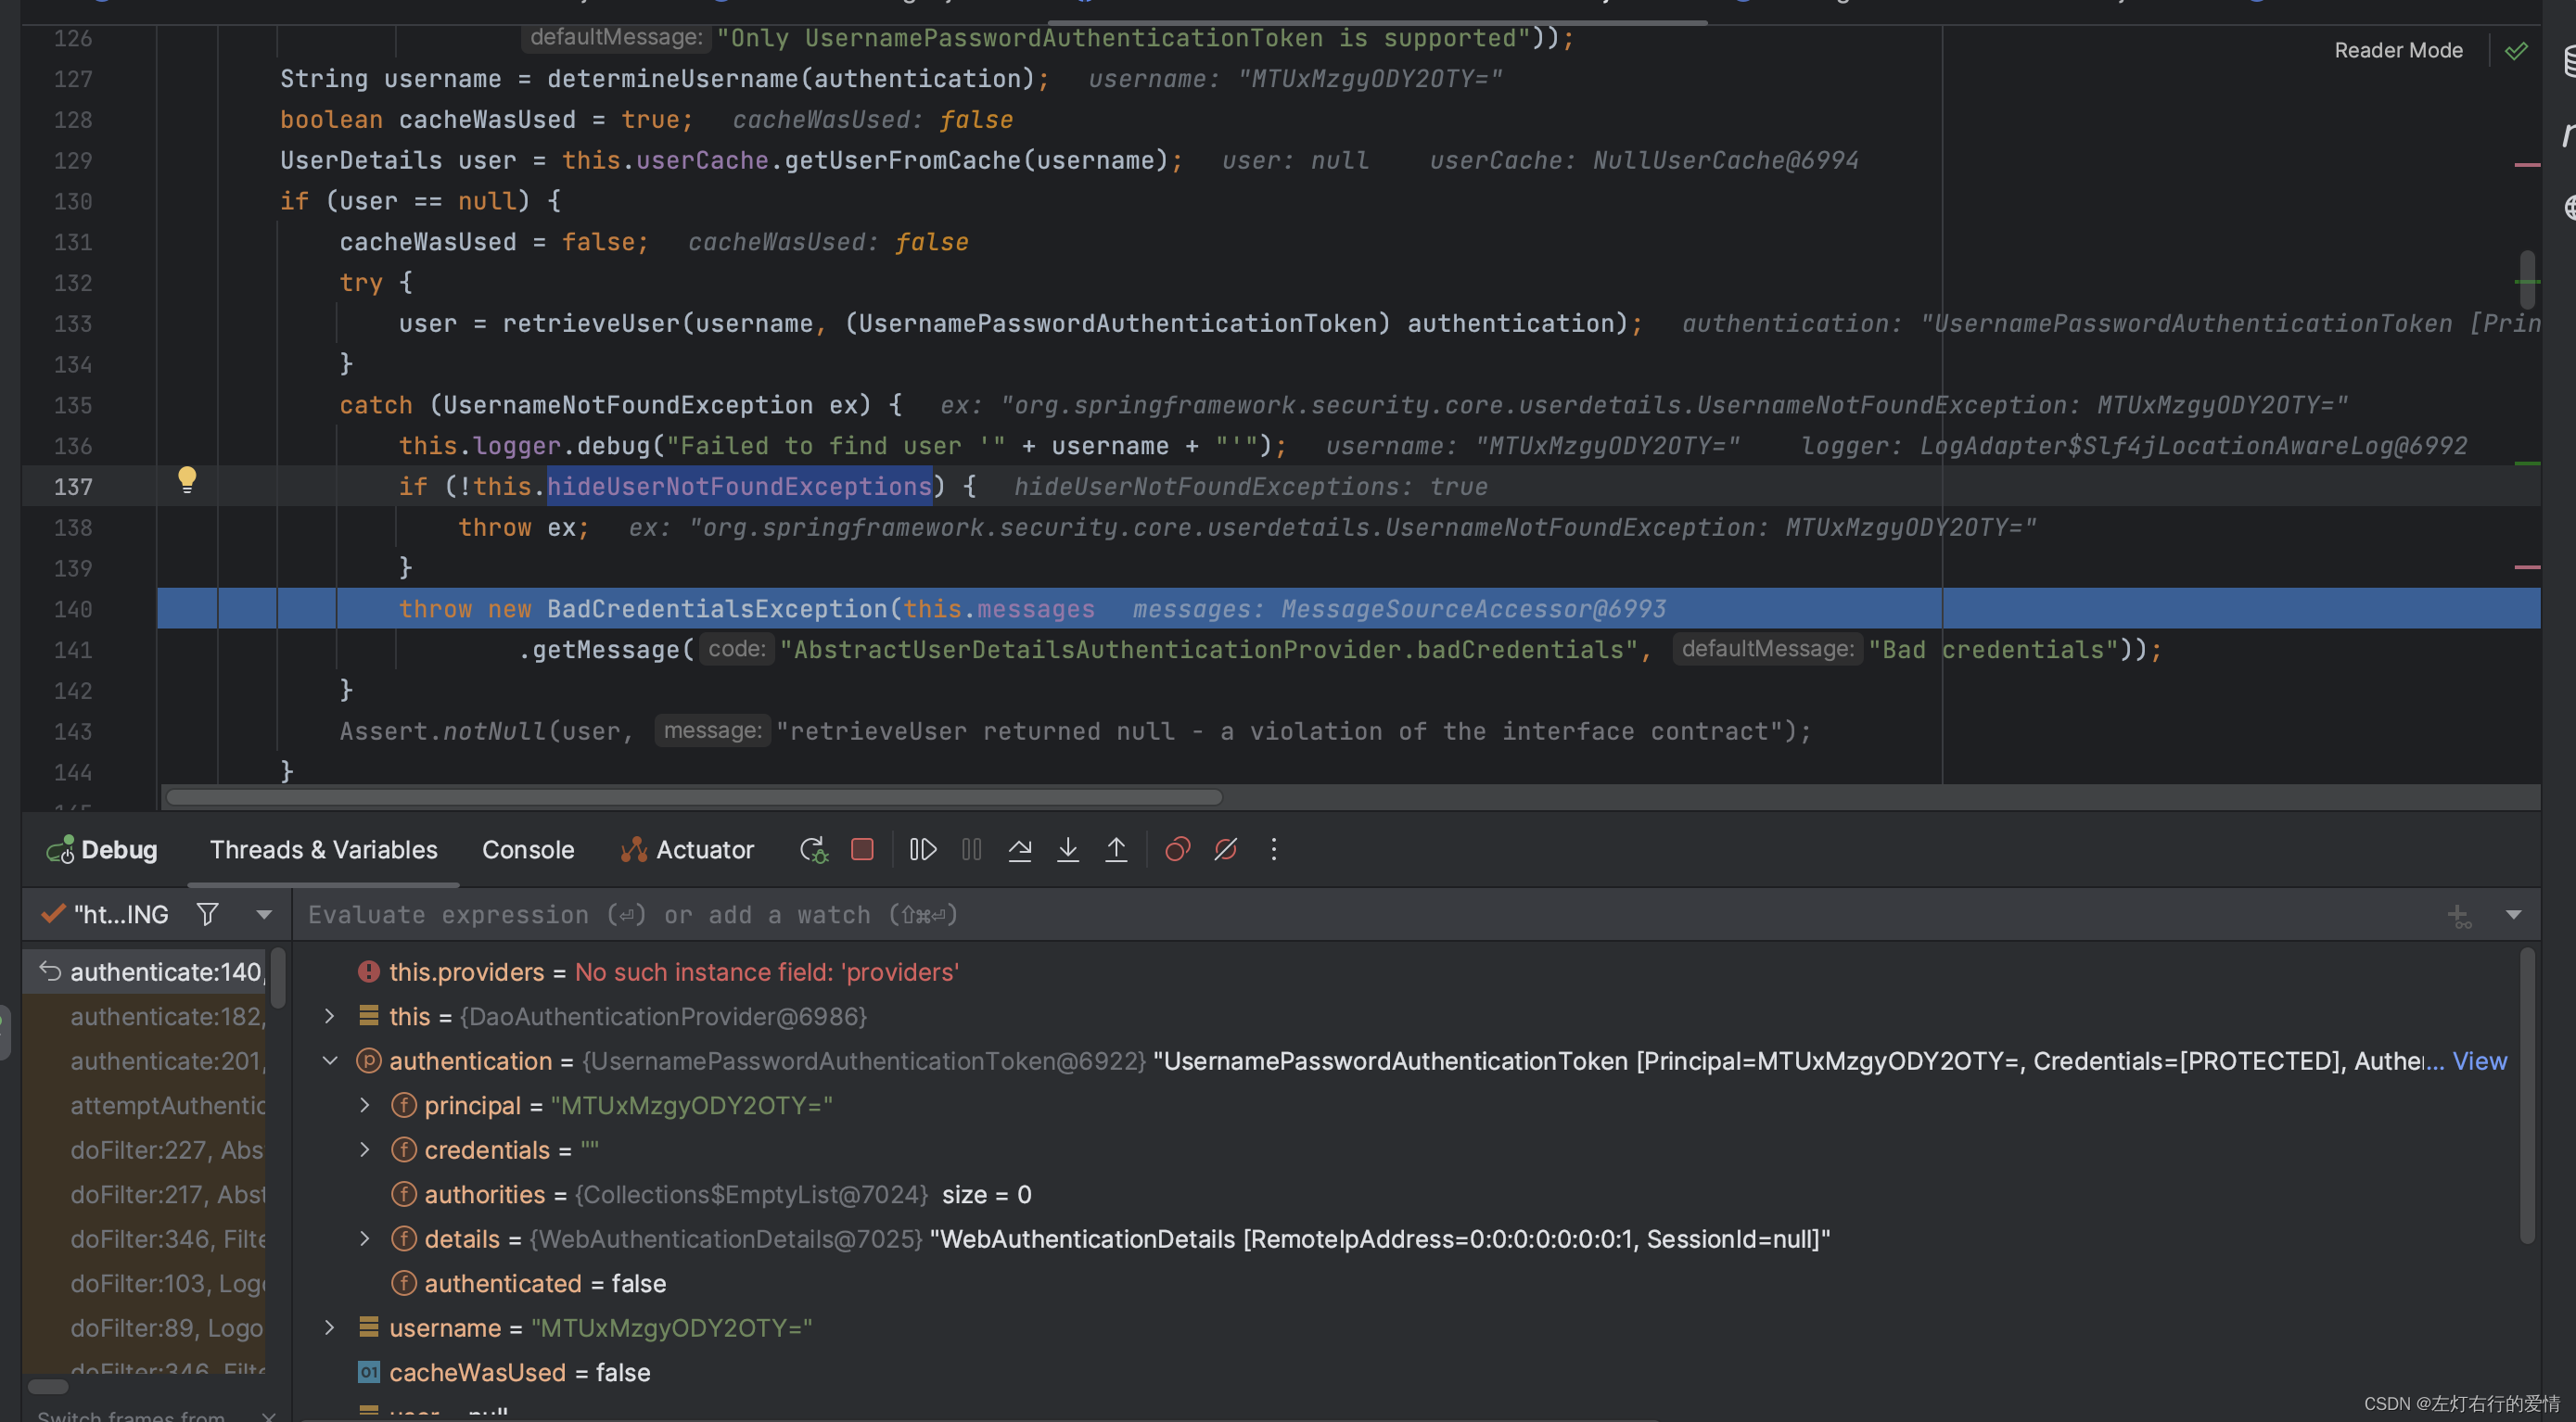
发现最后没有抛出ex,而是抛出BadCredentialsException错误类型,那么你是否会好奇,这个hideUserNotFoundExceptions是干什么的呢?
扩展:hideUserNotFoundExceptions
当进行身份验证时,如果传入的用户名在数据源中不存在,通常会抛出UsernameNotFoundException异常。这个异常可以向调用方提供有关身份验证失败的详细信息。
然而,有时在安全考虑下,我们不希望明确告知调用方用户名是否存在,以防止潜在的安全漏洞。在这种情况下,可以将hideUserNotFoundExceptions属性设置为true,这样当发生UsernameNotFoundException异常时,将抛出一个更通用的BadCredentialsException异常,而不会明确指示用户名是否存在。
通过隐藏具体的用户名信息,可以增加系统的安全性,因为攻击者无法通过错误消息得知系统中是否存在特定的用户账号,从而减少了可能的信息泄露和攻击风险。
好的我们继续回来,抛出BadCredentialsException后,接着回调到provider为DaoAuthenticationProvider中: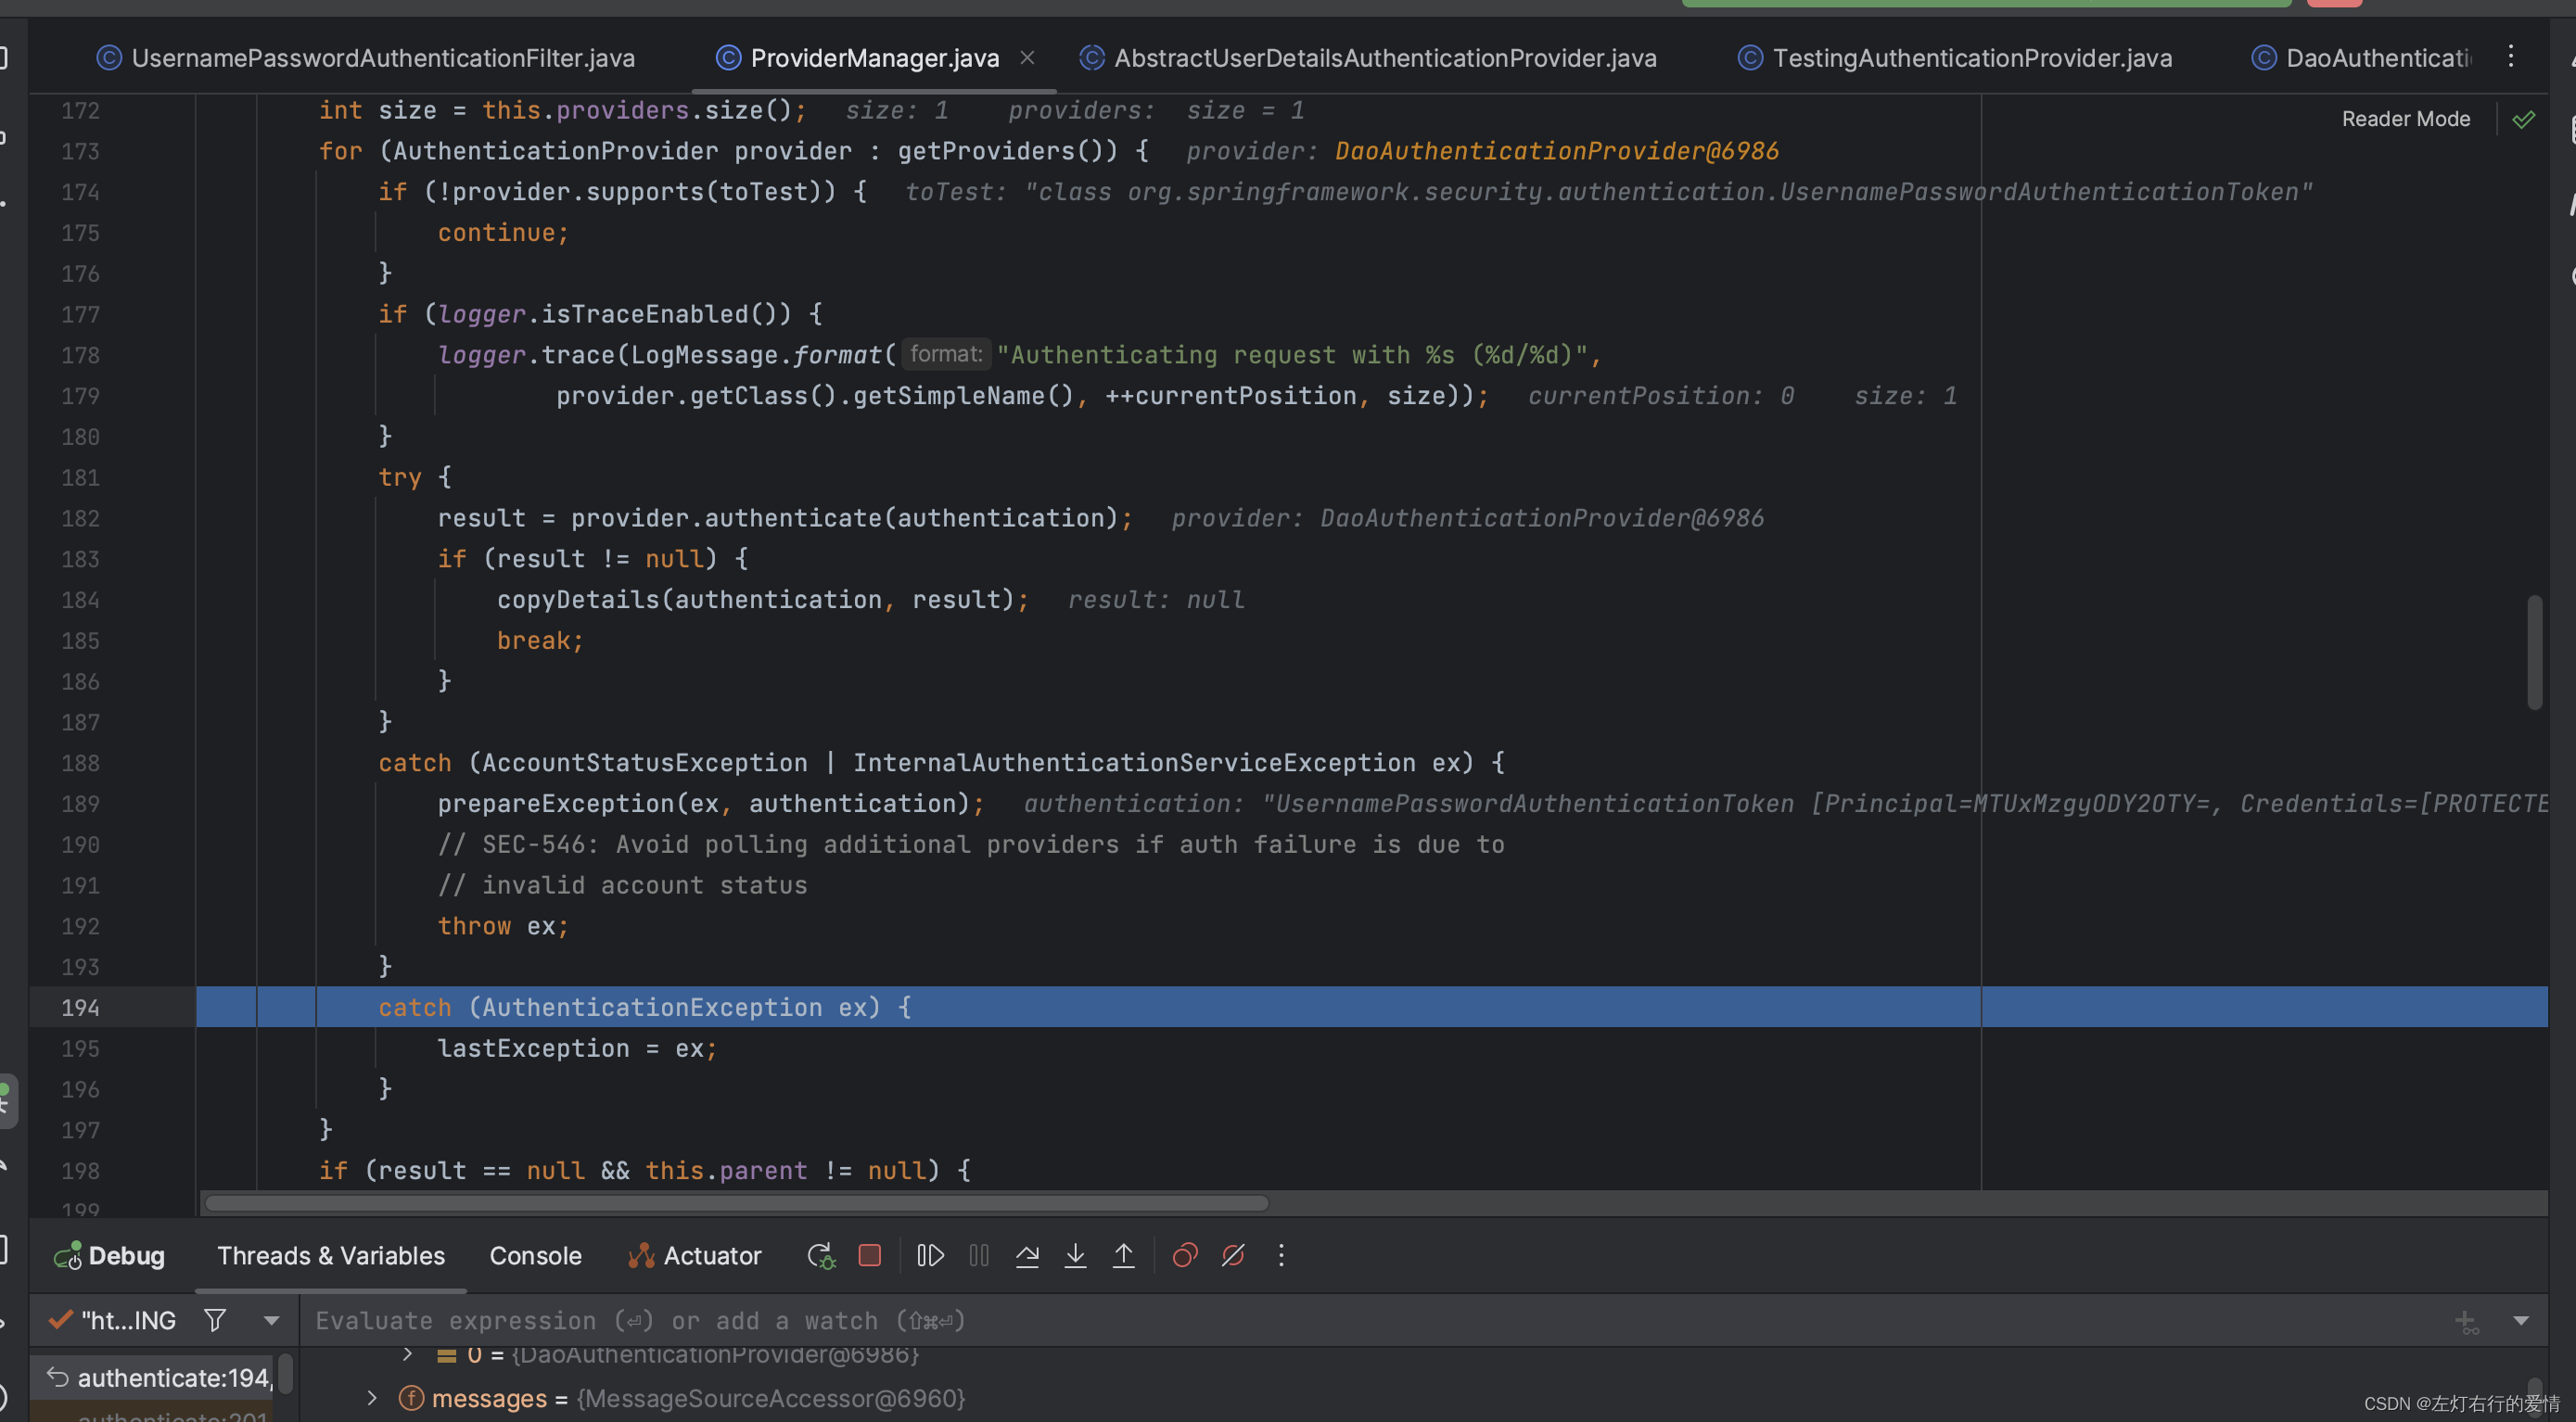
执行完catch中的方法后,跳出for循环,因为只有一个provider:
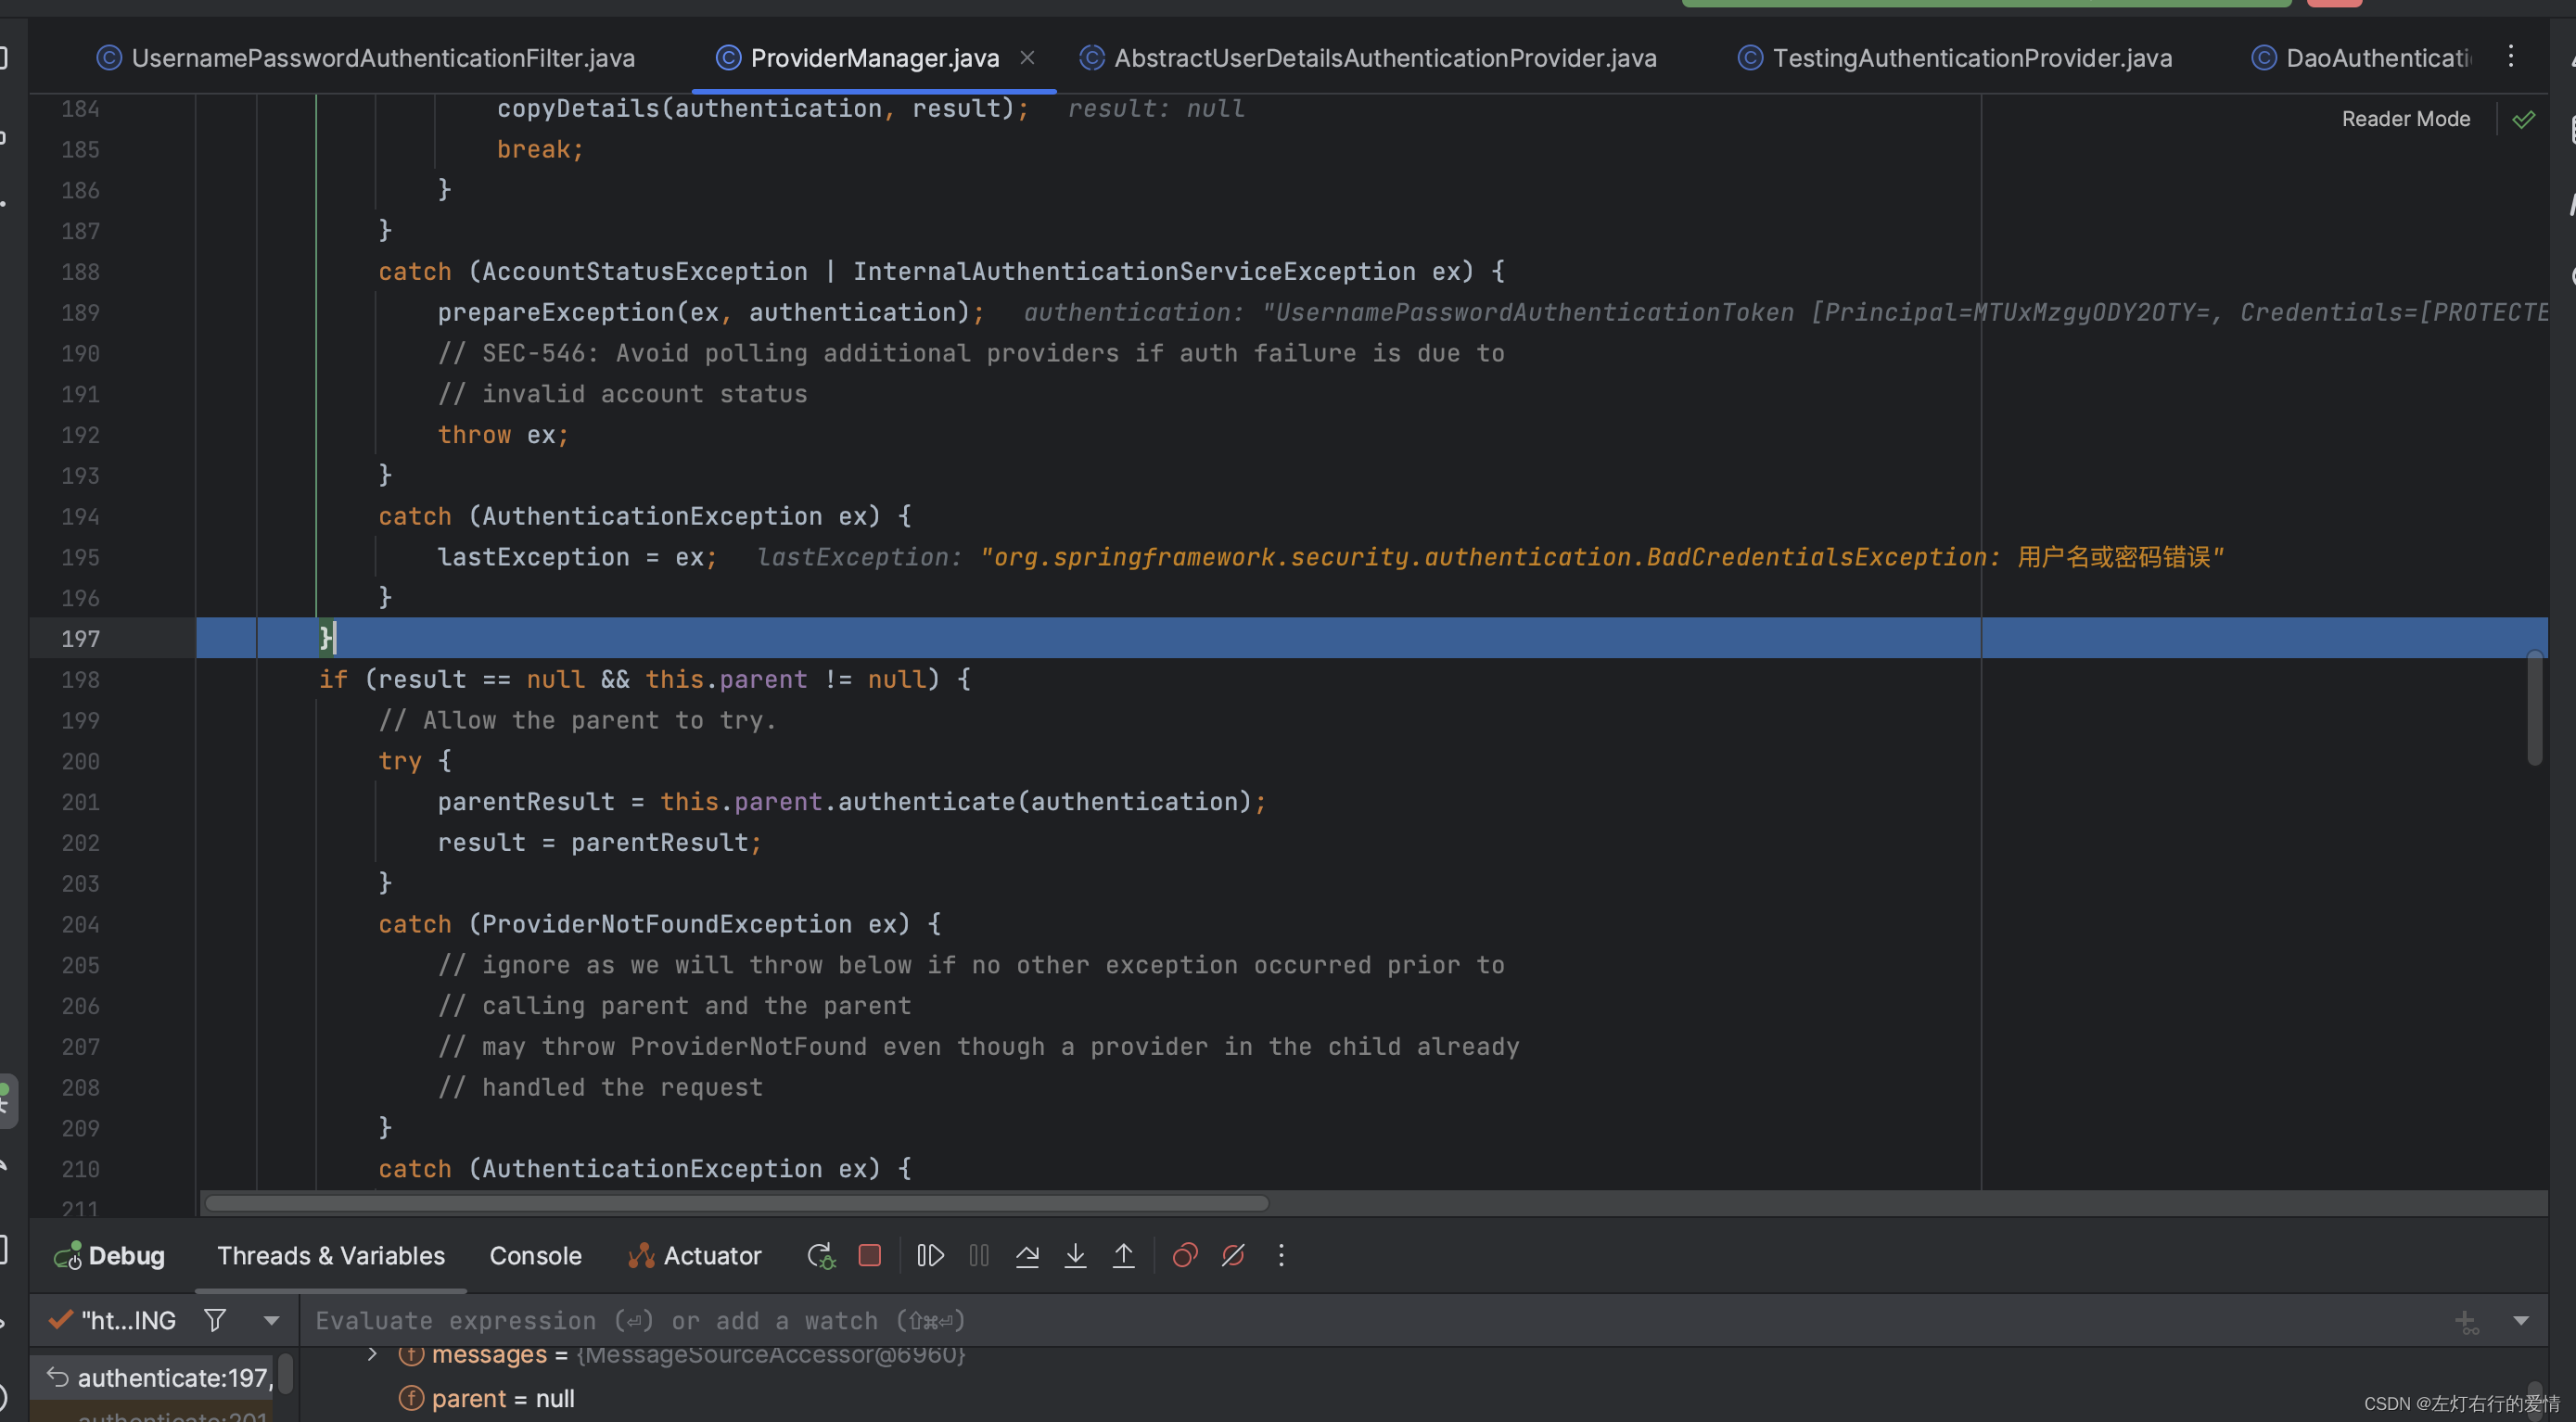
接着往下走,到if条件中发现,都不符合:
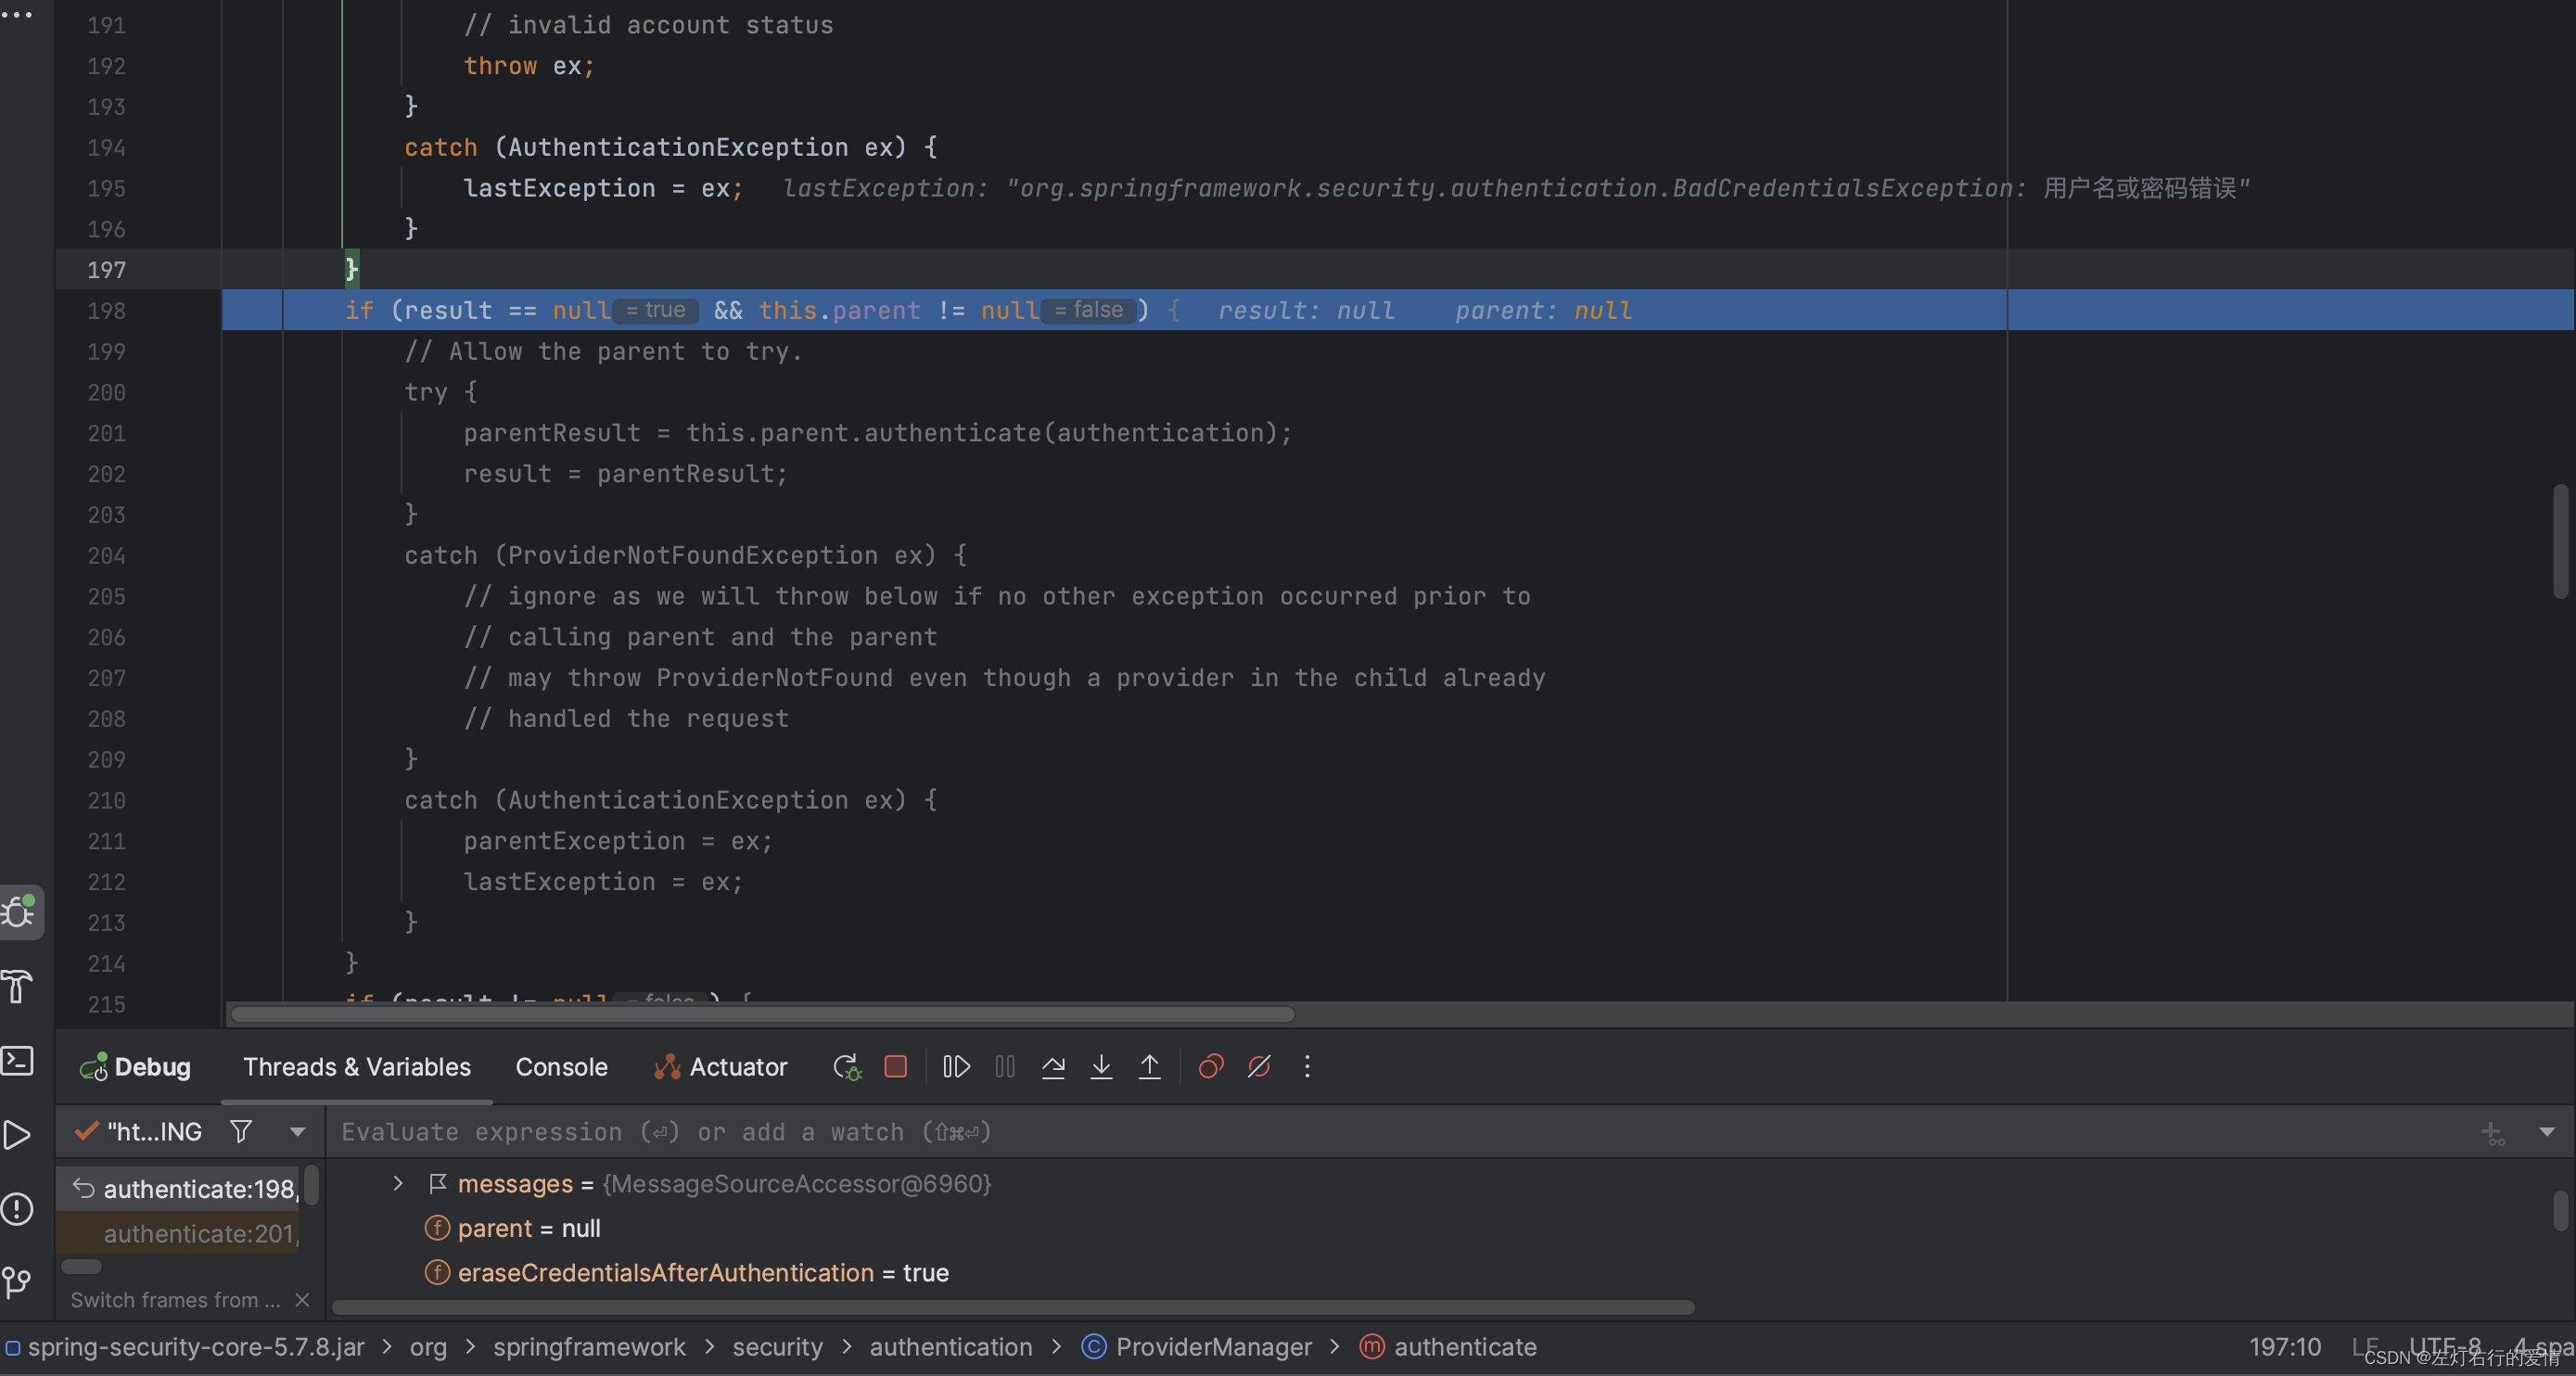
到第三个if判断中,还是不符合:
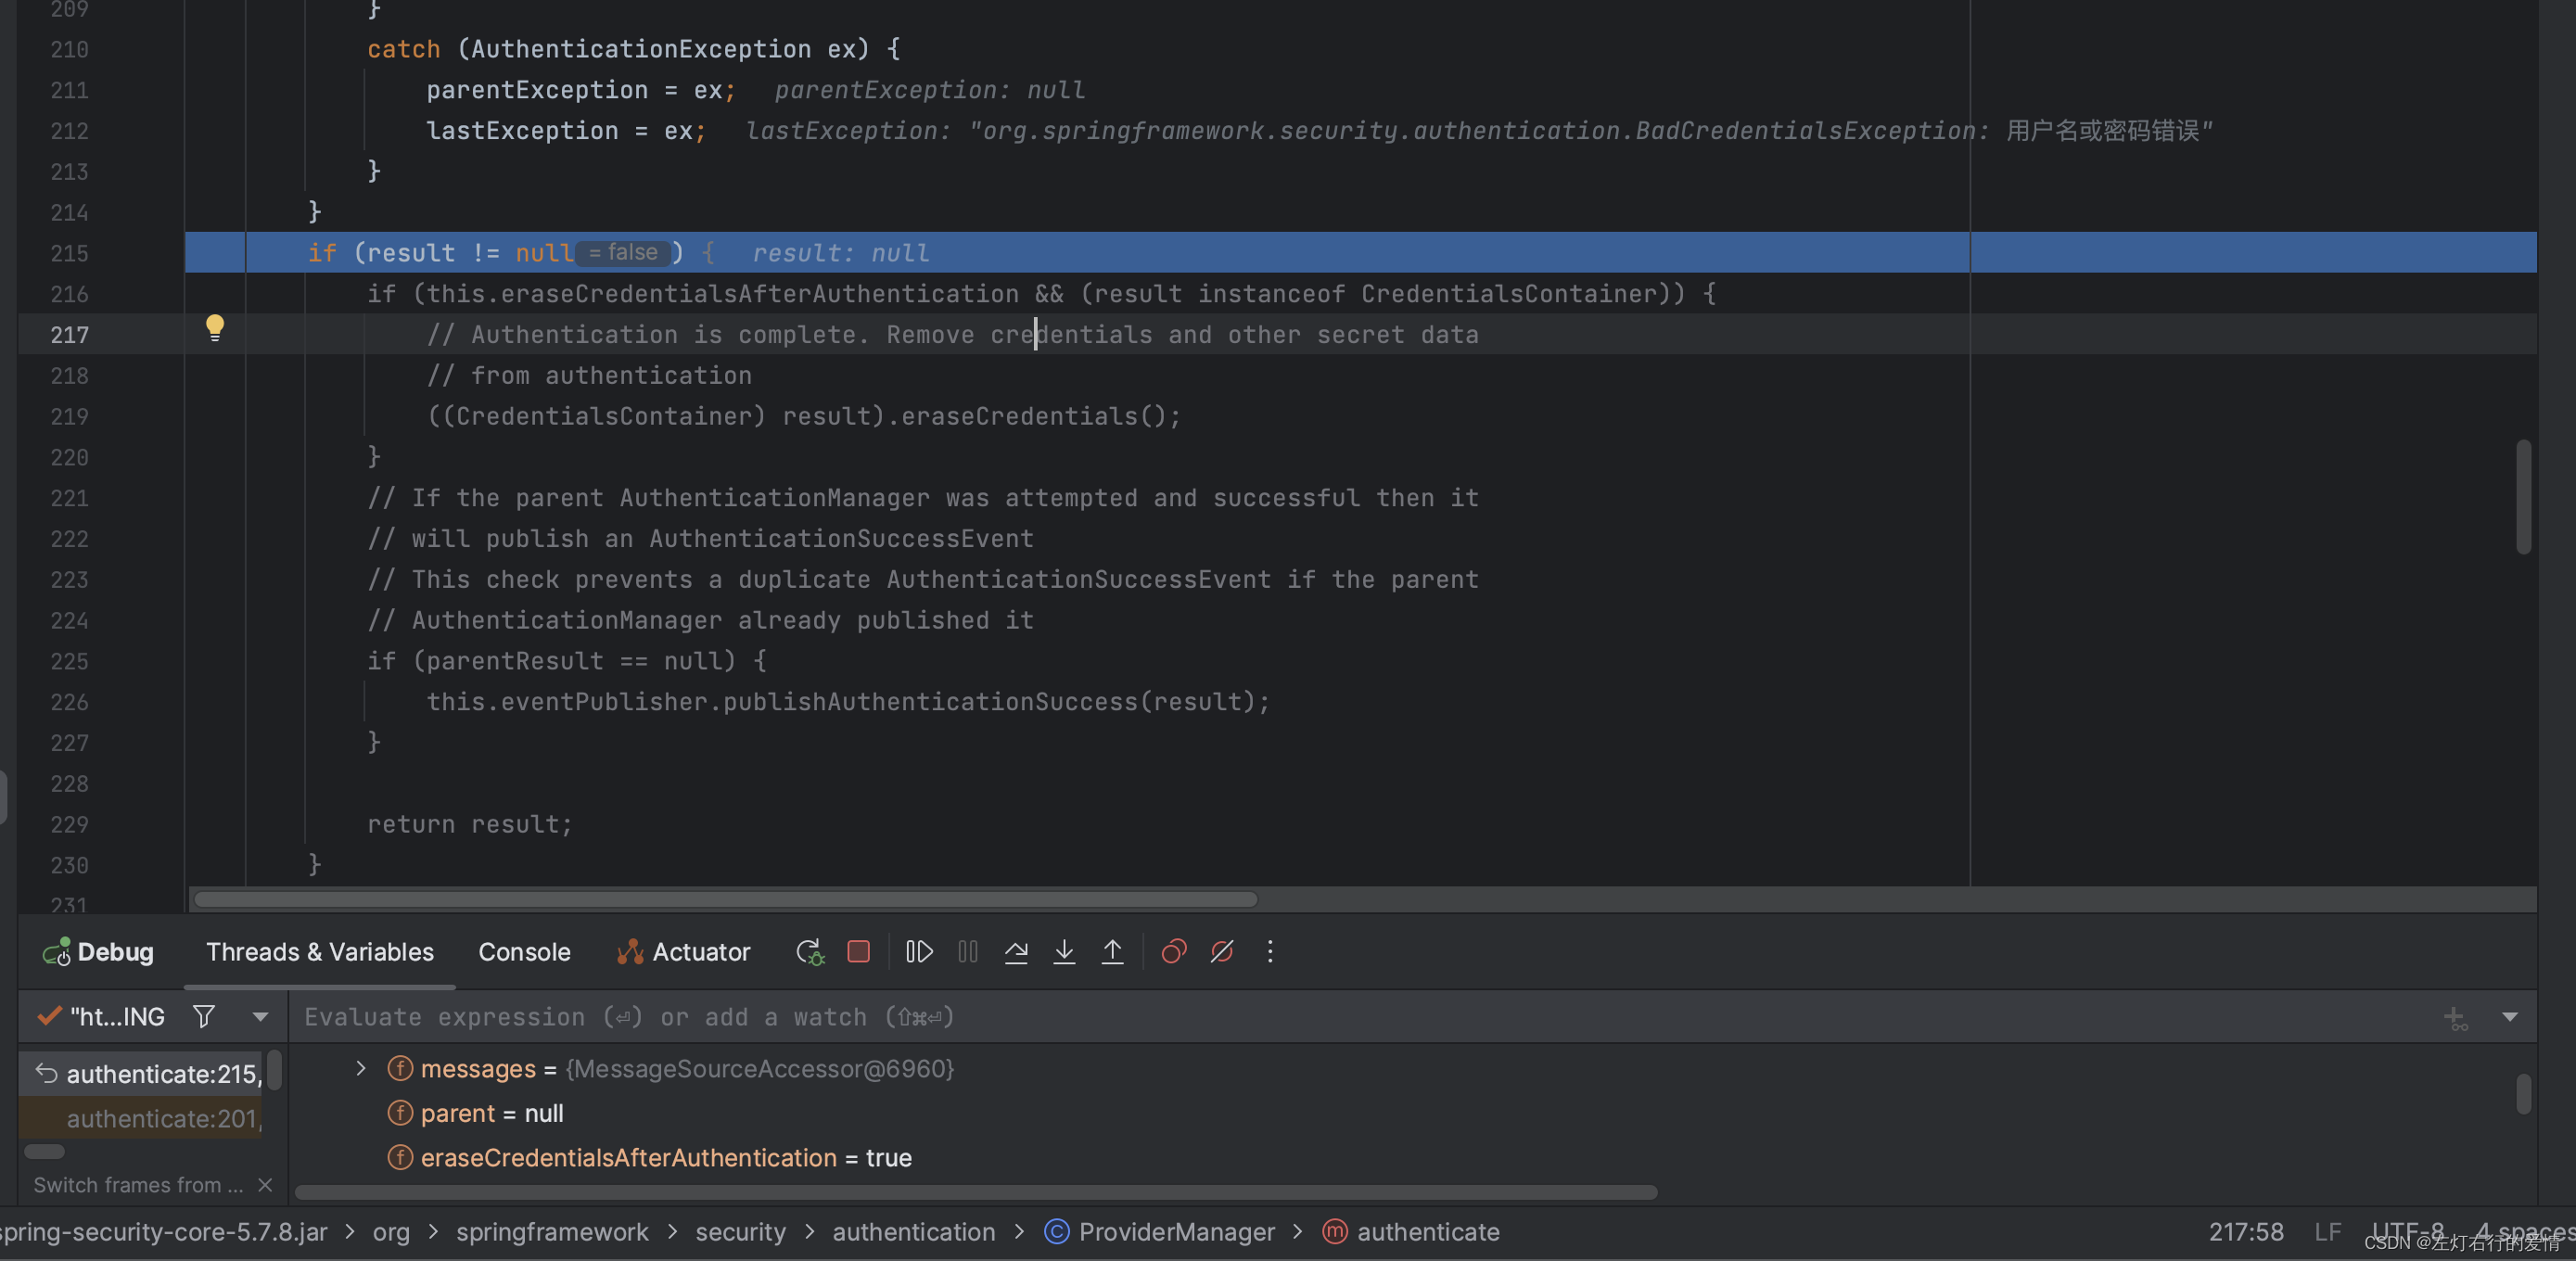
接着进入下一个if判断,我们此时lastException不为空,所以不符合:
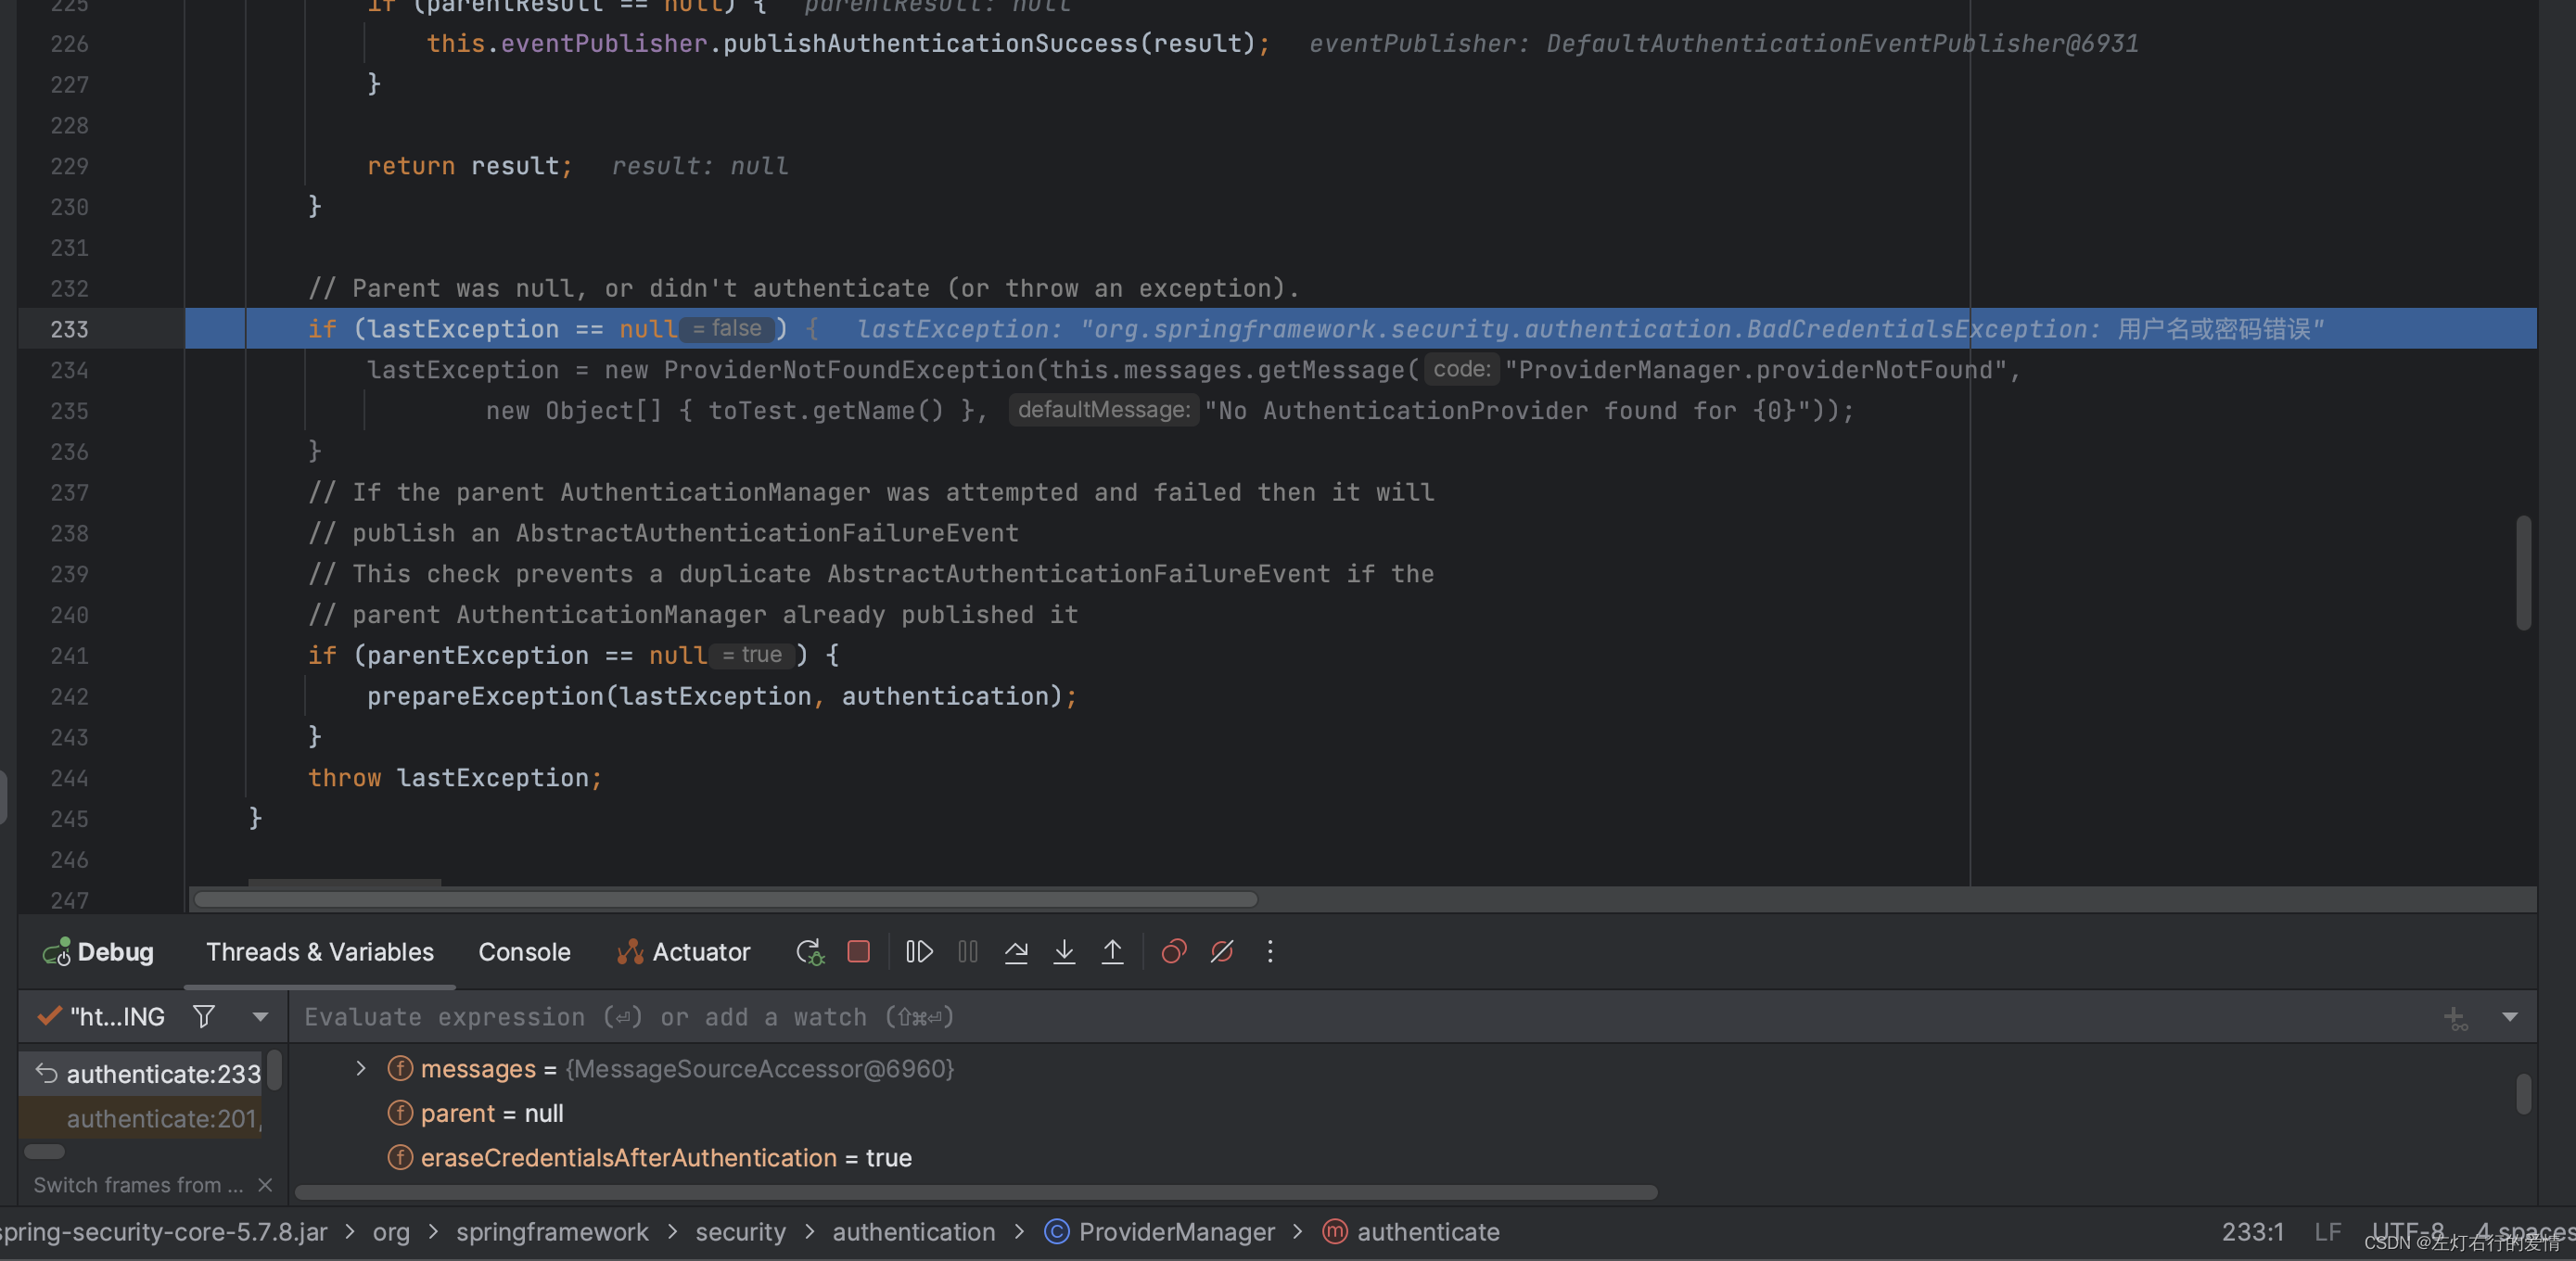
走到最后一个if条件时,发现我们的parentException为空,符合条件:
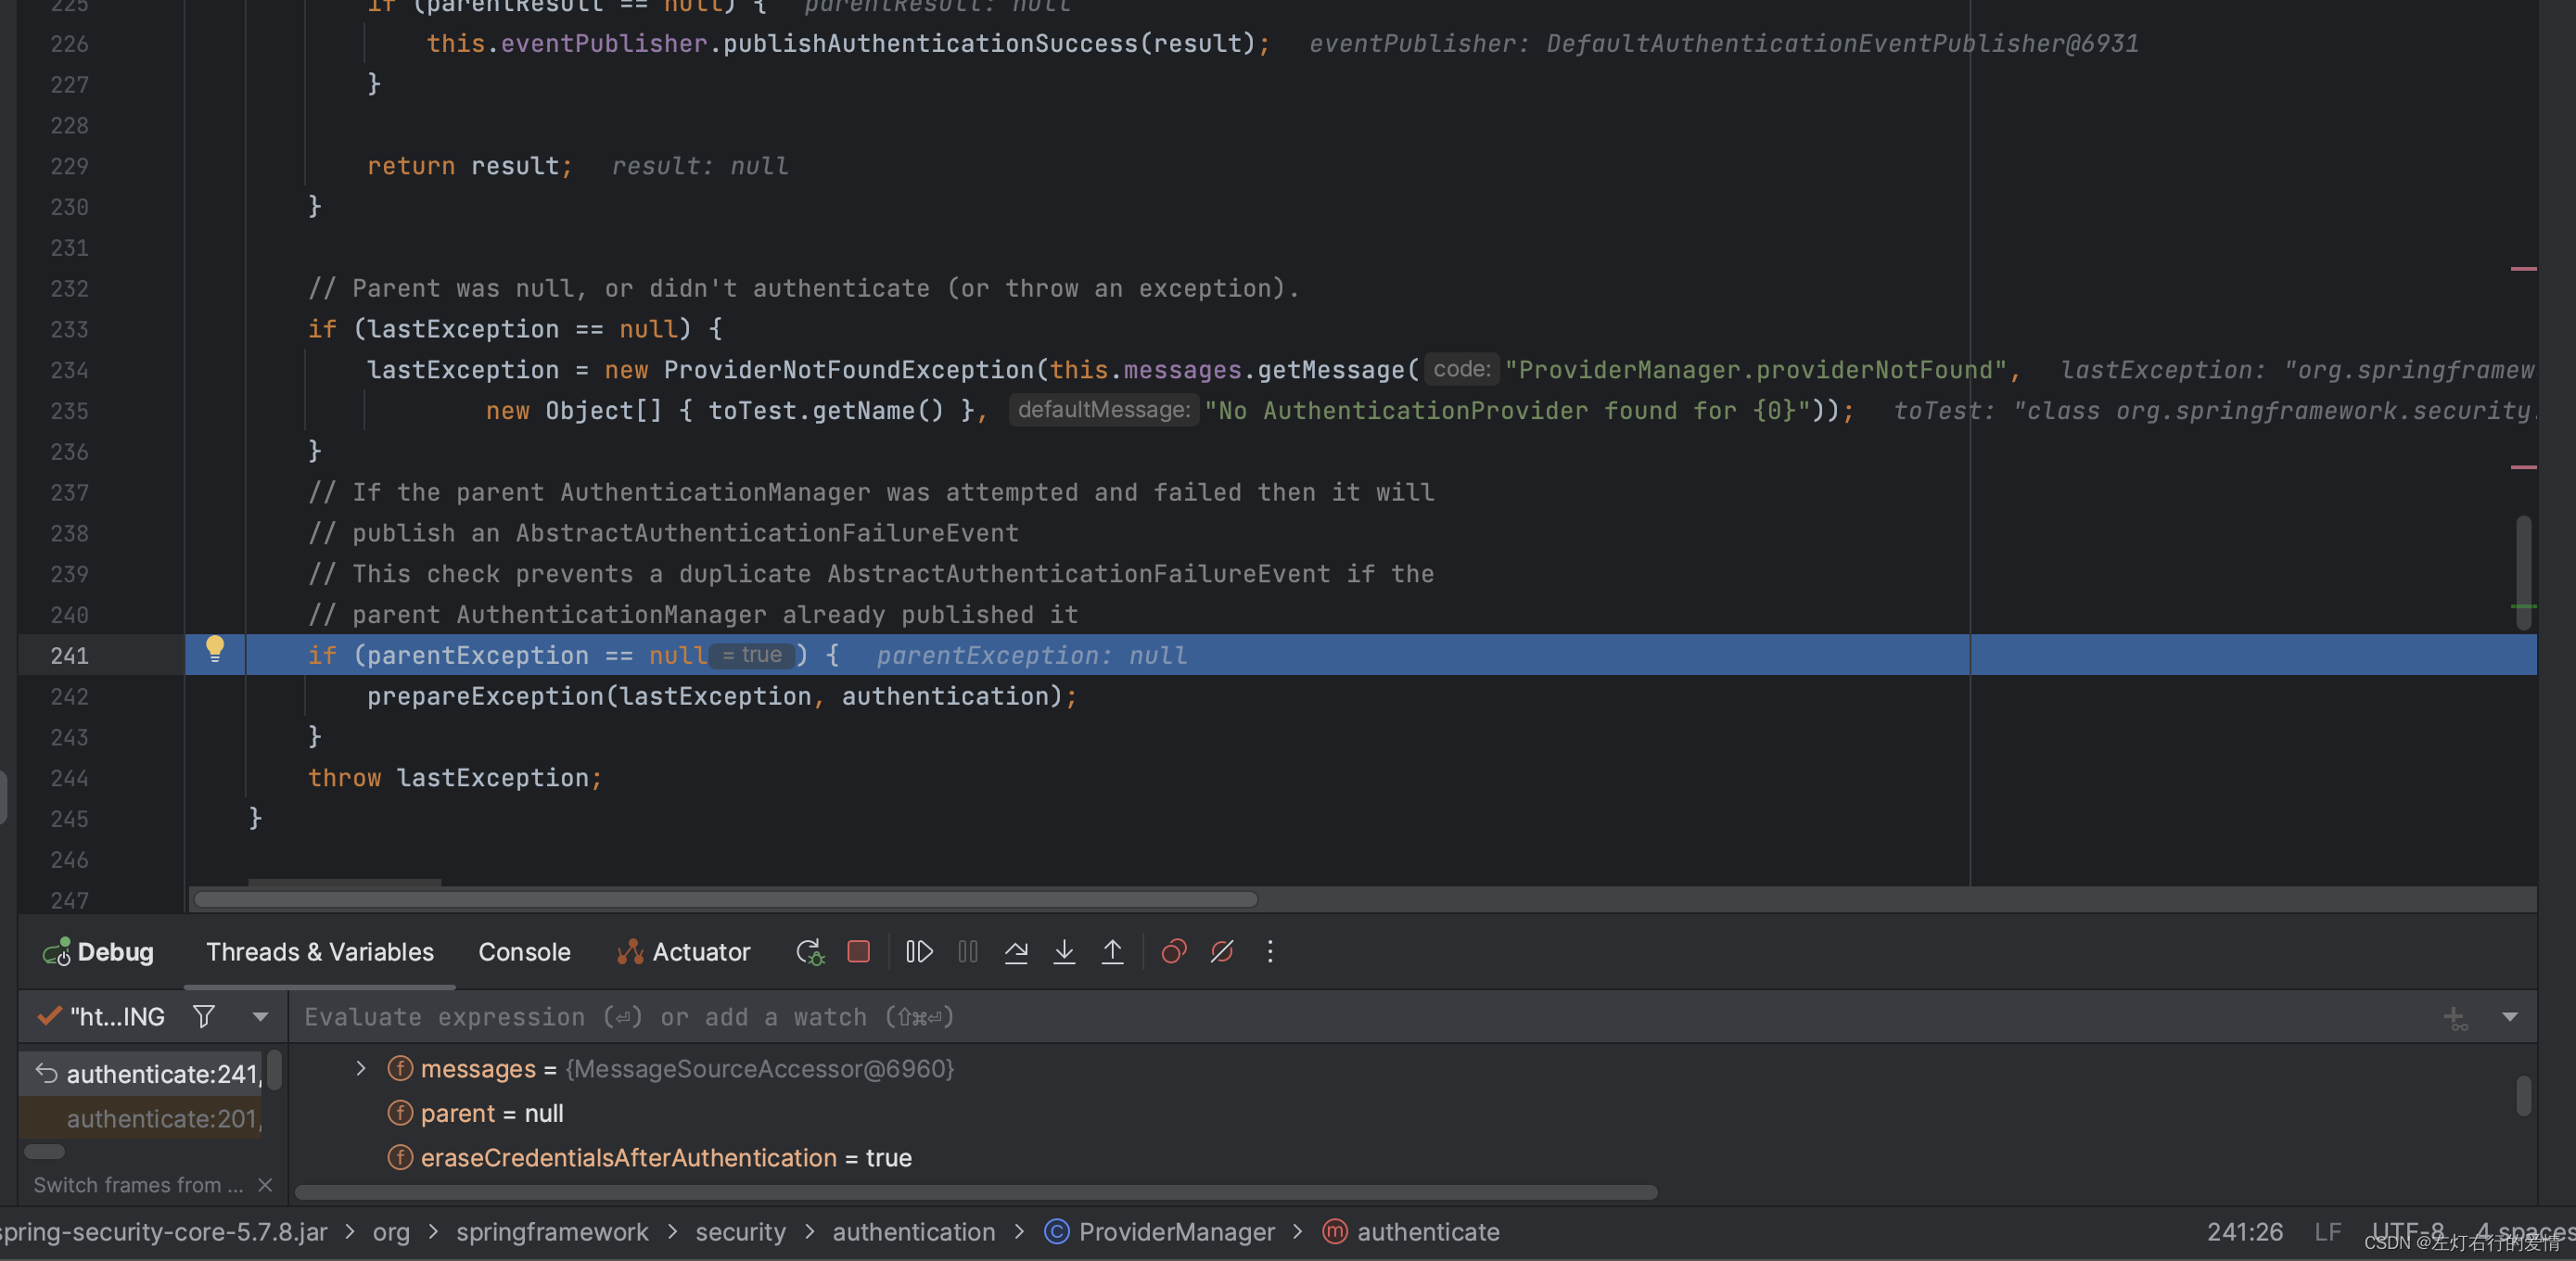
进入方法里面,执行prepareException, 如果父级AuthenticationManager存在并且验证失败,则父级AuthenticationManager会发布一个AbstractAuthenticationFailureEvent事件。为避免重复发布事件,这里进行了检查。
接着抛出错误:
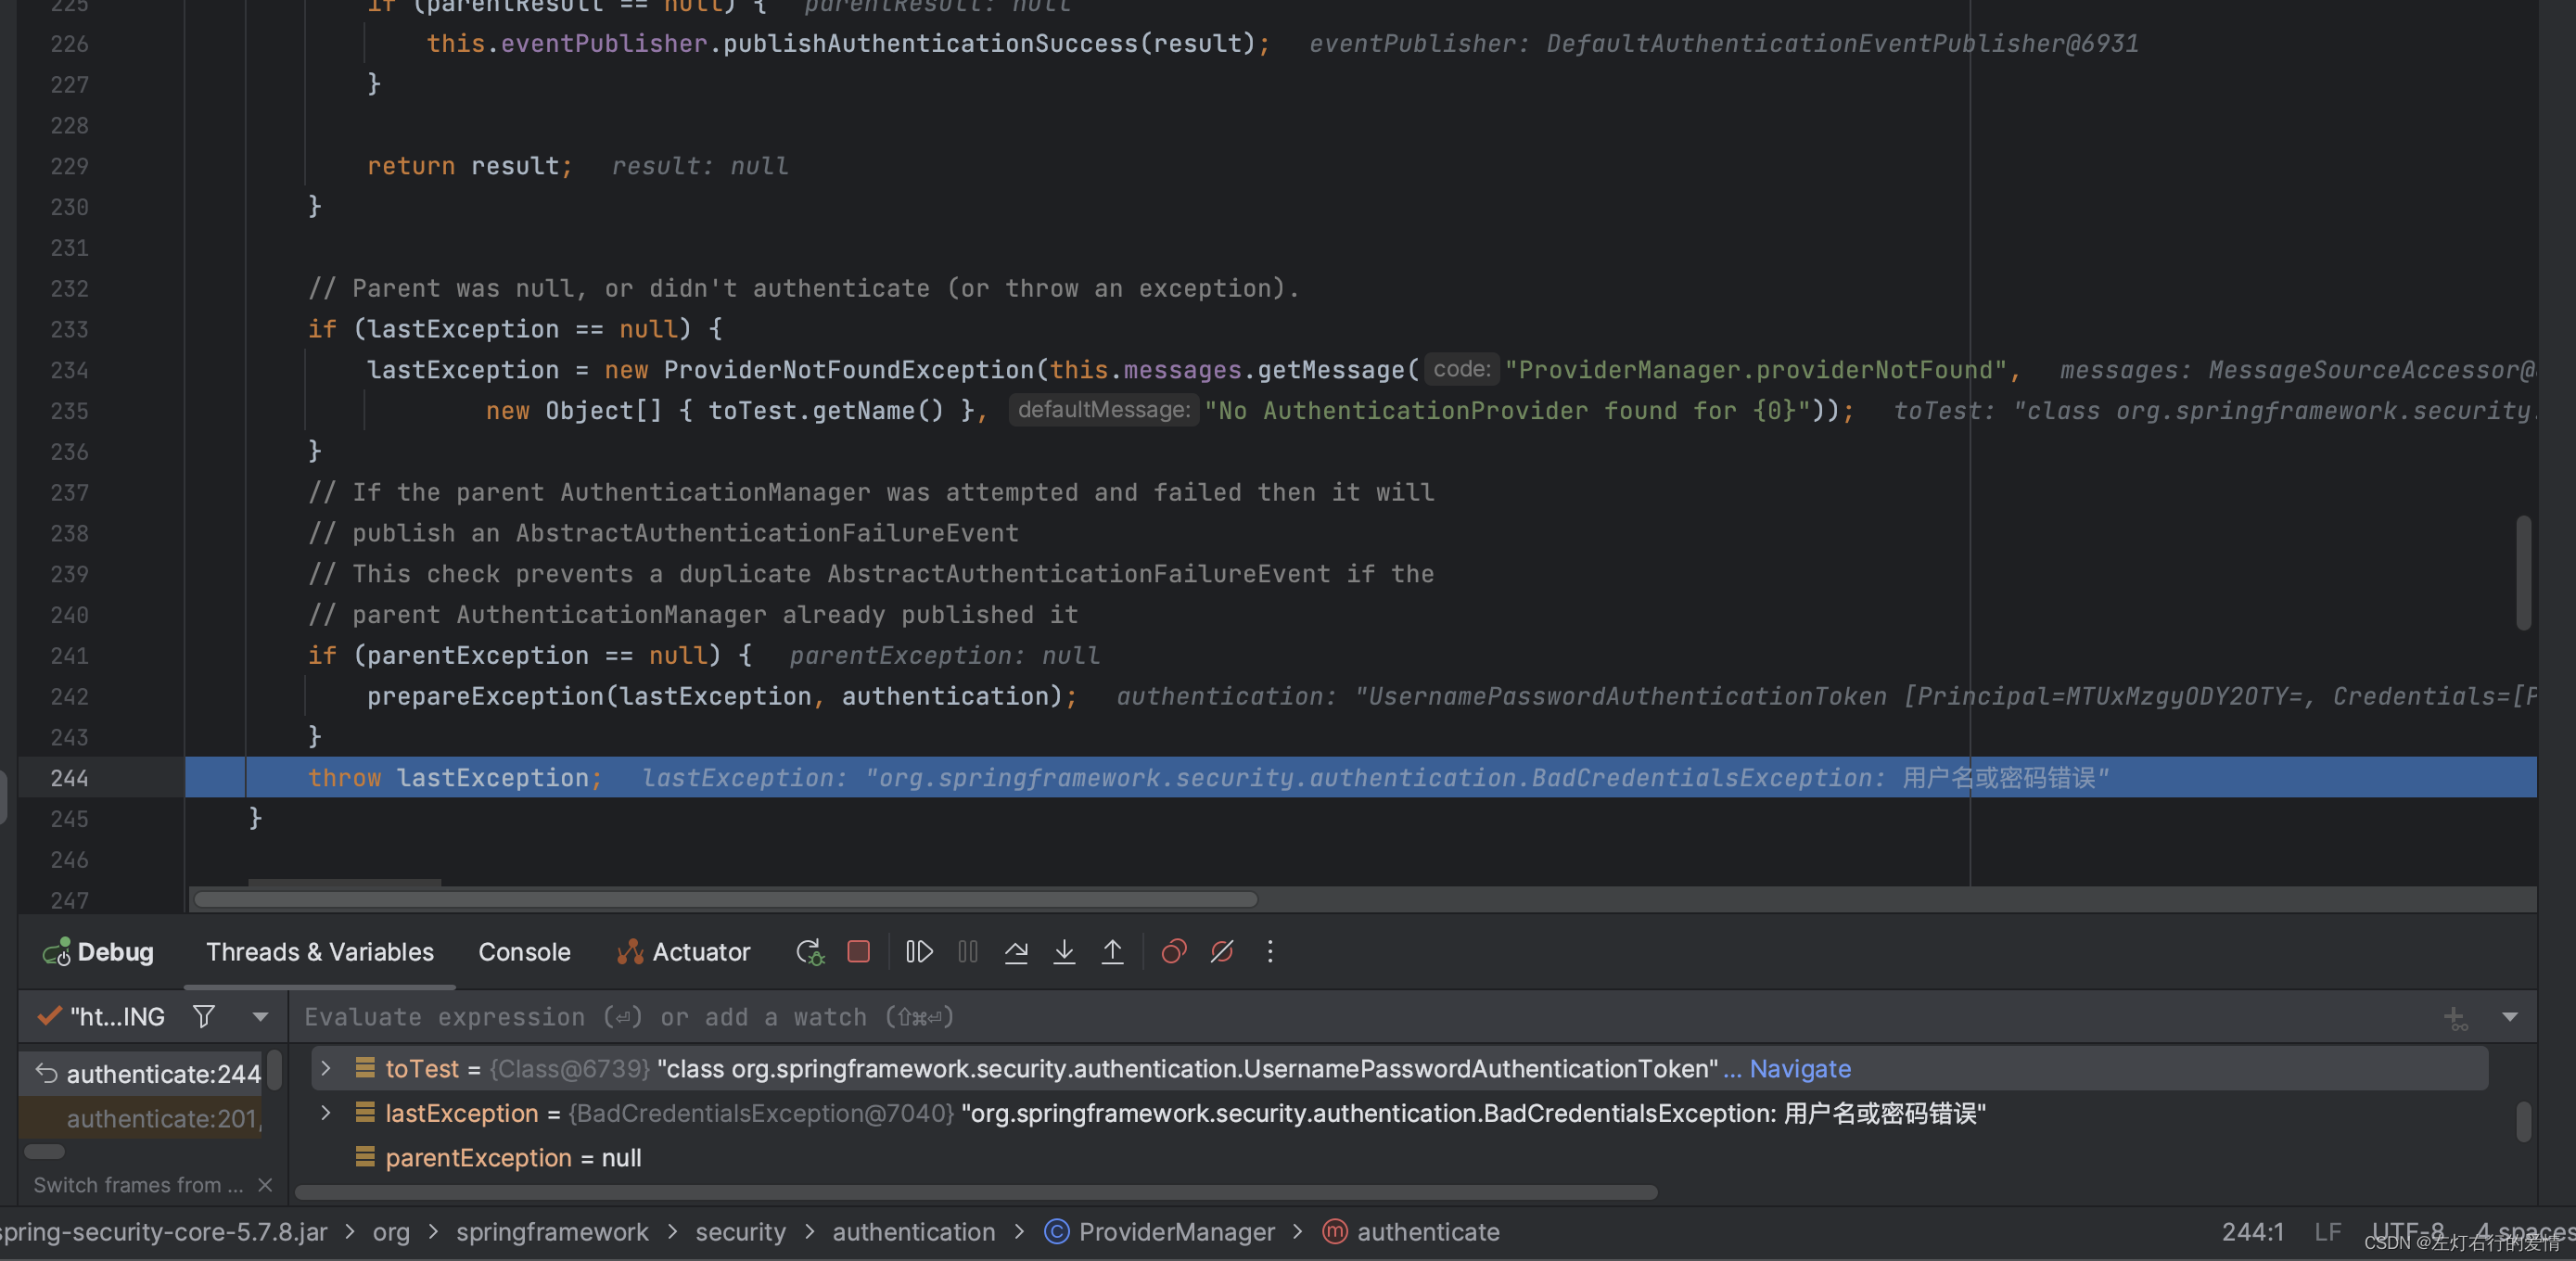
最后回到provider为AnonymousAuthenticationProvider,执行完catch里面的方法后,进入if判断,此时result为空,不符合:
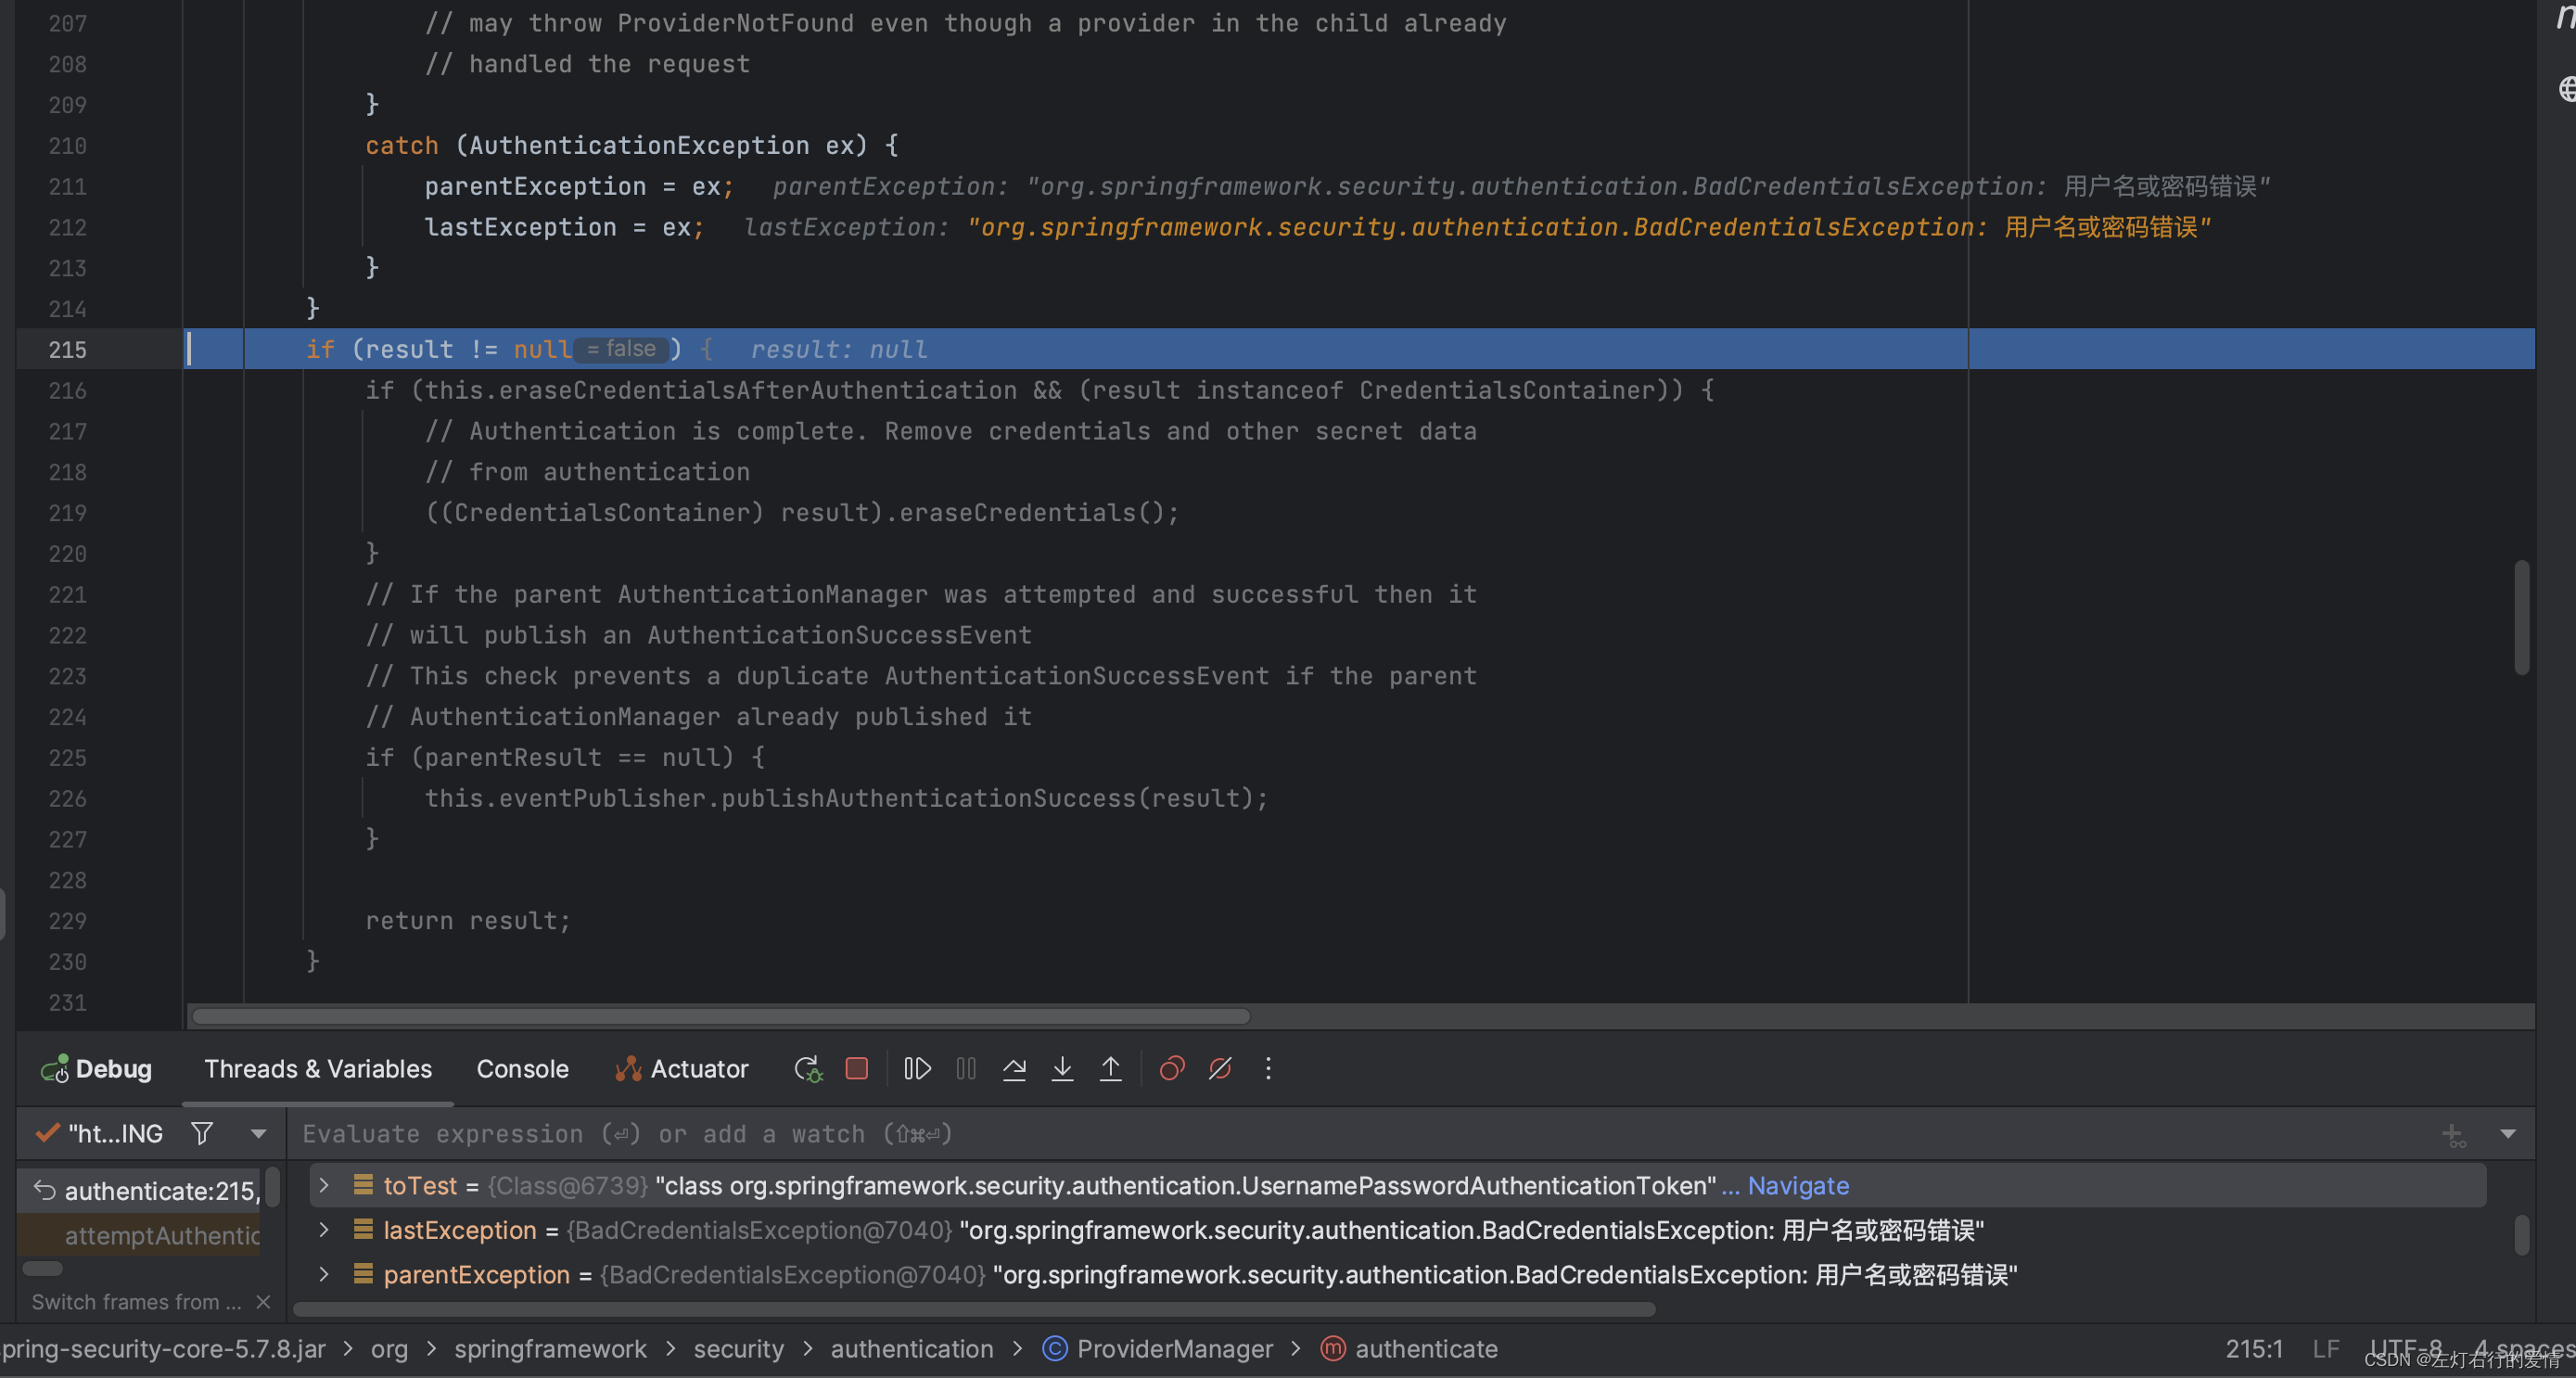
进入下一个判断,这里lastException不为空,所以不符合:
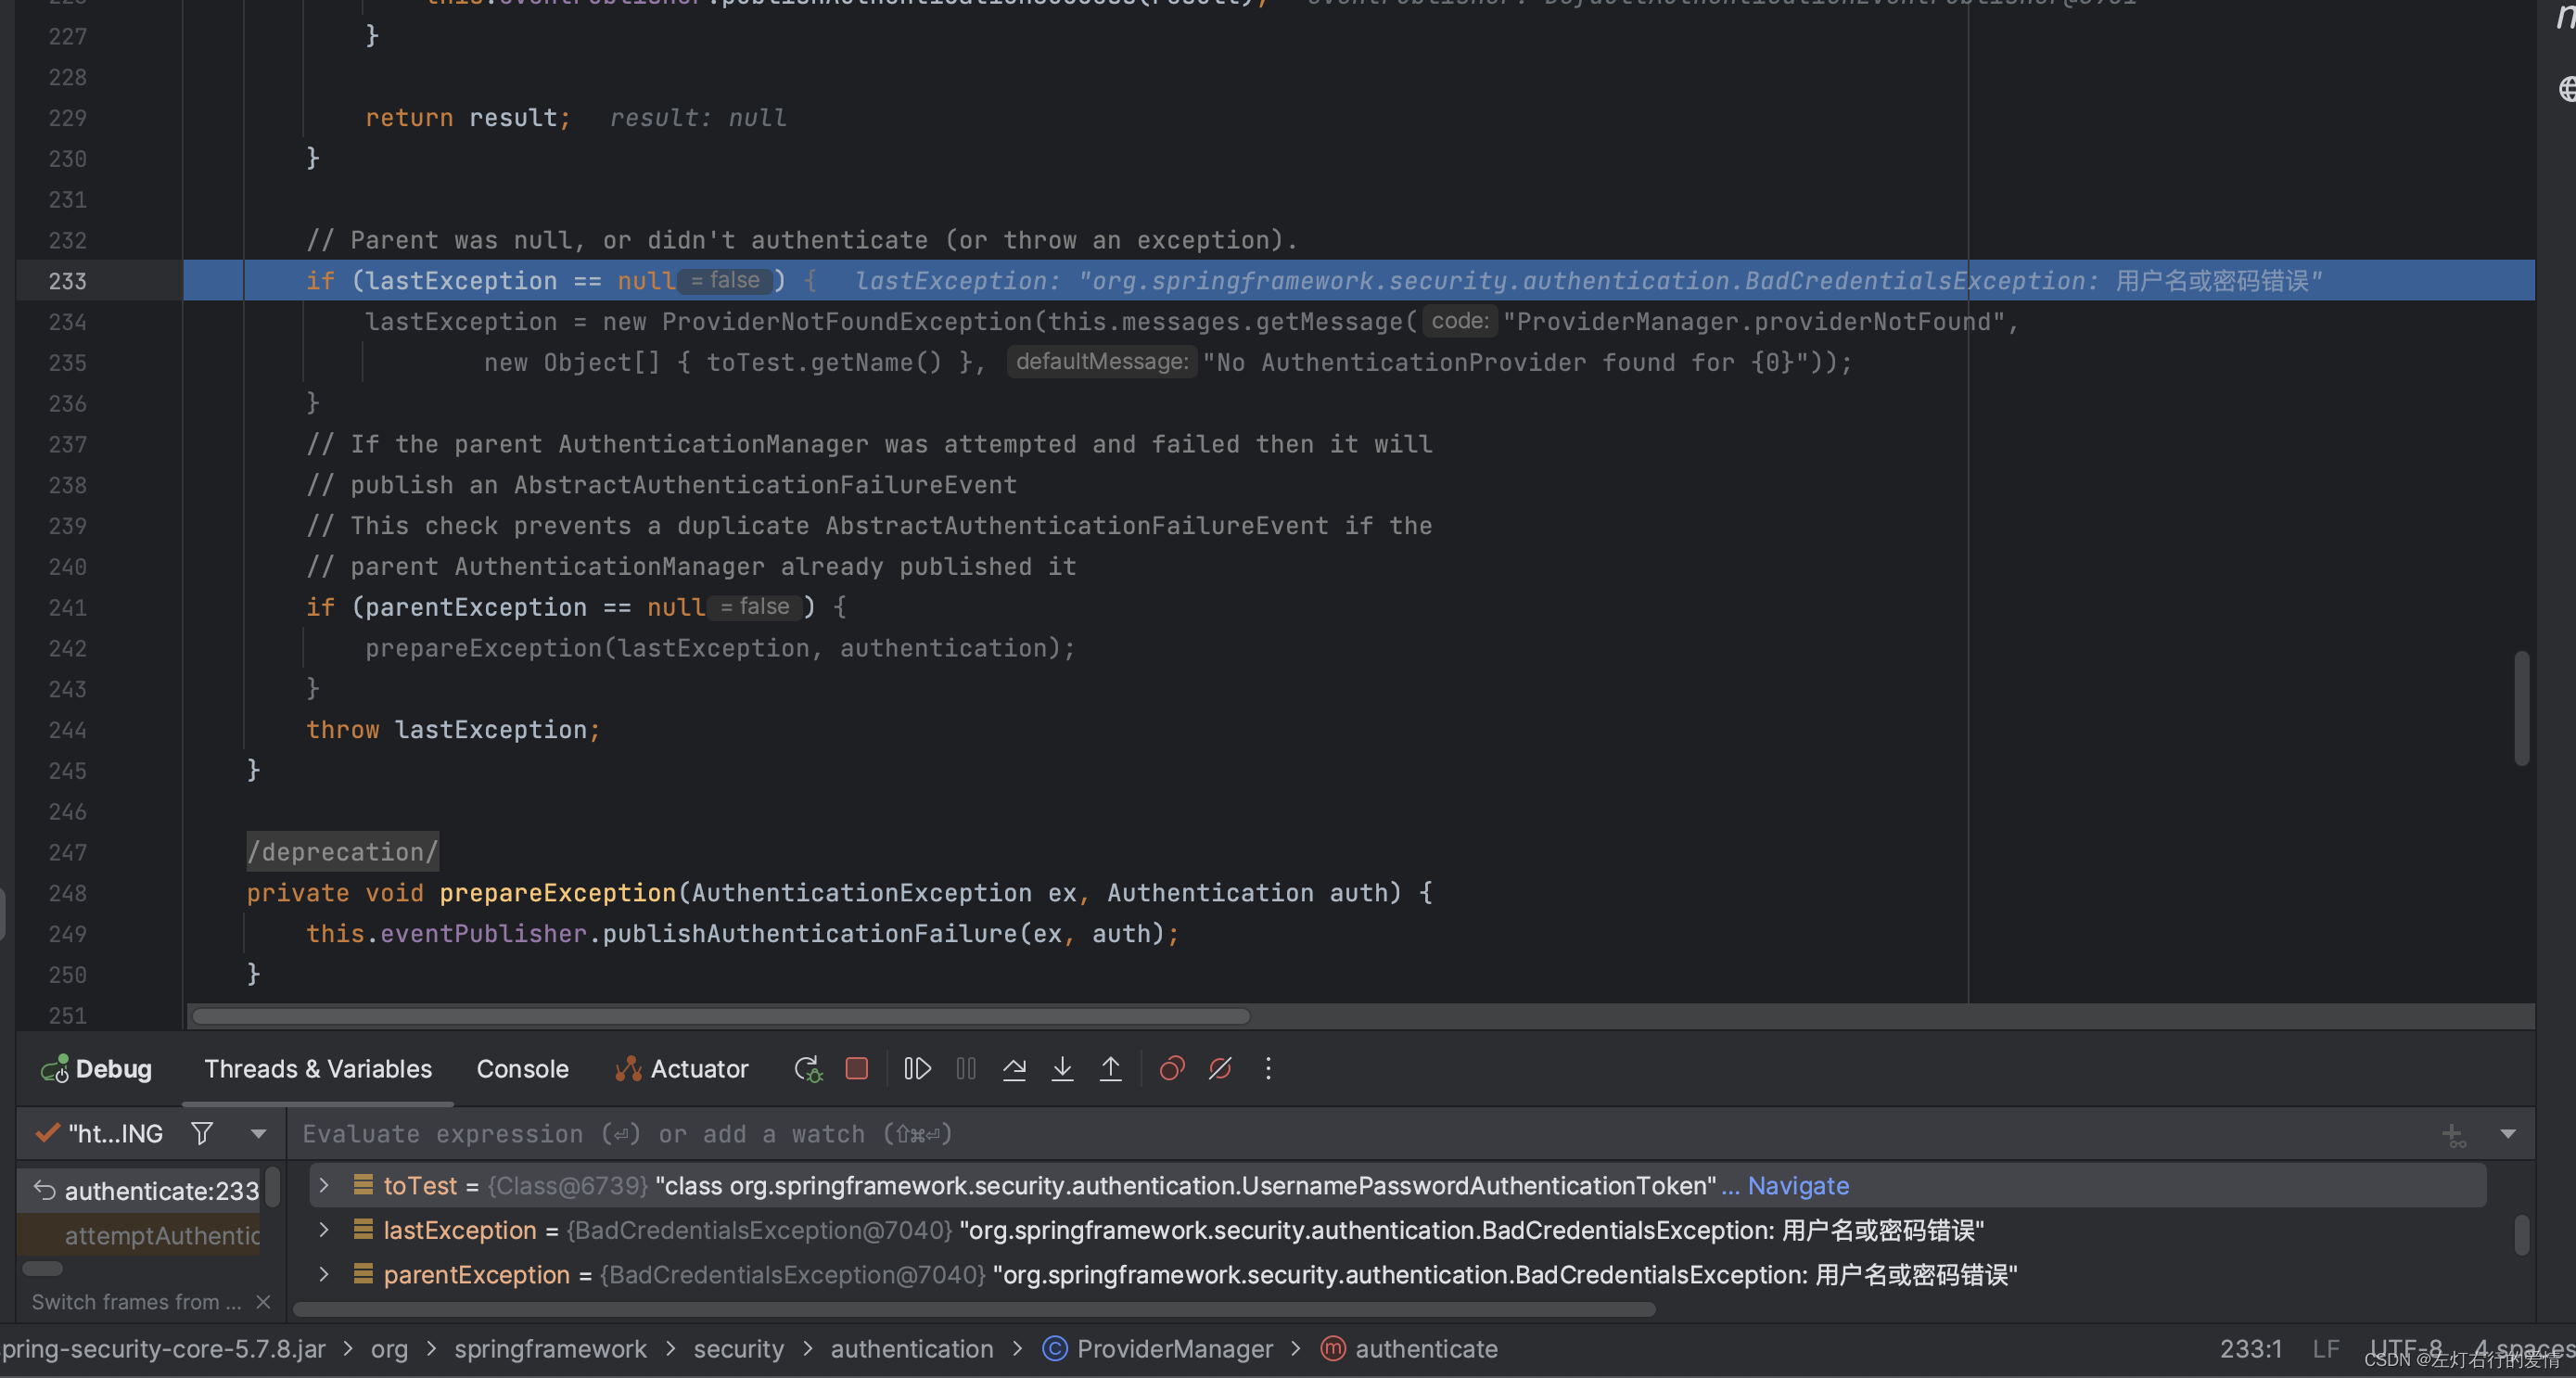
最后一个判断,此时parentException不为空,不符合:
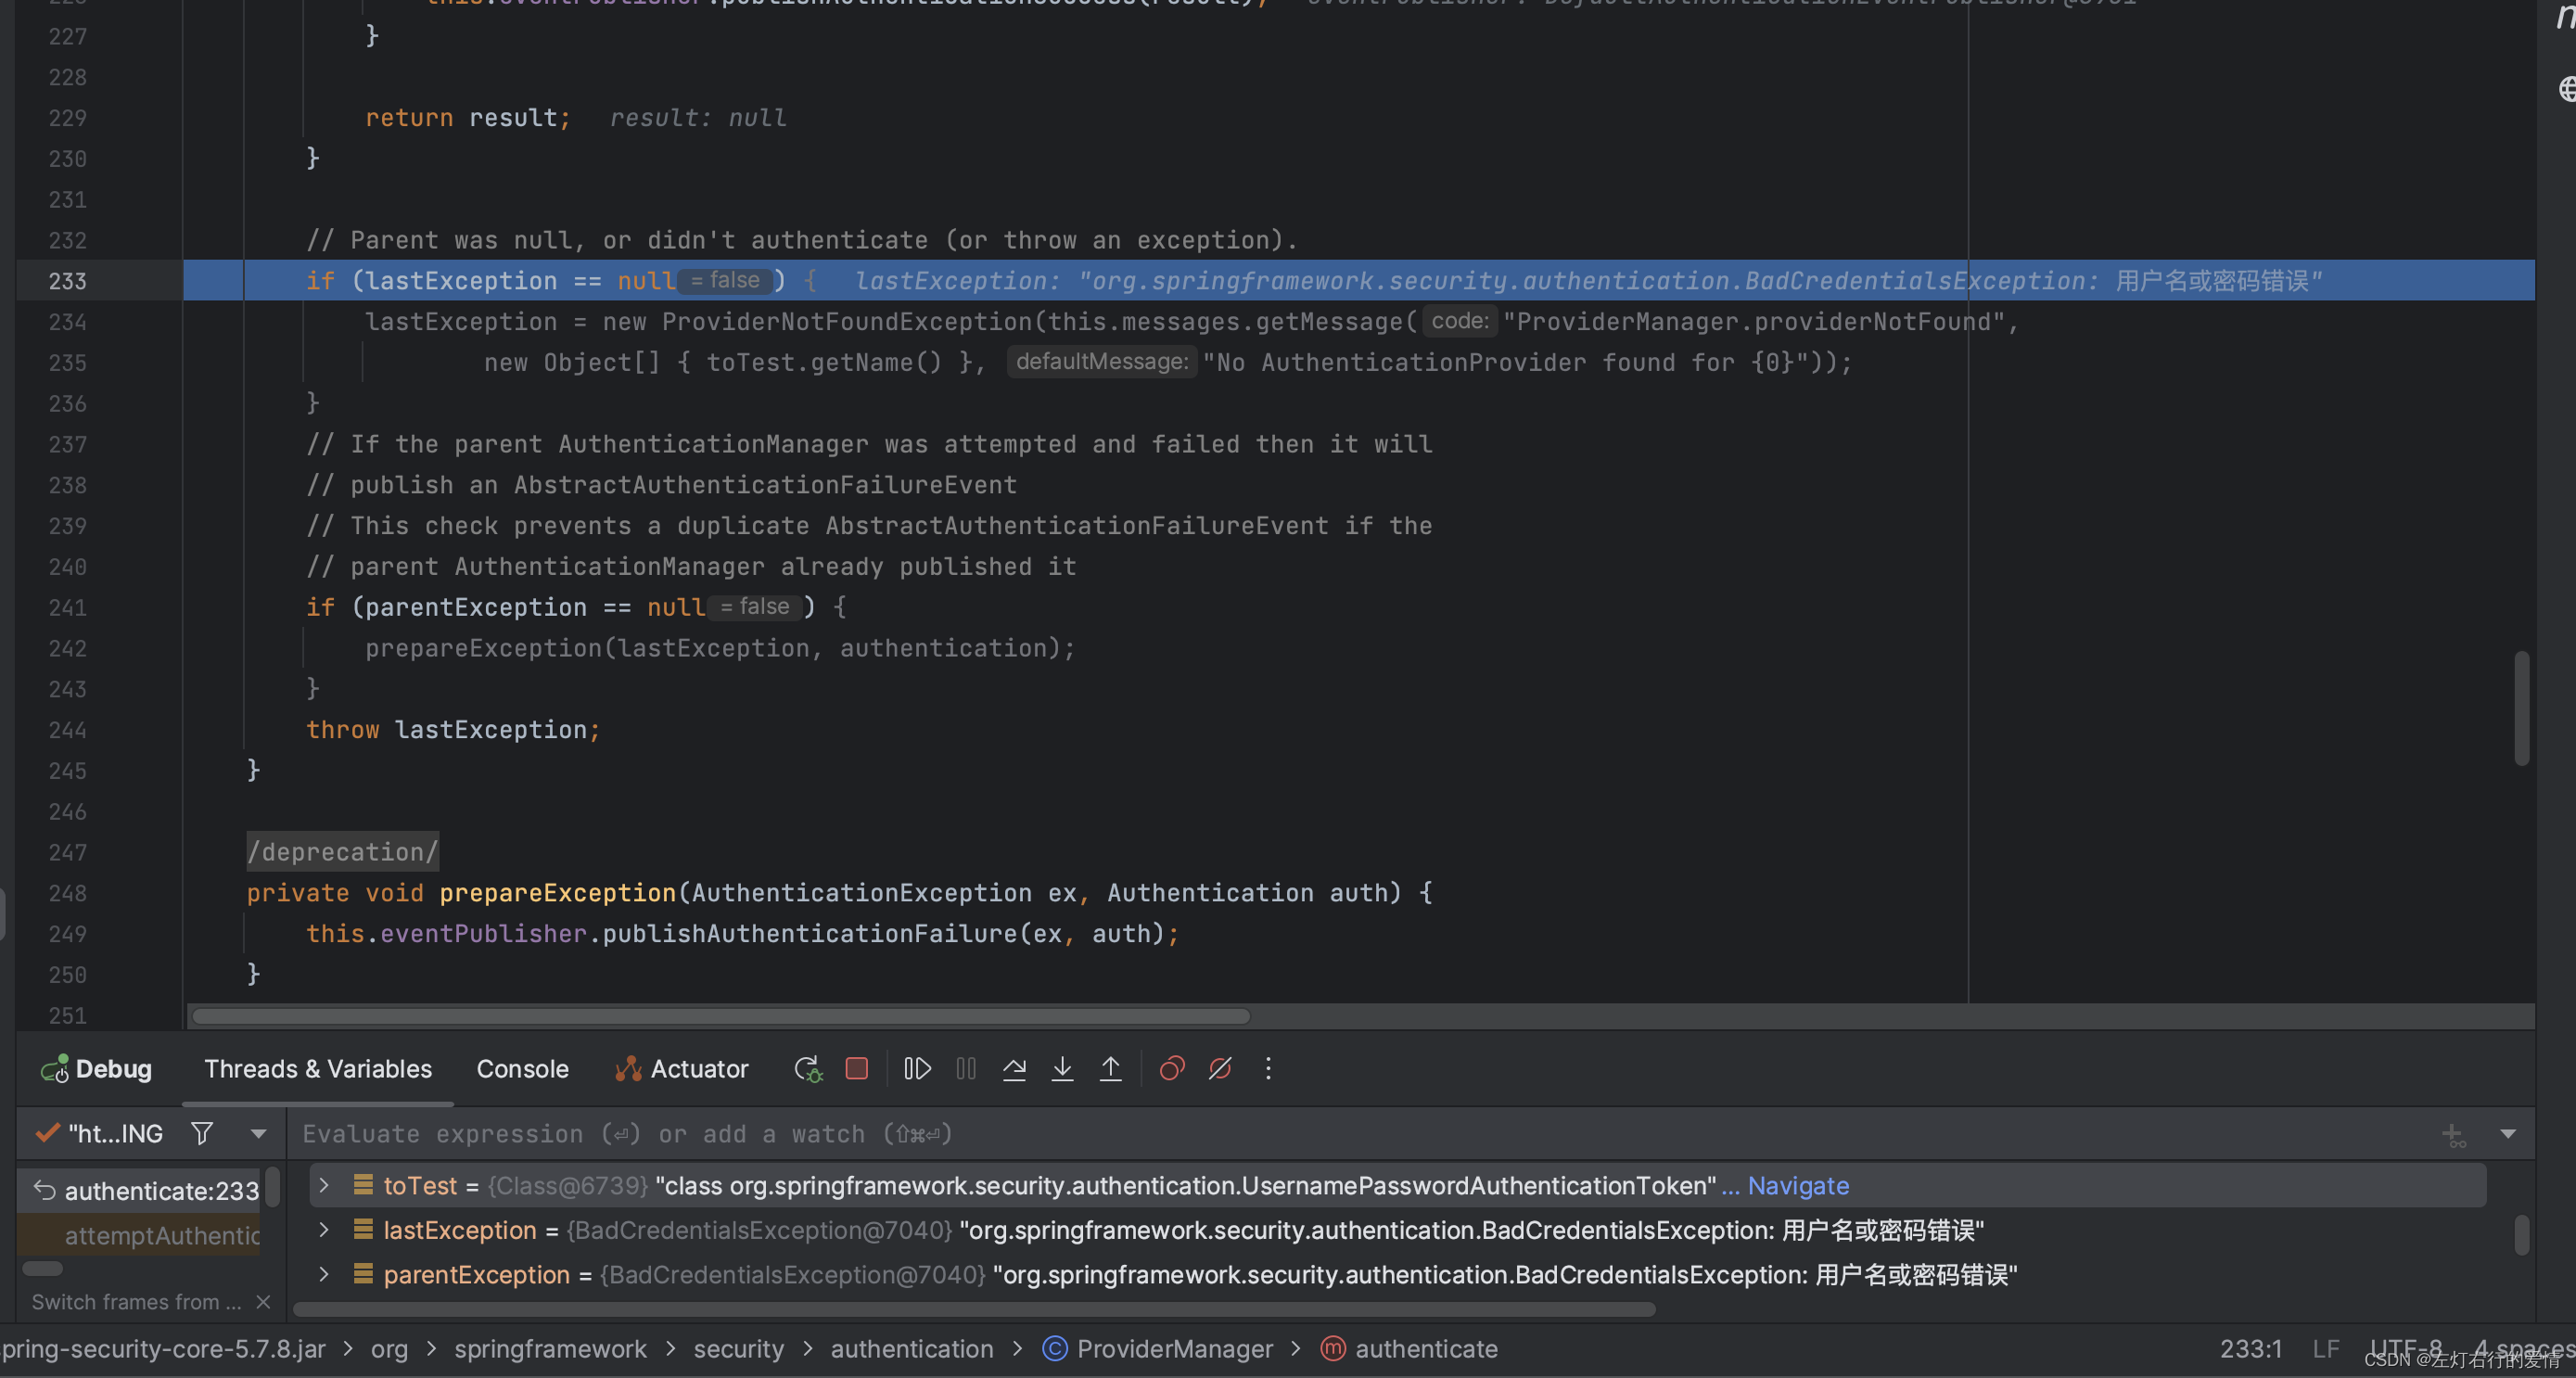
最后抛出错误:
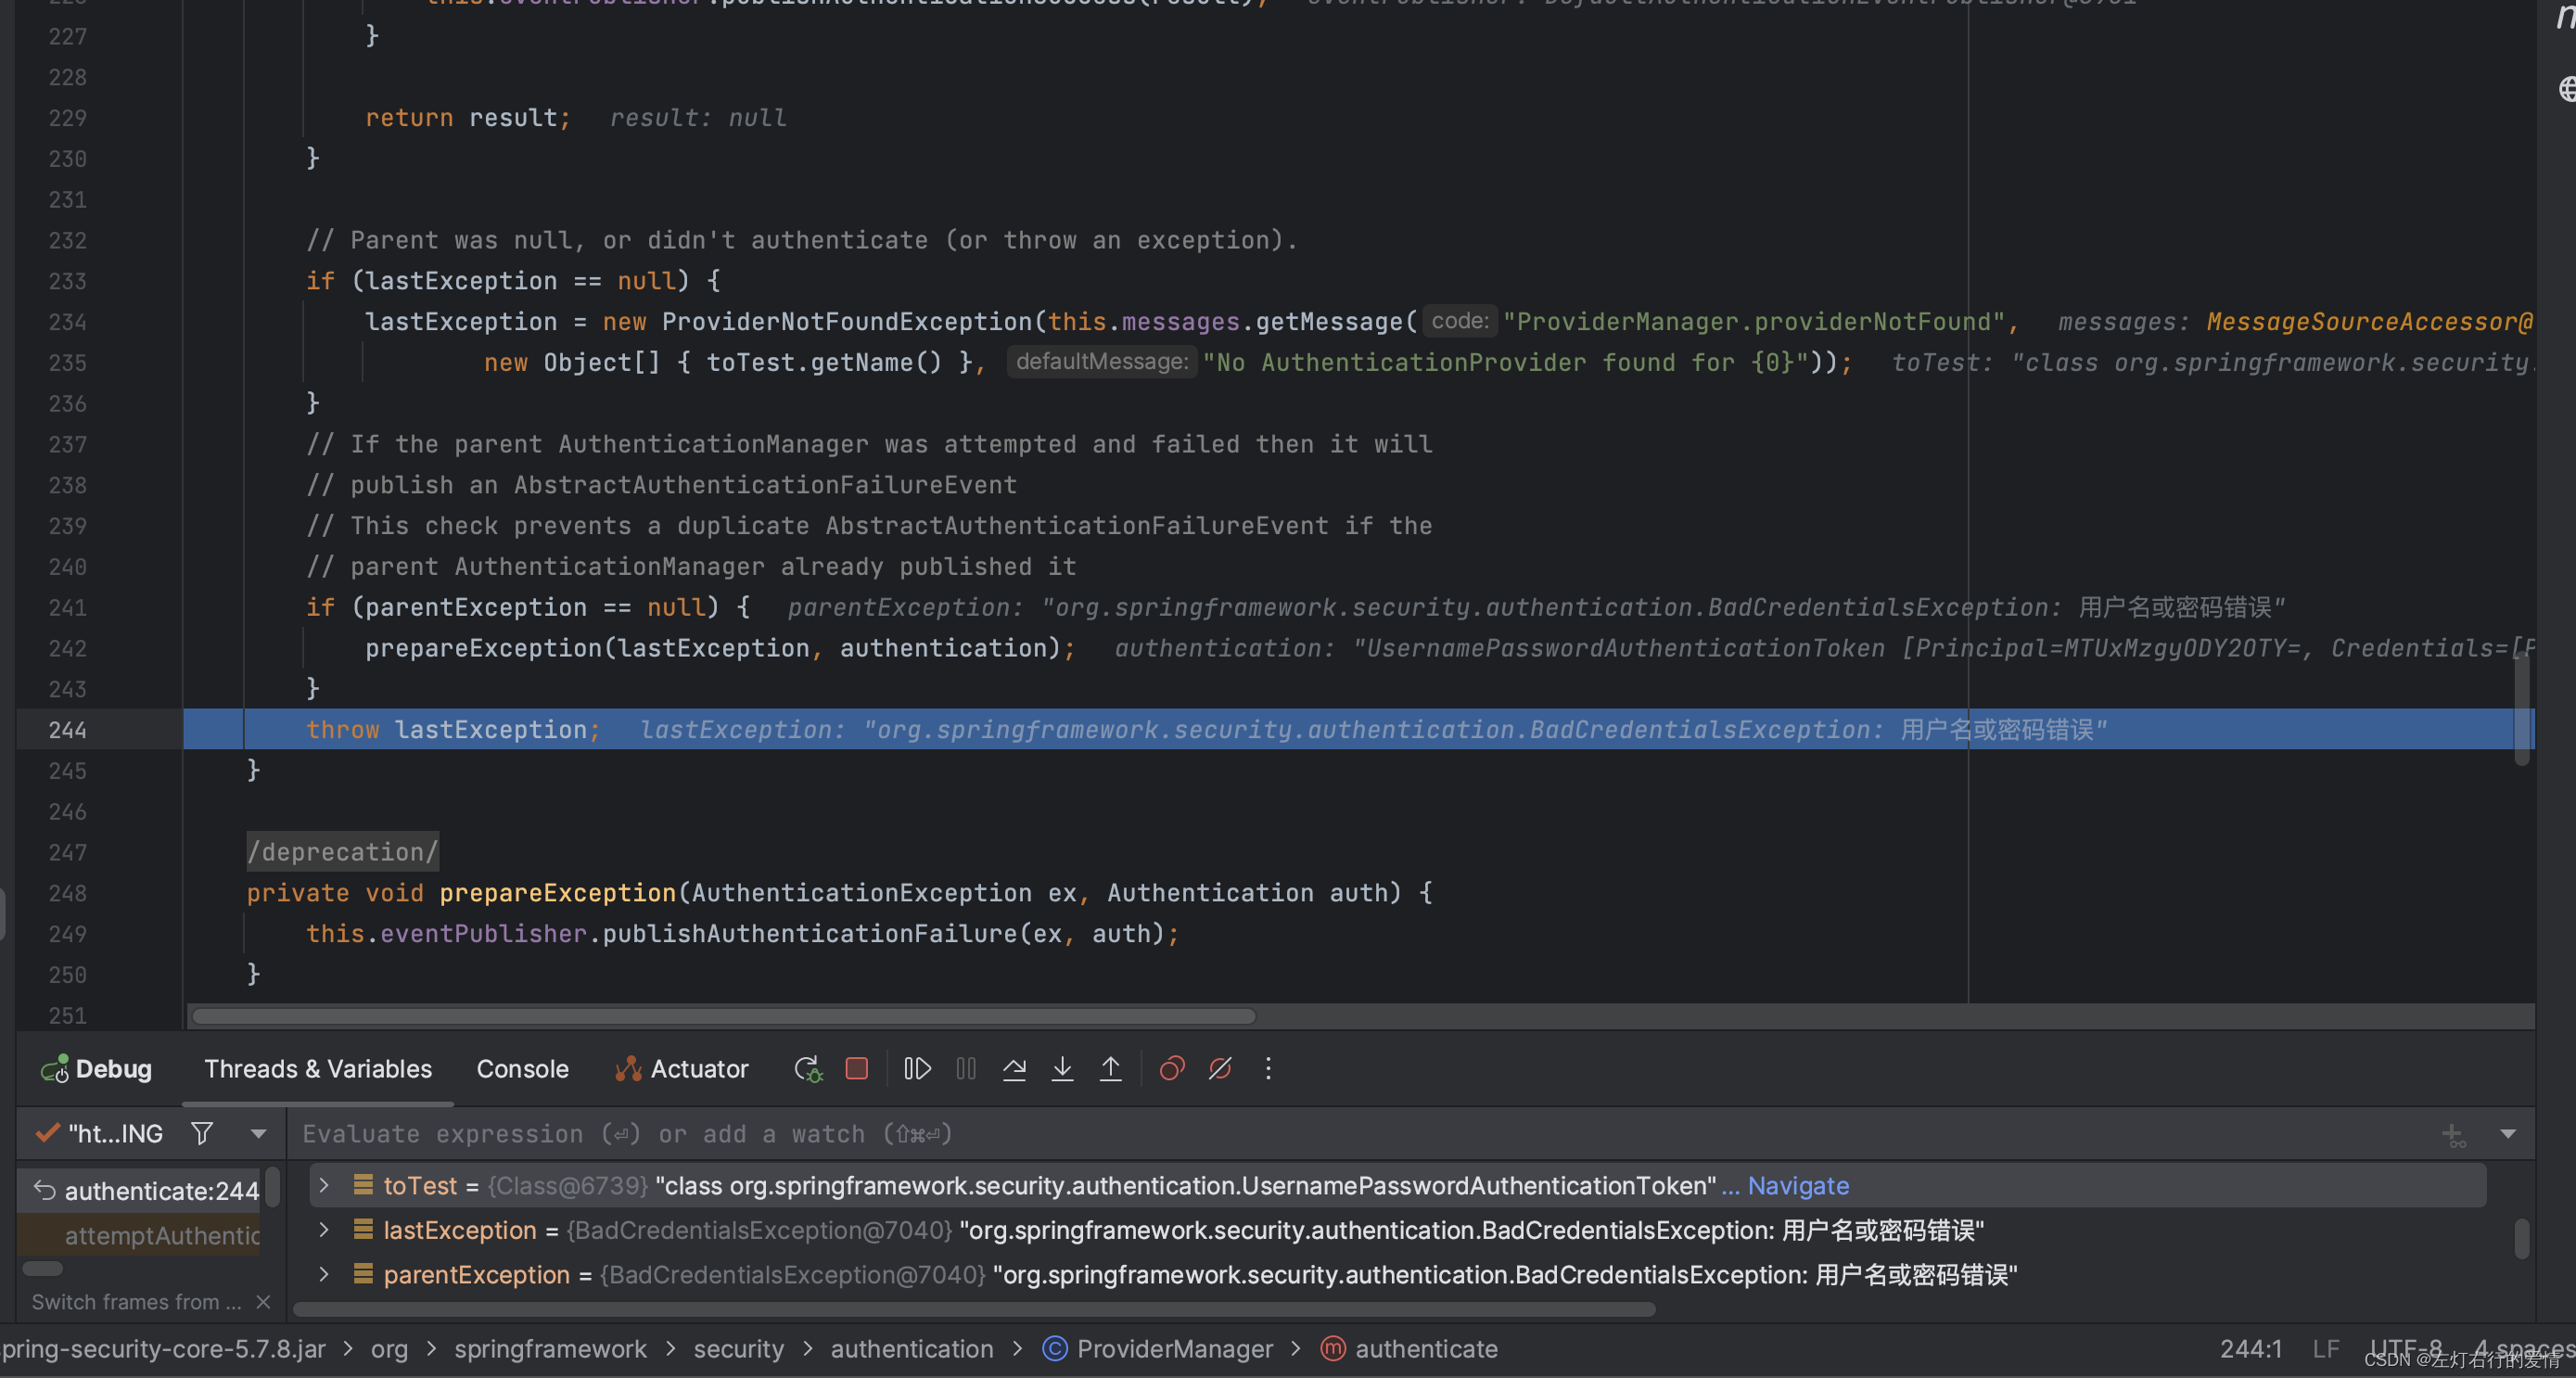
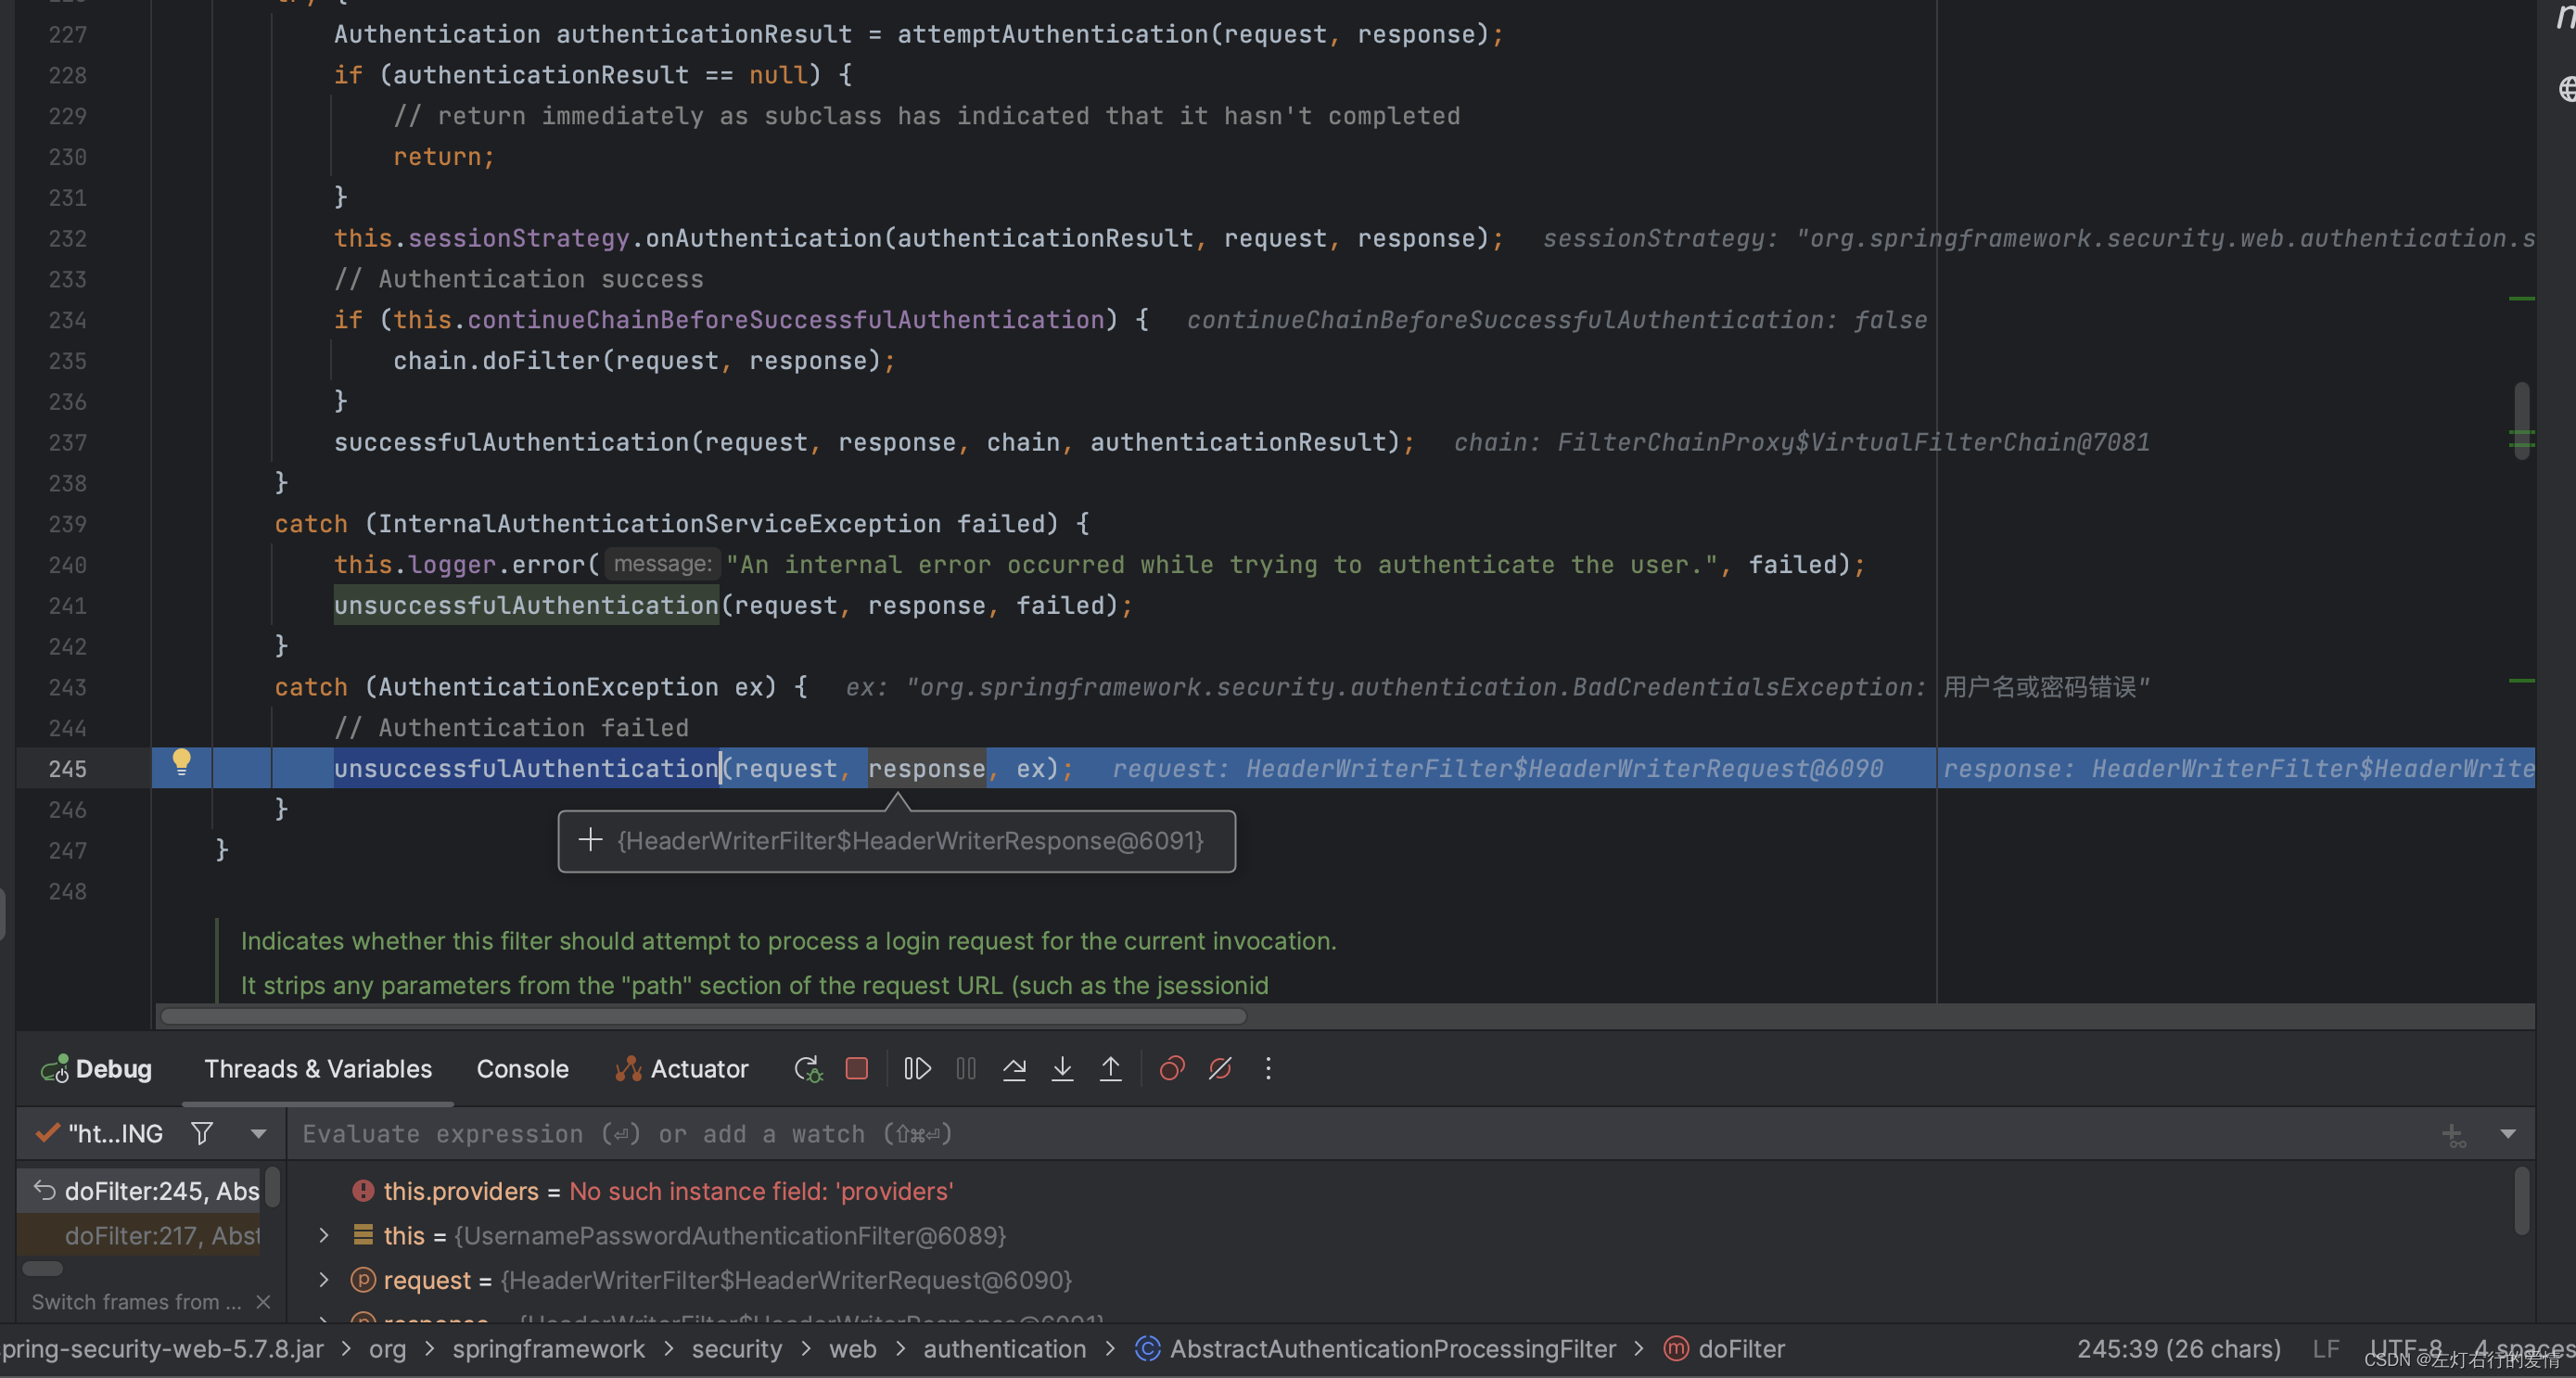
抛出错误后,错误回调,来到AbstractAuthenticationProcessingFilter
类的doFileter里面,在这里面catch房啊捕获到异常,执行方法体里面的unsuccessfulAuthentication方法:
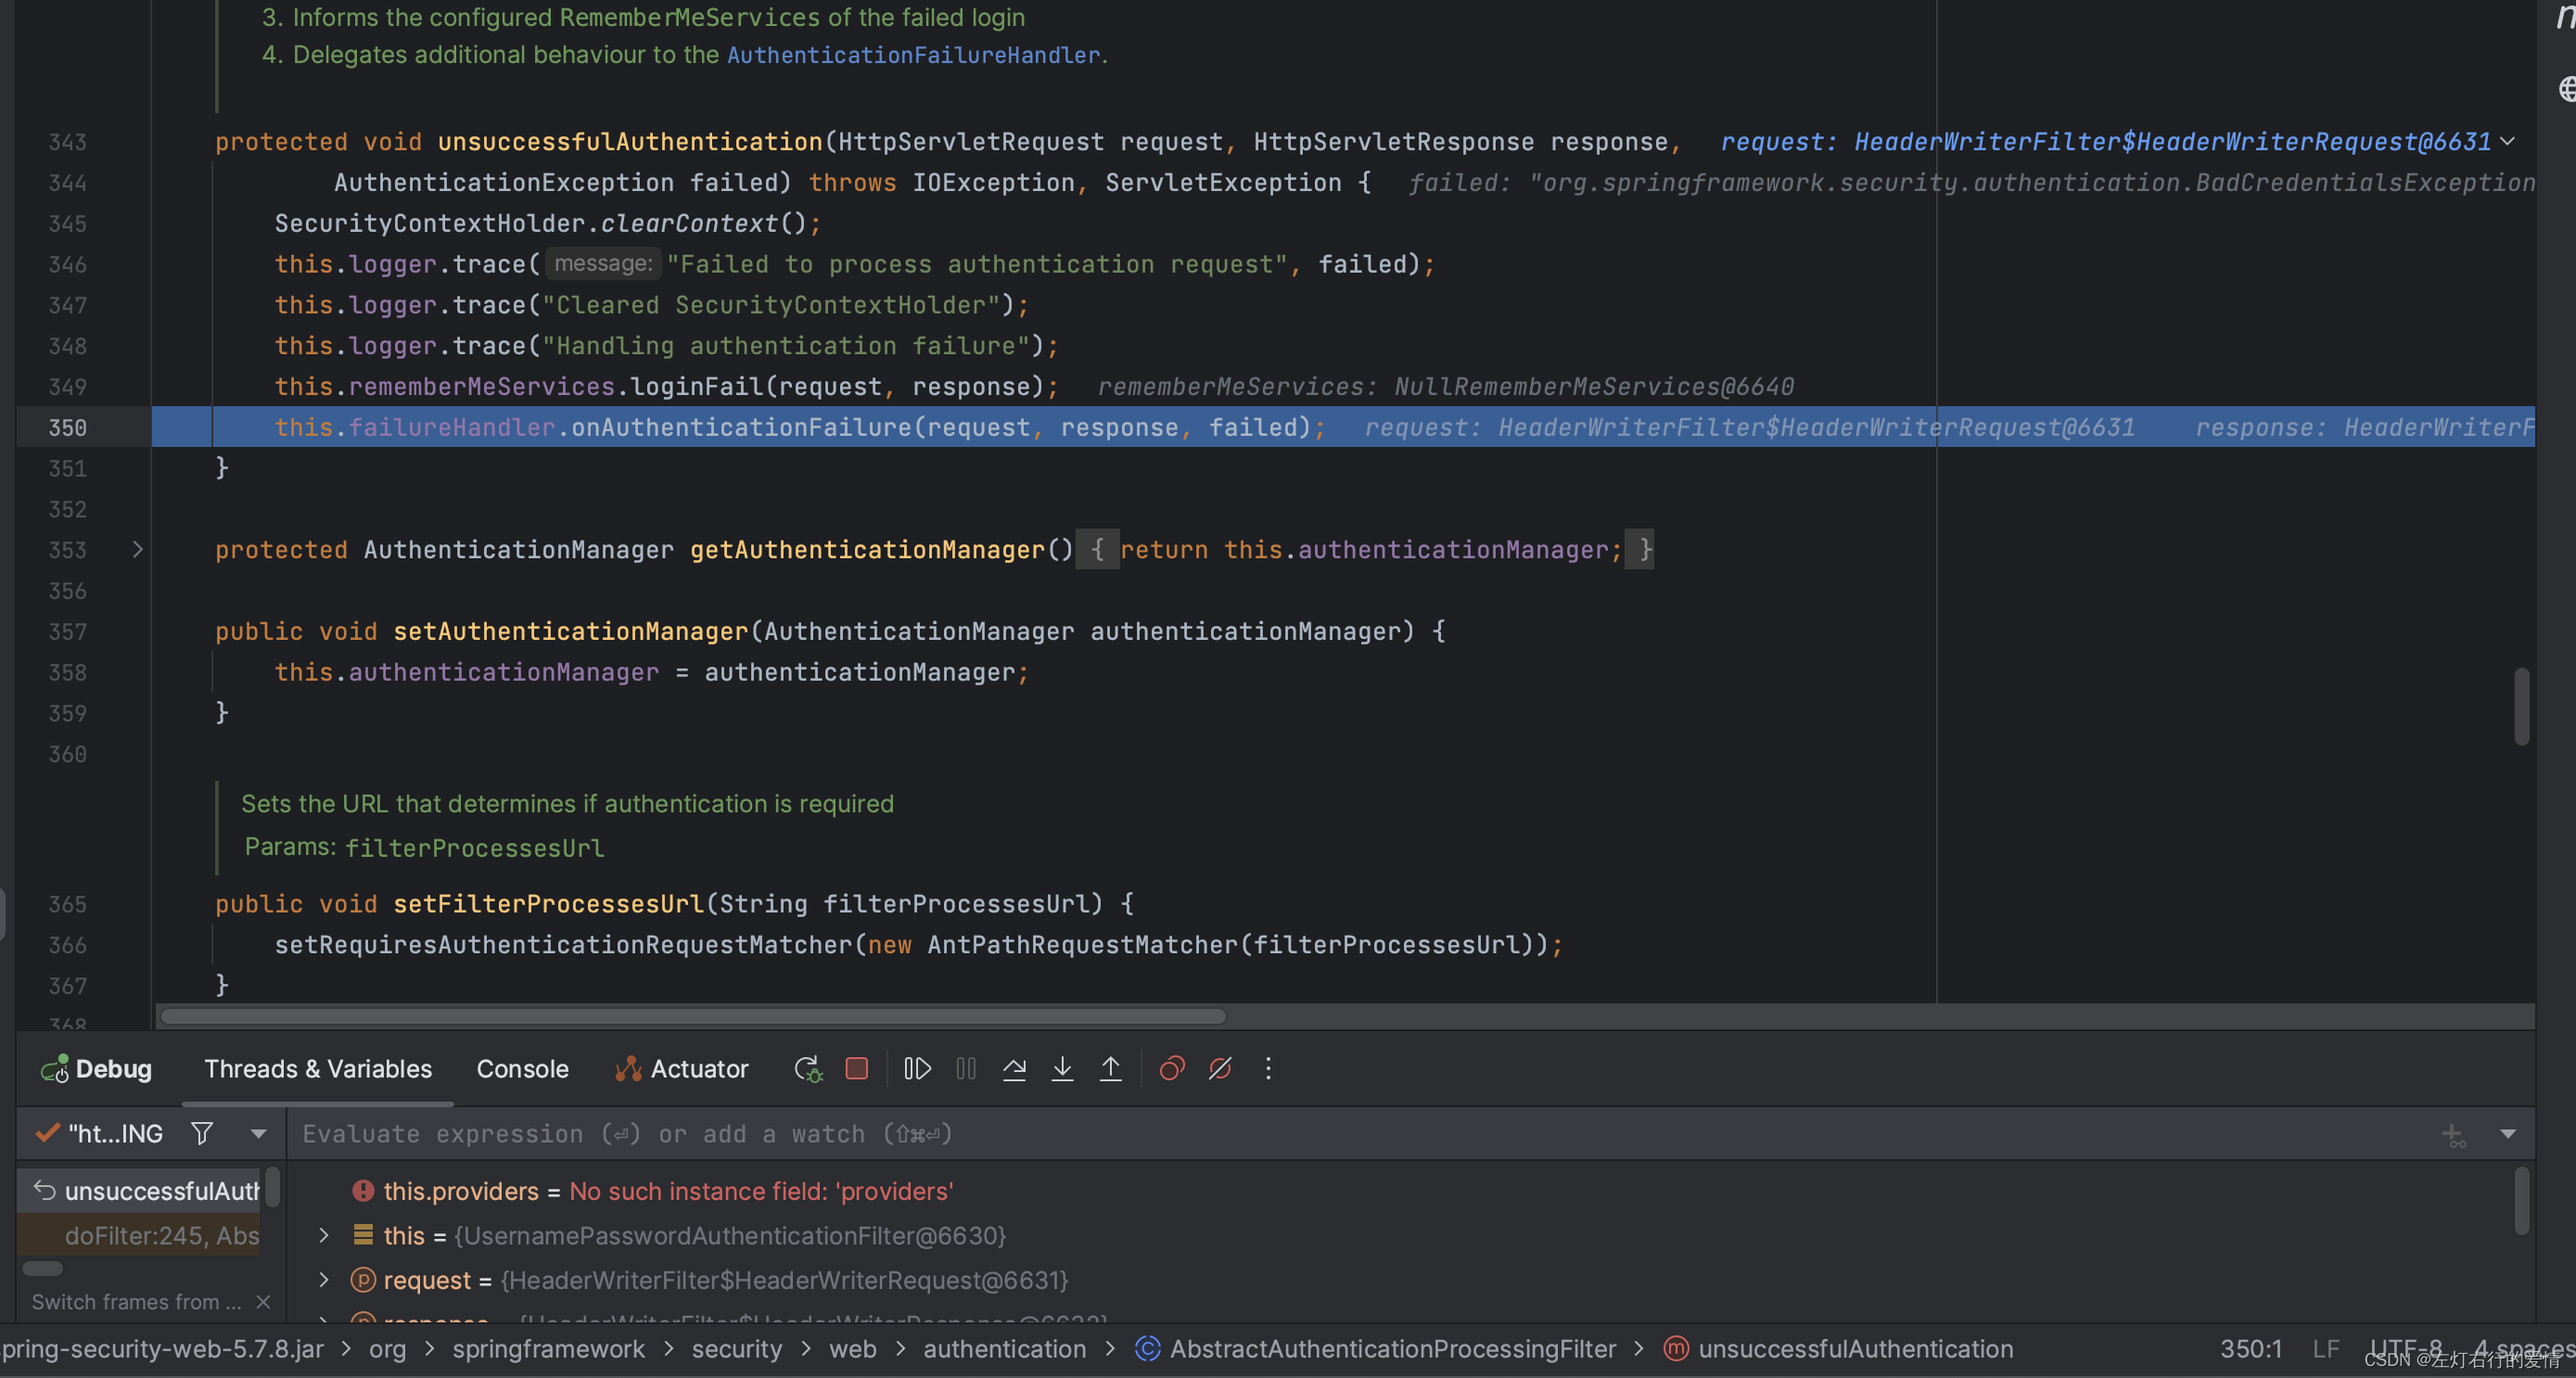
进入unsuccessfulAuthentication方法里面,我们来看看这里面的内容:
protected void unsuccessfulAuthentication(HttpServletRequest request, HttpServletResponse response,
		AuthenticationException failed) throws IOException, ServletException {
	// 清除 SecurityContextHolder 中的身份验证信息
	SecurityContextHolder.clearContext();
	// 记录身份验证失败的异常信息到日志
	this.logger.trace("Failed to process authentication request", failed);
	// 清除 SecurityContextHolder
	this.logger.trace("Cleared SecurityContextHolder");
	// 处理记住我功能的登录失败
	this.rememberMeServices.loginFail(request, response);
	// 调用身份验证失败处理器进行处理
	this.failureHandler.onAuthenticationFailure(request, response, failed);
}
我们执行到最后一步,进入到身份验证失败处理器方法里面:
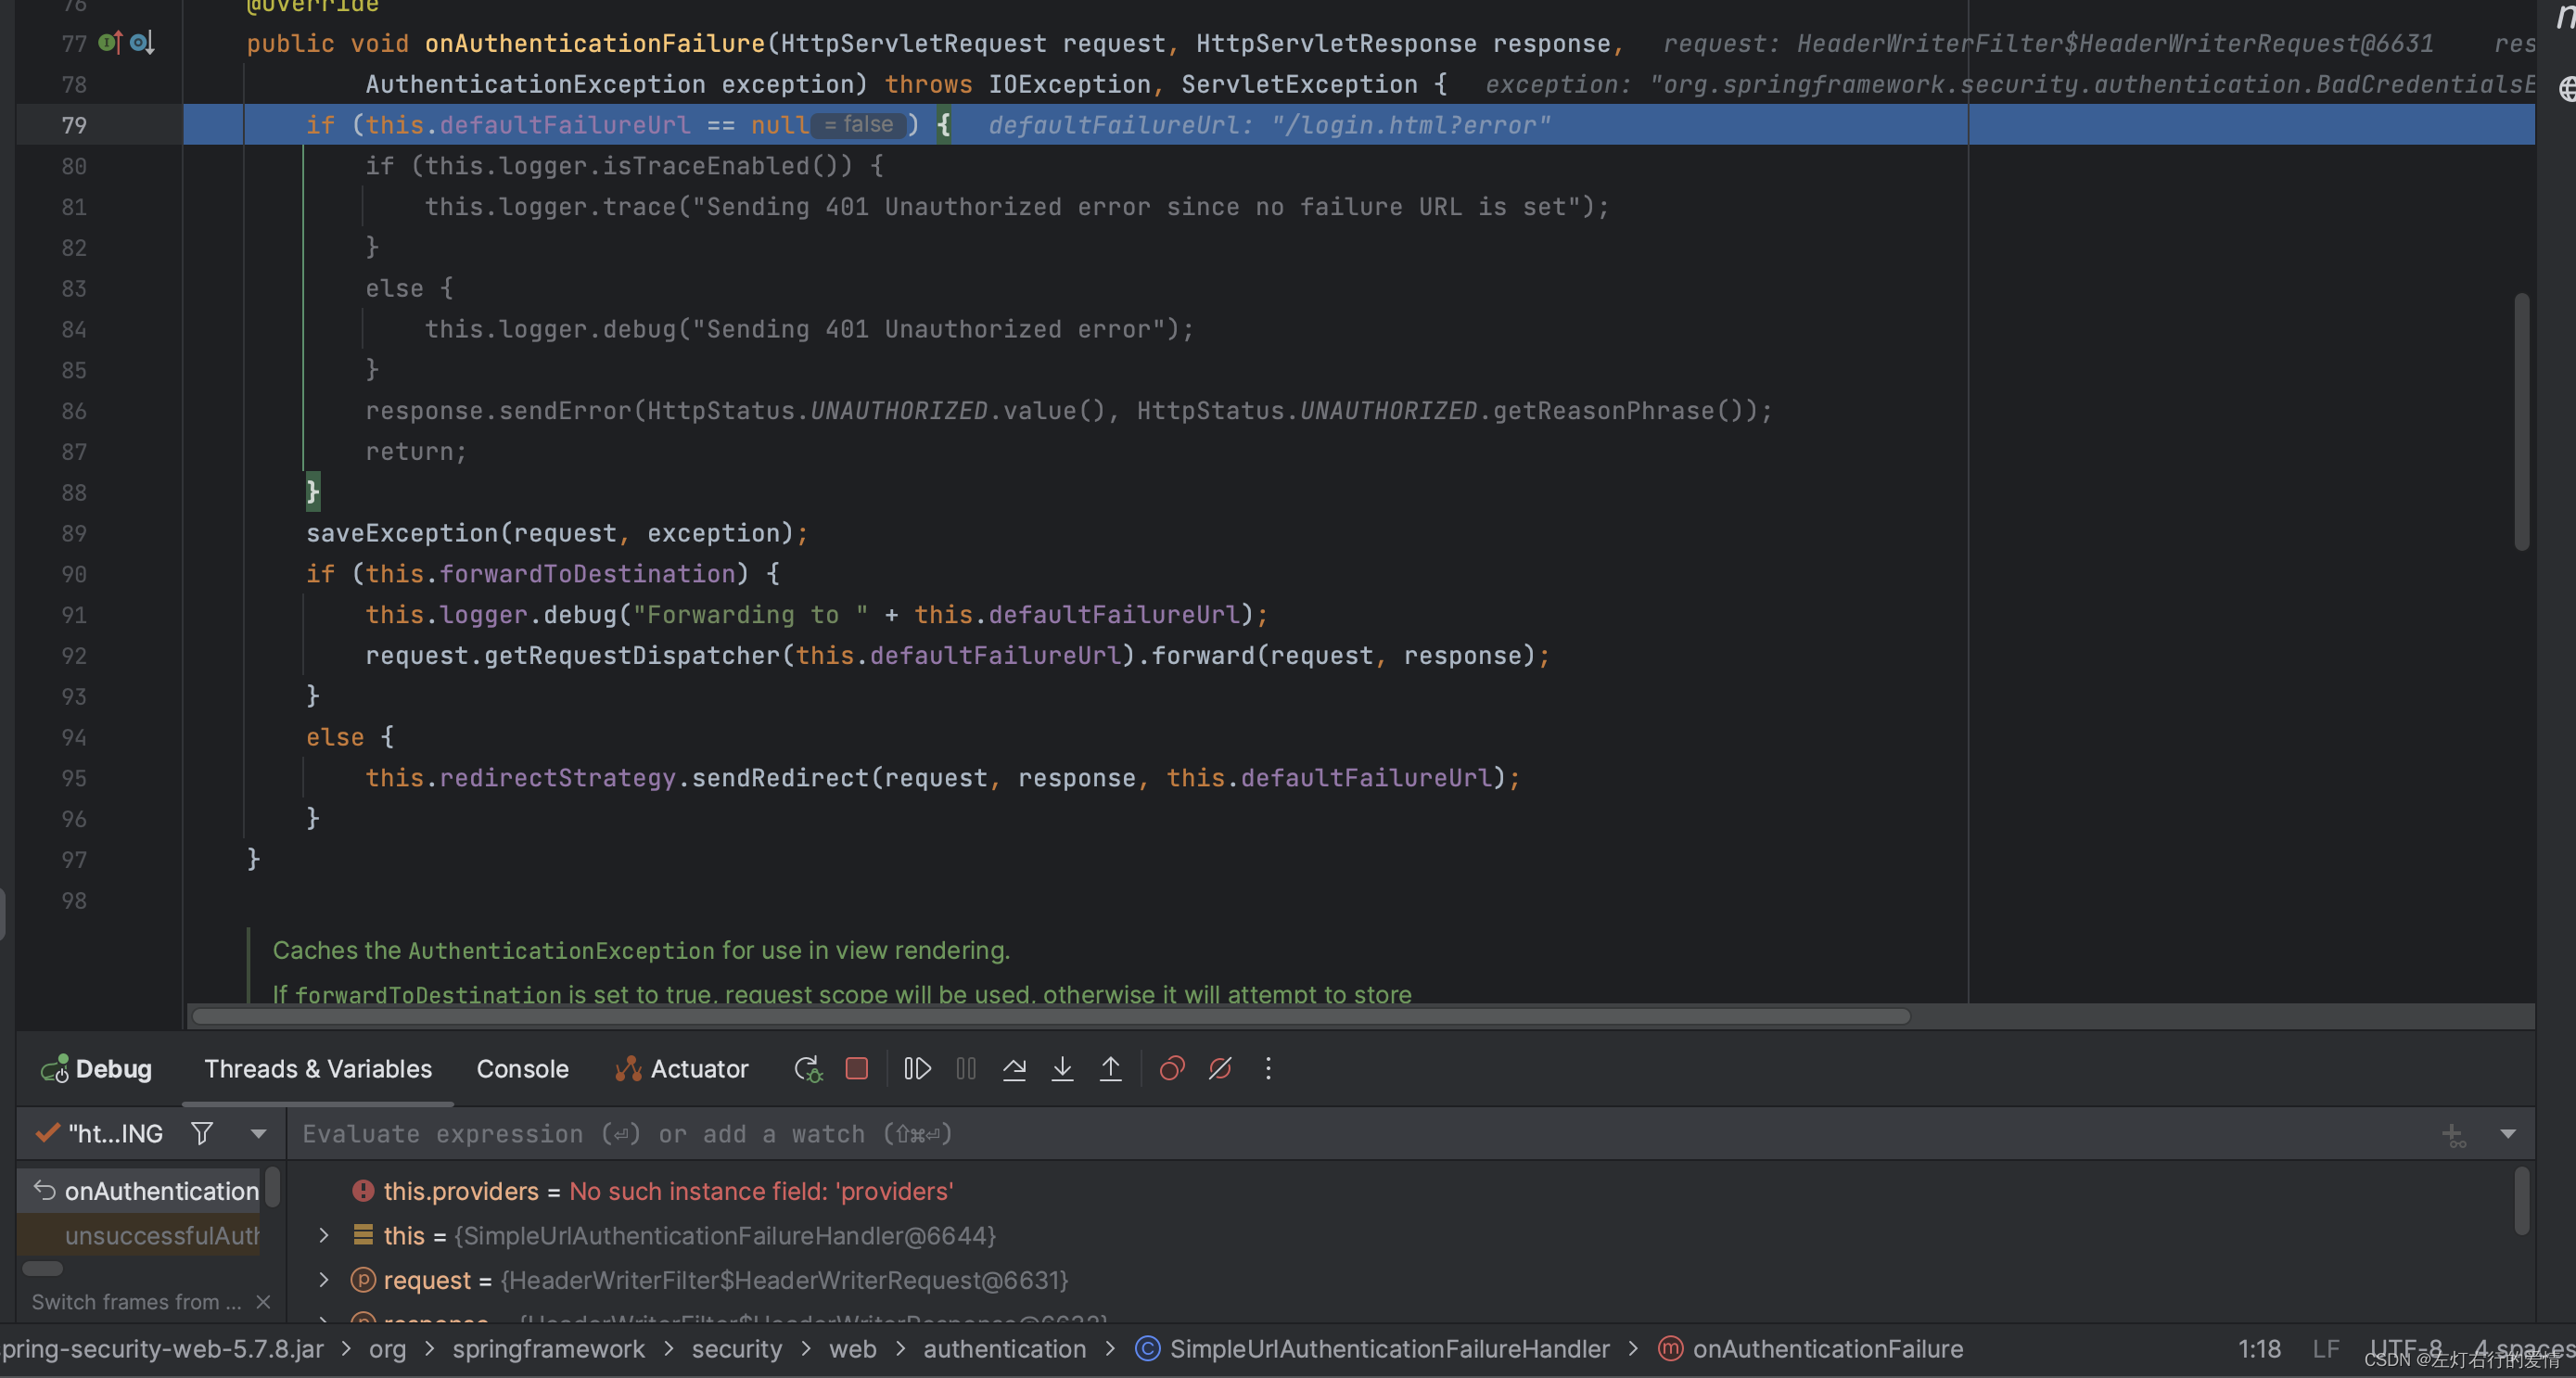
进入onAuthenticationFailure方法,我们先看看里面的内容:
public void onAuthenticationFailure(HttpServletRequest request, HttpServletResponse response,
		AuthenticationException exception) throws IOException, ServletException {
	if (this.defaultFailureUrl == null) {
		// 如果没有设置默认的失败 URL,则发送 401 未经授权的错误
		if (this.logger.isTraceEnabled()) {
			this.logger.trace("Sending 401 Unauthorized error since no failure URL is set");
		} else {
			this.logger.debug("Sending 401 Unauthorized error");
		}
		response.sendError(HttpStatus.UNAUTHORIZED.value(), HttpStatus.UNAUTHORIZED.getReasonPhrase());
		return;
	}
	// 将异常保存到request属性中
	saveException(request, exception);
	if (this.forwardToDestination) {
		// 如果设置为转发到目的地,则使用请求转发将请求转发到默认的失败 URL
		this.logger.debug("Forwarding to " + this.defaultFailureUrl);
		request.getRequestDispatcher(this.defaultFailureUrl).forward(request, response);
	} else {
		// 否则,使用重定向策略将请求重定向到默认的失败 URL
		this.redirectStrategy.sendRedirect(request, response, this.defaultFailureUrl);
	}
}
debug走一下里面的流程,刚进入时,注意里面的默认失败url,此时默认失败url不为null,不符合:
然后执行saveException,将异常保存到请求属性中:
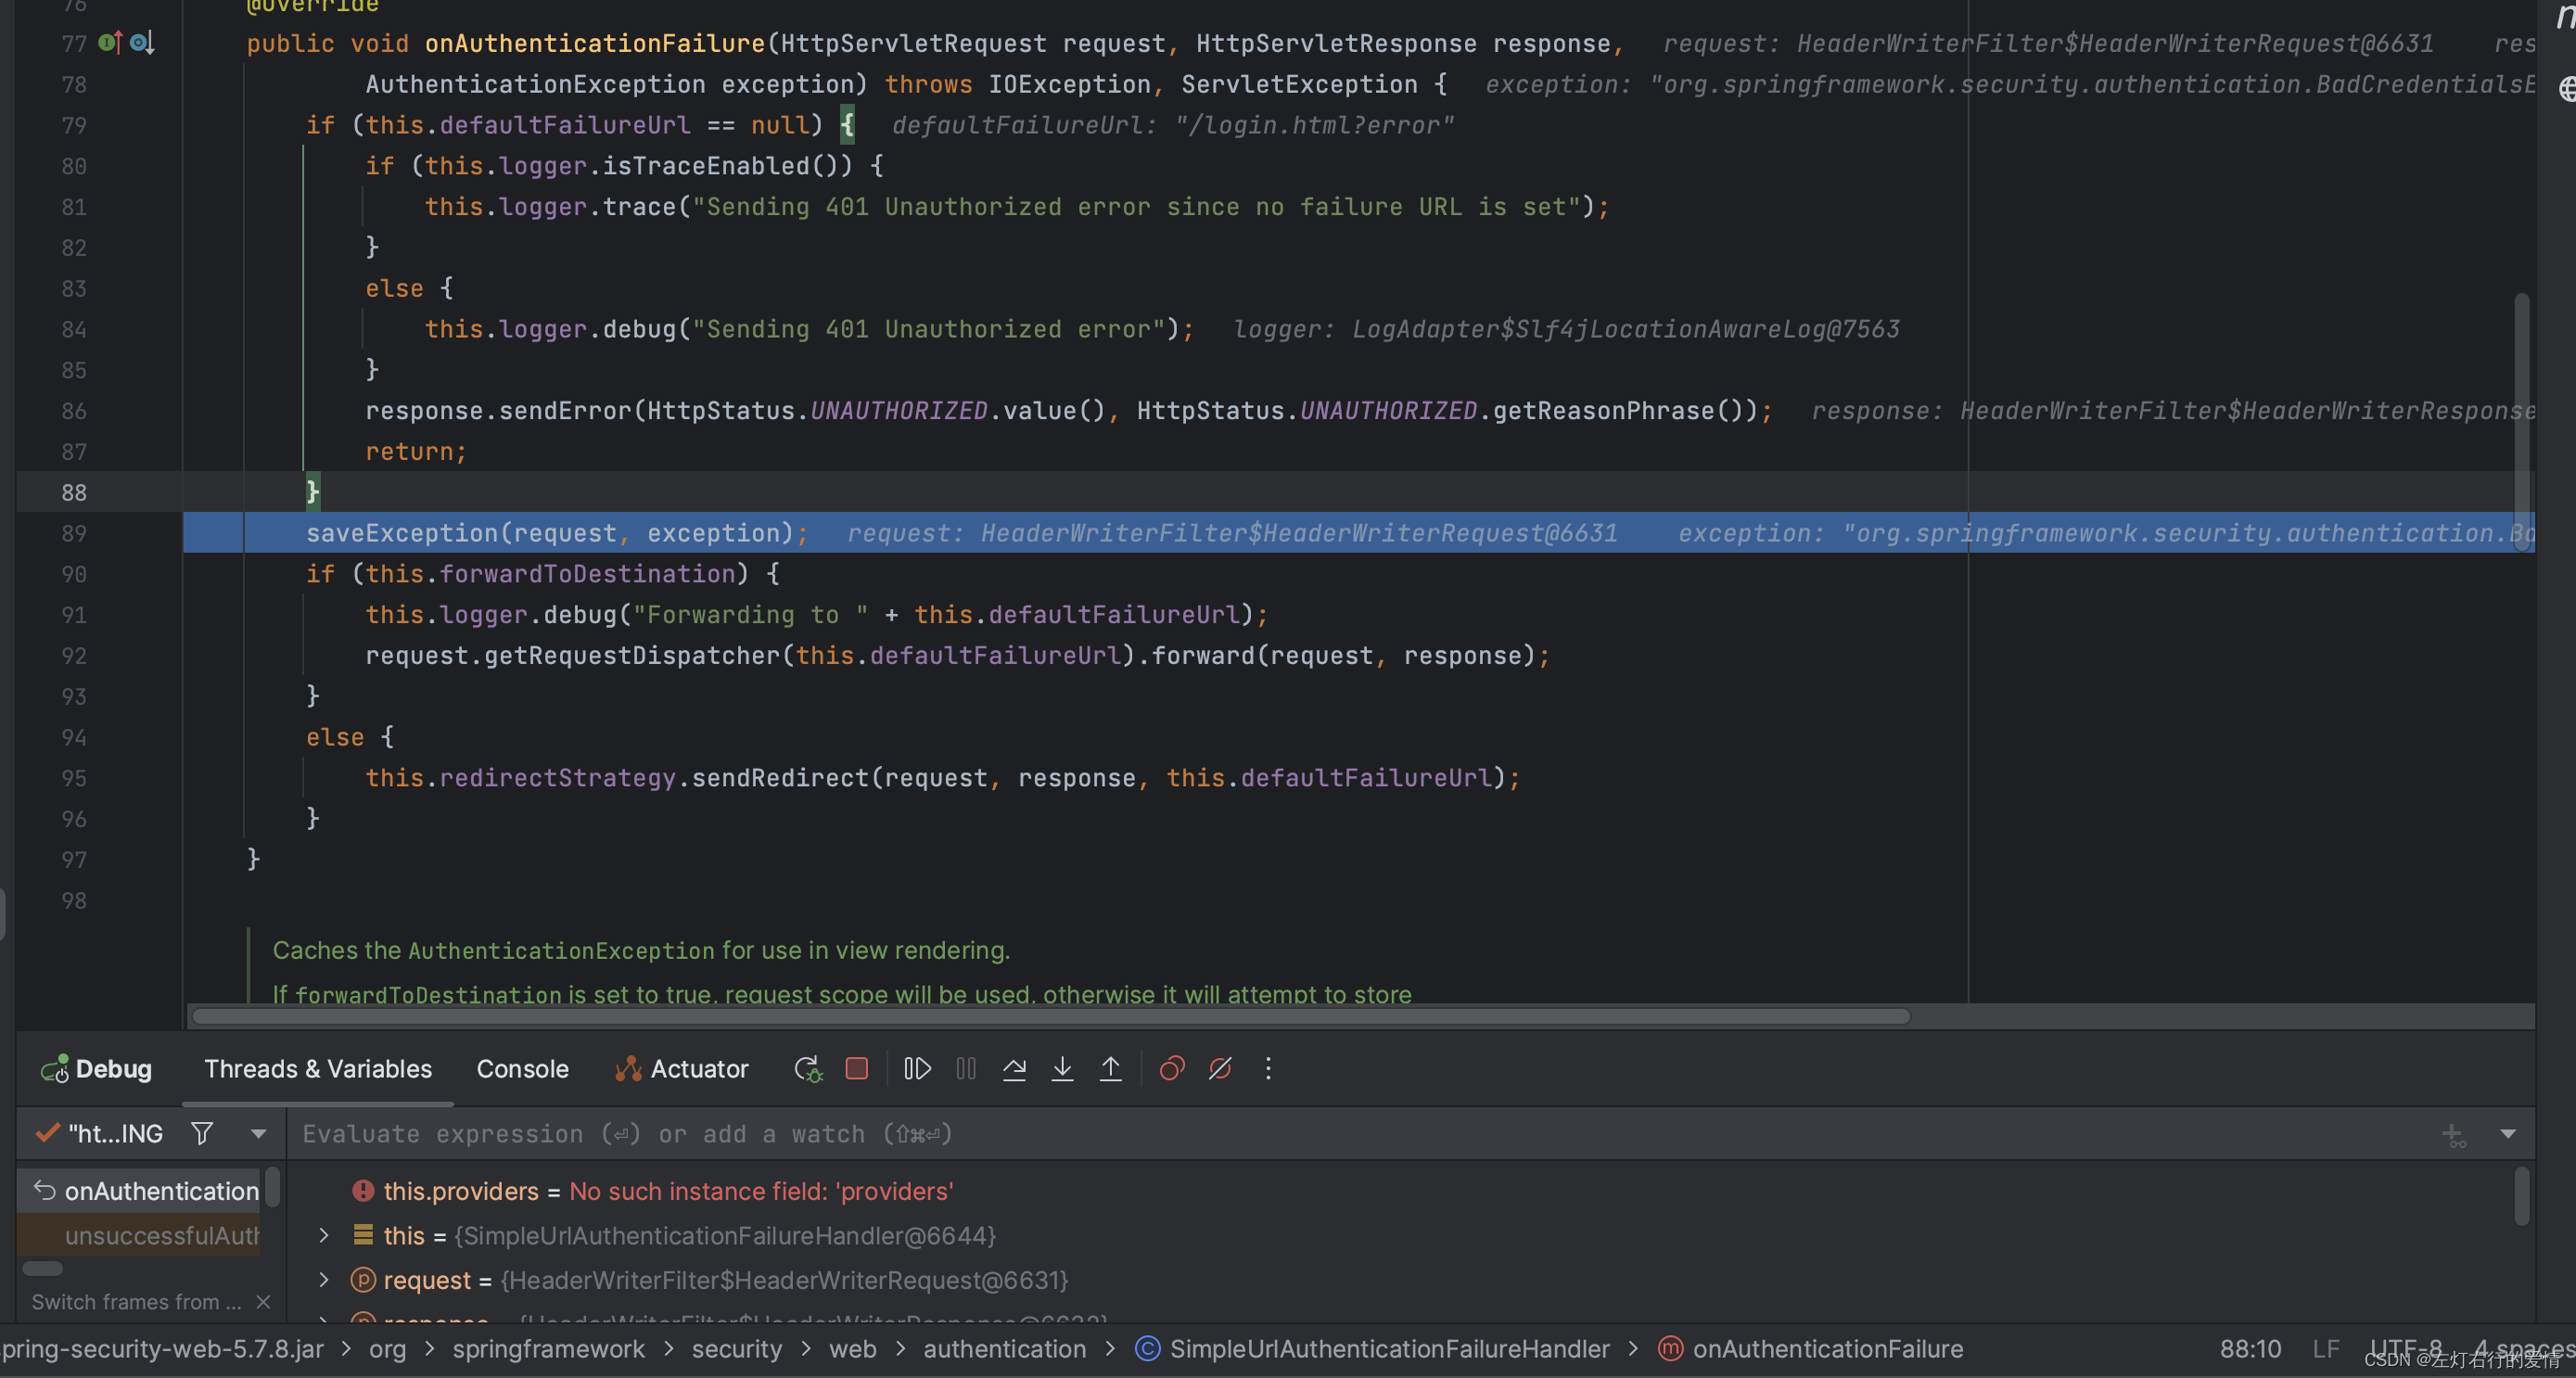
它里面的内容如下:
protected final void saveException(HttpServletRequest request, AuthenticationException exception) {
	if (this.forwardToDestination) {
		// 如果配置为转发到目的地,则将异常保存到requset属性中
		request.setAttribute(WebAttributes.AUTHENTICATION_EXCEPTION, exception);
		return;
	}

	// 否则,根据会话配置将异常保存到session中
	HttpSession session = request.getSession(false);
	if (session != null || this.allowSessionCreation) {
		request.getSession().setAttribute(WebAttributes.AUTHENTICATION_EXCEPTION, exception);
	}
}
接着执行下一个if条件,因为forwardToDestination为false,也就是没有设置为跳转转发,所以不会为true,不符合,然后直接进入到else里面,进行重定向转发。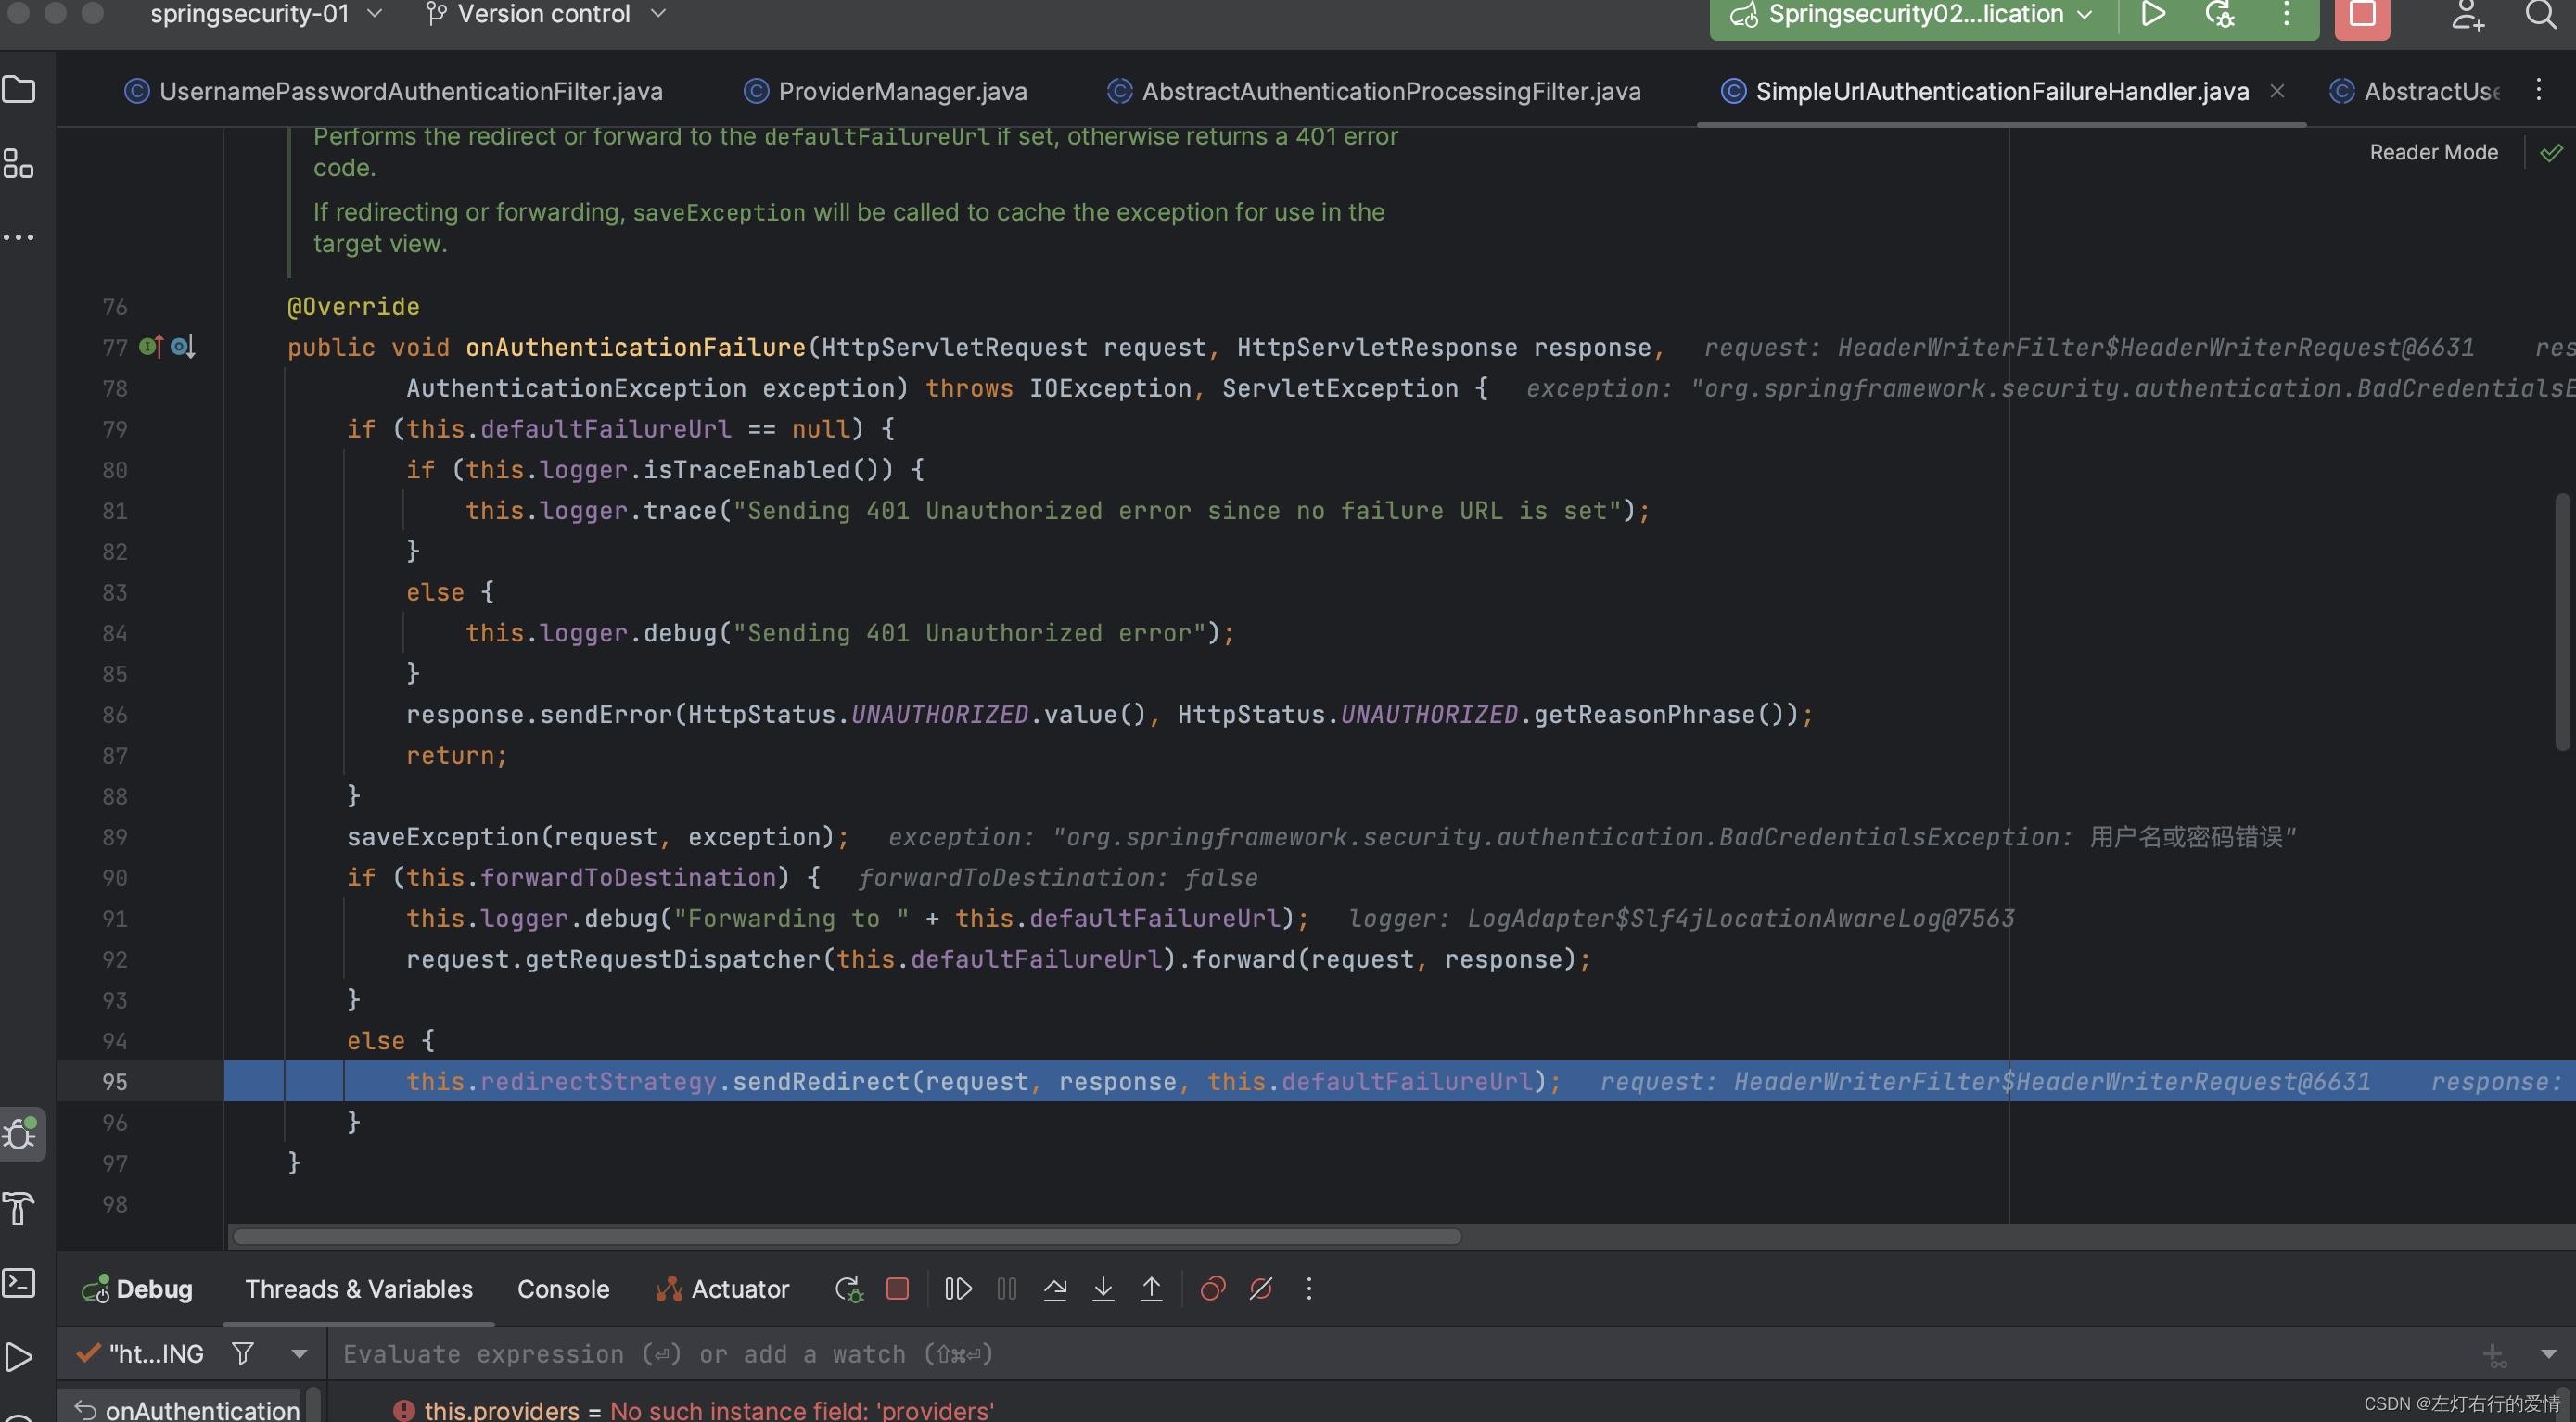
所以,我们默认为redirect,报错信息存储在session中,命名属性为SPRING_SECURITY_LAST_EXCEPTION。
如果是forward,报错信息存储在reqeust中,后面是一样的。
那么我们如何设置认证失败后的跳转方式呢,security给我们提供了两个方法:
- failureForwardUrl() // 认证失败后,forward跳转。
- failureUrl() // 认证失败后,redirect跳转。
最后实现效果:

自定义登录失败处理
和自定义登陆成功的使用场景一样,在面对前后端分离时,上面failureForwardUrl和failureUrl两个方法就力不从心了,所以security提供了failureHandler方法用来自定义认证失败之后处理。
我们来看一看里面的内容:
	public final T failureHandler(AuthenticationFailureHandler authenticationFailureHandler) {
		this.failureUrl = null;
		this.failureHandler = authenticationFailureHandler;
		return getSelf();
	}
AuthenticationFailureHandler
它的结构如下图:

我们来看看里面的内容:
public interface AuthenticationFailureHandler {

	void onAuthenticationFailure(HttpServletRequest request, HttpServletResponse response,
			AuthenticationException exception) throws IOException, ServletException;

}
这是一个接口方法,它会在验证失败之后回调,所以我们只需要自定义实现就可以。
AuthenticationFailureHandler自定义实现
代码如下:
import com.fasterxml.jackson.databind.ObjectMapper;
import org.springframework.security.core.AuthenticationException;
import org.springframework.security.web.authentication.AuthenticationFailureHandler;

import javax.servlet.ServletException;
import javax.servlet.http.HttpServletRequest;
import javax.servlet.http.HttpServletResponse;
import java.io.IOException;
import java.util.HashMap;
import java.util.Map;

public class MyAuthenticationFailureHandler  implements AuthenticationFailureHandler {

    @Override
    public void onAuthenticationFailure(HttpServletRequest request, HttpServletResponse response, AuthenticationException exception) throws IOException, ServletException {
        Map<String,Object> result = new HashMap<>();
        result.put("msg","登陆失败:"+ exception.getMessage());
        result.put("status",500);
        response.setContentType("application/json;charset=UTF-8");
        String s = new ObjectMapper().writeValueAsString(result);
        response.getWriter().println(s);
    }
}
配置自定类
代码如下:
import org.springframework.context.annotation.Configuration;
import org.springframework.security.config.annotation.web.builders.HttpSecurity;
import org.springframework.security.config.annotation.web.configuration.WebSecurityConfigurerAdapter;

@Configuration
public class WebSecurityConfigurer extends WebSecurityConfigurerAdapter {

    @Override
     protected void configure(HttpSecurity http) throws Exception {
         http.authorizeRequests()
                 .mvcMatchers("/login.html").permitAll()
                 .mvcMatchers("/index").permitAll() //放行资源写在前面。
                 .anyRequest().authenticated()
                 .and()
                 .formLogin()
                 .loginPage("/login.html") //用来指定默认登陆页面,注意:一旦自定义登陆页面以后必须只能登陆URL。
                 .loginProcessingUrl("/doLogin")  //指定处理登陆请求URL。
                 .usernameParameter("uname")
                 .passwordParameter("passwd")
                 .successHandler(new MyAuthenticatioinSuccessHandler()) //认证成功时处理,前后端分离解决方案。
                 .failureHandler(new MyAuthenticationFailureHandler()) //认证失败时处理,前后端分离解决方案。
                 .and()
                 .csrf().disable(); //禁止csrf跨站请求保护。
     }


}
注销登录配置
Security提供默认的注销登录配置,开发时也可以按照自己的需求对注销进行个性化定制。
过滤器LogoutFilter专门处理注销登陆,默认是加载的。
- 开启注销登录 默认开启
@Configuration
public class WebSecurityConfigurer extends
WebSecurityConfigurerAdapter {
@Override
protected void configure(HttpSecurity http) throws
Exception {
http.authorizeHttpRequests()
//...
 .and()
 .formLogin()
//...
 .and()
 .logout(). //开启注销配置
 .logoutUrl("/logout"). //指定退出登录请求地址,默认是 GET 请求,路径为 /logout
 .invalidateHttpSession(true)  //退出时是否是 session 失效,默认值为 true
 .clearAuthentication(true)  //退出时是否清除认证信息,默认值为 true
 .logoutSuccessUrl("/login.html") //退出登录时跳转地址
 .and()
 .csrf().disable();  //这⾥先关闭 CSRF
 }
}
- 配置多个注销登录请求
 .logoutRequestMatcher(new OrRequestMatcher(
new
AntPathRequestMatcher("/aa","GET"),
new
AntPathRequestMatcher("/bb","POST")
 ))
- 前后端分离注销登录配置
如果是前后端分离开发,注销成功之后就不需要⻚⾯跳转了,只需要将注销成功的信息
返回前端即可,此时我们可以通过⾃定义 LogoutSuccessHandler 实现来返回注销
之后信息:
- 创建
MyLogoutSuccessHandler方法:
public class MyLogoutSuccessHandler implements LogoutSuccessHandler {
    @Override
    public void onLogoutSuccess(HttpServletRequest request, HttpServletResponse response, Authentication authentication) throws IOException, ServletException {
        Map<String,Object> result = new HashMap<>();
        result.put("msg","注销成功,当前认证对象为:"+ authentication);
        result.put("status",200);
        response.setContentType("application/json;charset=UTF-8");
        String s = new ObjectMapper().writeValueAsString(result);
        response.getWriter().println(s);
    }
}
- 配置
.logoutSuccessHandler(new MyLogoutSuccessHandler())
LogoutSuccessHandler
这个方法如下
	public LogoutConfigurer<H> logoutSuccessHandler(LogoutSuccessHandler logoutSuccessHandler) {
		this.logoutSuccessUrl = null;
		this.customLogoutSuccess = true;
		this.logoutSuccessHandler = logoutSuccessHandler;
		return this;
	}
LogoutSuccessHandler内容如下所示:
public interface LogoutSuccessHandler {

	void onLogoutSuccess(HttpServletRequest request, HttpServletResponse response, Authentication authentication)
			throws IOException, ServletException;

}
获取用户认证信息
SecurityContextHolder解析
Spring Security 会将登录⽤户数据保存在 Session 中。但是,为了使⽤⽅
便,Spring Security在此基础上还做了⼀些改进,其中最主要的⼀个变化就是线程绑定。
当⽤户登录成功后,Spring Security 会将登录成功的⽤户信息保存到
SecurityContextHolder 中。
SecurityContextHolder 中的数据保存默认是通过ThreadLocal 来实现的,使⽤
ThreadLocal 创建的变量只能被当前线程访问,不能被其他线程访问和修改,也就是⽤户
数据和请求线程绑定在⼀起。
当登录请求处理完毕后,Spring Security 会将
SecurityContextHolder 中的数据拿出来保存到 Session 中,同时将
SecurityContexHolder 中的数据清空。以后每当有请求到来时,Spring Security
就会先从 Session 中取出⽤户登录数据,保存到SecurityContextHolder 中,⽅便在
该请求的后续处理过程中使⽤,同时在请求结束时将 SecurityContextHolder 中的数据
拿出来保存到 Session 中,然后将SecurityContextHolder 中的数据清空。
实际上 SecurityContextHolder 中存储是 SecurityContext,在
SecurityContext 中存储是 Authentication。
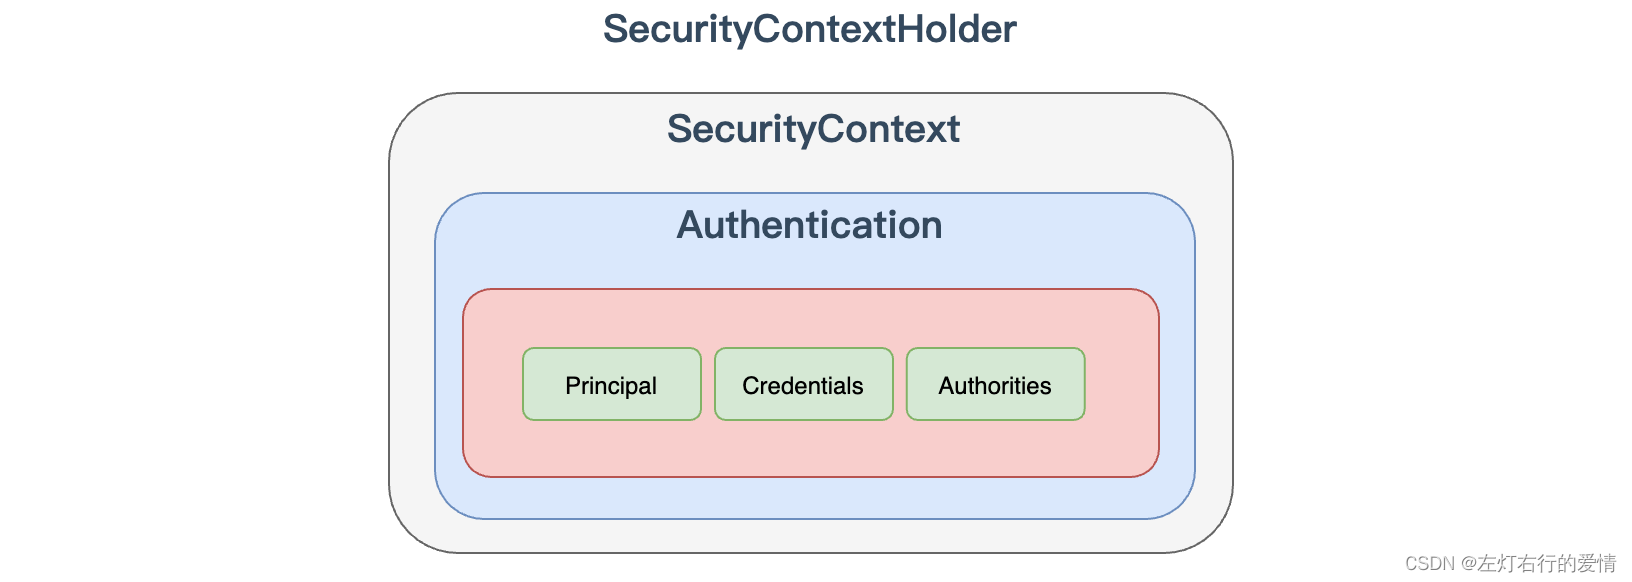
下面我们来看一看这个来类里面的内容:
先解释一下类里面的常量是什么意思:
- MODE_THREADLOCAL:
使用线程本地变量(ThreadLocal)来存储SecurityContext,每个线程拥有独立的SecurityContext。
Threadlocal 的特点是在哪个线程中存储就要在哪个线程中读取,⾮常适合 web 应⽤,因为在默认情况下,⼀个请求⽆论经过多少 Filter 到达
Servlet,都是由⼀个线程来处理的。这也是 SecurityContextHolder 的默认存储
策略,但这种存储策略意味着如果在具体的业务处理代码中,开启了⼦线程,在⼦线程中
去获取登录⽤户数据,就会获取不到。 - MODE_INHERITABLETHREADLOCAL:
使用可继承的线程本地变量(InheritableThreadLocal)来存储SecurityContext,子线程可以继承父线程的SecurityContext。
这种存储模式适⽤于多线程环境,如果希望在⼦
线程中也能够获取到登录⽤户数据,那么可以使⽤这种存储模式。 - MODE_GLOBAL
使用全局静态变量来存储SecurityContext,所有线程共享同一个SecurityContext。
这种存储模式实际上是将数据保存在⼀个静态变量中,在 JavaWeb开
发中,这种模式很少使⽤到。 - MODE_PRE_INITIALIZED:
预初始化模式,要求在使用时先设置完整的SecurityContextHolderStrategy实例。
基本没有业务场景(据我了解所知),欢迎评论区讨论。
public class SecurityContextHolder {

    // 不同的策略模式常量
    public static final String MODE_THREADLOCAL = "MODE_THREADLOCAL";
    public static final String MODE_INHERITABLETHREADLOCAL = "MODE_INHERITABLETHREADLOCAL";
    public static final String MODE_GLOBAL = "MODE_GLOBAL";
    private static final String MODE_PRE_INITIALIZED = "MODE_PRE_INITIALIZED";

    // 从系统属性中获取策略名称的键名
    public static final String SYSTEM_PROPERTY = "spring.security.strategy";

    private static String strategyName = System.getProperty(SYSTEM_PROPERTY);
    private static SecurityContextHolderStrategy strategy;
    private static int initializeCount = 0;

    static {
        initialize();
    }

    // 初始化 SecurityContextHolder
    private static void initialize() {
        initializeStrategy();
        initializeCount++;
    }

    // 初始化策略
    private static void initializeStrategy() {
        if (MODE_PRE_INITIALIZED.equals(strategyName)) {
            // 如果策略名称为 MODE_PRE_INITIALIZED,则需要确保 strategy 已经被设置
            Assert.state(strategy != null, "When using " + MODE_PRE_INITIALIZED
                    + ", setContextHolderStrategy must be called with the fully constructed strategy");
            return;
        }

        // 如果没有指定策略名称,默认为 MODE_THREADLOCAL
        if (!StringUtils.hasText(strategyName)) {
            strategyName = MODE_THREADLOCAL;
        }
        // 根据策略名称创建相应的策略实例
        if (strategyName.equals(MODE_THREADLOCAL)) {
            strategy = new ThreadLocalSecurityContextHolderStrategy();
            return;
        }
        if (strategyName.equals(MODE_INHERITABLETHREADLOCAL)) {
            strategy = new InheritableThreadLocalSecurityContextHolderStrategy();
            return;
        }
        if (strategyName.equals(MODE_GLOBAL)) {
            strategy = new GlobalSecurityContextHolderStrategy();
            return;
        }
        //根据给定的策略名称 strategyName 使用反射机制来动态创建并实例化对应的 SecurityContextHolderStrategy 对象。
        try {
            Class<?> clazz = Class.forName(strategyName);
            Constructor<?> customStrategy = clazz.getConstructor();
            strategy = (SecurityContextHolderStrategy) customStrategy.newInstance();
        } catch (Exception ex) {
            ReflectionUtils.handleReflectionException(ex);
        }
    }
    // 清除当前线程的 SecurityContext
    public static void clearContext() {
        strategy.clearContext();
    }
    // 获取当前线程的 SecurityContext
    public static SecurityContext getContext() {
        return strategy.getContext();
    }
    // 获取 SecurityContextHolder 的初始化次数
    public static int getInitializeCount() {
        return initializeCount;
    }
    // 设置当前线程的 SecurityContext
    public static void setContext(SecurityContext context) {
        strategy.setContext(context);
    }
    // 设置策略名称,并重新初始化 SecurityContextHolder
    public static void setStrategyName(String strategyName) {
        SecurityContextHolder.strategyName = strategyName;
        initialize();
    }
    // 设置自定义的 SecurityContextHolderStrategy,并重新初始化 SecurityContextHolder
    public static void setContextHolderStrategy(SecurityContextHolderStrategy strategy) {
        Assert.notNull(strategy, "securityContextHolderStrategy cannot be null");
        SecurityContextHolder.strategyName = MODE_PRE_INITIALIZED;
        SecurityContextHolder.strategy = strategy;
        initialize();
    }
    // 获取当前使用的 SecurityContextHolderStrategy
    public static SecurityContextHolderStrategy getContextHolderStrategy() {
        return strategy;
    }
    // 创建一个空的 SecurityContext
    public static SecurityContext createEmptyContext() {
        return strategy.createEmptyContext();
    }
    @Override
    public String toString() {
        return "SecurityContextHolder[strategy='" + strategy.getClass().getSimpleName() + "'; initializeCount="
                + initializeCount + "]";
    }
}
SecurityContextHolderStrategy解析
上下文在获取时,并不是直接可以获取的,而是通过策略(strategy)来获取,我们来看一看这个strategy里面是什么内容,通过 SecurityContextHolder 可以得知,SecurityContextHolderStrategy 接⼝
⽤来定义存储策略⽅法:
public interface SecurityContextHolderStrategy {
//清除存储的 SecurityContext对象
	void clearContext();
//获取存储的 SecurityContext 对象
	SecurityContext getContext();
//设置存储的 SecurityContext 对象
	void setContext(SecurityContext context);
//创建⼀个空的 SecurityContext 对象
	SecurityContext createEmptyContext();
}
我们可以看到,在setContext实现类中,有四种类型分别为:
- GlobalSecurityContextHolderStrategy
- InheritableThreadLocalSecurityContextHolderStrategy
- ListeningSecurityContextHolderStrategy(这种基本不用,下面就不展示了)
- ThreadLocalSecurityContextHolderStrategy

例子
- 代码中获取认证之后⽤户数据
@RestController
public class HelloController {
@RequestMapping("/hello")
public String hello() {
Authentication authentication = SecurityContextHolder
 .getContext().getAuthentication();
User principal = (User) authentication.getPrincipal();
System.out.println("身份 :"+principal.getUsername());
System.out.println("凭证 :"+authentication.getCredentials());
System.out.println("权限 :"+authentication.getAuthorities());
return "hello security";
 }
}
- 多线程情况下获取⽤户数据
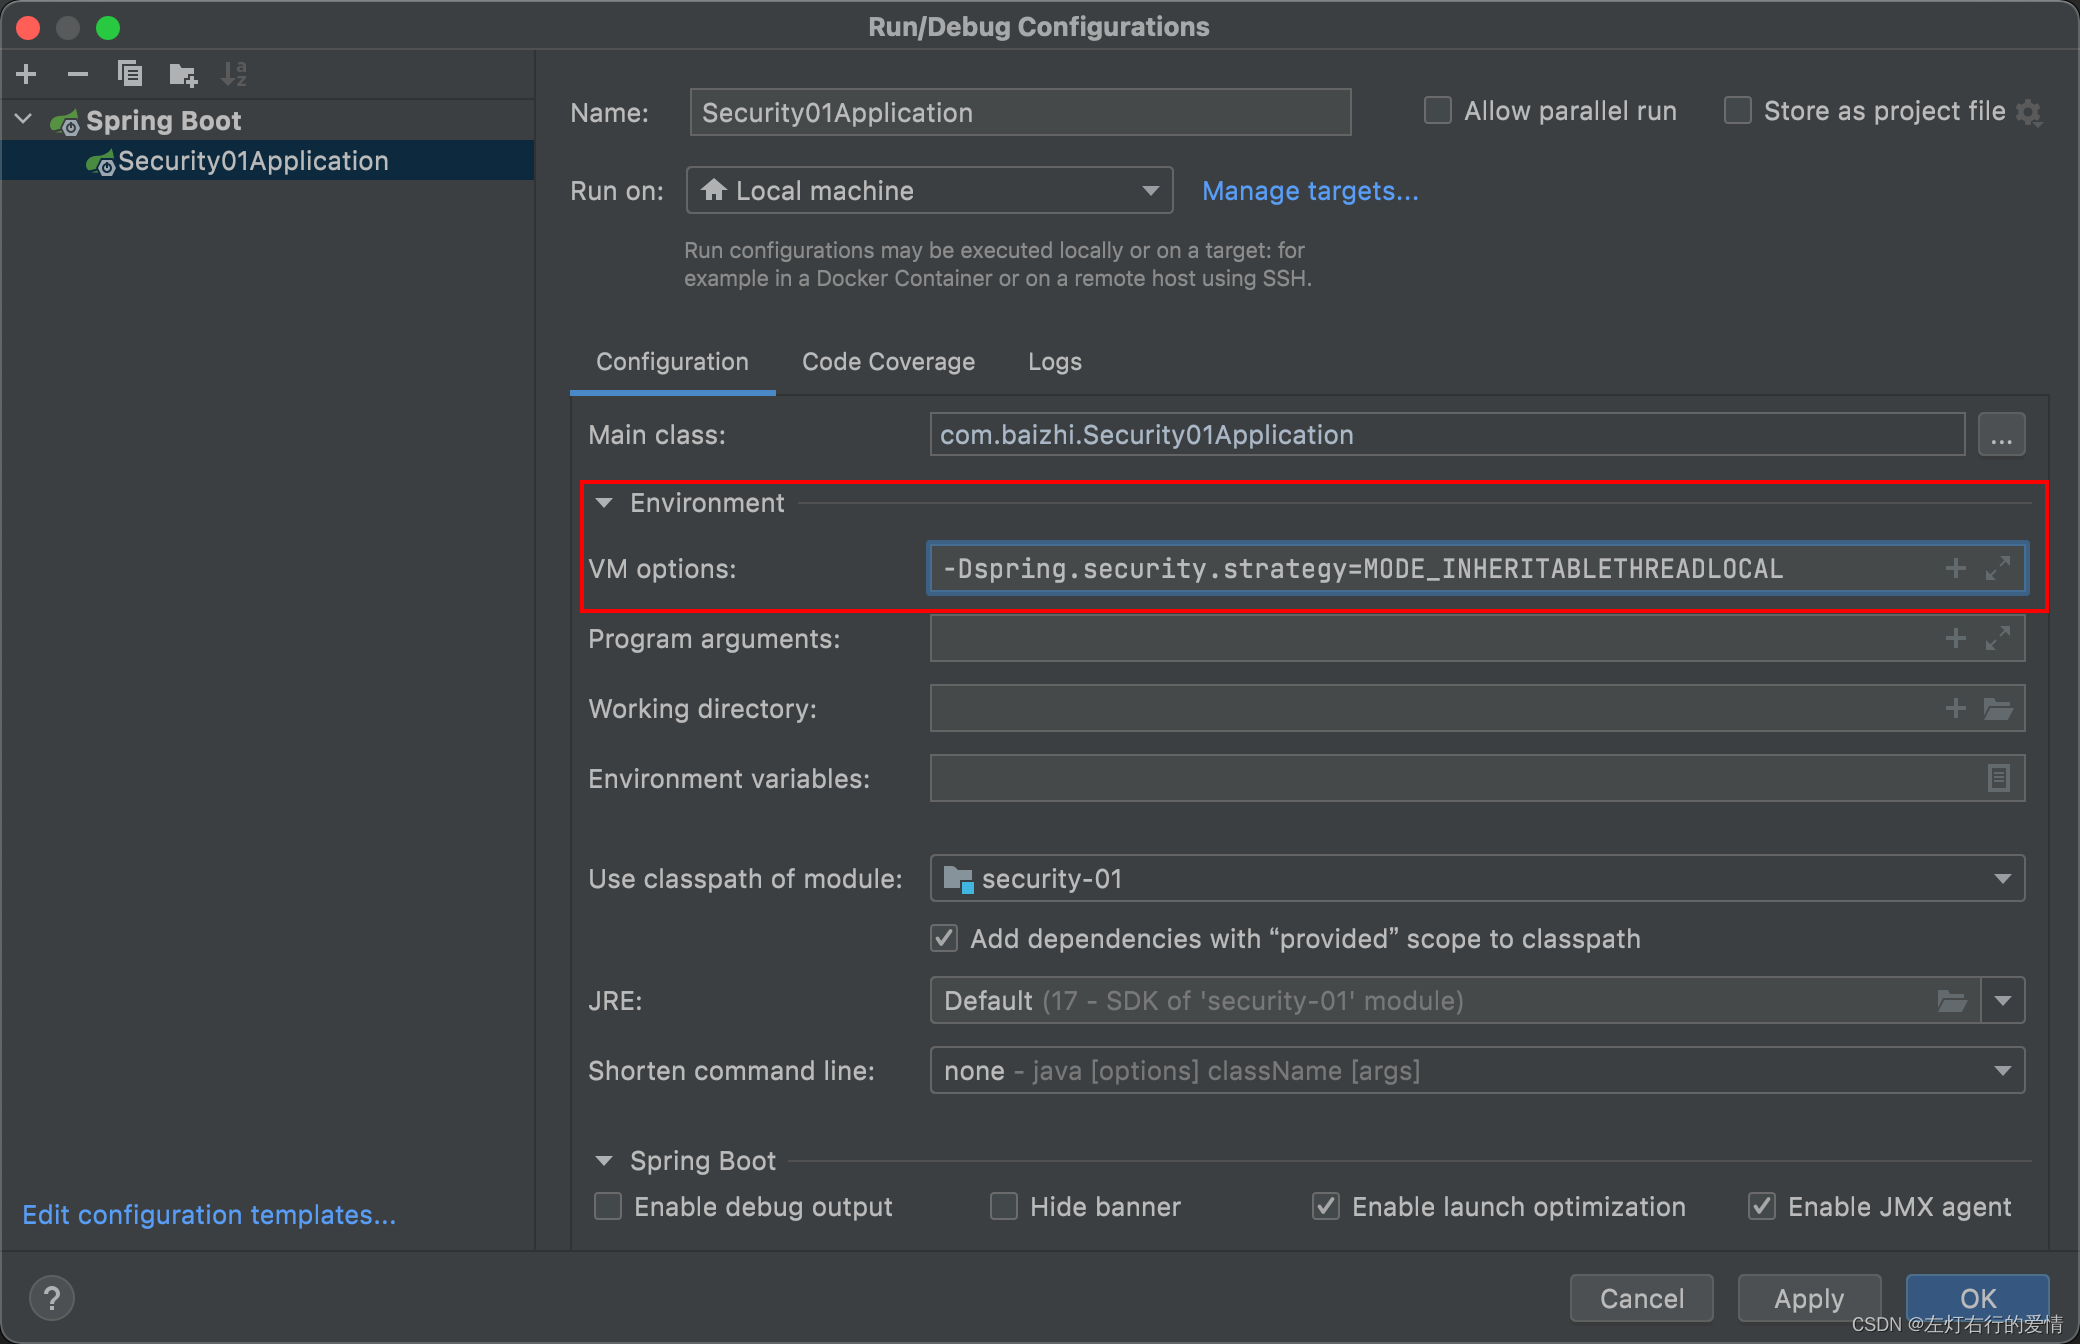
如果需要在⼦线程中获取必须使⽤第
⼆种策略,默认策略是通过System.getProperty加载的,因此我们可以通过增加VM Options参数进⾏修改。
添加-Dspring.security.strategy=MODE_INHERITABLETHREADLOCAL
@RestController
public class HelloController {
@RequestMapping("/hello")
public String hello() {
new Thread(()!.{
Authentication authentication = SecurityContextHolder
 .getContext().getAuthentication();
User principal = (User) authentication.getPrincipal();
System.out.println("身份 :"+principal.getUsername());
System.out.println("凭证
:"+authentication.getCredentials());
System.out.println("权限
:"+authentication.getAuthorities());
 }).start();
return "hello security";
 }
}
总结一下
通过上面的代码可以看到,SecurityContextHolder提供了一系列方法,用于获取(getContext)设置(setContext)和清除(clearContext)SecurityContext。
另外,SecurityContextHolder还提供了一些辅助方法:
getInitializeCount:用于获取SecurityContextHolder的初始化次数。setInitializeCount:用于设置策略名称并重新初始化。setContextHolderStrategy:用于设置自定义的SecurityContextHolderStrategy实例并重新初始化SecurityContextHolder。
使用SecurityContextHolder,可以方便地管理和访SecurityContext,以支持应用程序的身份验证和授权功能。
页面中获取用户认证信息
- 引入依赖
  <dependency>
            <groupId>org.thymeleaf.extras</groupId>
            <artifactId>thymeleaf-extras-springsecurity5</artifactId>
            <version>3.0.4.RELEASE</version>
        </dependency>
- ⻚⾯加⼊命名空间
<html lang="en" xmlns:th="https:!"www.thymeleaf.org"
xmlns:sec="http:!"www.thymeleaf.org/extras/spring-security">
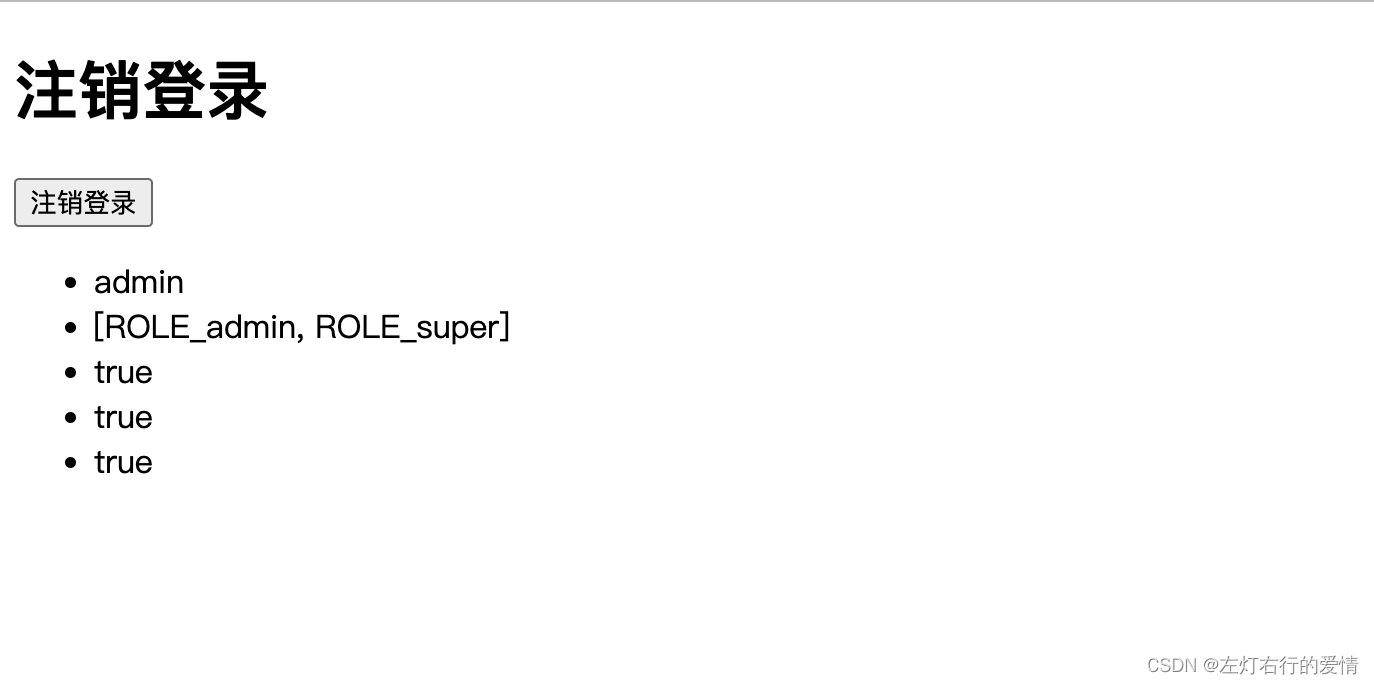
- ⻚⾯中使⽤
<!--获取认证用户名-->
<ul>
    <li sec:authentication="principal.username"></li>
    <li sec:authentication="principal.authorities"></li>
    <li sec:authentication="principal.accountNonExpired"></li>
    <li sec:authentication="principal.accountNonLocked"></li>
    <li sec:authentication="principal.credentialsNonExpired"></li>
</ul>
结果如下:
结尾
文章总体有点长,难免会有疏漏,如果感觉哪个地方看的不是很明白,欢迎留言,代码和源码过程都是一步步调的,确保按这个来是正确的,加油⛽️。




![[LeetCode周赛复盘] 第 107 场双周赛20230624](https://img-blog.csdnimg.cn/6d38bd32984d48baaa0af82b82b21081.png)
