环境准备:
| 主机名 | IP | 服务 | 系统 |
|---|---|---|---|
| ansible | 192.168.160.131 | ansible | CentOS-8.5 |
| nginx | 192.168.160.132 | nginx | CentOS-8.5 |
| mysql | 192.168.160.137 | mysql | CentOS-8.5 |
| php | 192.168.160.139 | php | CentOS-8.5 |
1、生成私钥,对另外三台主机进行免密登入
[root@ansible ~]# ssh-keygen -t rsa
Generating public/private rsa key pair.
Enter file in which to save the key (/root/.ssh/id_rsa):
/root/.ssh/id_rsa already exists.
Overwrite (y/n)? yes
Enter passphrase (empty for no passphrase):
Enter same passphrase again:
Your identification has been saved in /root/.ssh/id_rsa.
Your public key has been saved in /root/.ssh/id_rsa.pub.
The key fingerprint is:
SHA256:Ny1q6A+oJY8ZDV3+eX0hpKzOYWvrtR5/FipNa7DWj+0 root@ansible
The key's randomart image is:
+---[RSA 3072]----+
|                 |
|                 |
|      .     .    |
|   . o   . +     |
|  . . . S * o .  |
|   o . o =.+.... |
|  o + o O +*.o.. |
|   O . *.=++*+o  |
|  + . .+B+ooo=E  |
+----[SHA256]-----+
[root@ansible ~]# ssh-copy-id -i /root/.ssh/id_rsa.pub 192.168.160.132
[root@ansible ~]# ssh-copy-id -i /root/.ssh/id_rsa.pub 192.168.160.137
[root@ansible ~]# ssh-copy-id -i /root/.ssh/id_rsa.pub 192.168.160.139
2.构建Ansible清单
[root@ansible ~]# cd /etc/ansible/
[root@ansible ansible]# vim hosts
//添加受管主机
192.168.160.132
192.168.160.137
192.168.160.139
3. 受管主机安装python3
[root@nginx ~]# yum -y install python3
[root@mysql ~]# yum -y install python3
[root@php ~]# yum -y install python3
4. 管理nginx受管主机部署nginx服务
//创建系统用户nginx
[root@ansible ansible]# ansible 192.168.160.132 -m user -a 'name=nginx system=yes shell=/sbin/nologin state=present'

//安装依赖包
[root@ansible ansible]# ansible 192.168.160.132 -m yum -a 'name=pcre-devel,openssl,openssl-devel,gd-devel,gcc,gcc-c++,make,wget state=present'

//创建日志存放目录
[root@ansible ansible]# ansible 192.168.160.132 -m file -a 'path=/var/log/nginx state=directory'
[root@ansible ansible]# ansible 192.168.160.132 -m file -a 'path=/var/log/nginx state=directory owner=nginx group=nginx'

//下载nginx并解压
[root@ansible ansible]# ansible 192.168.160.132 -a 'wget http://nginx.org/download/nginx-1.20.2.tar.gz'
[root@ansible ansible]# ansible 192.168.160.132 -a 'tar xf nginx-1.20.2.tar.gz'

//编写编译脚本,然后进行编译安装
[root@ansible ansible]# mkdir scripts/
[root@ansible ansible]# vim scripts/a.sh
#!/bin/bash

cd nginx-1.20.2
./configure --prefix=/usr/local/nginx
--user=nginx --group=nginx --with-debug
--with-http_ssl_module
--with-http_realip_module
--with-http_image_filter_module
--with-http_gunzip_module
--with-http_gzip_static_module
--with-http_stub_status_module
--http-log-path=/var/log/nginx/access.log
--error-log-path=/var/log/nginx/error.log
[root@ansible ansible]# chmod +x scripts/a.sh
[root@ansible ansible]# ansible 192.168.160.132 -m script -a '/etc/ansible/scripts/a.sh'

[root@ansible ansible]# ansible 192.168.160.132 -m shell -a 'cd nginx-1.20.2 && make && make install '

//配置环境变量
[root@ansible ansible]# ansible 192.168.160.132 -m shell -a 'echo "export PATH=/usr/local/nginx/sbin:$PATH" > /etc/profile.d/nginx.sh'
[root@ansible ansible]# ansible 192.168.160.132 -m shell -a '. /etc/profile.d/nginx.sh'

[root@ansible ansible]# ansible 192.168.160.132  -a 'nginx'
[root@ansible ansible]# ansible 192.168.160.132  -a 'ss -anlt'
192.168.160.132 | CHANGED | rc=0 >>
State  Recv-Q Send-Q Local Address:Port Peer Address:PortProcess
LISTEN 0      128          0.0.0.0:80        0.0.0.0:*
LISTEN 0      128          0.0.0.0:22        0.0.0.0:*
LISTEN 0      128             [::]:22           [::]:*

//编写service文件
[root@ansible ansible]# vim scripts/nginx.sh
#!/bin/bash

cat > /usr/lib/systemd/system/nginx.service <<EOF
[Unit]
Description=nginx server daemon
After=network.target sshd-keygen.target

[Service]
Type=forking
ExecStart=/usr/local/nginx/sbin/nginx
ExecReload=/usr/local/nginx/sbin/nginx -s reload
ExecStop=/usr/local/nginx/sbin/nginx -s quit
PrivateTmp= true

[Install]
WantedBy=multi-user.target
EOF


[root@ansible ansible]# chmod +x scripts/nginx.sh
[root@ansible ansible]# ansible 192.168.160.132 -m script -a '/etc/ansible/scripts/nginx.sh'

//重启nginx服务
[root@ansible ansible]# ansible 192.168.160.132 -m service -a 'name=nginx state=restarted'

//查看nginx服务状态
[root@ansible ansible]# ansible 192.168.160.132 -a 'ss -anlt'
192.168.160.132 | CHANGED | rc=0 >>
State  Recv-Q Send-Q Local Address:Port Peer Address:PortProcess
LISTEN 0      128          0.0.0.0:80        0.0.0.0:*
LISTEN 0      128          0.0.0.0:22        0.0.0.0:*
LISTEN 0      128             [::]:22           [::]:*

//创建存放网站名称,写入php网页信息
[root@ansible ansible]# ansible 192.168.160.132 -a 'rm -rf /usr/local/nginx/html/*'

[root@ansible ansible]# vim scripts/nginx.php.sh

#!/bin/bash
cat > /usr/local/nginx/html/index.php <<EOF
<?php
        phpinfo();
?>
EOF
[root@ansible ansible]# chmod +x scripts/nginx.php.sh
[root@ansible ansible]# ansible 192.168.160.132 -m script -a '/etc/ansible/scripts/nginx.php.sh'

//修改nginx服务的配置
5. 管理mysql受管主机部署mysql服务
//创建系统用户msyql
[root@ansible ansible]# ansible 192.168.160.137 -m user -a 'name=mysql system=yes shell=/sbin/nologin state=present'

//安装依赖包
[root@ansible ansible]# ansible 192.168.160.137 -m yum -a 'name=ncurses-compat-libs,perl,ncurses-devel,openssl-devel,openssl,cmake,mariadb-devel state=present'

//下载nginx并解压
[root@ansible ansible]# ansible 192.168.160.137 -a 'wget https://mirrors.aliyun.com/mysql/MySQL-8.0/mysql-8.0.28-linux-glibc2.12-x86_64.tar.xz?spm=a2c6h.25603864.0.0.7a2e70b2GVOPCU'
[root@ansible ansible]# ansible 192.168.160.137 -a 'tar xf mysql-8.0.28-linux-glibc2.12-x86_64.tar.xz'

//修改MySQL数据库名称
[root@ansible ansible]# ansible 192.168.160.137 -a 'mv mysql-8.0.28-linux-glibc2.12-x86_64 mysql'
[root@ansible ansible]# ansible 192.168.160.137 -a 'mv mysql /usr/local/'

//修改目录/usr/local/mysql的属主属组
[root@ansible ansible]# ansible 192.168.160.137 -m file -a 'path=/usr/local/mysql owner=mysql group=mysql'

//添加环境变量
[root@ansible ansible]# ansible 192.168.160.137 -m shell -a 'echo "export PATH=/usr/local/mysql/bin:$PATH" > /etc/profile.d/mysql.sh'
[root@ansible ansible]# ansible 192.168.160.137 -m shell -a 'source /etc/profile.d/mysql.sh'

//头文件
[root@ansible ansible]# ansible 192.168.160.137 -a 'ln -sv /usr/local/mysql/include/ /usr/include/mysql'

//库文件
[root@ansible ansible]# ansible 192.168.160.137 -m shell -a 'echo "/usr/local/mysql/lib/" > /etc/ld.so.conf.d/mysql.conf'

//man文档
[root@ansible ansible]# ansible 192.168.160.137 -a 'sed -i "22a MANDATORY_MANPATH                         /usr/local/mysql/man" /etc/man_db.conf'

//建立数据存放目录
[root@ansible ansible]# ansible 192.168.160.137 -m file -a 'path=/opt/data state=directory owner=mysql group=mysql'

//初始化数据库
[root@ansible ansible]# ansible 192.168.160.137 -m shell -a '/usr/local/mysql/bin/mysqld --initialize --user=mysql --datadir=/opt/data/'
192.168.160.137 | CHANGED | rc=0 >>
2022-10-22T10:16:43.715352Z 0 [System] [MY-013169] [Server] /usr/local/mysql/bin/mysqld (mysqld 8.0.28) initializing of server in progress as process 42021
2022-10-22T10:16:43.729133Z 1 [System] [MY-013576] [InnoDB] InnoDB initialization has started.
2022-10-22T10:16:44.704775Z 1 [System] [MY-013577] [InnoDB] InnoDB initialization has ended.
2022-10-22T10:16:46.845493Z 6 [Note] [MY-010454] [Server] A temporary password is generated for root@localhost: 1eP>h#nRO&;7

//配置服务启动脚本
[root@ansible ansible]# ansible 192.168.160.137 -a 'cp -a /usr/local/mysql/support-files/mysql.server /etc/init.d/mysqld'
[root@ansible ansible]# ansible 192.168.160.137 -a 'sed  -i "46cbasedir=/usr/local/mysql" /etc/init.d/mysqld'
[root@ansible ansible]# ansible 192.168.160.137 -a 'sed  -i "47cdatadir=/opt/data" /etc/init.d/mysqld'

//编写mysql配置文件和service文件
[root@ansible ansible]# vim scripts/mysql.sh
#!/bin/bash

cat > /etc/my.cnf <<EOF
[mysqld]
basedir = /usr/local/mysql
datadir = /opt/data
socket = /tmp/mysql.sock
port = 3306
pid-file = /opt/data/mysql.pid
user = mysql
skip-name-resolve
EOF

cat > /usr/lib/systemd/system/mysqld.service <<EOF
[Unit]
Description=mysql server daemon
After=network.target sshd-keygen.target

[Service]
Type=forking
ExecStart=/usr/local/mysql/support-files/mysql.server start
ExecStop=/usr/local/mysql/support-files/mysql.server stop
ExecReload=/bin/kill -HUP $MAINPID

[Install]
WantedBy=multi-user.target
EOF
[root@ansible ansible]# chmod +x scripts/mysql.sh
[root@ansible ansible]# ansible 192.168.160.137 -m script -a '/etc/ansible/scripts/mysql.sh'

[root@ansible ansible]# ansible 192.168.160.137 -a 'systemctl daemon-reload'
[root@ansible ansible]# ansible 192.168.160.137 -m service -a 'name=mysqld state=restarted'
[root@ansible ansible]# ansible 192.168.160.137 -a 'ss -anlt'
192.168.160.137 | CHANGED | rc=0 >>
State  Recv-Q Send-Q Local Address:Port  Peer Address:PortProcess
LISTEN 0      128          0.0.0.0:22         0.0.0.0:*
LISTEN 0      128                *:3306             *:*
LISTEN 0      128             [::]:22            [::]:*

//修改数据库密码
[root@ansible ansible]# ansible 192.168.160.137 -a 'mysqladmin -uroot -p"1eP>h#nRO&;7" password 123456'
192.168.160.137 | CHANGED | rc=0 >>
mysqladmin: [Warning] Using a password on the command line interface can be insecure.
Warning: Since password will be sent to server in plain text, use ssl connection to ensure password safety.

//重启mysql服务
[root@ansible ansible]# ansible 192.168.160.137 -m service -a 'name=mysqld state=restarted'
[root@ansible ansible]# ansible 192.168.160.137 -a 'ss -anlt'
192.168.160.137 | CHANGED | rc=0 >>
State  Recv-Q Send-Q Local Address:Port  Peer Address:PortProcess
LISTEN 0      128          0.0.0.0:22         0.0.0.0:*
LISTEN 0      128                *:3306             *:*
LISTEN 0      128             [::]:22            [::]:*
5. 管理php受管主机部署php服务
//安装依赖包
[root@ansible ansible]# ansible 192.168.160.139 -m yum -a 'name=gcc,gcc-c++,vim,make,wget,libxml2,libxml2-devel,openssl,openssl-devel,bzip2,bzip2-devel,libcurl,libcurl-devel,libicu-devel,libjpeg,libjpeg-devel,libpng,libpng-devel,openldap-devel,pcre-devel,freetype,freetype-devel,gmp,gmp-devel,libmcrypt,libmcrypt-devel,readline,readline-devel,libxslt,libxslt-devel,mhash,mhash-devel,php-mysqlnd state=present'
[root@ansible ansible]# ansible 192.168.160.139 -a 'yum -y install  http://mirror.centos.org/centos/8-stream/PowerTools/x86_64/os/Packages/oniguruma-devel-6.8.2-2.el8.x86_64.rpm'

//下载PHP并解压
[root@ansible ansible]# ansible 192.168.160.139 -a 'wget https://www.php.net/distributions/php-8.1.11.tar.gz'
[root@ansible ansible]# ansible 192.168.160.139 -a 'tar xf php-8.1.11.tar.gz -C /usr/src'

//编译安装php
#编译脚本
[root@ansible ansible]# vim scripts/php.sh
#!/bin/bash

cd /usr/src/php-8.1.11/
./configure --prefix=/usr/local/php8 --with-config-file-path=/etc --enable-fpm --enable-inline-optimization --disable-debug --disable-rpath --enable-shared --enable-soap --with-openssl --enable-bcmath --with-iconv --with-bz2 --enable-calendar --with-curl --enable-exif --enable-ftp --enable-gd --with-jpeg --with-zlib-dir --with-freetype --with-gettext --enable-json --enable-mbstring --enable-pdo --with-mysqli=mysqlnd --with-pdo-mysql=mysqlnd --with-readline --enable-shmop --enable-simplexml --enable-sockets --with-zip --enable-mysqlnd-compression-support --with-pear --enable-pcntl --enableposix
[root@ansible ansible]# chmod +x scripts/php.sh
[root@ansible ansible]# ansible 192.168.160.139 -m script -a '/etc/ansible/scripts/php.sh'
[root@ansible ansible]# ansible 192.168.160.139 -m shell -a 'cd /usr/src/php-8.1.11/ && make && make install'

//安装后配置
[root@ansible ansible]# ansible 192.168.160.139 -m shell -a 'echo "export PATH=/usr/local/php8/bin/:$PATH" > /etc/profile.d/php8.sh
[root@ansible ansible]# ansible 192.168.160.139 -m shell -a 'source /etc/profile.d/php8.sh'
[root@ansible ansible]# ansible 192.168.160.139 -a 'php -v'
192.168.160.139 | CHANGED | rc=0 >>
PHP 8.1.11 (cli) (built: Oct 22 2022 09:23:40) (NTS)
Copyright (c) The PHP Group
Zend Engine v4.1.11, Copyright (c) Zend Technologies

//配置php-fpm
[root@ansible ansible]# ansible 192.168.160.139 -a '\cp /usr/src/php-8.1.11/php.ini-production /etc/php.ini'
[root@ansible ansible]# ansible 192.168.160.139 -a '\cp /usr/src/php-8.1.11/sapi/fpm/init.d.php-fpm /etc/init.d/php-fpm'
[root@ansible ansible]# ansible 192.168.160.139 -m file -a 'path=/etc/init.d/php-fpm mode=755'
[root@ansible ansible]# ansible 192.168.160.139 -a '\cp /usr/local/php8/etc/php-fpm.conf.default  /usr/local/php8/etc/php-fpm.conf'
[root@ansible ansible]# ansible 192.168.160.139 -a '\cp /usr/local/php8/etc/php-fpm.d/www.conf.default /usr/local/php8/etc/php-fpm.d/www.conf'

//启动php-fpm
[root@ansible ansible]# ansible 192.168.160.139 -a 'service php-fpm start'
192.168.160.139 | CHANGED | rc=0 >>
Starting php-fpm  done
[root@ansible ansible]# ansible 192.168.160.139 -a 'ss -anlt'
192.168.160.139 | CHANGED | rc=0 >>
State  Recv-Q Send-Q Local Address:Port Peer Address:PortProcess
LISTEN 0      128        127.0.0.1:9000      0.0.0.0:*
LISTEN 0      128          0.0.0.0:22        0.0.0.0:*
LISTEN 0      128             [::]:22           [::]:*

//连接nginx和php
##生成php测试页面
[root@ansible ansible]# ansible 192.168.160.139 -m file -a 'path=/usr/local/nginx state=directory'
[root@ansible ansible]# ansible 192.168.160.139 -m file -a 'path=/usr/local/nginx/html state=directory'

[root@ansible ansible]# vim scripts/n-p.sh
#!/bin/bash

cat > /usr/local/nginx/html/index.php << EOF
<?php
     phpinfo();
?>
EOF

[root@ansible ansible]# chmod +x scripts/n-p.sh
[root@ansible ansible]# ansible 192.168.160.139 -m script -a '/etc/ansible/scripts/n-p.sh'

//修改nginx配置文件
[root@ansible ansible]# ansible 192.168.160.139 -a 'sed -i "36clisten = 192.168.160.139:9000" /usr/local/php8/etc/php-fpm.d/www.conf'
[root@ansible ansible]# ansible 192.168.160.139 -a 'sed -i "63clisten.allowed_clients = 192.168.160.132" /usr/local/php8/etc/php-fpm.d/www.conf'

[root@ansible ansible]# ansible 192.168.160.132 -a 'sed -i "45c                   index  index.php index.html index.htm;" /usr/local/nginx/conf/nginx.conf'
[root@ansible ansible]# ansible 192.168.160.132 -a 'sed -i "65c     location ~ \.php$ {" /usr/local/nginx/conf/nginx.conf'
[root@ansible ansible]# ansible 192.168.160.132 -a 'sed -i "66c     root           html;" /usr/local/nginx/conf/nginx.conf'
[root@ansible ansible]# ansible 192.168.160.132 -a 'sed -i "67c     fastcgi_pass   192.168.160.139:9000;" /usr/local/nginx/conf/nginx.conf
[root@ansible ansible]# ansible 192.168.160.132 -a 'sed -i "68c     fastcgi_index  index.php;" /usr/local/nginx/conf/nginx.conf'
[root@ansible ansible]# ansible 192.168.160.132 -a 'sed -i "69c     fastcgi_param  SCRIPT_FILENAME  $document_root$fastcgi_script_name;" /usr/local/nginx/conf/nginx.conf'
[root@ansible ansible]# ansible 192.168.160.132 -a 'sed -i "70c      include        fastcgi_params;" /usr/local/nginx/conf/nginx.conf'
[root@ansible ansible]# ansible 192.168.160.132 -a 'sed -i "71c      }" /usr/local/nginx/conf/nginx.conf'

//重启nginx和php服务
[root@ansible ansible]# ansible 192.168.160.132 -m service -a 'name=nginx state=restarted'
[root@ansible ansible]# ansible 192.168.160.139 -a 'service php-fpm restart'
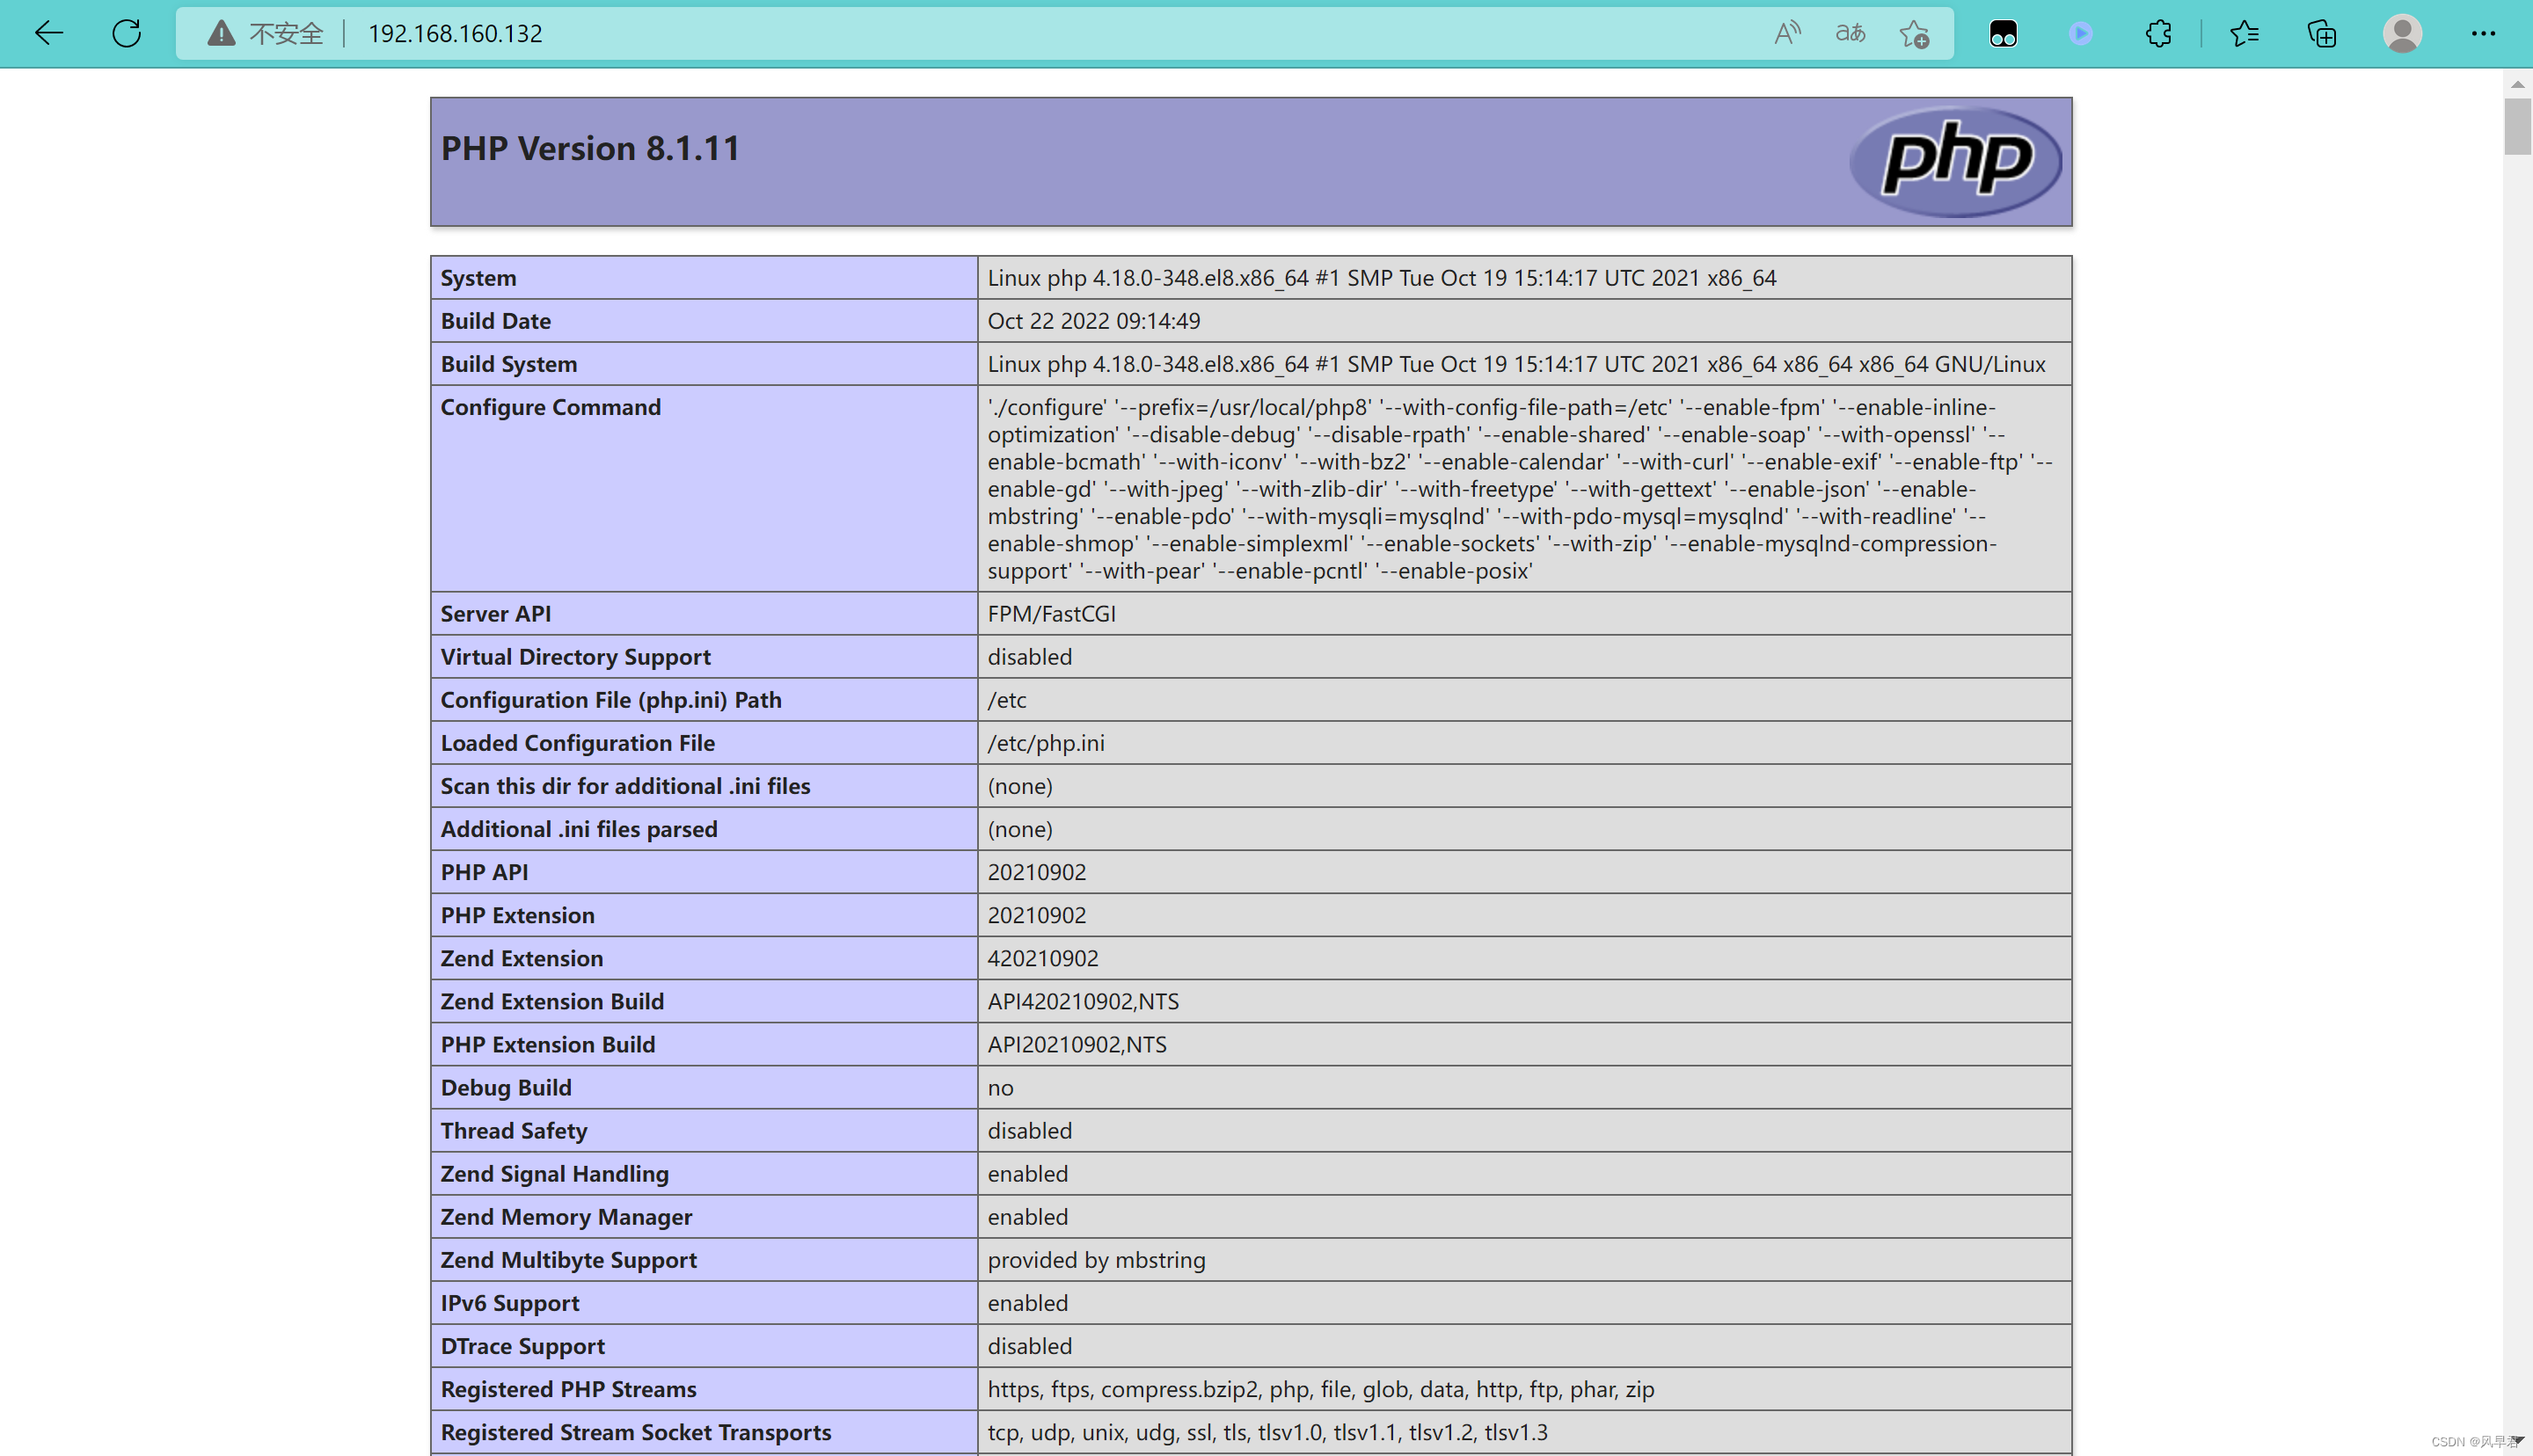
访问web


