在学习目标检测算法的过程中,发现了一些有趣的目标检测算法,打算简单写个笔记,不足之处还望谅解,可以在评论中指出来。
目标检测作为需要大量数据的算法,在实际情况中经常面临数据不足的情况,事实上很多时候数据确实对于开发者来说非常难搞,因此大佬们开发了各式各样的通过软件的方式将我们的数据变的多样化的方法。(Mixup,Cutout,CutMix,Mosaic)就是四种最为经典的算法,下面我们逐一进行讲解。
Mixup数据增强算法:
随机混合图像:将两个图像按一定比例混合生成新的图像,(与其他数据增强方式不同的是这里还会生成新标签),然后使用新的图像和标签参与训练,整个过程中原始图像不参与训练。
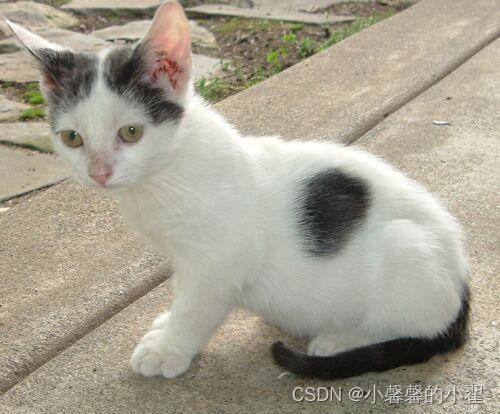
图1
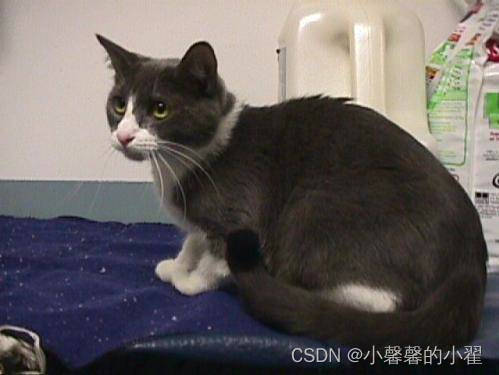
图2
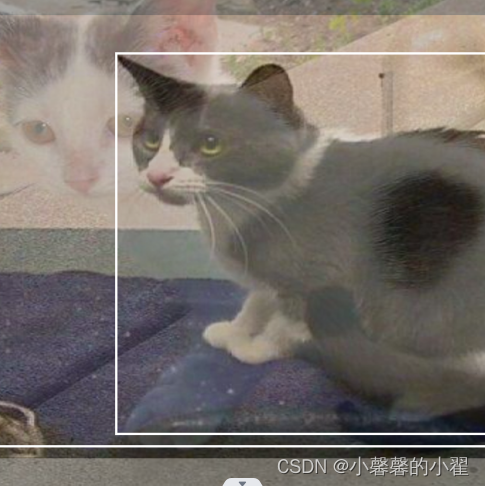
混合后的图像
图像混合的数学方法(mixup数学公式)如下:

(xᵢ , yᵢ),(xⱼ , yⱼ)是随机选择的两个样本及对应标签。其中,图像xᵢ(标签为yᵢ)和图像xⱼ(标签为yⱼ),λ为从beta分布中随机采样的数。
个人感觉他这个算法思想还是很easy的就是根据从beta中采样的随机数,然后根据随机数的比例对图像进行混合,同时标签也是按照相应的比例混合,从何得到混合后的新图像和新标签。
mixup源代码:
import matplotlib.pyplot as plt
import matplotlib.image as Image
import cv2
im1 = Image.imread("cat1.jpg") #输入图片1的路径
im1 = im1/255.
im2 = Image.imread("cat2.jpg") #输入图片2的路径
im2 = im2/255.

lam= 4*0.1  #融合比例
im_mixup = (im1*lam+im2*(1-lam))
cv2.imwrite('mixup.jpg', im_mixup) #把融合之后的图片保存到当前文件夹
plt.imshow(im_mixup)
plt.show()
Cutout数据增强算法:
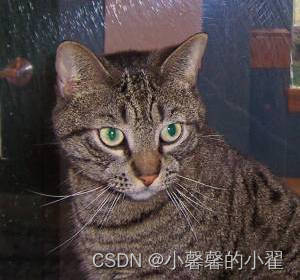
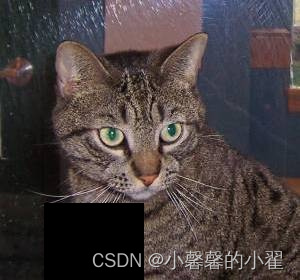
随机裁剪图像的一块区域,并在图像中对裁剪后的区域进行补0,与mixup不同的是,它不改变label。如下图所示,很简单和容易理解的方法,这个有点类似神经网络的dropout,我们随时扔掉一些神经元,可缓解神经网络的过拟合达到更好的效果。
Cutout源代码:
import cv2
from torchvision import transforms
import matplotlib.pyplot as plt
import numpy as np
import torch
class Cutout(object):
    """Randomly mask out one or more patches from an image.
    Args:
        n_holes (int): Number of patches to cut out of each image.
        length (int): The length (in pixels) of each square patch.
    """

    def __init__(self, n_holes=1, length=16):
        self.n_holes = n_holes
        self.length = length

    def __call__(self, img):
        """
        Args:
            img (Tensor): Tensor image of size (C, H, W).
        Returns:
            Tensor: Image with n_holes of dimension length x length cut out of it.
        """
        h = img.size(1)
        w = img.size(2)

        mask = np.ones((h, w), np.float32)

        for n in range(self.n_holes):
            y = np.random.randint(h)
            x = np.random.randint(w)

            y1 = np.clip(y - self.length // 2, 0, h)
            y2 = np.clip(y + self.length // 2, 0, h)
            x1 = np.clip(x - self.length // 2, 0, w)
            x2 = np.clip(x + self.length // 2, 0, w)

            mask[y1: y2, x1: x2] = 0.

        mask = torch.from_numpy(mask)
        mask = mask.expand_as(img)
        img = img * mask

        return img
# 执行cutout
img = cv2.imread('cat.1.jpg')#图片路径
img = transforms.ToTensor()(img)

cut = Cutout(length=100)
img = cut(img)

# cutout图像写入本地
img = img.mul(255).byte()
img = img.numpy().transpose((1, 2, 0))
cv2.imwrite('cutout.jpg', img)  #把随机裁剪之后的图片保存到当前文件夹
plt.imshow(img)
plt.show()
CutMix数据增强算法:
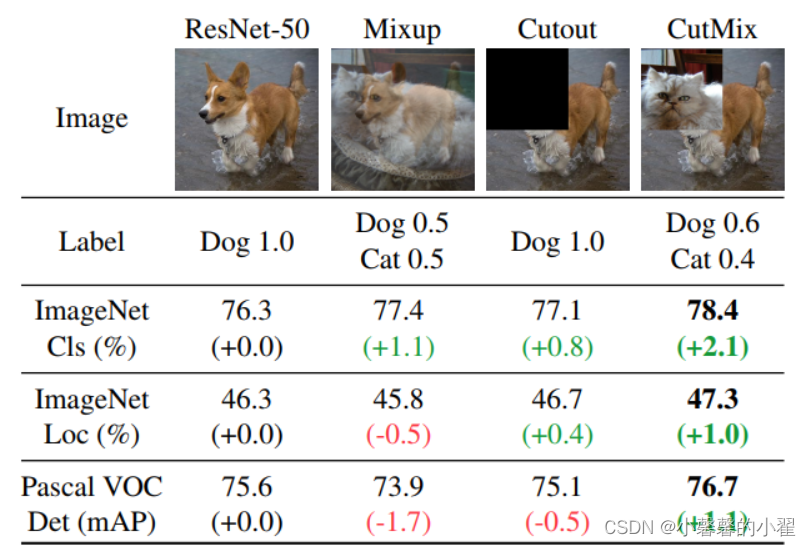
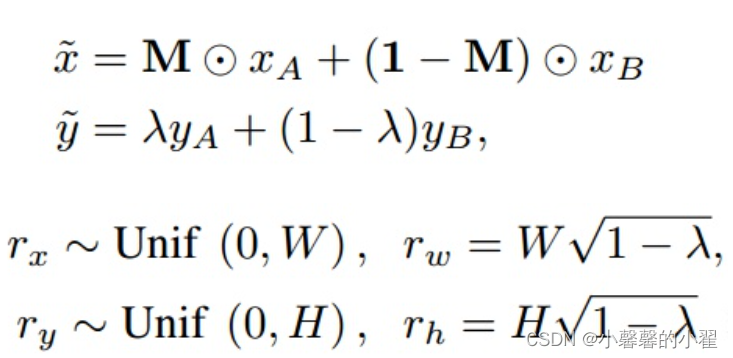
CutMix算法其实也可以顾名思义理解,Cutout和Mixup的结合体,思想很简单,我们首先使用Cutout对图像随机选择一块儿区域进行裁剪,然后使用Mixup图像跟裁剪后的图像进行混合。
数学上实现方法如下:

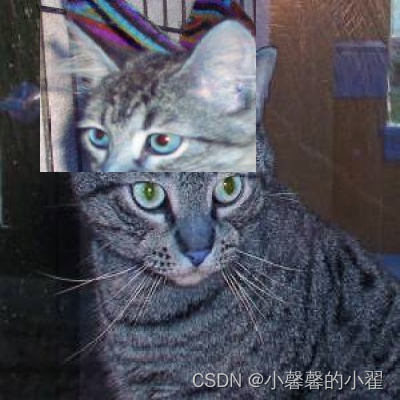
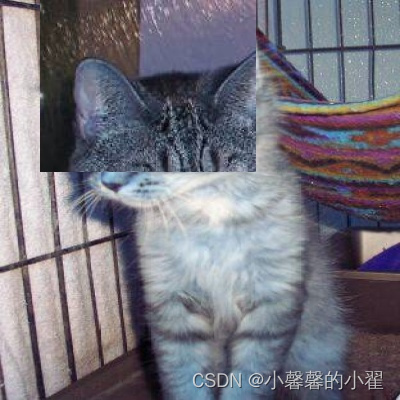
Cutmix代码:
代码懒得自己写了,参考这位
数据增强---CutMix - hikari_1994 - 博客园大佬的修改了一下。可以自动将输入的图片resize成同样大小的,这样可以随意输入两个不同大小的图片,和效果图可以自动保存到本地。
import matplotlib.pyplot as plt
import numpy as np

plt.rcParams['figure.figsize'] = [10, 10]

import cv2


def rand_bbox(size, lamb):
    """
    生成随机的bounding box
    :param size:
    :param lamb:
    :return:
    """
    W = size[0]
    H = size[1]

    # 得到一个bbox和原图的比例
    cut_ratio = np.sqrt(1.0 - lamb)
    cut_w = int(W * cut_ratio)
    cut_h = int(H * cut_ratio)

    # 得到bbox的中心点
    cx = np.random.randint(W)
    cy = np.random.randint(H)

    bbx1 = np.clip(cx - cut_w // 2, 0, W)
    bby1 = np.clip(cy - cut_h // 2, 0, H)
    bbx2 = np.clip(cx + cut_w // 2, 0, W)
    bby2 = np.clip(cy + cut_h // 2, 0, H)#随机生成遮挡框


    return bbx1, bby1, bbx2, bby2


def cutmix(image_batch, image_batch_labels, alpha=1.0):
    # 决定bbox的大小,服从beta分布
    lam = np.random.beta(alpha, alpha)

    #  permutation: 如果输入x是一个整数,那么输出相当于打乱的range(x)
    rand_index = np.random.permutation(len(image_batch))

    # 对应公式中的y_a,y_b
    target_a = image_batch_labels
    target_b = image_batch_labels[rand_index]

    # 根据图像大小随机生成bbox
    bbx1, bby1, bbx2, bby2 = rand_bbox(image_batch[0].shape, lam)

    image_batch_updated = image_batch.copy()

    # image_batch的维度分别是 batch x 宽 x 高 x 通道
    # 将所有图的bbox对应位置, 替换为其他任意一张图像
    # 第一个参数rand_index是一个list,可以根据这个list里索引去获得image_batch的图像,也就是将图片乱序的对应起来
    image_batch_updated[:, bbx1: bbx2, bby1:bby2, :] = image_batch[rand_index, bbx1:bbx2, bby1:bby2, :]

    # 计算 1 - bbox占整张图像面积的比例
    lam = 1 - ((bbx2 - bbx1) * (bby2 - bby1)) / (image_batch.shape[1] * image_batch.shape[2])
    # 根据公式计算label
    label = target_a * lam + target_b * (1. - lam)

    return image_batch_updated, label


if __name__ == '__main__':
    cat = cv2.cvtColor(cv2.imread("cat.1.jpg"), cv2.COLOR_BGR2RGB)
    dog = cv2.cvtColor(cv2.imread("cat.2.jpg"), cv2.COLOR_BGR2RGB)
    data = [cat , dog]
    a = 0

    H, W = cat.shape[0], cat.shape[1]
    width = 400  # 需要缩放成多大,这里直接修改就行,我这里是缩放成400*400,根据自己的需要修改成响应的数值即可
    height = 400  #博主源代码只能输入大小相同两张图片进行cutmix,我这里可以自动将两张图片调整成相同大小,避免了还需要手动调节图片大小输入的尴尬
    cat= cv2.resize(cat, (width, height), interpolation=cv2.INTER_AREA)

    H, W = dog.shape[0], dog.shape[1]
    width = 400  # 需要缩放成多大,这里直接修改就行,我这里是缩放成400*400,根据自己的需要修改成响应的数值即可
    height = 400
    dog= cv2.resize(dog, (width, height), interpolation=cv2.INTER_AREA)


    updated_img, label = cutmix(np.array([cat, dog]), np.array([[0, 1], [1, 0]]), 0.5)
    print(label)#输出融合后的标签

    fig, axs = plt.subplots(nrows=1, ncols=2, squeeze=False)
    ax1 = axs[0, 0]
    ax2 = axs[0, 1]
    ax1.imshow(updated_img[0])
    cv2.imwrite('cutmix_1.jpg', updated_img[0])
    ax2.imshow(updated_img[1])
    cv2.imwrite('cutmix_2.jpg', updated_img[1])
    plt.show()
Mosaic数据增强算法:
更像是Cutmix的改进,四张图片拼接到一起,这样使得在训练的时候可以一次性训练四张图,
据说是在BN层计算的时候效果更好,到底好不好咱也不知道,作者说好就是好把。不过极大的丰富了目标背景这个倒是真的,毕竟一个目标有了四个背景不是?
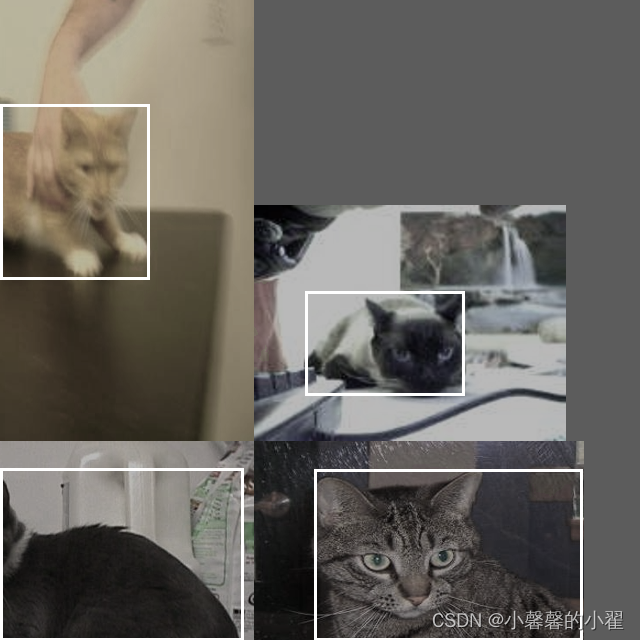
我这效果图不好可能是因为选的图片尺寸有点问题,懒得调了,知道啥意思就行。
一句话看懂思路的就是这位大佬的
目标检测: 一文读懂 Mosaic 数据增强_大林兄的博客-CSDN博客_mosaic数据增强
的这部分
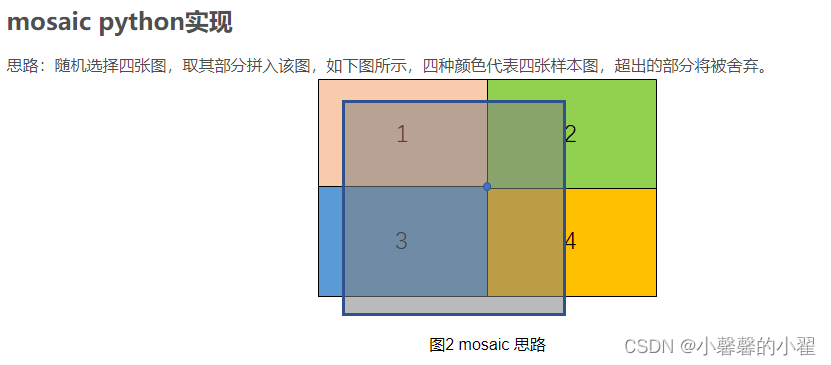
好的,我想这里已经表达的很清楚了。当然细节的地方得注意一下,图像拼接的时候,是需要分别对图片进行增光操作的。
1、翻转(对原始图片进行左右的翻转);
2、缩放(对原始图片进行大小的缩放);
3、色域变化(对原始图片的明亮度、饱和度、色调进行改变)等操作。这也是为了丰富一下数据多样性
并且按照四个方向位置摆好
代码看B导的:睿智的目标检测28——YoloV4当中的Mosaic数据增强方法_Bubbliiiing的博客-CSDN博客_睿智yolov4
b导已经写的很好了,我就不写了
好的 目标检测数据增强篇就到这里了,兄弟们觉得有用的麻烦点个赞!感谢!

![[附源码]JAVA毕业设计仁爱公益网站(系统+LW)](https://img-blog.csdnimg.cn/94967b8d072a48b7979ede031dc45b6e.png)


![[附源码]Python计算机毕业设计Django校园快递柜存取件系统](https://img-blog.csdnimg.cn/e674792252ab4dc0adfe4ca12adc8f83.png)
