基础课程
第一章-读取图片、视频和摄像头
Chapter 1 – Read Images Videos and Webcams
图片放在程序所在文件夹下的Resources/test.png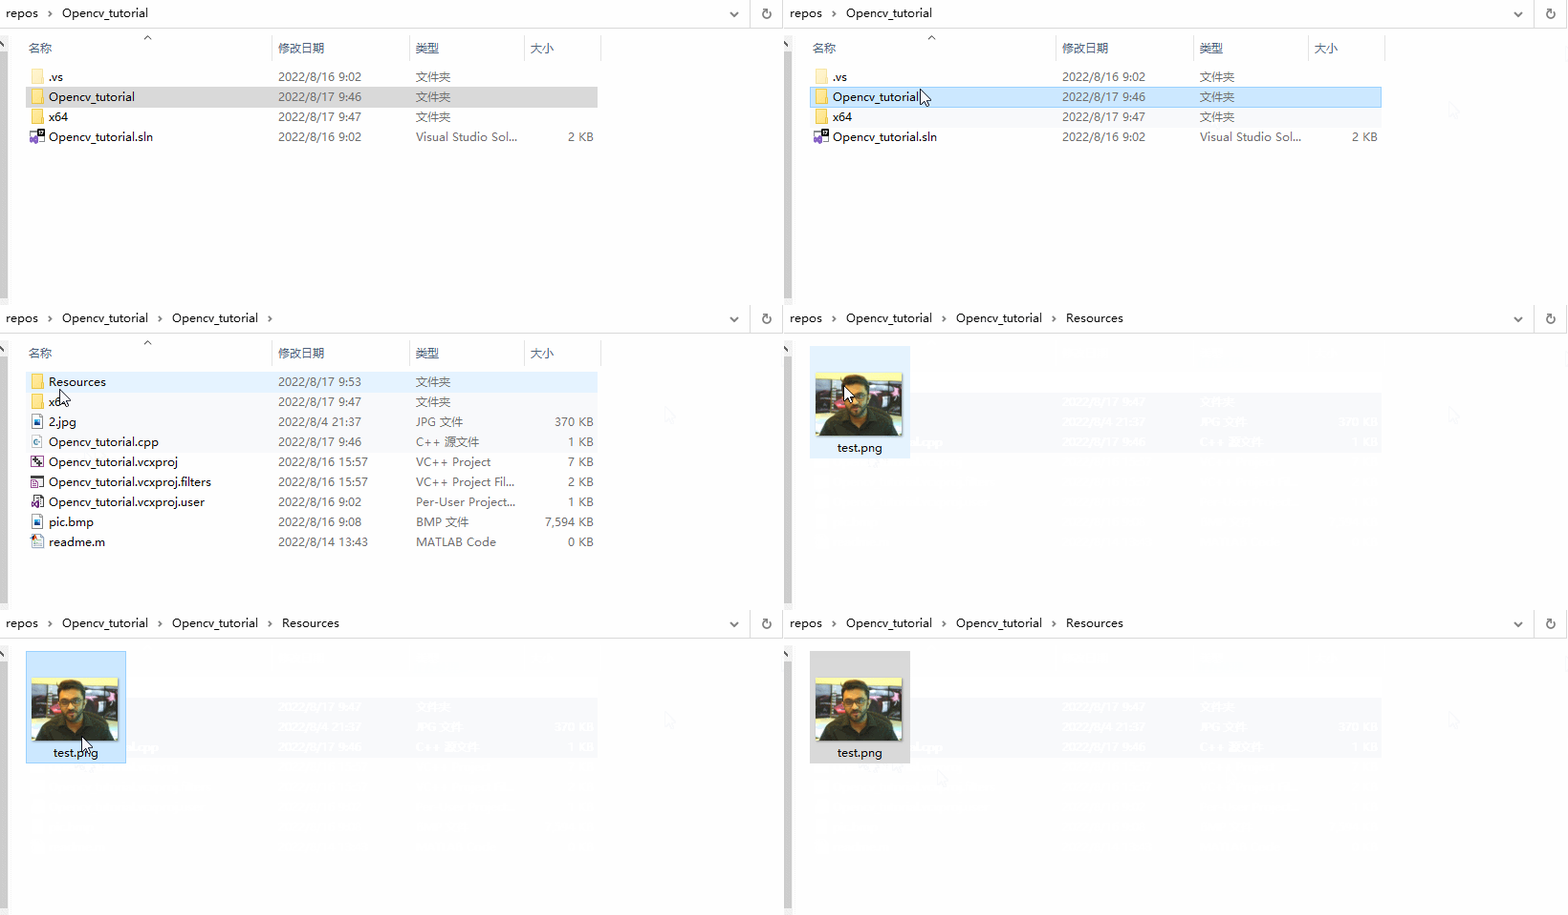
1.1 opencv读取一张图片并显示:
#include <opencv2/imgcodecs.hpp>
#include <opencv2/highgui.hpp>
#include <opencv2/imgproc.hpp>
#include <iostream>
using namespace cv;
using namespace std;
/  Images  //
void main() {
    string path = "Resources/test.png";
    Mat img = imread(path);
    imshow("Image", img);
    waitKey(0);
}
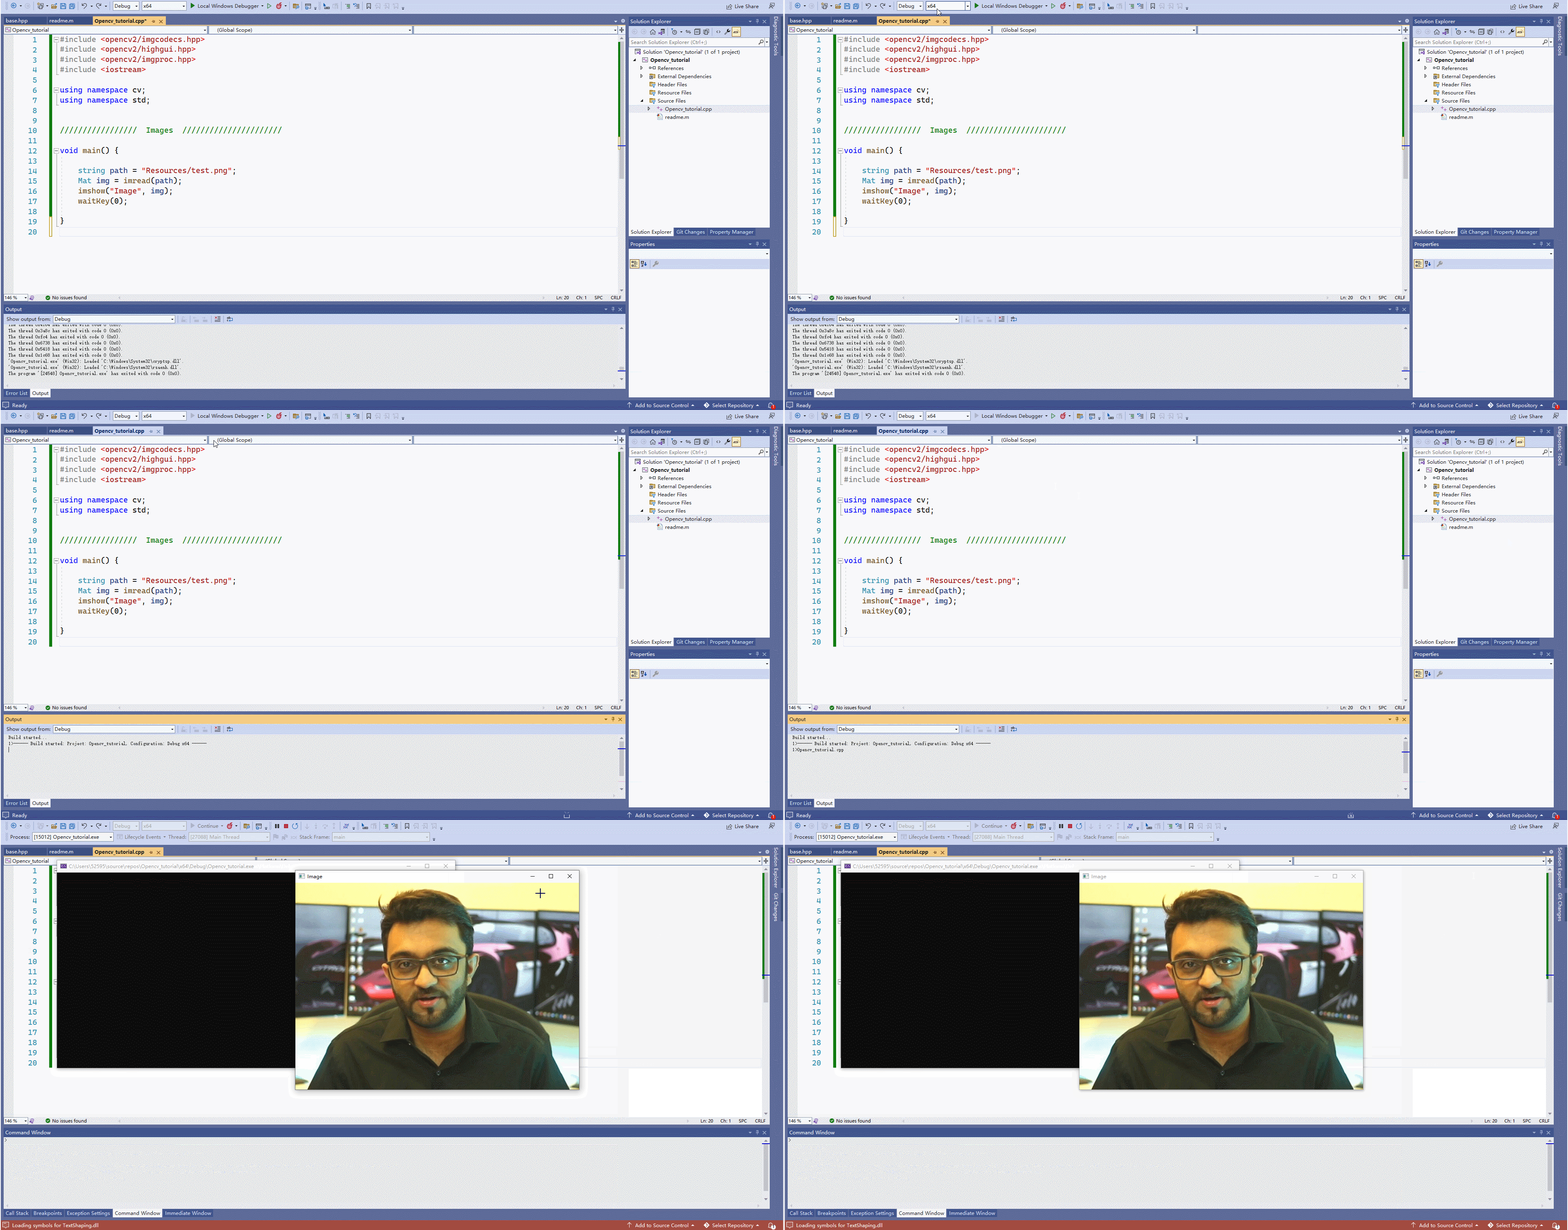
运行后的效果
1.2 opencv读取一段视频并显示:
#include <opencv2/imgcodecs.hpp>
#include <opencv2/highgui.hpp>
#include <opencv2/imgproc.hpp>
#include <iostream>
using namespace cv;
using namespace std;
///  Video  //
void main() {
	string path = "Resources/test_video.mp4";
	VideoCapture cap(path);
	Mat img;
	while (true) { //循环读取视频的帧
		cap.read(img);
		imshow("Image", img);
		waitKey(2);//每2ms读取一张图
	}
}
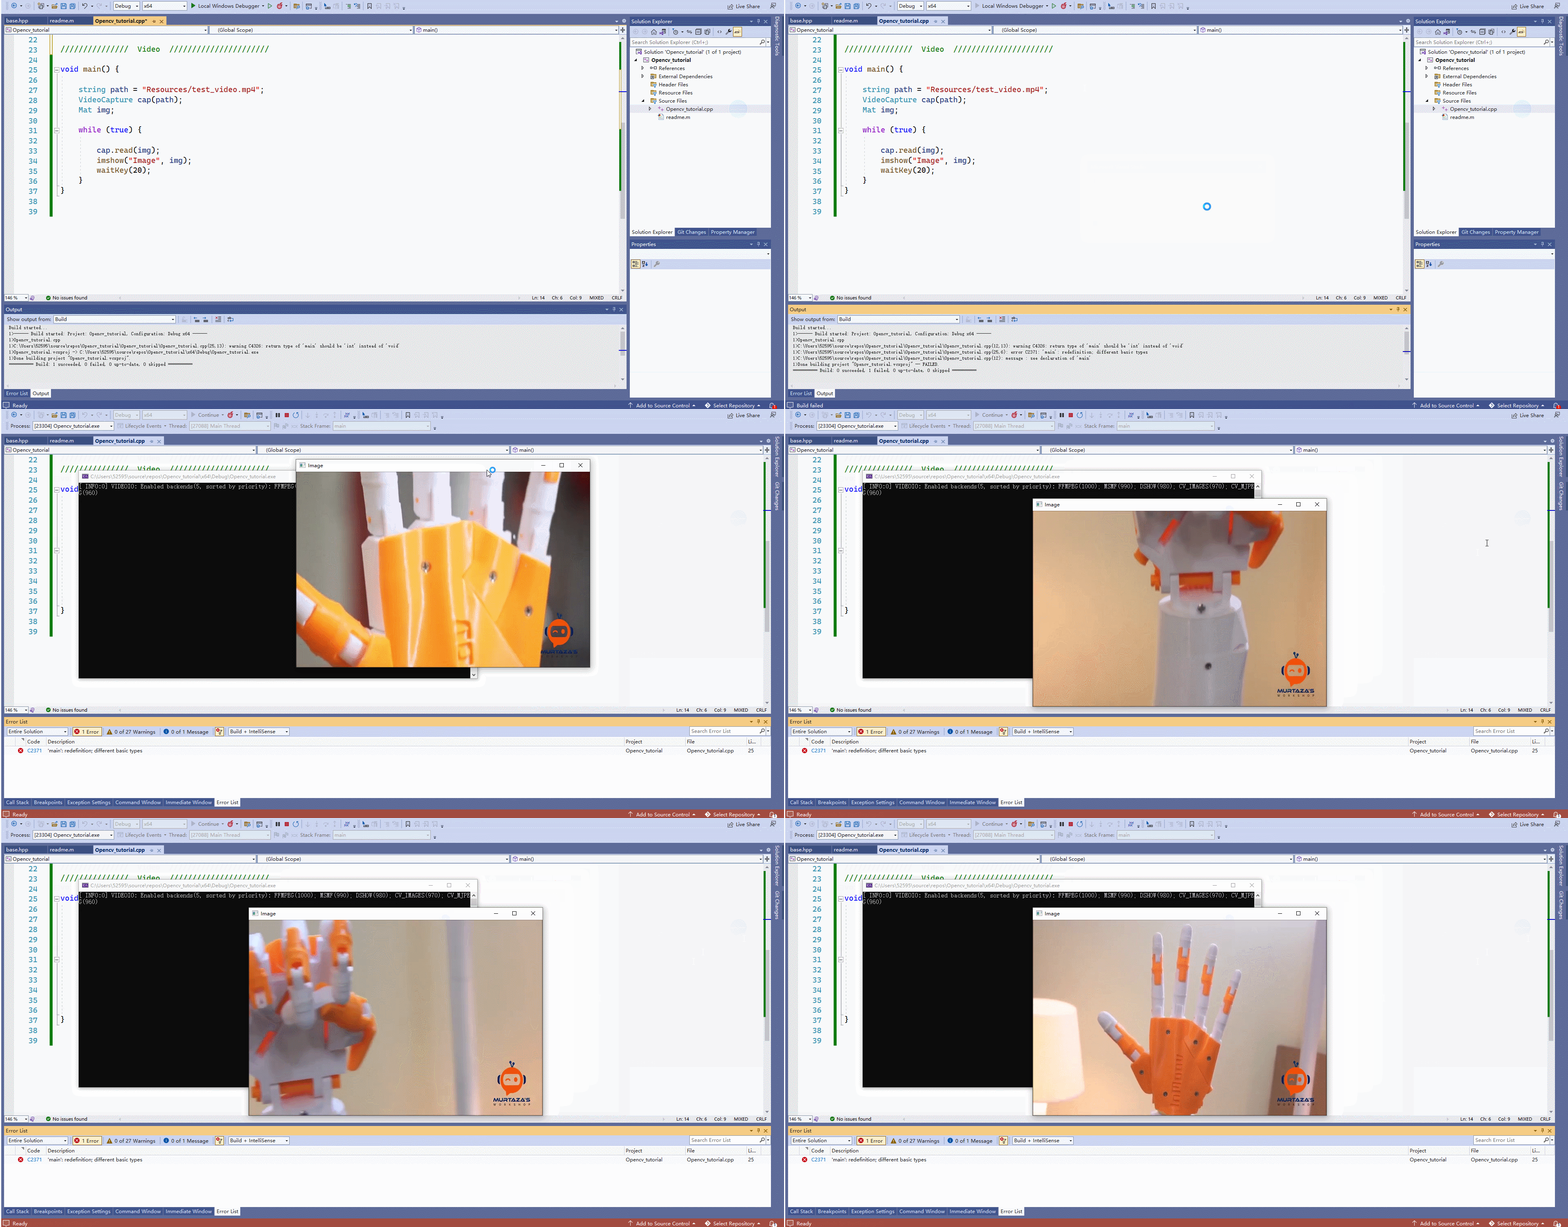
运行后的效果
1.3 opencv读取摄像头视频并显示:
#include <opencv2/imgcodecs.hpp>
#include <opencv2/highgui.hpp>
#include <opencv2/imgproc.hpp>
#include <iostream>
using namespace cv;
using namespace std;
///  Video  //
void main() {
	VideoCapture cap(0); //笔记本自带的摄像头是0,外接的USB摄像头是1、2
	Mat img;
	while (true) {
		cap.read(img);
		imshow("image", img);
		waitKey(1);
			}
	}
}
运行后的效果
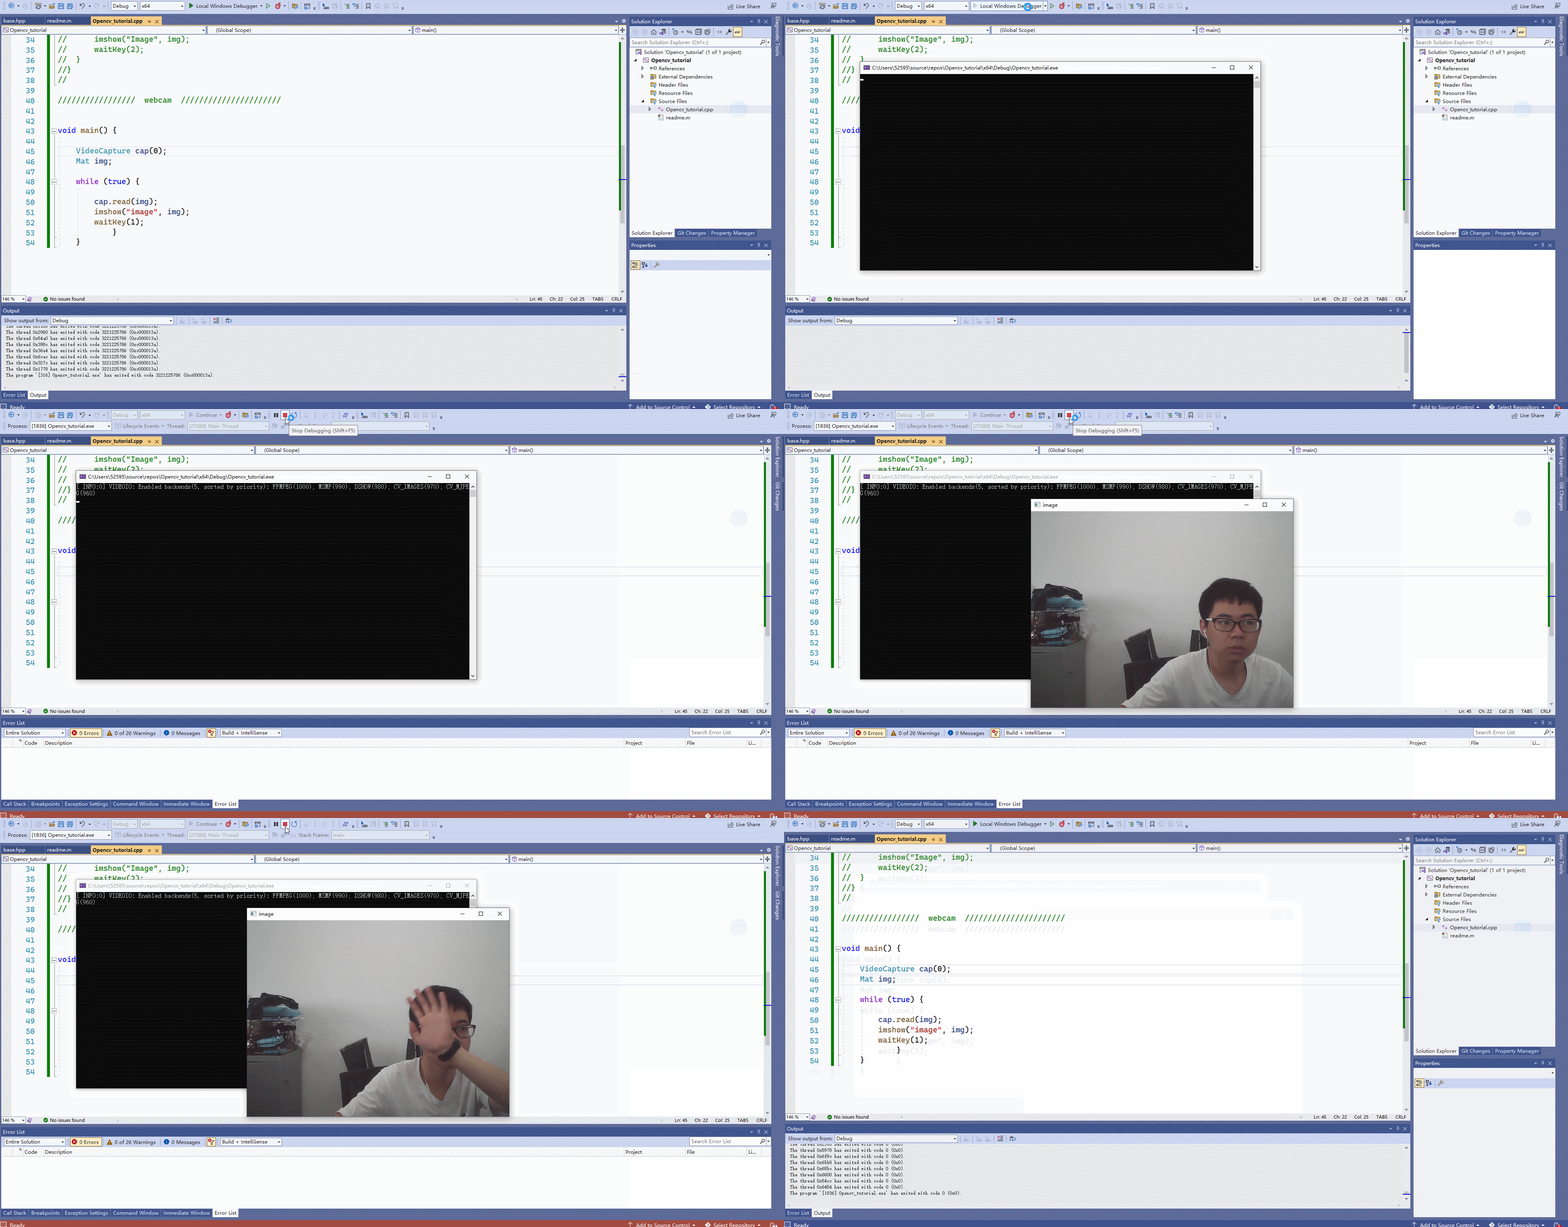
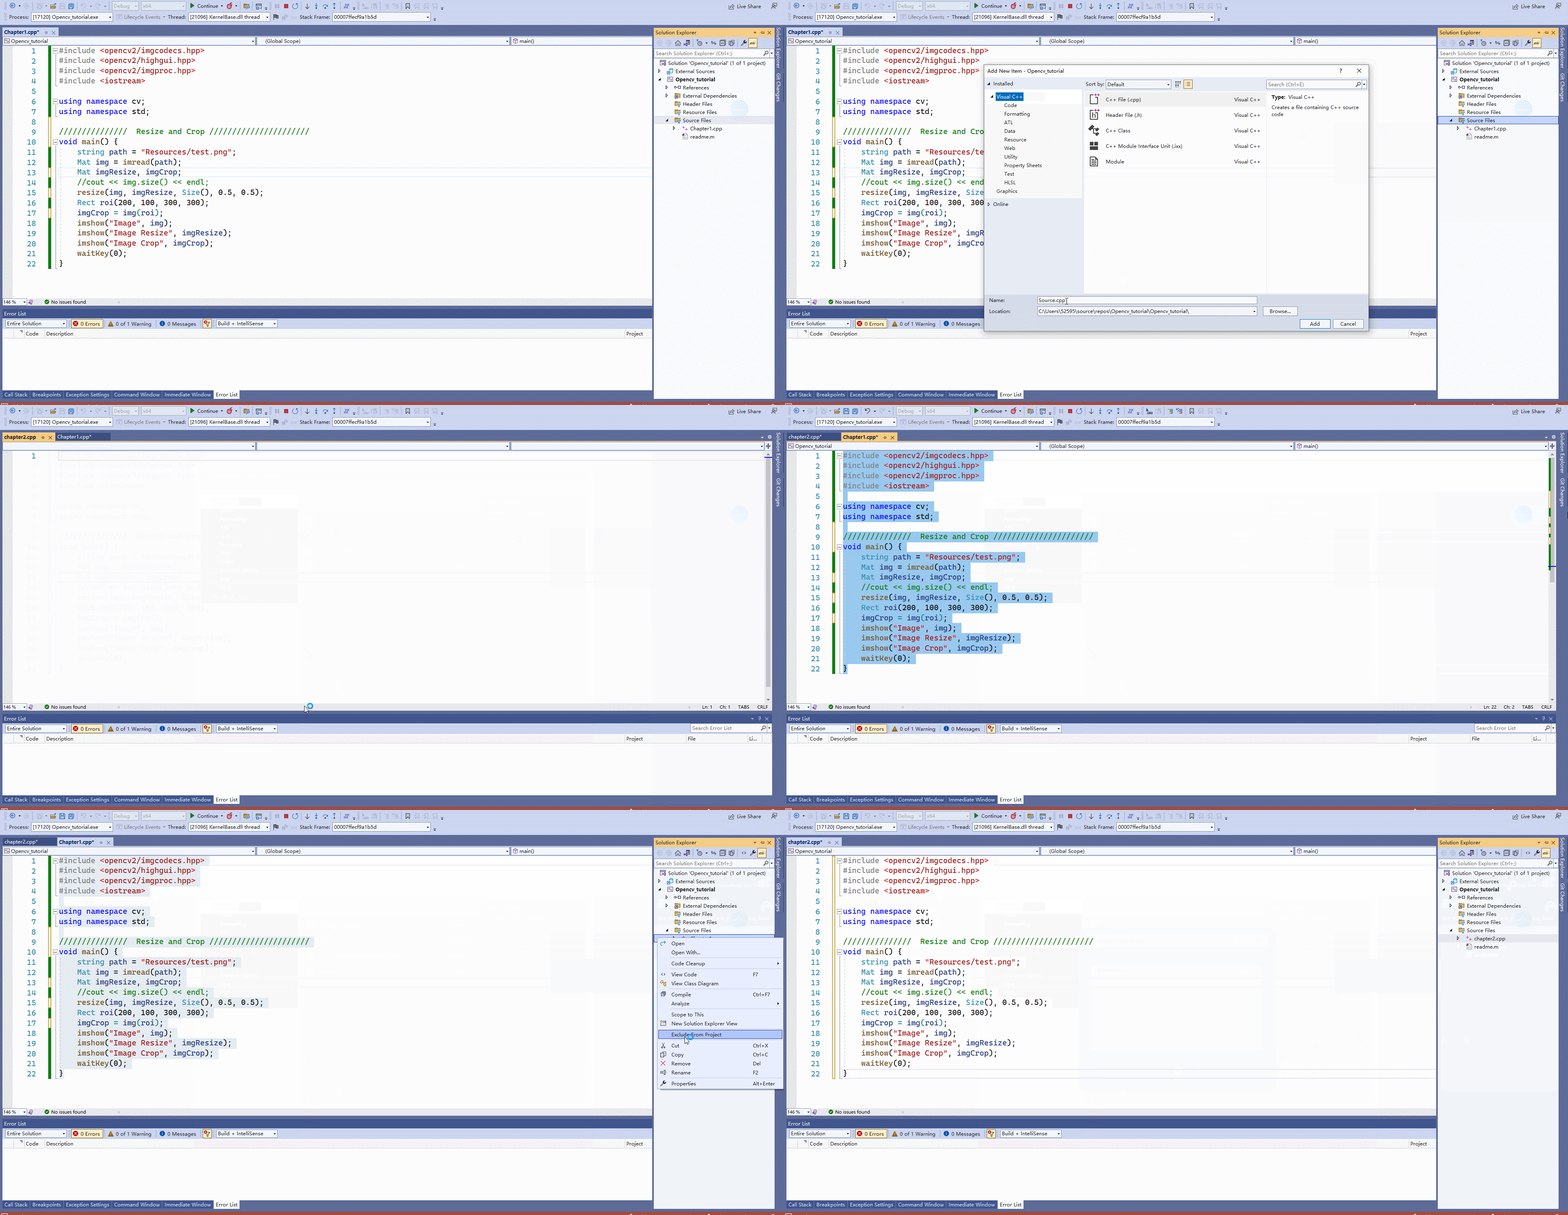
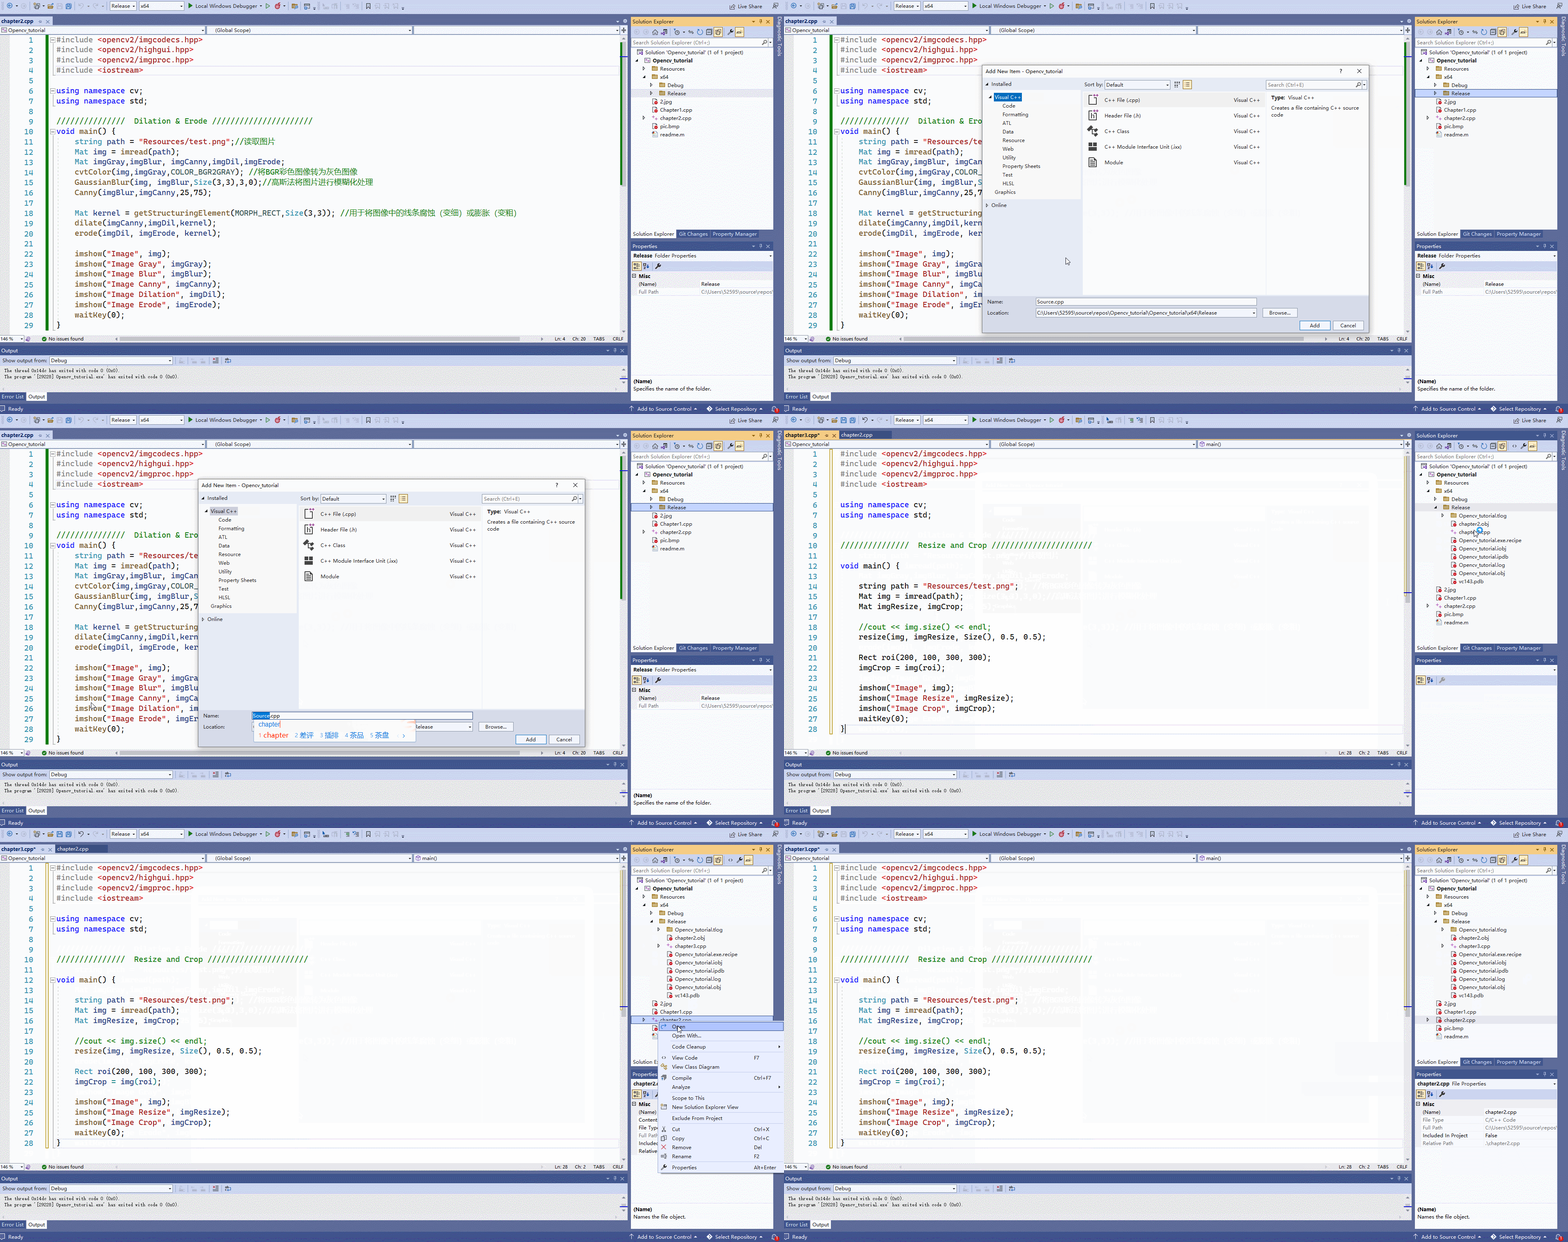
注意:由于一个程序只能有一个主函数main(),所有这里我们可以先将chapter1.cpp从source files exclude(不是remove删除,而是取消程序对这个程序的读取)
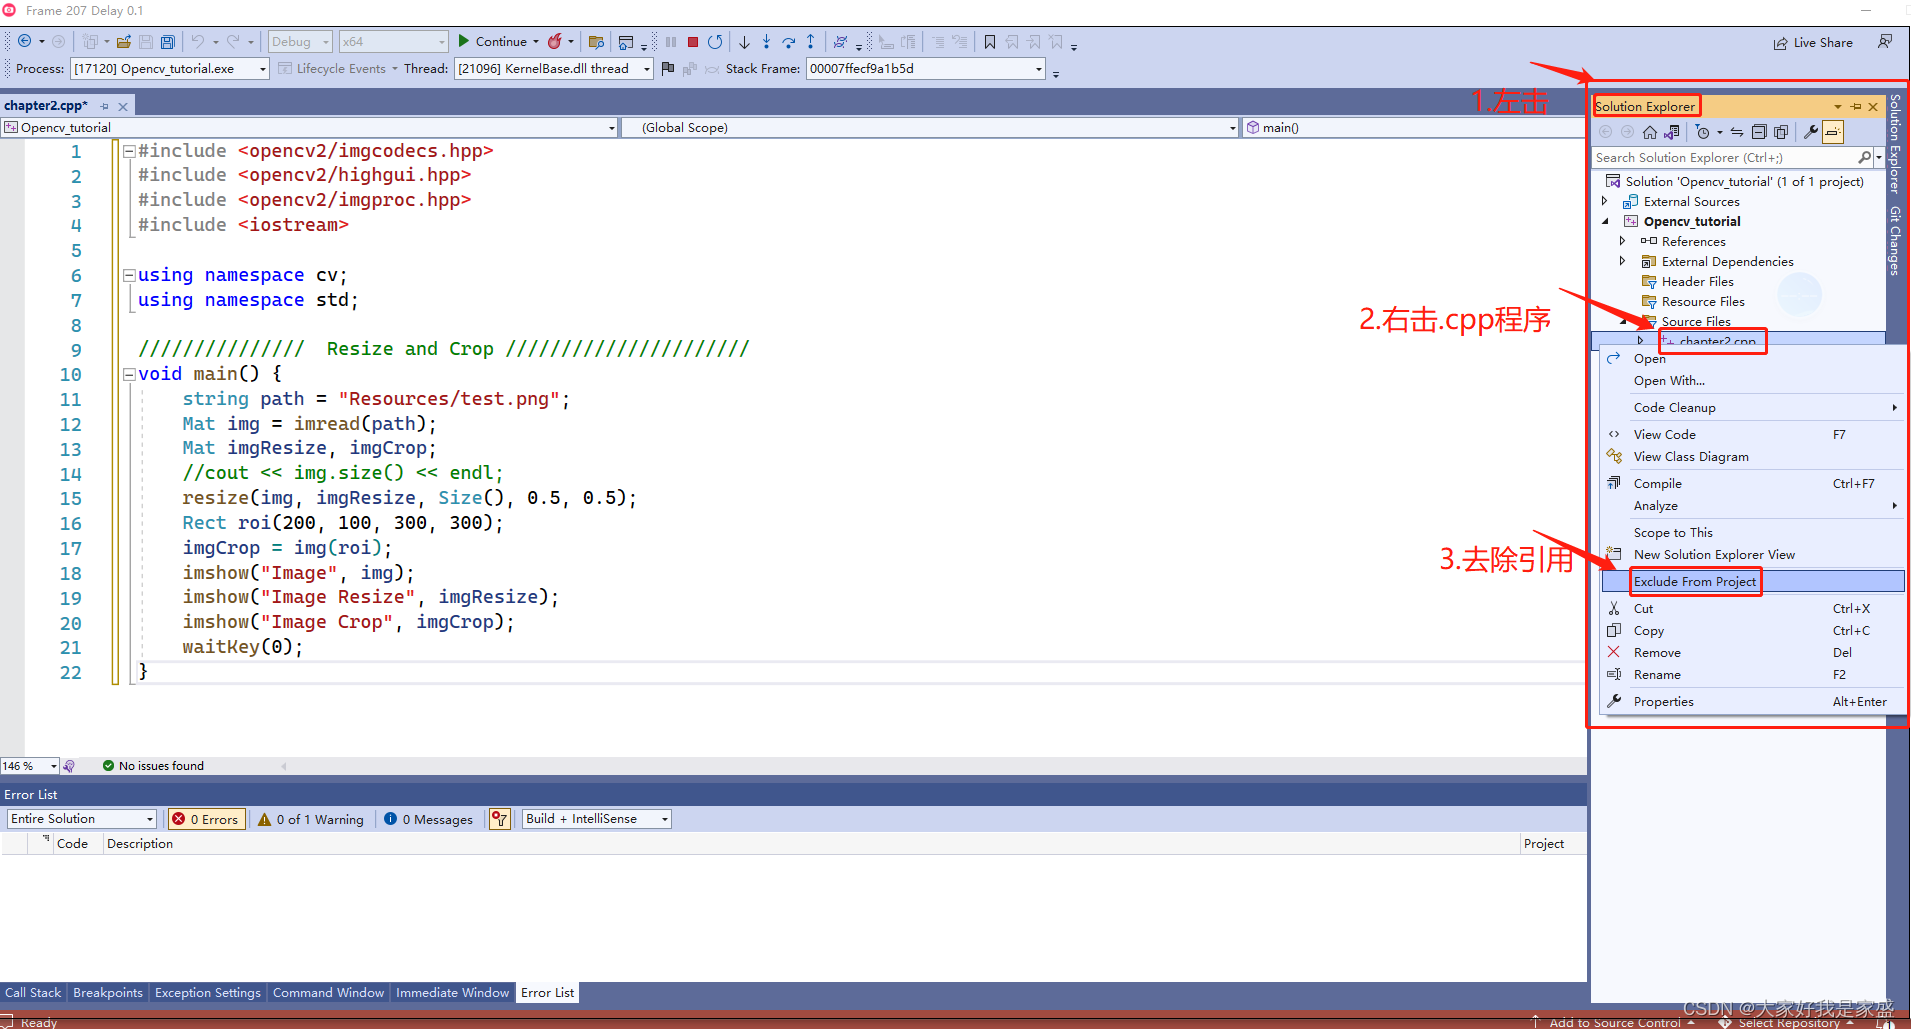
操作过程:
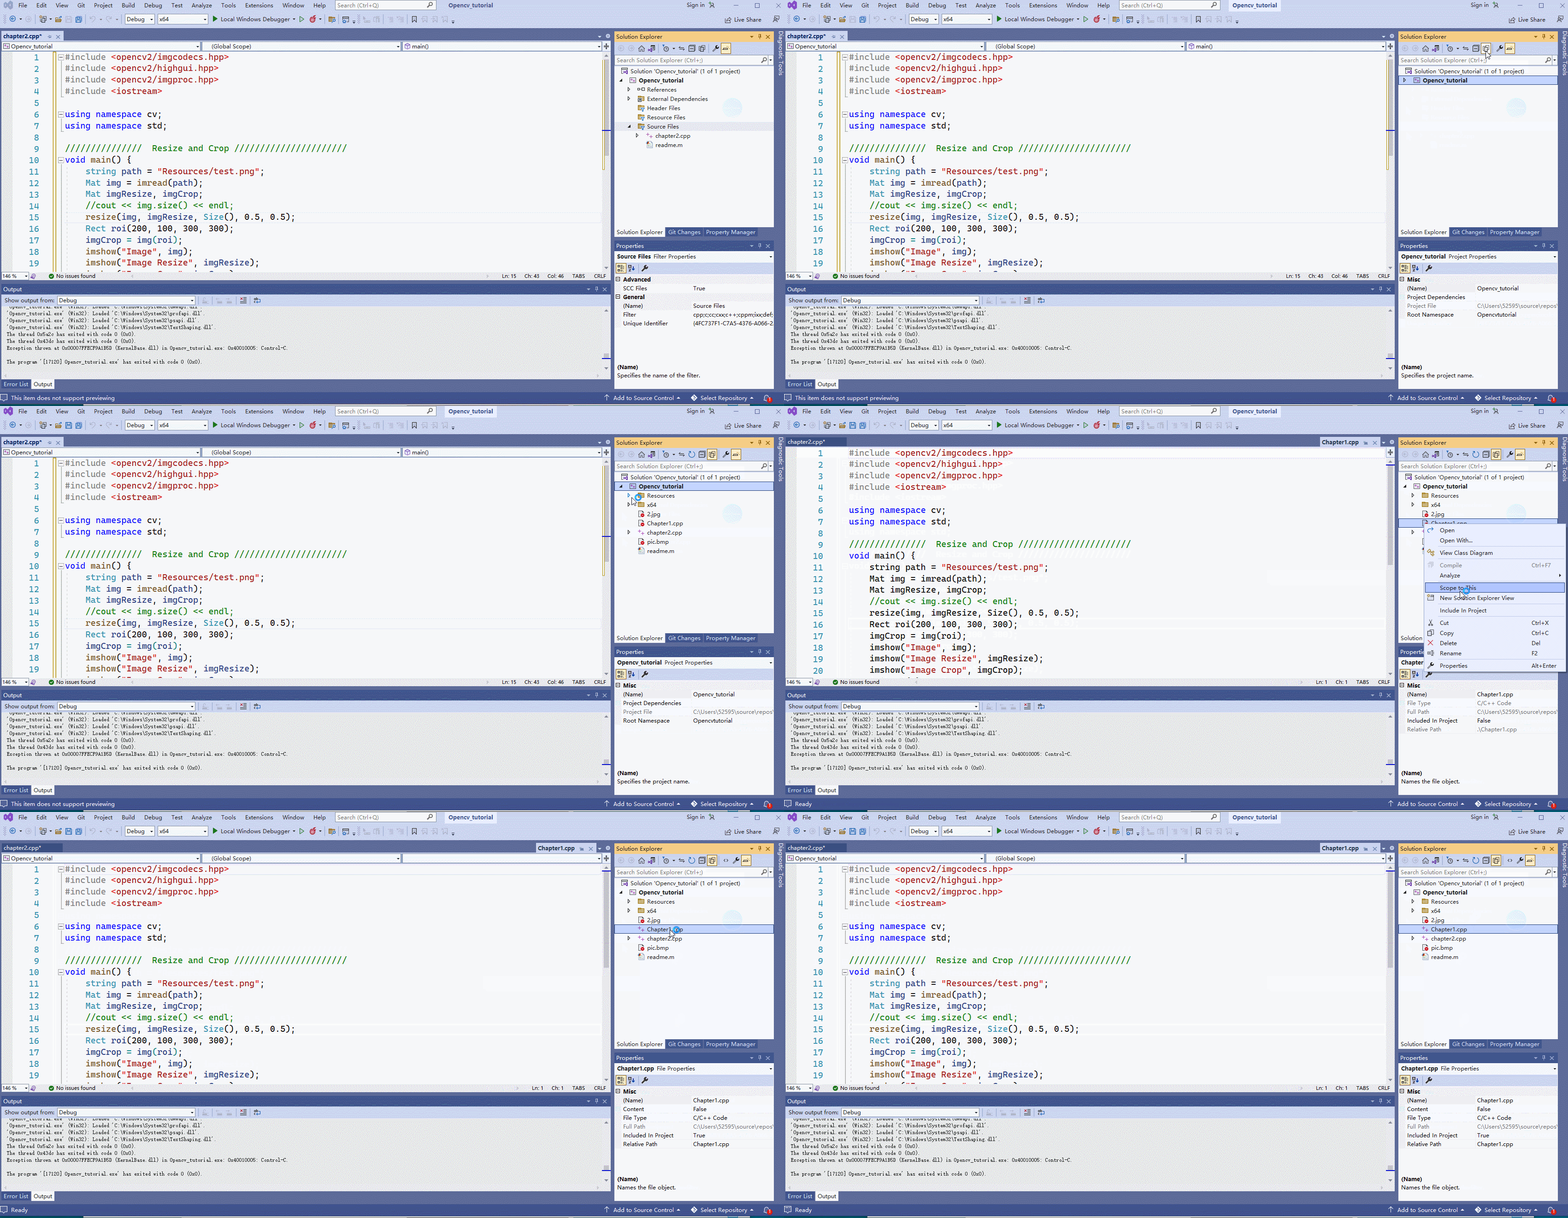
后面如果想把chapter1.cpp程序加载回来的操作:
第二章-基本功能
Chapter 2 – Basic Functions
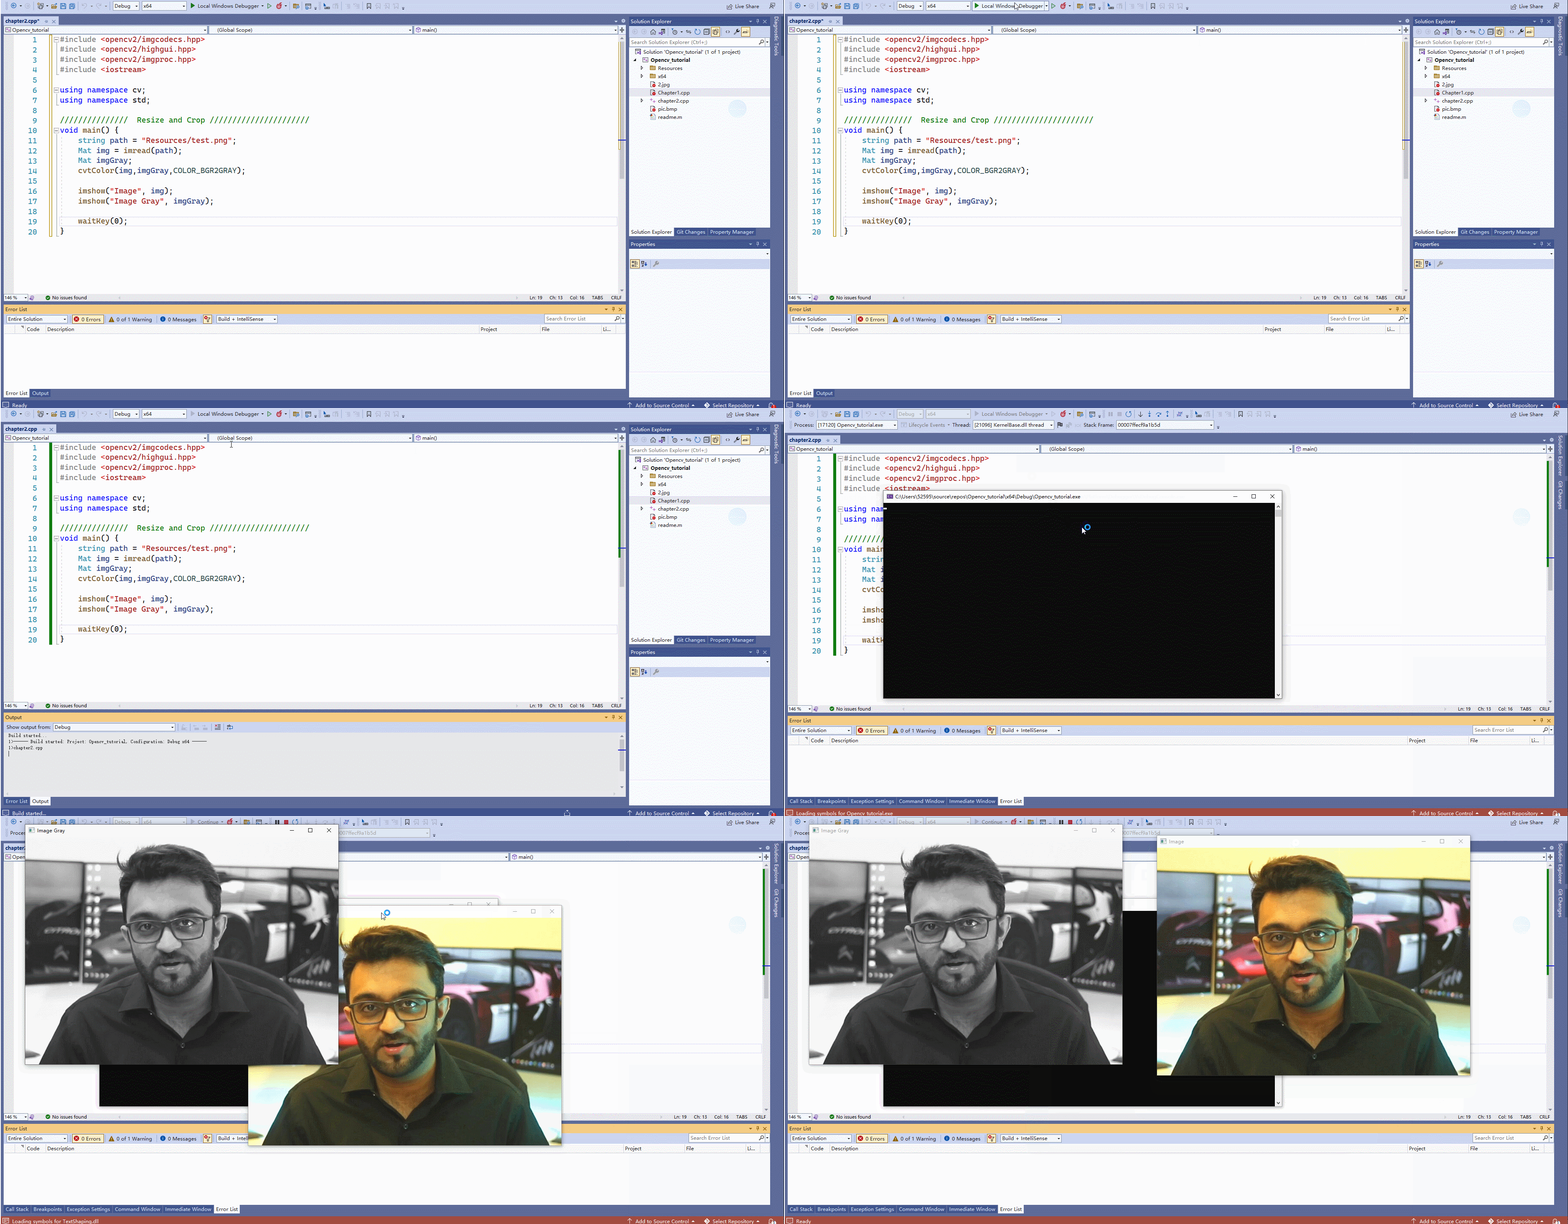
2.1 将图片转为灰度图
#include <opencv2/imgcodecs.hpp>
#include <opencv2/highgui.hpp>
#include <opencv2/imgproc.hpp>
#include <iostream>

using namespace cv;
using namespace std;

///  Gray //
void main() {
	string path = "Resources/test.png";//读取图片
	Mat img = imread(path);
	Mat imgGray;
	cvtColor(img,imgGray,COLOR_BGR2GRAY); //将BGR彩色图像转为灰色图像
	imshow("Image", img);
	imshow("Image Gray", imgGray);
	waitKey(0);
}
2.2 将图片变得模糊
#include <opencv2/imgcodecs.hpp>
#include <opencv2/highgui.hpp>
#include <opencv2/imgproc.hpp>
#include <iostream>
using namespace cv;
using namespace std;
///  Blur //
void main() {
	string path = "Resources/test.png";//读取图片
	Mat img = imread(path);
	Mat imgGray,imgBlur;
	cvtColor(img,imgGray,COLOR_BGR2GRAY); //将BGR彩色图像转为灰色图像
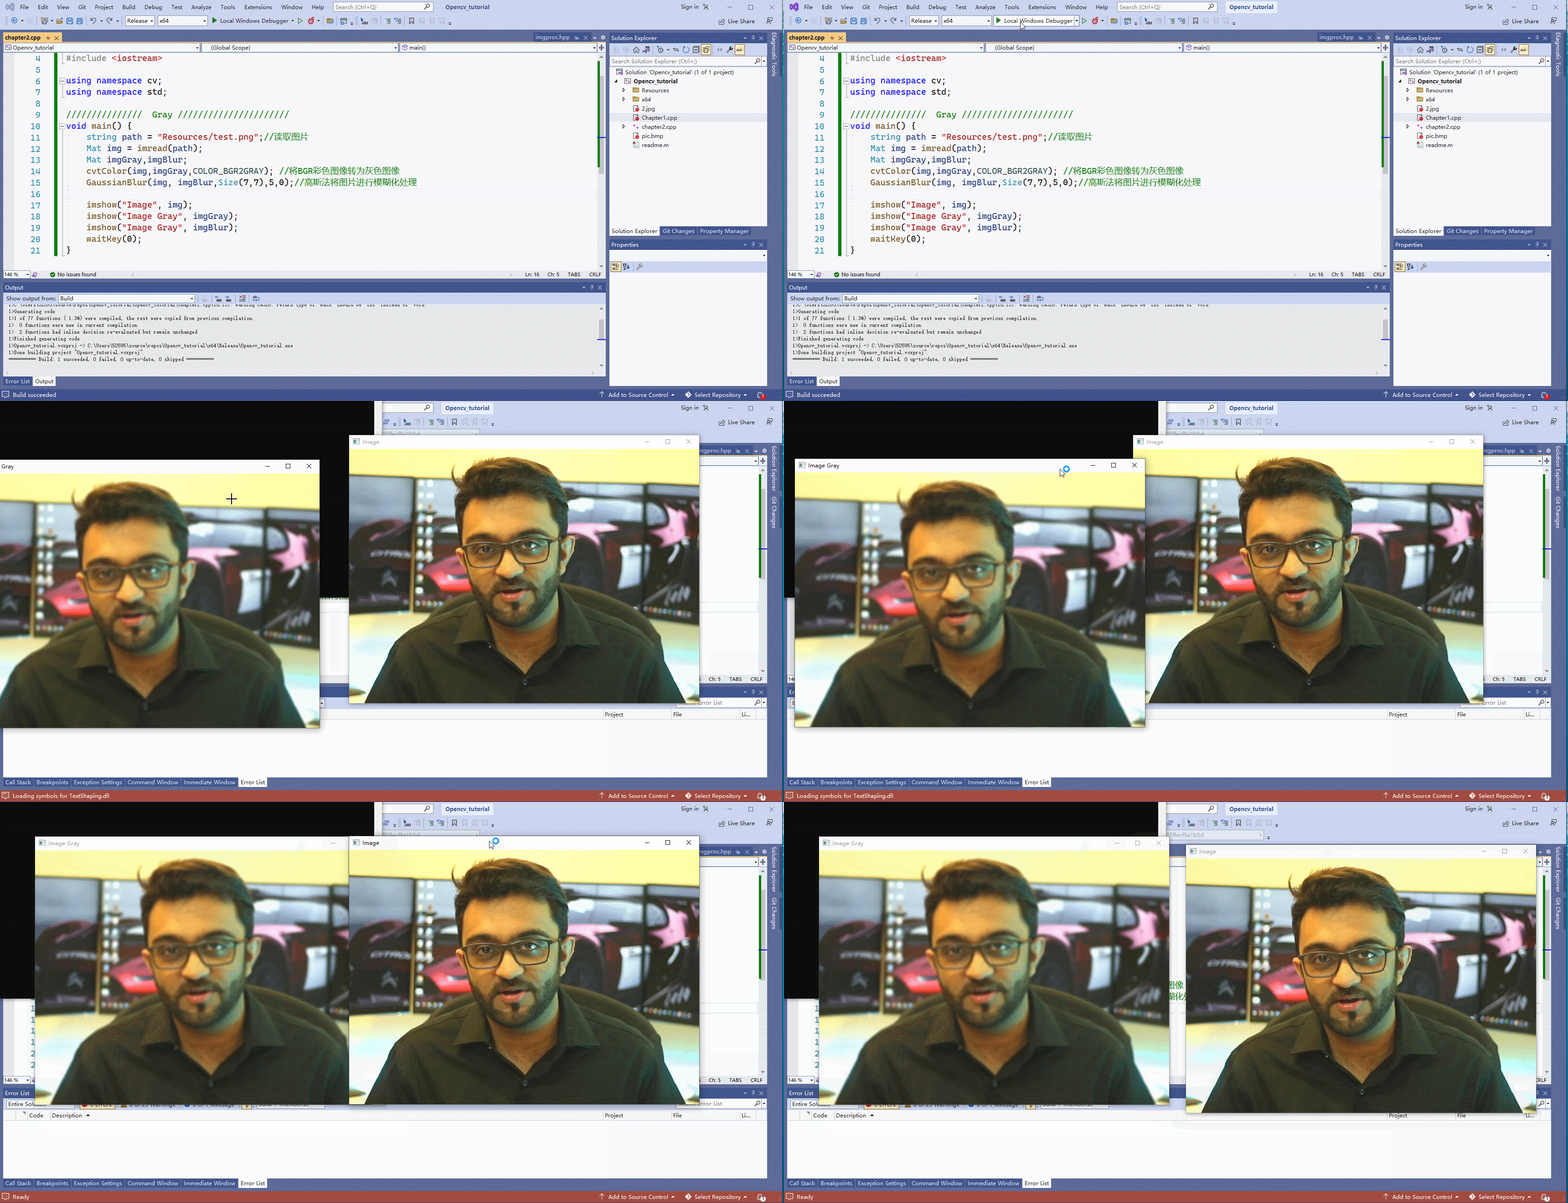
	GaussianBlur(img, imgBlur,Size(7,7),5,0);//高斯法将图片进行模糊化处理
	imshow("Image", img);
	imshow("Image Gray", imgGray);
	imshow("Image imgBlur", imgBlur);//别写成
	 //imshow("Image Gray", imgBlur);否则只显示一张图!
	waitKey(0);
}
2.3 将图片进行边缘轮廓检测
#include <opencv2/imgcodecs.hpp>
#include <opencv2/highgui.hpp>
#include <opencv2/imgproc.hpp>
#include <iostream>
using namespace cv;
using namespace std;
///  Canny //
void main() {
	string path = "Resources/test.png";//读取图片
	Mat img = imread(path);
	Mat imgGray,imgBlur, imgCanny;
	cvtColor(img,imgGray,COLOR_BGR2GRAY); //将BGR彩色图像转为灰色图像
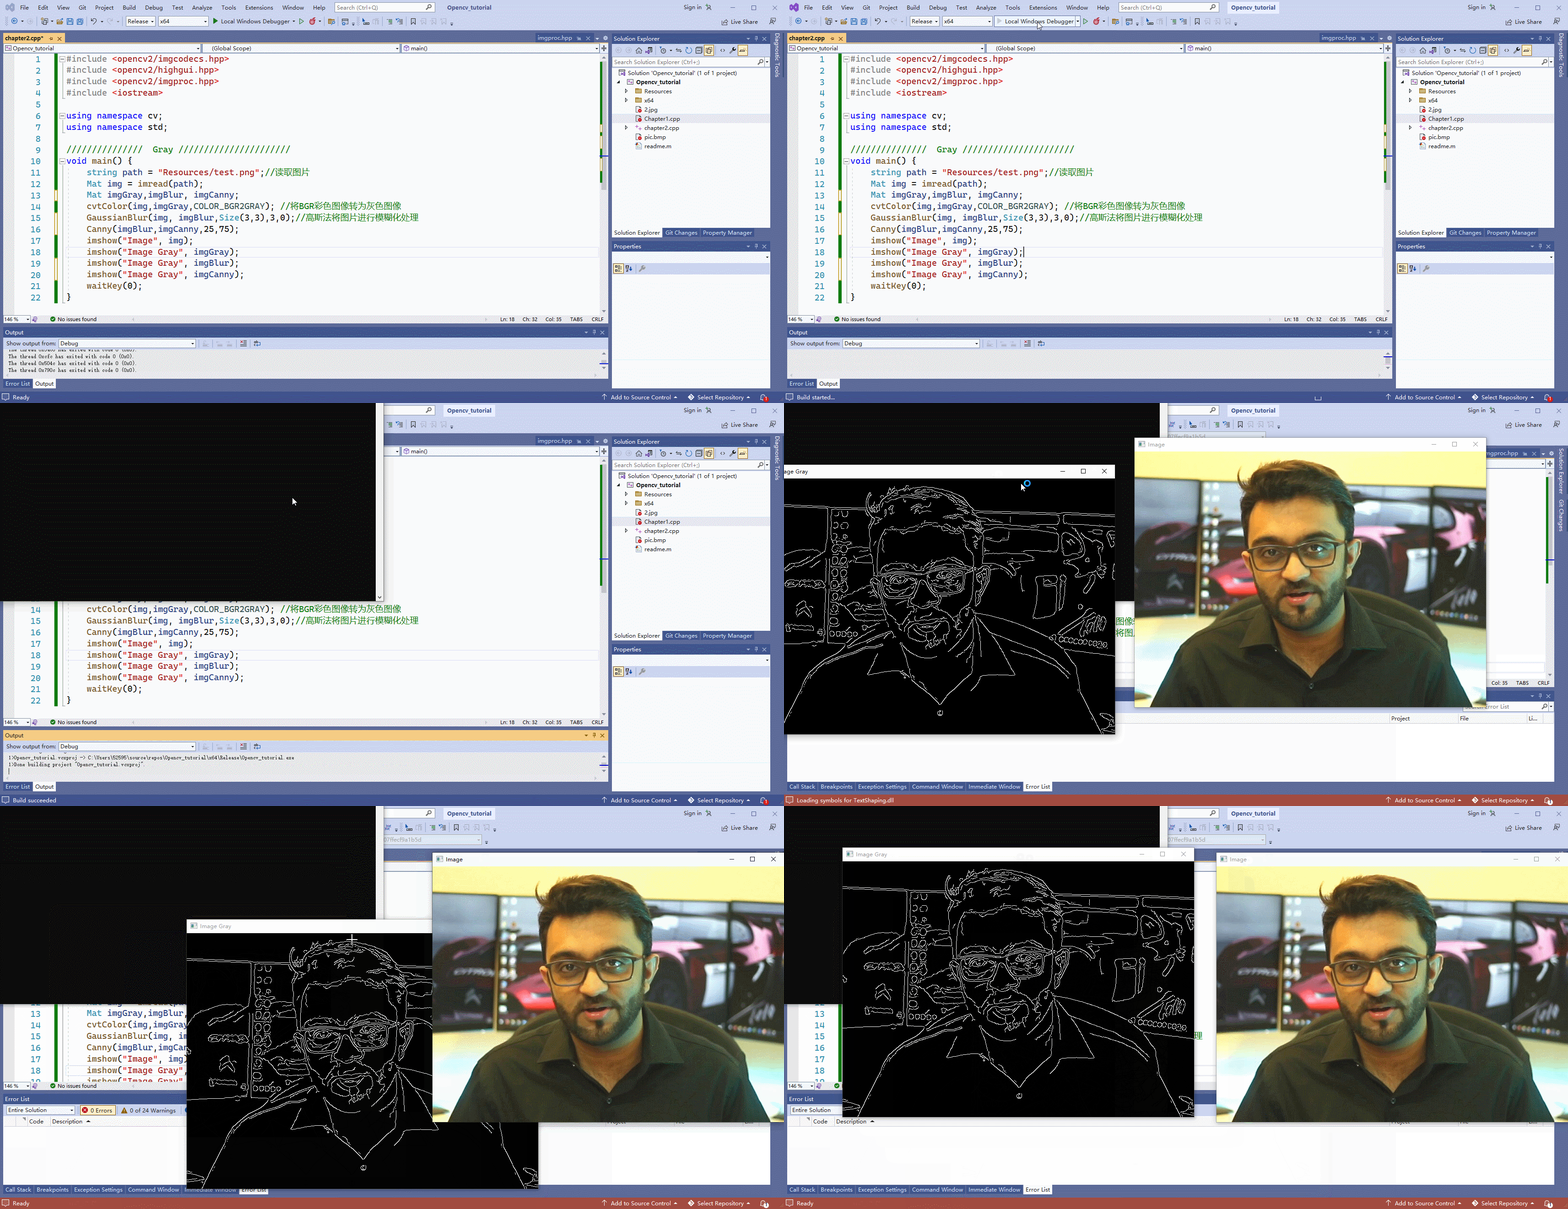
	GaussianBlur(img, imgBlur,Size(3,3),3,0);//高斯法将图片进行模糊化处理
	Canny(imgBlur,imgCanny,25,75);
	imshow("Image", img);
	imshow("Image Gray", imgGray);
	imshow("Image imgBlur", imgBlur);
	imshow("Image imgCanny", imgCanny);
	waitKey(0);
}
2.4 将已经进行边缘检测的图片进行腐蚀或膨胀
#include <opencv2/imgcodecs.hpp>
#include <opencv2/highgui.hpp>
#include <opencv2/imgproc.hpp>
#include <iostream>
using namespace cv;
using namespace std;
///  Dilation & Erode //
void main() {
	string path = "Resources/test.png";//读取图片
	Mat img = imread(path);
	Mat imgGray,imgBlur, imgCanny,imgDil,imgErode;
	cvtColor(img,imgGray,COLOR_BGR2GRAY); //将BGR彩色图像转为灰色图像
	GaussianBlur(img, imgBlur,Size(3,3),3,0);//高斯法将图片进行模糊化处理
	Canny(imgBlur,imgCanny,25,75);
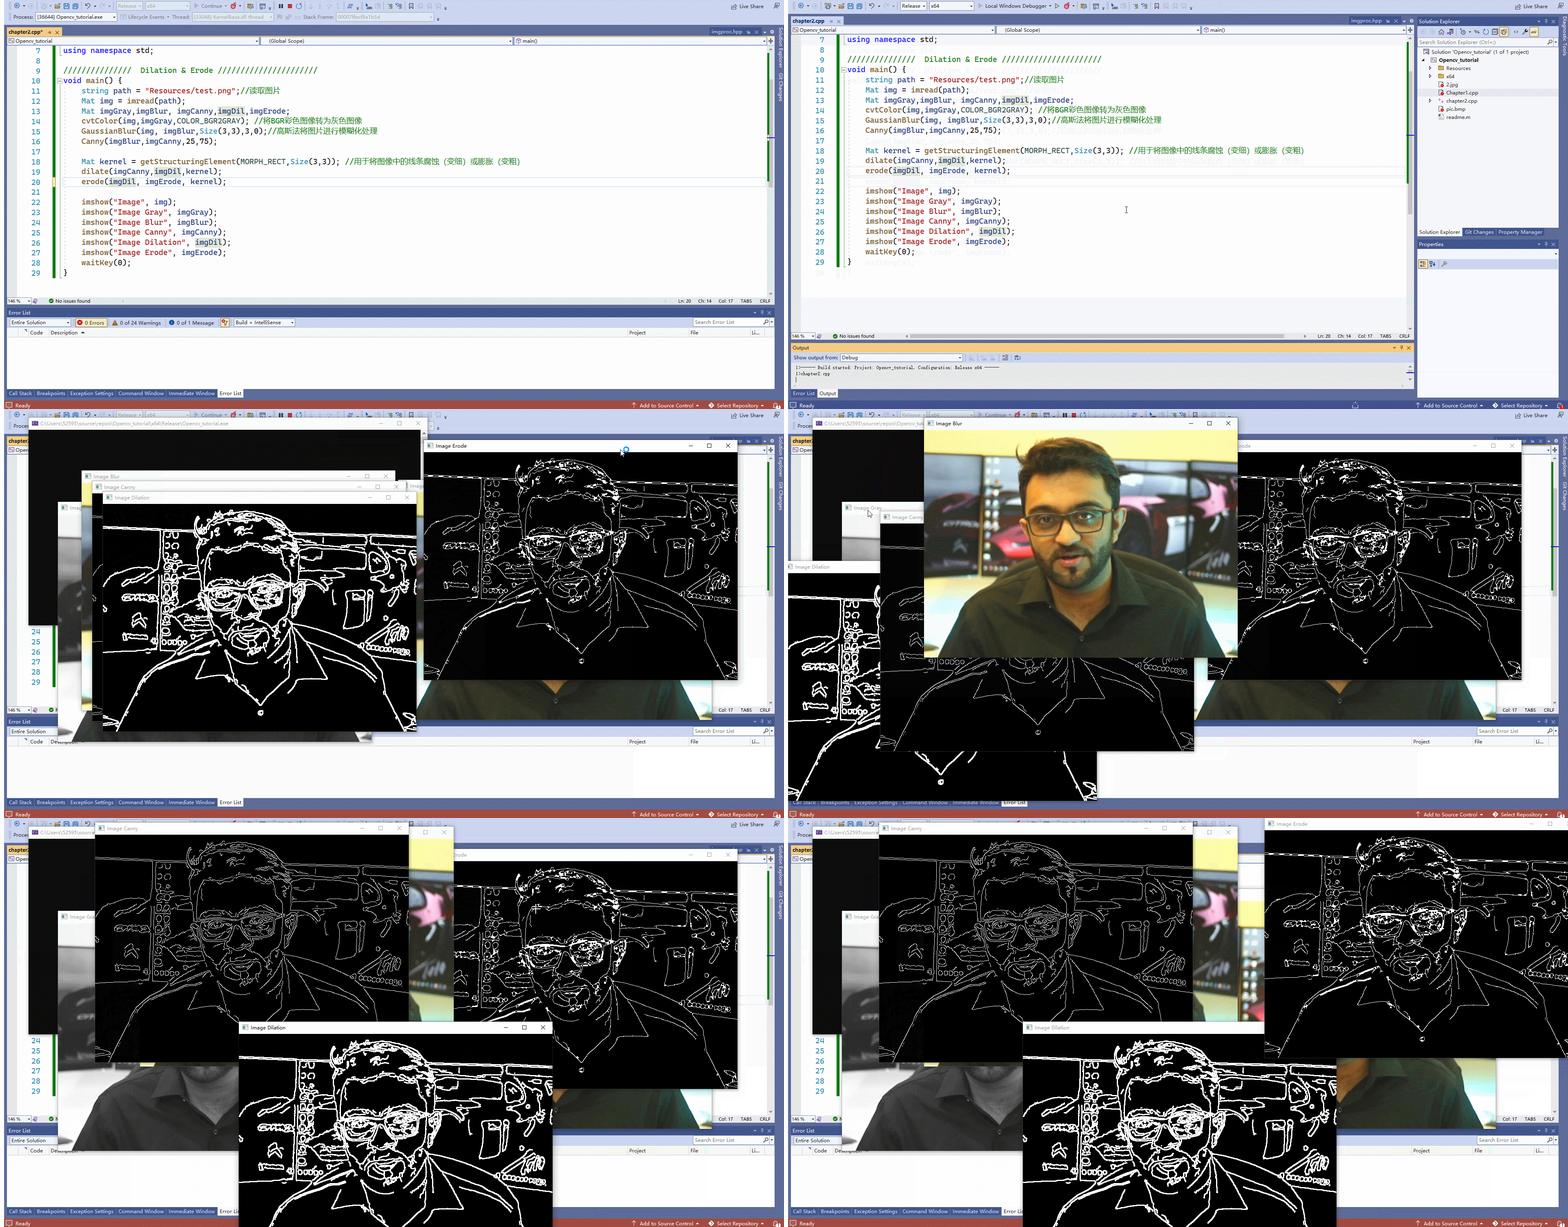
	Mat kernel = getStructuringElement(MORPH_RECT,Size(3,3)); //用于将图像中的线条腐蚀(变细)或膨胀(变粗)
	dilate(imgCanny,imgDil,kernel);
	erode(imgDil, imgErode, kernel);
	imshow("Image", img);
	imshow("Image Gray", imgGray);
	imshow("Image Blur", imgBlur);
	imshow("Image Canny", imgCanny);
	imshow("Image Dilation", imgDil);
	imshow("Image Erode", imgErode);
	waitKey(0);
}
第三章-调整大小和裁剪
Chapter 3 – Resize and Crop
这里再演示一下新建chapter3.cpp程序,将chapter2.cpp程序 exclude。
3.1 将图片调整大小、裁剪
#include <opencv2/imgcodecs.hpp>
#include <opencv2/highgui.hpp>
#include <opencv2/imgproc.hpp>
#include <iostream>
using namespace cv;
using namespace std;
///  Resize and Crop //

void main() {
	string path = "Resources/test.png";
	Mat img = imread(path);
	Mat imgResize, imgCrop;
	//cout << img.size() << endl; //打印出图片的大小  768X559
	resize(img, imgResize, Size(), 0.5, 0.5);//缩放
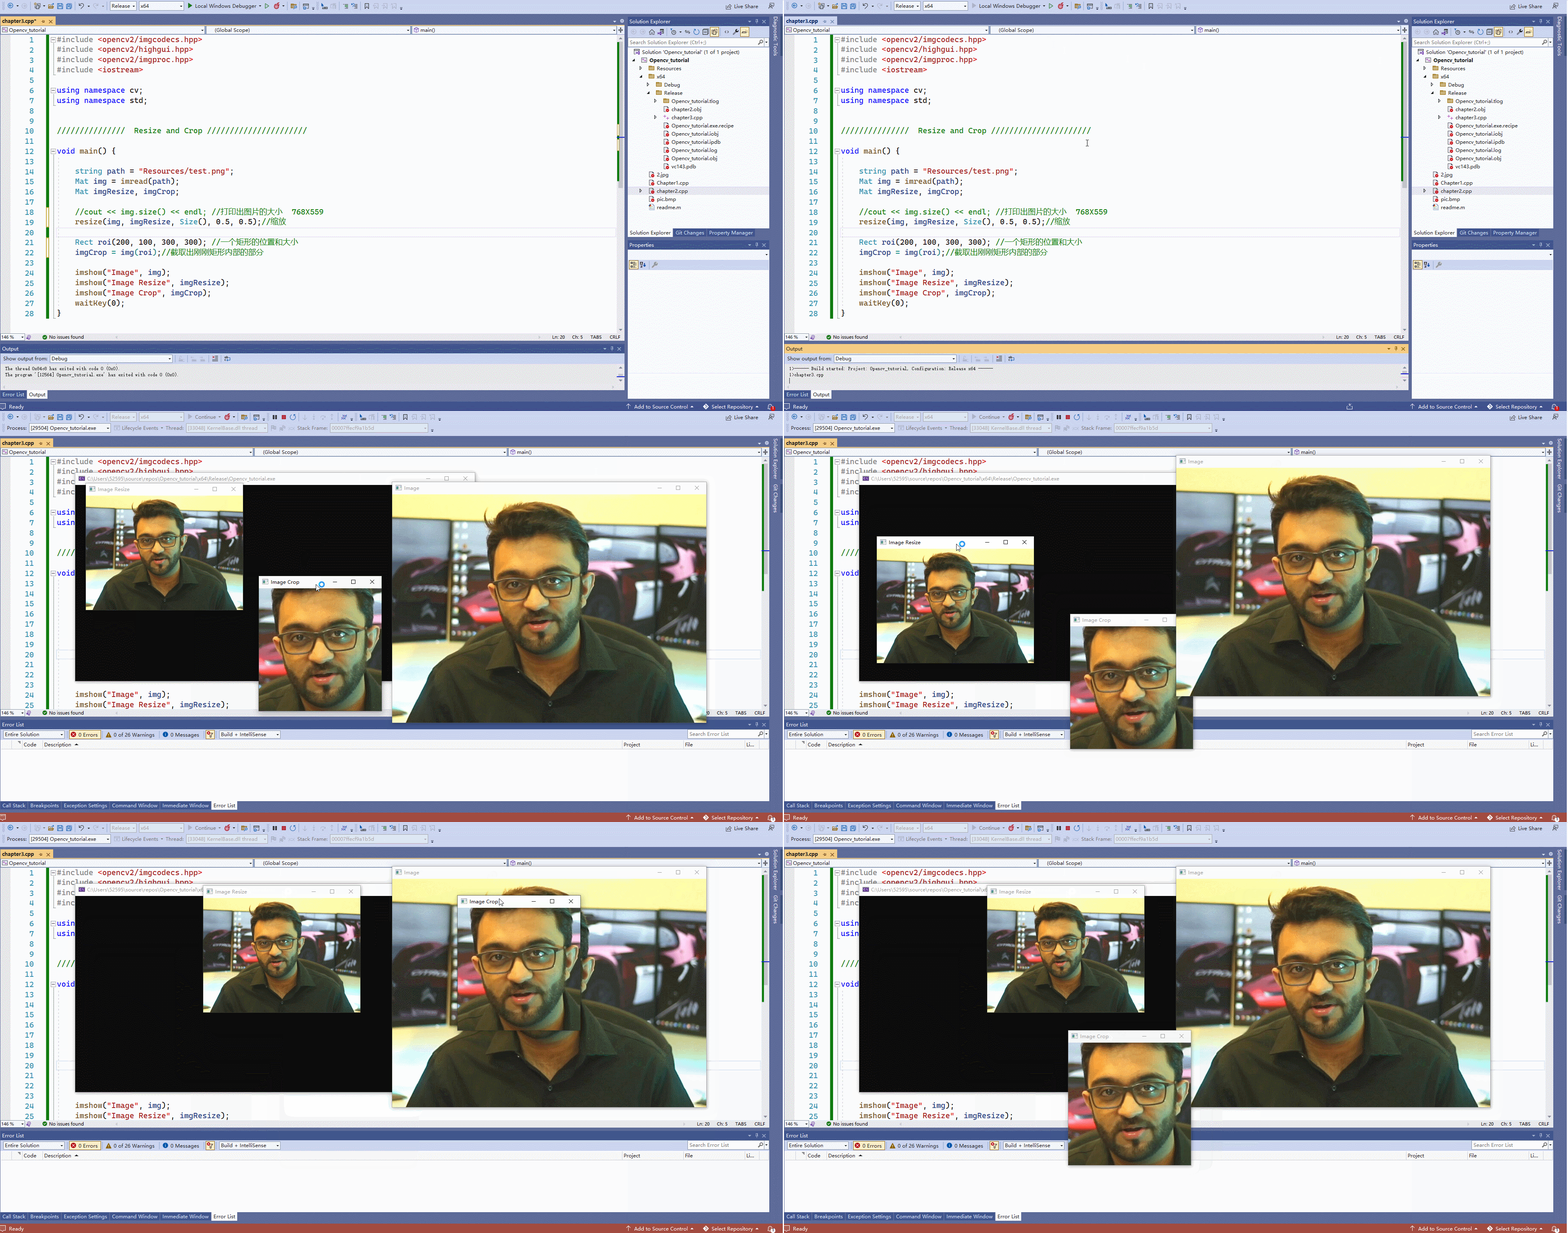
	Rect roi(200, 100, 300, 300); //一个矩形的位置和大小
	imgCrop = img(roi);//截取出刚刚矩形内部的部分
	imshow("Image", img);
	imshow("Image Resize", imgResize);
	imshow("Image Crop", imgCrop);
	waitKey(0);
}
第四章-绘制形状和文本
Chapter 4 – Draw Shapes and Text
这里再演示一下新建chapter4.cpp程序,将chapter3.cpp程序 exclude。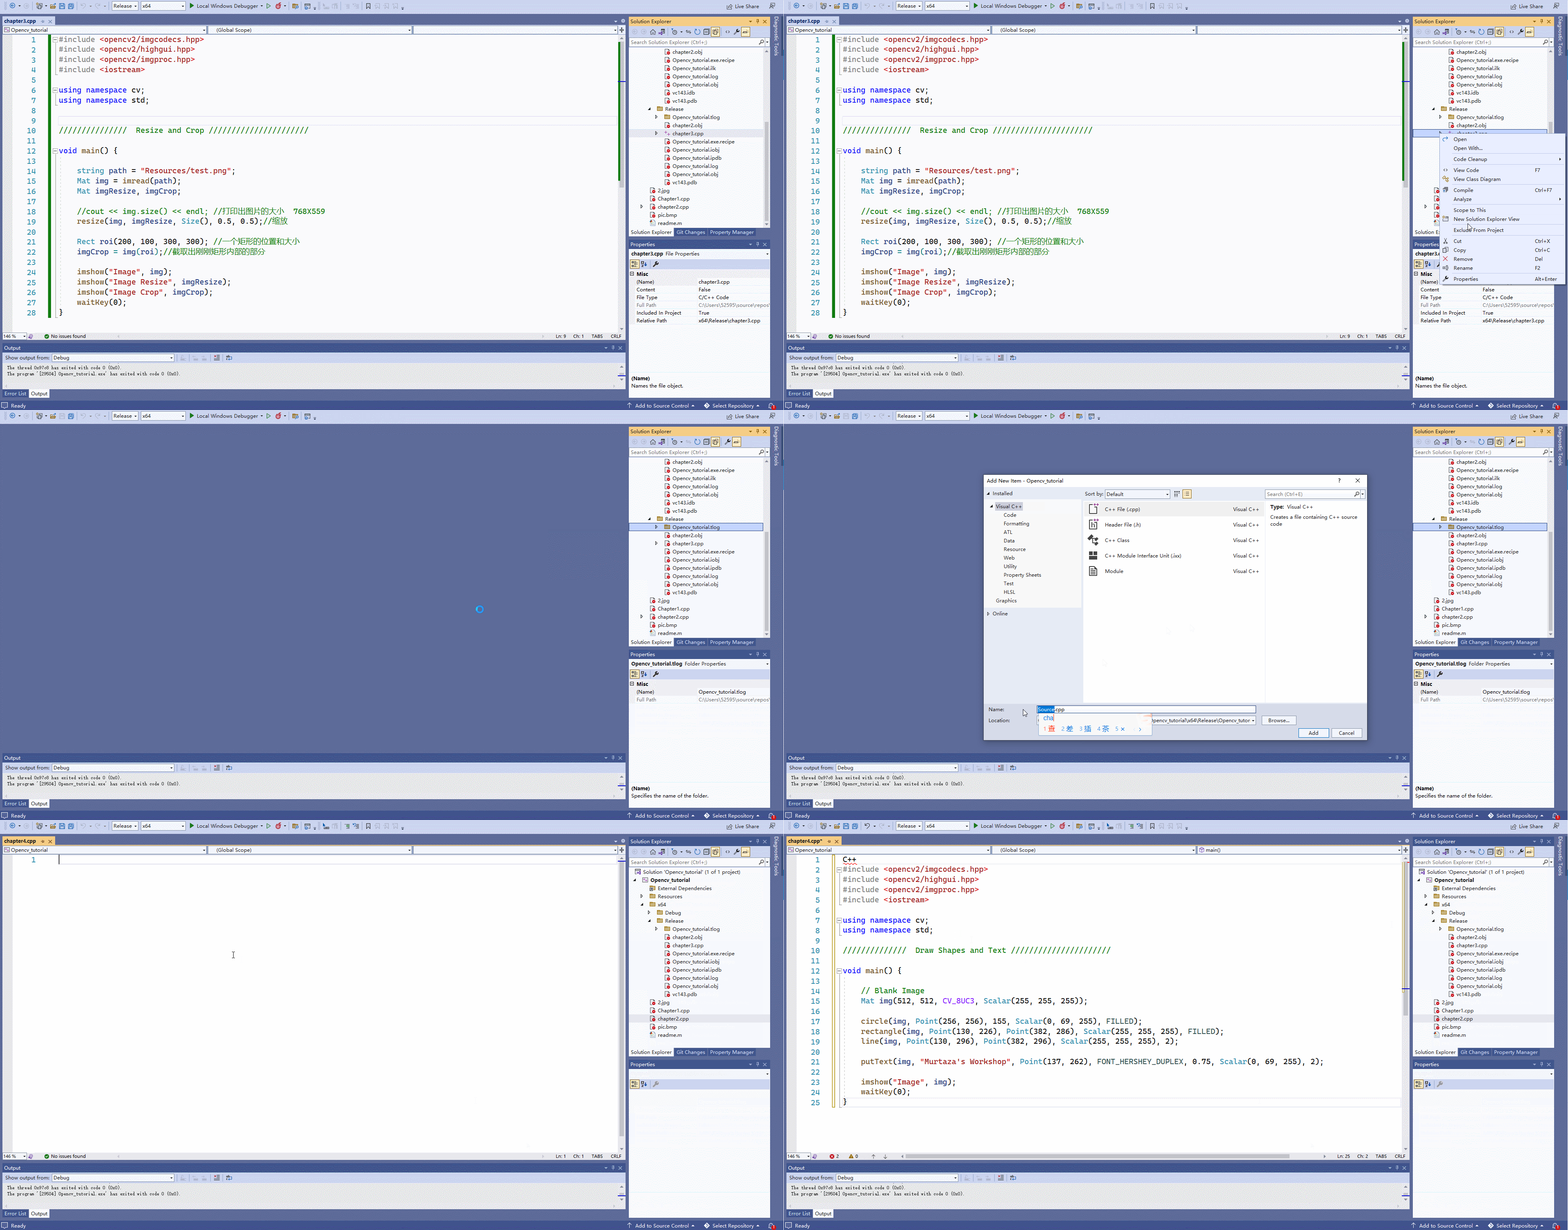
4.1 在图片中绘制形状和写入文字
#include <opencv2/imgcodecs.hpp>
#include <opencv2/highgui.hpp>
#include <opencv2/imgproc.hpp>
#include <iostream>
using namespace cv;
using namespace std;
//  Draw Shapes and Text //
void main() {
	// Blank Image
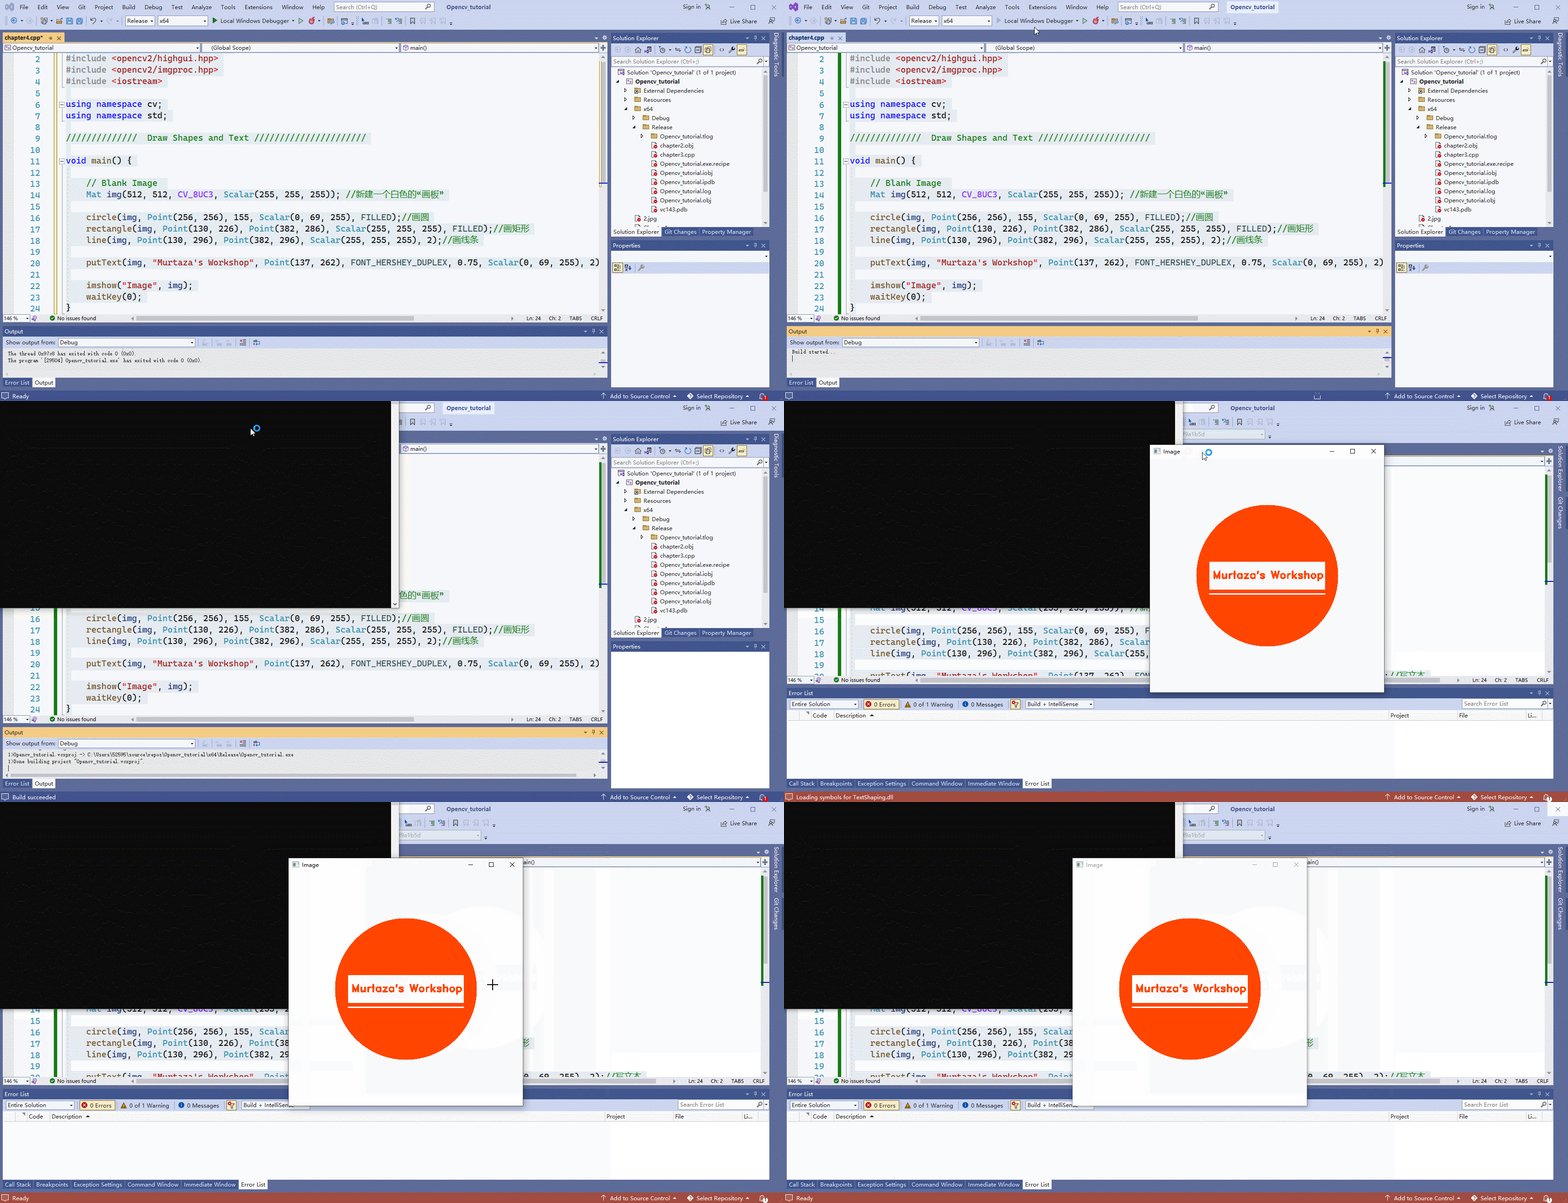
	Mat img(512, 512, CV_8UC3, Scalar(255, 255, 255)); //新建一个白色的“画板”
	circle(img, Point(256, 256), 155, Scalar(0, 69, 255), FILLED);//画圆
	rectangle(img, Point(130, 226), Point(382, 286), Scalar(255, 255, 255), FILLED);//画矩形
	line(img, Point(130, 296), Point(382, 296), Scalar(255, 255, 255), 2);//画线条
	putText(img, "Murtaza's Workshop", Point(137, 262), FONT_HERSHEY_DUPLEX, 0.75, Scalar(0, 69, 255), 2);//写文本

	imshow("Image", img);
	waitKey(0);
}
第五章-将图像进行变形操作
Chapter 5 – Warp Images
5.1 将图片转为灰度图
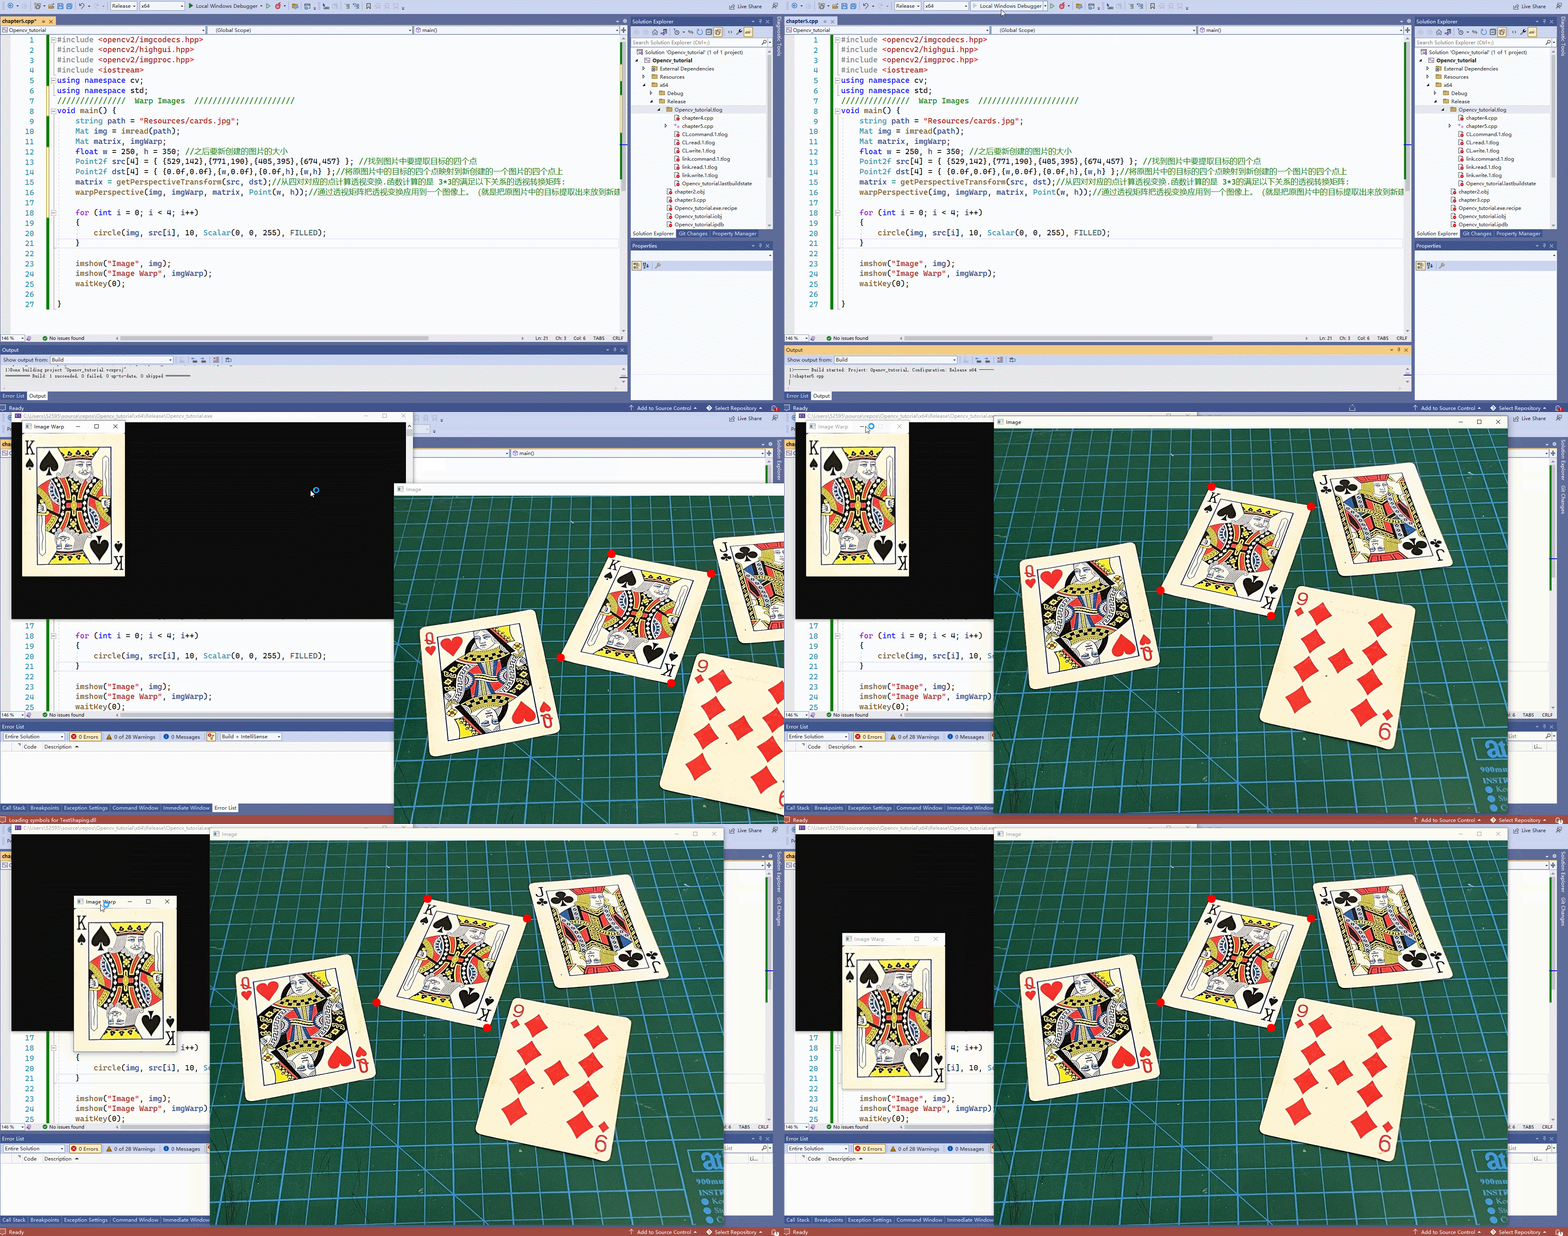
右键图片,选择其他方式打开-选择画图,然后可以获得图片中不同物体在图片中的坐标(截的动图有点绿…)
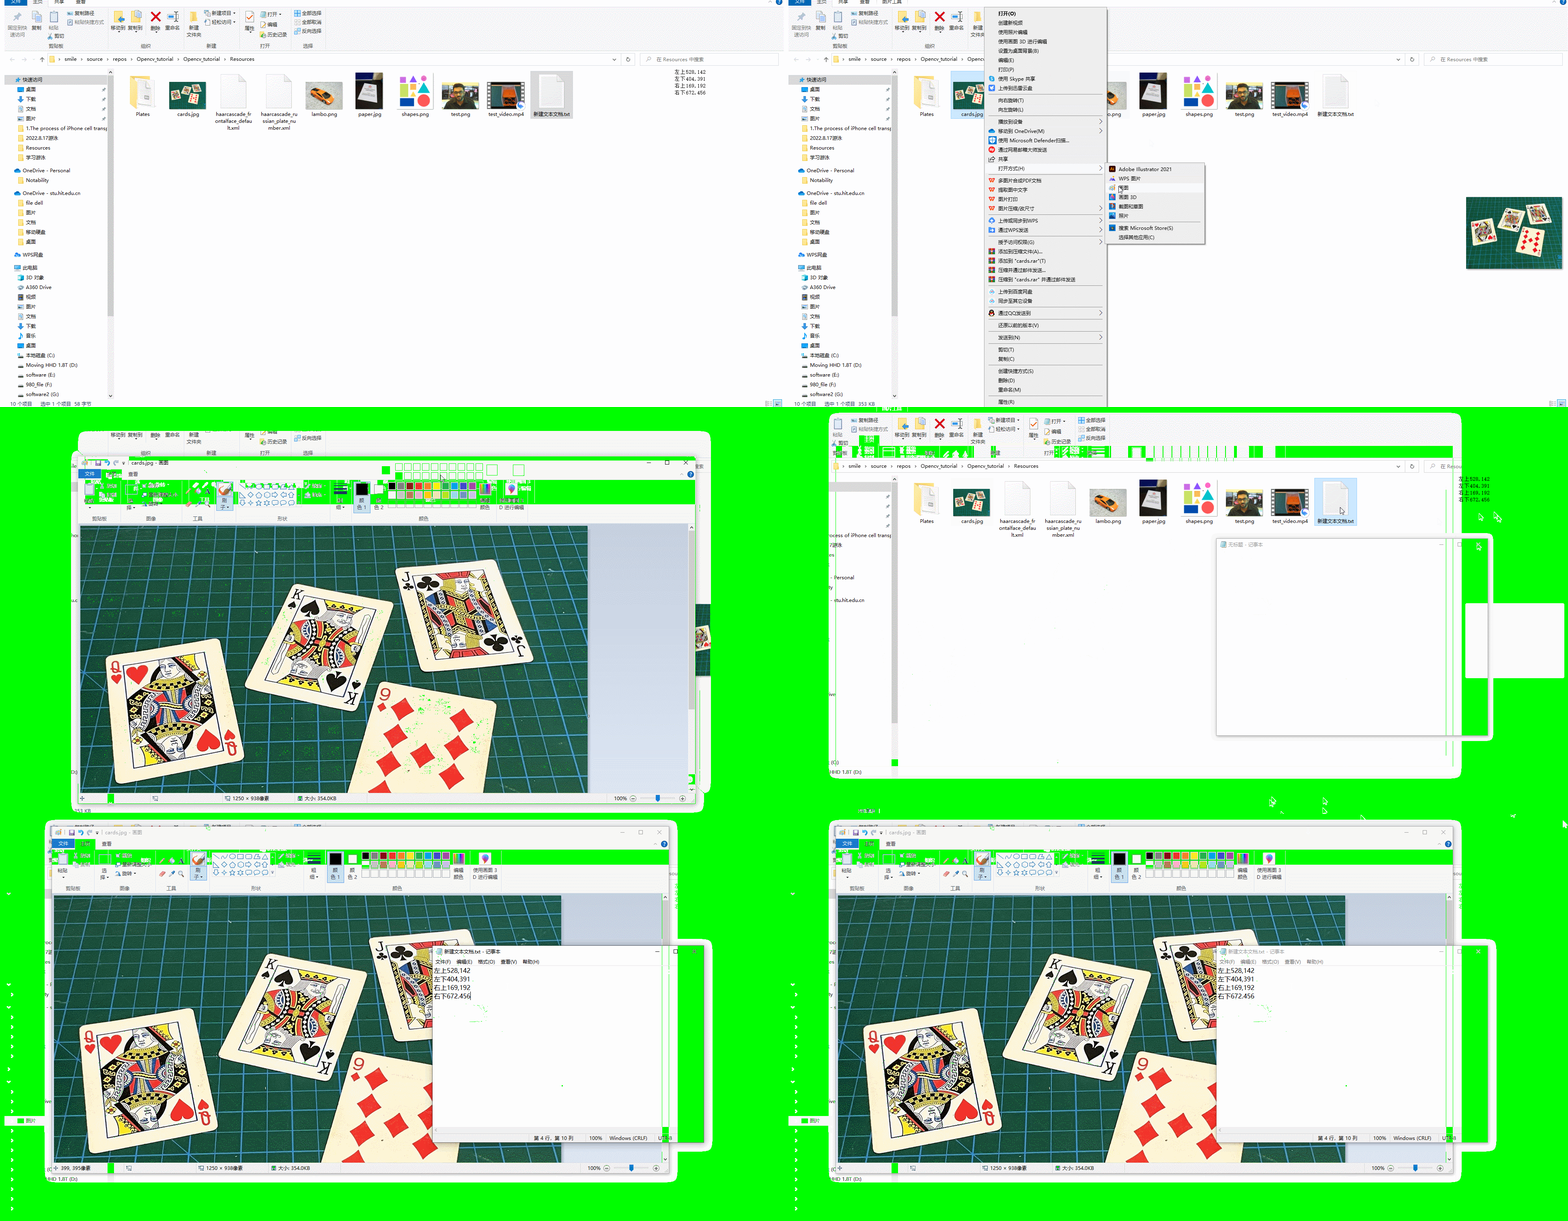
左上528,142
左下404,391
右上169,192
右下672.456
#include <opencv2/imgcodecs.hpp>
#include <opencv2/highgui.hpp>
#include <opencv2/imgproc.hpp>
#include <iostream>
using namespace cv;
using namespace std;
///  Warp Images  //
void main() {
	string path = "Resources/cards.jpg";
	Mat img = imread(path);
	Mat matrix, imgWarp;
	float w = 250, h = 350; //之后要新创建的图片的大小
	Point2f src[4] = { {529,142},{771,190},{405,395},{674,457} }; //找到图片中要提取目标的四个点
	Point2f dst[4] = { {0.0f,0.0f},{w,0.0f},{0.0f,h},{w,h} };//将原图片中的目标的四个点映射到新创建的一个图片的四个点上
	matrix = getPerspectiveTransform(src, dst);//从四对对应的点计算透视变换.函数计算的是 3*3的满足以下关系的透视转换矩阵:
	warpPerspective(img, imgWarp, matrix, Point(w, h));//通过透视矩阵把透视变换应用到一个图像上。(就是把原图片中的目标提取出来放到新建的图片中)
	for (int i = 0; i < 4; i++)
	{
		circle(img, src[i], 10, Scalar(0, 0, 255), FILLED);//将原图片上要提取目标的四个点圈起来
	}
	imshow("Image", img);
	imshow("Image Warp", imgWarp);
	waitKey(0);

}
实验效果:
第六章-颜色检测
Chapter 6 – Color Detection
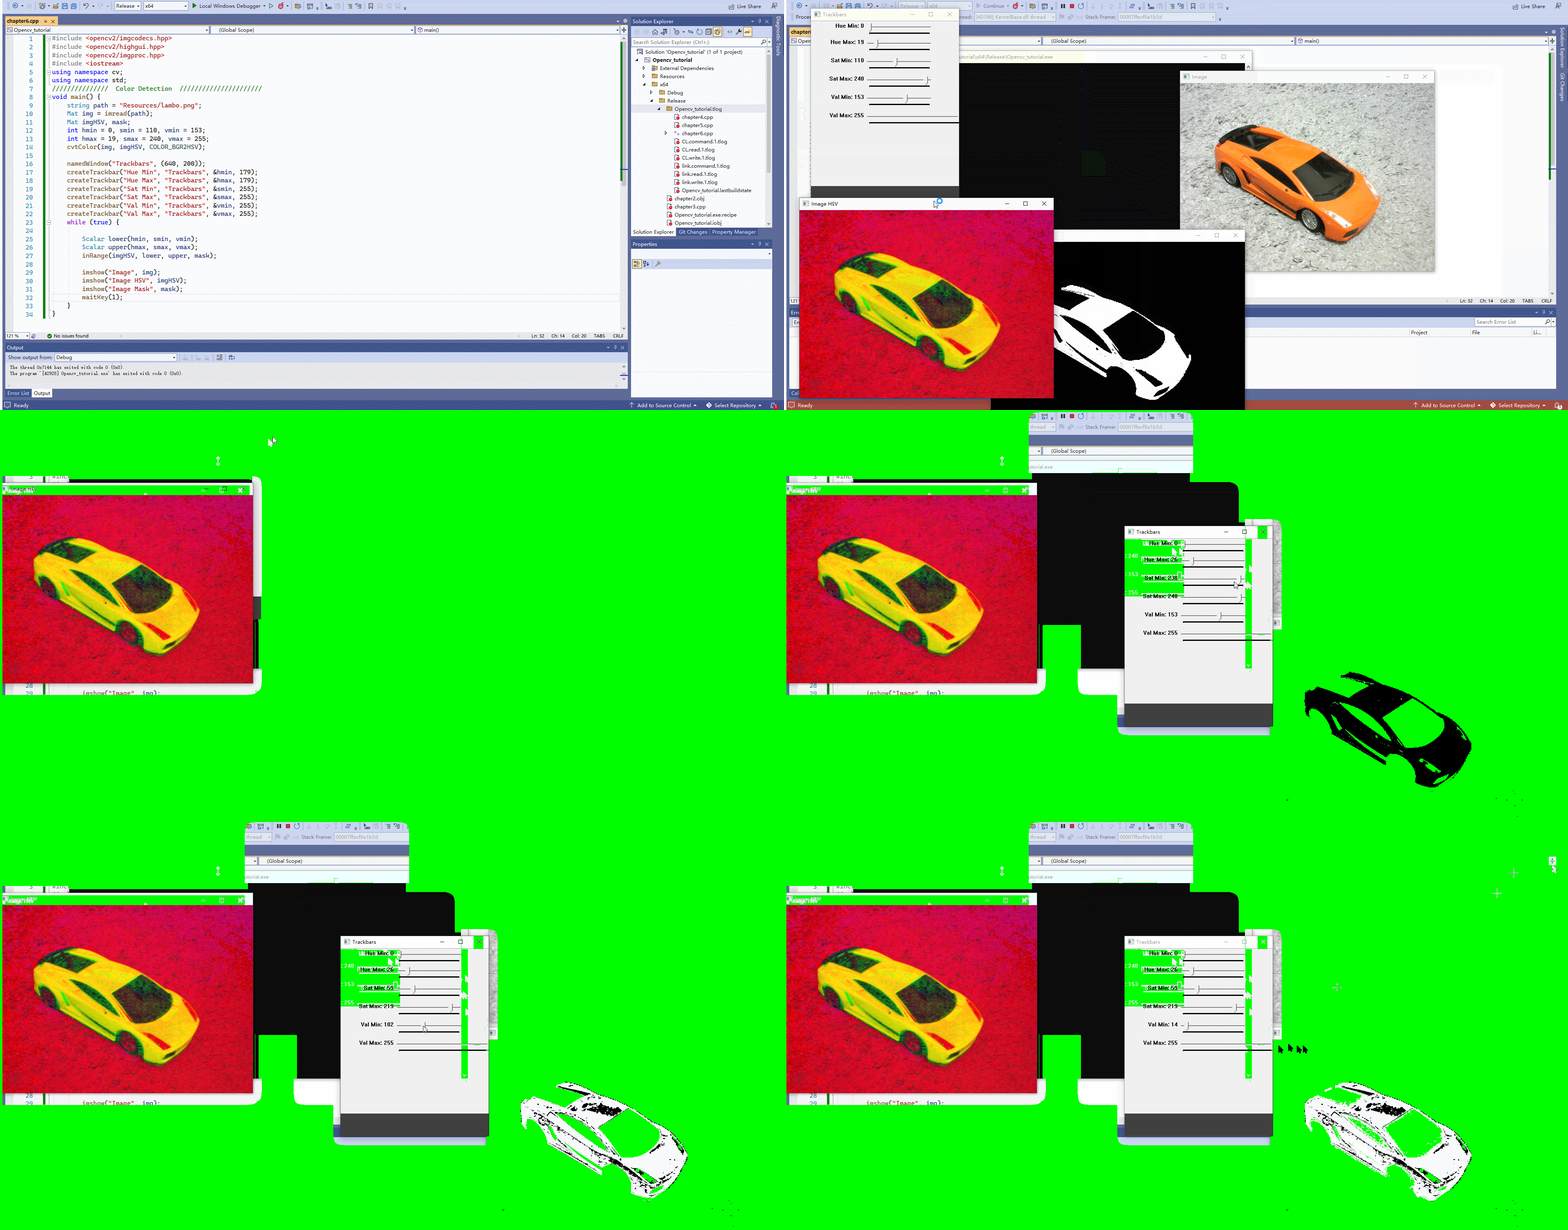
6.1 颜色检测
#include <opencv2/imgcodecs.hpp>
#include <opencv2/highgui.hpp>
#include <opencv2/imgproc.hpp>
#include <iostream>
using namespace cv;
using namespace std;
///  Color Detection  //
void main() {
	string path = "Resources/lambo.png";//可以把图片换成shapes.png用于颜色区分检测
	Mat img = imread(path);
	Mat imgHSV, mask;
	int hmin = 0, smin = 110, vmin = 153; //为了寻找到检测颜色的区间
	int hmax = 19, smax = 240, vmax = 255;
	cvtColor(img, imgHSV, COLOR_BGR2HSV);//将图片转化为HSV格式,便于检测颜色
	namedWindow("Trackbars", (640, 200));//创建一个名为"Trackbars"的窗口
	createTrackbar("Hue Min", "Trackbars", &hmin, 179);//在"Trackbars"窗口中创建一个名为"Hue Min"的拖条,其值变化区间为(hmin, 179)(hmin最初为0);
	createTrackbar("Hue Max", "Trackbars", &hmax, 179);
	createTrackbar("Sat Min", "Trackbars", &smin, 255);
	createTrackbar("Sat Max", "Trackbars", &smax, 255);
	createTrackbar("Val Min", "Trackbars", &vmin, 255);
	createTrackbar("Val Max", "Trackbars", &vmax, 255);
	while (true) {
		Scalar lower(hmin, smin, vmin);
		Scalar upper(hmax, smax, vmax);
		inRange(imgHSV, lower, upper, mask);//基于imgHSV进行一定范围的颜色检测,最后生成Image Mask
		imshow("Image", img);
		imshow("Image HSV", imgHSV);
		imshow("Image Mask", mask);
		waitKey(1);
	}
}
第七章-形状/轮廓检测
Chapter 7 – Shape/Contour Detection
7.1 形状/轮廓检测
#include <opencv2/imgcodecs.hpp>
#include <opencv2/highgui.hpp>
#include <opencv2/imgproc.hpp>
#include <iostream>

using namespace cv;
using namespace std;

///  Color Detection  //

void getContours(Mat imgDil, Mat img) {

	vector<vector<Point>> contours;
	vector<Vec4i> hierarchy;

	findContours(imgDil, contours, hierarchy, RETR_EXTERNAL, CHAIN_APPROX_SIMPLE);
	//drawContours(img, contours, -1, Scalar(255, 0, 255), 2);

	vector<vector<Point>> conPoly(contours.size());
	vector<Rect> boundRect(contours.size());

	for (int i = 0; i < contours.size(); i++) //最核心的地方其实是检测出图形的边缘,然后根据边缘角度变化(例如三角形有三条边),矩形有四条边等对检测到的图形进行分类
	{
		int area = contourArea(contours[i]);
		cout << area << endl;
		string objectType;

		if (area > 1000)
		{
			float peri = arcLength(contours[i], true);
			approxPolyDP(contours[i], conPoly[i], 0.02 * peri, true);
			cout << conPoly[i].size() << endl;
			boundRect[i] = boundingRect(conPoly[i]);

			int objCor = (int)conPoly[i].size();

			if (objCor == 3) { objectType = "Tri"; }
			else if (objCor == 4)
			{
				float aspRatio = (float)boundRect[i].width / (float)boundRect[i].height;
				cout << aspRatio << endl;
				if (aspRatio > 0.95 && aspRatio < 1.05) { objectType = "Square"; }
				else { objectType = "Rect"; }
			}
			else if (objCor > 4) { objectType = "Circle"; }

			drawContours(img, conPoly, i, Scalar(255, 0, 255), 2);
			rectangle(img, boundRect[i].tl(), boundRect[i].br(), Scalar(0, 255, 0), 5);
			putText(img, objectType, { boundRect[i].x,boundRect[i].y - 5 }, FONT_HERSHEY_PLAIN, 1, Scalar(0, 69, 255), 2);
		}
	}
}


void main() {

	string path = "Resources/shapes.png";
	Mat img = imread(path);
	Mat imgGray, imgBlur, imgCanny, imgDil, imgErode;

	// Preprocessing
	cvtColor(img, imgGray, COLOR_BGR2GRAY);
	GaussianBlur(imgGray, imgBlur, Size(3, 3), 3, 0);
	Canny(imgBlur, imgCanny, 25, 75);
	Mat kernel = getStructuringElement(MORPH_RECT, Size(3, 3));
	dilate(imgCanny, imgDil, kernel);

	getContours(imgDil, img);

	imshow("Image", img);
	//imshow("Image Gray", imgGray);
	//imshow("Image Blur", imgBlur);
	//imshow("Image Canny", imgCanny);
	//imshow("Image Dil", imgDil);

	waitKey(0);

}
过程演示(不知道为啥拖动窗口就出现绿色了…)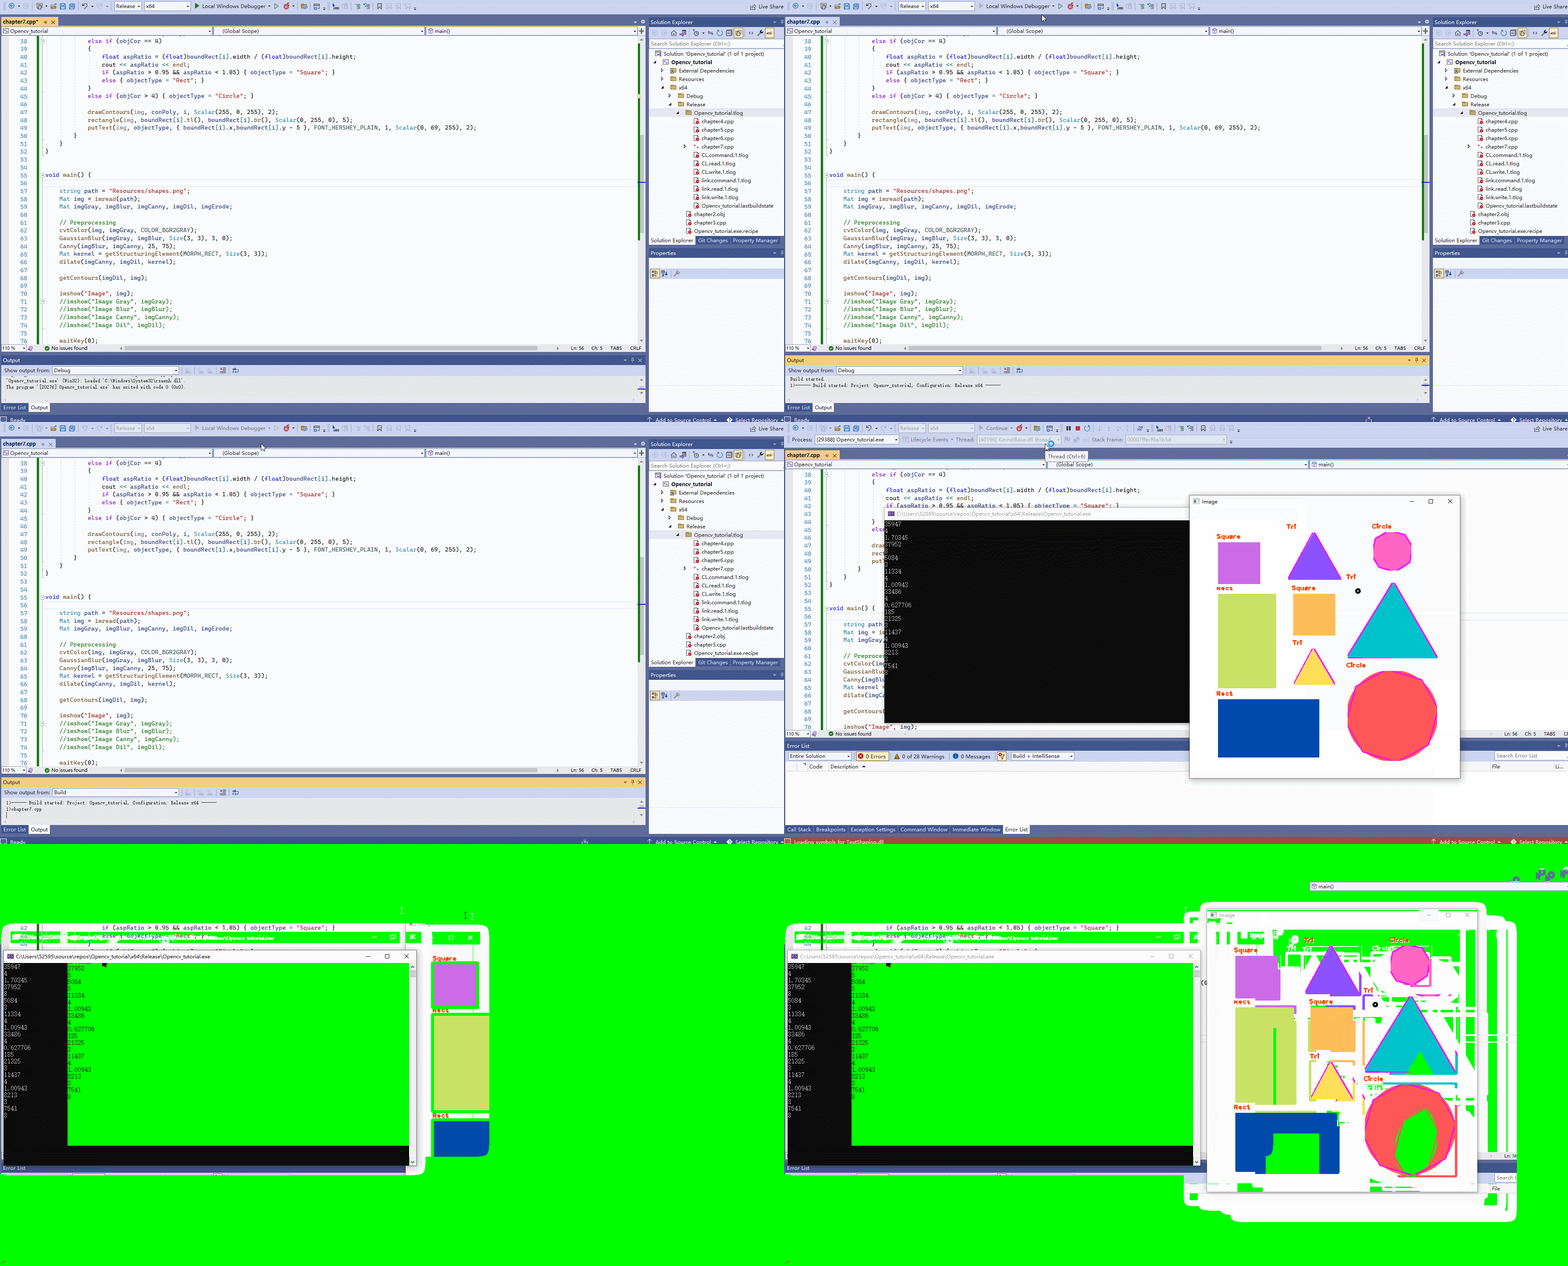
第八章-人脸识别
Chapter 8 – Face Detection
#include <opencv2/imgcodecs.hpp>
#include <opencv2/highgui.hpp>
#include <opencv2/imgproc.hpp>
#include <opencv2/objdetect.hpp>//用于检测的包
#include <iostream>

using namespace cv;
using namespace std;


///  Images  //

void main() {

	string path = "Resources/test.png";
	Mat img = imread(path);

	CascadeClassifier faceCascade;
	faceCascade.load("Resources/haarcascade_frontalface_default.xml");//这个是已经训练过的分类器的包

	if (faceCascade.empty()) { cout << "XML file not loaded" << endl; }

	vector<Rect> faces;//用于圈脸的矩形
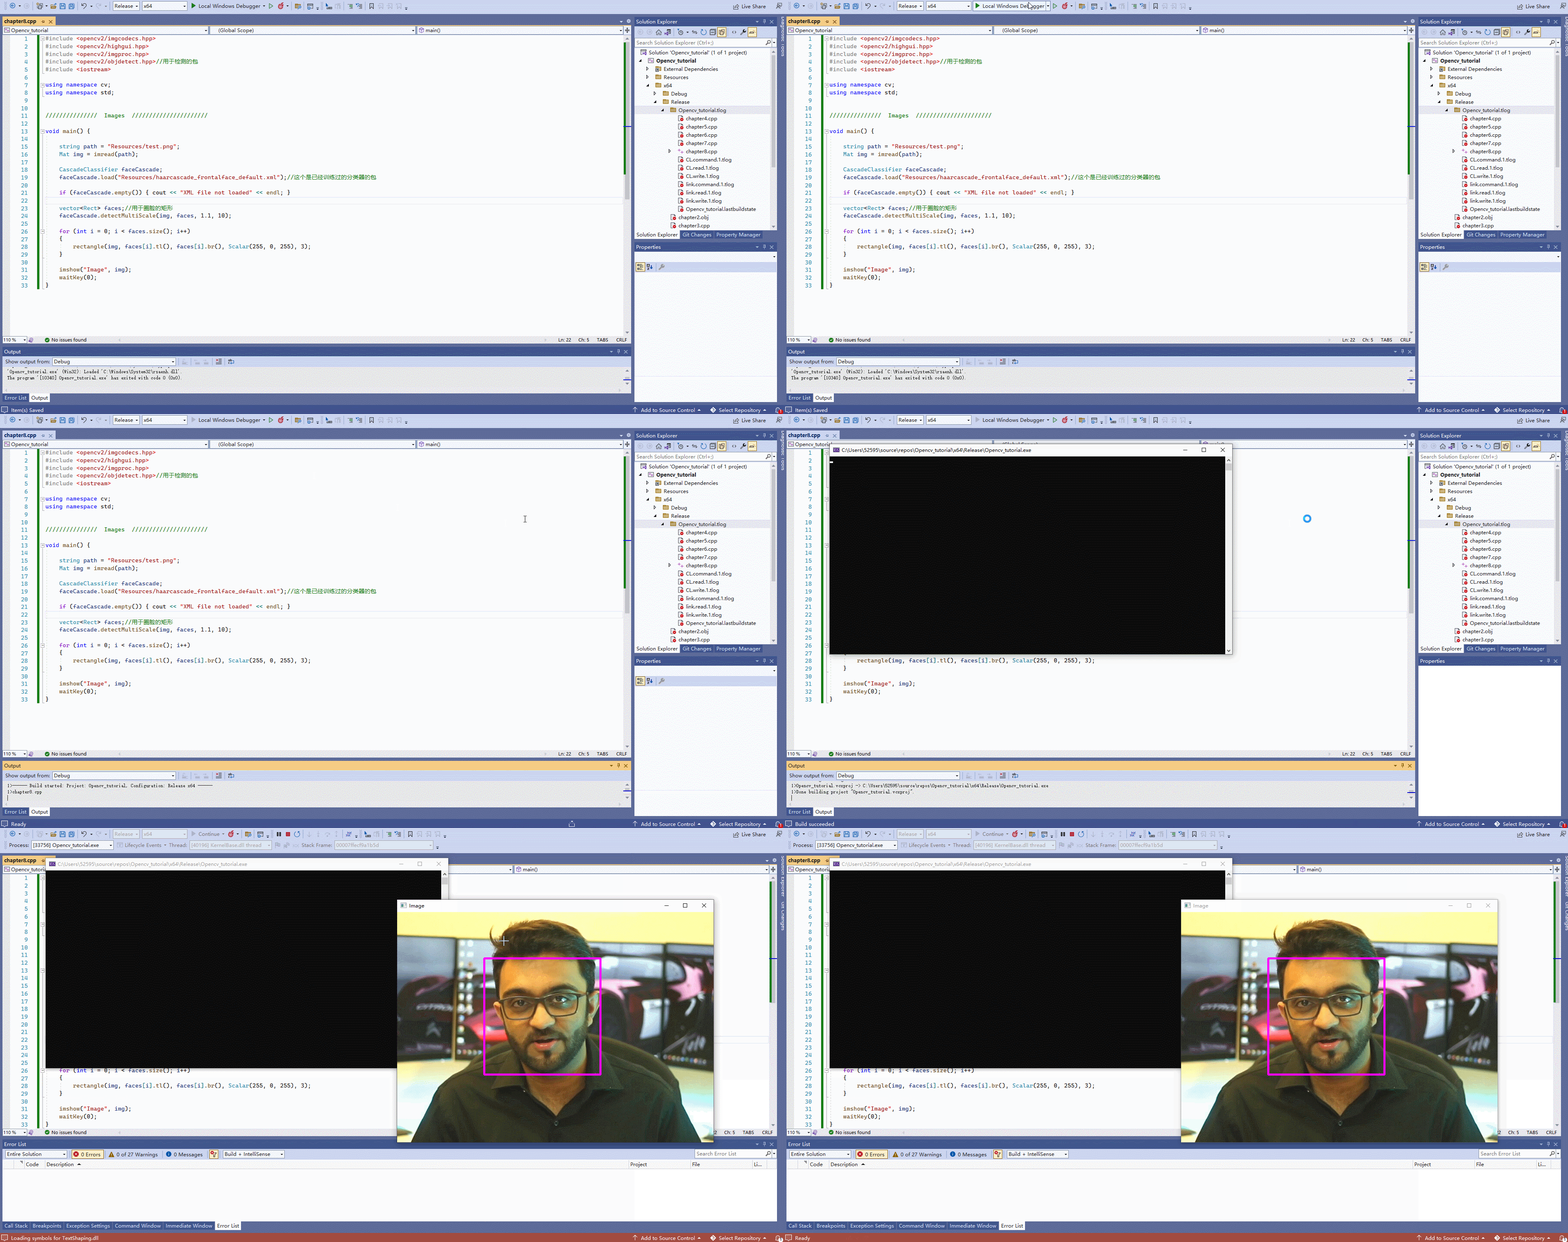
	faceCascade.detectMultiScale(img, faces, 1.1, 10);

	for (int i = 0; i < faces.size(); i++)
	{
		rectangle(img, faces[i].tl(), faces[i].br(), Scalar(255, 0, 255), 3);
	}

	imshow("Image", img);
	waitKey(0);
}
小项目
1. 虚拟画家
Project 1 – Virtual Paint
#include <opencv2/imgcodecs.hpp>
#include <opencv2/highgui.hpp>
#include <opencv2/imgproc.hpp>
#include <iostream>

using namespace cv;
using namespace std;


/  Project 1 - Virtual Painter //

Mat img;
VideoCapture cap(0);
vector<vector<int>> newPoints;  // to store all points

/  COLOR VALUES
						   // hmin, smin, vmin hmax, smax, vmax
vector<vector<int>> myColors{ {124,48,117,143,170,255}, // Purple
								{68,72,156,102,126,255} };// Green
vector<Scalar> myColorValues{ {255,0,255},		// Purple
								{0,255,0} };// Green


Point getContours(Mat image) {


	vector<vector<Point>> contours;
	vector<Vec4i> hierarchy;

	findContours(image, contours, hierarchy, RETR_EXTERNAL, CHAIN_APPROX_SIMPLE);
	//drawContours(img, contours, -1, Scalar(255, 0, 255), 2);
	vector<vector<Point>> conPoly(contours.size());
	vector<Rect> boundRect(contours.size());

	Point myPoint(0, 0);

	for (int i = 0; i < contours.size(); i++)
	{
		int area = contourArea(contours[i]);
		cout << area << endl;

		string objectType;

		if (area > 1000)
		{
			float peri = arcLength(contours[i], true);
			approxPolyDP(contours[i], conPoly[i], 0.02 * peri, true);

			cout << conPoly[i].size() << endl;
			boundRect[i] = boundingRect(conPoly[i]);
			myPoint.x = boundRect[i].x + boundRect[i].width / 2;
			myPoint.y = boundRect[i].y;

			//drawContours(img, conPoly, i, Scalar(255, 0, 255), 2);
			//rectangle(img, boundRect[i].tl(), boundRect[i].br(), Scalar(0, 255, 0), 5);
		}
	}
	return myPoint;
}


vector<vector<int>> findColor(Mat img)
{
	Mat imgHSV;
	cvtColor(img, imgHSV, COLOR_BGR2HSV);

	for (int i = 0; i < myColors.size(); i++)
	{
		Scalar lower(myColors[i][0], myColors[i][1], myColors[i][2]);
		Scalar upper(myColors[i][3], myColors[i][4], myColors[i][5]);
		Mat mask;
		inRange(imgHSV, lower, upper, mask);
		//imshow(to_string(i), mask);
		Point myPoint = getContours(mask);
		if (myPoint.x != 0 ) {
			newPoints.push_back({ myPoint.x,myPoint.y,i });
		}
	}
	return newPoints;
}

void drawOnCanvas(vector<vector<int>> newPoints, vector<Scalar> myColorValues)
{

	for (int i = 0; i < newPoints.size(); i++)
	{
		circle(img, Point(newPoints[i][0],newPoints[i][1]), 10, myColorValues[newPoints[i][2]], FILLED);
	}
}


void main() {

	while (true) {

		cap.read(img);
		newPoints = findColor(img);
		drawOnCanvas(newPoints, myColorValues);

		imshow("Image", img);
		waitKey(1);
	}
}
2. 文档扫描仪
Project 2 – Document Scanner
3. 虚拟画家
Project 1 – Virtual Paint







![[附源码]Python计算机毕业设计SSM家居购物系统(程序+LW)](https://img-blog.csdnimg.cn/a1b5507bcc9a41a4986b1c9725f6d727.png)


![[附源码]Python计算机毕业设计Django养生药膳推荐系统](https://img-blog.csdnimg.cn/a2b0c8501174488ebfcc229deb229005.png)