一 简介
1.1 弹框即浮与页面之上的窗口,如键盘弹框,吐司弹框,确认弹框,下拉选择框,应用悬浮框等
1.2 弹框控件也很多,比如常用的Spinner,Dialog,Toast,PopWindow等,以及新增的SnackBar,DialogFragment等。
二 Spinner下拉选择使用
2.1 Spinner根Listview,Gridview等是同一时代的产物,所以用法也根它们差不多,主要用到BaseAdapter来加载数据源
2.2 用系统提供的Adapter,使用简单,但样式固定,数据模型固定,只能是String类型。
效果图
布局文件,添加Spinner控件
<FrameLayout
	android:layout_width="wrap_content"
	android:layout_height="wrap_content"
	android:layout_gravity="center_horizontal"
	android:layout_marginTop="40dp"
	android:background="#eeeeee">

	<Spinner
		android:id="@+id/spinner"
		android:layout_width="wrap_content"
		android:layout_height="wrap_content" />
</FrameLayout>
java文件设置数据源和是配置
private void initSystemAdapter(){
        //设置数据源
        List<String> list = new ArrayList<String>();
        list.add("苹果");
        list.add("香蕉");
        list.add("橘子");
        list.add("香蕉");
        //设置系统适配器
        ArrayAdapter<String> adapter=new ArrayAdapter<String>(this, android.R.layout.simple_spinner_item,list);
        adapter.setDropDownViewResource(android.R.layout.simple_spinner_dropdown_item);
        spinner.setAdapter(adapter);
        //设置弹出偏移位置
        spinner.setDropDownVerticalOffset(40);
        //点击监听
        spinner.setOnItemClickListener(new AdapterView.OnItemClickListener() {
            @Override
            public void onItemClick(AdapterView<?> parent, View view, int position, long id) {
                Toast.makeText(SpinnerActivity.this, list.get(position), Toast.LENGTH_SHORT).show();
            }
        });
    }
注意:系统Adapter样式固定,有以下几种
simple_spinner_dropdown_item(列表-间距较高比较好看)
simple_spinner_item(列表-间距紧凑不好看)
simple_list_item_checked(复选框-选中的有绿沟)
simple_list_item_single_choice (单选按钮)
2.3 自定义适配器,灵活度高,可以设置任何类型的数据源和样式
效果图
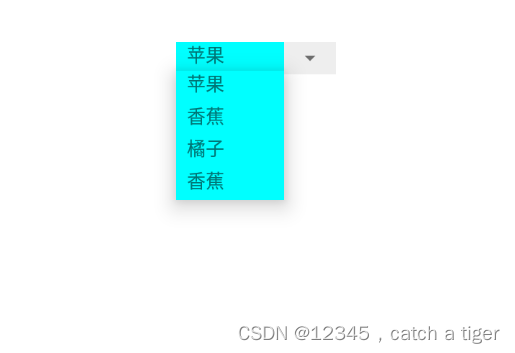
自定义条目布局 item_fruit_list.xml
<?xml version="1.0" encoding="utf-8"?>
<LinearLayout xmlns:android="http://schemas.android.com/apk/res/android"
    android:layout_width="match_parent"
    android:layout_height="wrap_content">

    <TextView
        android:id="@+id/tv_name"
        android:layout_width="100dp"
        android:layout_height="30dp"
        android:background="#00ffff"
        android:paddingLeft="10dp"
        android:paddingRight="10dp"
        android:text="条目"
        android:textSize="15sp" />
</LinearLayout>
自定义数据源 FruitBean.java
public class FruitBean {
    public String name;

    public FruitBean(String name) {
        this.name = name;
    }
}
自定义适配器CustomerAdapter.java
public class CustomerAdapter extends BaseAdapter {
    private Context mContext;
    private List<FruitBean> mList;

    public CustomerAdapter(Context mContext, List<FruitBean> mList) {
        this.mContext = mContext;
        this.mList = mList;
    }

    @Override
    public int getCount() {
        return mList.size();
    }

    @Override
    public Object getItem(int position) {
        return mList.get(position);
    }

    @Override
    public long getItemId(int position) {
        return position;
    }

    @Override
    public View getView(int position, View convertView, ViewGroup parent) {
        ViewHolder holder = null;
        if (convertView == null) {
            holder = new ViewHolder();
            convertView = LayoutInflater.from(mContext).inflate(R.layout.item_fruit_list, null);
            holder.tvName = (TextView) convertView.findViewById(R.id.tv_name);
            convertView.setTag(holder);
        } else {
            holder = (ViewHolder) convertView.getTag();
        }
        holder.tvName.setText(mList.get(position).name);
        return convertView;
    }

    class ViewHolder {
        public TextView tvName;

    }
}
spinner配置自定义适配器
private void initCustomerAdapter(){
	//设置数据源
	List<FruitBean> list = new ArrayList<>();
	list.add(new FruitBean("苹果"));
	list.add(new FruitBean("香蕉"));
	list.add(new FruitBean("橘子"));
	list.add(new FruitBean("香蕉"));
	//设置系统适配器
	CustomerAdapter customerAdapter=new CustomerAdapter(this,list);
	spinner.setAdapter(customerAdapter);
	//设置弹出偏移位置
	spinner.setDropDownVerticalOffset(40);
}
三 Dialog的使用
3.1 Dialog是除了Toast之外,用的最频繁的弹框,各种加载框,提示框,选择框也大都用的Dialog
3.2 Dialog支持任意布局,以及弹出位置,所以非常灵活。
3.2 示例效果图

3.3 创建自定义Dialog
dialog_confirm.xm
<?xml version="1.0" encoding="UTF-8"?>
<LinearLayout xmlns:android="http://schemas.android.com/apk/res/android"
	android:layout_width="match_parent"
	android:layout_height="wrap_content"
	android:background="@drawable/shape_bg_fffff_corner10"
	android:orientation="vertical"
	android:paddingLeft="25dp"
	android:paddingTop="20dp"
	android:paddingRight="25dp"
	android:paddingBottom="@dimen/dimen_20">

	<TextView
		android:id="@+id/tv_title"
		android:layout_width="wrap_content"
		android:layout_height="wrap_content"
		android:layout_gravity="center_horizontal"
		android:text="退出提示"
		android:textColor="@color/color_333333"
		android:textSize="16sp"
		android:textStyle="bold" />


	<TextView
		android:id="@+id/tv_content"
		android:layout_width="wrap_content"
		android:layout_height="wrap_content"
		android:layout_gravity="center"
		android:layout_marginTop="15dp"
		android:gravity="center"
		android:text="是否对本地编辑的内容进行保存?"
		android:textColor="@color/color_333333"
		android:textSize="@dimen/text_14" />


	<LinearLayout
		android:layout_width="match_parent"
		android:layout_height="wrap_content"
		android:layout_marginTop="@dimen/dimen_20"
		android:orientation="horizontal">

		<TextView
			android:id="@+id/tv_cancel"
			android:layout_width="0dp"
			android:layout_height="wrap_content"
			android:layout_marginRight="10dp"
			android:layout_weight="1"
			android:background="@drawable/shape_bg_1677ff_corners7_border"
			android:gravity="center"
			android:paddingTop="@dimen/dimen_9"
			android:paddingBottom="@dimen/dimen_9"
			android:text="取消"
			android:textColor="@color/color_1677ff"
			android:textSize="14sp" />

		<TextView
			android:id="@+id/tv_sure"
			android:layout_width="0dp"
			android:layout_height="wrap_content"
			android:layout_marginLeft="10dp"
			android:layout_weight="1"
			android:background="@drawable/shape_bg_1677ff_corners7"
			android:gravity="center"
			android:paddingTop="@dimen/dimen_9"
			android:paddingBottom="@dimen/dimen_9"
			android:text="立即充值"
			android:textColor="@color/white"
			android:textSize="@dimen/sp_14" />

	</LinearLayout>
</LinearLayout>
设置dialog样式custom_dialog.style,半透明度,标题,背景,弹出动画等等
<style name="custom_dialog" parent="@android:style/Theme.Dialog">
	<item name="android:windowFrame">@null</item>
	<!-- Dialog的windowFrame框为无 -->
	<item name="android:windowIsFloating">true</item>
	<!-- 是否漂现在activity上 -->
	<item name="android:windowIsTranslucent">true</item>
	<!-- 是否半透明 -->
	<item name="android:windowNoTitle">true</item>
	<item name="android:background">@null</item>
	<item name="android:windowBackground">@android:color/transparent</item>
	<item name="android:windowContentOverlay">@null</item>
	<!-- 去除黑色边框的关键设置项 -->
	<item name="android:backgroundDimEnabled">true</item>
	<!-- 屏幕背景是否变暗 -->
	<item name="android:backgroundDimAmount">0.7</item>
</style>
需要继承系统Dialog父类
public class ConfirmDialog extends Dialog {
    private Context context;

    private TextView tvTitle;
    private TextView tvContent;
    private TextView tvCancel;
    private TextView tvSure;


    private String title, content, cancelString, sureString;

    public interface OnViewClickLiatener {
        void sureClick();
        void cancelClick();
    }

    public OnViewClickLiatener onViewClickLiatener;

    public void setOnViewClickLiatener(OnViewClickLiatener onViewClickLiatener) {
        this.onViewClickLiatener = onViewClickLiatener;
    }

    public ConfirmDialog(Context context) {
        this(context, R.style.custom_dialog);
    }

    public ConfirmDialog(Context context, int themeResId) {
        super(context, themeResId);
        this.context = context;
    }

    public ConfirmDialog(Context context, int themeResId, String title, String content, String cancelString, String sureString) {
        super(context, themeResId);
        this.context = context;
        this.title = title;
        this.content = content;
        this.cancelString = cancelString;
        this.sureString = sureString;
    }

    @Override
    protected void onCreate(Bundle savedInstanceState) {
        super.onCreate(savedInstanceState);
        setContentView(R.layout.dialog_confirm);
        setCanceledOnTouchOutside(true);
        WindowManager.LayoutParams params = getWindow().getAttributes();
        params.width = (int) (ScreenUtils.getScreenWidth((Activity) context) * 0.8f);
        params.height = ViewGroup.LayoutParams.WRAP_CONTENT;
        getWindow().setGravity(Gravity.CENTER);
        getWindow().setAttributes(params);
        getWindow().setBackgroundDrawableResource(R.color.trans);
        initView();
        setData();

    }

    public void initView() {
        tvTitle = (TextView) findViewById(R.id.tv_title);
        tvContent = (TextView) findViewById(R.id.tv_content);
        tvCancel = (TextView) findViewById(R.id.tv_cancel);
        tvSure = (TextView) findViewById(R.id.tv_sure);
    }
    public void setData() {
        if (!TextUtils.isEmpty(title)) {
            tvTitle.setText(title);
        }

        if (!TextUtils.isEmpty(content)) {
            tvContent.setText(content);
        }
        if (!TextUtils.isEmpty(cancelString)) {
            tvCancel.setText(cancelString);
        }

        if (!TextUtils.isEmpty(sureString)) {
            tvSure.setText(sureString);
        }


        tvCancel.setOnClickListener(new View.OnClickListener() {
            @Override
            public void onClick(View view) {
                dismiss();
                if (onViewClickLiatener != null) {
                    onViewClickLiatener.cancelClick();
                }
            }
        });
        tvSure.setOnClickListener(new View.OnClickListener() {
            @Override
            public void onClick(View view) {
                dismiss();
                if (onViewClickLiatener != null) {
                    onViewClickLiatener.sureClick();
                }
            }
        });
    }


    @Override
    public void dismiss() {
        super.dismiss();

    }
}
使用
 /**
     * 确认取消提示
     */
    ConfirmDialog showCancelDialog;

    public void showCancelDialog(String reportOrderNo, String storeCode) {
        if (showCancelDialog == null) {
            showCancelDialog = new ConfirmDialog(activity, "取消提醒", "取消后将不再对已添加的内容进行保存", "暂不取消", "确认取消");
            showCancelDialog.setOnViewClickLiatener(new ConfirmDialog.OnViewClickLiatener() {
                @Override
                public void sureClick() {
                    if (TextUtils.isEmpty(reportOrderNo)) {
                        activity.finish();
                    } else {
                        httpReportOrderCancel(reportOrderNo, storeCode);
                    }
                }

                @Override
                public void cancelClick() {

                }
            });
        }

        if (!showCancelDialog.isShowing()) {
            showCancelDialog.show();
        }
    }
3.4 设置认为位置的dialog,如下效果图在屏幕右上角,并且有偏移距离
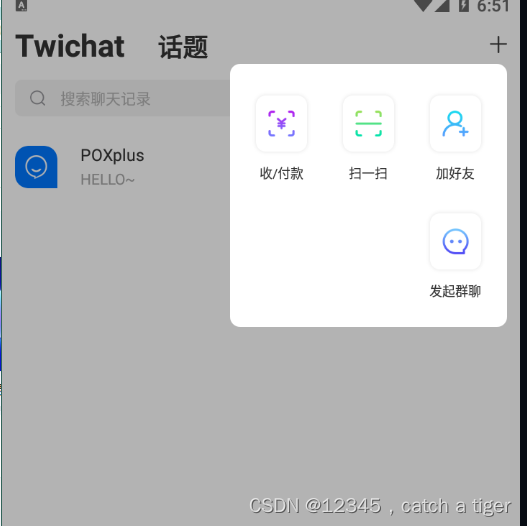
根正常Dialog使用一样,不过在构造函数里面需要传一个view,即对于那个view弹出,通过获取view在屏幕的位置,来设置Dialog的偏移位置。如下示例
public class OtherUserMainMoreDialog extends Dialog {

    private DialogViewListener listener;
    private Activity mContext;
    private View locationView;

    private LinearLayout llRemarks;
    private LinearLayout llPullBlack;
    private LinearLayout llDeleteFriend;

    public interface DialogViewListener {
        void remarksClick();

        void pullBlackClick();

        void deleteFriend();
    }

    public OtherUserMainMoreDialog(Activity context) {
        super(context);
        mContext = context;
    }

    public void setDialogViewListener(DialogViewListener listener) {
        this.listener = listener;
    }

    public OtherUserMainMoreDialog(Activity context, int themeResId, View locationView) {
        super(context, themeResId);
        mContext = context;
        this.locationView = locationView;
    }

    @Override
    protected void onCreate(Bundle savedInstanceState) {
        super.onCreate(savedInstanceState);
        View view = LayoutInflater.from(mContext).inflate(R.layout.dialog_other_more, null);
        setContentView(view);
        //设置Dialog点击外部消失
        setCanceledOnTouchOutside(true);
        setCancelable(true);

        //获取控件 textview 的绝对坐标,( y 轴坐标是控件上部到屏幕最顶部(不包括控件本身))
        //location [0] 为x绝对坐标;location [1] 为y绝对坐标
        int[] location = new int[2];
        locationView.getLocationInWindow(location); //获取在当前窗体内的绝对坐标
        //获取当前Activity所在的窗体
        Window window = getWindow();
        WindowManager.LayoutParams wlp = window.getAttributes();
        //获取通知栏高度  重要的在这,获取到通知栏高度
        int notificationBar = Resources.getSystem().getDimensionPixelSize(
                Resources.getSystem().getIdentifier("status_bar_height", "dimen", "android"));
        wlp.x = location[0];//对 dialog 设置 x 轴坐标
        wlp.y = location[1] + locationView.getHeight() - notificationBar - 15; //对dialog设置y轴坐标
        wlp.gravity = Gravity.TOP;
        wlp.width = WindowManager.LayoutParams.MATCH_PARENT;
        window.setAttributes(wlp);

        llRemarks = (LinearLayout) findViewById(R.id.ll_remarks);
        llPullBlack = (LinearLayout) findViewById(R.id.ll_pull_black);
        llDeleteFriend = (LinearLayout) findViewById(R.id.ll_delete_friend);

        llPullBlack.setOnClickListener(new View.OnClickListener() {
            @Override
            public void onClick(View view) {
                if (listener != null) {
                    listener.pullBlackClick();
                }
                cancel();
            }
        });

        llRemarks.setOnClickListener(new View.OnClickListener() {
            @Override
            public void onClick(View view) {
                if (listener != null) {
                    listener.remarksClick();
                }
                cancel();
            }
        });
        llDeleteFriend.setOnClickListener(new View.OnClickListener() {
            @Override
            public void onClick(View view) {
                if (listener != null) {
                    listener.deleteFriend();
                }
                cancel();
            }
        });

    }

}
3.5 DIalog使用注意:
由于DIalog必须依赖与一个Activty,如果Activity意外销毁,那Dialog再去弹出或者消息就会找不到该Activity,从而发生崩溃。解决方法如下:
- 把Activity设置为弱引用,以便Activity销毁时,持有Activity的对象能够及时回收。
- 在Dialog弹出消息前判断是否Activity存活,从而保证安全弹出或者消息
如下处理:
@Override
public void dismiss() {
	if (context == null || ((Activity) context).isDestroyed() || ((Activity) context).isFinishing()) {
		return;
	}
	super.dismiss();

}

@Override
public void show() {
	if (context == null || ((Activity) context).isDestroyed() || ((Activity) context).isFinishing()) {
		return;
	}
	super.show();
}
四,Toast的使用
4.1 最简单使用,调用系统api
Toast.makeText(context, "提示消息", Toast.LENGTH_SHORT).show();
4.2 设置Toast的位置,顶部,中间,底部等位置
Toast toast = Toast.makeText(context, "提示消息", Toast.LENGTH_SHORT);
toast.setGravity(Gravity.TOP, 0, 0);
toast.show();
4.3 控制短时间内弹出频率
 private static String oldMsg;
    protected static Toast toast = null;
    private static long oneTime = 0;
    private static long twoTime = 0;
    public static void showToast(Context context, String s, int gravity, int offX, int offY) {
        if (toast == null) {
            toast = Toast.makeText(context, s, Toast.LENGTH_SHORT);
            toast.setGravity(gravity, offX, offY);
            toast.show();
            oneTime = System.currentTimeMillis();
        } else {
            twoTime = System.currentTimeMillis();
            if (s.equals(oldMsg)) {
                if (twoTime - oneTime > Toast.LENGTH_SHORT) {
                    toast.show();
                }
            } else {
                oldMsg = s;
                toast.setText(s);
                toast.show();
            }
        }
        oneTime = twoTime;
    }
4.4 自定义Toast布局样式
 private static TextView textView;
    /**
     * 自定义样式的吐司
     * <p/>
     * 静态toast 只创建一个toast实例 可以实时显示弹出的内容
     *
     * @param context
     * @param text
     */
    public static void showPicToast(Context context, String text) {

        if (toast == null) { // 1. 创建前 2.消失后toast为null
            // 获取打气筒
            LayoutInflater inflater = (LayoutInflater) context.getSystemService(Context.LAYOUT_INFLATER_SERVICE);
            //创建视图
            View view = inflater.inflate(R.layout.toast_bg, null);
            textView = (TextView) view.findViewById(R.id.tv_toast_text);
            //创建土司
            toast = new Toast(context);
            //设置居中方式  默认在底部
            //toast.setGravity(Gravity.CENTER, 0, 0);//如果不设置剧中方式,使用系统默认的吐司位置
            //设置土司的持续时长
            toast.setDuration(Toast.LENGTH_SHORT);
            toast.setGravity(Gravity.CENTER, 0, 0);
            //设置土司的背景View
            toast.setView(view);
        }
        //设置土司的显示额内容
        textView.setText(text);
        toast.show();
    }
4.5 使用注意:
Android 30之后Toast位置参数将失效,设置位置也会跟随系统的位置,所以Google建议用SnackBar来替换Toast。
如果坚持用Toast那么推荐一个Toast库,可以设置Toast位置,如下添加依赖库
implementation 'com.hjq:toast:8.8'在application里面初始化
ToastUtils.init(this);在其它位置弹出该Toast
ToastUtils.show("提示消息");五 SnackBar
5.1

5.2 简单使用
 public void snackbar1(View view) {
   Snackbar.make(this,llRootLayout,"snack bar",Snackbar.LENGTH_SHORT).show();
}
第一个参数是Context
第二个参数是要显示的view
第三个参数是显示的字符串
第四个参数是显示时长,时长有下面三种:
Snackbar.LENGTH_SHORT与Toast.LENGHT_SHORT(大约1秒多)一样显示较短时长后自动消失
Snackbar.LENGTH_LONG与Toast.LENGHT_LONG(大约3秒)一样显示相对较长时间后自动消失
Snackbar.LENGTH_INDEFINITE:永不消失除非手动调用dismiss()方法去除Snackbar
5.3 交互使用
public void snackbar2(View view) {
	Snackbar snack_bar = Snackbar.make(this,view, "确定退出吗?", Snackbar.LENGTH_INDEFINITE);
	snack_bar.setAction("确认", new View.OnClickListener() {
		@Override
		public void onClick(View v) {
			//退出
		}
	});
	snack_bar.show();
}
5.4 自定义布局SnackBar
布局snackbar_view.xml
<?xml version="1.0" encoding="utf-8"?>
<androidx.constraintlayout.widget.ConstraintLayout xmlns:android="http://schemas.android.com/apk/res/android"
    xmlns:app="http://schemas.android.com/apk/res-auto"
    android:layout_width="match_parent"
    android:layout_height="50dp"
    android:background="#000000">

    <TextView
        android:id="@+id/textView"
        android:layout_width="wrap_content"
        android:layout_height="wrap_content"
        android:layout_marginStart="12dp"
        android:layout_marginLeft="12dp"
        android:textColor="@color/black"
        android:textSize="11sp"
        app:layout_constraintBottom_toBottomOf="parent"
        app:layout_constraintStart_toStartOf="parent"
        app:layout_constraintTop_toTopOf="parent" />

    <ImageView
        android:id="@+id/imageView2"
        android:layout_width="24dp"
        android:layout_height="24dp"
        android:layout_marginEnd="12dp"
        android:layout_marginRight="12dp"
        android:visibility="invisible"
        app:layout_constraintBottom_toBottomOf="@+id/textView"
        app:layout_constraintEnd_toEndOf="parent"
        app:layout_constraintTop_toTopOf="@+id/textView" />

    <TextView
        android:id="@+id/textViewSub"
        android:layout_width="wrap_content"
        android:layout_height="0dp"
        android:layout_marginEnd="5dp"
        android:layout_marginRight="5dp"
        android:gravity="center"
        android:paddingStart="8dp"
        android:paddingEnd="8dp"
        android:text=""
        android:textColor="#ffffff"
        android:textSize="11sp"
        android:visibility="invisible"
        app:layout_constraintBottom_toBottomOf="parent"
        app:layout_constraintEnd_toEndOf="parent"
        app:layout_constraintTop_toTopOf="parent" />
</androidx.constraintlayout.widget.ConstraintLayout>
工具类SnackBarUtil.java
public class SnackBarUtil {
    //自定义 SnackBar 布局
    public static void show(Activity activity, View view, String msg, String action, SnackBarOnClick listener) {
        //获取示例 findViewById(android.R.id.content) //LENGTH_LONG/LENGTH_SHORT: 会自动消失 LENGTH_INDEFINITE: 需要手动点击消失
        Snackbar snackbar = Snackbar.make(view, "", Snackbar.LENGTH_SHORT);
        //设置 Snackbar 的深度,避免被其他控件遮挡
        if (Build.VERSION.SDK_INT >= Build.VERSION_CODES.LOLLIPOP) {
            snackbar.getView().setElevation(0);
        }
        //设置背景透明,避免自带黑色背景影响
        snackbar.getView().setBackgroundColor(Color.TRANSPARENT);
        //设置padding 取消自定义时黑色边框
        snackbar.getView().setPadding(0, 0, 0, 0);
        Snackbar.SnackbarLayout snackbarLayout = (Snackbar.SnackbarLayout) snackbar.getView();
        //设置SnackBar的显示位置
        //ViewGroup.LayoutParams layoutParams = snackbarLayout.getLayoutParams();
        FrameLayout.LayoutParams flp = new FrameLayout.LayoutParams(dip2px(activity,260),dip2px(activity,32)); // 将原来Snackbar的宽高传入新的LayoutParams
        flp.gravity = Gravity.CENTER | Gravity.BOTTOM; // 设置显示位置
        flp.bottomMargin = dip2px(activity,8);
        ((View) snackbarLayout).setLayoutParams(flp);
        //获取自定义布局
        View inflate = LayoutInflater.from(activity).inflate(R.layout.snackbar_view, null);
        //获取布局内控件
        TextView textView = inflate.findViewById(R.id.textView);
        //TextView 前边添加图片
        //Drawable drawable = getResources().getDrawable(R.mipmap.ic_launcher_round);//图片自己选择
        //drawable.setBounds(0, 0, drawable.getMinimumWidth(), drawable.getMinimumHeight());
        //textView.setCompoundDrawables(drawable, null, null, null);
        //增加文字和图标的距离
        //textView.setCompoundDrawablePadding(20);
        //设置文本
        textView.setText(msg);
        if (action != null && listener != null) {
            TextView textViewSub = inflate.findViewById(R.id.textViewSub);
            textViewSub.setVisibility(View.VISIBLE);
            textViewSub.setText(action);
            textViewSub.setOnClickListener(v -> {
                if (listener != null) {
                    listener.clickEvent(snackbar);
                }
            });
        }
        //添加图片 获取布局内控件
        //ImageView imageView = inflate.findViewById(R.id.imageView2);
        //获取图片资源
        //Drawable drawable = activity.getResources().getDrawable(closeIcon);
        //设置图片
        //imageView.setImageDrawable(drawable);
        //将自定义布局添加到 Snackbar 中
        snackbarLayout.addView(inflate);
        //显示
        snackbar.show();
    }

    public interface SnackBarOnClick {
        void clickEvent(Snackbar snackbar);
    }

    /**
     * 根据手机的分辨率从 dp 的单位 转成为 px(像素)
     */
    public static int dip2px(Activity activity, float dpValue) {
        final float scale = activity.getResources().getDisplayMetrics().density;
        return (int) (dpValue * scale + 0.5f);
    }
}
调用工具类SnackBarUtil
public void snackbar3(View view) {
        SnackBarUtil.show(this, view, "确定退出吗?", "确认", new SnackBarUtil.SnackBarOnClick() {
            @Override
            public void clickEvent(Snackbar snackbar) {
                //退出
            }
        });
    }
六 PopWindow下拉弹框使用
6.1 PopWindow也是一种弹框,相比较Dialog它更多的使用场景是基于某个控件位置的弹出,也支持任意布局和样式
6.2 示例,添加布局文件,popup_size_listview.xml
<?xml version="1.0" encoding="utf-8"?>
<RelativeLayout xmlns:android="http://schemas.android.com/apk/res/android"
    android:layout_width="@dimen/dp_80"
    android:layout_height="wrap_content">

    <androidx.recyclerview.widget.RecyclerView
        android:id="@+id/rcl_view"
        android:layout_width="@dimen/dp_80"
        android:layout_height="wrap_content" />
</RelativeLayout>
6.3 自定义PopupWindow
public class PopupviewSizeModel extends PopupWindow {
    private IPopuWindowListener mOnClickListener;
    private Activity mContext;
    private RecyclerView recyclerView;
    private PopupModelListAdapter popupModelListAdapter;
    private List<InfoBean.BindSizeListDTO> listString=new ArrayList<>();

    /**
     * 暴露给外面的设置单击事件
     */
    public void setPopuWindowListener(IPopuWindowListener mOnClickListener) {
        this.mOnClickListener = mOnClickListener;
    }

    public PopupviewSizeModel(Activity context) {
        super(context);
        this.mContext = context;
        //获取布局文件
        View mContentView = LayoutInflater.from(mContext).inflate(R.layout.popup_size_listview, null);
        initView(mContentView);
        //设置布局
        setContentView(mContentView);
        int width = context.getWindowManager().getDefaultDisplay().getWidth();
        setWidth(ViewGroup.LayoutParams.WRAP_CONTENT);
        setHeight(ViewGroup.LayoutParams.WRAP_CONTENT);
        //设置可以点击外部消息
        //开始
        setOutsideTouchable(true);
        setFocusable(true);
//        setBackgroundDrawable(new BitmapDrawable());
        setBackgroundDrawable(context.getResources().getDrawable(android.R.color.transparent));
        setAnimationStyle(R.style.pop_animation);

    }
    private void initView(View contentView) {
        recyclerView = (RecyclerView) contentView.findViewById(R.id.rcl_view);
        LinearLayoutManager manager = new LinearLayoutManager(mContext);
        recyclerView.setLayoutManager(manager);
        recyclerView.setNestedScrollingEnabled(false);
        popupModelListAdapter = new PopupModelListAdapter(mContext, R.layout.item_popup_size_list, listString);
        recyclerView.setAdapter(popupModelListAdapter);
        popupModelListAdapter.setOnItemClickListener(new MultiItemTypeAdapter.OnItemClickListener() {
            @Override
            public void onItemClick(View view, RecyclerView.ViewHolder holder, int position) {
                dismiss();
                if(mOnClickListener!=null){
                    mOnClickListener.onItemClick(position);
                }

            }

            @Override
            public boolean onItemLongClick(View view, RecyclerView.ViewHolder holder, int position) {
                return false;
            }
        });
    }

    public void setListData(List<InfoBean.BindSizeListDTO> list) {
        listString.clear();
        listString.addAll(list);
        popupModelListAdapter.setData(listString);
        popupModelListAdapter.notifyDataSetChanged();
    }
//     /***
//     * 在android7.0上,如果不主动约束PopuWindow的大小,比如,设置布局大小为 MATCH_PARENT,那么PopuWindow会变得尽可能大,以至于 view下方无空间完全显示PopuWindow,而且view又无法向上滚动,此时PopuWindow会主动上移位置,直到可以显示完全。
//     * 解决办法:主动约束PopuWindow的内容大小,重写showAsDropDown方法:
//     * @param anchor
//     */
//    @Override
//    public void showAsDropDown(View anchor,int xoff,int yoff,int gravity) {
//        if (Build.VERSION.SDK_INT >= 24) {
//            Rect visibleFrame = new Rect();
//            anchor.getGlobalVisibleRect(visibleFrame);
//            int height = anchor.getResources().getDisplayMetrics().heightPixels - visibleFrame.bottom;
//            setHeight(height);
//            showAsDropDown(anchor, xoff, yoff,gravity);
//        } else {
//           showAsDropDown(anchor, xoff, yoff,gravity);
//        }
//        super.showAsDropDown(anchor);
//    }

    public interface IPopuWindowListener {
        void onItemClick(int position);
    }
}
6.4 设置数据模型
publicclass BindSizeListDTO{
        public String id;
        public String name;

        public BindSizeListDTO(String name) {
            this.name = name;
        }
    }
6.5 在指定view位置弹出该PopupWindow
private PopupviewSizeModel popupviewModelSize;
List<InfoBean.BindSizeListDTO> listStringSize = new ArrayList<>();
private void showSizePopup() {
	listStringSize.add(new InfoBean.BindSizeListDTO("230x150"));
	listStringSize.add(new InfoBean.BindSizeListDTO("270x200"));
	listStringSize.add(new InfoBean.BindSizeListDTO("300x200"));
	listStringSize.add(new InfoBean.BindSizeListDTO("330x225"));
	listStringSize.add(new InfoBean.BindSizeListDTO("340x239"));
	if (popupviewModelSize == null) {
		popupviewModelSize = new PopupviewSizeModel(mContext);
		popupviewModelSize.setPopuWindowListener(new PopupviewSizeModel.IPopuWindowListener() {
			@Override
			public void onItemClick(int position) {
				Toast.makeText(SnackBarActivity.this, "点击了条目", Toast.LENGTH_SHORT).show();

			}
		});
	}
	popupviewModelSize.setListData(listStringSize);
	popupviewModelSize.showAsDropDown(tvSize);
}
七 DialogFragment
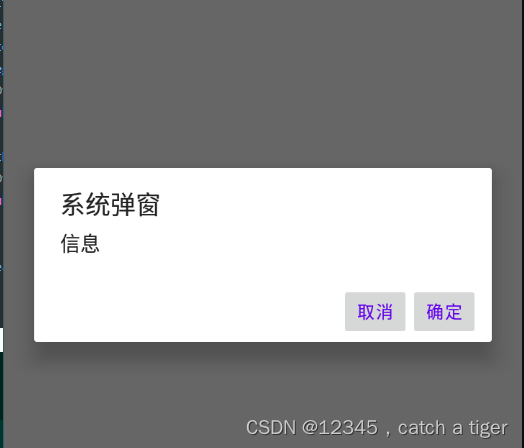
7.1 Dialog是依赖与Activity的生命周期,DialogFragment与Dialog不同的是它本质上是一个Fragment,也就具有Fragment所拥有的生命周期,
7.1 创建DialogFragment的方式,用onCreateDialog来创建系统提供的Dialog
public class SystemDialogFragment extends DialogFragment {

    @NonNull
    @Override
    public Dialog onCreateDialog(@Nullable Bundle savedInstanceState) {
        AlertDialog dialog = new AlertDialog.Builder(getContext())
                .setTitle("系统弹窗")
                .setMessage("信息")
                //.setIcon(R.drawable.assign_set_question_ic_v2)
                .setNegativeButton("取消", new DialogInterface.OnClickListener() {
                    @Override
                    public void onClick(DialogInterface dialog, int which) {
                    }
                }).setPositiveButton("确定", new DialogInterface.OnClickListener() {
                    @Override
                    public void onClick(DialogInterface dialog, int which) {
                        Toast.makeText(getContext(), "确认", Toast.LENGTH_SHORT).show();
                    }
                }).create();
        return dialog;
    }
}
Activity中调用该DialogFragment
public class DialogFragmentActivity extends ComponentActivity {
    @Override
    protected void onCreate(@Nullable Bundle savedInstanceState) {
        super.onCreate(savedInstanceState);
        setContentView(R.layout.activty_dialog_fragment);
    }

    public void alertdialog(View view) {
        SystemDialogFragment systemDialogFragment=new SystemDialogFragment();
        systemDialogFragment.show(getFragmentManager(),"ss");
    }
}
效果:
7.2 自定义布局DialogFragment
创建布局文件dialog_confirm.xml
<?xml version="1.0" encoding="UTF-8"?>
<LinearLayout xmlns:android="http://schemas.android.com/apk/res/android"
    android:layout_width="match_parent"
    android:layout_height="wrap_content"
    android:background="#ffffff"
    android:orientation="vertical"
    android:paddingLeft="25dp"
    android:paddingTop="20dp"
    android:paddingRight="25dp"
    android:paddingBottom="20dp">

    <TextView
        android:id="@+id/tv_title"
        android:layout_width="wrap_content"
        android:layout_height="wrap_content"
        android:layout_gravity="center_horizontal"
        android:text="退出提示"
        android:textColor="#333333"
        android:textSize="16sp"
        android:textStyle="bold" />


    <TextView
        android:id="@+id/tv_content"
        android:layout_width="wrap_content"
        android:layout_height="wrap_content"
        android:layout_gravity="center"
        android:layout_marginTop="15dp"
        android:gravity="center"
        android:text="是否对本地编辑的内容进行保存?"
        android:textColor="#333333"
        android:textSize="14sp" />


    <LinearLayout
        android:layout_width="match_parent"
        android:layout_height="wrap_content"
        android:layout_marginTop="20dp"
        android:orientation="horizontal">

        <TextView
            android:id="@+id/tv_cancel"
            android:layout_width="0dp"
            android:layout_height="wrap_content"
            android:layout_marginRight="10dp"
            android:layout_weight="1"
            android:gravity="center"
            android:paddingTop="9dp"
            android:paddingBottom="9dp"
            android:text="取消"
            android:textColor="#666666"
            android:textSize="14sp" />

        <TextView
            android:id="@+id/tv_sure"
            android:layout_width="0dp"
            android:layout_height="wrap_content"
            android:layout_marginLeft="10dp"
            android:layout_weight="1"
            android:gravity="center"
            android:paddingTop="9dp"
            android:paddingBottom="9dp"
            android:text="立即充值"
            android:textColor="#000000"
            android:textSize="14sp" />

    </LinearLayout>
</LinearLayout>
创建DialogFragment,CustomerDialogFragment.java
public class CustomerDialogFragment extends DialogFragment {

    public View mRootView;

    private TextView tvTitle;
    private TextView tvContent;
    private TextView tvCancel;
    private TextView tvSure;


    @Nullable
    @Override
    public View onCreateView(@NonNull LayoutInflater inflater, @Nullable ViewGroup container, @Nullable Bundle savedInstanceState) {
        if (mRootView == null){
            //获取布局
            mRootView = inflater.inflate(R.layout.dialog_confirm,container,false);
        }


        tvTitle = (TextView) mRootView.findViewById(R.id.tv_title);
        tvContent = (TextView) mRootView.findViewById(R.id.tv_content);
        tvCancel = (TextView) mRootView.findViewById(R.id.tv_cancel);
        tvSure = (TextView) mRootView.findViewById(R.id.tv_sure);
        tvCancel.setOnClickListener(new View.OnClickListener() {
            @Override
            public void onClick(View v) {
                dismiss();
            }
        });
        tvSure.setOnClickListener(new View.OnClickListener() {
            @Override
            public void onClick(View v) {
                Toast.makeText(getActivity(), "点击确定", Toast.LENGTH_SHORT).show();
                dismiss();
            }
        });
        return mRootView;
    }

}
Activity调用该DialogFragment
 public void customerdialog(View view) {
     CustomerDialogFragment systemDialogFragment=new CustomerDialogFragment();
     systemDialogFragment.show(getFragmentManager(),"Customer");
 }
效果演示

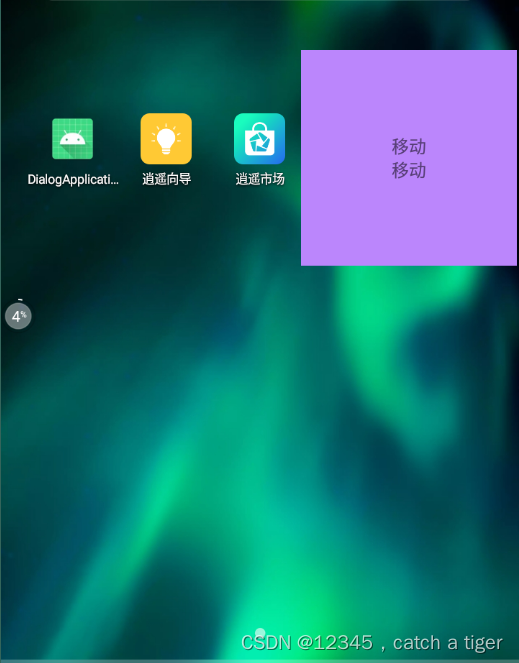
八 系统悬浮框
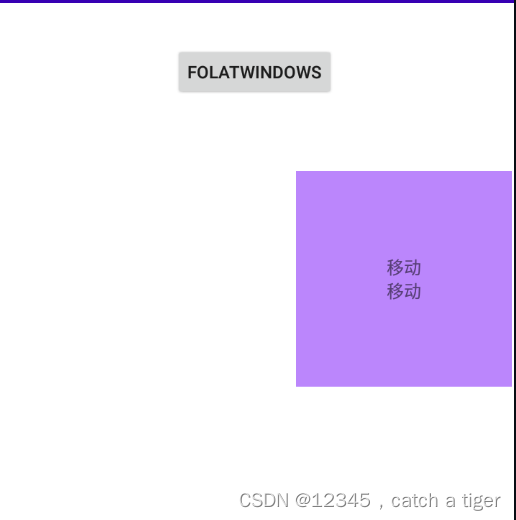
8.1 系统悬浮框跟随应用生命周期,可以不在Acitivity上面,不依赖Acitivity,适合全局生命周期的弹框
8.2 使用,新建布局文件,float_layout_window.xml
<?xml version="1.0" encoding="utf-8"?>
<LinearLayout xmlns:android="http://schemas.android.com/apk/res/android"
    android:layout_width="match_parent"
    android:layout_height="match_parent">
    <LinearLayout
        android:id="@+id/linear"
        android:layout_width="200dp"
        android:orientation="vertical"
        android:gravity="center"
        android:background="@color/purple_200"
        android:layout_height="200dp">
        <TextView
            android:id="@+id/text"
            android:layout_width="wrap_content"
            android:text="移动"
            android:layout_height="wrap_content" />
        <TextView

            android:layout_width="wrap_content"
            android:text="移动"
            android:layout_height="wrap_content" />
    </LinearLayout>

</LinearLayout>
8.2 添加悬浮框权限
<uses-permission android:name="android.permission.SYSTEM_ALERT_WINDOW"/>
<uses-permission android:name="android.permission.SYSTEM_OVERLAY_WINDOW" />
8.3 新建FloatWindowsActivity.java,添加悬浮框布局
public class FloatWindowsActivity extends ComponentActivity {
    public WindowManager mWindowManager;
    public View mWindowView;
    public LinearLayout mText;
    public WindowManager.LayoutParams wmParams;

    @Override
    protected void onCreate(@Nullable Bundle savedInstanceState) {
        super.onCreate(savedInstanceState);
        setContentView(R.layout.activty_float_windows);
    }

    public void folatwindows(View view) {
        checkFloatPermission();
    }

    @Override
    protected void onActivityResult(int requestCode, int resultCode, @Nullable Intent data) {
        super.onActivityResult(requestCode, resultCode, data);
        if(requestCode==0){
            checkFloatPermission();
        }
    }

    /**
     * 检查是否开启悬浮框权限
     */
    public void checkFloatPermission(){
        if(!Settings.canDrawOverlays(FloatWindowsActivity.this)) {

            Toast.makeText( FloatWindowsActivity.this, "当前无权限,请授权", Toast.LENGTH_SHORT);

            startActivityForResult( new Intent(Settings.ACTION_MANAGE_OVERLAY_PERMISSION, Uri.parse( "package:"+ getPackageName())), 0);

        }else {
            initWindowParams();
        }

    }
    /**
     * 初始化Window对象的参数
     */
    private void initWindowParams() {
        //1,获取系统级别的WindowManager
        mWindowManager = (WindowManager) getApplication().getSystemService(getApplication().WINDOW_SERVICE);
        wmParams = new WindowManager.LayoutParams();
        //2,添加系统参数,确保悬浮框能显示到手机上
        //电话窗口。它用于电话交互(特别是呼入)。它置于所有应用程序之上,状态栏之下。
        if (Build.VERSION.SDK_INT >= Build.VERSION_CODES.O) {
            wmParams.type = WindowManager.LayoutParams.TYPE_APPLICATION_OVERLAY;
        } else {
            wmParams.type = WindowManager.LayoutParams.TYPE_PHONE;
        }
        // flag 设置 Window 属性
        wmParams.flags
                |= WindowManager.LayoutParams.FLAG_FULLSCREEN
                | WindowManager.LayoutParams.FLAG_LAYOUT_IN_SCREEN;

        //期望的位图格式。默认为不透明
        wmParams.format = PixelFormat.TRANSLUCENT;
        //不许获得焦点
        wmParams.flags = WindowManager.LayoutParams.FLAG_NOT_FOCUSABLE;
        //窗口停靠位置
        wmParams.gravity = Gravity.LEFT | Gravity.TOP;
        wmParams.width = WindowManager.LayoutParams.WRAP_CONTENT;
        wmParams.height = WindowManager.LayoutParams.WRAP_CONTENT;

        addWindowViewZWindow();
        initClick();
    }


    /**
     * 添加View到桌面Window界面上
     */
    private void addWindowViewZWindow() {
        if(mWindowView==null){
            mWindowView = LayoutInflater.from(getApplication()).inflate(R.layout.float_layout_window, null);
            mText = (LinearLayout) mWindowView.findViewById(R.id.linear);
        }
        mWindowManager.addView(mWindowView, wmParams);
    }

    /**
     * 点击事件和拖拽事件
     */
    int mStartX, mStartY;
    int mEndX, mEndY;

    private void initClick() {
        mText.setOnTouchListener(new View.OnTouchListener() {
            @Override
            public boolean onTouch(View v, MotionEvent event) {
                switch (event.getAction()) {
                    //按下鼠标的时候记录下屏幕的位置
                    case MotionEvent.ACTION_DOWN:
                        mStartX = (int) event.getRawX();
                        mStartY = (int) event.getRawY();

                        break;
                    case MotionEvent.ACTION_MOVE:
                        mEndX = (int) event.getRawX();
                        mEndY = (int) event.getRawY();
                        if (needIntercept()) {
                            //getRawX是触摸位置相对于整个屏幕的位置,getX是控触摸点相对于控件最左边的位置
                            wmParams.x = (int) event.getRawX() - mWindowView.getMeasuredWidth() / 2;
                            wmParams.y = (int) event.getRawY() - mWindowView.getMeasuredHeight() / 2;
                            mWindowManager.updateViewLayout(mWindowView, wmParams);
                            return true;
                        }
                        break;
                    case MotionEvent.ACTION_UP:
                        if (needIntercept()) {
                            return true;
                        }
                        break;
                }

                return false;
            }
        });

        mText.setOnClickListener(new View.OnClickListener() {
            @Override
            public void onClick(View v) {
                Toast.makeText(FloatWindowsActivity.this, "点击悬浮框", Toast.LENGTH_SHORT).show();
            }
        });
    }

    /**
     * 判断是否拦截,根据滑动的距离
     *
     * @return
     */
    private boolean needIntercept() {
        if (Math.abs(mStartX - mEndX) > 30 || Math.abs(mStartY - mEndY) > 30) {
            return true;
        }
        return false;
    }
}
8.4 效果图
可以在任意Activity显示
也可以退到桌面仍显示
