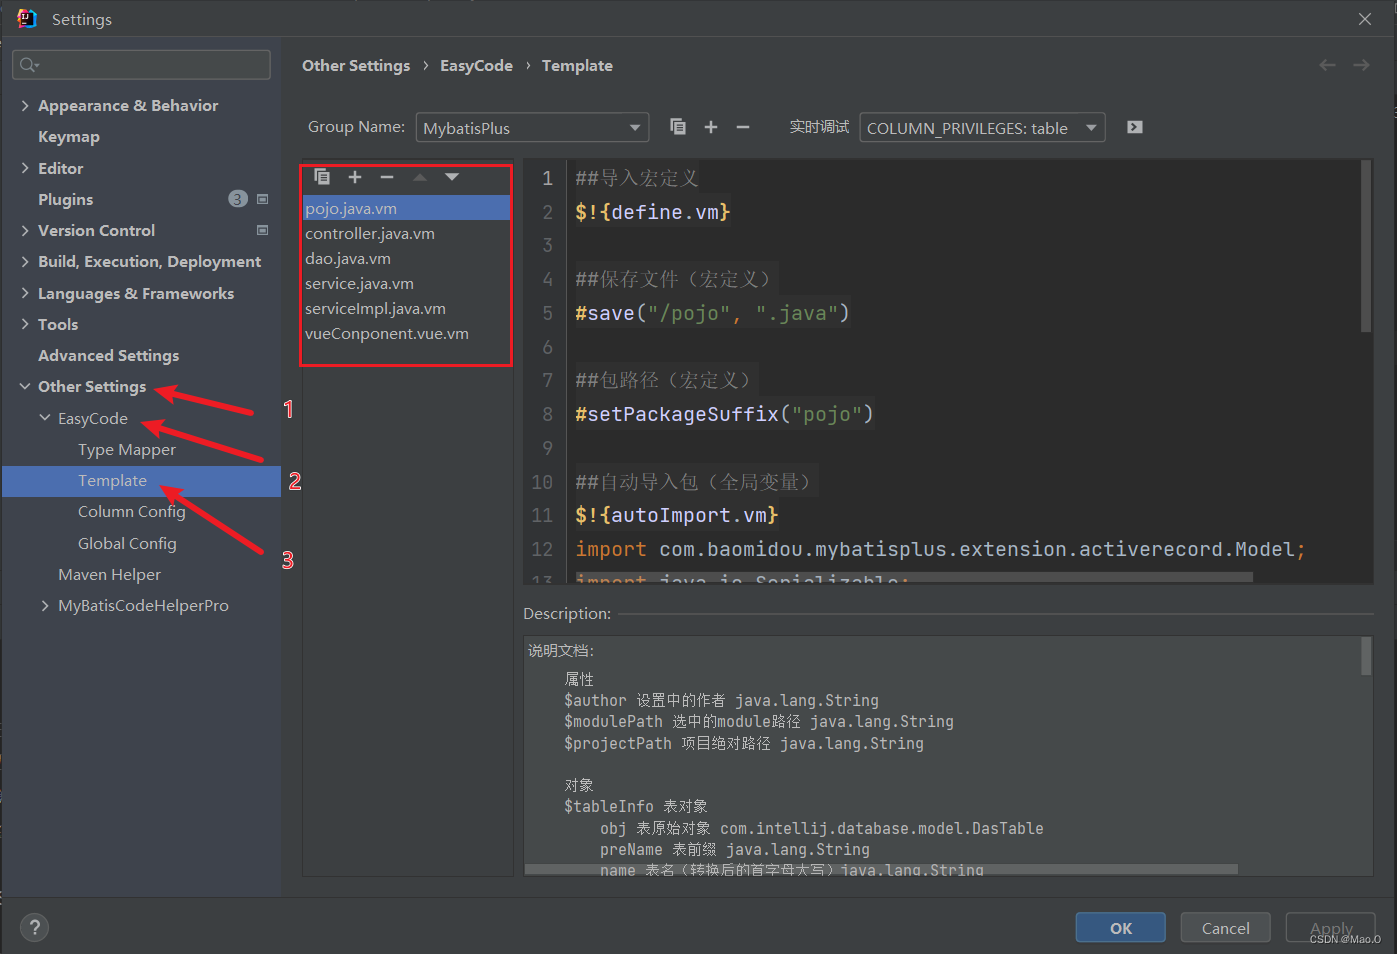
1.The GAN game
Let’s suppose, for a moment, that we’re career criminals who want to move into selling forgeries of “lost” paintings by famous artists. We’re criminals, not painters, so as we paint our fake Rembrandts and Picassos, it quickly becomes apparent that they’re amateur imitations rather than the real deal. Even if we spend a bunch of time practicing until we get a canvas that we can’t tell is fake, trying to pass it off at the local art auction house is going to get us kicked out instantly. Even worse, being told “This is clearly fake; get out,” doesn’t help us improve! We’d have to randomly try a bunch of things, gauge which ones took slightly longer to recognize as forgeries, and emphasize those traits on our future attempts, which would take far too long.Instead, we need to find an art historian of questionable moral standing to inspect our work and tell us exactly what it was that tipped them off that the painting wasn’t legit. With that feedback, we can improve our output in clear, directed ways, until our sketchy scholar can no longer tell our paintings from the real thing.
In the context of deep learning, what we’ve just described is known as the GAN game, where two networks, one acting as the painter and the other as the art historian, compete to outsmart each other at creating and detecting forgeries. GAN stands for generative adversarial network, where generative means something is being created (in this case, fake masterpieces), adversarial means the two networks are competing to outsmart the other, and well, network is pretty obvious. These networks are one of the most original outcomes of recent deep learning research.
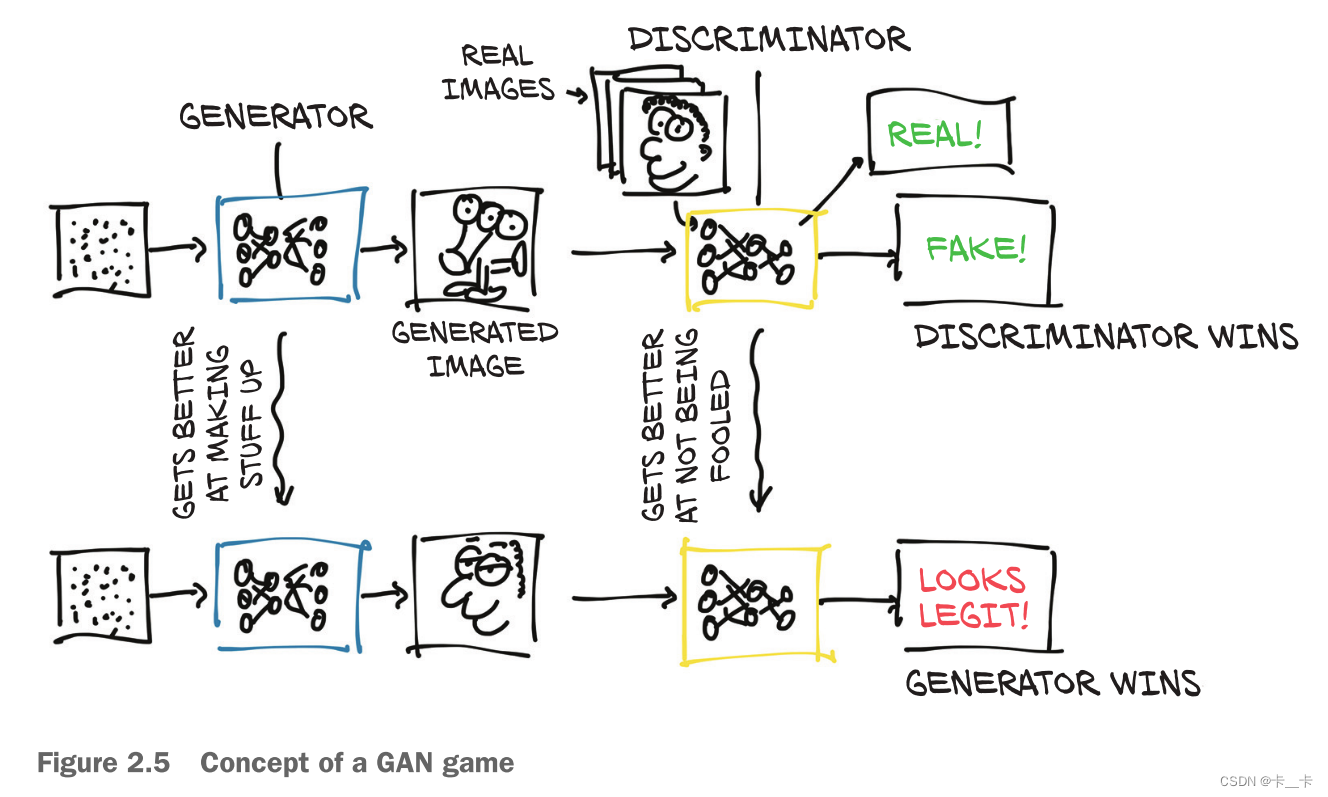
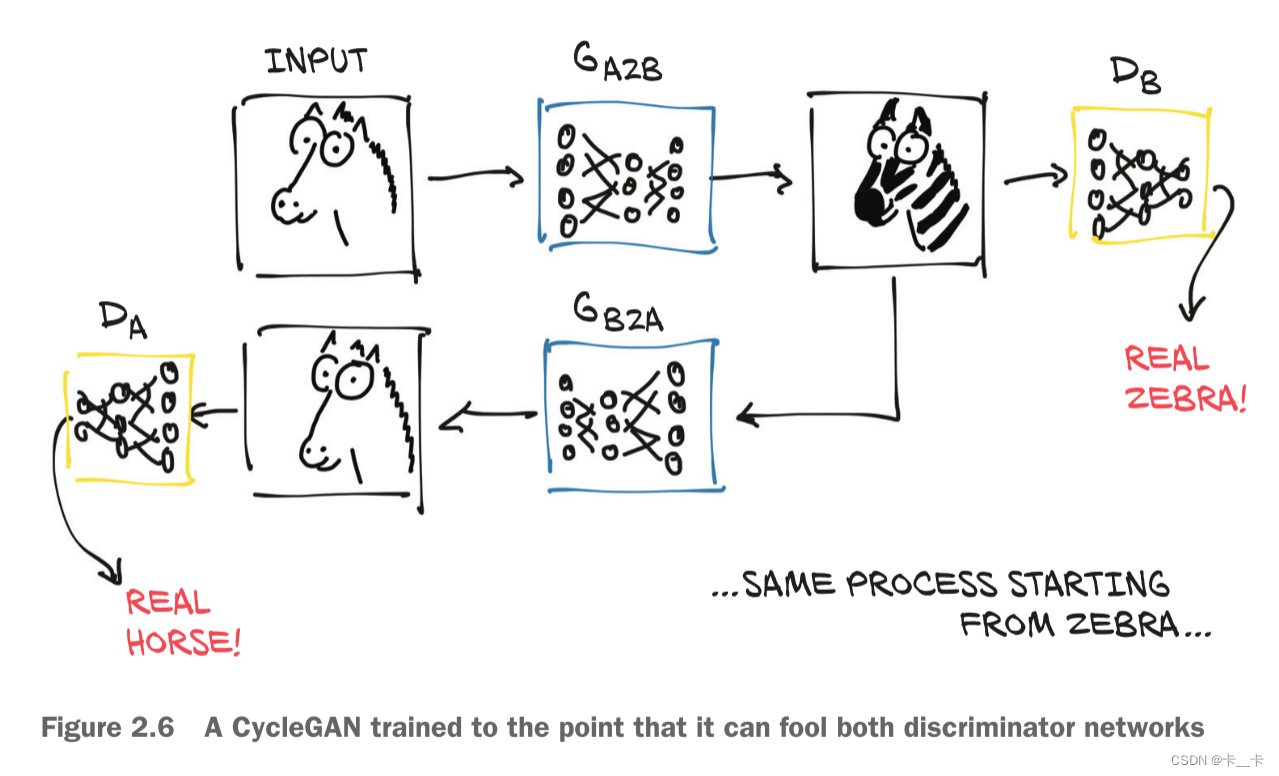
Figure 2.5 shows a rough picture of what’s going on. The end goal for the generator is to fool the discriminator into mixing up real and fake images. The end goal for the discriminator is to find out when it’s being tricked, but it also helps inform the generator about the identifiable mistakes in the generated images. At the start, the generator produces confused, three-eyed monsters that look nothing like a Rembrandt portrait. The discriminator is easily able to distinguish the muddled messes from the real paintings. As training progresses, information flows back from the discriminator, and the generator uses it to improve. By the end of training, the generator is able to produce convincing fakes, and the discriminator no longer is able to tell which is which.
2014 年来,生成对抗网络(Generative Adve-rsarial Network, GAN)的提出和改进使得用DNN(深度神经网络)合成逼真图像成为可能,相关方法的性能稳步提高,合成图像的视觉效果已经达到了肉眼难辨真伪的程度,吸引了学术界和工业界的广泛关注。
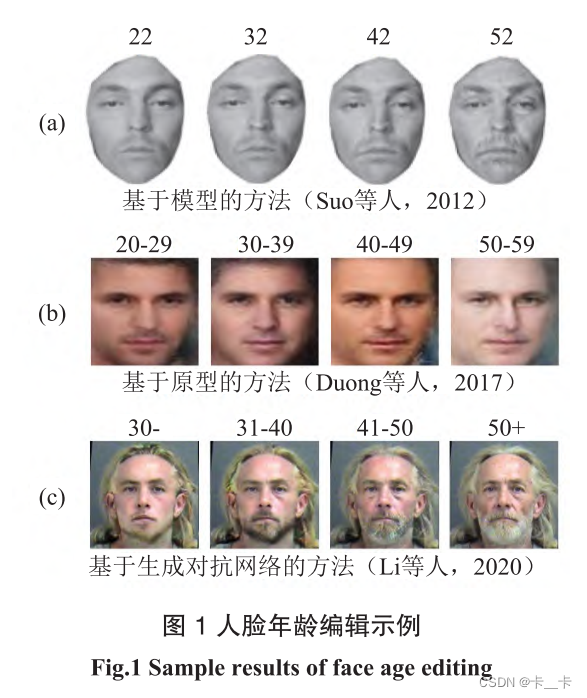
例如人脸年龄编辑技术旨在针对人脸图像的年龄特征进行逼真且准确地修改(如图 1 所示),在数字娱乐和公共安全等与人们日常生活息息相关的场景中发挥着关键作用。举例来说,风靡全球的人脸图像编辑软件 FaceApp就能够对任意人脸图像的年龄特征进行调整,具有很强的娱乐效果,在推特和脸书等众多社交平台上引起了极为广泛的讨论。该应用也因此于 2019 年荣登 IOS 和安卓平台应用下载量榜首,并至今活跃于数字内容创作相关的各种任务中。除此以外,人脸年龄编辑还可以根据旧时照片对走失儿童或者通缉人员的当前样貌进行预测,改善跨年龄人脸识别系统的精度,从而提升破案效率。
2.CycleGAN
A CycleGAN can turn images of one domain into images of another domain (and back), without the need for us to explicitly provide matching pairs in the training set.
As the figure shows, the first generator learns to produce an image conforming to a target distribution (zebras, in this case) starting from an image belonging to a different distribution (horses), so that the discriminator can’t tell if the image produced from a horse photo is actually a genuine picture of a zebra or not.
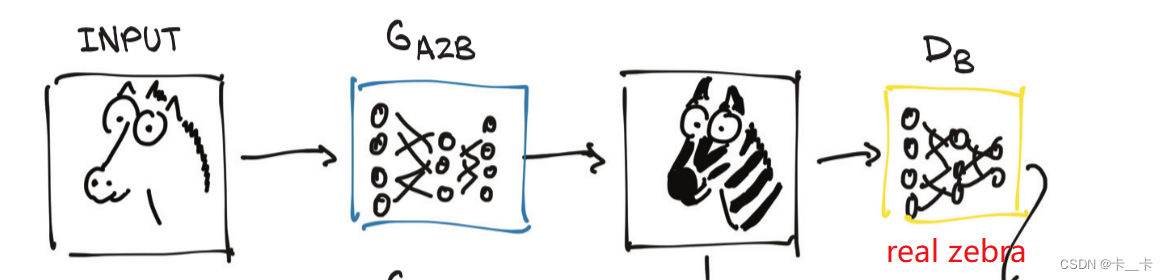
At the same time—and here’s where the Cycle prefix in the acronym comes in—the resulting fake zebra is sent through a different generator going the other way, to be judged by another discriminator on the other side.
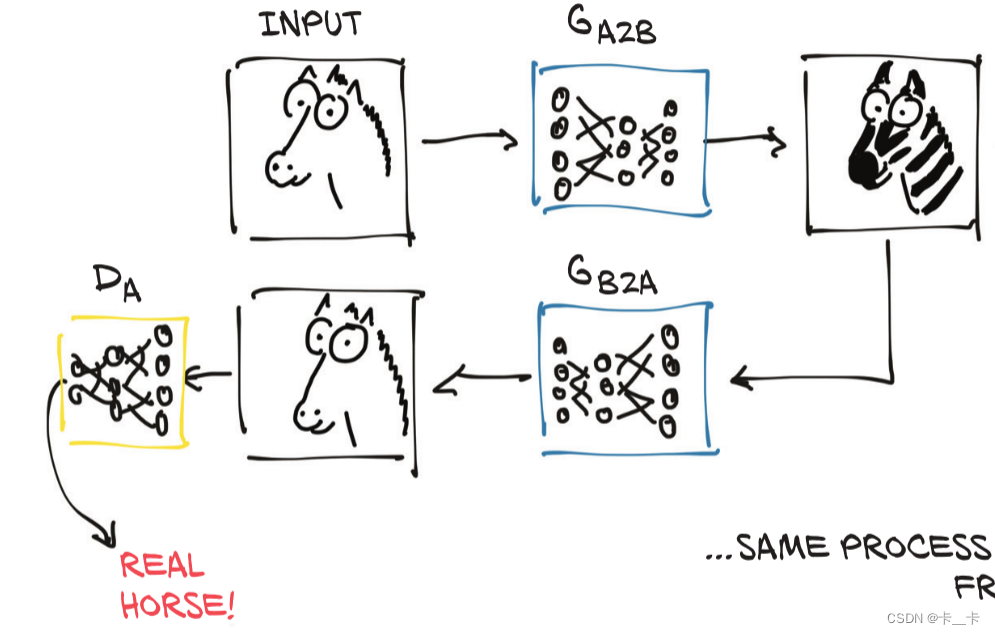
So, we have a CycleGAN workflow for the task of turning a photo of a horse into a zebra, and vice versa. Note that there are two separate generator networks, as well as two distinct discriminators.
3.Let’s try to do it
首先导入两个类(了解即可,注释仅供参考)
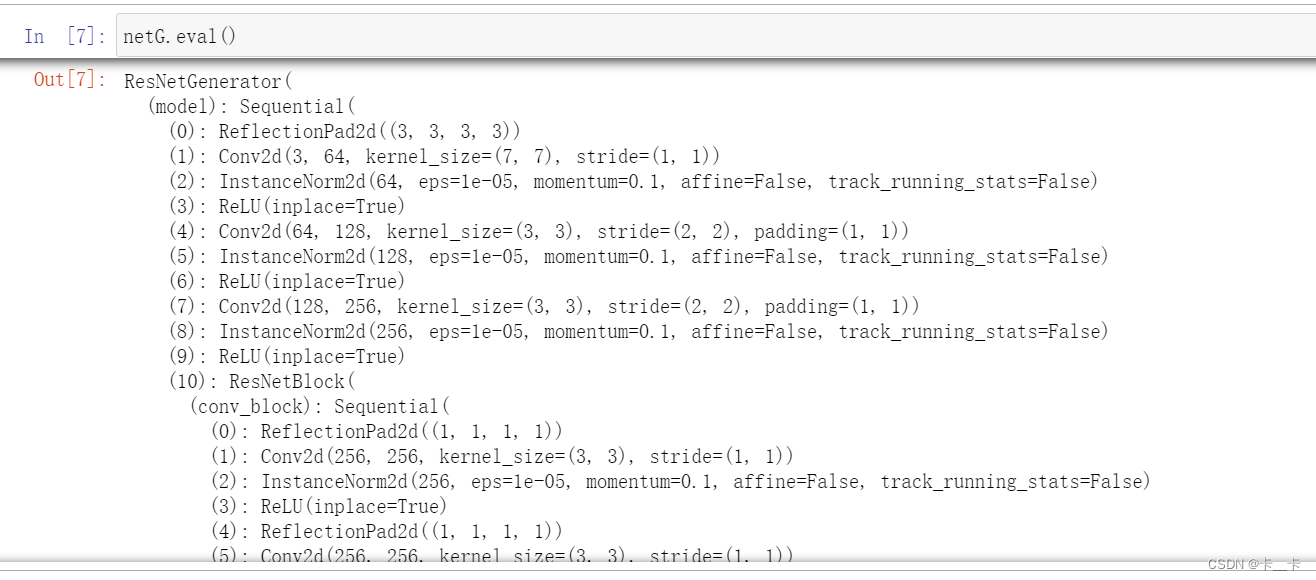
ResNetBlock实现了ResNet中的一个残差块(Residual Block),目的是通过跨层连接(shortcut connection)来实现信息的直接传递,从而有助于减轻梯度消失问题和训练深层网络。
class ResNetBlock(nn.Module):
    def __init__(self, dim):
        super(ResNetBlock, self).__init__() # 调用父类的__init__方法进行初始化
        self.conv_block = self.build_conv_block(dim) # 调用build_conv_block方法来构建残差块的卷积块部分,将其赋值给self.conv_block属性

    def build_conv_block(self, dim): # 构建残差块的卷积块部分
        conv_block = [] # 创建一个空的列表conv_block
        conv_block += [nn.ReflectionPad2d(1)] # 在卷积块之前添加一个反射填充层,进行1个像素的反射填充

# 添加一个卷积层、实例归一化层和ReLU激活函数层。卷积层使用3x3的卷积核进行卷积操作,dim表示输入和输出的通道数。实例归一化层用于归一化卷积层的输出,并提供额外的正则化效果。ReLU激活函数层用于引入非线性。
        conv_block += [nn.Conv2d(dim, dim, kernel_size=3, padding=0, bias=True),
                       nn.InstanceNorm2d(dim),
                       nn.ReLU(True)]

        conv_block += [nn.ReflectionPad2d(1)] # 再次添加一个反射填充层,进行1个像素的反射填充

# 添加另一个卷积层和实例归一化层,但不再使用激活函数
        conv_block += [nn.Conv2d(dim, dim, kernel_size=3, padding=0, bias=True),
                       nn.InstanceNorm2d(dim)]

        return nn.Sequential(*conv_block) # 将列表中的层组合成一个顺序的序列

    def forward(self, x): # 定义了前向传播的过程
        out = x + self.conv_block(x) # 将输入x传入残差块的卷积块部分进行处理,得到卷积块的输出,然后和x相加得到out
        return out
基于残差网络的生成器模型,将输入图像转换为特定领域的输出图像,通过残差块和跳跃连接,可以增强模型的特征表达能力和图像细节保留能力,进而提高生成图像的质量和准确性
class ResNetGenerator(nn.Module):
    def __init__(self, input_nc=3, output_nc=3, ngf=64, n_blocks=9): #定义了生成器模型的结构
        assert(n_blocks >= 0) # 确保n_blocks的值大于等于0,使残差网络中的残差块数量是合理的
        super(ResNetGenerator, self).__init__() # 确保正确地初始化生成器模型
        # 将传入的输入通道数、输出通道数和每个卷积层的通道数存储到三个参数中
        self.input_nc = input_nc
        self.output_nc = output_nc
        self.ngf = ngf
        # 创建一个列表model,用于存储生成器模型的层
        model = [nn.ReflectionPad2d(3), # 进行3个像素的反射填充
       			 # 进行7x7的卷积操作,卷积核大小为7,填充为0,输出通道数为ngf
                 nn.Conv2d(input_nc, ngf, kernel_size=7, padding=0, bias=True),
                 # 经过nn.InstanceNorm2d和ReLU激活函数
                 nn.InstanceNorm2d(ngf),
                 nn.ReLU(True)]
# 使用循环添加了若干个下采样块。每个下采样块由nn.Conv2d、nn.InstanceNorm2d和ReLU激活函数组成,其中卷积操作的步长为2,实现了图像的尺寸减半。
        n_downsampling = 2 # 下采样的层数
# 在每次循环中,计算mult的值,它是一个倍数因子,用于确定当前卷积层的输入通道数和输出通道数之间的倍数关系。在每个下采样步骤中,输入通道数ngf * mult通过nn.Conv2d进行卷积操作,卷积核大小为3x3,步长为2,填充为1,输出通道数为ngf * mult * 2。接着,通过nn.InstanceNorm2d进行实例归一化,然后使用ReLU激活函数。
        for i in range(n_downsampling): # 对输入特征图进行多次下采样操作
            mult = 2**i
            model += [nn.Conv2d(ngf * mult, ngf * mult * 2, kernel_size=3,
                                stride=2, padding=1, bias=True),
                      nn.InstanceNorm2d(ngf * mult * 2),
                      nn.ReLU(True)]
        mult = 2**n_downsampling
# 使用循环添加了n_blocks个残差块,每个残差块由ResNetBlock组成,其中ngf * mult表示残差块的输入和输出通道数。
        for i in range(n_blocks):
            model += [ResNetBlock(ngf * mult)]
# 使用循环添加了若干个上采样块。每个上采样块由nn.ConvTranspose2d、nn.InstanceNorm2d和ReLU激活函数组成,其中卷积操作的步长为2,实现了图像的尺寸增加。
# 通过nn.ConvTranspose2d进行反卷积操作,卷积核大小为3x3,步长为2,填充为1,输出通道数为ngf * mult / 2。输出通道数是下采样层输出通道数的一半。接着,通过nn.InstanceNorm2d进行实例归一化,然后使用ReLU激活函数。
#反卷积层的输出通道数逐渐减小,而空间尺寸逐渐增大,实现了图像的上采样。
        for i in range(n_downsampling):
            mult = 2**(n_downsampling - i)
            model += [nn.ConvTranspose2d(ngf * mult, int(ngf * mult / 2),
                                         kernel_size=3, stride=2,
                                         padding=1, output_padding=1,
                                         bias=True),
                      nn.InstanceNorm2d(int(ngf * mult / 2)),
                      nn.ReLU(True)]
# 通过nn.ReflectionPad2d进行3个像素的反射填充,使用nn.Conv2d进行7x7的卷积操作,输出通道数为output_nc,最后经过nn.Tanh激活函数
        model += [nn.ReflectionPad2d(3)]
        model += [nn.Conv2d(ngf, output_nc, kernel_size=7, padding=0)]
        model += [nn.Tanh()]
        self.model = nn.Sequential(*model)
# 将输入数据传入生成器模型的self.model中进行前向传播,得到生成的输出。
    def forward(self, input):
        return self.model(input)
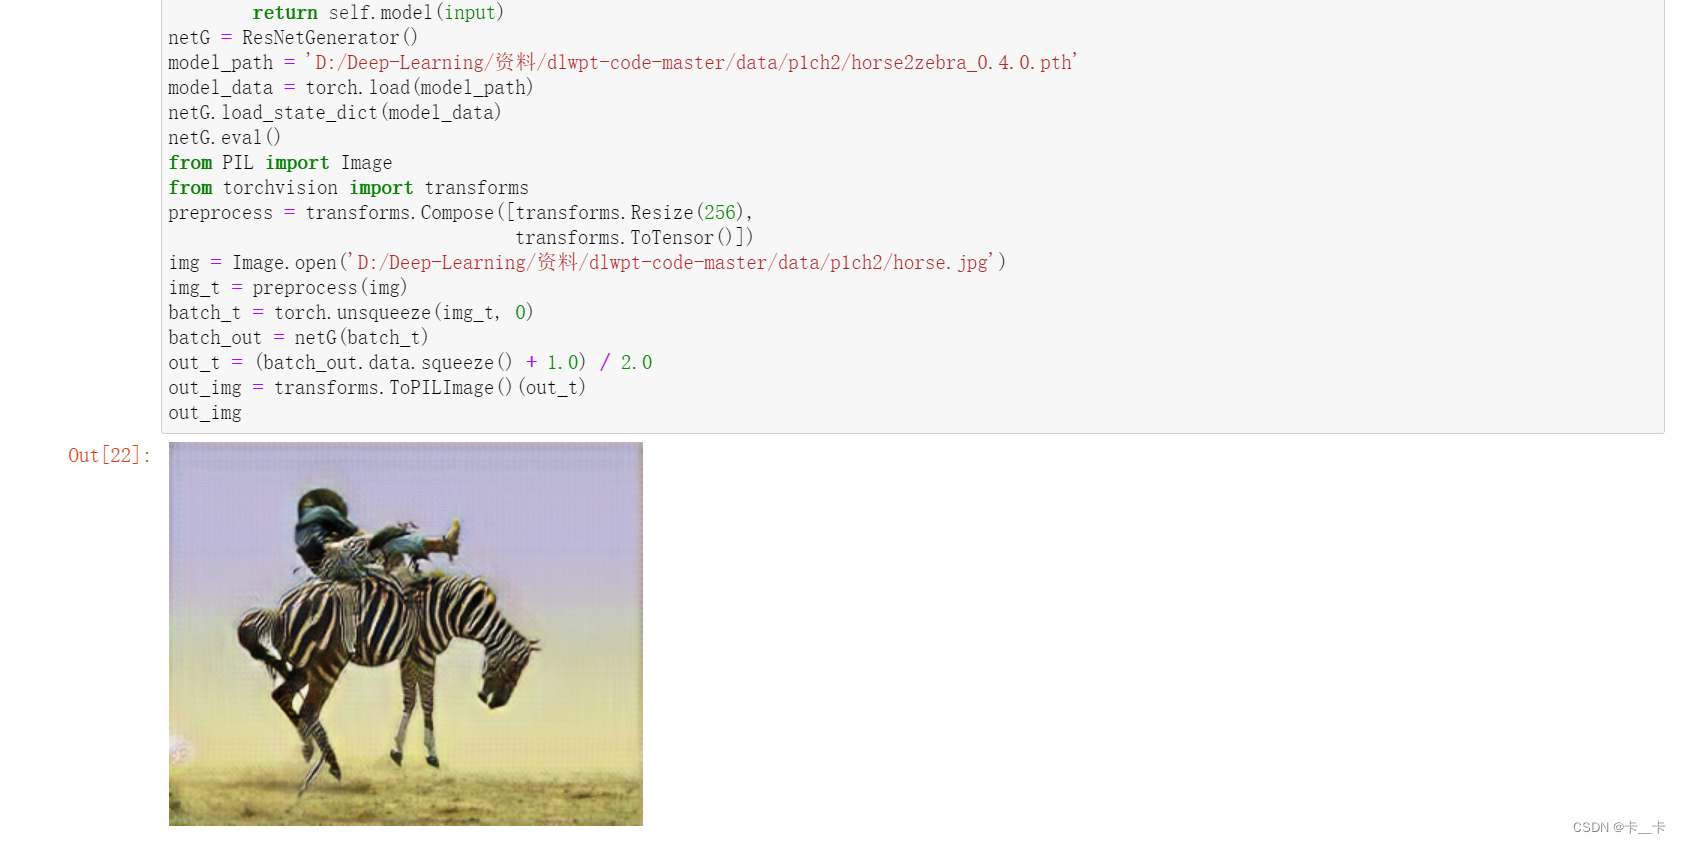
创建ResNetGenerator的实例对象netG
netG = ResNetGenerator()
We can load those into ResNetGenerator using the model’s load_state_dict method:
model_path = 'D:/Deep-Learning/资料/dlwpt-code-master/data/p1ch2/horse2zebra_0.4.0.pth' # 预训练模型的存储位置
model_data = torch.load(model_path) # 加载模型参数文件
netG.load_state_dict(model_data) # 将加载的模型参数数据加载到netG模型中,使netG模型的参数与预训练模型一致

At this point, netG has acquired all the knowledge it achieved during training.
Let’s put the network in eval mode, as we did for resnet101:
netG.eval()
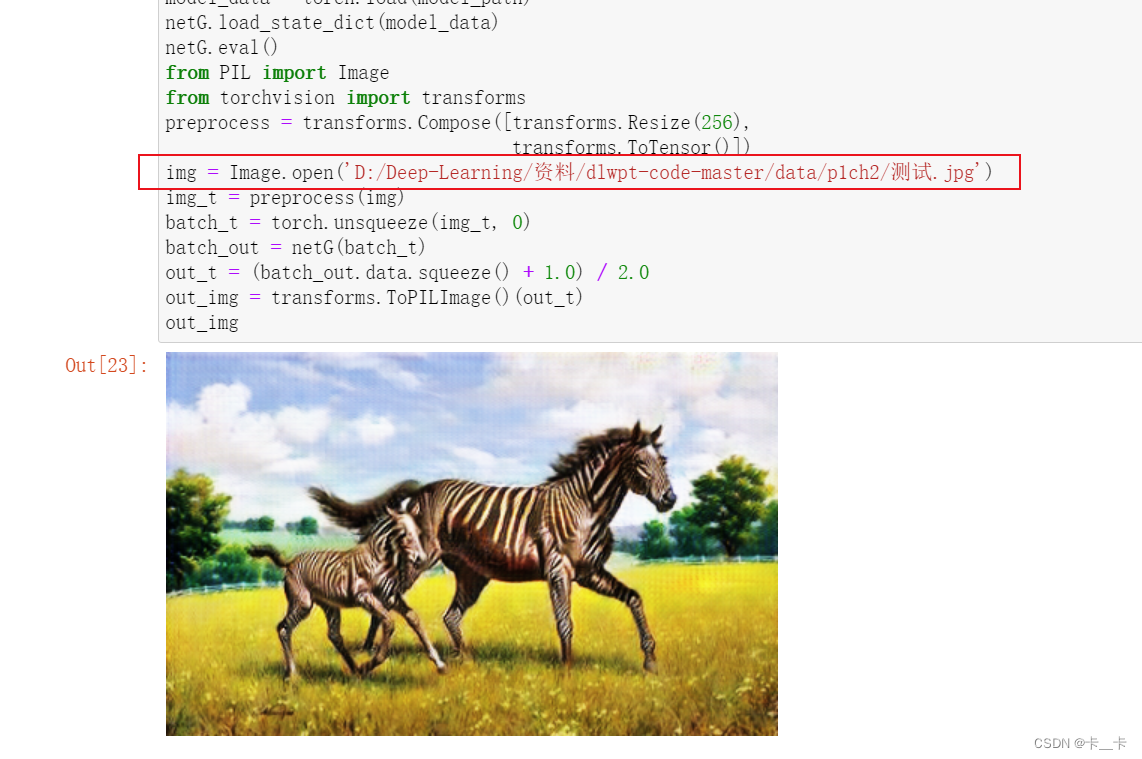
It takes an image, recognizes one or more horses in it by looking at pixels, and individually modifies the values of those pixels so that what comes out looks like a credible zebra.
First, we need to import PIL and torchvision. Then we define a few input transformations to make sure data enters the network with the right shape and size:
from PIL import Image
from torchvision import transforms
preprocess = transforms.Compose([transforms.Resize(256), # 将图像的大小调整为256x256像素,保持图像的长宽比不变
                                 transforms.ToTensor()]) # 将图像转换为Tensor对象
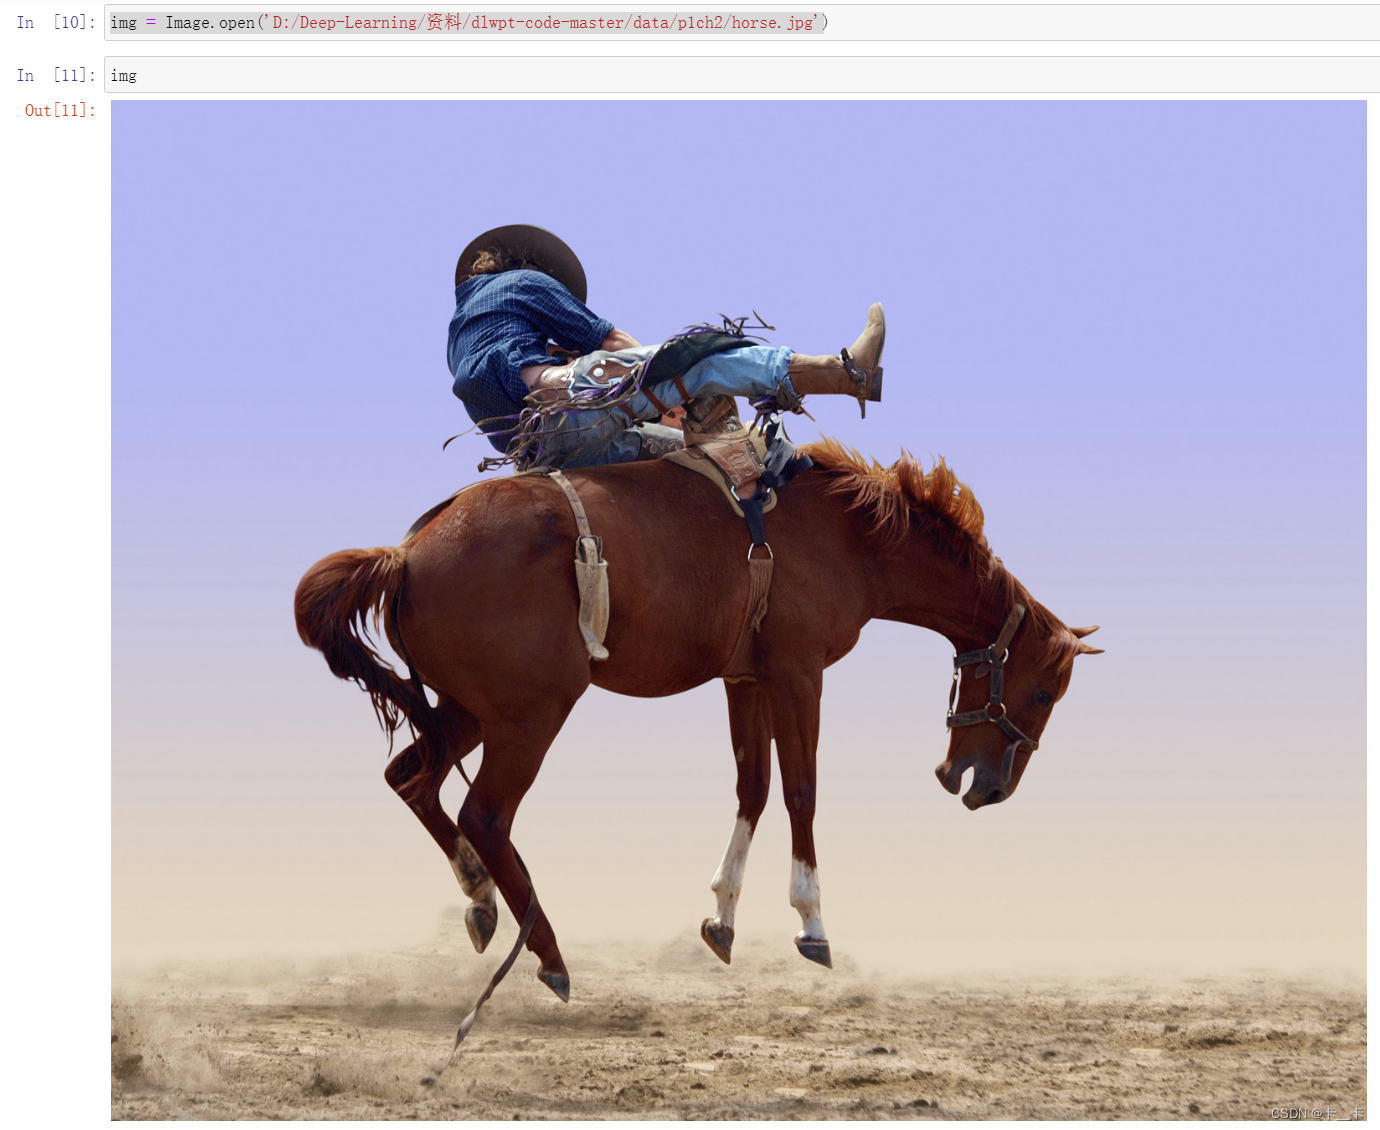
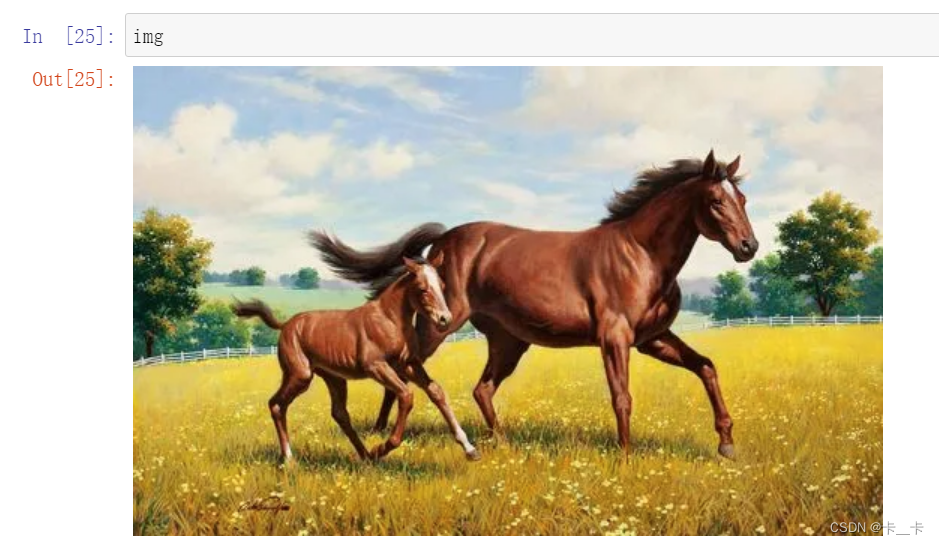
Let’s open a horse file
img = Image.open('D:/Deep-Learning/资料/dlwpt-code-master/data/p1ch2/horse.jpg')
img
Anyhow, let’s pass it through preprocessing and turn it into a properly shaped variable:
img_t = preprocess(img) # 按照预处理操作序列进行处理
batch_t = torch.unsqueeze(img_t, 0) # unsqueeze增维
batch_out = netG(batch_t) # 将输入的图像批次数据传递给netG模型进行前向传播,即生成器的推断过程
batch_out is now the output of the generator, which we can convert back to an image:
out_t = (batch_out.data.squeeze() + 1.0) / 2.0 # squeeze降维,然后进行缩放和平移操作,以使其像素值范围在0到1之间
out_img = transforms.ToPILImage()(out_t) # 将处理后的图像数据转换为PIL图像对象,以便进行可视化
out_img
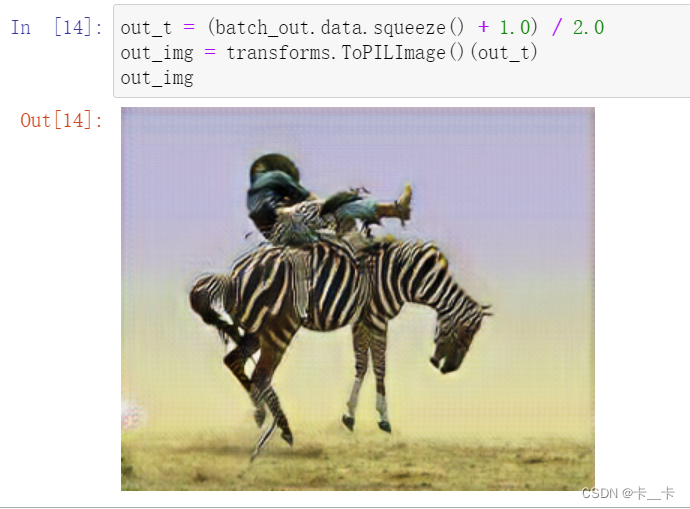
The generator has learned to produce an image that would fool the discriminator into thinking that was a zebra, and there was nothing fishy about the image.
总结
class ResNetBlock(nn.Module):
    def __init__(self, dim):
        super(ResNetBlock, self).__init__()
        self.conv_block = self.build_conv_block(dim)

    def build_conv_block(self, dim):
        conv_block = []
        conv_block += [nn.ReflectionPad2d(1)]
        conv_block += [nn.Conv2d(dim, dim, kernel_size=3, padding=0, bias=True),
                       nn.InstanceNorm2d(dim),
                       nn.ReLU(True)]
        conv_block += [nn.ReflectionPad2d(1)]

        conv_block += [nn.Conv2d(dim, dim, kernel_size=3, padding=0, bias=True),
                       nn.InstanceNorm2d(dim)]
        return nn.Sequential(*conv_block)

    def forward(self, x):
        out = x + self.conv_block(x)
        return out

class ResNetGenerator(nn.Module):
    def __init__(self, input_nc=3, output_nc=3, ngf=64, n_blocks=9):
        assert(n_blocks >= 0)
        super(ResNetGenerator, self).__init__()
        self.input_nc = input_nc
        self.output_nc = output_nc
        self.ngf = ngf
        model = [nn.ReflectionPad2d(3),
                 nn.Conv2d(input_nc, ngf, kernel_size=7, padding=0, bias=True),
                 nn.InstanceNorm2d(ngf),
                 nn.ReLU(True)]
        n_downsampling = 2
        for i in range(n_downsampling):
            mult = 2**i
            model += [nn.Conv2d(ngf * mult, ngf * mult * 2, kernel_size=3,
                                stride=2, padding=1, bias=True),
                      nn.InstanceNorm2d(ngf * mult * 2),
                      nn.ReLU(True)]
        mult = 2**n_downsampling
        for i in range(n_blocks):
            model += [ResNetBlock(ngf * mult)]
        for i in range(n_downsampling):
            mult = 2**(n_downsampling - i)
            model += [nn.ConvTranspose2d(ngf * mult, int(ngf * mult / 2),
                                         kernel_size=3, stride=2,
                                         padding=1, output_padding=1,
                                         bias=True),
                      nn.InstanceNorm2d(int(ngf * mult / 2)),
                      nn.ReLU(True)]
        model += [nn.ReflectionPad2d(3)]
        model += [nn.Conv2d(ngf, output_nc, kernel_size=7, padding=0)]
        model += [nn.Tanh()]
        self.model = nn.Sequential(*model)

    def forward(self, input): # <3>
        return self.model(input)
netG = ResNetGenerator()
model_path = 'D:/Deep-Learning/资料/dlwpt-code-master/data/p1ch2/horse2zebra_0.4.0.pth'
model_data = torch.load(model_path)
netG.load_state_dict(model_data)
netG.eval()
from PIL import Image
from torchvision import transforms
preprocess = transforms.Compose([transforms.Resize(256),
                                 transforms.ToTensor()])
img = Image.open('D:/Deep-Learning/资料/dlwpt-code-master/data/p1ch2/horse.jpg') # 选择图片
img_t = preprocess(img)
batch_t = torch.unsqueeze(img_t, 0)
batch_out = netG(batch_t)
out_t = (batch_out.data.squeeze() + 1.0) / 2.0
out_img = transforms.ToPILImage()(out_t)
out_img # 输出
若需更换图片只需要改变路径即可
资料下载:
提取码:t0is
模型:horse2zebra_0.4.0.pth
马图片:horse.jpg