文章目录
- 一、工程环境
- 二、OpenMV
- 1. 色块选定
- 2. 色块识别
- 3. 串口通信
- 4. WiFi无线图传
- 5. 代码汇总
- 三、MSP430
- 四、视频演示
一、工程环境
1. 软件
- OpenMV IDE
- Code Composer Studio
- Microsoft Edge
2. 硬件
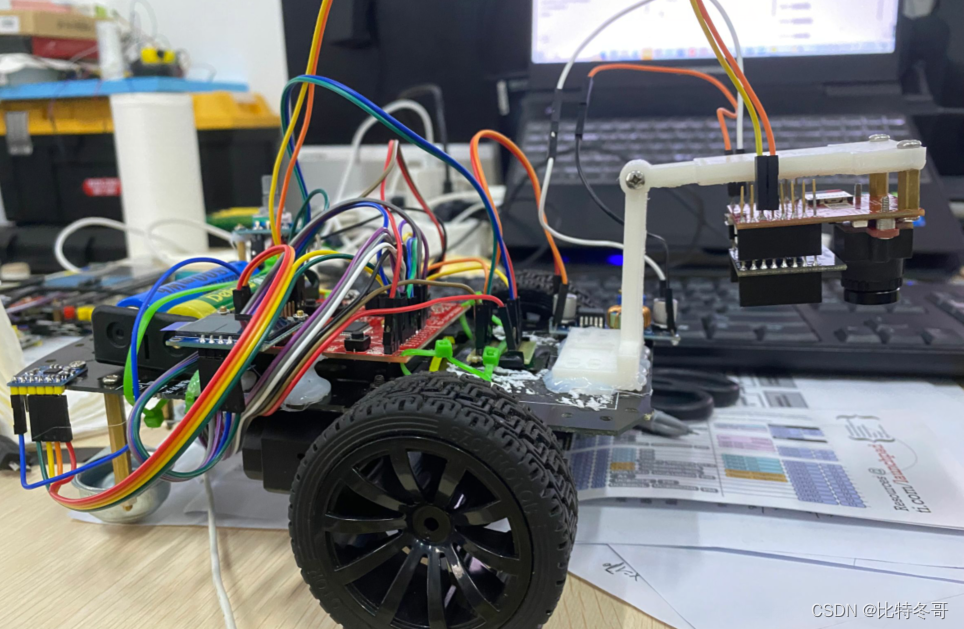
- MSP430F5529
- OpenMV4 H7及其 WiFi拓展板
- 视觉云台
- 旋转编码器、oled显示屏等等
- iPone
二、OpenMV
循迹其本质为寻找色块,即通过色块的位置判定小车走向。
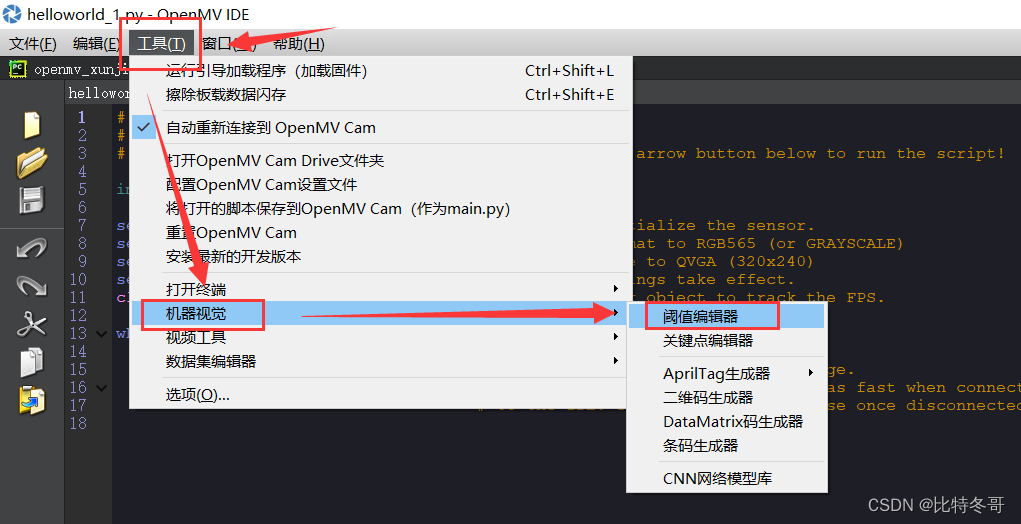
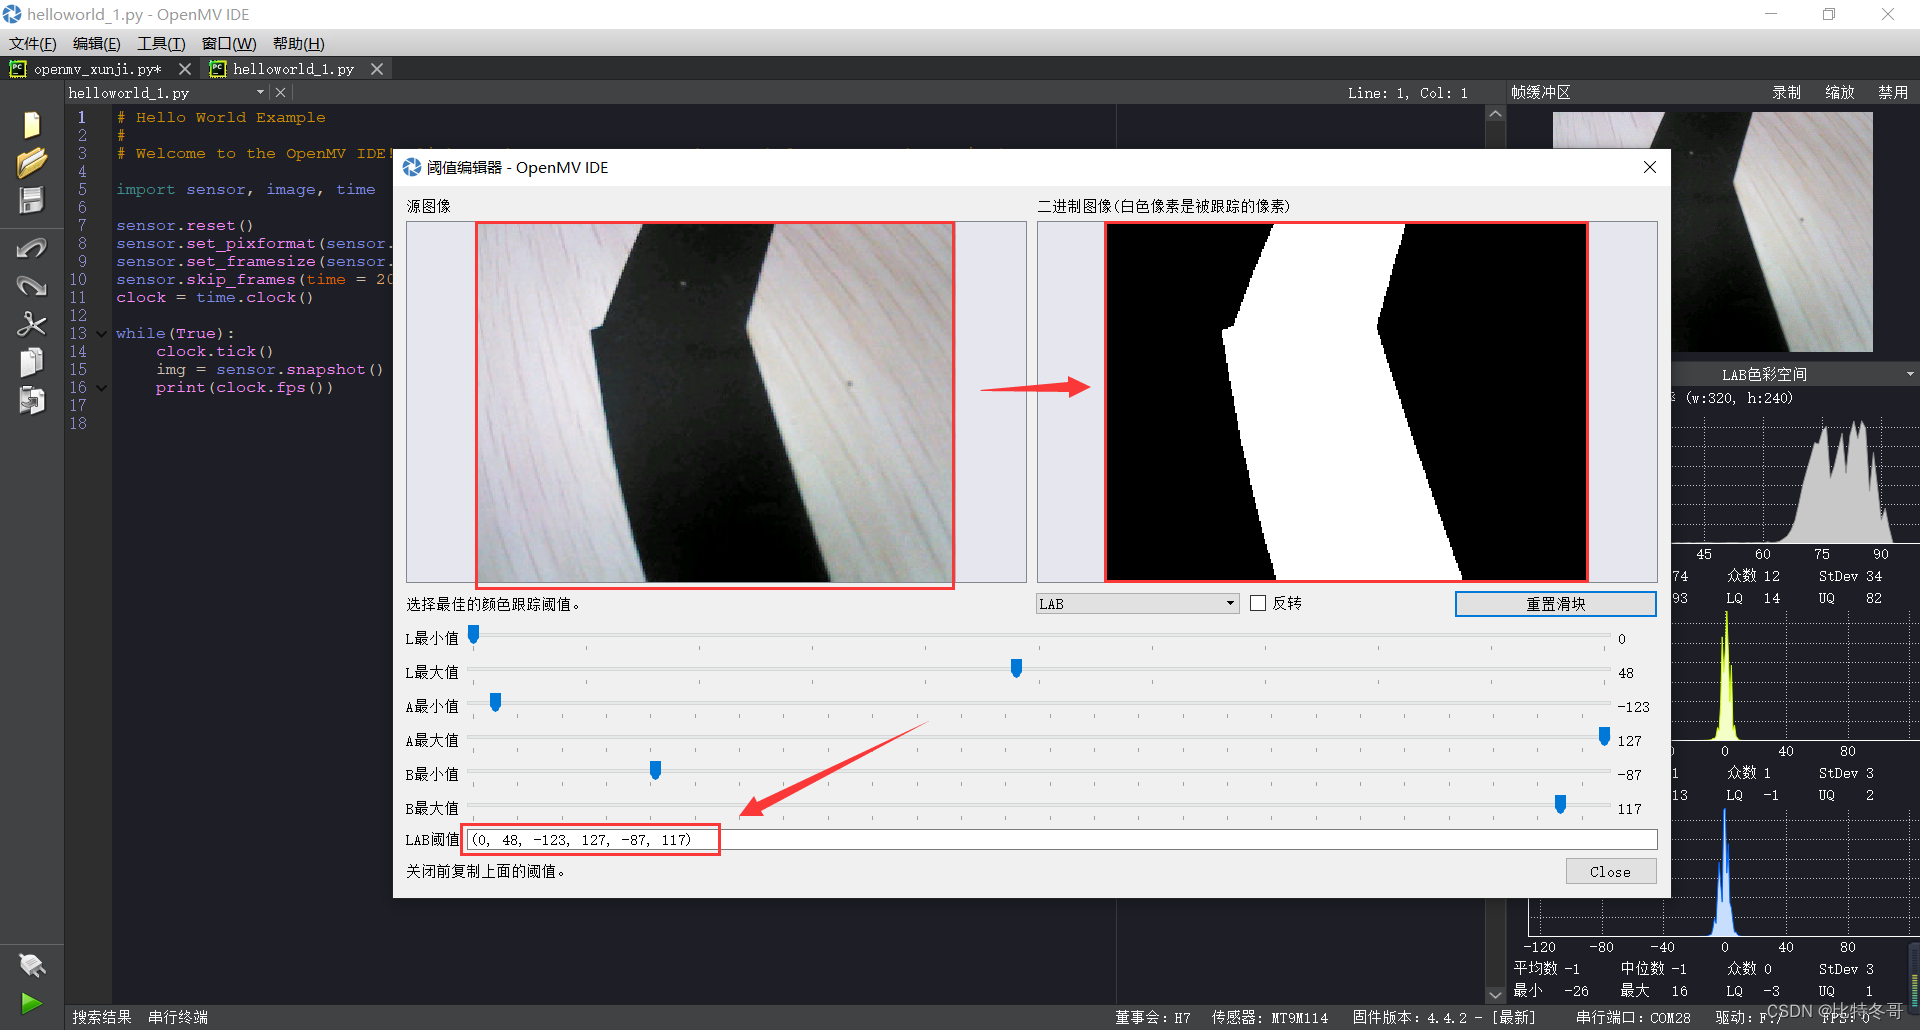
1. 色块选定
可在OpenMV IDE中选中帧缓冲区的图片进行阈值选择,将你所选择的色块瞄成白色,将阈值剔出来作色块识别。
具体操作如下:
2. 色块识别
色块识别实例代码可在OpenMV官网查看,以下我已贴出以供参考:
以下参考资料来源于OpenMV官网
# Single Color RGB565 Blob Tracking Example
#
# This example shows off single color RGB565 tracking using the OpenMV Cam.

import sensor, image, time, math

threshold_index = 0 # 0 for red, 1 for green, 2 for blue

# Color Tracking Thresholds (L Min, L Max, A Min, A Max, B Min, B Max)
# The below thresholds track in general red/green/blue things. You may wish to tune them...
thresholds = [(30, 100, 15, 127, 15, 127), # generic_red_thresholds
              (30, 100, -64, -8, -32, 32), # generic_green_thresholds
              (0, 30, 0, 64, -128, 0)] # generic_blue_thresholds

sensor.reset()
sensor.set_pixformat(sensor.RGB565)
sensor.set_framesize(sensor.QVGA)
sensor.skip_frames(time = 2000)
sensor.set_auto_gain(False) # must be turned off for color tracking
sensor.set_auto_whitebal(False) # must be turned off for color tracking
clock = time.clock()

# Only blobs that with more pixels than "pixel_threshold" and more area than "area_threshold" are
# returned by "find_blobs" below. Change "pixels_threshold" and "area_threshold" if you change the
# camera resolution. "merge=True" merges all overlapping blobs in the image.

while(True):
    clock.tick()
    img = sensor.snapshot()
    for blob in img.find_blobs([thresholds[threshold_index]], pixels_threshold=200, area_threshold=200, merge=True):
        # These values depend on the blob not being circular - otherwise they will be shaky.
        if blob.elongation() > 0.5:
            img.draw_edges(blob.min_corners(), color=(255,0,0))
            img.draw_line(blob.major_axis_line(), color=(0,255,0))
            img.draw_line(blob.minor_axis_line(), color=(0,0,255))
        # These values are stable all the time.
        img.draw_rectangle(blob.rect())
        img.draw_cross(blob.cx(), blob.cy())
        # Note - the blob rotation is unique to 0-180 only.
        img.draw_keypoints([(blob.cx(), blob.cy(), int(math.degrees(blob.rotation())))], size=20)
    print(clock.fps())
即需先找到色块位于循迹信号线中心的位置,可通过查看色块中心点的坐标得到。
for blob in img.find_blobs([thresholds[threshold_index]],
即blobs是一个列表
find_blobs对象返回的是多个blob的列表。(注意区分blobs和blob,这只是一个名字,用来区分多个色块,和一个色块)。
列表类似与C语言的数组,一个blobs列表里包含很多blob对象,blobs对象就是色块,每个blobs对象包含一个色块的信息。
blob色块对象
blob有多个方法:
-
blob.rect() 返回这个色块的外框——矩形元组(x, y, w, h),可以直接在image.draw_rectangle中使用。
-
blob.x() 返回色块的外框的x坐标(int),也可以通过blob[0]来获取。
-
blob.y() 返回色块的外框的y坐标(int),也可以通过blob[1]来获取。
-
blob.w() 返回色块的外框的宽度w(int),也可以通过blob[2]来获取。
-
blob.h() 返回色块的外框的高度h(int),也可以通过blob[3]来获取。
-
blob.pixels() 返回色块的像素数量(int),也可以通过blob[4]来获取。
-
blob.cx() 返回色块的外框的中心x坐标(int),也可以通过blob[5]来获取。
-
blob.cy() 返回色块的外框的中心y坐标(int),也可以通过blob[6]来获取。
-
blob.rotation() 返回色块的旋转角度(单位为弧度)(float)。如果色块类似一个铅笔,那么这个值为0~180°。如果色块是一个圆,那么这个值是无用的。如果色块完全没有对称性,那么你会得到0 ~ 360°,也可以通过blob[7]来获取。
-
blob.code() 返回一个16bit数字,每一个bit会对应每一个阈值。举个例子:
blobs = img.find_blobs([red, blue, yellow], merge=True)
如果这个色块是红色,那么它的code就是0001,如果是蓝色,那么它的code就是0010。注意:一个blob可能是合并的,如果是红色和蓝色的blob,那么这个blob就是0011。这个功能可以用于查找颜色代码。也可以通过blob[8]来获取。
-
blob.count() 如果merge=True,那么就会有多个blob被合并到一个blob,这个函数返回的就是这个的数量。如果merge=False,那么返回值总是1。也可以通过blob[9]来获取。
-
blob.area() 返回色块的外框的面积。应该等于(w * h)
-
blob.density() 返回色块的密度。这等于色块的像素数除以外框的区域。如果密度较低,那么说明目标锁定的不是很好。
比如,识别一个红色的圆,返回的blob.pixels()是目标圆的像素点数,blob.area()是圆的外接正方形的面积。
3. 串口通信
相同OpenMV官网也已提供示例代码,我贴出如下以供参考:
import sensor, image, time
import json
from pyb import UART
# For color tracking to work really well you should ideally be in a very, very,
# very, controlled enviroment where the lighting is constant...
yellow_threshold   = ( 46,  100,  -68,   72,   58,   92)
# You may need to tweak the above settings for tracking green things...
# Select an area in the Framebuffer to copy the color settings.

sensor.reset() # Initialize the camera sensor.
sensor.set_pixformat(sensor.RGB565) # use RGB565.
sensor.set_framesize(sensor.QQVGA) # use QQVGA for speed.
sensor.skip_frames(10) # Let new settings take affect.
sensor.set_auto_whitebal(False) # turn this off.
clock = time.clock() # Tracks FPS.

uart = UART(3, 115200)

while(True):
    clock.tick() # Track elapsed milliseconds between snapshots().
    img = sensor.snapshot() # Take a picture and return the image.

    blobs = img.find_blobs([yellow_threshold])
    if blobs:
        #print('sum : %d'% len(blobs))
        data=[]
        for b in blobs:
            # Draw a rect around the blob.
            img.draw_rectangle(b.rect()) # rect
            img.draw_cross(b.cx(), b.cy()) # cx, cy
            data.append((b.cx(),b.cy()))

        #{(1,22),(-3,33),(22222,0),(9999,12),(0,0)}
        data_out = json.dumps(set(data))
        uart.write(data_out +'\n')
        print('you send:',data_out)
    else:
        print("not found!")
所以,需将以上俩个代码作个简单合并,即可将设别到色块的位置通过串口发送给单片机,单片机及时做出回应。
4. WiFi无线图传
此功能需购买WiFi拓展版,且官方也已给出示例代码,我贴出如下以供参考:
# MJPEG Streaming AP.
#
# 这个例子展示了如何在AccessPoint模式下进行MJPEG流式传输。
# Android上的Chrome,Firefox和MJpegViewer App已经过测试。
# 连接到OPENMV_AP并使用此URL:http://192.168.1.1:8080查看流。

import sensor, image, time, network, usocket, sys

SSID ='OPENMV_AP'    # Network SSID
KEY  ='1234567890'   # wifi密码(必须为10字符)
HOST = ''           # 使用第一个可用的端口
PORT = 8080         # 任意非特权端口

# 重置传感器
sensor.reset()
# 设置传感器设置
sensor.set_contrast(1)
sensor.set_brightness(1)
sensor.set_saturation(1)
sensor.set_gainceiling(16)
sensor.set_framesize(sensor.QQVGA)
sensor.set_pixformat(sensor.GRAYSCALE)

# 在AP模式下启动wlan模块。
wlan = network.WINC(mode=network.WINC.MODE_AP)
wlan.start_ap(SSID, key=KEY, security=wlan.WEP, channel=2)

#您可以阻止等待客户端连接
#print(wlan.wait_for_sta(10000))

def start_streaming(s):
    print ('Waiting for connections..')
    client, addr = s.accept()
    # 将客户端套接字超时设置为2秒
    client.settimeout(2.0)
    print ('Connected to ' + addr[0] + ':' + str(addr[1]))

    # 从客户端读取请求
    data = client.recv(1024)
    # 应该在这里解析客户端请求

    # 发送多部分head
    client.send("HTTP/1.1 200 OK\r\n" \
                "Server: OpenMV\r\n" \
                "Content-Type: multipart/x-mixed-replace;boundary=openmv\r\n" \
                "Cache-Control: no-cache\r\n" \
                "Pragma: no-cache\r\n\r\n")

    # FPS clock
    clock = time.clock()

    # 开始流媒体图像
    #注:禁用IDE预览以增加流式FPS。
    while (True):
        clock.tick() # 跟踪snapshots()之间经过的毫秒数。
        frame = sensor.snapshot()
        cframe = frame.compressed(quality=35)
        header = "\r\n--openmv\r\n" \
                 "Content-Type: image/jpeg\r\n"\
                 "Content-Length:"+str(cframe.size())+"\r\n\r\n"
        client.send(header)
        client.send(cframe)
        print(clock.fps())

while (True):
    # 创建服务器套接字
    s = usocket.socket(usocket.AF_INET, usocket.SOCK_STREAM)
    try:
        # Bind and listen
        s.bind([HOST, PORT])
        s.listen(5)

        # 设置服务器套接字超时
        # 注意:由于WINC FW bug,如果客户端断开连接,服务器套接字必须
        # 关闭并重新打开。在这里使用超时关闭并重新创建套接字。
        s.settimeout(3)
        start_streaming(s)
    except OSError as e:
        s.close()
        print("socket error: ", e)
        #sys.print_exception(e)
此功能可将摄像头拍到的图片以图片流的方式传输到网址上,用户在PC或移动端都可自由查看。
5. 代码汇总
以下贴出我汇总后的示例代码:
# Single Color RGB565 Blob Tracking Example
#
# This example shows off single color RGB565 tracking using the OpenMV Cam.

import sensor, image, time, math, pyb, json

from image import SEARCH_EX, SEARCH_DS
from pyb import UART


uart = UART(3, 115200)


threshold_index = 0 # 0 for red, 1 for green, 2 for blue

# Color Tracking Thresholds (L Min, L Max, A Min, A Max, B Min, B Max)uo
# The below thresholds track in general red/green/blue things. You may wish to tune them...

thresholds = [(42, 0, -128, 127, -90, 127), # 黑  色块阈值选择
              (70, 20, 14, 127, -128, 127), # 红
              (0, 30, 0, 64, -128, 0)]

sensor.reset()     #摄像头重置
sensor.set_pixformat(sensor.RGB565)
sensor.set_framesize(sensor.QVGA)   # 设置分辨率大小
sensor.skip_frames(time = 2000)
sensor.set_auto_gain(False) # must be turned off for color tracking
sensor.set_auto_whitebal(False) # must be turned off for color tracking
clock = time.clock()
ROI=(75,66,184,121)   #感应区域设置
# Only blobs that with more pixels than "pixel_threshold" and more area than "area_threshold" are
# returned by "find_blobs" below. Change "pixels_threshold" and "area_threshold" if you change the
# camera resolution. "merge=True" merges all overlapping blobs in the image.

while(True):
    clock.tick()
    img = sensor.snapshot()  #截取摄像头的一个图像

    for blob in img.find_blobs([thresholds[0]], roi=ROI, x_stride=10, y_stride=5,pixels_threshold=10, area_threshold=10, merge=True):   #模板匹配函数
        img.draw_rectangle(blob.rect())  #给识别出来的色块画矩形
        img.draw_rectangle(ROI)  #给感应区画矩形

        print('x='+str(blob.cx())+'  y='+str(blob.cy()))
        x=blob.cx()
        #print(blob.area())
        if x>140 and x<200:
            uart.write("1")
            print("1")
        elif x>=100 and x<=140:
            uart.write("2")
            print("2")
        elif x>=60 and x<100:
            uart.write("3")
            print("3")
        elif x>=200 and x<=250:
            uart.write("4")
            print("4")
        elif x>250 and x<290:
            uart.write("5")
            print("5")


        # Note - the blob rotation is unique to 0-180 only.
        #img.draw_keypoints([(blob.cx(), blob.cy(), int(math.degrees(blob.rotation())))], size=20)
    #print(clock.fps())
测得车子位于信号上的色块x坐标为140~200,当然这只是我测得在我这的结果,具体还需自测。当x坐标减小时,即为偏向左,反偏右,此x值为距离左上角的x轴位置,即根据x坐标点的不同位置返回不同数值。
最后,将写好的代码保存到OpenMv Cam中,即为模块上电后启动该程序。

三、MSP430
此小节即为小车接受到OpenMV打过来的数据,作出相应动作,小车循迹这块我已经介绍许多遍了,相信大家也无需我多言,直接上代码
int main(void)
{
	WDTCTL = WDTPW | WDTHOLD;	// stop watchdog timer
	LED_Init();
	Anjian_Init();
	motor_gpio_init();
	OLED_Init();
    OLED_ShowString(10,7,"  OpenMV_Car",16,1);
	OLED_Refresh();
	openmv_init();
	InitMPU6050();
	TIMER_B0_Init(5);
	head();
	while(1)
	{


	    switch(flag)
	    {
	        case 1:
	            SetPwm_Init(24,1000,400);
	            SetPwm_Init(25,1000,400);
	            UCA0IE |= UCRXIE;
	            break;
	        case 2:
                SetPwm_Init(24,1000,200);
                SetPwm_Init(25,1000,500);
                UCA0IE |= UCRXIE;
	            break;
            case 3:
                SetPwm_Init(24,1000,100);
                SetPwm_Init(25,1000,600);
                UCA0IE |= UCRXIE;
                break;
            case 4:
                SetPwm_Init(24,1000,500);
                SetPwm_Init(25,1000,200);
                UCA0IE |= UCRXIE;
                break;
            case 5:
                SetPwm_Init(24,1000,600);
                SetPwm_Init(25,1000,100);
                UCA0IE |= UCRXIE;
                break;
	    }
	}
}


/* --------------   串口中断(OpenMV通信)    ----------------*/
// Echo back RXed character, confirm TX buffer is ready first,发送数据之前确定发送缓存准备好
#pragma vector=USCI_A0_VECTOR
__interrupt void USCI_A0_ISR(void)
{

  switch(__even_in_range(UCA0IV,4))
  {

  case 0:     //无中断
      break;                             // Vector 0 - no interrupt
  case 2:                                   // Vector 2 - RXIFG  接受中断

   while (!(UCA0IFG&UCTXIFG));    // USCI_A1 TX buffer ready?   UCTXIFG(USCI Transmit Interrupt Flag)

   if(UCA0RXBUF=='1'){
       flag=1;
   }
   else if(UCA0RXBUF=='2'){
       flag=2;
   }
   else if(UCA0RXBUF=='3'){
       flag=3;
   }
   else if(UCA0RXBUF=='4'){
       flag=4;
   }
   else if(UCA0RXBUF=='5'){
       flag=5;
   }
   OLED_ShowNum(65,24,flag,1,16,1);
   OLED_Refresh();
   UCA0IE &=~ UCRXIE;
   break;
  case 4:
      break;                             // Vector 4 - TXIFG  发送中断


  default: break;
  }
}
四、视频演示
OpenMV视觉循迹+WiFi无线图传