kubernets 笔记
kubernets 安装
1. 环境准备
- 硬件要求
- 内存:2GB+
- CPU:2 核+
- 硬盘:30GB+
- 本次环境说明
- 操作系统:CentOS 7.9
- 内核版本:3.10.0-1160.76.1.el7.x86_64
- k8s-m:192.168.222.3
- k8s-s01:192.168.222.4
- k8s-s02:192.168.222.5
2. 系统优化(三台服务都配置)
# 安装必需软件(非必要)
yum install -y conntrack ntpdate ntp ipvsadm ipset jq iptables curl sysstat libseccomp wgetvimnet-tools git
# 关闭防火墙和 设置 iptables 空规则
systemctl  stop firewalld  &&  systemctl  disable firewalld
yum -y install iptables-services  &&  systemctl  start iptables  &&  systemctl  enable iptables &&  iptables -F  &&  service iptables save
# 关闭 selinux 和交换分区
swapoff -a && sed -ri 's/.*swap.*/#&/' /etc/fstab  # 禁用 sawpoff
sed -i 's/enforcing/disabled/' /etc/selinux/config && setenforce 0
# 修改hosts 文件
cat /etc/hosts
192.168.222.3 k8s-m
192.168.222.5 k8s-s02
192.168.222.4 k8s-s01
# 修改内核参数
cat > /etc/sysctl.d/k8s.conf << EOF
net.bridge.bridge-nf-call-ip6tables = 1
net.bridge.bridge-nf-call-iptables = 1
net.ipv4.ip_forward = 1
EOF

sysctl --system
# 加载 ipvs 内核模块
modprobe ip_vs
modprobe ip_vs_rr
modprobe ip_vs_wrr
modprobe ip_vs_sh
modprobe nf_conntrack_ipv4

cat > /etc/modules-load.d/ip_vs.conf << EOF
ip_vs
ip_vs_rr
ip_vs_wrr
ip_vs_sh
nf_conntrack_ipv4
EOF
3. 安装 docker 和 kubernets(三台服务器都配置)
# 安装 docker
sudo yum remove docker*
sudo yum install -y yum-utils
sudo yum-config-manager --add-repo http://mirrors.aliyun.com/docker-ce/linux/centos/docker-ce.repo
yum install -y docker-ce docker-ce-cli containerd.io
systemctl enable docker
systemctl start docker
sudo mkdir -p /etc/docker

cat > /etc/docker/daemon.json << EOF
{
"registry-mirrors": ["https://gqs7xcfd.mirror.aliyuncs.com","https://hub-mirror.c.163.com"],
"exec-opts": ["native.cgroupdriver=systemd"],
"log-driver": "json-file",
"log-opts": {
"max-size": "100m"
},
"storage-driver": "overlay2"
}
EOF

sudo systemctl daemon-reload && systemctl restart docker
# 显示可安装的版本
yum list docker-ce --showduplicates | sort -r
# 这里推荐安装 19.03 版本
yum install docker-ce-19.03.5 docker-ce-cli-19.03.5 containerd.io
cat <<EOF > /etc/yum.repos.d/kubernetes.repo
[kubernetes]
name=Kubernetes
baseurl=http://mirrors.aliyun.com/kubernetes/yum/repos/kubernetes-el7-x86_64
enabled=1
gpgcheck=0
repo_gpgcheck=0
gpgkey=http://mirrors.aliyun.com/kubernetes/yum/doc/yum-key.gpg
http://mirrors.aliyun.com/kubernetes/yum/doc/rpm-package-key.gpg
EOF
yum install -y kubelet-1.21.0 kubeadm-1.21.0 kubect1-1.21.0
systemctl enable kubelet && systemctl start kubelet
4. 创建主节点(master)
kubeadm config print init-defaults > kubeadm-config.yaml

vim kubeadm-config.yaml   # 配置以下内容,有的就改没有的就添加
-------------------------------------------------------
localAPIEndpoint:
  advertiseAddress: 192.168.222.3  # 主机 IP
kubernetesVersion: v1.21.0
networking:
  dnsDomain: cluster.local    # 网络范围不能重合,且不能和主机重合
  podSubnet: "10.244.0.0/16"  # ppod 的网络范围
  serviceSubnet: 10.96.0.0/12 # service 的网络范围
scheduler: {}
---
apiVersion: kubeproxy.config.k8s.io/v1alpha1
kind: KubeProxyConfiguration    # 启用 ipvs
featureGates:
        SupportIPVSProxyMode: true
mode: ipvs
-------------------------------------------------------

kubeadm init --config=kubeadm-config.yaml | tee kubeadm-init.log
mkdir -p $HOME/.kube
cp -i /etc/kubernetes/admin.conf $HOME/.kube/config
chown $(id -u):$(id -g) $HOME/.kube/config
# 部署 calico 网络
wget https://docs.projectcalico.org/manifests/calico.yaml
kubectl apply -f calico.yaml
5. 将 node 加入 master
# 复制 kubeadm-init.log 中的 kubeadm join 一句话,运行至 node 即可
#例如:
kubeadm join 192.168.80.142:6443 --token abcdef.0123456789abcdef     --discovery-token-ca-cert-hash sha256:8bfee48fe1560b64828d3e375fb9944a460933e9057cf60bd5b7ede41437ea45
kubectl 命令总汇
# 补全命令增强版
# 执行以下三行命令即可
yum install bash-completion
echo 'source <(kubectl completion bash)' >>~/.bashrc
source /usr/share/bash-completion/bash_completion
排错命令
# 获取基本信息
kubectl get 资源类型(pod、deploy、nodes..)[onw]
	 -o wide:显示详细信息
	 -o yaml:以 yaml 的形式展现
	 -n 命名空间:显示指定命名空间下的资源(默认default)
	 -A:查看所有命名空间下的指定资源
	 -w:动态查看更改
	 --show-labels:显示标签
kubectl api-resources  # 获取所有资源类型
# 获取详细信息
kubectl describe 资源类型 资源名称
# 查看日志信息
kubectl logs 资源类型 资源名称
	-f:持续监控日志信息
# 进入容器
kubectl exec -it POD_NAME  -- /bin/sh   ###  进入容器的命令,还可跟 -c 命令
创建、删除命令
kubectl apply -f 文件名
kubectl delete -f 文件名
如何编写好各种 yaml
# 1. 获取该资源的 yaml(还可以使用 vscode )
kubectl run/create 资源类型 资源名 --image=镜像名称 --dry-run -o yaml
# 2. 将获取到的 yaml 文件status 以上的内容复制下来
# 3. 如果有些内容看不懂可以使用如下命令
$ kubectl explain pod.apiVersion
KIND:     Pod # 类型
VERSION:  v1  # 版本

FIELD:    apiVersion <string>  # 可接受的数据类型

DESCRIPTION:  # 描述
     APIVersion defines the versioned schema of this representation of an
     object. Servers should convert recognized schemas to the latest internal
     value, and may reject unrecognized values. More info:
     https://git.k8s.io/community/contributors/devel/api-conventions.md#resources
# 4. 然后根据自己的需求修改 yaml
apiVersion: apps/v1  # 资源版本
kind: Pod   # 资源类型 kubectl api-resources
# 以上 type 信息
metadata:  # 元数据
# 删除这行  creationTimestamp: null
  name: pod # 资源名称
# 以上是元数据部分
spec:  # 指定规格信息(期望)
  containers:
  - image: nginx
    name: mynginx
# 以上资源的完整描述
status:{}
# status 不用我们写,是 k8s 集群实时更新的状态信息。
Pod
pod 的定义
自主式 pod
- 自主式就是没有控制器管理的 pod,而 pod 就是多个容器的集合。
- 这些容器都和 pause 共用一份网络和挂载。
- 在开启一个pod的时候,必然会开启 pause 容器。
pod 的生命周期
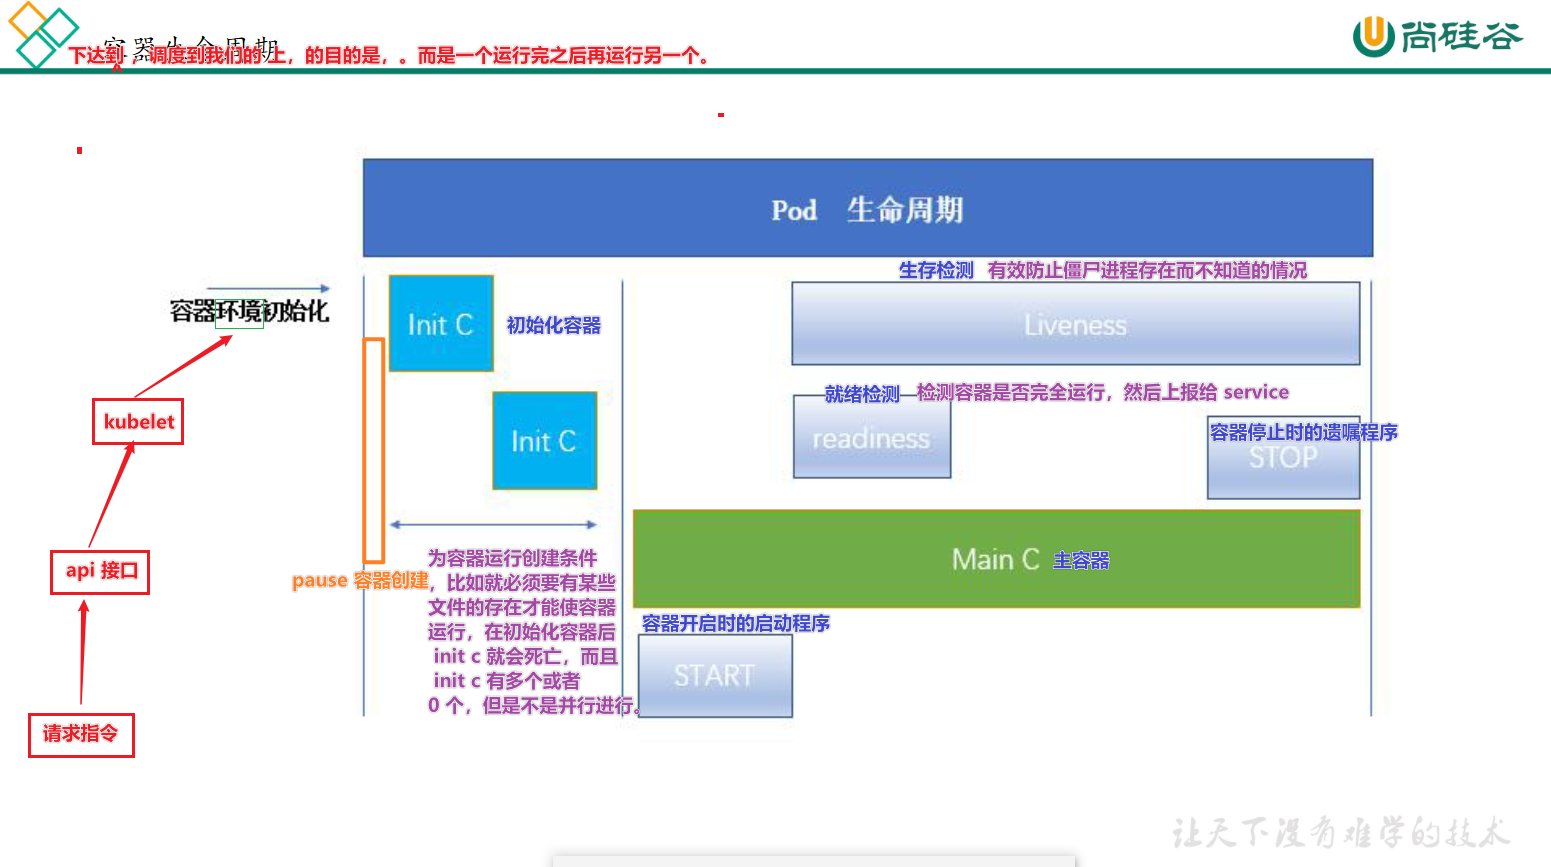
Pod 的五种状态
- 挂起(Pending):Pod已被Kubernetes系统接受,但有一个或者多个容器镜像尚未创建。等待时间包括调度Pod的时间和通过网络下载镜像的时间,这可能需要花点时间
- 运行中(Running):该Pod已经绑定到了一个节点上,Pod中所有的容器都已被创建。至少有一个容器正在运行,或者正处于启动或重启状态
- 成功(Succeeded):Pod中的所有容器都被成功终止,并且不会再重启
- 失败(Failed):Pod中的所有容器都已终止了,并且至少有一个容器是因为失败终止。也就是说,容器以非0状态退出或者被系统终止
- 未知(Unknown):因为某些原因无法取得Pod的状态,通常是因为与Pod所在主机通信失
部署pod
以 yaml 方式部署
# pod 模板
apiVersion: v1
kind: Pod
metadata:
  name: nginx  # pod 名
spec:
  containers:
  - name: nginx # 容器名
    image: nginx:1.14.2 # 容器镜像名称
    ports: # 开放的端口
    - containerPort: 80
  - name: # 还可以创建多个容器
kubectl apply -f pod.yaml
以命令行的方式部署
# kubectl create 帮我们创建k8s集群中的一些对象
kubectl create deployment 这次部署的名字 --image=应用的镜像
kubectl create deployment my-nginx --image=nginx

#最终在一个机器上有pod、这个Pod其实本质里面就是一个容器
k8s_nginx_my-nginx-6b74b79f57-snlr4_default_dbeac79e-1ce9-42c9-bc59-c8ca0412674b_0
### k8s_镜像(nginx)-pod名(my-nginx-6b74b79f57-sn1r4)_容器名(defau1t_dbeac79e-1ce9-42c9-bc59-c8ca0412674b_0)

---------------------explain--comamad------------------------
# Create a deployment with command
kubectl create deployment my-nginx --image=nginx
# Create a deployment named my-nginx that runs the nginx image with 3 replicas.
kubectl create deployment my-nginx --image=nginx --replicas=3
# Create a deployment named my-nginx that runs the nginx image and expose port 80.
kubectl create deployment my-nginx --image=nginx --port=80
pod 的常用设置
使用私有镜像部署 pod
## 创建 secret 对象,保存密码信息 # 注意名称空间,不同的名称空间并不共享 kubectl create secret docker-registry image-secret \ --docker-server="registry.cn-hangzhou.aliyuncs.com" \ --docker-username="听风声168" \ --docker-password="123456gxGx"apiVersion: v1 kind: Pod metadata: name: "private-image" namespace: default labels: app: "private-image" spec: imagePullSecrets: # 镜像拉取密码 - name: image-secret # 保存私有仓库 secret 的资源名 containers: - name: "private-image" image: "registry.cn-hangzhou.aliyuncs.com/codefun/nginx:alpine-v1" imagePullPolicy: Always ports: - containerPort: 80 name: http
给 pod 设置环境变量
apiVersion: v1
kind: Pod
metadata:
name: "env-mysql"
namespace: default
labels:
 app: "env-mysql"
spec:
containers:
  - name: "env-mysql"
    image: mysql:5.7.40
    imagePullPolicy: Never
    env:	# 环境变量允许的数据类型为数组,且使用 name:value 的形式传值
    - name: MYSQL_ROOT_PASSWORD
      value: "123456"
    - name: MYSQL_DATABASE
      value: "codefun"
    ports:
    - containerPort:  3306
设置启动命令
- 一旦在容器中设置启动命令(command),原来镜像中的数据都会被覆盖
apiVersion: v1
kind: Pod
metadata:
  name: "env-mysql"
  namespace: default
  labels:
    app: "env-mysql"
spec:
  containers:
  - name: "env-mysql"
    image: mysql:5.7.40
    imagePullPolicy: Never
    command:	# command 下的也是数组,
    - /bin/bash
    - -c
    # 引用环境变量的方式如下:
    - "echo $(MYSQL_ROOT_PASSWORD) && sleep 3600"
    env:
    - name: MYSQL_ROOT_PASSWORD
      value: "123456"
    - name: MYSQL_DATABASE
      value: "codefun"
    ports:
    - containerPort:  3306
设置容器的生命周期 – 钩子
postStart当一个容器启动后,Kubernetes 将立即发送 postStart 事件;preStop在容器被终结之前, Kubernetes 将发送一个 preStop 事件
kind: Pod
spec:
  containers:
    lifecycle:  # 生命周期
      postStart: # 容器前
        exec: # 执行命令
          command: ["/bin/bash","-c","echo 'it is start'"]
        httpGet: # 发送 http 请求
          host: "10.244.87.213"  # 接收方的 ip
          path: "test/" # 请求的路径
          port: 80 # 接受方的端口(必须有)
          scheme: HTTP  # 什么协议
        # toSocket:
      preStop:
         exec:
          command: ["/bin/bash","-c","echo 'it is end'"]
        httpGet:
          host: "10.244.87.213"
          path: "test/"
          port: 80
          scheme: HTTP
资源限制
kind: Pod
spec:
containers:
 resources:
   limits: # 限制最大大小
     memory: "200Mi"
     cpu: "700m" # 1000m 是一个核
   requests: # 启动默认给分配的大小
     memory: "200Mi"
     cpu: "700m"
容器初始化
-
在 pod 启动时,会先执行初始化容器,当初始化容器的任务结束后,才会开始启动所有的应用容器,只要有一个应用容器起不来,pod 就不会对外提供服务
-
临时容器:当应用容器出现错误时,应用容器还没有相应的排错命令,这时我们可以使用临时容器,使用临时容器的排错命令进行排错。退出临时容器,临时容器就会被删除。
# 临时容器如何定义:
apiVersion: v1
kind: Pod
metadata:
  name: "init-nginx"
  namespace: default
  labels:
    app: "init-nginx"
spec:
  volumes:
  - name: nginx-init   # 通过和 nginx 的挂载卷名相同的方式实现向 nginx 输入内容
    emptyDir: {}
  initContainers:
     - name: alpine
       image: alpine
       command: ["/bin/sh","-c","echo 'hello world' > /app/index.html "]
       volumeMounts:
       - name: nginx-init
         mountPath: /app
  containers:
  - name: "nginx"
    image: nginx:stable-alpine
    volumeMounts:
    - name: nginx-init
      mountPath: /usr/share/nginx/html
静态 pod
- 在
/etc/kubernetes/manifests/位置放的所有.yaml文件,服务器启动 kubelet 自己就把它启动起来了。 - 若想在其他节点启动,要到其他节点的
/etc/kubernetes/manifests/目录下。 - 静态 pod 相当于守护进程。
- 若想删除静态 pod 只需删除相应的
.yaml文件即可。
pod 的健康检查机制
- 每个容器三种探针(probe)
- 启动探针(
一次性成功探针)- kubelet 使用启动探针,来检测应用是否已经启动。如果启动就可以进行后续探测检查。慢容器一定指定启动探针。
- 启动探针成功以后就不用了,剩下存活探针和就绪探针持续运行。
- 存活探针
- kubelet 使用存活探针,来检测容器是否存活正常。(有些容器可能会产生死锁【应用程序在运行但是无法继续执行后面的步骤】),如果监测失败就会重新启动这个容器
- 就绪探针
- kubelet 使用就绪探针,来检测容器受否准备好了可以接收流量。当一个 pod 内的所有容器都准备好了。才能把这个容器看作就绪了。用途就是:service 后端负载均衡多个 pod,如果某个 pod 还没有就绪,就会从 service 负载均衡里面剔除。
- 启动探针(
kind: Pod
spec:
  containers:
    startupProbe: # 启动探针,看当前容器是否启动了。
      # startupProbe 下的属性和声明周期一样。
    livenessProbe: # 存活探针,看当前容器是否存活,如果死了,kubelet 就会重启
    readinessProbe: # 就绪探针,告诉 kubelet 当前容器能否对外服务。
-
probe配置项initialDelaySeconds:容器启动后要等待多少秒后存活和就绪探测器才被初始化,默认是 0 秒,最小值是 0,这是针对以前没有。periodSeconds:执行探测的时间间隔(单位是秒),默认是 10 秒,最小值是 1。timeoutSeconds:探测超时,到了超时的秒数探测还没返回结果说明失败successThreshold:连续几次成功才算真成功(default 1)failureThreshold:失败阈值,连续几次失败才算真失败(default 3)
# 举例来说
kind: Pod
spec:
  containers:
    startupProbe: # 启动探针,看当前容器是否启动了。
      exec: ["/bin/sh","-c","command"]  # 如果命令执行的返回值不是零,表示一次探测失败。
      initalDelaySeconds: 20 # 20 秒后开始使用 exc 的命令进行探测
      periodSeconds: 5 # 每隔 5 秒执行 exec 的命令
      timeoutSeconds: 2 # 探测时间最多不能超过 2 秒
      successThreshold: 5 # 连续探测成功 5 次才算探测成功
      failureThreshold: # 连续探测失败 5 次才算探测失败
探针实例
- 存活探针主要是检测 /html 目录下有没有 abc.html 文件,有则检测成功。这里又将 /html 目录挂载到了宿主机的 /app 下,方便添加 abc.html
- 就绪探针访问自己的 80 端口,访问成功就是检测成功。
apiVersion: v1
kind: Pod
metadata:
  name: "init-nginx"
  namespace: default
  labels:
    app: "init-nginx"
spec:
  volumes:
  - name: nginx-probe
    hostPath:
      path: /app
  containers:
  - name: "nginx"
    image: nginx:stable-alpine
    volumeMounts:
    - name: nginx-probe
      mountPath: /usr/share/nginx/html
    livenessProbe:
      exec:
        command: ["/bin/sh","-c","cat /usr/share/nginx/html/abc.html"]
      initialDelaySeconds: 3
      periodSeconds: 5
      successThreshold: 1
      timeoutSeconds: 5
      failureThreshold: 2
    readinessProbe:
      httpGet:
        port: 80
pod 的调度
通过命令行的方式给资源打标签
# 给名为 foo 的 pod 打标签为 unhealthy=true
  kubectl label pods foo unhealthy=true

# 更新名为 foo 的 pod 的标签,将 key 为 status 所对应的值改为 unhealthy
  kubectl label --overwrite pods foo status=unhealthy

# 将 key 为 bar 的标签删除
  kubectl label pods foo bar-
NodeSelector:定向调度
## 首先,给 node 打上标签
kubectl label nodes k8s-s01 node=node01
apiVersion: v1
kind: Pod
metadata:
  name: "nodeSelect"
  labels:
    app: "nodeSelect"
spec:
  containers:
  - name: nodeSelect
    image: "nginx:stable-alpine"
    ports:
    - containerPort:  80
      name:  http
  nodeSelector:
    node: node01
NodeAffinity:node 亲和性调度
## nodeselect 是硬调度,如果调度不到所对应的 node,就不运行容器
## NodeAffinity 可以软调度,根据权重值优先调度
apiVersion: apps/v1
kind: Deployment
metadata:
  name: test005
spec:
  selector:
    matchLabels:
      app: test005
  replicas: 3
  template:
    metadata:
      labels:
        app:  test005
    spec:
      containers:
      - name:  test005
        image:  "nginx:stable-alpine"
        ports:
        - containerPort:  80
      affinity:  # 亲和性
        nodeAffinity: # node 的亲和性
          preferredDuringSchedulingIgnoredDuringExecution:
          - weight: 10 # 权重
            preference:  # 选择下面的 node
              matchExpressions:
              - key: test
                operator: In
                values:
                - node1
          - weight: 90 # 优先选择下面的调度器
            preference:
              matchExpressions:
              - key: test
                operator: In
                values:
                - node2
PodAffinity:pod 亲和与互斥调度策略
# 参照目标 pod
apiVersion: v1
kind: Pod
metadata:
  name: "podaffinity"
  labels:
    app: "nodeSelect"
    bpp: "podaffinity"
spec:
  containers:
  - name: "podaffinity"
    image: "nginx:stable-alpine"
    ports:
    - containerPort:  80
      name:  http
# 建立 pod 亲和性
apiVersion: v1
kind: Pod
metadata:
  name: "podaffinity01"
spec:
  containers:
  - name: "podaffinity01"
    image: "nginx:stable-alpine"
    ports:
    - containerPort:  80
      name:  http
  affinity:
    podAffinity:  # 亲和性
      requiredDuringSchedulingIgnoredDuringExecution:
      - labelSelector:  # 选择参照 pod 的标签
          matchExpressions:
          - key: app
            operator: In
            values:
            - "nodeSelect"
        topologyKey: test  # 选取参照 pod 所在 node 的标签的 key 值,不能为空值
# pod 互斥性
apiVersion: v1
kind: Pod
metadata:
  name: "podaffinity01"
spec:
  containers:
  - name: "podaffinity01"
    image: "nginx:stable-alpine"
    ports:
    - containerPort:  80
      name:  http
  affinity:
    podAntiAffinity:  # pod 互斥性
      requiredDuringSchedulingIgnoredDuringExecution:
      - labelSelector:
          matchExpressions:
          - key: app
            operator: In
            values:
            - "nodeSelect"
        topologyKey: test
使用命令行的方式打 taint
# 打 taint
  kubectl taint nodes foo dedicated=special-user:NoSchedule

# 删除 taint
  kubectl taint nodes foo dedicated:NoSchedule-

# 查看标签
kubectl describe node k8s-s02 | grep Taints -A 5
taints(污点) 和 tolerations(容忍)
- 默认情况下,在 node 上设置了一个 taint 之后,除非 pod 明确声明能够容忍这个污点,否则无法在这些 pod 上运行
- 污点有三种形式:
- NoSchedule:表示K8S将不会把Pod调度到具有该污点的Node节点上
- PreferNoSchedule:表示K8S将尽量避免把Pod调度到具有该污点的Node节点上
- NoExecute:表示K8S将不会把Pod调度到具有该污点的Node节点上,同时会将Node上已经存在的Pod驱逐出去
- 如果 pod 不能容忍 effect 值为 NoExecute 的 taint,那么 pod 将马上被驱逐
- 如果 pod 能够容忍 effect 值为 NoExecute 的 taint,且在 toleration 定义中没有指定 tolerationSeconds,则 pod 会一直在这个节点上运行。
- 如果 pod 能够容忍 effect 值为 NoExecute 的 taint,但是在toleration定义中指定了 tolerationSeconds,则表示 pod 还能在这个节点上继续运行的时间长度。
kubectl taint node k8s-s01 test=node01:NoSchedule
# 虽然打了标签,但是还能容忍
apiVersion: apps/v1
kind: Deployment
metadata:
  name:  taints
spec:
  selector:
    matchLabels:
      app: taints
  replicas: 2
  template:
    metadata:
      labels:
        app:  taints
    spec:
      containers:
      - name:  taints
        image: "nginx:stable-alpine"
        ports:
        - containerPort:  80
      tolerations:
      - key: test
        value: node01
        effect: NoSchedule
# 如果 pod 正在运行,会在该 node 上存活 3600 后被驱逐,若不设时间,则永久存活。
	spec:
      tolerations:
      - key: test
        value: node01
        effect: NoExecute
        tolerationSeconds: 3600
pod priority preemption:pod 优先级调度
- 提高资源利用率的常规做法是采用优先级方案
- 面对资源不足的情况时,优先考虑的应该是扩容,而不是优先级调度
- 当优先级高的 pod 申请资源时,会驱逐掉优先级低的pod,在清除过程中,优先级更高的 pod 申请资源则当清除完优先级低的 pod 后,直接运行优先级更高的 pod,而优先级高的就会得等系统再驱逐。陷入死循环状态。
# 给 pod 添加优先级
---
apiVersion: scheduling.k8s.io/v1
kind: PriorityClass
metadata:
  name: high-priority
value: 100000 # 数字越大,优先级越高,超过一亿的被系统保留
globalDefault: false
description: "简单的描述,这个 priorityClass 只能用于检测"
---
apiVersion: v1
kind: Pod
metadata:
  name: "high-priority"
  labels:
    app: "high-priority"
spec:
  containers:
  - name: high-priority
    image: "nginx:stable-alpine"
    ports:
    - containerPort:  80
  priorityClassName: high-priority # 绑定
升级和回滚
# 设置镜像为nginx:stable-alpine-perl并且记录升级记录
kubectl set image deploy mynginx nginx=nginx:stable-alpine-perl --record

# 查询历史回滚或升级信息
kubectl rollout history deploy mynginx

# 回滚到指定版本
kubectl rollout undo deploy mynginx --to-revision=3
pod 的扩缩容
- 手动扩缩容
# 扩容、缩容一个 deploy replicaSet RC 或 Job 中 pod 的数量
kubectl scale (-f 文件名称|资源类型 资源名称|资源类型/资源名称) \
	--replicas=数量 [--resource-version=version] [--dry-run=bool] \
	[--current-replicas=count] [flags]
- 自动扩缩容机制
- HPA 控制器基于 Master 的
kbue-controller-manager服务揿动参数--horizontal-pod-aoutoscaler-sync-period定义探测周期为 15 秒,周期性的检测目标 pod 的资源性能指标与预期对标进行对比。
- HPA 控制器基于 Master 的
- HPA 工作原理
- k8s 中的某个 Metrics Server 持续采集所有 pod 副本呢的指标数据。
- HPA 控制器通过 Metrics Server 的 api 获取这些数据,基于用户定义的扩容缩规则进行计算,得到目标 pod 的副本数量。
- 当目标 pod 副本数量与当前副本数量不同时,HPA 控制器就向 pod 的副本控制器发起 scale 操作。。。
- 扩缩容算法
- 期望副本数 = 当前副本数 x (当前指标值 / 期望指标值)
<--结果向上取整 - 如果在 HPA 设置了多个指标,则取最大的副本数。
- 期望副本数 = 当前副本数 x (当前指标值 / 期望指标值)
HPA 配置
## autoscaling/v1 写法
---
apiVersion: apps/v1
kind: Deployment
metadata:
  name:  php-apache
  labels:
    app:  php-apache
spec:
  selector:
    matchLabels:
      app: php-apache
  replicas: 2
  template:
    metadata:
      labels:
        app:  php-apache
    spec:
      containers:
      - name:  php-apache
        image:  "nginx:stable-alpine"
        resources:
          requests: # 每个 pod 请求 0.1 的 cpu 和 100m的内存资源
            cpu: 100m
            memory: 100Mi
          limits:   # 每个 pod 最大资源为 0.2 的 cpu 和 200m的内存
            cpu: 200m
            memory: 200Mi
        ports:
        - containerPort:  80
          name:  php-apache
---
apiVersion: autoscaling/v1
kind: HorizontalPodAutoscaler
metadata:
  name: php-apache
spec:
  scaleTargetRef:
    kind: Deployment # 可写的资源类型为 Deployment ReplicationController replicaSet
    name: php-apache # 管理资源的具体名称
  maxReplicas: 5  # 最大副本数
  minReplicas: 1
  targetCPUUtilizationPercentage: 50  # 超过 requests 值的 百分之50 就扩容
### autoscaling/v2beta2 写法
---
apiVersion: apps/v1
kind: Deployment
metadata:
  name:  php-apache
  labels:
    app:  php-apache
spec:
  selector:
    matchLabels:
      app: php-apache
  replicas: 2
  template:
    metadata:
      labels:
        app:  php-apache
    spec:
      containers:
      - name:  php-apache
        image:  "nginx:stable-alpine"
        resources:
          requests:
            cpu: 100m
            memory: 100Mi
          limits:
            cpu: 200m
            memory: 200Mi
        ports:
        - containerPort:  80
          name:  php-apache
---
apiVersion: autoscaling/v2beta2
kind: HorizontalPodAutoscaler
metadata:
  name: php-apache
spec:
  scaleTargetRef: # 目标作用对象
    kind: Deployment
    name: php-apache
  maxReplicas: 5
  minReplicas: 1
  metrics:  # 目标指标值
  - type: Resource  # 指标类型:
    resource: #
      name: cpu  # 监控的资源名称 cpu 或者 Memory
      target: # 目标值
        type: Utilization # 只支持 Utilization(cpu 的利用率) averageValue(内存的平均值)
        averageUtilization: 50 # 目标值
 # 以上为当名为 php-apache 的 deploy 中的 pod cpu 的利用率大于或者小于 50% 时,进行扩缩容
metrics:  # 目标指标值
  - type: Pod  # 指标类型
    pods:
    metric:
      name: packets-per-second
    target: # 目标值
      type: AverageValue # 只支持 AverageValue(内存的平均值)
        AverageValue: 1k # 目标值
# 设置指标值为 requests-per-second,在名为 main-route ingress 资源的每秒请求量达到 2000 时进行扩缩容
metrics:
  - type: Object  # 指标类型
    object:
    metric:
      name: requests-per-second
    describedObject: # 期望从哪里获取信息
      apiVersion: extensions/v1beta1
      kind: Ingress
      name: main-rotue
    target: # 目标值
      type: Value
      value: 2k # 目标值
# 设置指标值为 http_requests, 并且该资源对象具有 verb=GET 标签,在指标平均值达到 500 时进行扩缩容
metrics:
  - type: Object  # 指标类型
    object:
    metric:
      name: 'http-requests'
      selector: 'verb=GET'
    target: # 目标值
      type: AverageValue
      averageValue: 500  # 目标值
pod 和 configMap
创建 configMap
kind: ConfigMap
apiVersion: v1
metadata:
  name: test
data:
  name: gx
  sex: na
kubectl create configmap my-config --from-literal=key1=config1 --from-literal=key2=config2
kubectl create configmap my-config --from-file=key1=file1.txt --from-file=key2=/path/to/bar/file2.txt
# 下面的 key 为文件名
kubectl create configmap my-config --from-file=file1.txt
在 pod 中使用configMap
- 限制条件
- configmap 必须在 pod 之前创建
- cofigmap 只有在相同的命名空间下才会被调用
- configmap 无法用于静态 pod
# 将 configmap 写在 pod 里面,实现挂载
apiVersion: v1
kind: Pod
metadata:
  name: "test002"
  labels:
    app: "test002"
spec:
  containers:
  - name: test002
    image: "nginx:stable-alpine"
    ports:
    - containerPort:  80
      name:  http
    volumeMounts:
    - name: localtime
      mountPath: /test
  volumes:
    - name: localtime
      configMap:
        name: test002
        items:
        - key: test
          path: a.txt # 主机的相对路径
# 通过环境变量的方式使用 configMap
---
kind: ConfigMap
apiVersion: v1
metadata:
  name: test
data:
  name: gx
  sex: na
---
apiVersion: v1
kind: Pod
metadata:
  name: "test001"
  labels:
    app: "test001"
spec:
  containers:
  - name: test001
    image: "busybox"
    command: ["/bin/sh","-c","env | grep APP"]
    env:
    - name: "APPname"
      valueFrom:
        configMapKeyRef:
          name: test001
          key: name
    - name: "APPsex"
      valueFrom:
        configMapKeyRef:
          name: test001
          key: sex
deployment
- 一个 deploy 产生三个资源
- deployment 资源
- 资源的回滚和升级
- 每升级一次,就建立一个新的 replicaSet, 并将相应的信息记录到 etcd 中。
- 每次升级都会在 etcd 中检查信息,如果检查到相同的信息,这次升级其实叫做回滚。
- replicaSet 资源
- 只提供了副本数量的控制功能
- pod 资源
- 三个资源的关系
- deployment 控制 RS, RS 控制 pod 的副本数
## deploy 模板和参数详解
apiVersion: apps/v1
kind: Deployment
metadata:
  name:  MYAPP
  namespace: default
  labels:
    app:  MYAPP
spec:
  selector:  # 必要!指定 deploy 要控制所有的 pod 的共同标签
    matchLabels:
      app: MYAPP
  replicas: 1  # 期望的副本数量
  minReadySeconds: 1 # 这个 pod 1 秒以后才认为是 ready 状态
  pasued: false # 当前是否停止状态,是否暂停更新
  progressDeadlinesSeconds: 600 # 处理的最后期限,deploy 如果超过了这个指定的处理时间
  # 就不会再处理
  revisionHistoryLimit: 10 # 旧副本集保留的数量,可以回滚的数量
  strategy:  # 新 pod 替换旧 pod 的策略
    type: RollingUpdate # 更新策略:Recreate(全部杀死,再创建) RollingUpdate(滚动更新)
    rollingUpdate:
      maxSurge: 25%  # 一次最多新建几个 pod(百分比和数字都行)
      maxUnavailable: 25% # 最大不可用量
  template: # 必要! 编写 pod 模板
    metadata:
      labels:
        app:  MYAPP
    spec:
      - name:  MYAPP
        image:  MYAP
RC、RS
-
RC:ReplicasController(副本控制器)
-
RS:ReplicasSet(副本集) 被 deploy 默认控制
-
RS 相较于 RC 可以有复杂的选择器
# 复杂选择器的语法
spec:
  selector:
    matchExperssions:  # 根据键值进行匹配
    - key: rs-demo  # 必要!
      value: ["aaa","bbb"] # 必要!
      operator: In # 必要!In: 表示 key 指定的标签值是这个集合内的
                   # NotIn 表示 key 指定的标签值不是这个集合内的
                   # Exists 表示 只要有 key 指定的标签即可,不用管值是多少
                   # DoesNotExsist 只要 pod 上没有 key 指定的标签,不用管值是多少
# 选择器的语法 spec: selector: matchLabels: # 下面要写成 map 类型的数据类型 app: rs-demo app: nginx
DaemonSet
- 该控制器确保所有的节点都运行一个指定的 pod 副本。
- 每当向集群中添加或删除一个节点时指定的 pod 副本也将添加或删除到该节点上
- 删除一个 daemonSet 可以清理所有由其创建的 pod
- daemonSet 的应用场景
- 集群存储的守护进程:glusterd、ceph
- 日志收集的守护进程:fluented、logstash
- 监控守护进程:Prometheus 等
- 怎么写?
- 和 deploy 一样,只是不用设置副本集而已。
StatefulSet
无状态应用(deployment)
网络可能会变、存储可能会变、顺序可能会变。场景:业务代码
有状态应用(statefulSet)
网络不变、存储不变、顺序不变。场景:中间件
StatefulSet 的特点
- sts 建立的 pod 的名字:如
sts-0(sts是 pod 名,0 说明这个 pod 是第一个建立的。- sts 中的 pod 的访问方式:
- 只能从其他 pod 进行访问,宿主机是访问不了的
curl pod名.svc名.namespace名.svc.cluster.local
- 其中
.svc.cluster.local是默认的名字- 最精简的可以直接访问
svc 名就行- sts 的挂载:不写挂载目录,而写挂载请求
- 想要访问 sts 中的 pod 就必须建立一个无头服务(headless service)
- 即不分配 ip 给负载均衡器
apiVersion: apps/v1
kind: StatefulSet
metadata:
  name: sts-demo
spec:
  updateStrategy:   # 更新策略
    rollingUpdate:  # 滚动更新
      partition: 0  # 大于等于零号的 pod 进行更新
  selector:
    matchLabels:
      app: sts-demo
  serviceName: "sts-svc"  # 无头服务的名字
  replicas: 3
  template:
    metadata:
      labels:
        app: sts-demo
    spec:
      containers:
      - name: sts-demo
        image: nginx:stable-alpine
        ports:
        - containerPort: 80
---
# 创建无头服务
apiVersion: v1
kind: Service
metadata:
  name: sts-svc # 无头服务的名字,要和上面的 serviceName 相同
spec:
  selector:
    app: sts-demo
  clusterIP: "None"
  type: ClusterIP
  ports:
  - port: 80
    targetPort: 80
job、cronJob
# 一次性任务
apiVersion: batch/v1
kind: Job
metadata:
  name: job-test
spec:
  activeDeadlineSeconds:  # 整个 job 存活时间,超出时间就杀死(有尸体)
  completions: 1  # 多少个 pod 运行成功算 job 运行成功。
  backoffLimt: 6 # 设定 job 最大重试次数,超过表示失败。
  parallelism: 1 # 并行 pod 的个数
  ttlSecondsAfterFinished: 5 # 在 job 执行完的 5 秒后删除 job 和 pod
  template:
    spec:
      containers:
      - name: job-test
        image: busybox
        command: ['sh', '-c', 'ping -c 5 www.baidu.com']
cronJob 创建 job,job 启动 pod 执行命令。
cronJob 按照 master 所在的时区所预定的时间规划创建 pod。
一个 cronJob 资源类似于 crontab 文件中的一行记录,该对象根据 cron 格式周期性的创建 job 对象。
一个 cronJob 在时间规划中的每次执行时刻,都创建了0个或至多两个 job 对象,所以 job 程序必须是幂等的
apiVersion: batch/v1beta1
kind: CronJob
metadata:
  name: hello
spec:
  schedule: "*/1 * * * *"   # 和 crontab 一样:分时日月周
  concurrencyPolicy: Allow # 当前的并发策略:
                             # Allow 允许并发(推荐)
                             # Forbid 上一个运行,下一个跳过
                             # Replace 停止上一个,运行下一个
  startingDeadlineSeconds: # 启动的超时时间,越大越好
  jobTemplate:
    spec:   # 下面写的是 job
      template:
        spec:
          containers:
          - name: hello
            image: busybox
            args: ['/bin/sh', '-c', 'date; echo Hello from the Kubernetes cluster']
          restartPolicy: OnFailure
Service
service 的负载均衡机制
- 从服务 ip 到后端 pod 的负载均衡机制,是由每个 node 上的 kube-proxy 负责实现的
kube-proxy 的代理模式
- **userspace:**用户空间模式,由 kube-proxy 完成代理的实现,效率最低,不推荐使用。
- iptables 模式:
- 原理:kube-proxy 通过设置 Linux Kernel 的 iptables 规则,实现从 Service 到后端 Endpoint 列表的负载分发规则,效率很高。
- 缺陷:但是如果某个后端 Endpoint 在转发时不可用,此次客户端请求就会得到失败的响应,相对于 userspace 更不可靠。
- 解决办法:通过为 pod 设置 readinessprobe(服务可用性健康检查) 来保证只有达到 read 状态的 endpoint 才会被设置为 Service 的后端 endpoint。
- **ipvs 模式:**kube-proxy 通过设置 linux kernel 的 netlink 接口设置 ipvs 规则,转发的效率和支持的吞吐率都是最高的。
- rr:round-robin,轮询。
- lc:least connection,最小连接数。
- dh:destination hashing,目的地址哈希。
- sh:source hashing,源地址哈希。
- sed:shortest expected delay,最短期望延时。
- nq:never queue,用不排队。
更改 kube-proxy 的代理模式
# 启用 ipvs (注意:每个节点都需要做)
yum install ipset ipvsadm -y
modprobe ip_vs
modprobe ip_vs_rr
modprobe ip_vs_wrr
modprobe ip_vs_sh
modprobe nf_conntrack_ipv4

cat > /etc/modules-load.d/ip_vs.conf << EOF
ip_vs
ip_vs_rr
ip_vs_wrr
ip_vs_sh
nf_conntrack_ipv4
EOF
kubectl edit configmap -n kube-system kube-proxy
# 然后搜索 mode 将对应的值更改为 ipvs
# 删除每个节点名为 kube-proxy 的 pod
curl localhost:10249/proxyMode # 通过这个命令可以查看代理模式是什么
将外部服务定义为 Service
- 可以通过 service + endpoint 的方式和外部服务进行绑定,集群内部资源访问 service,就是访问外部的服务,使用场景如下:
- 已部署的一个集群外的服务,例如数据库服务,缓存服务
- 其他 kubernets 集群的某个服务
- 迁移过程中对某个服务进行 kubernets 内的服务访问机制的验证
# endpoint【svc 绑定 ip:port 的另一种方式】
# 通过将 svc 名字、 svc port 的名字和 endpoint 一致,将 svc 和 endpoint
# 绑定在一起,这样访问 svc 就是负载均衡的访问 endpoint 所绑定的 ip:port
apiVersion: v1
kind: Service
metadata:
  name: svc-ep  # svc 的名字要和 endpoint 的名字一致
spec:
  type: ClusterIP
  ports:
  - name: http   # svc port 名字要和 endpoint port 名字一致
    port: 80
    targetPort: 80
---
apiVersion: v1
kind: Endpoints
metadata:
  name: svc-ep
subsets:
- addresses:  # 下面可写任意可访问 ip
  - ip: 10.244.104.248
  - ip: 10.244.104.247
  - ip: 192.168.222.4 # 集群外的 nginx 服务
  ports:
  - name: http
    port: 80
亲和设置
# svc 模板以及详细参数解析
apiVersion: v1
kind: Service
metadata:
  name: probe-svc
  namespace: default
spec:
  sessionAffinity:  # 是否开启亲和性 ClientIP 为开启,None 为不开启
  # 亲和性:访问 svc,svc 会负载均衡一个 pod,在一定时间内,
  # 重复访问 svc,svc 还会负载均衡到同一个 pod
  sessionAffinityConfig: # 亲和性的配置
    clientIP:
      timeoutSeconds: # 亲和时间
  selector:
    app: "init-nginx"
  type: ClusterIP  # 当前 service 在集群内可以被所有人发现,
                  # 默认给这个 service 分配一个集群内的 svccidr
  ports:
  - name: probe-svc
    protocol: TCP
    port: 80  # 访问当前 service 的 80 端口
    targetPort: 80 # 派发到 pod 的 80 端口
将 service 暴露到集群外部
- service 的类型如下
- ClusterIP:尽可被集群内部的客户端应用访问。
- NodePort:将 service 映射到每个 Node 上的一个端口号,集群中的任意 Node(服务器) 都可作为 service 的访问入口地址,访问方式为
NodeIP:NodePort - LoadBalancer:将 service 映射到一个已存在的负载均衡器的 IP 地址,通常在公有云环境使用。
- ExternalName:将 service 映射为一个外部域名地址,通过 externalName 字段进行设置。
# ClusterIP
apiVersion: v1
kind: Service
metadata:
  name: cluster-ip
spec:
  selector:
    app: cluster-ip
  type: ClusterIP
  ports:
  - name: cluster-ip
    protocol: TCP
    port: 80
    targetPort: 80
# NodePort
apiVersion: v1
kind: Service
metadata:
  name: node-port
spec:
  selector:
    app: cluster-ip
  type: NodePort # 注意类型
  ports:
  - name: node-port
    protocol: TCP
    port: 80
    targetPort: 80
    nodePort: 30521 # 设置 nodePort
# LoadBalancer
apiVersion: v1
kind: Service
metadata:
  name: load-balance
spec:
  selector:
    app: load-balance
  type: LoadBalancer
  ports:
  - name: load-balance
    protocol: TCP
    port: 80
    targetPort: 80
# 在服务器创建了上述内容后,云服务上会在 Service 的定义中补充 LoadBalancer 的 IP 地址:
status:
  loadBalancer:
    ingress:
    - ip: xx.xx.xx.xx
# ExternalName
## 适用于将集群外的服务定义为 kubernets 的集群的 Service,并通过 externalName 字段指定外部服务,可以使用域名或 ip 格式。
apiVersion: v1
kind: Service
metadata:
  name: external-name
spec:
  type: ExternalName
  externalName: my.database.example.com
# 访问方式为 external-name.default.svc.cluster.local
service 支持的网络协议
- TCP:默认网络协议,可用于所有类型的 service
- UDP:大多数类型的 service,loadBalancer 类型取决于云服务商对 UDP 的支持
- HTTP:取决于云服务商是否支持 HTTP 和实现机制
- PROXY:取决于云服务商
服务发现机制
- 服务发现机制指客户端应用在一个集群中如何获得后端服务的访问地址。
- 环境变量方式
- DNS 方式
环境变量方式
- 在一个pod 运行起来之后,系统自动会向 pod 的环境变量中注入 service 的相关信息。
env | grep TEST  # 相关信息如下: 这里的 TEST 是 service 名称的全大写
TEST_SERVICE_PORT_TEST=80
TEST_SERVICE_HOST=10.96.64.244 # 服务 IP
TEST_SERVICE_PORT=80 # 服务端口号
TEST_PORT=tcp://10.96.64.244:80
TEST_PORT_80_TCP_ADDR=10.96.64.244
TEST_PORT_80_TCP_PORT=80
TEST_PORT_80_TCP_PROTO=tcp
TEST_PORT_80_TCP=tcp://10.96.64.244:80
# 然后就可以根据 service 相关环境变量命名规则,从环境变量中获取需要访问的目标服务器的地址了,如:
curl http://${TEST_SERVICE_HOST}:${TEST_SERVICE_PORT=80}
服务拓扑(Service Topology)
– 1.21 已经弃用
- 目的:实现基于 node 拓扑的服务路由,允许 service 创建者根据来源 node 和目标 node 的标签定义流量路由策略。
- 举例:比如 node1 和 node2 上部署了一模一样的 podA,node1 上的其他 pod 需要访问 podA 的信息,此时我们就可以使用服务拓扑来使其他 pod 访问 node1(默认是随机访问),以此提高效率,获得更低的网络延迟。
# pod 内部通过主机名(域名)的方式访问
# 访问方式 主机名.subdomain名
apiVersion: v1
kind: Service
metadata:
  name: host-name
spec:
  type: ClusterIP
  selector:
    app: host-name
  ports:
  - name: http
    port: 80
    targetPort: 80
---
apiVersion: v1
kind: Pod
metadata:
  name: host-name
  labels:
    app: host-name
spec:
  hostname: host-name  # 指定主机名
  subdomain: host-name  # 此值要和 service 的 name 相同
  containers:
  - name: nginx
    image: nginx:stable-alpine
    ports:
    - containerPort: 80
ingress nginx
-
为什么需要 ingress
- service 可以使用 nodePort 暴露集群访问端口,但是性能低下不安全
- 缺少第七层的统一访问入口,可以负载均衡、限流等
- ingress 公开了从集群外部到集群内部服务的 http 和 https 路由,流量路由由 ingress 资源上定义的规则控制
- 我们使用 ingress 作为整体集群统一的入口,配置 ingress 规则转到对应的 service
- 缺点:ingress 只能以 HTTP 和 HTTPS 提供服务,对于使用其他网络协议的服务,可以通过设置 service 的类型为 NodePort 或 LoadBalancer 对集群外部提供服务
-
ingress 架构

-
ingress-nginx 原理
- 我们只需要编写 ingress 的相关配置即可,它会自动的根据我们指定的 ingressClassName 去寻找我们安装的 ingress-nginx,然后相应的 ingress-nginx-controller 里面的 nginx.conf 会自动生成相关代码,实现各种操作。
-
安装 ingress-nginx
- 官网路径:Installation Guide - NGINX Ingress Controller (kubernetes.github.io)
- 安装步骤:
## 修改官网的 yaml
1. 将 Deployment 修改为 DaemonSet
2. 将名为 ingress-nginx 的 Service 中的 type 修改为 ClusterIP
3. 将 Daemonset 中的 dnsPolicy 修改为 ClusterFirstWithHostNet 并在下方添加一行
   hostNetwork: true
4. 在 Daemonset 中的 containers 下的 args 下添加如下字段:
   - --report-node-internal-ip-address=true
5. kubectl apply 一下就行了。能够看到 ingress-nginx-controller 在运行说明安装成功
- ingress-nginx 的全局配置项
- 参考网址:ConfigMap - NGINX Ingress Controller (kubernetes.github.io)
kubectl edit configMap -n ingress-nginx ingress-nginx-controller## 在 data 下面修改相应的配置 data: 配置项: 配置值然后再将 ingress-nginx-controller 的 pod 删除掉,不然不会更新
- 编写 ingress
## 最小化必要字段
apiVersion: networking.k8s.io/v1
kind: Ingress
metadata:
  name: minimal-ingress
spec:
  ingressClassName: nginx # 在安装 ingress 时,声明了该资源
                          # 没有它,访问会 404
  rules:
  - http:
      paths:
      - path: /testpath
        pathType: Prefix
        backend:
          service:
            name: test
            port:
              number: 80
# https://kubernetes.io/docs/concepts/services-networking/ingress/#the-ingress-resource

apiVersion: networking.k8s.io/v1
kind: Ingress
metadata:
  name: IngressName
  namespace: default
spec:
  defaultBackend: # 默认的后端服务
  tls: # 定义 tls 安全连接
  rules: # 定义 nginx 的路由转发等各种规则
  - host: foo.bar.com  # 指定监听的主机域名(nginx: server)
    http:  # 指定路由规则
      paths:
      - path: /
        pathType: Prefix # 匹配规则
              # Prefix: 基于以 / 分隔的 URL 路径前缀匹配,匹配区分大小写
              #         并对路径中的元素逐个完成。路径元素指的是由 / 分隔
              #         的路径中的标签列表。如果每个 p 都是请求路径 p 的元素
              #         前缀,则请求与路径 p 匹配。
              # Exact:精确匹配 URL 路径,且区分大小写。
              # ImplementationSpecific:【自定义匹配】对于这种路径类型,匹配方法取决于
              #         IngresClass。具体实现可以将其作为单独的 pathType
              #         处理,或者与 prefix 和 exact 类型作相同处理。
        backend: # 指定路由的后台服务的 service 名
          service:
            name: ServiceName
            port:
              number: 80
- 编写注解(内容扩展)
参考网址:Annotations - NGINX Ingress Controller (kubernetes.github.io)
## 实现路径重写(rewrite)
piVersion: networking.k8s.io/v1
kind: Ingress
metadata:
annotations:
nginx.ingress.kubernetes.io/rewrite-target: /$2
name: rewrite
namespace: default
spec:
ingressClassName: nginx
rules:
  - host: rewrite.bar.com
    http:
      paths:
      - path: /abc(/|$)(.*)
        pathType: Prefix
        backend:
          service:
            name: http-svc
            port:
              number: 80
# 浏览器上的网址为 rewrite.bar.com/abc/xxx 重写后的地址为 rewrite.bar.com/xxx,重写后的为真正的访问地址。
## 会话亲和 ## 利用每次请求携带同样的 cookie,来标识是否是同一个会话 nginx.ingress.kubernetes.io/affinitya: "cookie"## 安全连接 1. 生成公钥和密钥(模仿生成) openssl req -x509 -nodes -days 365 -newkey rsa:2048 -keyout tls.key -out tls.cert -subj "/CN=foo.bar.com/O=foo.bar.com" 2. 创建 tls 的 secret kubectl create secret tls foo-tls --key tls.key --cert tls.cert 3. 编写 yaml 并 apply kind: Ingress metadata: name: ingress002 namespace: default annotations: spec: ingressClassName: nginx tls: - hosts: ## 安全连接的域名 - foo.bar.com secretName: foo-tls # 安全连接的 secret 名 rules: - host: foo.bar.com http: paths: - path: / pathType: Prefix backend: service: name: ingress-svc port: number: 80
# 金丝雀
## 在原有的 ingress 上创建该 ingress 的金丝雀版本,并给予相应的配置,使其路由到金丝雀版本上
cat ingress-canary.yaml
apiVersion: networking.k8s.io/v1
kind: Ingress
metadata:
  name: ingress002-canary
  namespace: default
  annotations:
    nginx.ingress.kubernetes.io/canary: "true"  # 开启金丝雀版本
    nginx.ingress.kubernetes.io/canary-by-header: "vip"
    # vip = alway 流量路由到金丝雀版本
    # vip = nerver 流量永远不会路由到金丝雀版本
    nginx.ingress.kubernetes.io/canary-by-cookie: "cookie"
    # cookie = alway 流量路由到金丝雀版本
    # cookie = nerver 流量永远不会路由到金丝雀版本
    nginx.ingress.kubernetes.io/canary-weight: "90"
    # 流量百分之九十来到金丝雀版本
    # 上面三项的优先级: canary-by-header > canary-by-cookie > canary-weight
spec:
  ingressClassName: nginx
  rules:
  - host: foo.bar.com   # 必须和原来的一样
    http:
      paths:
      - path: /  # 必须和原来的一样
        pathType: Prefix
        backend:
          service:
            name: ingress-svc002  # 服务不一样
            port:
              number: 80
转发到单个后端服务
# 既然是单个服务,ingress 就无需定义任何 rule 只需要设置一个默认的后端服务即可
# 对 ingress 的请求都被转发到 myweb:8080
apiVersion: networking.k8s.io/v1
kind: Ingress
metadata:
  name: minimal-ingress
spec:
  ingressClassName: nginx
  defaultBackend:
    service:
    name: webapp
    port:
      number: 8080
将同一域名不同 URL 路径转发到不同的服务
# 对于 foo.bar.com/web 的请求会转发到 web-service:8080 服务
# 对于 foo.bar.com/api 的请求会转发到 api-service:8080 服务
apiVersion: networking.k8s.io/v1
kind: Ingress
metadata:
  name: minimal-ingress
spec:
  ingressClassName: nginx
  rules:
  - host: foo.bar.com
    http:
      paths:
      - path: /web
        pathType: Prefix
        backend:
          service:
            name: web-service
            port:
              number: 80
      - path: /api
        pathType: Prefix
        backend:
          service:
            name: api-service
            port:
              number: 8080
集群的安全机制
访问控制概述
- API Server 作为 kubernetes 集群系统的网关,是访问和管理资源对象的唯一入口,包括 kube-controller-manager、kubelet 和 kube-proxy 等集群基础组件、coreDNS 等附加组件和 kubectl 命令等都需要经过网关才能进行正常的访问和管理。
- 每一次访问请求都需要进行合法性检验,包括用户身份验证、操作权限以及操作规范等

认证方式
HTTPS 证书认证
- 流程如下:
- 服务端和和客户端都向 CA 机构申请证书,CA 机构给服务端下发根证书、服务端证书、私钥;CA 机构给客户端下发根证书、客户端证书、私钥。
- 客户端向服务端发起请求,服务端下发服务端证书给客户端。客户端会根据 CA 根证书来验证服务端证书的合法性,以确定服务端的身份。
- 客户端发送客户端证书给服务端,服务端会根据 CA 根证书来验证客户端证书的合法性。
- 客户端将随机加密信息发送给服务端。在服务端和客户端协商好加密方案后,客户端会产生一个随机密钥,客户端通过加密方案加密随机密钥,并发送给服务端。之后双方通信的信息使用随机密钥加密。
User 认证
kubectl config view
# 通过向 config 中添加用户和集群,然后再进行绑定,从而实现那个用户管理那个集群的目的。
---
apiVersion: v1
# 集群相关信息
clusters:
- cluster:
    certificate-authority-data: DATA+OMITTED
    server: https://192.168.222.7:6443
  name: kubernetes

# 上下文:那个用户和那个集群进行绑定
contexts:
- context:
    cluster: kubernetes
    user: codefun
  name: codefun@kubernetes
- context:
    cluster: kubernetes
    user: kubernetes-admin
  name: kubernetes-admin@kubernetes

# 当前上下文:决定了当前用什么用户来管理什么集群
current-context: kubernetes-admin@kubernetes
kind: Config
preferences: {}

# 用户相关信息
users:
- name: codefun
  user:
    client-certificate-data: DATA+OMITTED
    client-key-data: DATA+OMITTED
- name: kubernetes-admin
  user:
    client-certificate-data: DATA+OMITTED
    client-key-data: DATA+OMITTED
生成用户密钥
# 有关 kubernetes 的认证信息
[root@kube-m nginx]# cd /etc/kubernetes/pki/
# 生成私钥 [root@kube-m pki]# openssl genrsa -out codefun.key 2048 Generating RSA private key, 2048 bit long modulus .......................................................+++ ................................................................+++ e is 65537 (0x10001)# 生成证书,由 codefen.key 私钥生成证书,并且用户名为 codefun 用户群组为 kubernetes [root@kube-m pki]# openssl req -new -key ./codefun.key -out codefun.csr -subj "/CN=codefun/O=kubernetes"# 进行签证 openssl x509 -req -in codefun.csr -CA ca.crt -CAkey ca.key -CAcreateserial -out codefun.crt -days 3650 Signature ok subject=/CN=codefun/O=kubernetes Getting CA Private Key# 查看生成信息 openssl x509 -in codefun.crt -text -noout Certificate: Data: Version: 1 (0x0) Serial Number: c0:e1:20:3a:a9:b6:4b:72 Signature Algorithm: sha256WithRSAEncryption Issuer: CN=kubernetes # 是谁签署的 Subject: CN=codefun, O=kubernetes # 用户名和用户组
向 config 中添加集群信息
# 需要指明集群的名字、集群的证书、集群的访问地址
kubectl config set-cluster CLUSTER_NAME \
--embed-certs=true \ # 隐藏证书位置
--certificate-authority=/etc/kubernetes/pki/ca.crt \ # 集群的 ca 证书
--server="https://192.168.222.7:6443" \
--kubeconfig=/tmp/test # 更改配置文件位置
向 config 中添加用户并联系上下文
# 向 config 中添加 codefun 用户,通过密钥的方式
kubectl config set-credentials codefun --client-certificate=./codefun.crt --client-key=./codefun.key --embed-certs=true
User "codefun" set.
# 联系上下文,将 config 中的用户和集群进行绑定 名字格式为:用户名@集群名 kubectl config set-context codefun@kubernetes --user=codefun --cluster=kubernetes Context "codefun@kubernetes" created.
# 更改当前上下文
kubectl config use-context CONTEXT_NAME
例如:kubectl config use-context codefun@kubernetes
Secret 私密凭据
- secret 对象类型用来保存敏感信息。例如密码、OAuth 令牌和 SSH 密钥。将这些信息放在 secret 中比放在 pod 定义或者容器镜像中来说更加安全和灵活。
- secret 的种类
generic通用的,从本地文件、目录或文本值创建密码。docker-registry创建一个给 Docker registry 使用的 Secrettls创建一个 TLS secret
# 命令行创建
## 创建 docker-registry 类型的 secret
kubectl create secret docker-registry image-secret \
--docker-server="registry.cn-hangzhou.aliyuncs.com" \
--docker-username="听风声168" \
--docker-password="123456gxGx"

## 创建 generic 类型的 secret
kubectl create secret generic secret-name \
--from-literal=usrKey="usrValue" \
--from-literal=passKey="passValue"
# yaml 创建: 不推荐,还要 base64 加密
apiVersion: v1
kind: Secret
type: Opaque
metadata:
  name: secret-name
data:
  passKey: cGFzc1ZhbHVl  # 使用 base64 加密了
  usrKey: dXNyVmFsdWU=
ServiceAccount 认证
- serviceAccount 是为 pod 中的进程提供必要的身份认证。
- 当建立新 pod 不提供
serviceAccountName时,系统会自动指定该 pod 命名空间下名为 default 的 serviceAccount。 - 每当创建一个 serviceAccount 就会有一个 secret 与之绑定,这个 secret 会随着 serviceAccount 的死亡而死亡。
# 命令行创建: 指定好名字和命名空间即可
kubectl create serviceaccount NAME -n NAMESPACE
apiVersion: v1
kind: ServiceAccount
metadata:
  name: sa-demo
imagePullSecrets:
  name: SECRET_NAME
webhook 授权模式
# 启用条件: kube-apiserver 启动参数加入以下:
--authorization-webhook-config-file=SOME_FILENAME
# HTTPS 客户端认证的配置实例:
apiVersion: v1
kind: Config
clusters: # 远程授权服务器
  - name: name-of-remote-authz-service
    cluster:
      certificate-authority: /path/to/ca.pem  # 验证远程授权服务的 CA 证书
      server: https://authz.example.com/authorize # 远程授权服务 url,必须使用 https

# users 代表 API 服务器的 webhook 配置
users:
  - name: name-of-api-server
    user:
      client-certificate: /path/to/cert.pem # webhook plugin 使用 cert
      client-key: /path/to/key.pem          # cert 所对应的 key

# kubeconfig 文件必须有 context。需要提供一个给 API 服务器。
current-context: webhook
contexts:
- context:
    cluster: name-of-remote-authz-service
    user: name-of-api-server
  name: webhook
- 另见网址:Webhook 模式 | Kubernetes
RBAC 授权模式详解
- RBAC 的优势:
- 对集群中的资源和非资源权限有完整的覆盖
- 可以在运行时进行调整,无需重启 API Server
- 要使用 RBAC 授权模式,kube-apiserver 的启动参数必须为:
--authorization-mode=...,RBAC
RBAC 的 API 资源对象说明

给其他用户授予查看默认命名空间下的 pod 资源
进行认证
参考认证方式的 user 认证
角色绑定
# 创建角色
apiVersion: rbac.authorization.k8s.io/v1
kind: Role
metadata:
name: pods-reader
namespace: default
rules:
- apiGroups:
  - ""
  resources:
  - pods
  verbs:
  - get
  - list
  - watch
# 角色绑定 apiVersion: rbac.authorization.k8s.io/v1 kind: RoleBinding metadata: name: pods-reader-bing roleRef: apiGroup: rbac.authorization.k8s.io kind: Role name: pods-reader subjects: - apiGroup: rbac.authorization.k8s.io kind: User name: codefun# 创建用户 useradd gx # 将 .kube 复制到 gx 的家目录下并更改所属者 cp -r ~/.kube/ /home/gx/ && chown -R gx.gx /home/gx/.kube # 切换到 gx 用户下,更改上下文 su gx kubectl config use-context codefun@kubernetes
角色(Role)
- 一个角色就是一组权限的集合,在 Role 中设置的权限都是许可(permisssive)形式的,不可以设置拒绝形式的规则。
- Role 设置的权限将会局限于命名空间
# 该角色具有在命名空间 default 中读取(list get watch)pod 资源对象信息的权限:
apiVersion: rbac.authorization.k8s.io/v1
kind: Role
metadata:
  name: pod-reader
rules:
- apiGroups: [""] # 空字符串,表示 Core API Group
  resources: ["pods"]
  verbs: ["get","watch","list"]
# resources: 需要操作的资源对象类型,例如 pods deployment jobs 等
# apiGroups:资源对象 API 组列表,例如 Core、extensions、apps、batch 等
# verbs:设置允许对资源对象操作的方法列表,例如 get、watch、list、delete、replace、patch 等
集群角色(ClusterRole)
- 集群角色除了具有和角色一致的命名空间内资源的管理能力,还有如下授权应用场景:
- 对集群范围内的资源的授权,例如 node
- 对非资源型的授权,例如 /healthz
- 对包含全部 namespace 资源的授权,例如 pods
- 对某个命名空间中多种权限的一次性授权
apiVersion: rbac.authorization.k8s.io/v1
kind: ClusterRole
metadata:
  # ClusterRole 不受限于命名空间,所以无需设置 namespace
  name: secret-reader
rules:
- apiGroups: [""]
  resources: ["secrets"]
  verbs: ["get","watch","list"]
角色绑定(RoleBinding)
- 用来把一个角色绑定到一个目标主体,目标主体可以是 User(用户)、Group(组) 或者 Service Account。RoleBinding 用于某个命名空间的授权
# 允许用户 jane 读取命名空间 default 的 pod 资源对象信息。
apiVersion: rbac.authorization.k8s.io/v1
kind: RoleBinding
metadata:
  name: read-pods
  namespace: default # 必须指定
subjects:  # 需要绑定的用户
- kind: User # 可以是 User 或 ServiceAccount
  name: jane
  apiGroup: rbac.authorization.k8s.io
roleRef:  # 需要绑定的角色
- kind: Role
  name: pod-reader
  apiGroup: rbac.authorization.k8s.io
- RoleBinding 也可以引用 ClusterRole,对目标主体在其所在的命名空间授予在 ClusterRole 中定义的权限。【即用户拥有 ClusterRole 的管理权限,但是管理范围是 RoleBinding 所在的命名空间】
- 常见用法是:集群管理员预先定义好一组 ClusterRole,然后在多个命名空间中重复使用这些 ClusterRole
# 用户“dave”授权一个ClusterRole “secretreader”
# 虽然secret-reader是一个集群角色,但因为RoleBinding的作用范围为命名空间development,
# 所以用户dave只能读取命名空间 development中的secret资源对象,而不能读取其他命名空间中的secret资源对象
apiVersion: rbac.authorization.k8s.io/v1
kind: RoleBinding
metadata:
  name: read-secrets
  namespace: development
subjects:
- kind: User
  name: dave
  apiGroup: rbac.authorization.k8s.io
roleRef:
- kind: ClusterRole
  name: secret-reader
  apiGroup: rbac.authorization.k8s.io
集群角色绑定
- 集群角色绑定中引用的角色只能是集群级别的角色
- 一旦创建了角色绑定,用户就无法修改与之绑定的角色,只有删除了角色绑定,才能更改角色。
apiVersion: rbac.authorization.k8s.io/v1
kind: ClusterRoleBinding
metadata:
  name: read-secrets-global
subjects:
- kind: Group
  name: manager
  apiGroup: rbac.authorization.k8s.io
roleRef:
- kind: ClusterRole
  name: secret-reader
  apiGroup: rbac.authorization.k8s.io
聚合 ClusterRole
- 即将多个 ClusterRole 聚合成一个新的 ClusterRole
- 系统内置的集群角色有些也是聚合集群角色,我们也可以引用系统内置的 labels
apiVersion: rbac.authorization.k8s.io/v1
kind: ClusterRole
metadata:
  name: monitoring
aggregationRule:  # 设置包含的 ClusterRole
# 使用 Lable Selector 的形式进行设置
  clusterRoleSelectors:
  - matchLabels:
      rabc.example.com/aggregate-to-monitoring: "true" # 注意不能对其
rules: []  # 系统自动填充,合并结果
apiVersion: rbac.authorization.k8s.io/v1
kind: ClusterRole
metadata:
  name: monitoring-endpoints
  labels: # 通过标签进行绑定
    rabc.example.com/aggregate-to-monitoring: "true"
rules: []
- apiGroups: [""]
  resources: ["services","endpoints","pods"]
  verbs: ["get","list","watch"]
常见的授权规则示例
允许读取 pod 资源对象(属于 Core API Group)的信息
rules:
- apiGroups: [""]
  resources: ["pods"]
  verbs: ["get","list","watch"]
允许读写 extensions 和 apps 两个 api Group 中 deployment 资源对象的信息
rules:
- apiGroups: ["extensions","apps"]
  resources: ["deployments"]
  verbs: ["get","list","watch","create","update","patch","delete"]
允许读取 pod 资源对象的信息,并允许读写 batch 和 extensions 两个 API Group 中 Job 的信息
rules:
- apiGroups: [""]
  resources: ["pods"]
  verbs: ["get","list","watch"]
- apiGroups: ["batch","extensions"]
  resources: ["pods"]
  verbs: ["get","list","watch","create","update","patch","delete"]
允许读取名为 myconfig 的 ConfigMap 的信息
- 必须绑定到一个 RoleBinding 来限制一个命名空间中的特定 ConfigMap 实例
rules:
- apiGroups: [""]
  resources: ["configmap"]
  resourceNames: ["myconfig"]
  verbs: ["get"]
读取 Node 资源对象(属于Core API Groups)
- 由于 node 是集群级别的资源对象,所以必须存在 ClusterRole 中,并使用 ClusterRoleBinding
rules:
- apiGroups: [""]
  resources: ["nodes"]
  verbs: ["get","list","watch"]
允许对非资源类型的 /healthz 端点(endpoint) 及其所有子路径进行 get post 操作
- 必须使用 ClusterRole ClusterRoleBinding
rules:
- nonResourceURLs: ["/healthz","/healthz/*"]
  verbs: ["get","post"]
常见的角色绑定示例
- kubernetes 内置的用户/用户组以
system:开头,用户自定义的名称不应该使用这个前缀。 - ServiceAccount 在系统中的用户名以
system:serviceaccount:开头,- 其所属的组名会被以
system:serviceaccount为前缀
- 其所属的组名会被以
为用户 alice@example.com 授权
subjects:
- kind: User
  name: "alice@example.com"
  apiGroup: rbac.authorization.k8s.io
为 fronted-admins 组授权
subjects:
- kind: Group
  name: "fronted-admins"
  apiGroup: rbac.authorization.k8s.io
为 kube-system 命名空间中的默认 Service Account 授权
subjects:
- kind: ServiceAccount
  name: "default"
  namespace: kube-system
为 qa 命名空间中所有 Service Account 授权
subjects:
- kind: Group
  name: "system:serviceaccounts:qa"
  apiGroup: rbac.authorization.k8s.io
为所有命名空间中的所有 service account 授权
subjects:
- kind: Group
  name: "system:serviceaccounts"
  apiGroup: rbac.authorization.k8s.io
为所有已认证用户授权
subjects:
- kind: Group
  name: "system:authenticated"
  apiGroup: rbac.authorization.k8s.io
为所有未认证用户授权
subjects:
- kind: Group
  name: "system:unauthenticated"
  apiGroup: rbac.authorization.k8s.io
为全部用户授权
subjects:
- kind: Group
  name: "system:authenticated"
  apiGroup: rbac.authorization.k8s.io
- kind: Group
  name: "system:unauthenticated"
  apiGroup: rbac.authorization.k8s.io
面向用户的 ClusterRole
| 默认 ClusterRole | 默认ClusterRoleBinding | 描述 |
|---|---|---|
| cluter-admin | system:master 组 | 可以对任何资源对象执行任何操作 |
| admin | None | 不允许操作命名空间本身,不能对资源配额进行修改 |
| edit | None | 大多数资源的读写操作,不允许查看角色资源 |
| view | None | 大多数资源的只读操作,不允许查看角色资源 |
对 serviceAccount 的授权管理
- 默认的 RBAC 策略不会为命名空间 kube-system 之外的 ServiceAccount 授予任何权限
- 除了所有已认证用户所具有的 Discovery 权限
为应用专属的 ServiceAccount 赋权
- 需要在 pod 中指定
serviceAccountName,并为其创建 ServiceAccount- 下例为命名空间 my-namespace 中的 ServiceAccount my-sa 授予只读权限
kubectl create roleBinding my-sa-view \
--clusterrole=view \
--serviceaccount=my-namespace:my-sa \ # 命名空间:sa名
--namespace=my-namespace
为一个命名空间中名为 default 的 ServiceAccount 授权
- 当应用没有指定 serviceAccountName,系统则将为其设置名为 default 的 ServiceAccount
kubectl create roleBinding my-sa-view \
--clusterrole=view \
--serviceaccount=my-namespace:default \
--namespace=my-namespace
集群网络
kubernetes 网络策略
- 默认情况下,所有 pod 的网络都是互通的(无论命名空间不同)
- Network Policy 的主要功能是对 pod 和命名空间之间的网络通信进行限制和准入控制
网络策略设置说明
# Ingress 规则
	# 允许属于 IP 地址范围 172.17.0.0/16 的访问,但是 172.17.1.0/24 除外
	# 允许属于包含 project: myproject 标签的命名空间的客户端 pod 访问目标 pod
	# 允许与同命名空间中包含  role: frontend 标签的客户端访问目标 pod。
# Egress 规则
	# 允许目标 pod 访问属于IP地址 10.0.0.0/24 并监听 5978 端口的服务
apiVersion: networking.k8s.io/v1
kind: NetworkPolicy
metadata:
  name: test-network-policy
spec:
  podSelector:  # 定义该网络策略作用的 pod 范围
    matchLabels:
      role: db
  policyTypes:
    - Ingress  # 入站规则(被别人访问)
    - Egress   # 出站规则(访问别人)
  ingress: # 定义允许访问目标 pod 入站的白名单
    - from: # 满足 from 的客户端才能访问
        - ipBlock:
            cidr: 172.17.0.0/16
            except:
              - 172.17.1.0/24
        - namespaceSelector:
            matchLabels:
              project: myproject
        - podSelector:
            matchLabels:
              role: frontend
      ports:  # 允许访问的目标 pod 监听端口号
        - protocol: TCP
          port: 6379
  egress: # 定义目标 pod 允许访问的出站白名单
    - to: # 允许访问的服务端信息
        - ipBlock:
            cidr: 10.0.0.0/24
      ports: # 允许访问的目标 pod 监听端口号
        - protocol: TCP
          port: 5978
Selector 功能说明
- 在 from 或 to 下共有四种选择器:
podSelector:networkPolicy 所在命名空间中按照标签选择namespaceSelector:所设置命名空间所有的 podpodSelector和namespaceSelector:选定指定命名空间中的 podipBlock:可以设置集群外的地址
# 在 from 中同时设置 namespaceSelector 和 podSelector
# 该策略允许从拥有 user=alice 标签的命名空间中拥有 role=client 标签的 pod 发起访问
......
ingress:
- from:
  - namespaceSelector:
      matchLabels:
        user: alice
    podSelector:
      matchLabels:
        role: client
......
# 在 from 中分别设置 namespaceSelector 和 podSelector
# 该策略允许从拥有 user=alice 标签的命名空间中任意 pod 发起访问
# 也允许从当前命名空间中有 role=client 标签的 pod 发起访问
......
ingress:
- from:
  - namespaceSelector:
      matchLabels:
        user: alice
  - podSelector:
      matchLabels:
        role: client
......
网络策略示例
# 默认禁止 ingress 访问
apiVersion: networking.k8s.io/v1
kind: NetworkPolicy
metadata:
  name: default-deny
spec:
  podSelector: {}
  policyTypes:
  - Ingress
# 默认允许 ingress 访问
apiVersion: networking.k8s.io/v1
kind: NetworkPolicy
metadata:
  name: default-deny
spec:
  podSelector: {}
  ingress:
  - {}
  policyTypes:
  - Ingress
# 默认禁止 egress 访问
apiVersion: networking.k8s.io/v1
kind: NetworkPolicy
metadata:
  name: default-deny
spec:
  podSelector: {}
  policyTypes:
  - Egress
# 默认允许 ingress 访问
apiVersion: networking.k8s.io/v1
kind: NetworkPolicy
metadata:
  name: default-deny
spec:
  podSelector: {}
  egress:
  - {}
  policyTypes:
  - Egress
# 默认禁止 ingress 和 egress 访问
apiVersion: networking.k8s.io/v1
kind: NetworkPolicy
metadata:
  name: default-deny
spec:
  podSelector: {}
  policyTypes:
  - Ingress
  - Egress
存储原理与应用
将资源对象映射为存储卷
- 资源对象以存储卷的形式挂载为容器内的目录或文件
ConfigMap
- configMap 主要保存应用程序所需的配置文件,
- 并且通过 volume 形式挂载到容器内的文件系统供容器内的应用程序读取
---
apiVersion: v1
kind: ConfigMap
metadata:
  name: cm-appconfigfiles
data: # 键值对
  key-index: |
    hello world!!
  key-a: |
    hello A!!
---
apiVersion: v1
kind: Pod
metadata:
  name: cm-test-app
spec:
  containers:
  - name:  demo01
    image: "nginx:stable-alpine"
    ports:
    - containerPort:  80
    volumeMounts:
    - name: html	# 引用 volume 的名称
      mountPath: /usr/share/nginx/html # 挂载到容器内的目录下
  volumes:
  - name: html	# 定义 volume 的名称
    configMap:
      name: cm-appconfigfiles # 使用 ConfigMap “cm-appconfigfiles”
      items:
      - key: key-index # key = key-index
        path: index.html # 挂载为 index.html 文件
      - key: key-a
        path: a.html
Secret
- 假如 kubernetes 中已经存在如下 secret 资源
kubectl create secret generic mysecret --from-literal=password=123456 --from-literal=username=codefun
secret/mysecret created
kubectl get secret mysecret -o yaml
---
apiVersion: v1
kind: Pod
metadata:
  name: secret-test-app
spec:
  containers:
  - name:  demo01
    image: "nginx:stable-alpine"
    ports:
    - containerPort:  80
    volumeMounts:
    - name: secret
      mountPath: /etc/foo
  volumes:
  - name: secret
    secret:
      secretName: mysecret
- 效果如下:key 变成了文件名,value 变成了文件内容
kubectl exec -it  secret-test-app -- /bin/sh
/ # cd /etc/foo/
/etc/foo # ls
password  username
/etc/foo # cat password
123456/etc/foo #
/etc/foo #
/etc/foo # cat username
codefun/etc/foo
Downward API
- 通过 downward api 可以将 pod 或者容器的某些元数据信息(pod 名称、pod IP,node IP、label、annotation、容器资源限制等)以文件的形式供容器内的应用使用。
---
apiVersion: v1
kind: Pod
metadata:
  name: downward-test-app
  labels:
    rack: rack-22
    cluster: kubernetes
    zone: us-est-coast
  annotations:
    bulider: codefun
    bulid: two
spec:
  containers:
  - name:  demo01
    image: "busybox"
    command: ["sh","-c"]
    args:
    - while true; do
        if [[ -e /etc/podinfo/annotations ]]; then
        echo -en '\n\n'; cat /etc/podinfo/labels; fi;
        if [[ -e /etc/podinfo/labels ]]; then
        echo -en '\n\n'; cat /etc/podinfo/annotations; fi;
        sleep 5;
      done;
    volumeMounts:
    - name: podinfo
      mountPath: /etc/podinfo
  volumes:
  - name: podinfo
    downwardAPI:
      items:
      - path: "labels"
        fieldRef:
          fieldPath: metadata.labels
      - path: "annotations"
        fieldRef:
          fieldPath: metadata.annotations
# 效果如下
kubectl exec -it   downward-test-app -- /bin/sh
/ # cd /etc/podinfo/
/etc/podinfo # ls
annotations  labels

kubectl logs  downward-test-app


cluster="kubernetes"
rack="rack-22"
zone="us-est-coast"

bulid="two"
bulider="codefun"
kubectl.kubernetes.io/last-applied-configuration="{\"apiVersion\":\"v1\",\"kind\":\"Pod\",\"metadata\":{\"annotations\":{\"bulid\":\"two\",\"bulider\":\"codefun\"},\"labels\":{\"cluster\":\"kubernetes\",\"rack\":\"rack-22\",\"zone\":\"us-est-coast\"},\"name\":\"downward-test-app\",\"namespace\":\"default\"},\"spec\":{\"containers\":[{\"args\":[\"while true; do if [[ -e /etc/podinfo/annotations ]]; then echo -en '\\\\n\\\\n'; cat /etc/podinfo/labels; fi; if [[ -e /etc/podinfo/labels ]]; then echo -en '\\\\n\\\\n'; cat /etc/podinfo/annotations; fi; sleep 5; done;\"],\"command\":[\"sh\",\"-c\"],\"image\":\"busybox\",\"name\":\"demo01\",\"volumeMounts\":[{\"mountPath\":\"/etc/podinfo\",\"name\":\"podinfo\"}]}],\"volumes\":[{\"downwardAPI\":{\"items\":[{\"fieldRef\":{\"fieldPath\":\"metadata.labels\"},\"path\":\"labels\"},{\"fieldRef\":{\"fieldPath\":\"metadata.annotations\"},\"path\":\"annotations\"}]},\"name\":\"podinfo\"}]}}\n"
kubernetes.io/config.seen="2023-03-20T04:21:51.614279979-04:00"
kubernetes.io/config.source="api"
Projected Volume
- Projected Volume 用于将一个或多个上述资源对象一次性挂载到容器内的同一个目录下。
- Projected Volume 的常见应用场景:
- 通过Pod的标签生成不同的配置文件,需要使用配置文件,以及用户名和密码,这时需要使用以上三种资源
- 在自动化运维应用中使用配置文件和账号信息时,需要使用 ConfigMap、Secrets。
- 在
配置文件内使用Pod名称(metadata.name)记录日志时,需 要使用ConfigMap、Downward API。 - 使用某个
Secret对Pod所在命名空间(metadata.namespace)进 行加密时,需要使用Secret、Downward API。
apiVersion: v1
kind: Pod
metadata:
  name: volume-test
spec:
  containers:
  - name: container-test
    image: nginx:stable-alpine
    volumeMounts:
    - name: all-in-one
      mountPath: "/projected-volume"
      readOnly: true
  volumes:
  - name: all-in-one
    projected:
      sources:
      - secret:
          name: mysecret
          items:
            - key: username
              path: my-group/my-username
      - downwardAPI:
          items:  # 注意此处的缩进
            - path: "labels"
              fieldRef:
                fieldPath: metadata.labels
            - path: "cpu_limit"
              resourceFieldRef:
                containerName: container-test
                resource: limits.cpu
      - configMap:
          name: myconfigmap
          items:
            - key: key-index
              path: my-group/my-config
Node 本地存储
EmptyDir:与 pod 同生命周期的 node 临时存储HostPath:Node 目录Local:基于持久卷(PV)管理 Node 目录
EmptyDir
- 在初始状态下目录中是空目录,与 pod 同生命周期的 node 临时存储
- 应用场景:
- 基于磁盘进行合并排序操作时需要的临时存储
- 长时间计算任务的总监检查文件
- 为某个 web 服务提供临时网站内容文件
---
apiVersion: v1
kind: Pod
metadata:
  name: empty-dir
spec:
  containers:
  - name:  empty
    image: "nginx:stable-alpine"
    ports:
    - containerPort:  80
    volumeMounts:
    - name: empty
      mountPath: /usr/share/nginx/html # 这个目录变空了!
  volumes:
  - name: empty
    emptyDir: {}
HostPath
- 适用场景:
- 容器应用的关键数据需要被持久化到宿主机上
- 需要使用 Docker 中的某些内部数据,可以将主机的
/var/lib/docker目录挂载到容器内 - 监控系统,例如 cAdvisor 需要采集宿主机上
/sys目录下的内容 - pod 的启动依赖于宿主机上的某个目录或者文件就绪的场景
hostPath 的 type 配置参数和校验规则
type 配置参数 校 验 规 则 空 系统默认值,为向后兼容的设置,意为系统在挂载 path时不做任何校验 DirectoryOrCreate path 指定的路径必须是目录,如果不存在,则系统将自动创建该目录,将权限设置为0755, 与kubelet 具有相同的 owner 和 group Directory path 指定的目录必须存在,否则挂载失败 FileOrCreate path 指定的路径必须是文件,如果不存在,则系统将自动创建该文件,将权限设置为0644, 与kubelet 具有相同的 owner 和 group File path 指定的文件必须存在,否则挂载失败 Socket path 指定的UNIX socke t必须存在,否则挂载失败 CharDevice path 指定的字符设备(character device)必须存在,否则挂载失败 BlockDevice path 指定的块设备(block device)必须存在,否则挂载失败
- 当 type 为 FileOrCreate 时,如果挂载文件由上层目录,则系统不会自动创建上层目录
- 注意事项:
- 相同 hostPath 的多个 pod 运行在不同主机上,可能因为配置文件不同,而出现不同的结果
- 如果设置了基于存储资源情况的调度策略,则 hostPath 的目录空间无法计入 ndoe 的可用资源范围,从而出现不同的调度结果
- 如果是由 kubelet 自动创建的目录,则目录的所属者是 root
- 需要手动删除宿主机目录
---
apiVersion: v1
kind: Pod
metadata:
  name: host-path
spec:
  containers:
  - name:  host
    image: "nginx:stable-alpine"
    ports:
    - containerPort:  80
    volumeMounts:
    - name: host-path
      mountPath: /usr/share/nginx/html
  volumes:
  - name: host-path
    hostPath:
      path: /html	# node 节点上的目录
      type: Directory # 可选,表示这个目录必须存在
# 预先创建了文件的上层目录
---
apiVersion: v1
kind: Pod
metadata:
  name: host-path
spec:
  containers:
  - name:  host
    image: "nginx:stable-alpine"
    ports:
    - containerPort:  80
    volumeMounts:
    - name: host-path-dir
      mountPath: /usr/share/nginx/html
    - name: host-path-file
      mountPath: /usr/share/nginx/html/index.html
  volumes:
  - name: host-path-dir
    hostPath:
      path: /html
      type: DirectoryOrCreate
  - name: host-path-file
    hostPath:
      path: /html/index.html
      type: FileOrCreate
持久卷(Persistent Volume)
PV 和 PVC
- 将 pv 看作可用的存储资源,pvc 则是对存储资源的需求
- 生命周期包括:资源供应(Provisioning)、资源绑定(Binding)、资源使用(Using)、资源回
收(Reclaiming)
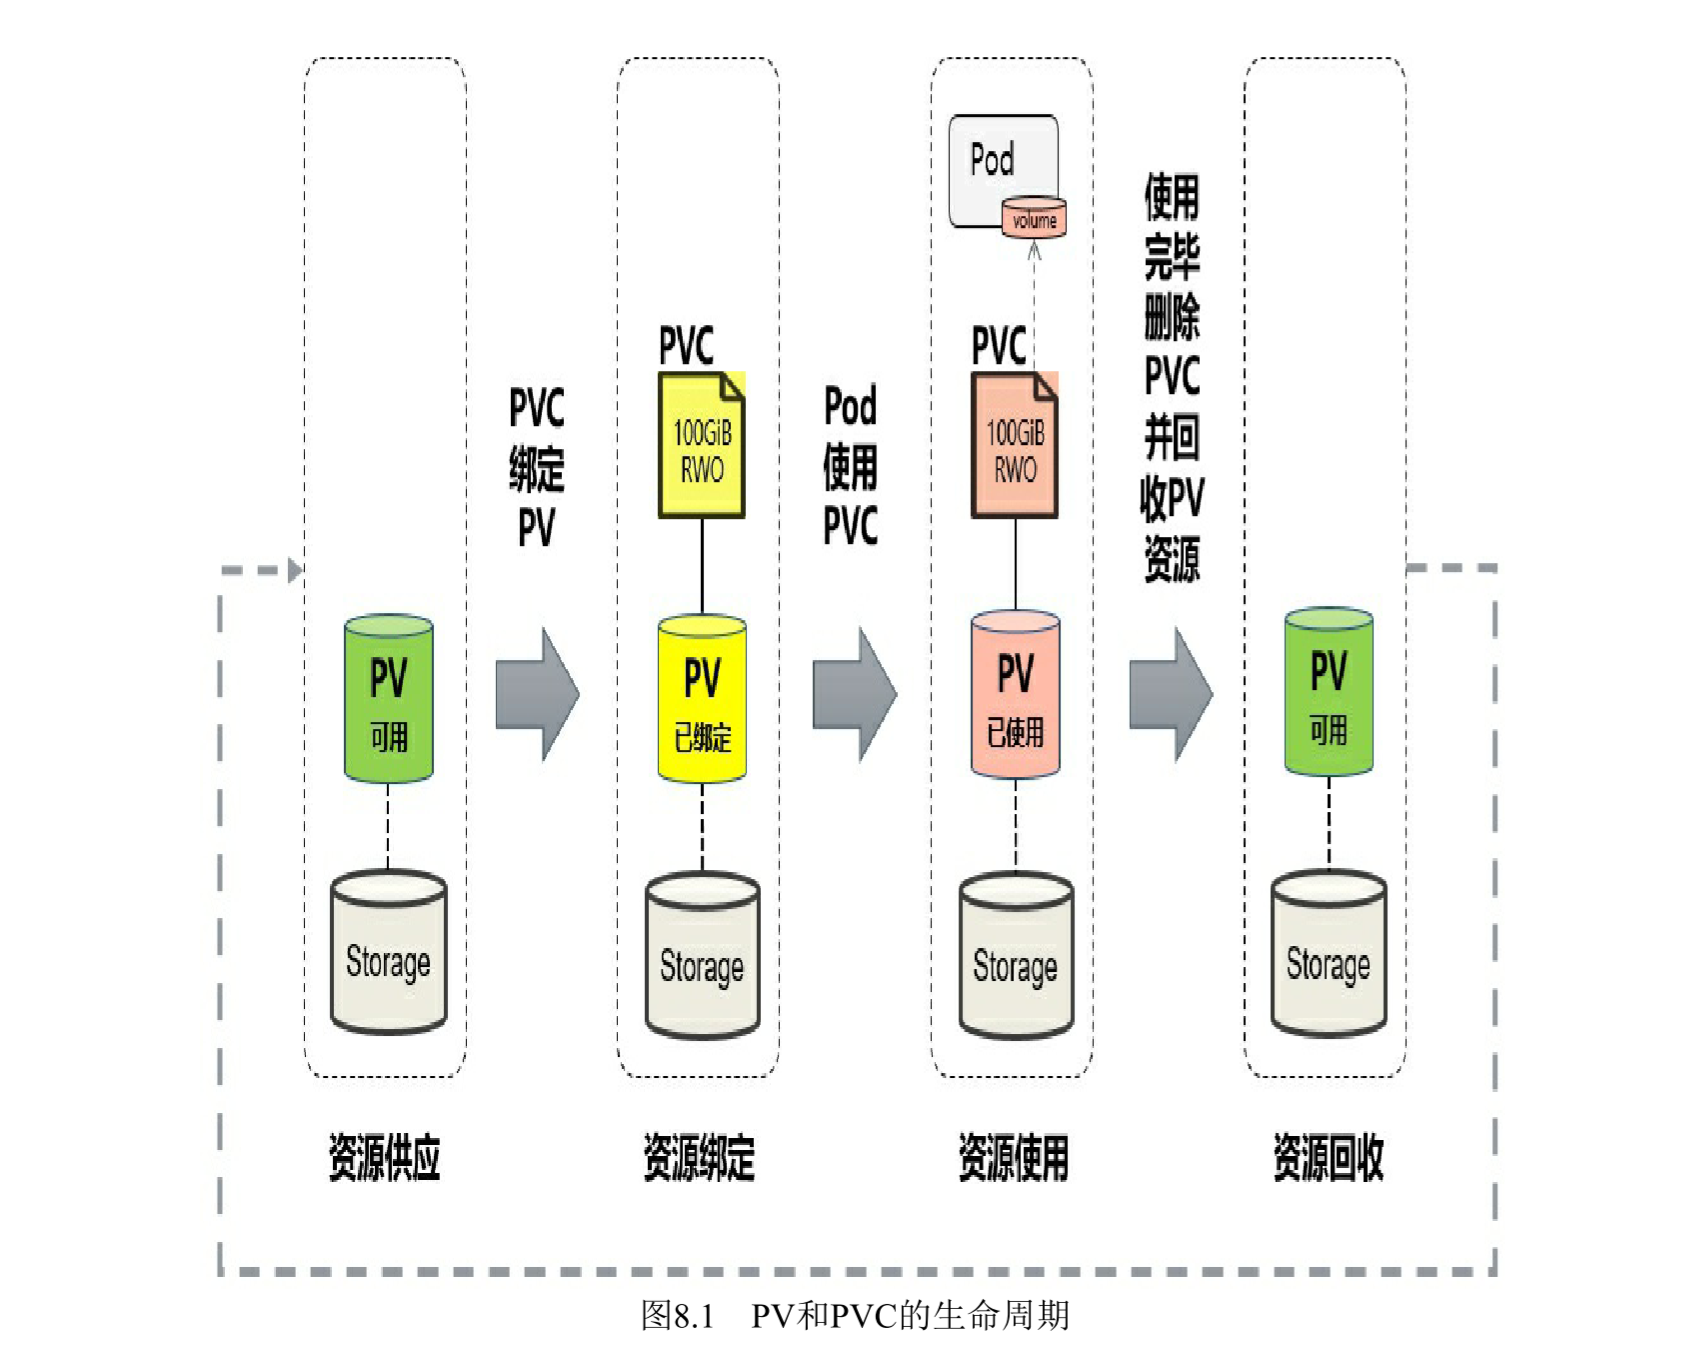
- 资源供应
- 静态模式
- 需要预先创建 pv,然后和 pvc 绑定
- 动态模式
- 通过 storageClass 的设置,系统自动完成 pv 的创建和 pvc 的绑定
- 静态模式
- 资源绑定
- 如果在系统中没有满足PVC要求的PV,PVC则会无限期处于
Pending状态,直到系统管理员创建了一个符合其要求的PV。 - PVC与PV的
绑定关系是一对一的,不会存在一对多的情况。
- 如果在系统中没有满足PVC要求的PV,PVC则会无限期处于
- 资源使用
- 同一个PVC还可以被多 个Pod同时挂载使用
- 存储对象(Storage Object in Use Protection)的保护机制
- 存储资源(PV、PVC)相对于容器应用(Pod)是独立管理的资 源,可以单独删除。
- 当删除 pvc 时,系统会检测是否被用,若被用则延迟删除,直到不被用才被删除
- 资源回收
- 删除 pvc 后,与其绑定的 pv 不能立即与其他 pvc 绑定,只有清除 pv 上的数据才能再次使用
- 资源回收策略(Reclaim Policy)
- Retain(保留数据)
- 删除PVC之后,与之绑定的PV不会被删除,仅被标记为已释放(released)
- 删除步骤如下:
- 删除PV资源对象
- 手工清理PV后端存储资产(asset)中的数据
- 手工删除后端存储资产。如果希望重用该存储资产,则可以创建一个新的PV与之关联。
- Delete(删除数据)
- 默认策略,自动删除,
- 目前支持Delete策略的存储 提供商包括AWSElasticBlockStore、GCEPersistentDisk、Azure Disk、 Cinder等。
- Recycle(已弃用)
- Retain(保留数据)
- pvc 资源扩容
- 前提条件
- 在PVC对应的StorageClass定义中设置
allowVolumeExpansion=true、
- 在PVC对应的StorageClass定义中设置
- 包含文件系统(File System)存储卷的扩容
- 文件系统的扩容只能在Pod启动时完成,或者底层文件系统在Pod运行过程中支持在线扩容
- 对于
FlexVolume类型的存储卷,在驱动程序支持RequiresFSResize=true参数设置的情况下才支持扩容。- FlexVolume支持在Pod重启时完成扩容操作
- 使用中的PVC在线扩容
- 需要设置
kubeapiserver、kube-controller-manager、kubelet服务的启动参数--feature-gates=ExpandInUsePersistentVolumes=true来开启该特性开关。
- 需要设置
- 扩容失败的恢复机制。
- 如果扩容存储资源失败,系统将不断尝试扩容请求
- 执行恢复操作的步骤:
- 设置与PVC绑定的PV资源的回 收策略为“Retain”;
- 删除PV中的 claimRef定义,这样新的PVC可以与之绑定,结果将使得PV的状态 为“Available”;
- 删除PVC,此时PV的数据仍然存在;
- 新建一个PVC,设置比PV空间小的存储空间申请,同时设置volumeName字段为PV的名称,结果将使得PVC与PV完成绑定;
- 前提条件
PV
---
apiVersion: storage.k8s.io/v1
kind: StorageClass
metadata:
  name: slow
provisioner: kubernetes.io/aws-ebs
parameters:
  type: gp2
reclaimPolicy: Retain
allowVolumeExpansion: true
mountOptions:
  - debug
volumeBindingMode: Immediate
---
apiVersion: v1
kind: PersistentVolume
metadata:
  name: pv1
spec:
  capacity:	# 存储容量
    storage: 5Gi
  volumeMode: Filesystem # 存储卷模式
  accessModes: # 访问模式
    - ReadWriteOnce
  persistentVolumeReclaimPolicy: Recycle # 回收策略设置
  storageClassName: slow # 存储类别的名字
  mountOptions:
    - hard
    - nfsvers=4.1
  nfs:
    path: /data
    server: 192.168.222.8
volumeMode:存储卷模式的可选参数Filesystem(文件系统,默认值)- PV将以目录(Directory)形式挂载到Pod内
accessMode: 访问模式的可选参数- ReadWriteOnce(RWO):读写权限,并且只能被单个Node挂载
- ReadOnlyMany(ROX):只读权限,允许被多个Node挂载。
- ReadWriteMany(RWX):读写权限,允许被多个Node挂载。
- 某些 pv 支持多种访问模式
storageClassName:存储类别的名称- 具有特定存储类别的PV只能与请求了该类别 的PVC绑定。
- 未设定类别的PV则只能与不请求任何存储类别的PVC绑定。
persistentVolumeReclaimPolicy:回收策略的选项- Retain:保留数据,需要手工处理。
- Recycle:简单清除文件的操作
- 例如运行
rm-rf/thevolume/*命令
- 例如运行
- Delete:与PV相连的后端存储完成Volume的删除操作。
- 目前只有NFS和HostPath两种类型的PV支持Recycle策略;
mountOptions:挂载选项 ***- Kubernetes不会对挂载选项进行验证,如果设置了错误的挂 载选项,则挂载将会失败。
- 节点亲和性
- 公有云提供的存储卷不需要,但是对于
Local类型的 pv,需要手工设置如下:
- 公有云提供的存储卷不需要,但是对于
apiVersion: vl
kind: PersistentVolume
metadata:
  name:example-local-pv
spec:
  capacity:
    storage: 5Gi
  accessModes:
  - ReadWriteOnce
  persistentVolumeReclaimPolicy: Delete
  storageclassName: local-storage
  local:
    path: /mnt/disks/ssdl
  nodeAffinity:
    required:
      nodeSelectorTerms:
      - matchExpe:
        - key: kubernetes.io/hostname
          operator: In
          values:
          - my-node
- pv 的生命周期
- Available:可用状态,还未与某个PVC绑定。
- Bound:已与某个PVC绑定。
- Released:与之绑定的PVC已被删除,但未完成资源回收,不能被其他PVC使用。
- Failed:自动资源回收失败。
PVC
apiVersion: v1
kind: PersistentVolumeClaim
metadata:
  name: myclain
spec:
  storageClassName: slow # 存储类别
  只有设置了该Class的PV才能被系统选出
  accessModes: # 访问模式和 pv 一样
  - ReadWriteOnce
  volumeMode: Filesystem # 存储卷模式
  resources:  # 资源请求
    requests:
      storage: 4Gi
  selector: # pv 选择条件
  如果 matchLabels 和 matchExpressions 都设置,则都必须满足两者的条件
    matchLabels:
      release: "stable"
    matchExpressions:
      - {key: environment, operator: In, values: [dev]}
Pod 使用 PVC
---
apiVersion: v1
kind: Pod
metadata:
  name: secret-test-app
spec:
  containers:
  - name:  demo01
    image: "nginx:stable-alpine"
    ports:
    - containerPort:  80
    volumeMounts:
    - name: pv01
      mountPath: /usr/share/nginx/html
  volumes:
  - name: pv01
    persistentVolumeClaim:
      claimName: myclain
- 设置子目录
---
apiVersion: v1
kind: Pod
metadata:
  name: pv02
spec:
  containers:
  - name:  demo01
    image: "nginx:stable-alpine"
    ports:
    - containerPort:  80
    volumeMounts:
    - name: pv01
      mountPath: /usr/share/nginx/html
      subPath: html  # 子目录,相对位置
  volumes:
  - name: pv01
    persistentVolumeClaim:
      claimName: myclain
StorageClass
---
apiVersion: storage.k8s.io/v1
kind: StorageClass
metadata:
  name: slow
provisioner: kubernetes.io/aws-ebs # 存储提供商
parameters:
  type: gp2
reclaimPolicy: Retain
allowVolumeExpansion: true # 是否允许扩容
mountOptions: # 挂载选项
  - debug
volumeBindingMode: Immediate
provisioner:存储提供者- 支持的有:AWSElasticBlockStore、AzureDisk、AzureFile、Cinder、Flocker、GCEPersistentDisk、GlusterFS、PortworxVolume、Quobyte Volumes、RBD(Ceph Block Device)、ScaleIO、StorageOS、VsphereVolume
reclaimPolicy:资源回收策略的选项- Delete(删除)(默认)
- Retain(保留)
mountOptions:挂载选项- 系统不会对挂载选项进行验证
volumeBindingMode:存储绑定模式的支持参数-
Immediate(默认值)
- 表示当一个 PVC 创建出来时,就动态创建PV并进行PVC与PV的绑定操作
- 如果无法从全部Node访问的后端存储,将在不了解Pod调度需求的情况下 完成PV的绑定操作,这可能会导致某些Pod无法完成调度。
-
WaitForFirstConsumer
- PVC与PV的绑定操作延迟到第一个使用 PVC 的 Pod 创建出来时再进行
- 基于特定拓扑信息(Topology)进行PV绑定操作,则在 StorageClass的定义中 还可以通过allowedTopologies字段进行设置
-
apiVersion: storage.k8s.io/vl
kind: Storageclass
metadata:
  name: standard
provisionr: kubernetes.io/gce-pd
parameters:
  type: pd-standard
volumeBindingMode: WaitForFirstConsumer
allowedTopologies:
- matchLabelExpressions:
  - key: failure-domain.beta.kubernetes.io/zone
    values:
    - us-centrall-a
    - us-centrall-b
parameters:存储参数- 不同的Provisioner可能提供不同 的参数设置。
- 下面是常见存储提供商提供的存储参数
# AWSElasticBlockStore 储卷
kind: Storageclass
apiversion: storage.k8s.io/v1
metadata:
  name: slow
provisioner: kubernetes.io/aws-ebs
parameters:
  type: io1 # 可选项为 io1、gp2、sc1、st1,默认值为 p2
  iopsPerGB: "10" # 仅用于io1类型的Volume,
  				# 每秒每GiB的I/O操作数量。
  fsType: ext4 # 文件系统类型 默认 ext4
# crypted:是否加密。
# kmsKeyId:加密时使用的Amazon Resource Name。
# GCEPersistentDisk 存储卷
kind: StorageClass
apiversion: storage.k8s.io/v1
metadata:
 name: slow
provisioner: kubernetes.io/gce-pd
parameters:
  type: pd-standard # 可选项为pd-standard、pd-ssd,默认值为pd-standard。
  fstype: ext4 # 文件系统类型,默认值为ext4
  repicaiye-type: none # 复制类型,可选项为none、regional-pd,默认值为none。
# GlusterFS 存储卷
apiVersion: storage.k8s.io/vl
kind: StorageClass
metadata:
  name: slow
provisioner: kubernetes.io/glusterfs
parameters:
  resturl: "http:/127.0.0.1:8081" # Gluster REST服务(Heketi)的URL地址
  clusterid: "630372ccdc720a92c681fb928f27b53f" # GlusterFS的Cluster ID
  restauthenabled: "true" #是否对Gluster REST服务启用安全机制。
  restuser: "admin" # 访问Gluster REST服务的用户名。
  # restuserkey:访问Gluster REST服务的密码。
  secretNamespace: "default" # 保存访问Gluster REST服务密码的Secret资源对象名
  secretName: "heketi-secret" # 保存访问Gluster REST服务密码的Secret资源对象名
  gidMin: "40000" # StorageClass的GID范围,用于动态资源供应时为PV设置的GID。
  gidMax: "50000"
  volumetype: "replicate:3" # 设置GlusterFS的内部Volume类型,
  # replicate:3(Replicate类型,3份副本);
  # disperse:4:2(Disperse类型,数据4份,冗余两份);
  # none(Distribute类型)
# Local 存储卷
# 不能以动 态资源供应的模型进行创建,
# 但仍可为其设置一个StorageClass,以延迟到一个使用PVC的Pod创建出来再进行PV的创建和绑定
apiVersion: storage.k8s.io/v1
kind: StorageClass
metadata:
  name: local-storage
  provisioner: kubernetes.io/no-provisioner
  volumeBindingMode: WaitForFirstConsumer
# 默认的StorageClass
# 在集群级别设置一个默认的StorageClass,为那些未指定StorageClass的PVC使用。
kind: StorageClass
apiVersion: storage.k8s.io/v1
metadata:
  name: gold
annotations: # 默认的需要添加注解
  storageclass.beta.kubernetes.io/is-default-class= "true"
provisioner: kubernetes.i/gce-pd
parameters:
  type: pd-ssd
动态存储管理实战:GluterFS
准备工作
- 用于GlusterFS的各Node上安 装GlusterFS客户端
yum install -y glusterfs glusterfs-fuse
- GlusterFS管理服务容器需要以特权模式运行,在kube-apiserver的启动参数增加:
cd /etc/kubernetes/manifests && cat kube-apiserver.yaml
containers:
  - command:
    - kube-apiserver
    - --advertise-address=192.168.222.7
    - --allow-privileged=true # 添加这行
- 给要部署GlusterFS管理服务的节点打上storagenode=glusterfs标签
- 是为了将GlusterFS容器定向部署到安装了GlusterFS的Node上
kubectl label node kube-s01 storagenode=glusterfs
kubectl label node kube-s02 storagenode=glusterfs
创建GlusterFS管理服务容器集群
kind: DaemonSet
apiVersion: apps/v1
metadata:
  name: glusterfs
  labels:
    glusterfs: daemonset
  annotations:
    description: GlusterFS Daemon Set
    tags: glusterfs
spec:
  selector:
    matchLabels:
      glusterfs-node: daemonset
  template:
    metadata:
      name: glusterfs
      labels:
        glusterfs-node: daemonset
    spec:
      nodeSelector:
        storagenode: glusterfs
      hostNetwork: true
      containers:
        - image: 'gluster/gluster-centos:latest'
          imagePullPolicy: IfNotPresent
          name: glusterfs
          volumeMounts:
            - name: glusterfs-heketi
              mountPath: /var/lib/heketi
            - name: glusterfs-run
              mountPath: /run
            - name: glusterfs-lvm
              mountPath: /run/lvm
            - name: glusterfs-etc
              mountPath: /etc/glusterfs
            - name: glusterfs-logs
              mountPath: /var/log/glusterfs
            - name: glusterfs-config
              mountPath: /var/lib/glusterd
            - name: glusterfs-dev
              mountPath: /dev
            - name: glusterfs-cgroup
              mountPath: /sys/fs/cgroup
          securityContext:
            capabilities: {}
            privileged: true
          readinessProbe:
            timeoutSeconds: 3
            initialDelaySeconds: 60
            exec:
              command:
                - /bin/bash
                - '-c'
                - systemctl status glusterd.service
          livenessProbe:
            timeoutSeconds: 3
            initialDelaySeconds: 60
            exec:
              command:
                - /bin/bash
                - '-c'
                - systemctl status glusterd.service
      volumes:
        - name: glusterfs-heketi
          hostPath:
            path: /var/lib/heketi
        - name: glusterfs-run
        - name: glusterfs-lvm
          hostPath:
            path: /run/lvm
        - name: glusterfs-etc
          hostPath:
            path: /etc/glusterfs
        - name: glusterfs-logs
          hostPath:
            path: /var/log/glusterfs
        - name: glusterfs-config
          hostPath:
            path: /var/lib/glusterd
        - name: glusterfs-dev
          hostPath:
            path: /dev
        - name: glusterfs-cgroup
          hostPath:
            path: /sys/fs/cgroup
kubectl apply -f gluster.yaml
创建Heketi服务
- 首先创建 service accout 以及 RBAC
---
apiVersion: v1
kind: ServiceAccount
  metadata:
    name: heketi-service-account
---
apiVersion: rbac.authorization.k8s.io/vl
kind: Role
metadata:
  name: heketi
rules:
- apiGroups:
  - ""
  resources:
  - endpoints
  - services
  - pods
  verbs:
  - get
  - list
  - watch
- apiGroups:
  - ""
  resources:
  - pods/exec
  verbs:
  - create
---
apiVersion: rbac.authorization.k8s.io/vl
kind: RoleBinding
metadata:
  name: heketi
roleRef:
  apiGroup: rbac.authorization.k8s.io
  kind: Role
  name: heketi
subjects:
- kind: ServiceAccount
  name: heketi-service-account
  namespace: default
- 部署 Heketi 服务
// kubectl apply -f 这个json 文件即可
{
  "kind": "List",
  "apiVersion": "v1",
  "items": [

    {
      "kind": "Service",
      "apiVersion": "v1",
      "metadata": {
        "name": "heketi",
        "labels": {
          "glusterfs": "heketi-service",
          "deploy-heketi": "support"
        },
        "annotations": {
          "description": "Exposes Heketi Service"
        }
      },
      "spec": {
        "selector": {
          "name": "heketi"
        },
        "ports": [
          {
            "name": "heketi",
            "port": 8080,
            "targetPort": 8080
          }
        ]
      }
    },
    {
      "kind": "Deployment",
      "apiVersion": "apps/v1",
      "metadata": {
        "name": "heketi",
        "labels": {
          "glusterfs": "heketi-deployment"
        },
        "annotations": {
          "description": "Defines how to deploy Heketi"
        }
      },
      "spec": {
        "selector": {
          "matchLabels": {
            "glusterfs": "heketi-pod",
            "name": "heketi"
          }
        },
        "replicas": 1,
        "template": {
          "metadata": {
            "name": "heketi",
            "labels": {
              "name": "heketi",
              "glusterfs": "heketi-pod"
            }
          },
          "spec": {
            "serviceAccountName": "heketi-service-account",
            "containers": [
              {
                "image": "heketi/heketi:dev",
                "imagePullPolicy": "Always",
                "name": "heketi",
                "env": [
                  {
                    "name": "HEKETI_EXECUTOR",
                    "value": "kubernetes"
                  },
                  {
                    "name": "HEKETI_DB_PATH",
                    "value": "/var/lib/heketi/heketi.db"
                  },
                  {
                    "name": "HEKETI_FSTAB",
                    "value": "/var/lib/heketi/fstab"
                  },
		  {
		    "name": "HEKETI_ADMIN_KEY",
		    "value": "admin"
		  },
                  {
                    "name": "HEKETI_SNAPSHOT_LIMIT",
                    "value": "14"
                  },
                  {
                    "name": "HEKETI_KUBE_GLUSTER_DAEMONSET",
                    "value": "y"
                  }
                ],
                "ports": [
                  {
                    "containerPort": 8080
                  }
                ],
                "volumeMounts": [
                  {
                    "name": "db",
                    "mountPath": "/var/lib/heketi"
                  }
                ],
                "readinessProbe": {
                  "timeoutSeconds": 3,
                  "initialDelaySeconds": 3,
                  "httpGet": {
                    "path": "/hello",
                    "port": 8080
                  }
                },
                "livenessProbe": {
                  "timeoutSeconds": 3,
                  "initialDelaySeconds": 30,
                  "httpGet": {
                    "path": "/hello",
                    "port": 8080
                  }
                }
              }
            ],
            "volumes": [
              {
                "name": "db",
                "hostPath": {
                  "path": "/heketi-data"
                }
              }
            ]
          }
        }
      }
    }
  ]
}
通过 Heketi 管理 Gluster FS 集群
- Heketi要求在一个GlusterFS集群中至少有3个节点
- 在Heketi能够管理GlusterFS集群之前,首先要为其设置GlusterFS集群的信息。
- 可以用一个topology.json配置文件来完成各个GlusterFS节点
和设备的定义。文件内容如下:
- 可以用一个topology.json配置文件来完成各个GlusterFS节点
{
  "clusters": [
    {
      "nodes": [
        {
          "node": {
            "hostnames": {
              "manage": [
                "kube-s01"
              ],
              "storage": [
                "192.168.222.8"
              ]
            },
            "zone": 1
          },
          "devices": [
            {
              "name": "/dev/sdb"
            }
          ]
        },
        {
          "node": {
            "hostnames": {
              "manage": [
                "kube-s02"
              ],
              "storage": [
                "192.168.222.9"
              ]
            },
            "zone": 1
          },
          "devices": [
            {
              "name": "/dev/sdb"
            }
          ]
        },
        {
          "node": {
            "hostnames": {
              "manage": [
                "kube-s03"
              ],
              "storage": [
                "192.168.222.10"
              ]
            },
            "zone": 1
          },
          "devices": [
            {
              "name": "/dev/sdb"
            }

          ]
        }
      ]
    }
  ]
}
- 部署上述文件
kubectl exec -it heketi-64cc9d684d-6hw7b -- /bin/sh
# 用户名默认为 admin 密码在创建 deployment 时有指定
heketi-cli --user admin --secret 'admin' topology load --json=topology.json

Creating cluster ... ID: 7c89e94102d958531ba7751ae07ed6e9
	Allowing file volumes on cluster.
	Allowing block volumes on cluster.
	Creating node kube-s01 ... ID: 4f5f5a766fe1f15083be9aca210588bd
		Adding device /dev/sdb ... OK
	Creating node kube-s02 ... ID: 3782f98429c482b5b003545abaf8119d
		Adding device /dev/sdb ... OK
	Creating node kube-s03 ... ID: 291338a9c0591875ea804b93abf6dfff
		Adding device /dev/sdb ... OK
- 查看 topology 信息
heketi-cli topology info --user admin --secret admin

Cluster Id: 7c89e94102d958531ba7751ae07ed6e9

    File:  true
    Block: true

    Volumes:
    Nodes:
	Node Id: 291338a9c0591875ea804b93abf6dfff
	State: online
	Cluster Id: 7c89e94102d958531ba7751ae07ed6e9
	Zone: 1
	Management Hostnames: kube-s03
	Storage Hostnames: 192.168.222.10
	Devices:
		Id:c5878778dcc5e672fef9cb320ccf1ec6   State:online    Size (GiB):19      Used (GiB):0       Free (GiB):19
			Known Paths: /dev/sdb
			Bricks:
	Node Id: 3782f98429c482b5b003545abaf8119d
	State: online
	Cluster Id: 7c89e94102d958531ba7751ae07ed6e9
	Zone: 1
	Management Hostnames: kube-s02
	Storage Hostnames: 192.168.222.9
	Devices:
		Id:4f5dbea51e9a5494b9ec08312ed943de   State:online    Size (GiB):19      Used (GiB):0       Free (GiB):19
			Known Paths: /dev/sdb

			Bricks:
	Node Id: 4f5f5a766fe1f15083be9aca210588bd
	State: online
	Cluster Id: 7c89e94102d958531ba7751ae07ed6e9
	Zone: 1
	Management Hostnames: kube-s01
	Storage Hostnames: 192.168.222.8
	Devices:
		Id:193d8e032cc93d4729516d402cb0f146   State:online    Size (GiB):19      Used (GiB):0       Free (GiB):19
			Known Paths: /dev/sdb
			Bricks:
定义 StroageClass
apiVersion: storage.k8s.io/v1
kind: StorageClass
metadata:
  name: gluster-heketi
provisioner: kubernetes.io/glusterfs
parameters:
  resturl: "http:/10.96.51.93:8080"
  restauthenabled: "false"
定义 PVC
apiVersion: v1
kind: PersistentVolumeclaim
metadata:
  name: pvc-gluster-heketi
spec:
  storageClassName: gluster-heketi
  accessModes:
  - ReadwriteOnce
  resources:
    requests:
      storage: 1Gi
安装实例
dashboard 安装
kubectl apply -f
# token 登录
kubectl create serviceaccount NAME -n kubernetes-dashboard
kubectl create clusterrolebinding NAME \
--clusterrole=cluster-admin \
--serviceaccount=kubernetes-dashboard:serviceaccountname \  # 和上面的 NAME 一致
# 之后根据 serviceAccount 所对应的 secret 获取 token 即可
## 使用 kubeconfig 进行登录
kubectl create serviceaccount def-ns-admin -n default
kubectl create rolebinding def-ns-admin -n default \
--clusterrole=cluster-admin \
--serviceaccount=default:def-ns-admin
kubectl config set-cluster default-kubernetes \
--kubeconfig=/root/def-ns-admin.conf \
--certificate-authority=/etc/kubernetes/pki/ca.crt \
--server="https://192.168.222.7:6443" \
--embed-certs=true

# 获取转码的 token
DEF_NS_ADMIN_TOKEN=$(kubectl get secret def-ns-admin-token-chf78 -o jsonpath={.data.token} | base64 -d)
# 向 kubeconfig 中添加用户(以 token 的形式)
kubectl config set-credentials def_ns_admin --kubeconfig=/root/def-ns-admin.conf --token=${DEF_NS_ADMIN_TOKEN}
kubectl config set-context def_ns_admin@default-kubernetes \
--cluster=defalut-kubernetes --user=def_ns_admin \
--kubeconfig=/root/def-ns-admin.conf
kubectl config --kubeconfig=/root/def-ns-admin.conf \
use-context def_ns_admin@default-kubernetes
集群扩容增加node节点
注意事项
- 时间要同步
- 需要科学上网
- 获取 token
kubeadm token list
TOKEN                     TTL         EXPIRES                     USAGES                   DESCRIPTION                                                EXTRA GROUPS
efk0xr.aufnn4ognjbbpdne   22h         2023-03-22T22:26:35-04:00   authentication,signin
# 若没有,亦可创建 token
kubeadm token create
- 获取 sha256
openssl x509 -pubkey -in /etc/kubernetes/pki/ca.crt | openssl rsa -pubin -outform der 2>/dev/null | openssl dgst -sha256 -hex | sed 's/^.* //'
- 在 node 上加入 master
kubeadm join --token [TOKEN] \
10.3.14.193:6443  \ # 更换 master 的 IP 地址
--discovery-token-ca-cert-hash sha256:[SHA256]
网络原理
网络插件
- flannel 网络插件配置最为简单,但是不能实现 pod 之间的网络隔离
- calico 可以实现网络隔离但是配置复杂
- 我们可以使用 flannel 管理网络,使用 calico 的功能

