1. config.ts 书写BASE_URL ( service/request/config.ts)
BASE_URL书写的方式很多
1: 直接在axios.create里面写死 ,在打包或者测试的时候手动进行修改BASE_URL
2:新建一个文件 在文件里面判断当前的环境 进行赋值BASE_URL
3:定义.env文件 Eg: env.development ;env.production; env.test 在文件里面进行书写变量 Eg:VUE_APP_BASE_URL=‘XXX’
我们选择新建文件config.ts
// config.ts定义环境变量
let BASE_URL: string
const TIME_OUT = 10000

if (process.env.NODE_ENV == 'development') {
    BASE_URL = "https://v.api.aa1.cn/api"
} else if (process.env.NODE_ENV == 'production') {
    BASE_URL = "http://152.136.185.210:5000"

} else {
    // test测试环境
    BASE_URL = "http://152.136.185.210:5000"


}
export { BASE_URL, TIME_OUT }
2.创建axios --> 配置全局拦截,BASE_URL请求和响应拦截, 单个接口的请求和响应拦截 (service/request/index.ts)
	我们会发现我们的项目有的不止是请求的一个BASE_URL,这时候我们会创建个axios比较臃肿,我们可以使用ES6的语法进行创建class类
	写一个函数体 进行new出子类创建对象即可
防止大家看不懂下面的逻辑 在这里写一个小demo
 interface obj {
    name: string;
    age: number
}
interface obj1 extends obj {
    boxobj: obj
}
class person {
    name: string;
    age: number;
    boxobj: object;
    constructor(obj: obj1) {
        this.age = obj.age;
        this.name = obj.name;
        this.boxobj = obj.boxobj
    }
}
console.log(new person({ age: 11, name: 'zz', boxobj: { name: 'zz', age: 232 } }))
正式创建
// 定义class对象的
import axios from 'axios';
import type { AxiosInstance } from 'axios';
import type { HYRequestInterceptors, HYRequestConfig } from './type'
class HYRequest {
    instance: AxiosInstance;
    interceptors?: HYRequestInterceptors;//拦截器
    constructor(config: HYRequestConfig) {
        // config// 传输的base_url  timeout 拦截器
        // const servise = axios.create(config)
        // servise.interceptors.request.use
        this.instance = axios.create(config)
        this.interceptors = config.interceptors;//传输的是对象
        // 针对base_url的拦截
        this.instance.interceptors.request.use(this.interceptors?.requestInterceptor, this.interceptors?.requestInterceptorCatch)
        this.instance.interceptors.response.use(this.interceptors?.responseInterceptor, this.interceptors?.responseInterceptorCatch)
        // 全局的拦截
        this.instance.interceptors.request.use((config) => { return config }, (err) => { return err })
        this.instance.interceptors.response.use((config) => { return config }, (err) => { return err })
    }
    // 请求request
    // config调用这个request函数的时候传输的config(单个接口拦截器)
    request<T = any>(config: HYRequestConfig): Promise<T> {
        return new Promise((resolve, reject) => {
            // 请求拦截  如果需要对当前的某个接口进行拦截 那么调用这个传输过来的方法 进行操作完毕再把结果返回过来 在重新赋值config
            if (config.interceptors?.requestInterceptor) {
                config = config.interceptors.requestInterceptor(config)
            }
            // 发送请求
            this.instance.request<any, T>(config).then((res) => {
                // 对单个请求的响应拦截进行操作
                if (config.interceptors?.responseInterceptor) {
                    // 把获取的结果传输给这个拦截进行操作在返回给我 我在resolve出去
                    res = config.interceptors.responseInterceptor(res)
                }
                resolve(res)
            }).catch((err) => {
                reject(err)
                return err
            })
        })
    }
    // T  限制的是返回的结果
    get<T = any>(config: HYRequestConfig<T>): Promise<T> {
        return this.request<T>({ ...config, method: 'GET' })
    }

    post<T = any>(config: HYRequestConfig<T>): Promise<T> {
        return this.request<T>({ ...config, method: 'POST' })
    }

    delete<T = any>(config: HYRequestConfig<T>): Promise<T> {
        return this.request<T>({ ...config, method: 'DELETE' })
    }

    patch<T = any>(config: HYRequestConfig<T>): Promise<T> {
        return this.request<T>({ ...config, method: 'PATCH' })
    }


}
export default HYRequest
3.创建针对上面service/request/index.ts文件的类型限制
新建 (service/request/type.ts)
// new  class对象导出外部使用的
import type { AxiosRequestConfig, AxiosResponse } from 'axios'
// 定义可能是base_url传输的针对接口的拦截器  为变量做类型限制的
export interface HYRequestInterceptors<T = AxiosResponse> {
    // requestInterceptor?: (config: AxiosRequestConfig) => AxiosRequestConfig;
    requestInterceptor?: (config: any) => any;
    requestInterceptorCatch?: (error: any) => any
    // responseInterceptor?: (res: T) => T
    responseInterceptor?: (res: any) => any
    responseInterceptorCatch?: (error: any) => any

}
export interface HYRequestConfig<T = AxiosResponse> extends AxiosRequestConfig {
    interceptors?: HYRequestInterceptors<T>
    showLoading?: boolean

}
4.new出class实例对象 就可以使用了 新建 service/index.ts文件
import HYRequest from './request/index'
import { BASE_URL, TIME_OUT } from './request/config'

// 地址1
const hyRequest = new HYRequest({
    baseURL: BASE_URL,
    timeout: TIME_OUT,
    interceptors: {
        requestInterceptor: (config) => {
            // 携带token的拦截
            return config
        },
        requestInterceptorCatch: (err) => {
            return err
        },
        responseInterceptor: (res) => {
            return res
        },
        responseInterceptorCatch: (err) => {
            return err
        }
    }
})
export default hyRequest
// 地址2  多个BASE_URL的时候 直接new以下class即可
// const hyRequest2 = new HYRequest({
//     baseURL: BASE_URL,
//     timeout: TIME_OUT,
//     interceptors: {
//         requestInterceptor: (config) => {
//             // 携带token的拦截

//             return config
//         },
//         requestInterceptorCatch: (err) => {
//             return err
//         },
//         responseInterceptor: (res) => {
//             return res
//         },
//         responseInterceptorCatch: (err) => {
//             return err
//         }
//     }
// })
上面的实例对象下不写interceptors 也可以 开启全局拦截照样使用
5.创建 service/types.ts类型文件 主要作用是限制接口返回参数的类型
// 限制的是返回的结果 T是返回的data的数据  不传默认是any
export interface IDataType<T = any> {
    code: number;
    data: T
}
// 测试接口返回的数据类型
export interface IStatusDataType<T = any> {
    status: number;
    data: T
}
6.新建api接口 service/login/login.ts
import hyReauest from '../index'//service/index
import { IAccount, ILoginResult, IStatusDataResul } from './types'
import { IDataType, IStatusDataType } from '../types'
enum LoginApi {
    AccountLogin = '/login',
    ceshis = "qqjson/index.php"
}
// account: IAccount  参数的类型限制
export function accountLoginRequest(account: IAccount) {
    return hyReauest.post<IDataType<ILoginResult>>({
        url: LoginApi.AccountLogin,
        data: account
    })
}
// 免费api接口测试
export function ceshiget() {
    return hyReauest.get<IStatusDataType<IStatusDataResul>>({
        url: LoginApi.ceshis,
        params: {
            qq: 'xxxxx'
        }
    })
}
7.定义针对login.ts的类型文件
// 针对login的类型限制
export interface IAccount {
    username: string;
    pwd: string;
}
export interface ILoginResult {
    id: number;
    name: string;
    token: string
}
//这个是演示接口
export interface IStatusDataResul {
    nickname: string;
    email: string;
    touxiang: string;
}
6. vue文件正式调用接口
<script lang="ts" setup>
import { accountLoginRequest, ceshiget } from '@/service/login/login'
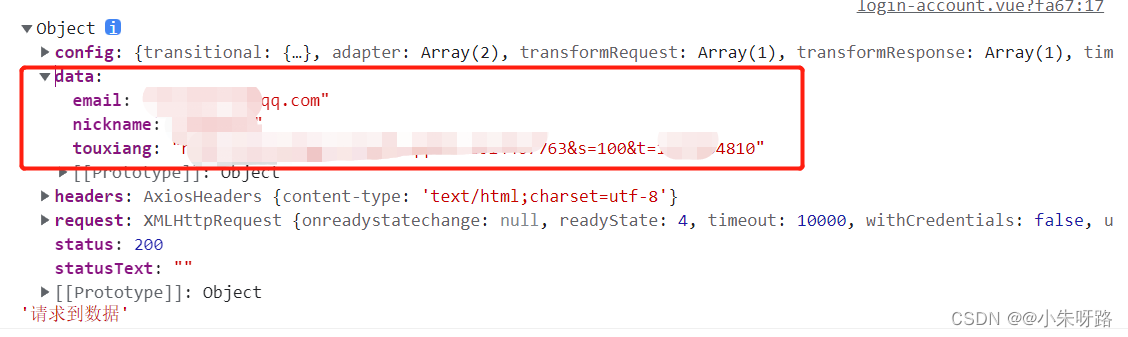
ceshiget().then((res) => {
console.log(res, '请求到数据')
})
</script>
7.成功获取数据


![Oracle安装时先决条件检查失败和[INS-35180] 无法检查可用内存问题解决](https://img-blog.csdnimg.cn/54dc1e6fd1fc4ee69c32e5748d2184a4.png)