20国赛公开卷KDC做法(个人整理)
先根据题意,用chrony服务同步时间
Linux-1为KDC服务器,认证Linux-2和Linux-3.三台都先同步时间。
所有的Linux selinux都为enforcing,防火墙都是打开的。此次为临时测试整理,所以Linux-1 ip=10.10.70.102
Linux-2 ip=10.10.70.103
Linux-3 ip=10.10.70.104


我们在Windows为Linux服务器提供DNS解析。

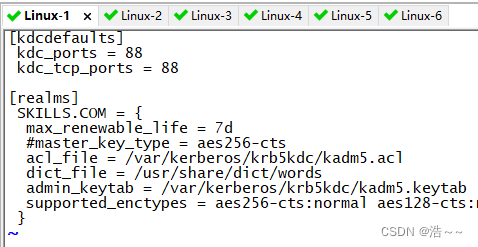
接下来看我的操作即可 vim /etc/krb5.conf
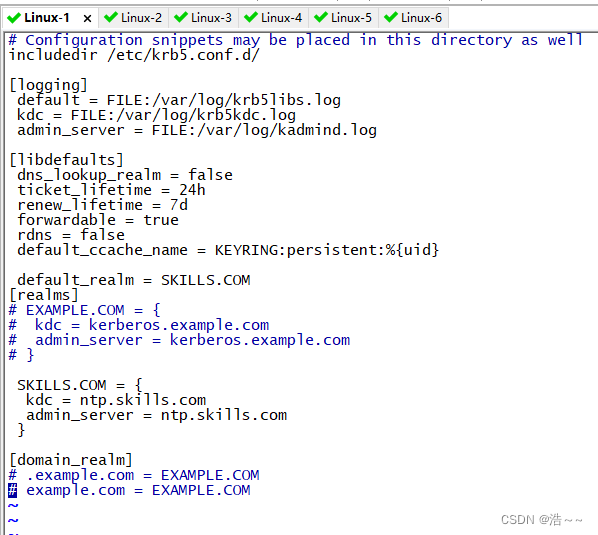
vim /var/kerberos/krbkdc/kdc.conf
scp /etc/krb5.conf 10.10.70.103:/etc
yes
Network2020
scp /etc/krb5.conf 10.10.70.104:/etc
yes
Network2020


krb5_util create -s -r SKILLS.COM (设置密码为123456,题目没要求,怎么简单怎么来)
123456
123456
 vim /var/kerberos/krb5kdc/kadm5.acl

systemctl restart krb5kdc kadmin
systemctl enable krb5kdc kadmin

addprinc nfs/apache.skills.com(密码为123456)
addprinc nfs/tomcat.skills.com(密码为123456)

ktadd -k /etc/apache.keytab nfs/apache.skills.com
ktadd -k /etc/tomcat.keytab nfs/tomcat.skills.com

我们把我们创建的keytab scp 给linux-2 ,linux-3.(注意传过去的同时改名为krb5.keytab)
scp /etc/apache.keytab 10.10.70.103:/etc/krb5.keytab
scp /etc/tomcat.keytab 10.10.70.104:/etc/krb5.keytab

此时我们要同时在三台linux上防火墙同时开放kerberos服务才能认证。
firewall-cmd --add-service=kerberos --permanent
firewall-cmd --reload

2和3都一样,以此类推(这里就不一一截图了)
在linux-2 和 linux-3 上安装krb5服务
yum install -y krb5*.* pam_krb5
安装完成后即可验证
Linux-2
kinit -kt /etc/krb5.keytab nfs/apache.skills.com
Linux-3
kinit -kt /etc/krb5.keytab nfs/tomcat.skills.com


这样就验证成功了。
接下来是NFS krb5加密方式做法
nfs配置
Cat /etc/exports

systemctl restart rpcbind nfs-secure nfs nfs-server
systemctl enable rpcbind nfs-secure nfs nfs-server

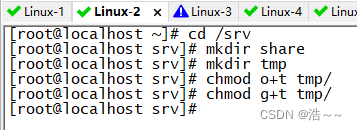
cd /srv
mkdir share
mkdir tmp
Chmod o+t tmp
Chmod g+t tmp
Linux-3 配置
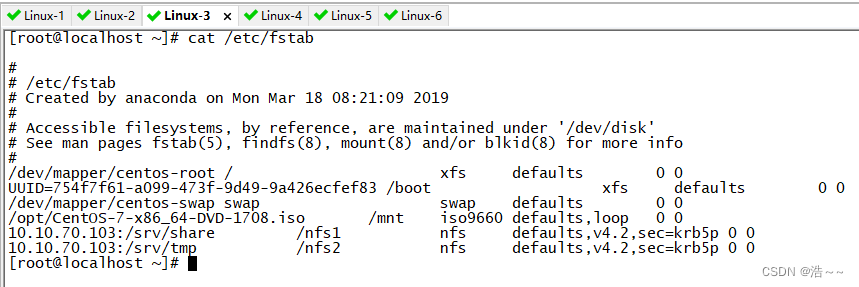
Mkdir /nfs1
Mkdir /nfs2

Cat /etc/fstab
systemctl restart rpcbind nfs-secure
systemctl enable rpcbind nfs-secure

在linux-2 和 linux-3上防火墙开放nfs服务
firewall-cmd --add-service=nfs --permanent
firewall-cmd --reload


Mount -a 即可 挂载上即可是两台的nfs目录同步
这样就OK了。
