前言
- 本文主要针对
Hugging Face平台中的图像分类模型,在自己数据集上进行微调,预训练模型为Google的vit-base-patch16-224模型,模型简介页面。 - 代码运行于kaggle平台上,使用平台免费GPU,型号P100,笔记本地址,欢迎大家
copy & edit。 - Github项目地址,
Hugging Face模型微调文档
依赖安装
- 如果是在本地环境下运行,只需要同时安装3个包就好
transformers,datasets,evaluate,即pip install transformers datasets evaluate - 在kaggle中因为
accelerate包与环境冲突,所以需要从项目源进行安装,即:
import IPython.display as display
! pip install -U git+https://github.com/huggingface/transformers.git
! pip install -U git+https://github.com/huggingface/accelerate.git
! pip install datasets
display.clear_output()
- 因为安装过程中会产生大量输出,所以使用
display.clear_output()清空jupyter notebook的输出。
数据处理
- 这里使用kaggle中的图像分类公共数据集,
5 Flower Types Classification Dataset,数据结构如下:
 - flower_images
	 - Lilly
		 - 000001.jpg
		 - 000002.jpg
		 - ......
	 - Lotus
		 - 001001.jpg
		 - 001002.jpg
		 - ......
	 - Orchid
	 - Sunflower
- 可以看到flower_images为主文件夹,Lilly,Lotus,Orchid,Sunflower为各类花的种类,每类花的图片数量均为1000张
- 微调模型图像的数据集读取与加载需要使用
datasets包中的load_dataset函数,有关该函数的文档
from datasets import load_dataset
from datasets import load_metric
# 加载本地数据集
dataset = load_dataset("imagefolder", data_dir="/kaggle/input/5-flower-types-classification-dataset/flower_images")
# 整合数据标签与下标
labels = dataset["train"].features["label"].names

label2id, id2label = dict(), dict()
for i, label in enumerate(labels):
    label2id[label] = i
    id2label[i] = label

metric = load_metric("accuracy")
display.clear_output()
- 如果想要查看图片,可以使用
image来访问
example = dataset["train"][0]
example['image'].resize((224, 224))

- 确定想要进行微调的模型,加载其配置文件,这里选择
vit-base-patch16-224,关于transfromers包中的AutoImageProcessor类,from_pretrained方法,请参见文档
from transformers import AutoImageProcessor
model_checkpoint = "google/vit-base-patch16-224"
batch_size = 64
image_processor  = AutoImageProcessor.from_pretrained(model_checkpoint)
image_processor
- 根据
vit-base-patch16-224预训练模型图像标准化参数标准化微调数据集,都是torchvision库中的一些常见变换,这里就不赘述了,重点是preprocess_train,preprocess_val函数,分别用于标准化训练集与验证集。
from torchvision.transforms import (
    CenterCrop,
    Compose,
    Normalize,
    RandomHorizontalFlip,
    RandomResizedCrop,
    Resize,
    ToTensor,
)

normalize = Normalize(mean=image_processor.image_mean, std=image_processor.image_std)
if "height" in image_processor.size:
    size = (image_processor.size["height"], image_processor.size["width"])
    crop_size = size
    max_size = None
elif "shortest_edge" in image_processor.size:
    size = image_processor.size["shortest_edge"]
    crop_size = (size, size)
    max_size = image_processor.size.get("longest_edge")

train_transforms = Compose(
        [
            RandomResizedCrop(crop_size),
            RandomHorizontalFlip(),
            ToTensor(),
            normalize,
        ]
    )

val_transforms = Compose(
        [
            Resize(size),
            CenterCrop(crop_size),
            ToTensor(),
            normalize,
        ]
    )

def preprocess_train(example_batch):
    example_batch["pixel_values"] = [
        train_transforms(image.convert("RGB")) for image in example_batch["image"]
    ]
    return example_batch

def preprocess_val(example_batch):
    example_batch["pixel_values"] = [val_transforms(image.convert("RGB")) for image in example_batch["image"]]
    return example_batch
- 划分数据集,并分别将训练集与验证集进行标准化
# 划分训练集与测试集
splits = dataset["train"].train_test_split(test_size=0.1)
train_ds = splits['train']
val_ds = splits['test']

train_ds.set_transform(preprocess_train)
val_ds.set_transform(preprocess_val)

display.clear_output()
微调模型
- 加载预训练模型使用
transformers包中AutoModelForImageClassification类,from_pretrained方法,参考文档 - 需要注意的是
ignore_mismatched_sizes参数,如果你打算微调一个已经微调过的检查点,比如google/vit-base-patch16-224(它已经在ImageNet-1k上微调过了),那么你需要给from_pretrained方法提供额外的参数ignore_mismatched_sizes=True。这将确保输出头(有1000个输出神经元)被扔掉,由一个新的、随机初始化的分类头取代,其中包括自定义数量的输出神经元。你不需要指定这个参数,以防预训练的模型不包括头。
from transformers import AutoModelForImageClassification, TrainingArguments, Trainer

model = AutoModelForImageClassification.from_pretrained(model_checkpoint,
                                                        label2id=label2id,
                                                        id2label=id2label,
                                                        ignore_mismatched_sizes = True)
display.clear_output()
- 配置训练参数由
TrainingArguments函数控制,该函数参数较多,参考文档
model_name = model_checkpoint.split("/")[-1]

args = TrainingArguments(
    f"{model_name}-finetuned-eurosat",
    remove_unused_columns=False,
    evaluation_strategy = "epoch",
    save_strategy = "epoch",
    save_total_limit = 5,
    learning_rate=5e-5,
    per_device_train_batch_size=batch_size,
    gradient_accumulation_steps=1,
    per_device_eval_batch_size=batch_size,
    num_train_epochs=20,
    warmup_ratio=0.1,
    logging_steps=10,
    load_best_model_at_end=True,
    metric_for_best_model="accuracy",)
- 我解释一下上面出现的一些参数
output_dir:模型预测和检查点的输出目录remove_unused_columns:是否自动删除模型转发方法未使用的列evaluation_strategy: 在训练期间采用的评估策略save_strategy:在训练期间采用的检查点保存策略save_total_limit:限制检查点的总数,删除较旧的检查点learning_rate:AdamW优化器的初始学习率per_device_train_batch_size:训练过程中GPU/TPU/CPU核心batch大小gradient_accumulation_steps:在执行向后/更新传递之前累积梯度的更新步数per_device_eval_batch_size:评估过程中GPU/TPU/CPU核心batch大小num_train_epochs:要执行的训练时期总数warmup_ratio:用于学习率从0到线性预热的总训练步数的比率logging_steps:记录steps间隔数load_best_model_at_end:是否在训练结束时加载训练期间找到的最佳模型metric_for_best_model:指定用于比较两个不同模型的指标
- 制定评估指标函数
import numpy as np
import torch

def compute_metrics(eval_pred):
    predictions = np.argmax(eval_pred.predictions, axis=1)
    return metric.compute(predictions=predictions, references=eval_pred.label_ids)

def collate_fn(examples):
    pixel_values = torch.stack([example["pixel_values"] for example in examples])
    labels = torch.tensor([example["label"] for example in examples])
    return {"pixel_values": pixel_values, "labels": labels}
- 传递训练配置,准备开始微调模型,
Trainer函数,参考文档
trainer = Trainer(model,
                  args,
                  train_dataset=train_ds,
                  eval_dataset=val_ds,
                  tokenizer=image_processor,
                  compute_metrics=compute_metrics,
                  data_collator=collate_fn,)
- 同样的,我解释一下上面的一些参数
model:训练、评估或用于预测的模型args:调整训练的参数train_dataset:用于训练的数据集eval_dataset:用于评估的数据集tokenizer:用于预处理数据的标记器compute_metrics:将用于在评估时计算指标的函数data_collator:用于从train_dataset或eval_dataset的元素列表形成批处理的函数
- 开始训练,并在训练完成后保存模型权重,模型训练指标变化,模型最终指标。
train_results = trainer.train()
# 保存模型
trainer.save_model()
trainer.log_metrics("train", train_results.metrics)
trainer.save_metrics("train", train_results.metrics)
trainer.save_state()
- 在训练过程中可选择使用
wandb平台对训练过程进行实时监控,但需要注册一个账号,获取对应api,个人推荐使用,当然也可以ctrl+q选择退出。 - 训练输出:
Epoch	Training Loss	Validation Loss	Accuracy
1	0.384800	0.252986	0.948000
2	0.174000	0.094400	0.968000
3	0.114500	0.070972	0.978000
4	0.106000	0.082389	0.972000
5	0.056300	0.056515	0.982000
6	0.044800	0.058216	0.976000
7	0.035700	0.060739	0.978000
8	0.068900	0.054247	0.980000
9	0.057300	0.058578	0.982000
10	0.067400	0.054045	0.980000
11	0.067100	0.051740	0.978000
12	0.039300	0.069241	0.976000
13	0.029000	0.056875	0.978000
14	0.027300	0.063307	0.978000
15	0.038200	0.056551	0.982000
16	0.016900	0.053960	0.984000
17	0.021500	0.049470	0.984000
18	0.031200	0.049519	0.984000
19	0.030500	0.051168	0.984000
20	0.041900	0.049122	0.984000
***** train metrics *****
  epoch                    =         20.0
  total_flos               = 6494034741GF
  train_loss               =       0.1092
  train_runtime            =   0:44:01.61
  train_samples_per_second =       34.062
  train_steps_per_second   =        0.538
wandb平台指标可视化
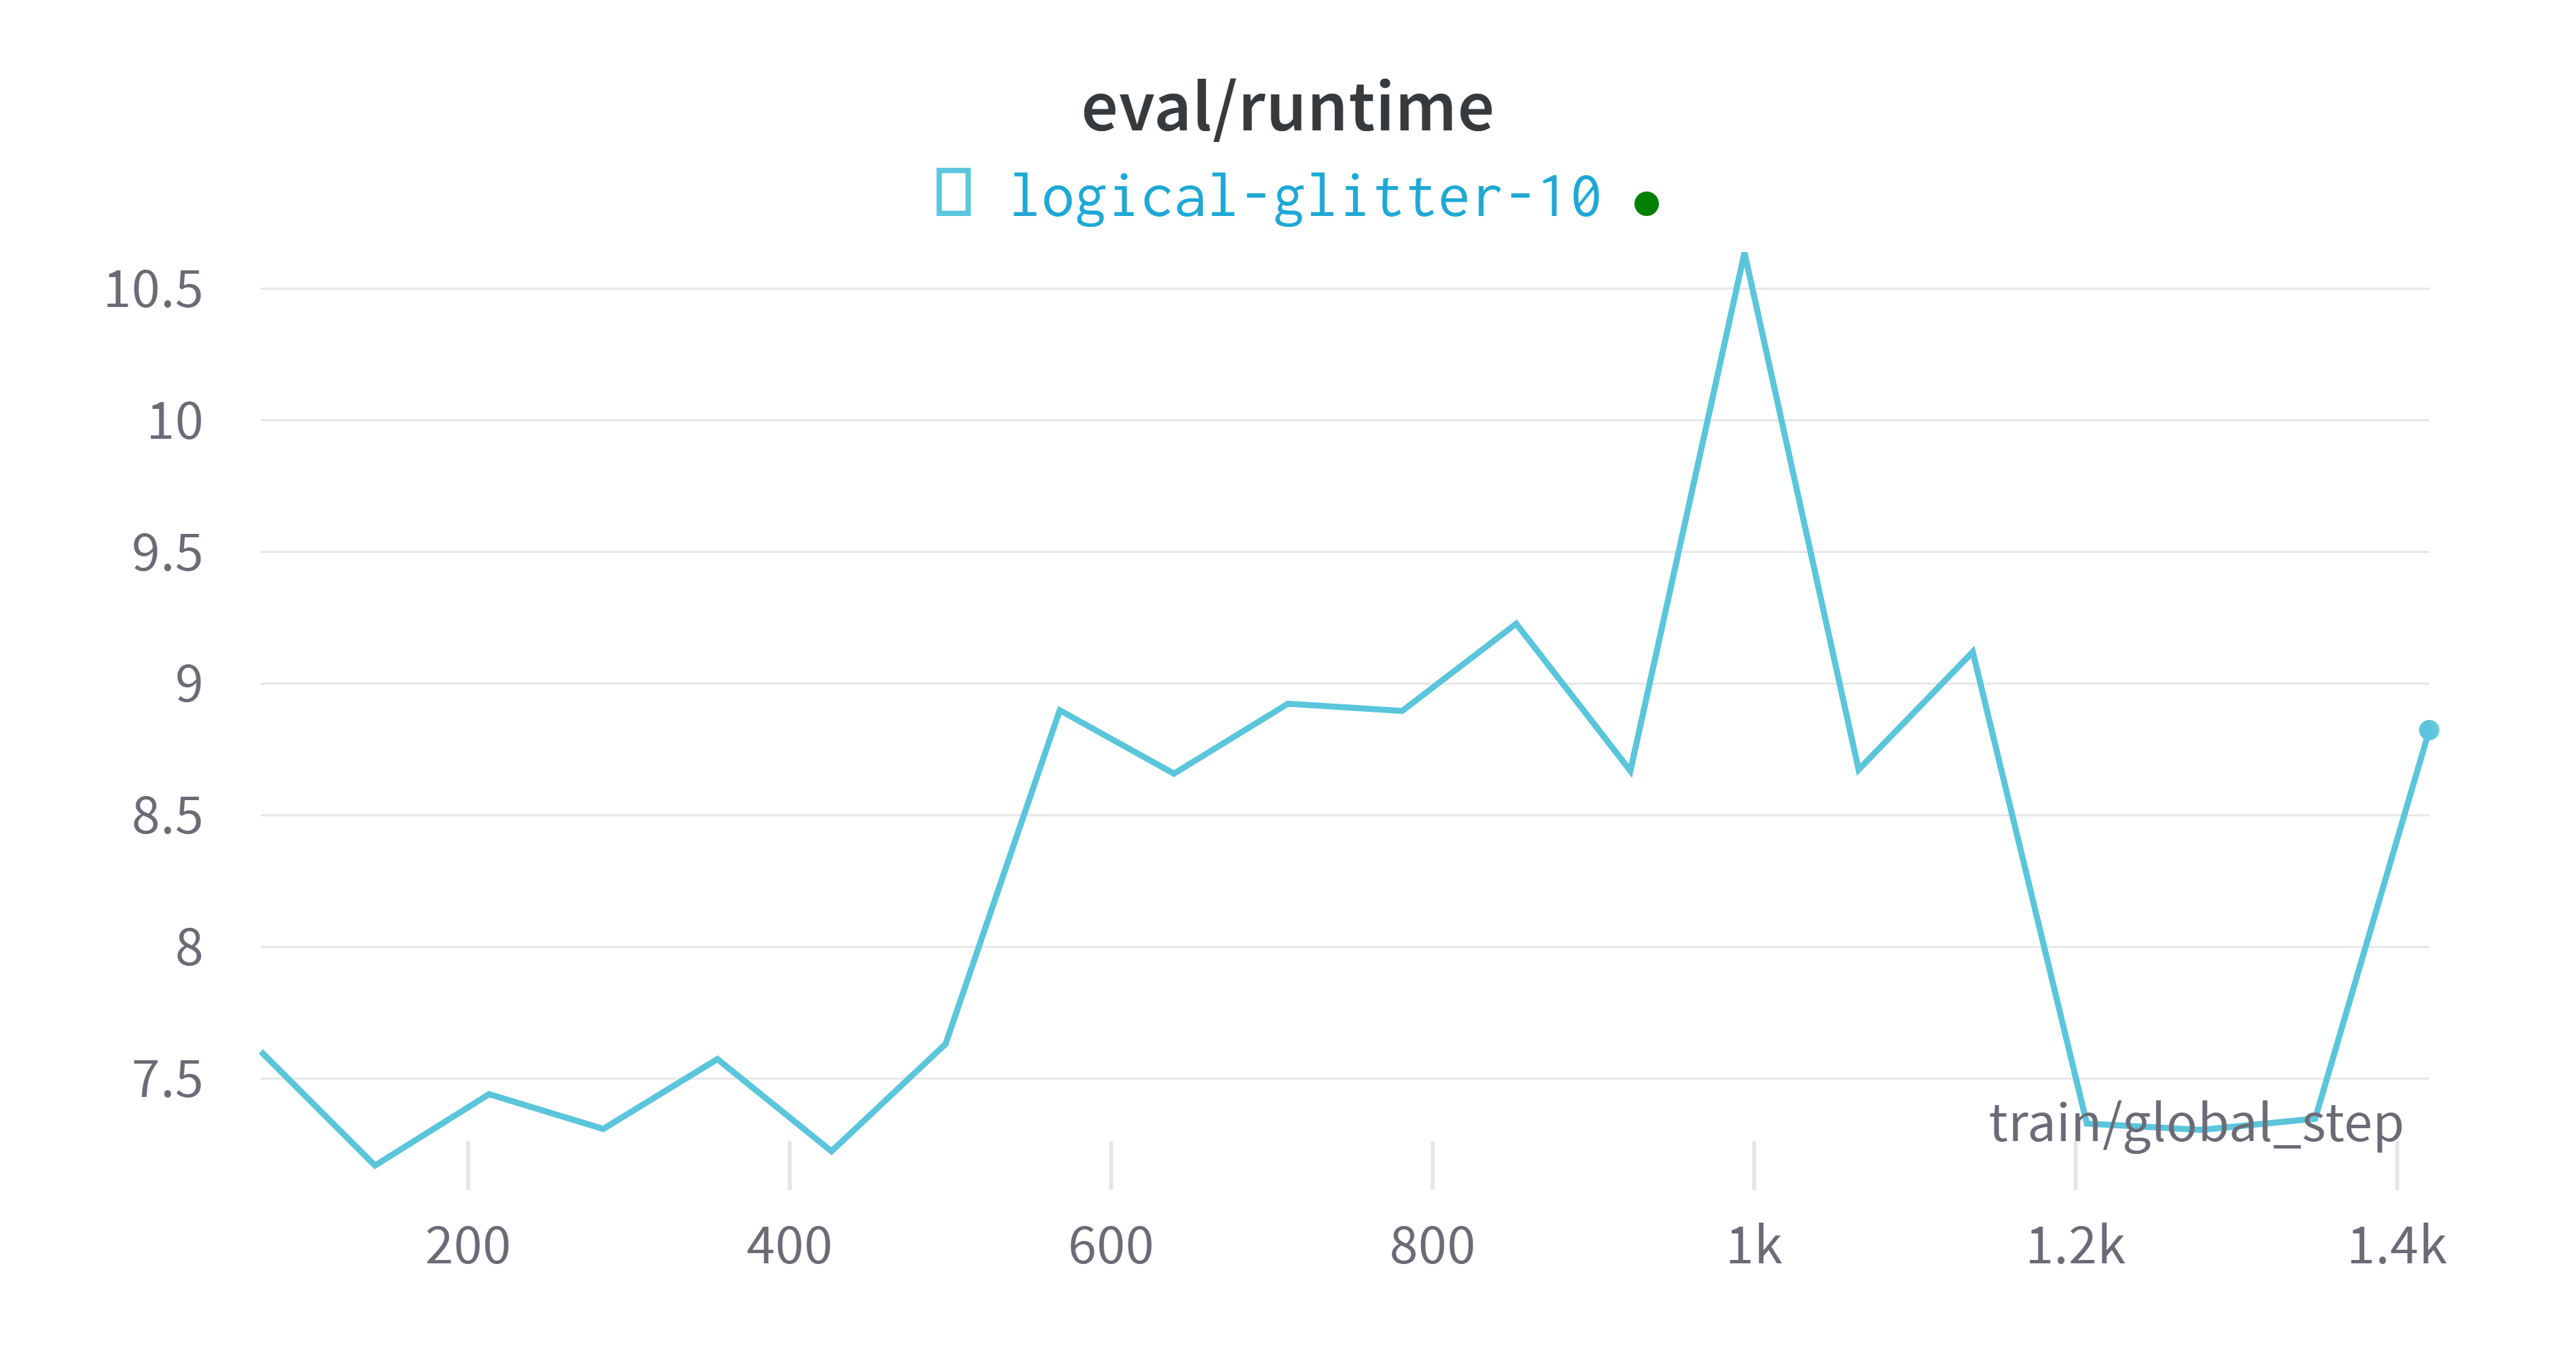
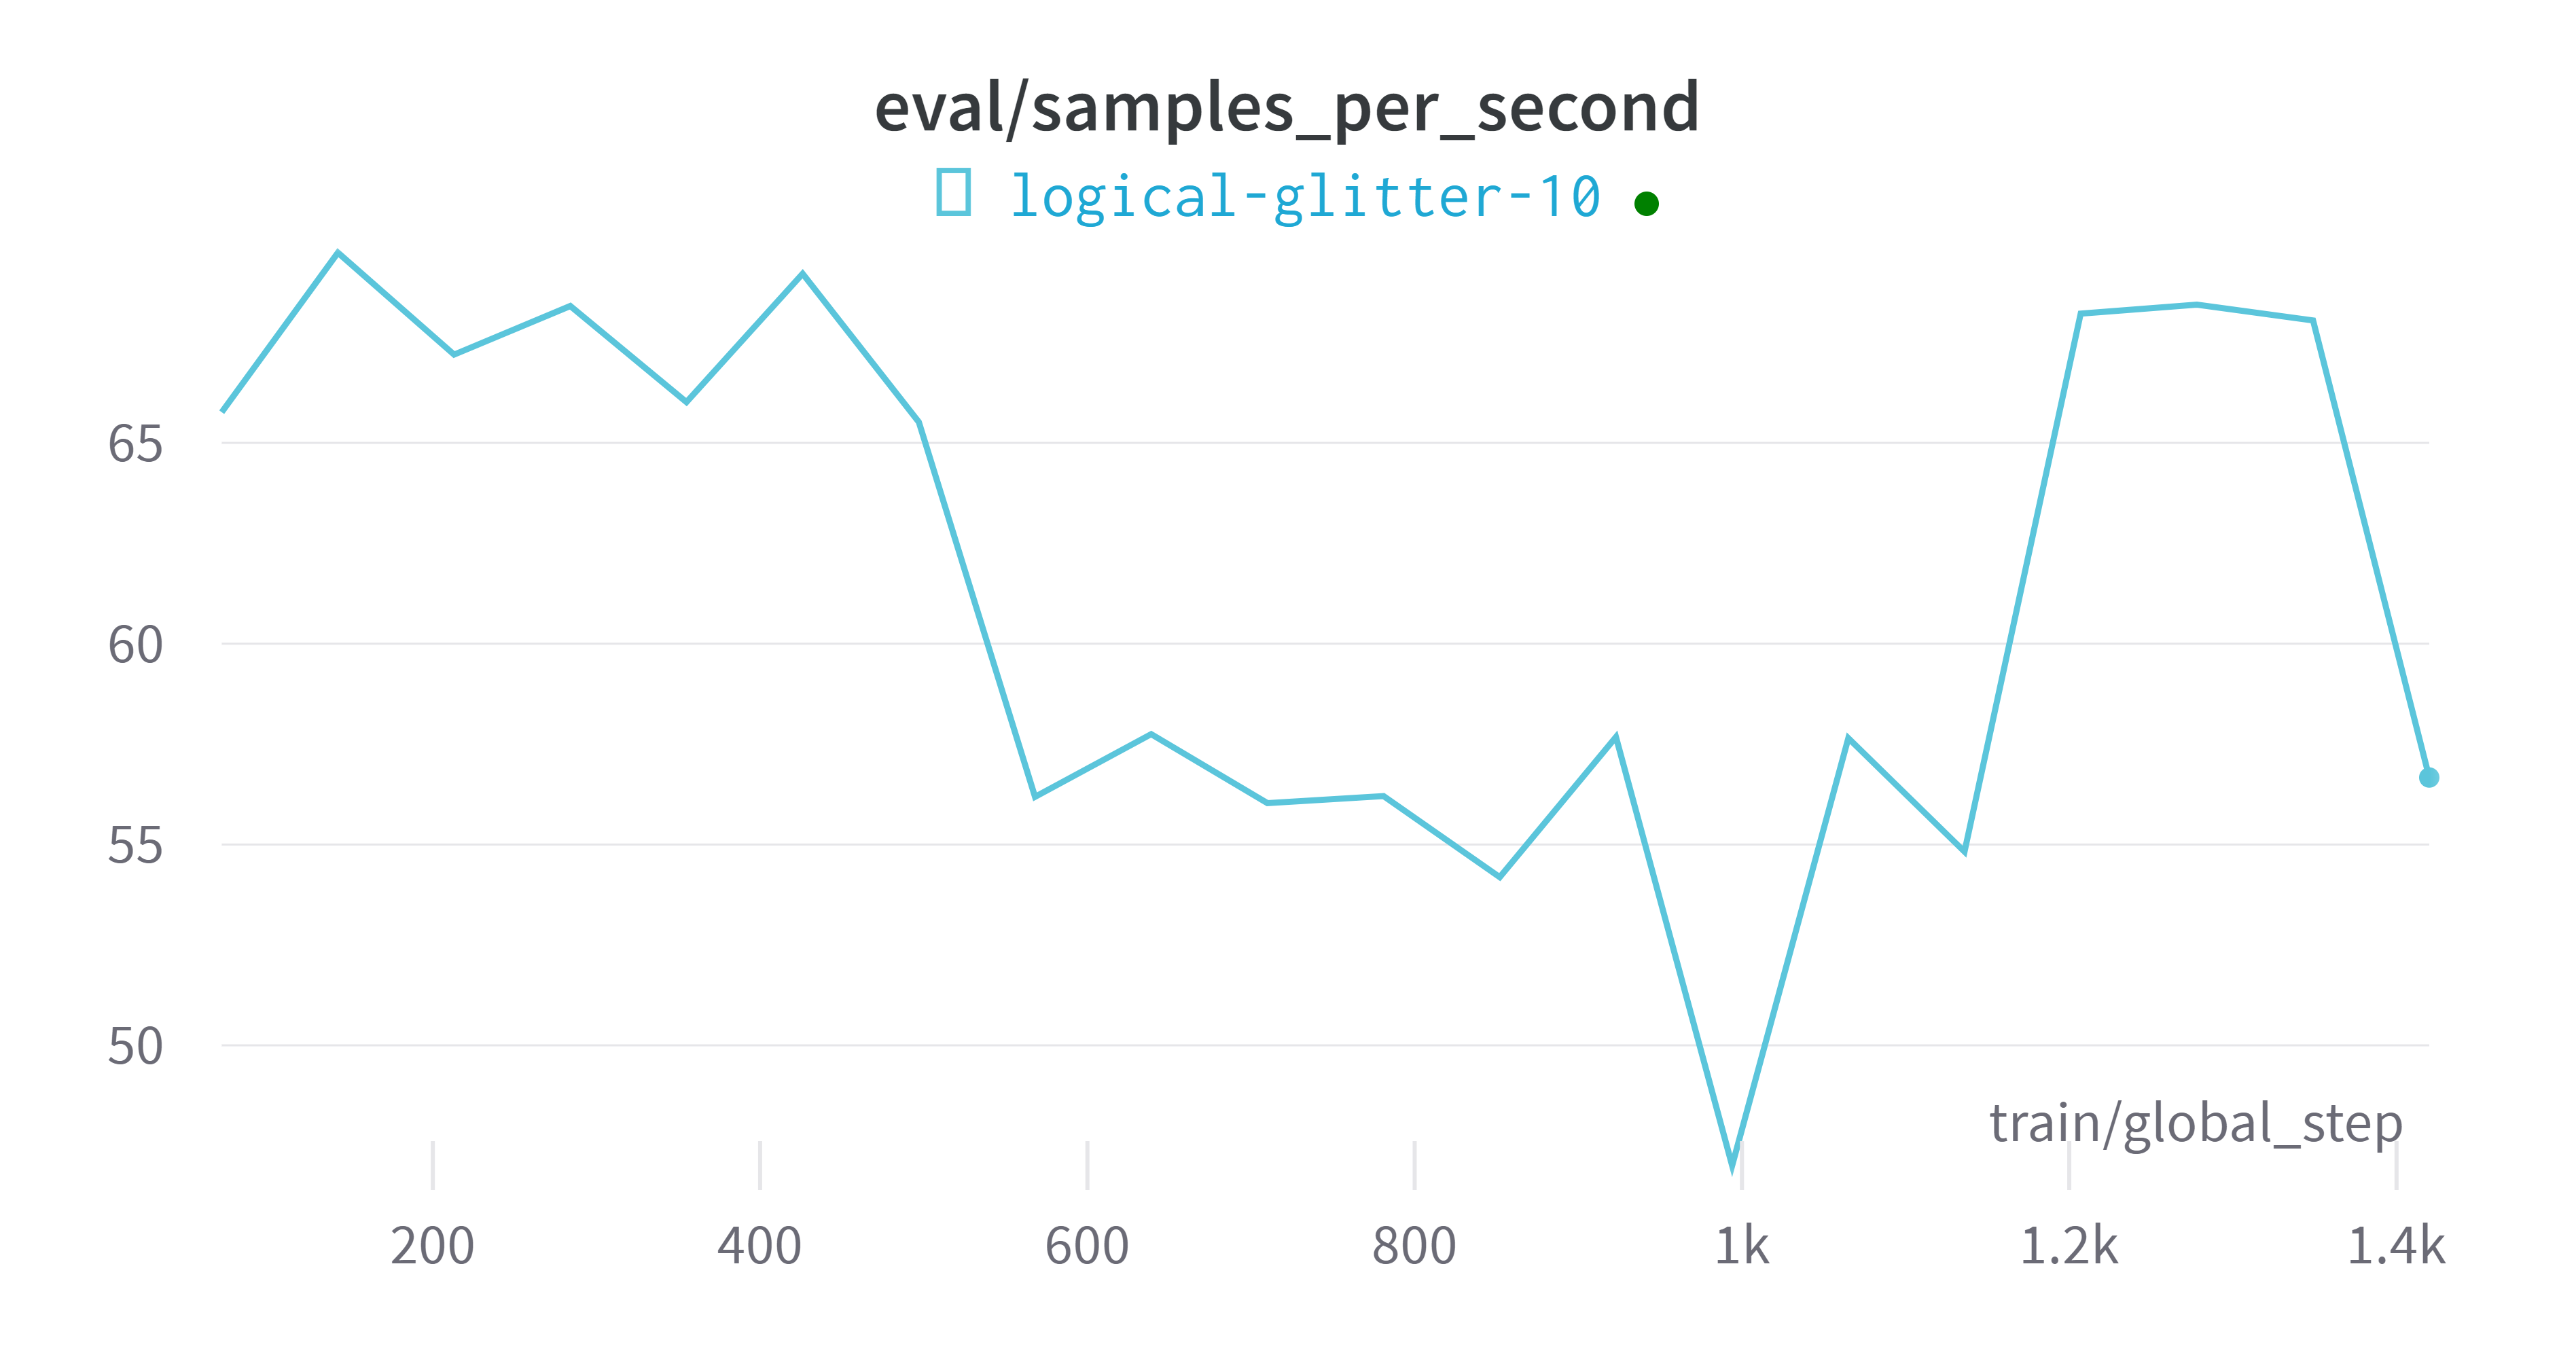
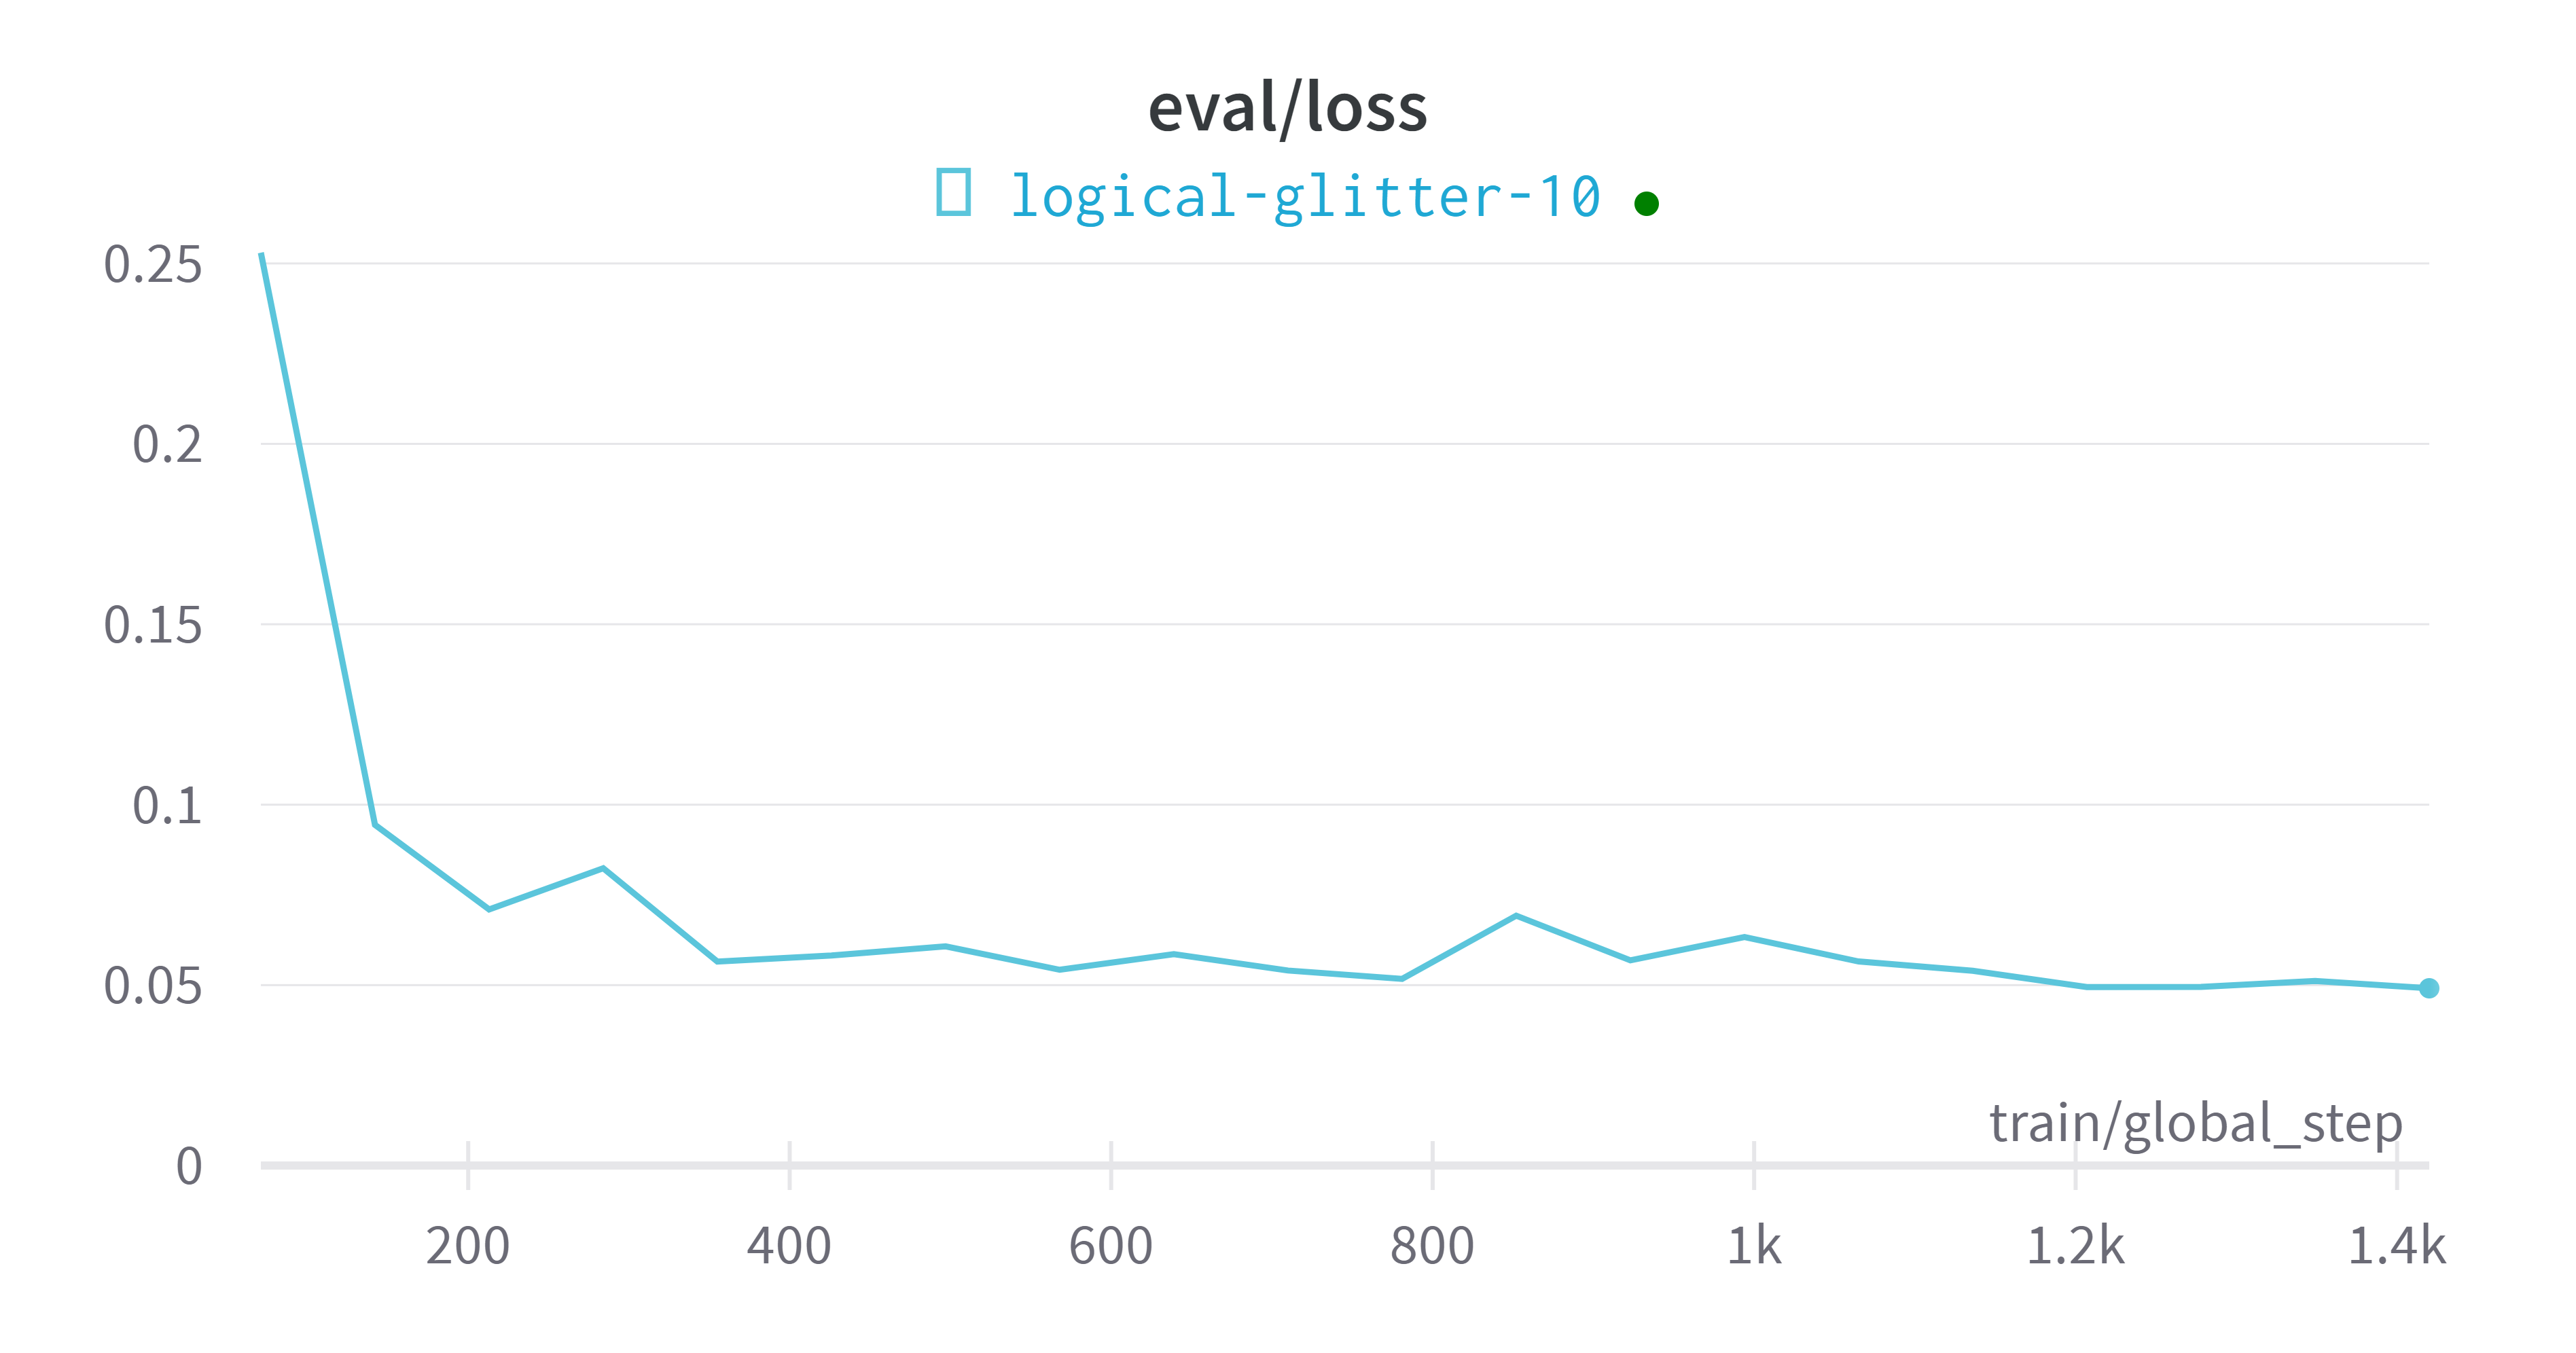
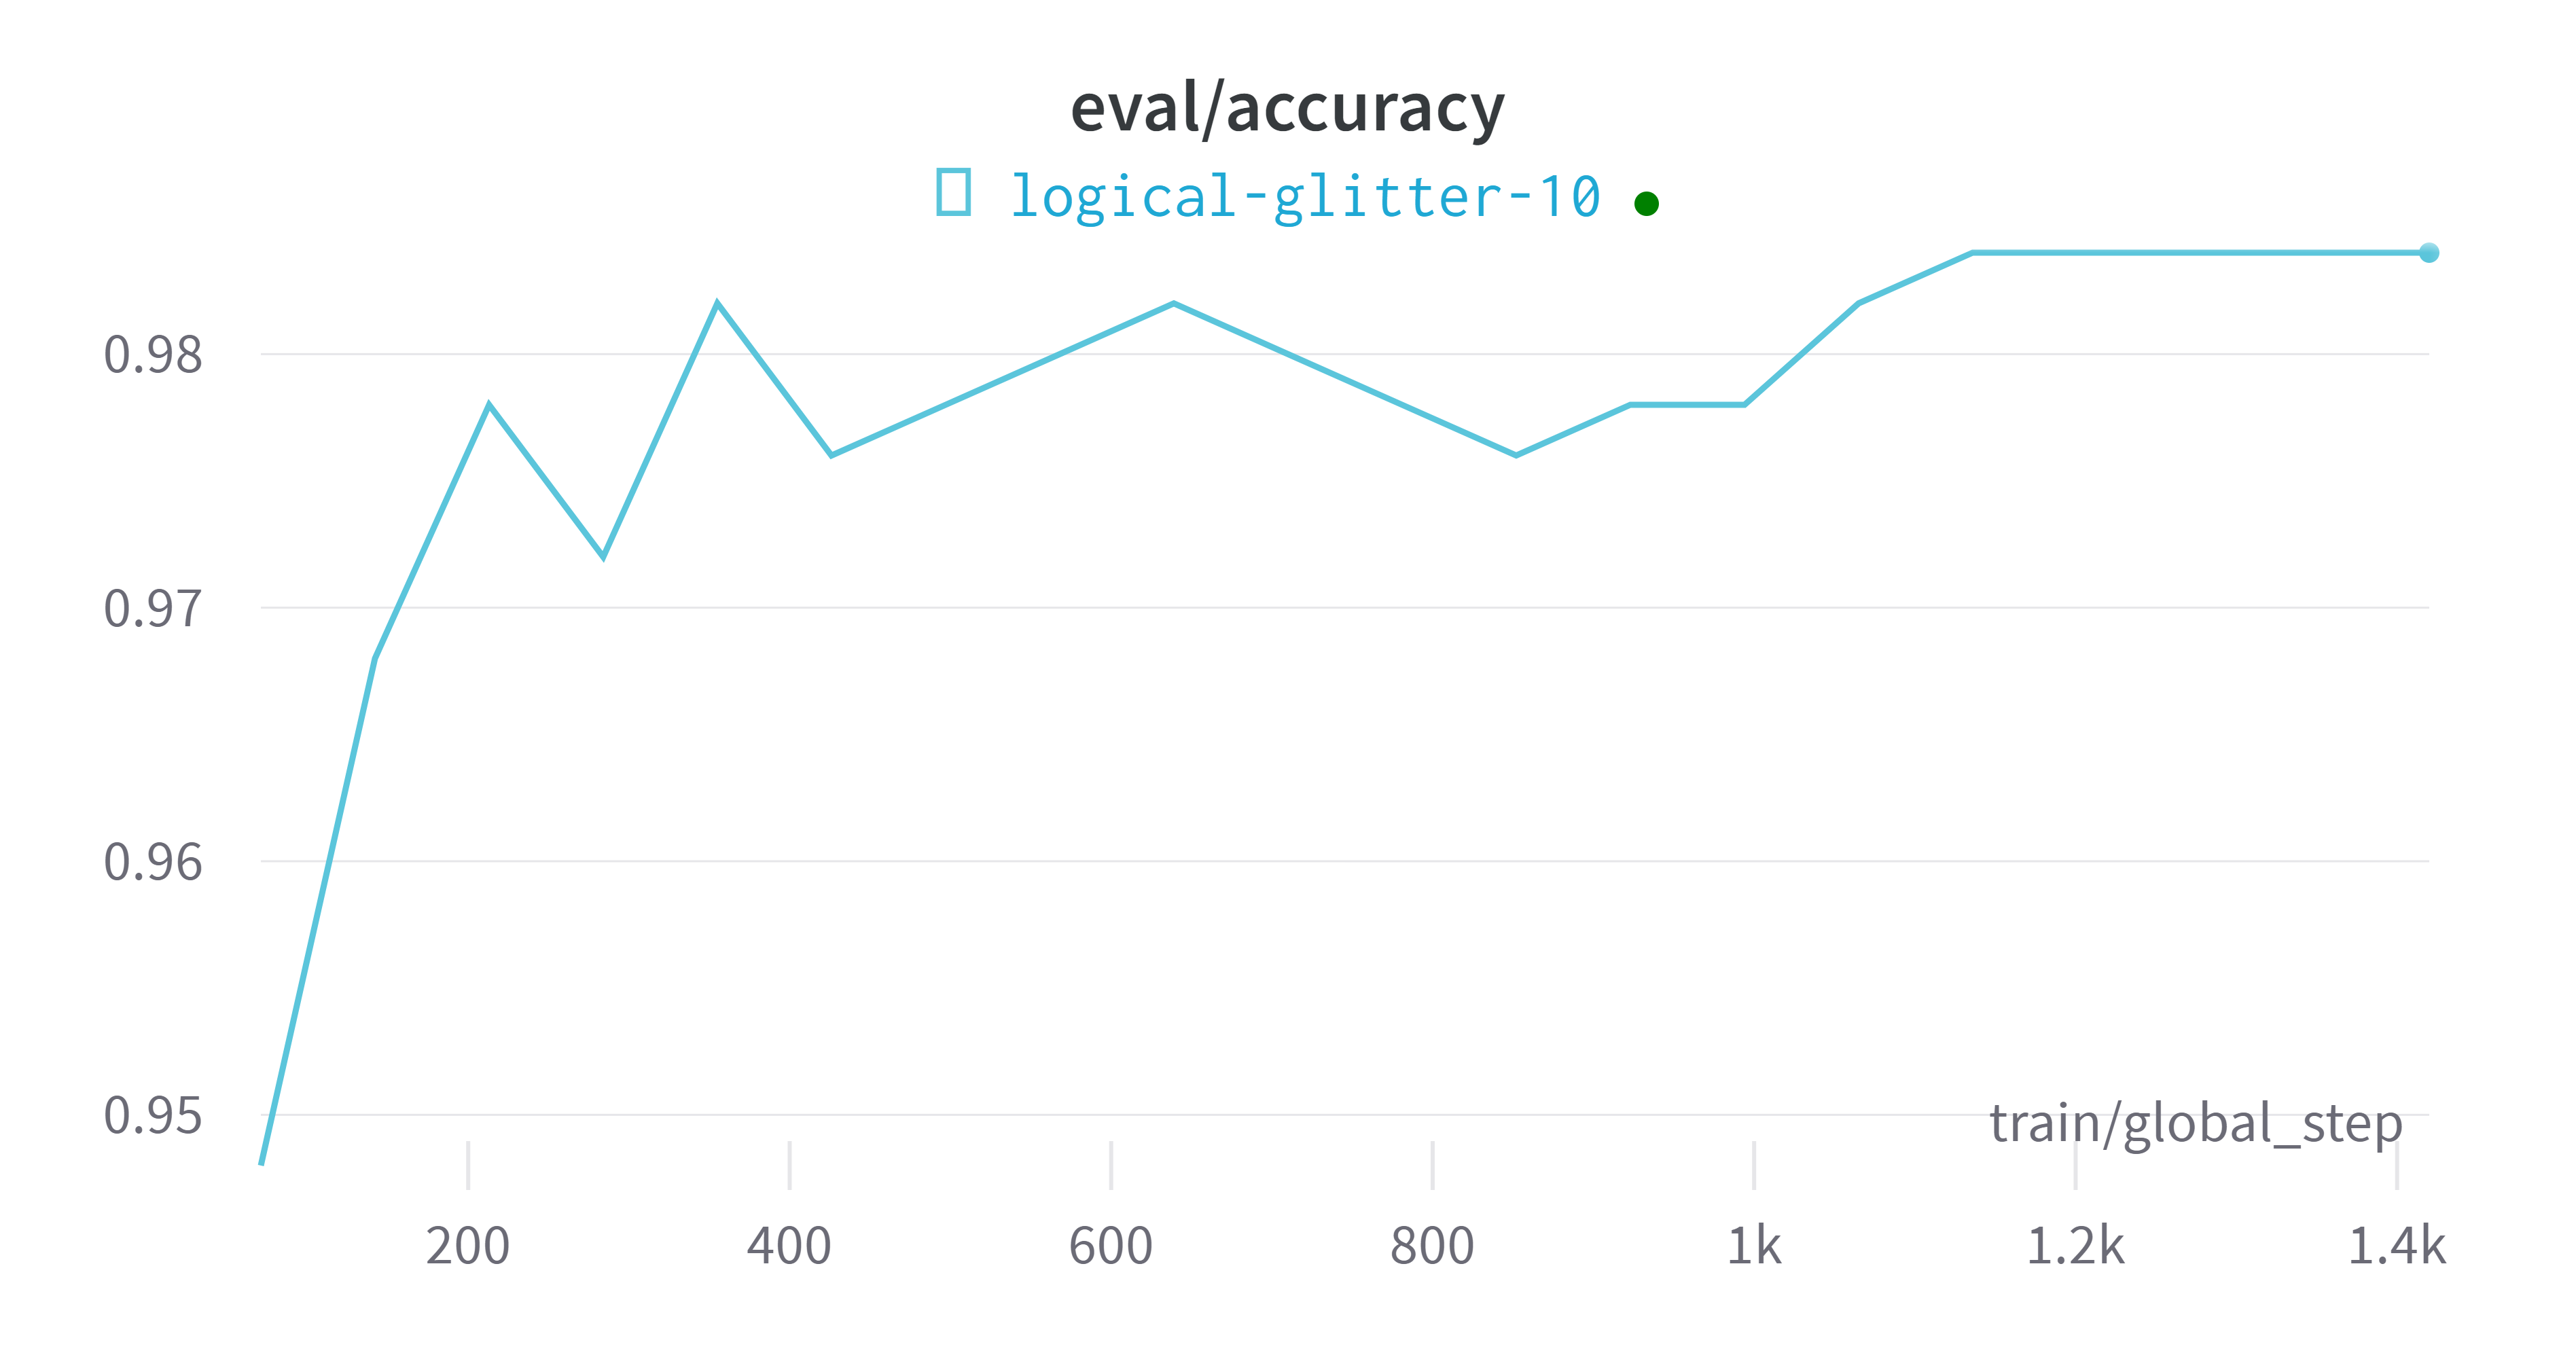
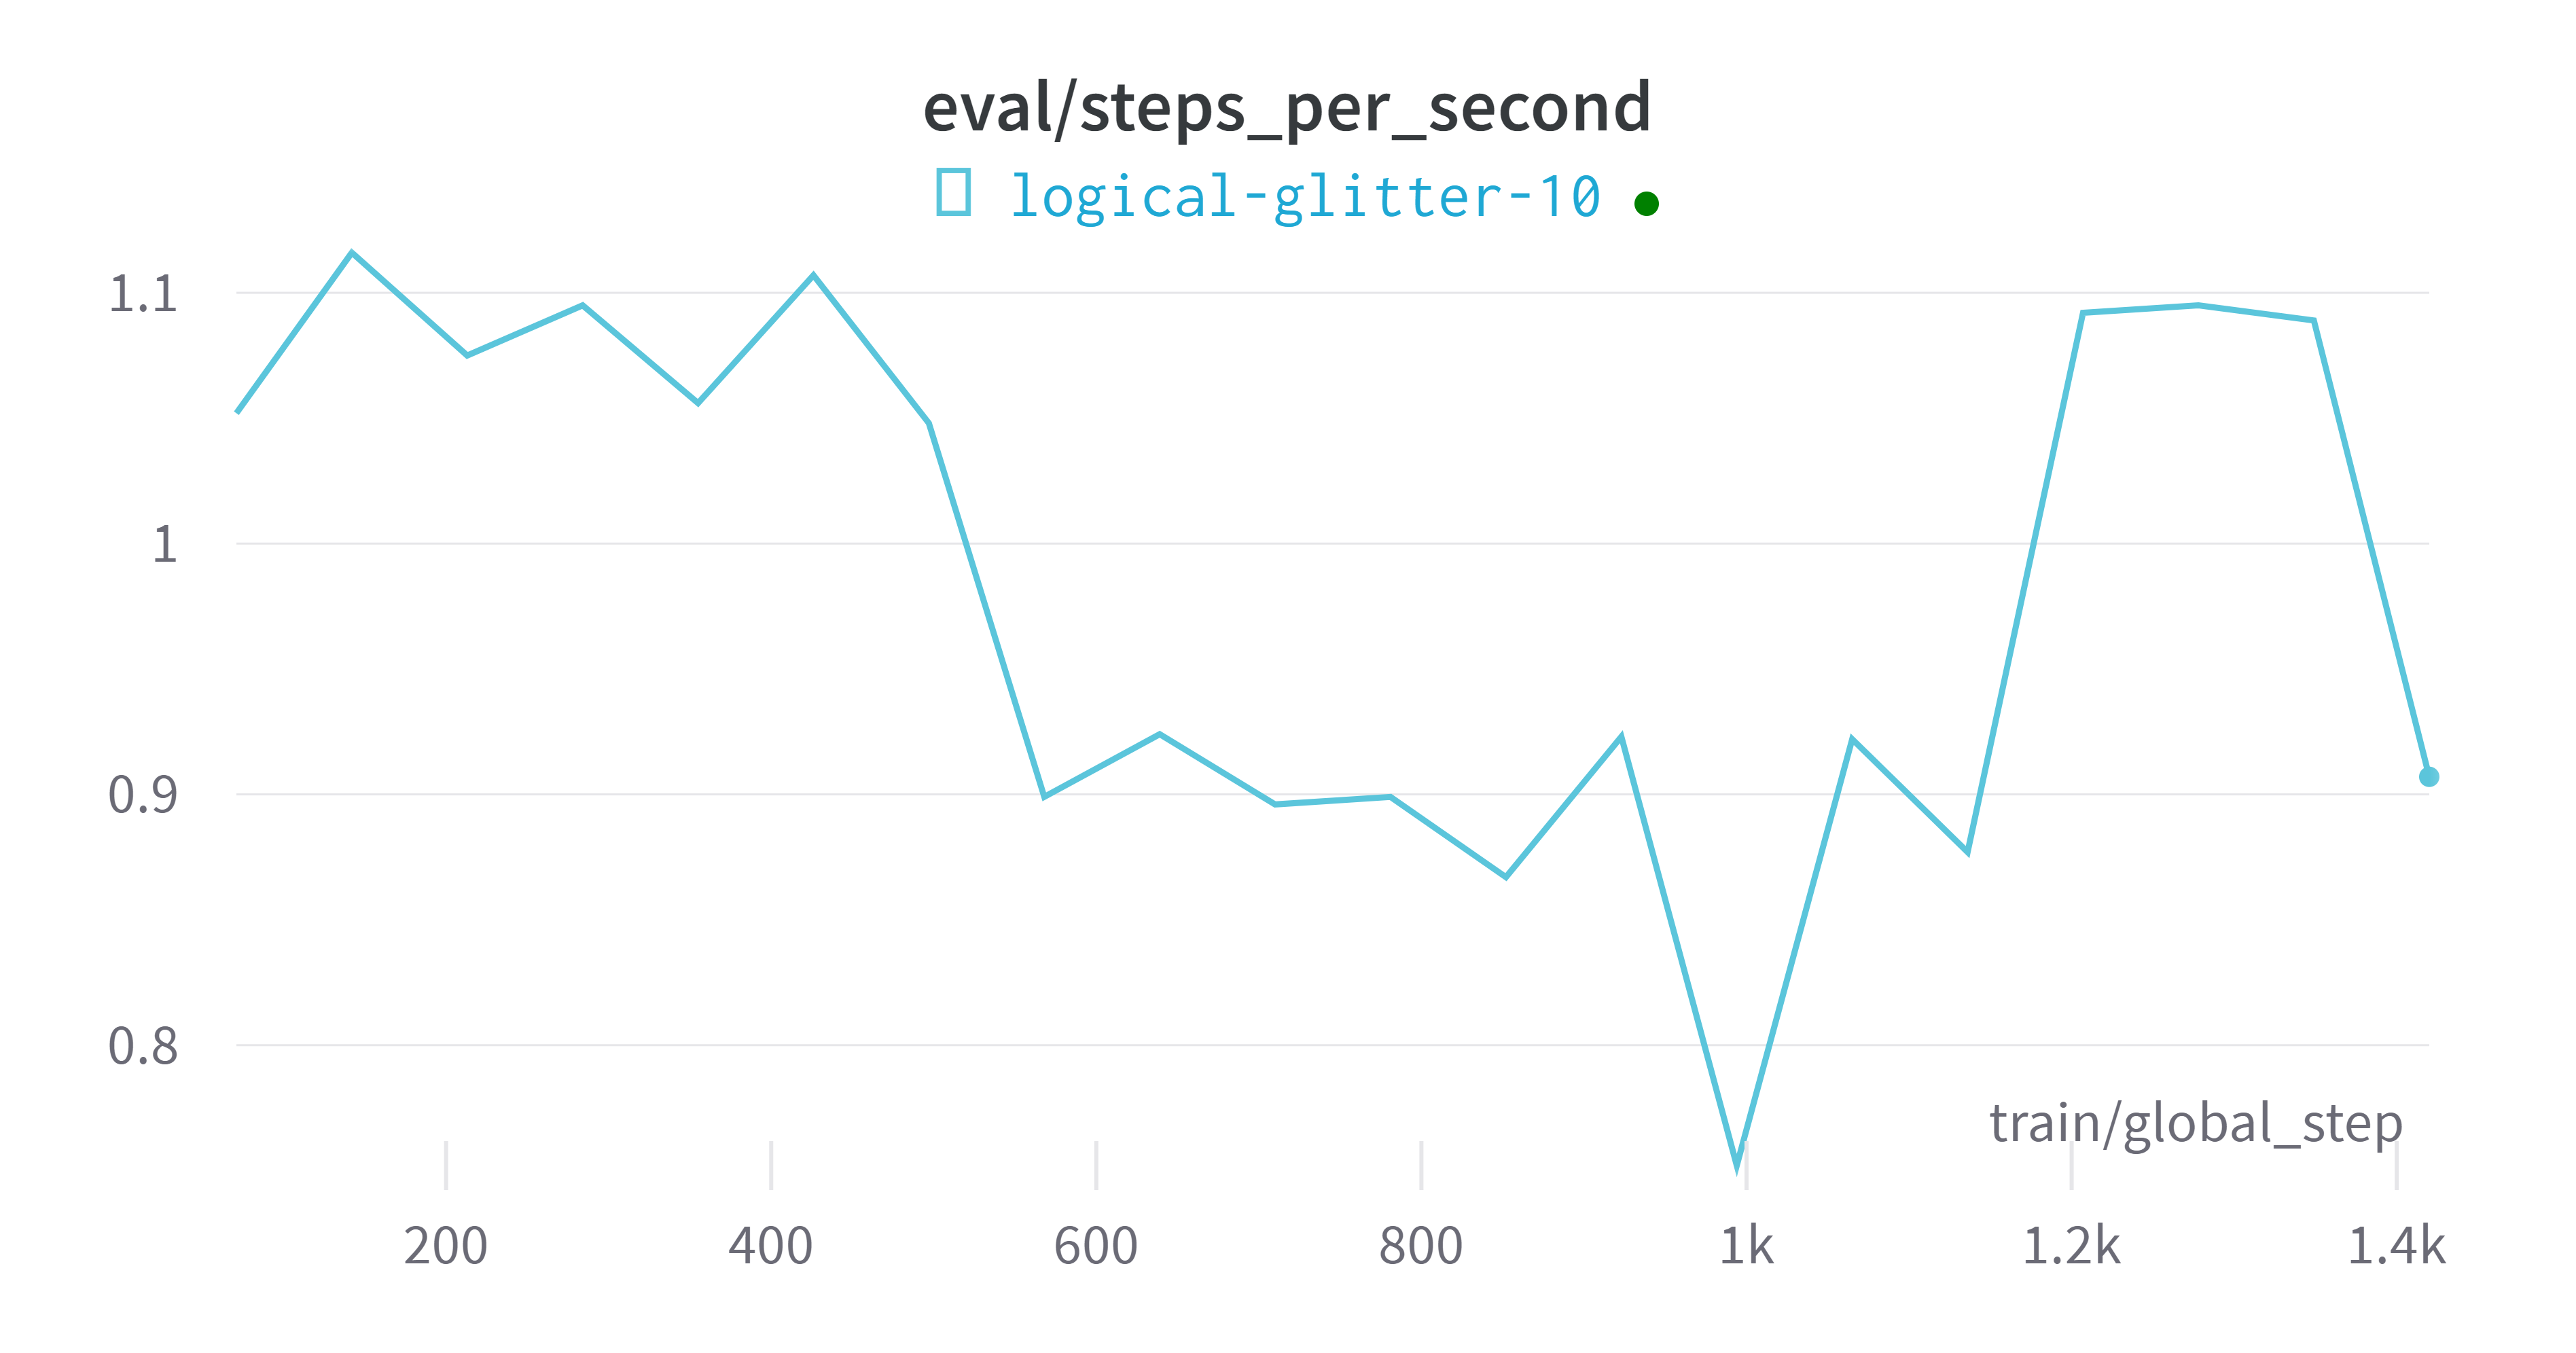
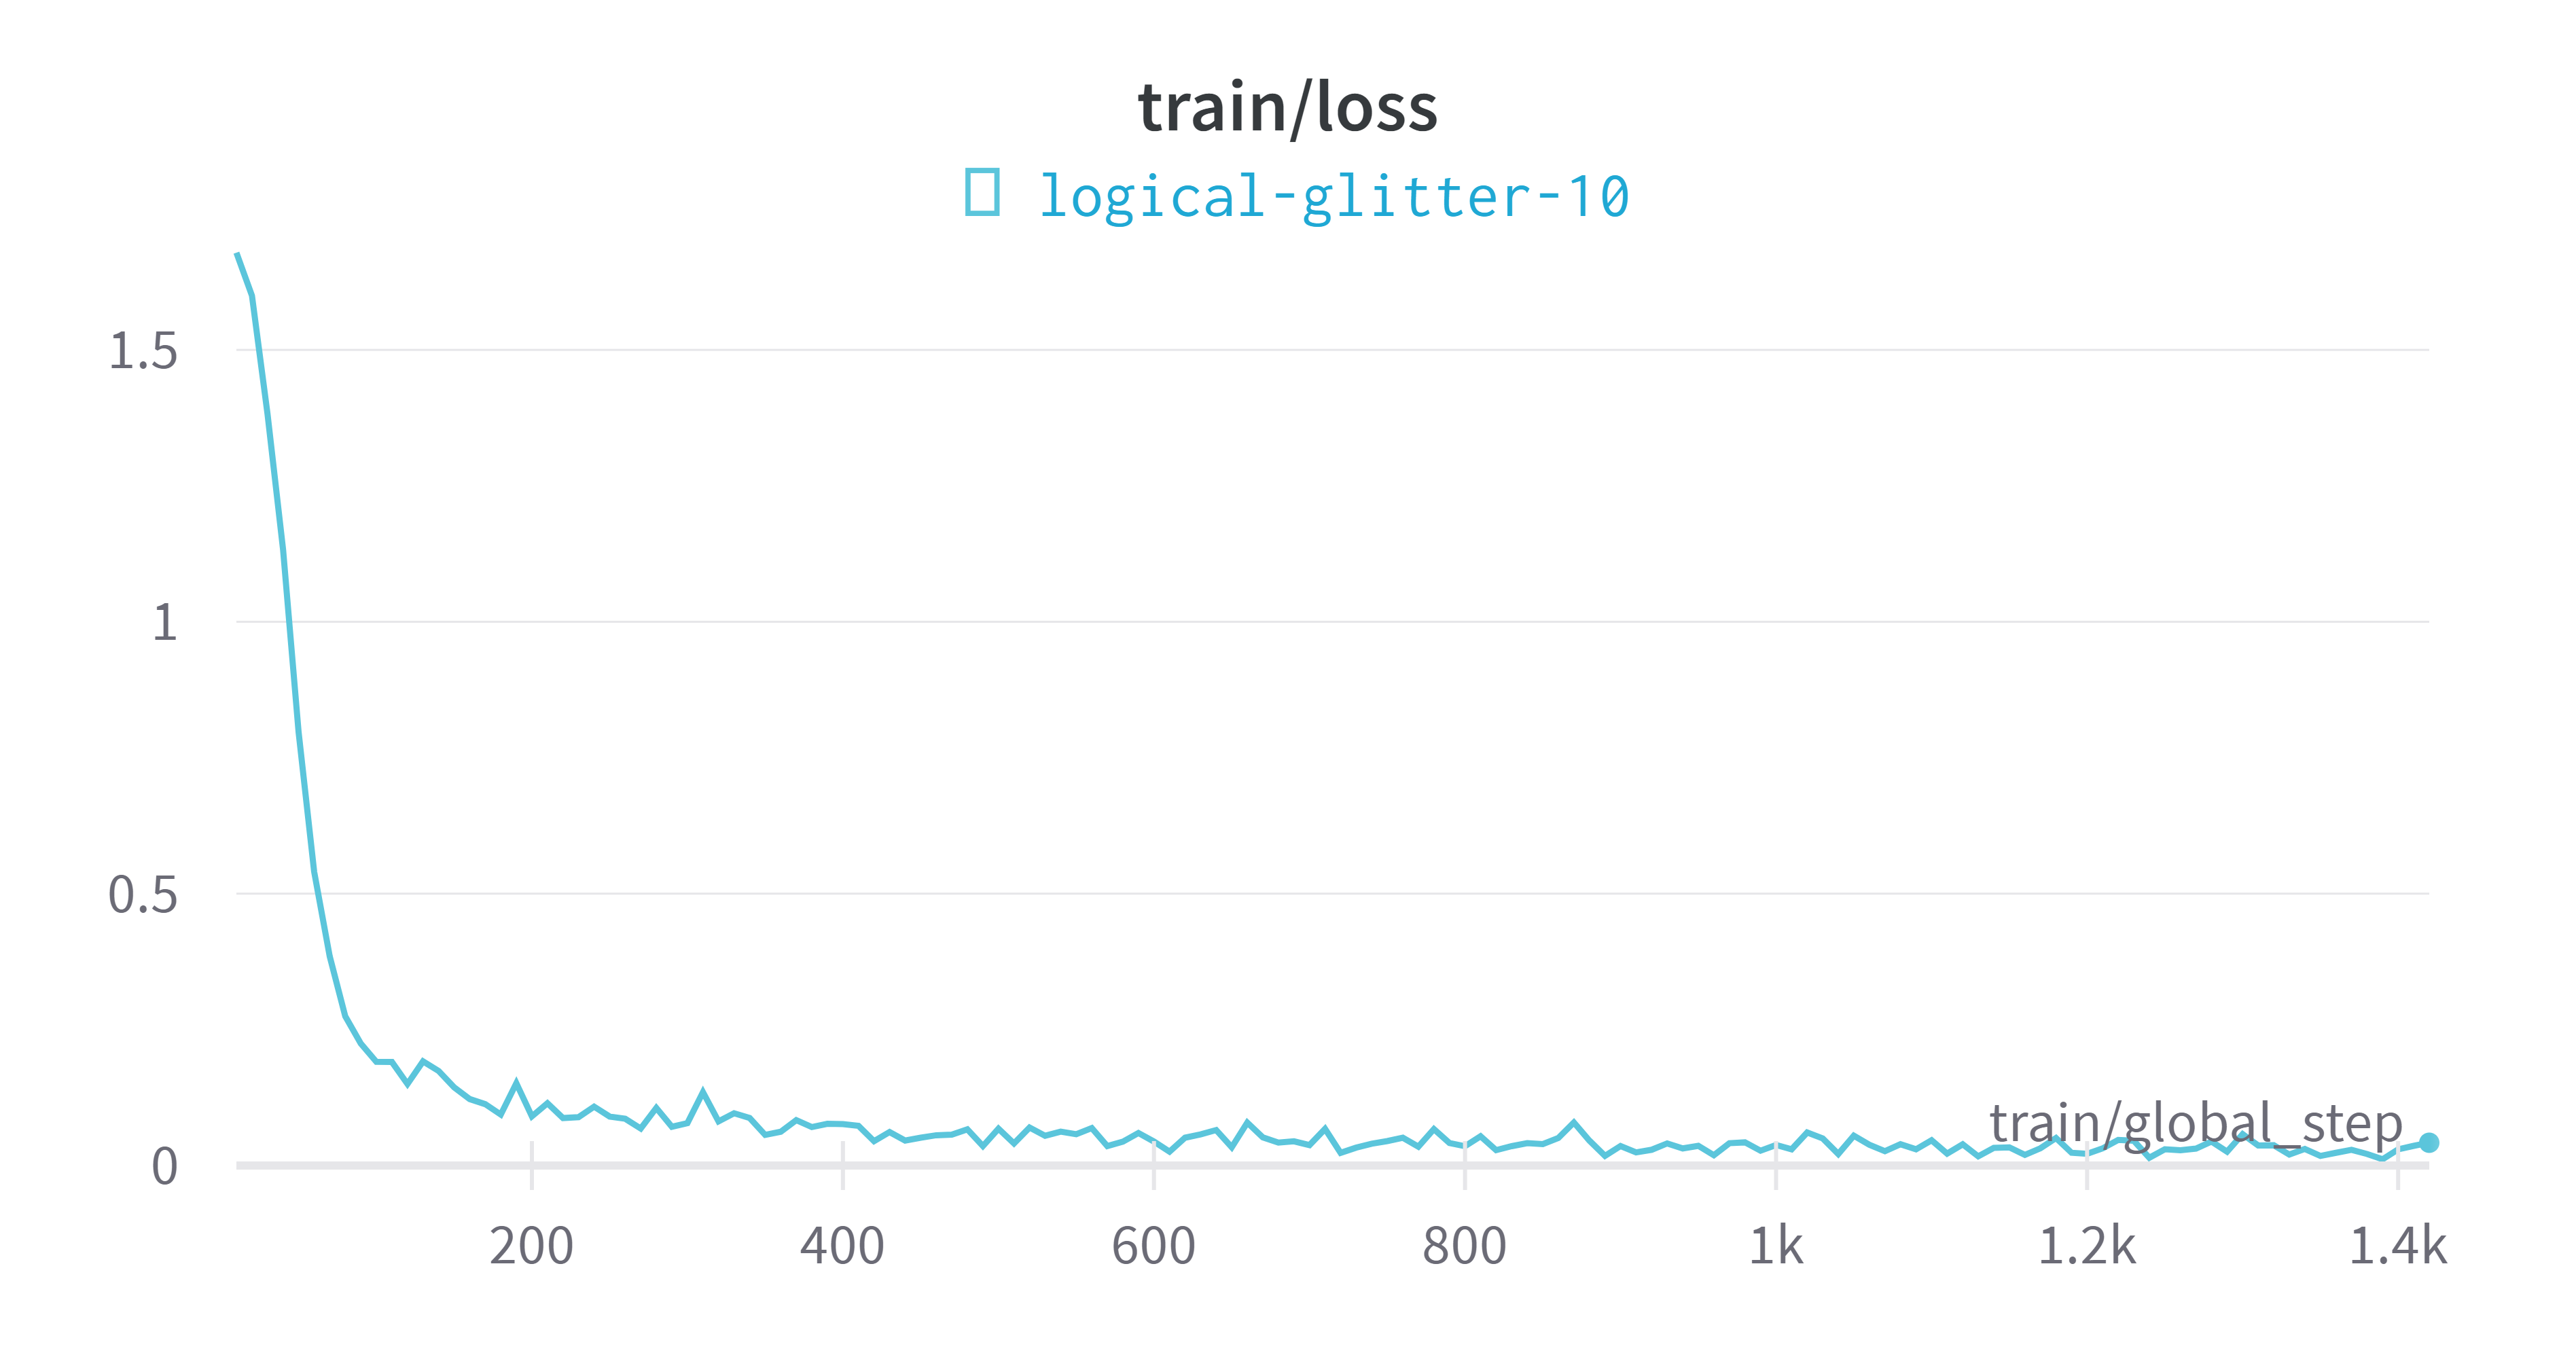
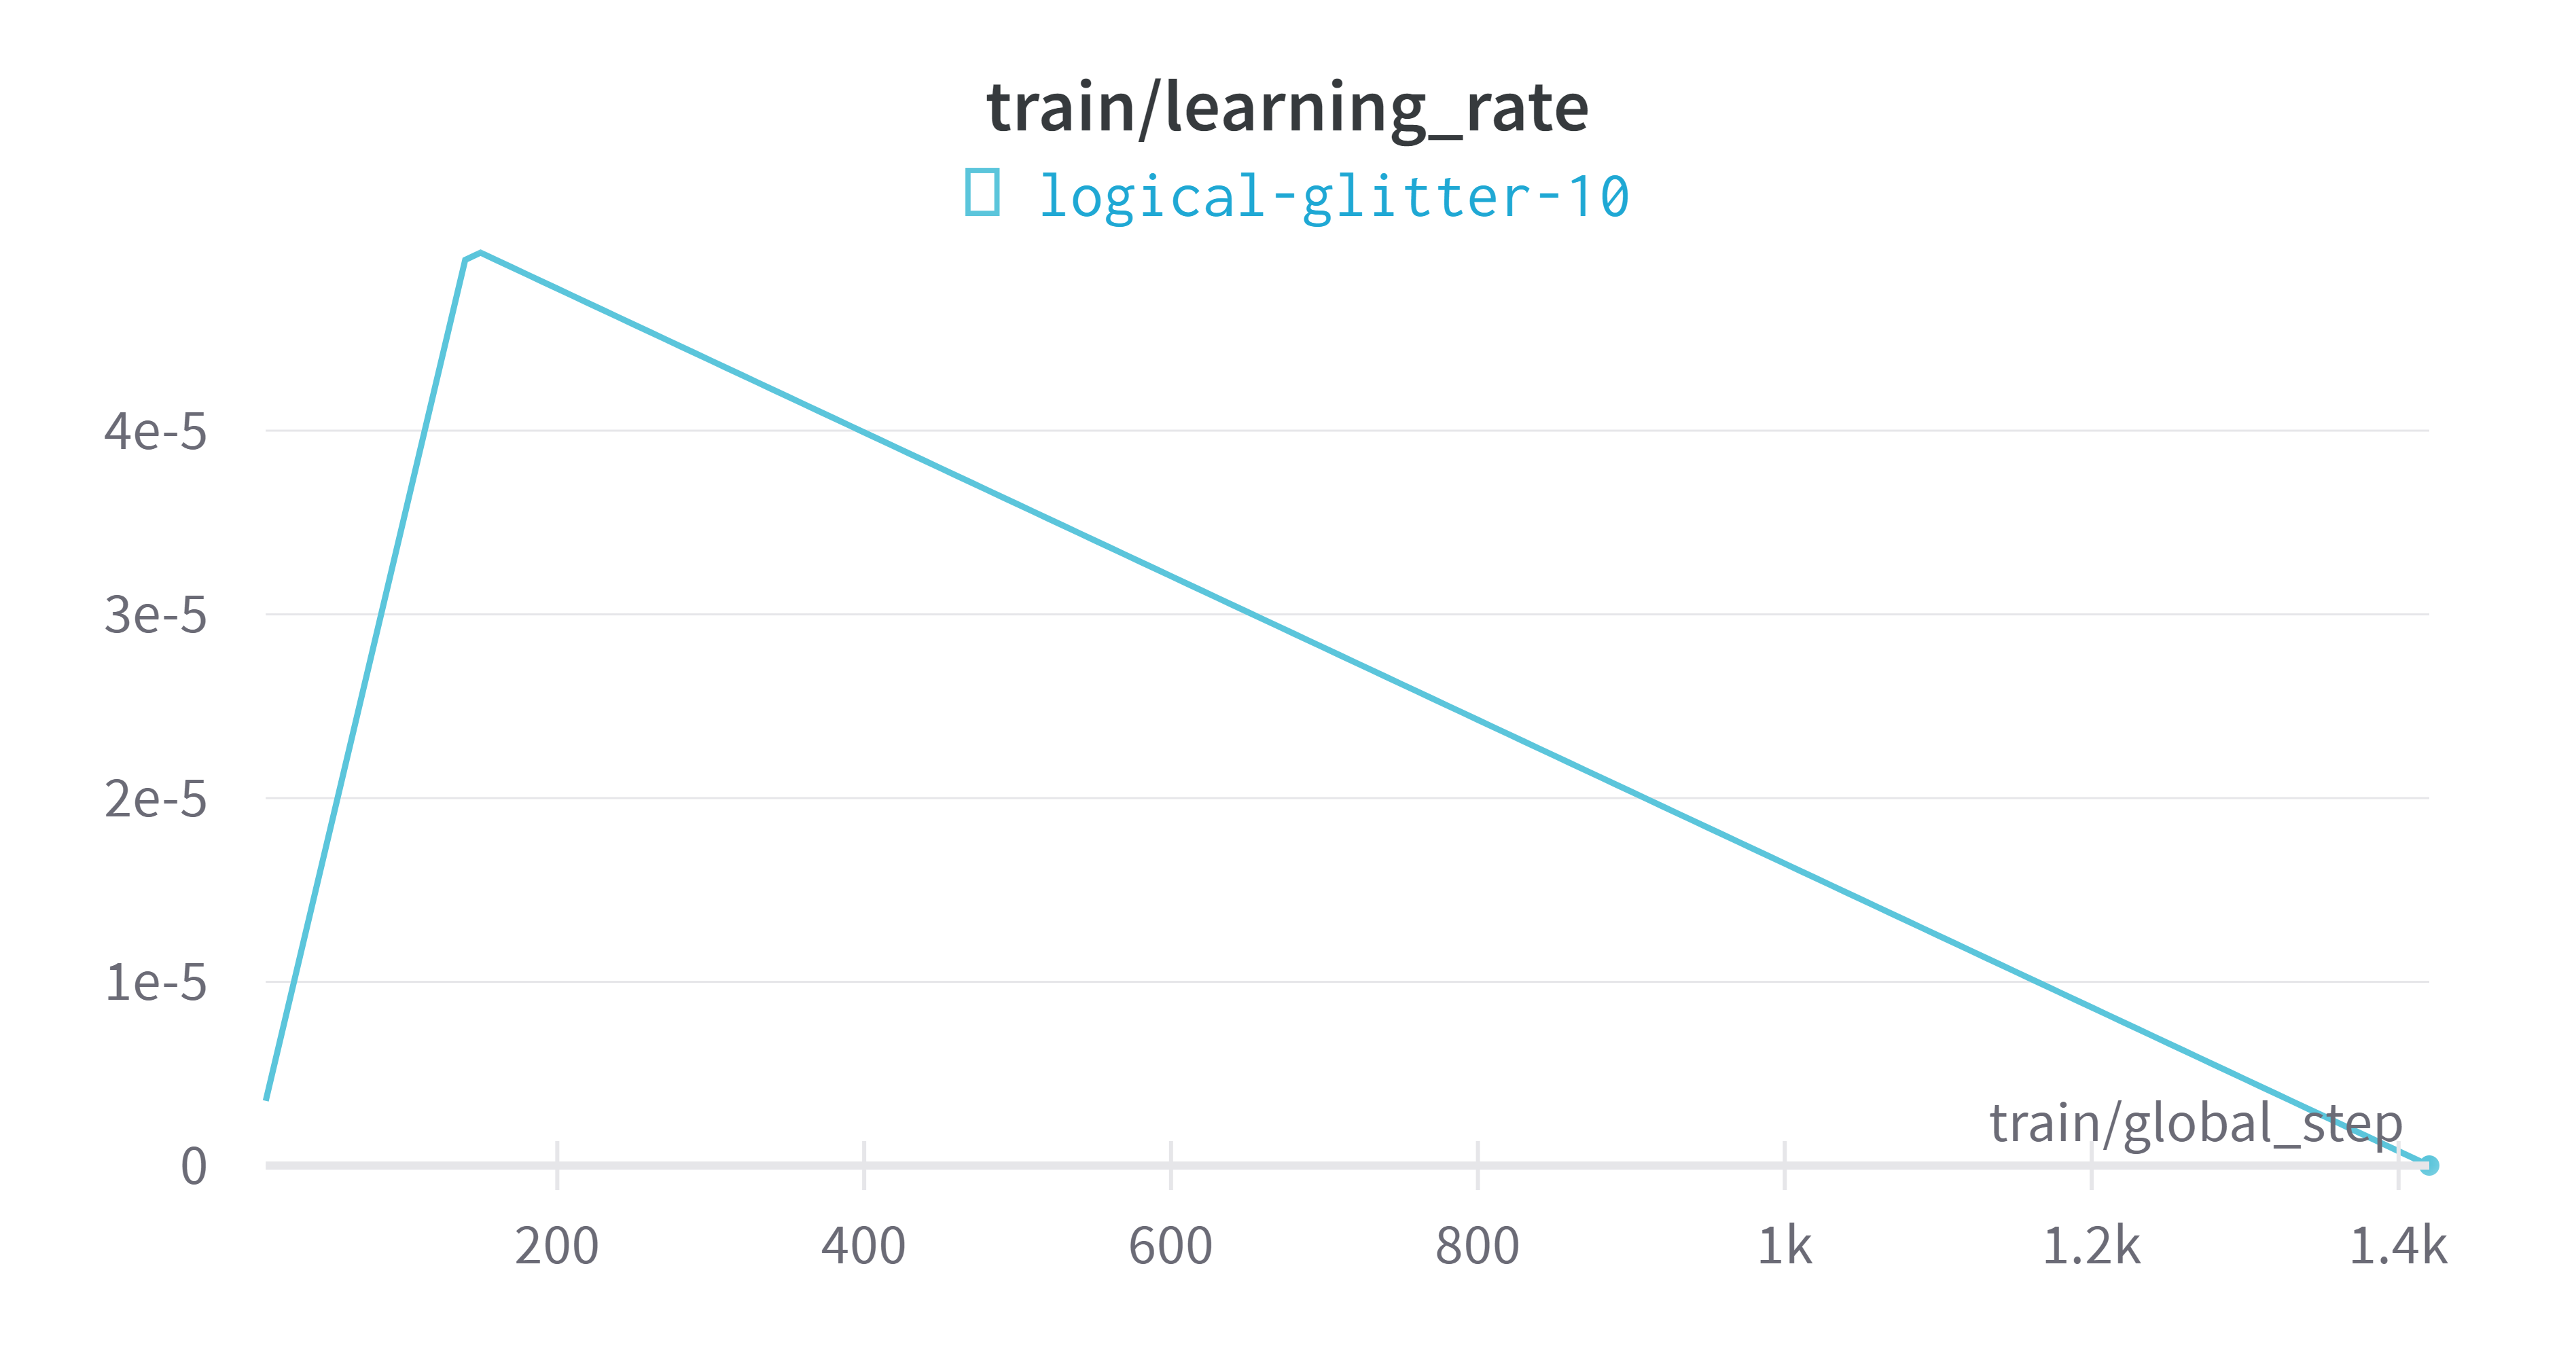
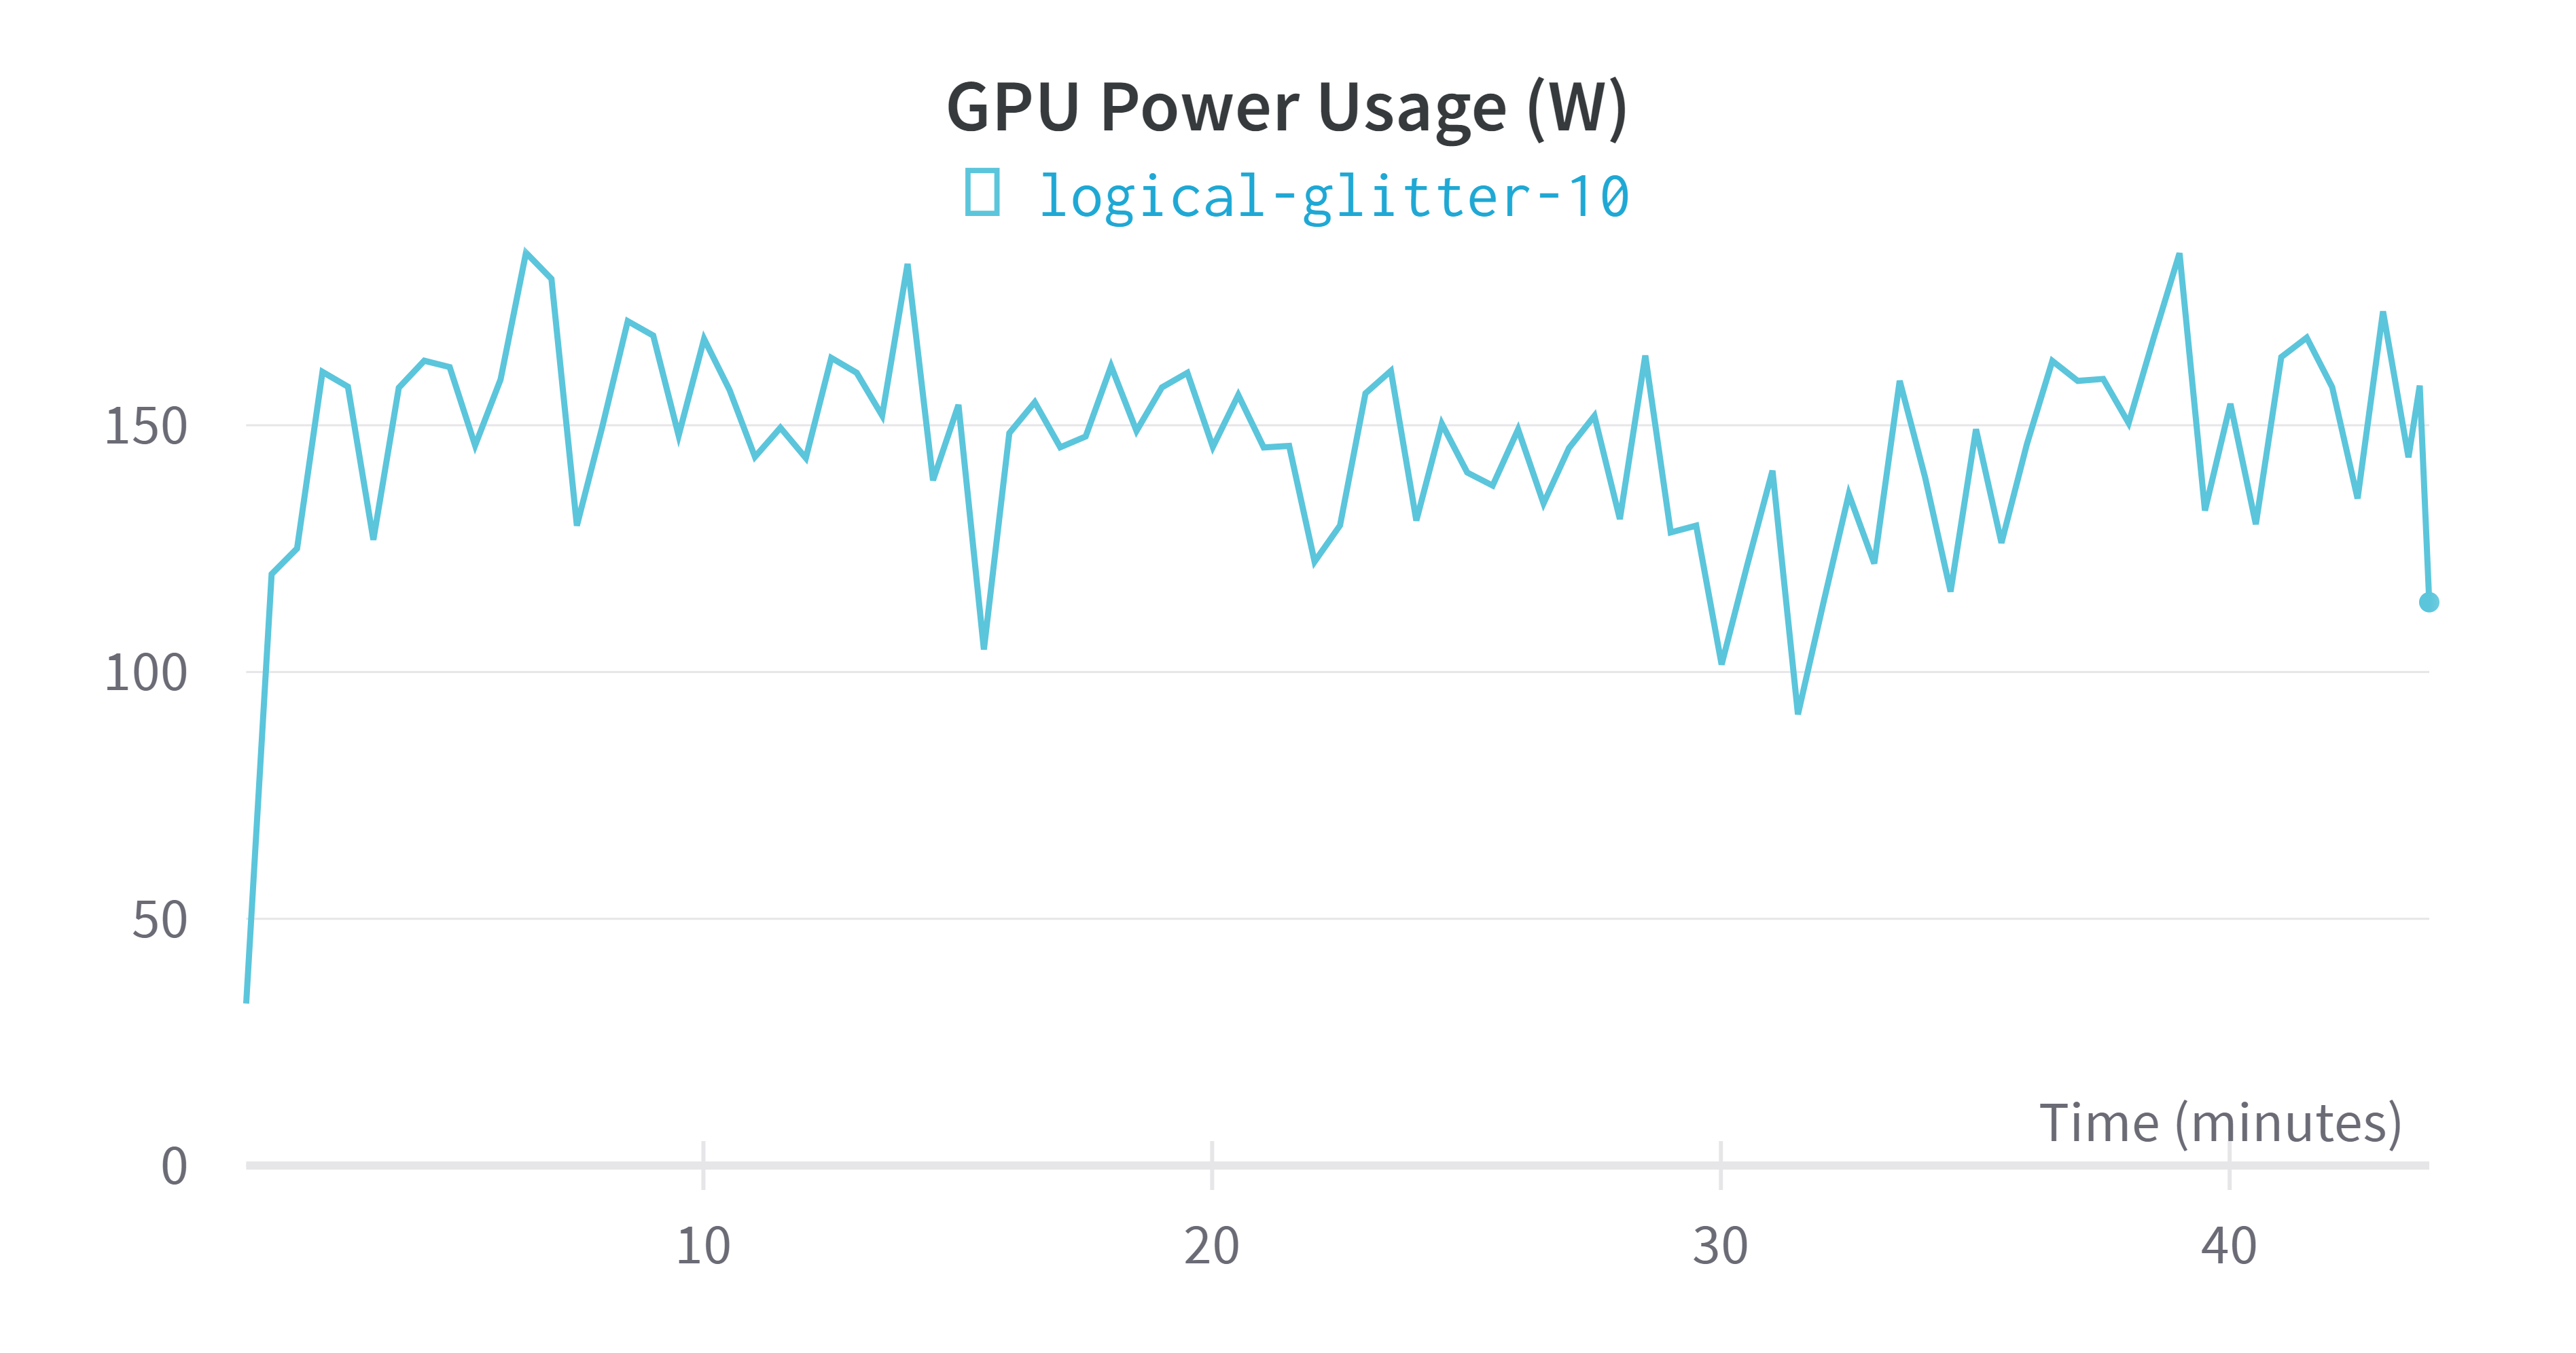
评估模型
metrics = trainer.evaluate()
# some nice to haves:
trainer.log_metrics("eval", metrics)
trainer.save_metrics("eval", metrics)
输出:
***** eval metrics *****
  epoch                   =       20.0
  eval_accuracy           =      0.984
  eval_loss               =      0.054
  eval_runtime            = 0:00:11.18
  eval_samples_per_second =     44.689
  eval_steps_per_second   =      0.715



![【读书笔记】《小王子》- [法] 安托万•德•圣埃克苏佩里 / [法国] 安东尼·德·圣-埃克苏佩里](https://img-blog.csdnimg.cn/9a6a3f8fd36e49dc90e1a3eb0c77fc8d.png#pic_center)
![【Java入门】-- Java基础详解之 [数组、冒泡排序]](https://img-blog.csdnimg.cn/ab4fbf404e044c9cabbdd8d7ab2329d7.png)
