Spring
循环依赖
概念
多个实体之间相互依赖并形成闭环的情况就叫做"循环依赖”,也叫做”循环引用。
三级缓存解决循环依赖的原理
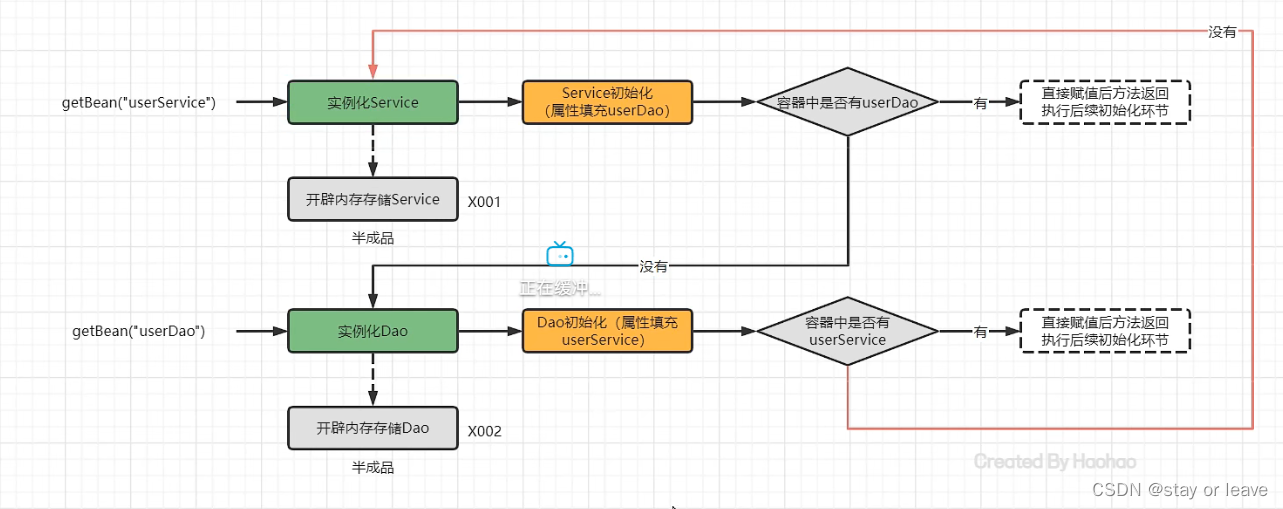
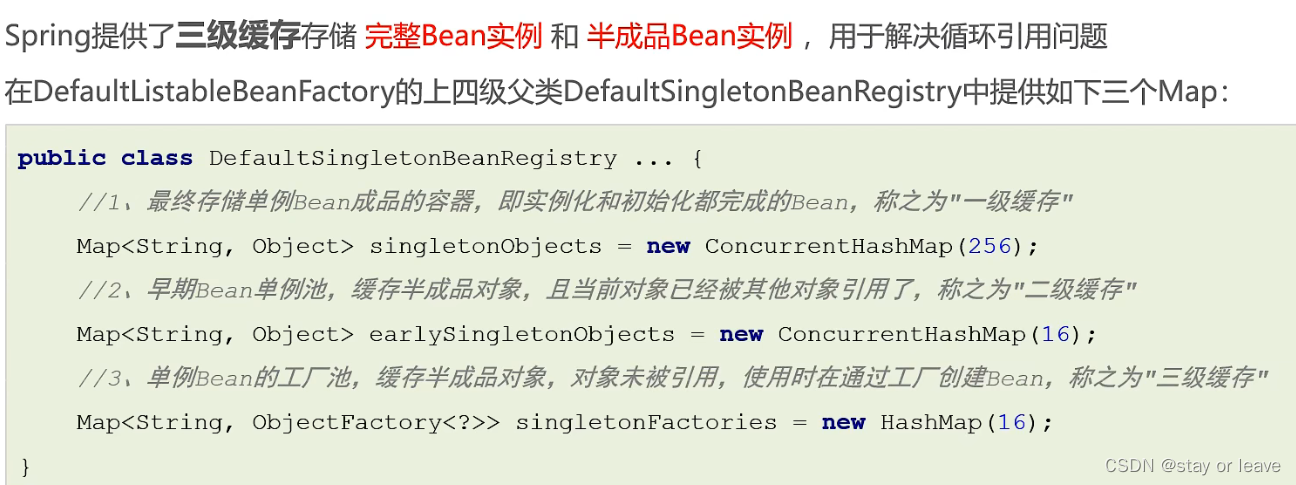
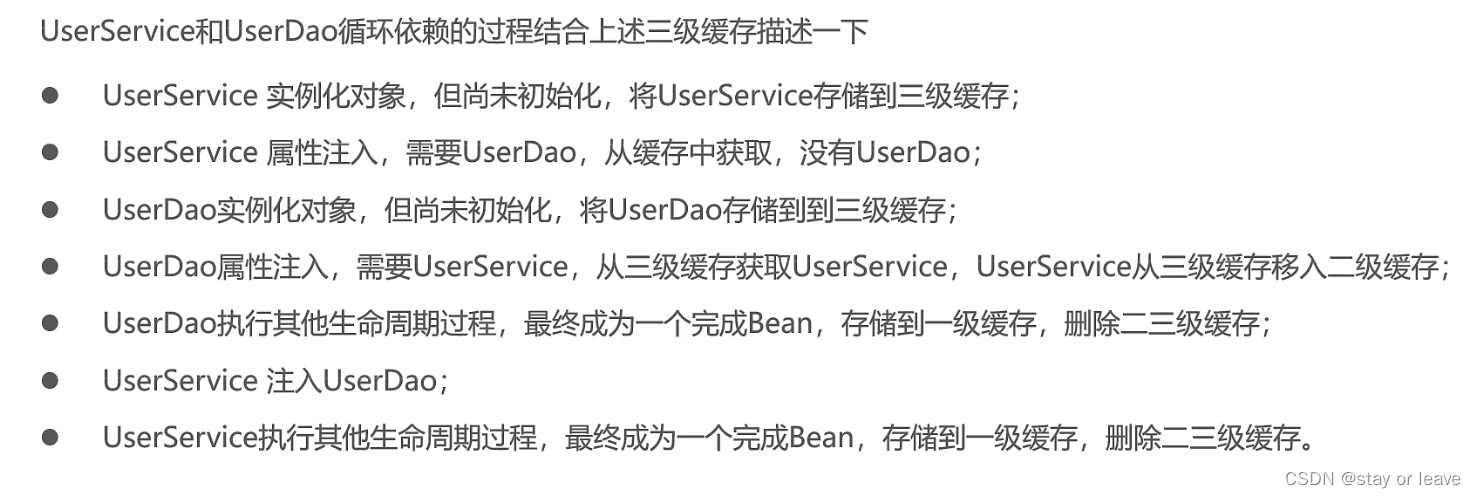
循环依赖的解决方案--- Feild注入单例(@AutoWired)
直接在类的成员变量上使用@Autowired注解,让Spring容器自动将依赖注入到相应的成员变量中。这种方式适用于只有少量依赖关系的情况。
package com.example.tmp;

import org.springframework.beans.factory.annotation.Autowired;
import org.springframework.stereotype.Component;

@Component
public class A {
    @Autowired
    private B b;

    private String name = "Tony";

    public String getName() {
        return name;
    }

    public void setName(String name) {
        this.name = name;
    }

    public String getTest() {
        return b.getAge().toString() + name;
    }
}

package com.example.tmp;

import org.springframework.beans.factory.annotation.Autowired;
import org.springframework.stereotype.Component;

@Component
public class B {
    @Autowired
    private A a;

    private Integer age = 20;

    public Integer getAge() {
        return age;
    }

    public void setAge(Integer age) {
        this.age = age;
    }

}
循环依赖的解决方案---构造器注入+@Lazy
构造器注入是通过类的构造函数进行依赖注入,而@Lazy注解可以延迟Bean的初始化。这种方式适用于需要在应用程序启动时延迟初始化某个单例Bean的场景,特别是当该单例Bean的初始化过程涉及到其他依赖关系时。
package com.example.tmp;

import org.springframework.context.annotation.Lazy;
import org.springframework.stereotype.Component;

@Component
public class A {
    private B b;

    public A(@Lazy B b) {
        this.b = b;
    }

    private String name = "Tony";

    public String getName() {
        return name;
    }

    public void setName(String name) {
        this.name = name;
    }

    public String getTest() {
        return b.getAge().toString() + name;
    }
}


package com.example.tmp;

import org.springframework.context.annotation.Lazy;
import org.springframework.stereotype.Component;

@Component
public class B {
    private A a;

    public B(@Lazy A a) {
        this.a = a;
    }

    private Integer age = 20;

    public Integer getAge() {
        return age;
    }

    public void setAge(Integer age) {
        this.age = age;
    }

}
循环依赖的解决方案--- Setter/Field注入单例
setter注入通过setter方法来注入依赖关系,而Field注入则是直接将依赖关系注入到成员变量上。这种方式适用于类中有多个依赖关系,并且可以根据需要选择合适的注入方式,更为灵活。
package com.example.tmp;

import org.springframework.beans.factory.annotation.Autowired;
import org.springframework.stereotype.Component;

@Component
public class A {
    private B b;

    private String name = "Tony";

    public String getName() {
        return name;
    }

    public void setName(String name) {
        this.name = name;
    }

    public String getTest() {
        return b.getAge().toString() + name;
    }

    public B getB() {
        return b;
    }

    @Autowired
    public void setB(B b) {
        this.b = b;
    }
}


package com.example.tmp;

import org.springframework.beans.factory.annotation.Autowired;
import org.springframework.stereotype.Component;

@Component
public class B {
    private A a;

    private Integer age = 20;

    public Integer getAge() {
        return age;
    }

    public void setAge(Integer age) {
        this.age = age;
    }

    public A getA() {
        return a;
    }

    @Autowired
    public void setA(A a) {
        this.a = a;
    }
}
循环依赖的解决方案--- @PostConstruct
@PostConstruct注解用于标记一个方法,在Bean初始化完成后执行该方法。适用场景包括需要在Bean初始化完成后进行一些额外的初始化工作,例如数据加载、资源初始化等。
package com.example.tmp;

import org.springframework.beans.factory.annotation.Autowired;
import org.springframework.stereotype.Component;

import javax.annotation.PostConstruct;

@Component
public class A {
    @Autowired
    private B b;

    @PostConstruct
    public void init() {
        b.setA(this);
    }

    private String name = "Tony";

    public String getName() {
        return name;
    }

    public void setName(String name) {
        this.name = name;
    }

    public String getTest() {
        return b.getAge().toString() + name;
    }
}


package com.example.tmp;

import org.springframework.beans.factory.annotation.Autowired;
import org.springframework.stereotype.Component;

@Component
public class B {
    @Autowired
    private A a;

    private Integer age = 20;

    public Integer getAge() {
        return age;
    }

    public void setAge(Integer age) {
        this.age = age;
    }

    public A getA() {
        return a;
    }

    public void setA(A a) {
        this.a = a;
    }
}
循环依赖的解决方案--- 实现ApplicationContextAware与InitializingBean
实现ApplicationContextAware接口可以让Bean获取到Spring容器的上下文,从而可以在需要时访问容器的功能和资源。InitializingBean接口定义了一个方法,Bean在初始化完成后会自动调用该方法,适用于需要在Bean初始化完成后进行一些额外的初始化逻辑的场景。
package com.example.tmp;

import org.springframework.beans.BeansException;
import org.springframework.beans.factory.InitializingBean;
import org.springframework.context.ApplicationContext;
import org.springframework.context.ApplicationContextAware;
import org.springframework.stereotype.Component;

@Component
public class A implements ApplicationContextAware, InitializingBean {
    private B b;

    private ApplicationContext context;

    private String name = "Tony";

    public String getName() {
        return name;
    }

    public void setName(String name) {
        this.name = name;
    }

    public String getTest() {
        return b.getAge().toString() + name;
    }

    @Override
    public void afterPropertiesSet() throws Exception {
        this.b = context.getBean(B.class);
    }

    @Override
    public void setApplicationContext(ApplicationContext applicationContext) throws BeansException {
        this.context = applicationContext;
    }
}


package com.example.tmp;

import org.springframework.beans.factory.annotation.Autowired;
import org.springframework.stereotype.Component;

@Component
public class B {
    @Autowired
    private A a;

    private Integer age = 20;

    public Integer getAge() {
        return age;
    }

    public void setAge(Integer age) {
        this.age = age;
    }
}
AOP
概念
AOP,Aspect Oriented Programming,面向切面编程,是对面向对象编程OOP的升华。而AOP是横向的对不同事物的抽象,属性与属性、方法与方法、对象与对象都可以组成一个切面,而用这种思维去设计编程的方式叫做面向切面编程。AOP通过预编译方式和运行期动态代理方式实现,在不修改源代码的情况下,给程序动态添加额外功能的一种技术。
AOP思想的实现方案

项目中的使用场景
权限管理、异常处理、操作日志、事务控制。
权限管理
情景1:控制用户的功能权限
方案详述:在@ControllerAdvice里边,处理全局请求,控制权限。
权限管理的其他方案:(除了AOP之外的方案)
在过滤器或者拦截器中处理
异常处理
情景1:在@ControllerAdvice里边,处理全局异常
操作日志
情景:按产品的需求,有的接口需要记录操作日志
自定义的AopBeanPostProcessor类,实现了BeanPostProcessor接口和ApplicationContextAware接口。它的作用是对目标中的目标方法进行增强。
返回代理类的代码思路如下:
-
实现
BeanPostProcessor接口和ApplicationContextAware接口,这样可以在Bean初始化后进行后置处理,并且获取ApplicationContext对象。 -
在后置处理方法中,通过判断
bean对象所属的包名是否正确,来确定是否对该类进行增强。 -
如果是对应包下的类,就创建一个代理对象(
beanProxy)来替代原始的bean对象。代理对象将执行增强逻辑。 -
代理对象的创建使用
Proxy.newProxyInstance()方法,传入目标对象的类加载器、目标对象实现的接口数组和一个InvocationHandler接口的实现。 -
用Lambda表达式
实现InvocationHandler接口。在Lambda表达式中,首先从applicationContext中获取增强对象,然后执行目标方法,最后调用增强对象的日志方法。 -
返回代理对象(
beanProxy),完成增强。 -
如果不需要对该类进行增强,直接返回原始的
bean对象。
返回代理类的代码如下:
public class MockAopBeanPostProcessor implements BeanPostProcessor, ApplicationContextAware {

    private ApplicationContext applicationContext;

    @Override
    public Object postProcessAfterInitialization(Object bean, String beanName) throws BeansException {

        //目的:对UserServiceImpl中的show1和show2方法进行增强,增强方法存在与MyAdvice中
        //问题1:筛选service.impl包下的所有的类的所有方法都可以进行增强,解决方案if-else
        //问题2:MyAdvice怎么获取到?解决方案:从Spring容器中获得MyAdvice

        if(bean.getClass().getPackage().getName().equals("com.itheima.service.impl")){
            //生成当前Bean的Proxy对象
            Object beanProxy = Proxy.newProxyInstance(
                    bean.getClass().getClassLoader(),
                    bean.getClass().getInterfaces(),
                    (Object proxy, Method method, Object[] args) -> {
                        MyAdvice myAdvice = applicationContext.getBean(MyAdvice.class);
                        //执行增强对象的before方法
                        myAdvice.beforeAdvice();
                        //执行目标对象的目标方法
                        Object result = method.invoke(bean, args);
                        //执行增强对象的after方法
                        myAdvice.afterAdvice();
                        return result;
                    }
            );

            return beanProxy;
        }

        return bean;
    }

    @Override
    public void setApplicationContext(ApplicationContext applicationContext) throws BeansException {
        this.applicationContext = applicationContext;
    }
}
测试代码思路如下(不用在面试中将,但要知道):
- 创建一个
ApplicationContext对象,使用ClassPathXmlApplicationContext类实现。该对象是Spring框架的核心容器,负责加载和管理应用程序的组件。 - 通过构造函数传递一个指向XML配置文件的路径,这里的路径是"applicationContext3.xml"。这个配置文件包含了定义和配置应用程序中的组件。
- 通过调用
getBean()方法从容器中获取一个UserService的实例。getBean()方法的参数是UserService.class,表示要获取UserService接口的实现类的实例。 - 调用
bean对象的show2()方法,执行相应的业务逻辑。
测试代码如下:
        ApplicationContext app = new ClassPathXmlApplicationContext("applicationContext3.xml");
        UserService bean = app.getBean(UserService.class);
        bean.show2();
事务控制
情景:使用Spring的@Transactional
注解配置声明式事务控制
首先在xml文件中启用基于注解的事务管理的配置项:<tx:annotation-driven/>。
在业务方法上加Transactional,配置isolation="READ COMMITTED" 和propagation="REQUIRED"。
isolation:
-
READ UNCOMMITTED(读未提交):最低的隔离级别,一个事务可以读取到其他事务未提交的数据。
-
READ COMMITTED(读已提交):事务只能读取到已经提交的数据,而不能读取到其他事务未提交的数据。
-
REPEATABLE READ(可重复读):事务执行期间,多次读取同一数据会得到一致的结果,即使其他事务对该数据进行了修改。
-
SERIALIZABLE(串行化):最高的隔离级别,事务按顺序串行执行。但并发性能较差,一般情况下很少使用。
propagation:
-
REQUIRED(默认):如果当前已存在事务,则加入到当前事务中执行;如果当前没有事务,则创建一个新的事务并执行。这是最常用的传播行为,它确保一组相关操作要么都成功地执行,要么都回滚。
-
REQUIRES_NEW:每次都创建一个新的事务,暂停当前事务(如果存在),并在新的事务中执行方法。该传播行为会将当前事务挂起,并在新事务执行完毕后恢复。
-
SUPPORTS:如果当前已存在事务,则加入到当前事务中执行;如果当前没有事务,则以非事务方式执行。该传播行为适用于不需要强制事务的方法,可以根据调用上下文决定是否参与事务。
-
NOT_SUPPORTED:以非事务方式执行方法,如果当前存在事务,则挂起该事务并执行方法。该传播行为适用于不需要事务支持的方法,即使当前存在事务,也会暂时挂起。
事务失效的原因及解决
1、方法内的自调用:Spring事务是基于AOP的,只要使用代理对象调用某个方法时,Spring事务才能生效,而在一个方法中调用使用this.xx0调用方法时,会导致注解失效,因为this并不是代理对象。
解放办法1,把调用方法拆分到另外一个Bean中,再通过Autowired注入。
解决办法2,通过Autowired注入当前类的对象,然后调用方法。
2、事务方法是private,Spring事务会基于CGLIB来进行AOP,而CGLB会基于父子类来失效,子类是代理类,父类是被代理类,如果父类中的某个方法是private的,那么子类就没有办法重写它,也就没有办法额外增加Spring事务的逻辑。
3、事务方法是final, 原因和private是一样的,也是由于子类不能重写父类中的final的方法。
4、单独的线程调用方法:当Myatis或JdbcTemplaten执行SQL时,会从Threadlocal中去获取数据库连接对象,如果开启事务的线程和执行SQL的线程是同一个,那么就能拿到数据库连接对象,如果不是同一个线程,那就拿到不到数据库连接对象,这样,Mybats或JdbcTemplaten就会自己去新建一个数据库连接用来执行SQL,该数据库连接的autocommit为true,那么执行完SQL就会提交,后续再抛异常也就不能再回滚之前已经提交了的SQL了。
5、没加@Configuration注解,如果用SpringBoot基本没有这问题,但是如果用的spring,那么可能会有这个问题,这个问题的原因其实也是由于Mybatis或dbcIemplate会从Threadlocal中去获取数据库连接,但是Threadlocal中存储的是MAP,MAP的key为DataSource对象,value为连接对象,而如果我们没有在AppConig上添加@Configuration注解,会导致MAP中存的Datasoure对象和MyBatis或JdbcTemplate中的Datasource对象不相等,从而也拿不到数据库连接,导致自己去创建数据库连接了。
6、异常被吃掉:如果Spring事务没有捕获到异常,那么也就不会回滚了,默认情况下sprin会捕获RuntimeException和Error。
7、类没有被Spring管理,例如类没有加Component,没有被加入Bean容器。
8、数据库不支持事务。
MyBatis--#与$的区别
1、#0是预编译处理、是占位符, 50是字符串替换、是拼接符
2、Mybatis 在处理#0时,会将 sql 中的#0替换为?号,调用 PreparedStatement 来赋值
3、Mybatis 在处理S0时,就是把S0替换成变量的值,调用 Statement 来赋值
4、使用#n可以有效的防止SQL注入,提高系统安全性
