文章目录
- 一、引言
- 二、操作
- 1、权限
- 2、开启蓝牙
- 3、可检测
- 4、搜索蓝牙
- 5、广播
- 三、附件
- 1、UI界面设计
- 2、总代码
一、引言
- 描述:蓝牙技术是一种无线数据和语音通信开放的全球规范,它是基于低成本的近距离无线连接,为固定和移动设备建立通信环境的一种特殊的近距离无线技术连接。蓝牙使当前的一些便携移动设备和计算机设备能够不需要电缆就能连接到互联网,并且可以无线接入互联网。在生活中也是得到广泛的应用,比如:车载蓝牙、公共洗衣机。
- 频段:2.4—2.485GHz的ISM波段
- 特点:(摘选引用自百度百科)
1、蓝牙技术的适用设备多,无需电缆,通过无线使电脑和电信连网进行通信。
2、蓝牙技术的工作频段全球通用,适用于全球范围内用户无界限的使用,解决了蜂窝式移动电话的国界障碍。
3、蓝牙技术的安全性和抗干扰能力强,由于蓝牙技术具有跳频的功能,有效避免了ISM频带遇到干扰源。
4、现阶段,蓝牙技术的主要工作范围在10米左右,经过增加射频功率后的蓝牙技术可以在100米的范围进行工作,只有这样才能保证蓝牙在传播时的工作质量与效率,提高蓝牙的传播速度。 - 知识点:
1、Bluetooth
2、广播 - 难度:初级
- 效果:
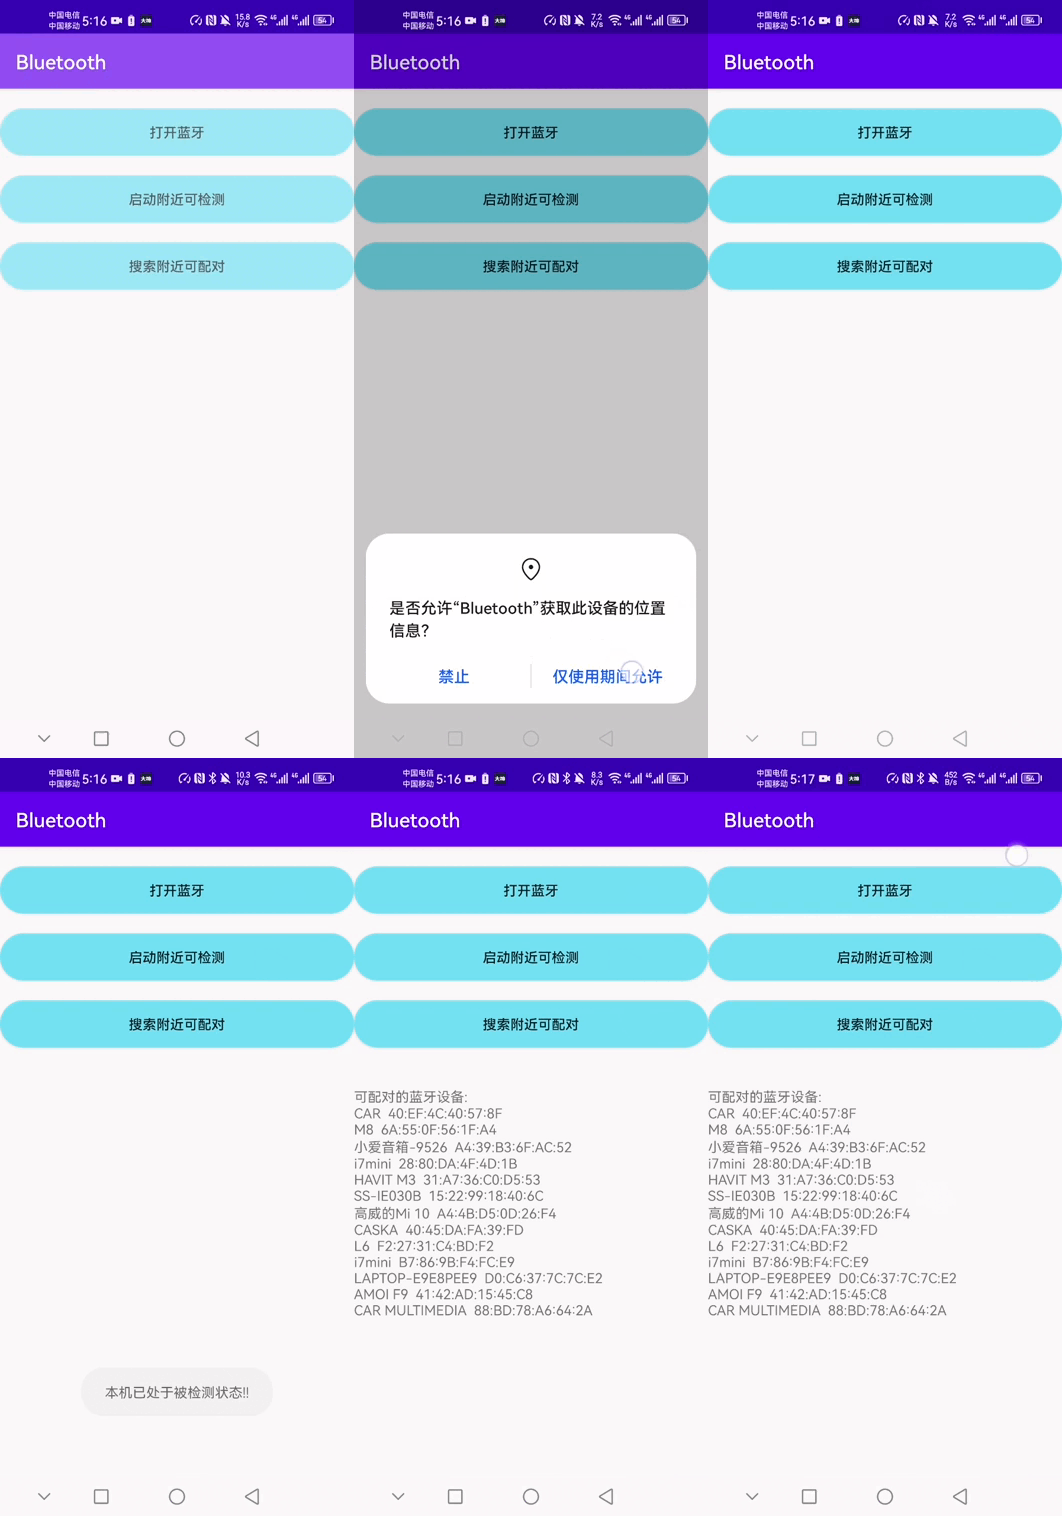
二、操作
因为进度问题,防止劝退初学者,所以此篇博客只会描述如何开启蓝牙、打开可检测设置和搜索蓝牙,关于蓝牙连接和蓝牙通信我会将TCP和UDP数据通信放在一起,综合成一篇进阶中级难度的博客。
1、权限
需要在 AndroidManifest.xml 中添加以下权限,防止开启蓝牙失败,并接收不到提醒。
<uses-permission android:name="android.permission.BLUETOOTH_ADMIN"/>
<uses-permission android:name="android.permission.BLUETOOTH"/>
<uses-permission android:name="android.permission.ACCESS_COARSE_LOCATION"/>
<uses-permission android:name="android.permission.ACCESS_FINE_LOCATION"/>
主界面.java 权限二次判断,在SDK23以上的版本都需要加上这个权限判断,要不然第一次拒绝之后,可能无法再次弹出提醒,需要用户手动开启权限。
	private void requestPermission() {
        if (Build.VERSION.SDK_INT >= 23 && !isPermissionR){
            isPermissionR = true;
            ArrayList<String> permissionsList = new ArrayList<>();
            String[] permissions = {
                    Manifest.permission.ACCESS_COARSE_LOCATION,
                    Manifest.permission.ACCESS_FINE_LOCATION,
            };
            for (String perm : permissions) {
                if (PackageManager.PERMISSION_GRANTED != ActivityCompat.checkSelfPermission(MainActivity.this,perm)) {
                    permissionsList.add(perm);
                }
            }
            if (!permissionsList.isEmpty()) {
                String[] strings = new String[permissionsList.size()];
                ActivityCompat.requestPermissions(MainActivity.this , permissionsList.toArray(strings),0);
            }
        }
    }
2、开启蓝牙
通过Intent机制发送请求,开启蓝牙。
   //获得BluetoothAdapter对象,启动API
   BluetoothAdapter bluetoothAdapter = BluetoothAdapter.getDefaultAdapter();

   //判断本机是否有蓝牙设备
   if (bluetoothAdapter == null) {
       text.setText("本机无蓝牙设备\n");
   } else if (!bluetoothAdapter.isEnabled()) {
       //若手机蓝牙未开启,将启动蓝牙设备
       Intent intent = new Intent(BluetoothAdapter.ACTION_REQUEST_ENABLE);
       //发送请求,开启蓝牙
       startActivityForResult(intent , 300);
       bluetoothAdapter.cancelDiscovery();
       requestPermission();
   } else {
       Toast.makeText(MainActivity.this , "蓝牙已开启", Toast.LENGTH_SHORT).show();
   }
3、可检测
只有打开可检测才能被其他应用所检测到。
    if (bluetoothAdapter == null || !bluetoothAdapter.isEnabled()) {
        showToast("请先开启本机蓝牙");
        return;
    }
    if (bluetoothAdapter.getScanMode() != BluetoothAdapter.SCAN_MODE_CONNECTABLE_DISCOVERABLE) {
        //不可被检测性
        Intent intent = new Intent(BluetoothAdapter.ACTION_REQUEST_DISCOVERABLE);
        //使本机可在 500秒 内可被检测到
        intent.putExtra(BluetoothAdapter.EXTRA_DISCOVERABLE_DURATION,500);
        startActivity(intent);
    } else {
        showToast("本机已处于被检测状态!!");
    }
4、搜索蓝牙
这里使用Set方法获取到蓝牙信息。
    if (bluetoothAdapter == null || !bluetoothAdapter.isEnabled()) {
        showToast("请先开启本机蓝牙");
        return;
    }
    foundInfo = "发现蓝牙设备:\n"; // 将搜索结果字符串恢复成初始值
    bluetoothAdapter.startDiscovery();
    // 收集蓝牙信息
    Set<BluetoothDevice> pairedDevices = bluetoothAdapter.getBondedDevices();
    if(pairedDevices.size()>0)
    {
        String pairedInfo = "可配对的蓝牙设备:\n";
        for(Iterator<BluetoothDevice> it = pairedDevices.iterator(); it.hasNext();)
        {
            BluetoothDevice pairedDevice = (BluetoothDevice)it.next();
            //显示出远程蓝牙设备的名字和物理地址
            pairedInfo += pairedDevice.getName()+"  "+pairedDevice.getAddress()+"\n";
        }
        text.setText(pairedInfo);
    }

	class BluetoothReceiver extends BroadcastReceiver{
    @Override
    public void onReceive(Context context, Intent intent) {
        String action = intent.getAction();
        if (BluetoothDevice.ACTION_FOUND.equals(action)) {
            //获得扫描到的远程蓝牙设备
            BluetoothDevice device = intent.getParcelableExtra(BluetoothDevice.EXTRA_DEVICE);
            foundInfo += device.getName()+"  "+device.getAddress()+"\n";
        }
        else if (BluetoothAdapter.ACTION_DISCOVERY_FINISHED.equals(action)) { //搜索结束
            if (foundInfo.equals("发现蓝牙设备:\n")) {
                Toast.makeText(MainActivity.this , "没有搜索到蓝牙设备" , Toast.LENGTH_SHORT).show();
            }
            else {
                //显示搜索结果
                text.setText(foundInfo);
                text.setMovementMethod(ScrollingMovementMethod.getInstance());
            }
        }
5、广播
广播是蓝牙检测中最重要的一环。
		//创建蓝牙广播信息
        bluetoothReceiver = new BluetoothReceiver();
        //设定广播接收的filter
        IntentFilter filter = new IntentFilter(BluetoothDevice.ACTION_FOUND);
        //注册广播接收器,当设备被发现时调用函数
        registerReceiver(bluetoothReceiver , filter);
        //设定另一事件广播
        filter = new IntentFilter(BluetoothAdapter.ACTION_DISCOVERY_FINISHED);
        //注册广播接收器
        registerReceiver(bluetoothReceiver,filter);
三、附件
1、UI界面设计
<?xml version="1.0" encoding="utf-8"?>
<LinearLayout xmlns:android="http://schemas.android.com/apk/res/android"
    xmlns:app="http://schemas.android.com/apk/res-auto"
    xmlns:tools="http://schemas.android.com/tools"
    android:layout_width="match_parent"
    android:layout_height="match_parent"
    tools:context=".MainActivity"
    android:orientation="vertical">

    <Button
        android:id="@+id/btn_kq"
        android:layout_width="match_parent"
        android:layout_height="wrap_content"
        android:layout_marginTop="20dp"
        android:text="打开蓝牙"
        android:background="@drawable/shape"/>

    <Button
        android:id="@+id/btn_jcx"
        android:layout_width="match_parent"
        android:layout_height="wrap_content"
        android:layout_marginTop="20dp"
        android:text="启动附近可检测"
        android:background="@drawable/shape"/>

    <Button
        android:id="@+id/btn_ss"
        android:layout_width="match_parent"
        android:layout_height="wrap_content"
        android:layout_marginTop="20dp"
        android:text="搜索附近可配对"
        android:background="@drawable/shape"/>

    <TextView
        android:id="@+id/bluetooth_text"
        android:layout_width="match_parent"
        android:layout_marginTop="40dp"
        android:scrollbars="vertical"
        android:fadeScrollbars="false"
        android:layout_height="wrap_content"/>

</LinearLayout>
2、总代码
public class MainActivity extends AppCompatActivity {

    private Button btnDk,btnKj,btnSs;
    private TextView text;
    private String foundInfo = null;
    //获得BluetoothAdapter对象,启动API
    BluetoothAdapter bluetoothAdapter = BluetoothAdapter.getDefaultAdapter();
    BluetoothReceiver bluetoothReceiver;
    private boolean isPermissionR = false;

    @Override
    protected void onCreate(Bundle savedInstanceState) {
        super.onCreate(savedInstanceState);
        setContentView(R.layout.activity_main);

        init();
    }

    private void init() {
        text = findViewById(R.id.bluetooth_text);
        //开启蓝牙
        btnDk = findViewById(R.id.btn_kq);
        btnDk.setOnClickListener(new View.OnClickListener() {
            @Override
            public void onClick(View v) {
                //判断本机是否有蓝牙设备
                if (bluetoothAdapter == null) {
                    text.setText("本机无蓝牙设备\n");
                } else if (!bluetoothAdapter.isEnabled()) {
                    //若手机蓝牙未开启,将启动蓝牙设备
                    Intent intent = new Intent(BluetoothAdapter.ACTION_REQUEST_ENABLE);
                    //发送请求,开启蓝牙
                    startActivityForResult(intent , 300);
                    bluetoothAdapter.cancelDiscovery();
                    requestPermission();
                } else {
                    showToast("蓝牙已开启");
                }
            }
        });

        btnKj = findViewById(R.id.btn_jcx);
        btnKj.setOnClickListener(new View.OnClickListener() {
            @Override
            public void onClick(View v) {
                if (bluetoothAdapter == null || !bluetoothAdapter.isEnabled()) {
                    showToast("请先开启本机蓝牙");
                    return;
                }
                if (bluetoothAdapter.getScanMode() != BluetoothAdapter.SCAN_MODE_CONNECTABLE_DISCOVERABLE) {
                    //不可被检测性
                    Intent intent = new Intent(BluetoothAdapter.ACTION_REQUEST_DISCOVERABLE);
                    //使本机可在 500秒 内可被检测到
                    intent.putExtra(BluetoothAdapter.EXTRA_DISCOVERABLE_DURATION,500);
                    startActivity(intent);
                } else {
                    showToast("本机已处于被检测状态!!");
                }
            }
        });

        btnSs = findViewById(R.id.btn_ss);
        btnSs.setOnClickListener(new View.OnClickListener() {
            @Override
            public void onClick(View v) {
                if (bluetoothAdapter == null || !bluetoothAdapter.isEnabled()) {
                    showToast("请先开启本机蓝牙");
                    return;
                }
                foundInfo = "发现蓝牙设备:\n"; //将搜索结果字符串恢复成初始值
                bluetoothAdapter.startDiscovery();
                Set<BluetoothDevice> pairedDevices = bluetoothAdapter.getBondedDevices();
                if(pairedDevices.size()>0)
                {
                    String pairedInfo = "可配对的蓝牙设备:\n";
                    for(Iterator<BluetoothDevice> it = pairedDevices.iterator(); it.hasNext();)
                    {
                        BluetoothDevice pairedDevice = (BluetoothDevice)it.next();
                        //显示出远程蓝牙设备的名字和物理地址
                        pairedInfo += pairedDevice.getName()+"  "+pairedDevice.getAddress()+"\n";
                    }
                    text.setText(pairedInfo);
                }
            }
        });

        //创建蓝牙广播信息
        bluetoothReceiver = new BluetoothReceiver();
        //设定广播接收的filter
        IntentFilter filter = new IntentFilter(BluetoothDevice.ACTION_FOUND);
        //注册广播接收器,当设备被发现时调用函数
        registerReceiver(bluetoothReceiver , filter);
        //设定另一事件广播
        filter = new IntentFilter(BluetoothAdapter.ACTION_DISCOVERY_FINISHED);
        //注册广播接收器
        registerReceiver(bluetoothReceiver,filter);
    }


    class BluetoothReceiver extends BroadcastReceiver{
        @Override
        public void onReceive(Context context, Intent intent) {
            String action = intent.getAction();
            if (BluetoothDevice.ACTION_FOUND.equals(action)) {
                //获得扫描到的远程蓝牙设备
                BluetoothDevice device = intent.getParcelableExtra(BluetoothDevice.EXTRA_DEVICE);
                foundInfo += device.getName()+"  "+device.getAddress()+"\n";
            }
            else if (BluetoothAdapter.ACTION_DISCOVERY_FINISHED.equals(action)) { //搜索结束
                if (foundInfo.equals("发现蓝牙设备:\n")) {
                    Toast.makeText(MainActivity.this , "没有搜索到蓝牙设备" , Toast.LENGTH_SHORT).show();
                }
                else {
                    //显示搜索结果
                    text.setText(foundInfo);
                    text.setMovementMethod(ScrollingMovementMethod.getInstance());
                }
            }
        }
    }

    public void showToast(String string) {
        Toast.makeText(MainActivity.this , string , Toast.LENGTH_SHORT).show();
    }

    private void requestPermission() {
        if (Build.VERSION.SDK_INT >= 23 && !isPermissionR){
            isPermissionR = true;
            ArrayList<String> permissionsList = new ArrayList<>();
            String[] permissions = {
                    Manifest.permission.ACCESS_COARSE_LOCATION,
                    Manifest.permission.ACCESS_FINE_LOCATION,
            };
            for (String perm : permissions) {
                if (PackageManager.PERMISSION_GRANTED != ActivityCompat.checkSelfPermission(MainActivity.this,perm)) {
                    permissionsList.add(perm);
                }
            }
            if (!permissionsList.isEmpty()) {
                String[] strings = new String[permissionsList.size()];
                ActivityCompat.requestPermissions(MainActivity.this , permissionsList.toArray(strings),0);
            }
        }
    }
}


