文章目录
- 1、了解 XML使用和布局控制
- 2、内外边距
- 3、浮动
- 4、占位符
- 5、默认样式
- 6、全局字体
1、了解 XML使用和布局控制
通过上一篇的学习我们可以制作一个简单的布局了,但是没有控件的窗口做再好的布局有什么用呀。赶紧找些素材,我们来做一个标准的 Windows 窗口。并通过这个窗口我们来了解一下布局中一些细微细节的控制。
一个常规的 Windows 窗口应该有一个像样的标题栏,标题栏左侧包含窗口的 logo 和窗口的名称,右侧有最小化、最大化和关闭按钮,还有一些窗口可能会有设置啊等等类似的按钮。我们到网络上找一些素材,亲自动手制作一个窗口。素材我们可以到 Iconfont-阿里巴巴矢量图标库 去自己下载。通过搜索功能搜索一个你喜欢的图片,比如我搜索一个 logo ,会出来很多可用的图形,随便点击一个进去后,可以设置图形的颜色:
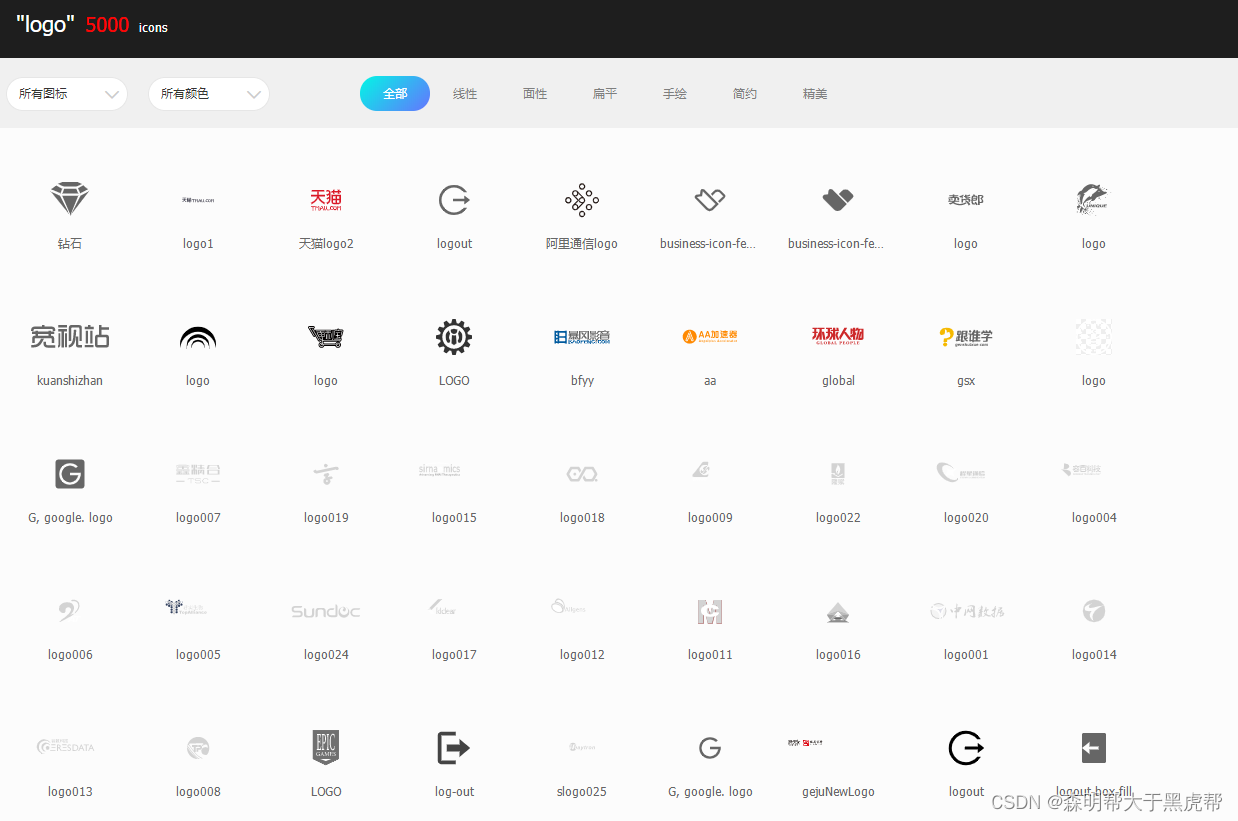
我下载了一个 PNG 小图片,大小是 32x32 像素,蓝色。将图片保存到项目的 theme 文件夹下。
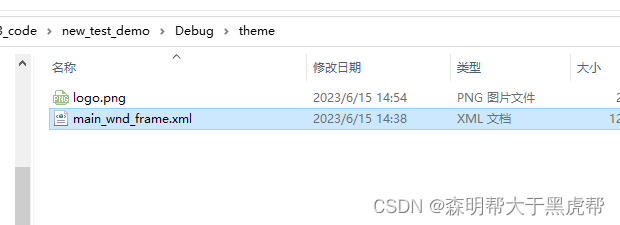
然后我们编辑 main_wnd_frame.xml,删除掉原来的 TileLayout 中所有内容,重新做一个布局,如下所示:
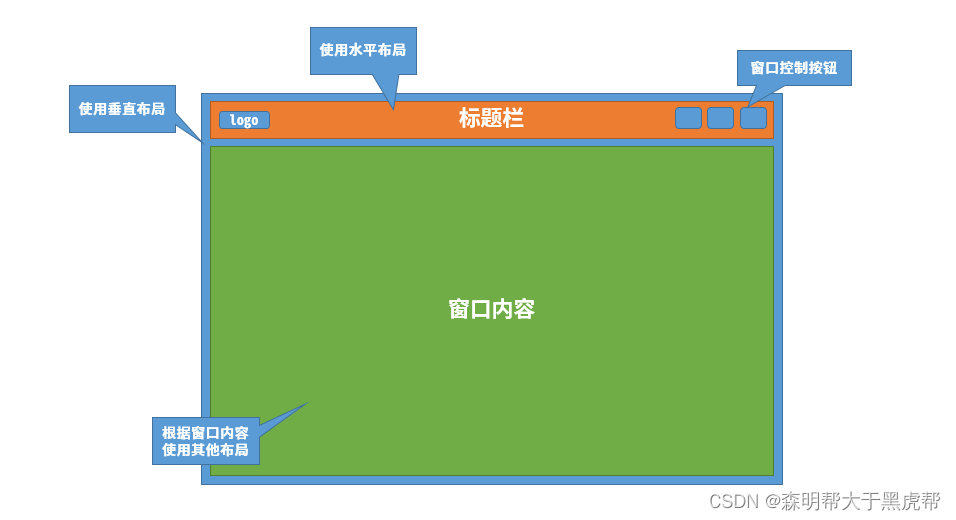
通过分析我们可以判断,最外部应该使用一个垂直布局VerticalLayout,因为标题栏和下面窗口内容区域是一个从上到下的垂直布局。而标题栏里面是从左到右的一个水平布局 HorizontalLayout。至于下方内容区域,我们暂时先不用关心,先把这个标题栏做好,所以我们还是使用一个水平布局。那么根据思路你可以先不看下面代码,自己试着写一个窗口的布局,算是对自己的一个锻炼。记得标题栏是有固定高度的,可以通过 height 属性指定 HorizontalLayout 的高度。
<?xml version="1.0" encoding="utf-8"?>
<Window size="640,480" caption="0,0,0,35">
  <VerticalLayout>
    <!--标题栏-->
    <HorizontalLayout height="35" bkcolor="#FFD6DBE9">
      <Control bkimage="logo.png" height="32" width="32" />
      <Label text="duilib tutorial" />
    </HorizontalLayout>
    <!--窗口内容区域-->
    <HorizontalLayout bkcolor="#FF4D6082">

    </HorizontalLayout>
  </VerticalLayout>
</Window>
运行代码:
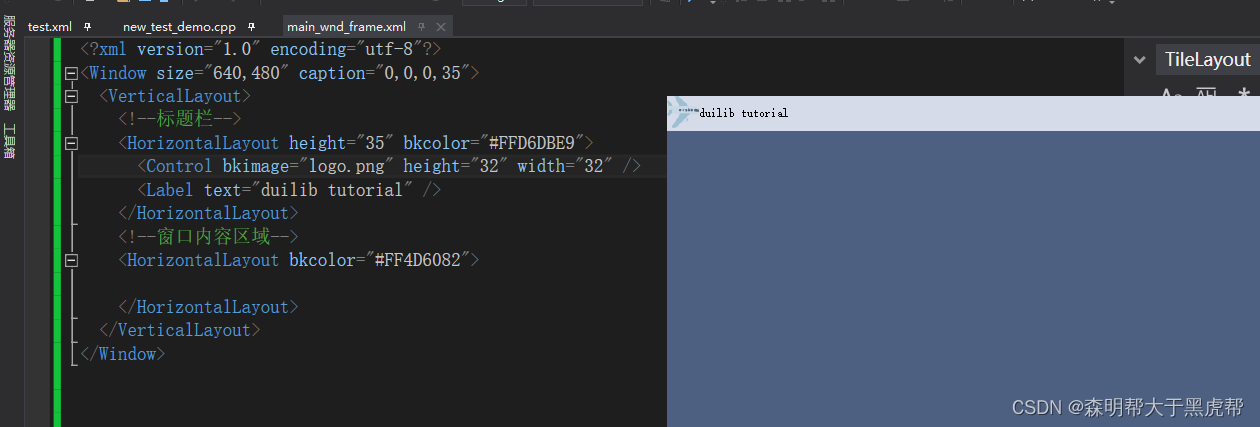
可以看到,我们给窗口分割了两个区域,一个标题栏,一个窗口内容区域,内容区域现在还没有任何内容。但是标题栏已经增加了一个 logo。其中标题栏我们用水平布局 HorizontalLayout :来实现,用 height=“35” 指定了标题栏的高度,用 bkcolor 属性指定了标题栏的背景色。接着标题栏内部我们使用 Control 控件包装的 logo 图像,使用 logobkimage=“Logo.png” 指定了图片文件的位置,并同样使用 height、width 设置了宽度和高度。这些属性在 DuiLib 属性列表**.xml** 中都是可以找到的。大家可以翻一番。
但是大家可能发现了, logo 的位置不是很好,他仅仅的挨在窗口的左上角,我们应该调整一下它的位置,让它居中显示。不过很不幸 DuiLib 好像并没有居中功能,想实现居中功能要通过布局来功能来实现,代码远远比指定一个属性要多的多。我们不通过布局方法实现难道就没有方法了吗?
2、内外边距
标题栏高度是 35,而 logo 的高度是 32,我们让 logo 图像的上方和左侧分别向下和向右移动 7~9 像素,这样 logo就可以居中显示了。通过 padding 属性可以指定容器的外边距,这里要注意,不像 Web 前端一样使用的是 margin,刚切换过来的朋友可能容易出错,所以要尤其注意。我们通过指定 padding=“8,8,0,0” 的方式,指定了 logo文件左边和上边分别有 4 个像素的边距,代码如下:
<?xml version="1.0" encoding="utf-8"?>
<Window size="640,480" caption="0,0,0,35">
  <VerticalLayout>
    <!--标题栏-->
    <HorizontalLayout height="35" bkcolor="#FFD6DBE9">
      <Control bkimage="logo.png" height="32" width="32" padding="4,4,0,0"/>
      <Label text="duilib tutorial" />
    </HorizontalLayout>
    <!--窗口内容区域-->
    <HorizontalLayout bkcolor="#FF4D6082">

    </HorizontalLayout>
  </VerticalLayout>
</Window>
此时再看一下效果基本上是上下居中显示了,而且左侧也与边缘有了写距离,看上去好看一些了。要注意,padding 的 4 个参数顺序分别是 左、上、右、下。与 Web 前端 CSS 还不一样,所以大家千万不要弄混了。
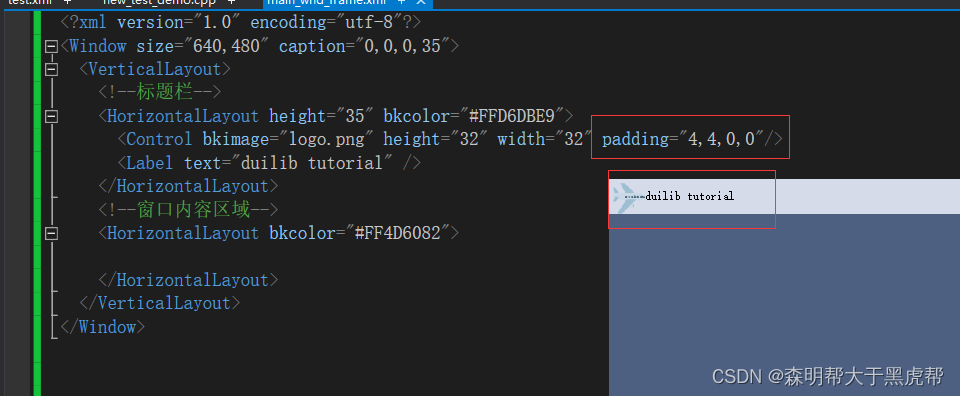
再注意 logo 和标题文字是不是挨的有点近?那么我们再给 Logo 指定一个右侧的边距,让标题“离她远点”。
<?xml version="1.0" encoding="utf-8"?>
<Window size="640,480" caption="0,0,0,35">
  <VerticalLayout>
    <!--标题栏-->
    <HorizontalLayout height="35" bkcolor="#FFD6DBE9">
      <Control bkimage="logo.png" height="32" width="32" padding="4,4,8,0"/>
      <Label text="duilib tutorial" />
    </HorizontalLayout>
    <!--窗口内容区域-->
    <HorizontalLayout bkcolor="#FF4D6082">

    </HorizontalLayout>
  </VerticalLayout>
</Window>

可以看到通过 padding 的设置我们可以实现让容器具有外边距效果,同样有外边距也会有内边距,我们设置标题栏容器的内边距同样可以实现让内容居中的方法。内容如下:
<!-- 标题栏 -->
<HorizontalLayout height="35" bkcolor="#FFD6DBE9" inset="8,8,8,0">
	<Control bkimage="Logo.png" height="18" width="18" />
	<Label text="duilib tutorial" height="18" padding="8"/>
</HorizontalLayout>
我们使用 inset 属性给外部的水平布局容器设置了左侧、上方、右侧分别 8 个像素的内边距,由于 Label 默认是填满整个容器的,所以我们要给他设置一个高度,否则会被挤下来,而且我们删除掉了 Logo 的 padding 属性,Logo 与标题之间的间距也不在了。所以这次换个方式,我们给标题文字指定了一个 padding=“8” 的属性,你会发现,如果我们不需要指定上、右、下的其他几个属性,我们仅指定填写第一个左侧的数据就可以了。这样可以让代码比较简练。效果如下:

3、浮动
除了上面的内外边距可以实现这个效果以外,我们还可以通过让控件 浮动起来 的方式,通过指定一个 pos 属性让它想在哪里就在哪里。但前提是你要通过 float 属性指定控件是一个浮动的控件。代码如下:
<?xml version="1.0" encoding="utf-8"?>
<Window size="640,480" caption="0,0,0,35">
  <VerticalLayout>
    <!--标题栏-->
    <HorizontalLayout height="35" bkcolor="#FFD6DBE9">
      <Control bkimage="logo.png" height="32" width="32" float="true" padding="4,4,8,8" />
      <Label text="duilib tutorial" height="32"  float="true" pos="40,5,185,26"/>
    </HorizontalLayout>
    <!--窗口内容区域-->
    <HorizontalLayout bkcolor="#FF4D6082">

    </HorizontalLayout>
  </VerticalLayout>
</Window>
去掉了外部水平布局容器的内边距后,我们让 Control 控件和 Label 控件都成为浮动控件,并指定他们的具体坐标。注意 pos 的第三个和第四个参数,他们决定了控件的右上角位置和右下角位置。要算上控件本身的大小,比如例子中的 Label 控件第三个参数 185,是算上了控件左侧的 45 + 控件自身宽度的总和,如下图所示:

这种方式虽然能实现功能,但是代码写起来繁琐,不容易维护,要调整一个位置要修改好多地方,非常容易出错。所以除非必要,还是建议大家少用这个浮动的功能。
接下来我们来把右侧的几个功能按钮也做一下,我们还是去找一下素材。在 Iconfont-阿里巴巴矢量图标库 搜索 min、max、close 等关键字就可以搜索到相关素材。在找素材的时候大家请注意,由于我们按钮需要三种状态的图片,一个是普通样式的,一个是鼠标悬浮状态的图片,一个是鼠标按下时的效果,三种效果我们都要找,为了区别不同效果,我使用了不同的颜色。你们也可以根据自己的需要设置不同的颜色,我分别给普通、悬浮状态和按下状态的图片命名为 btn_sub、btn_push.png、btn_close.png,如下图:

由于实在没有找到还原窗口的合适图片,所以临时找个了带了两个箭头的图片顶替了(论身边有个视觉是多么美妙的事情),4 种按钮默认只显示最小化、最大化和关闭,还原按钮只有在最大化的情况下才显示,所以默认我们让他不显示,最终代码如下:
<?xml version="1.0" encoding="utf-8"?>
<Window size="640,480" caption="0,0,0,35">
  <VerticalLayout>
    <!--标题栏-->
    <HorizontalLayout height="35" bkcolor="#FFD6DBE9" inset="4,4,8,6" >
      <Control bkimage="logo.png" height="32" width="32"   />
      <Label text="duilib tutorial" height="32"   padding="8,-2,4,0"/>
      <HorizontalLayout childpadding="3" width="100">
        <Button height="32" width="32" normalimage="btn_min_normal.png" hotimage="btn_min_hovered.png" pushedimage="btn_min_pushed.png" />
        <Button height="32" width="32" normalimage="btn_max_normal.png" hotimage="btn_max_hovered.png" pushedimage="btn_max_pushed.png" />
        <Button height="32" width="32" normalimage="btn_close_normal.png" hotimage="btn_close_hovered.png" pushedimage="btn_close_pushed.png" />
      </HorizontalLayout>
    </HorizontalLayout>
    <!--窗口内容区域-->
    <HorizontalLayout bkcolor="#FF4D6082">

    </HorizontalLayout>
  </VerticalLayout>
</Window>
- 使用 childpadding 属性指定了右侧三个按钮水平布局的子控件左右间距(如果是垂直布局那么就是上下间距)
- 使用 normalimage 属性设置控件的默认图片样式。
- 使用 hotimage 属性设置控件的鼠标悬浮状态图片。
- 使用 pushedimage 属性设置鼠标按下状态图片。
- 使用 visible 属性设置还原控件的默认显示状态(见还原按钮的最后一个属性)。
重新运行一下程序,我们可以看到三个按钮已经在右上角了。
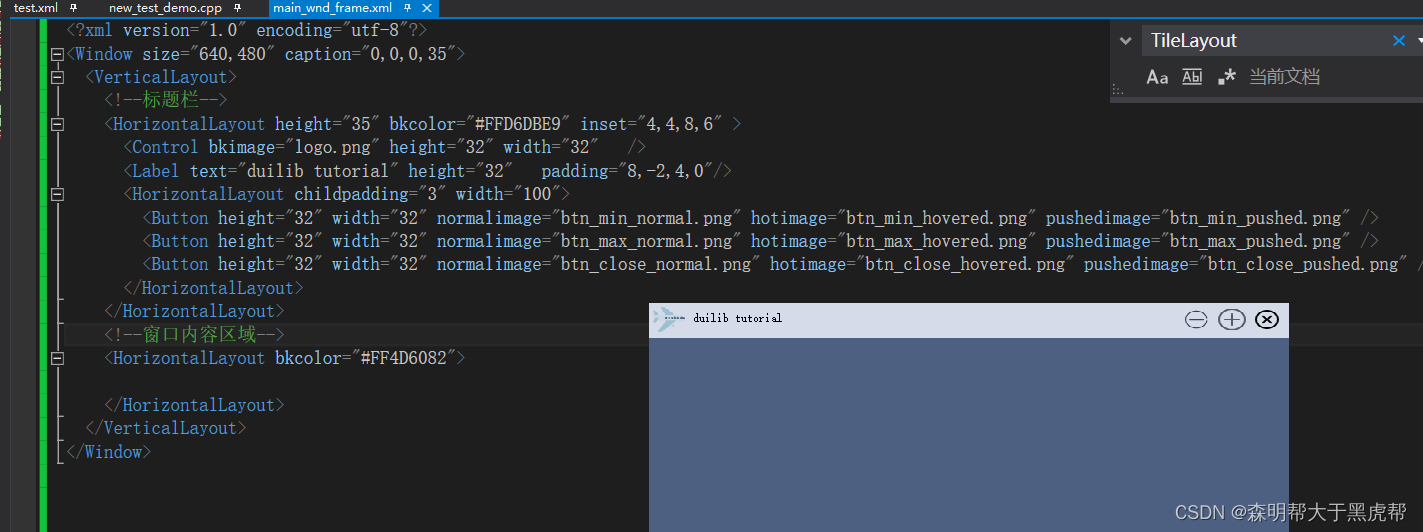
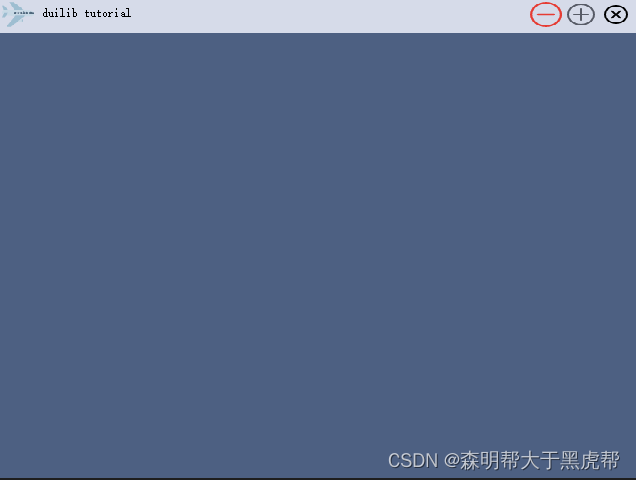
当我们鼠标按下缩小按钮时,颜色会变为红色。
4、占位符
因为我们给右侧三个按钮的水平布局容器设置了固定宽度,并且他们左边的 Label 控件是默认拉伸占满整个容器的状态,所以三个按钮的容器默认就被 “挤” 到最右侧去了。如果左边我们也设置了一个默认宽度的容器,右侧关闭按钮也被设置为固定宽度。那么布局就不是这样了,如下所示:
<?xml version="1.0" encoding="utf-8"?>
<Window size="640,480" caption="0,0,0,35">
  <VerticalLayout>
    <!--标题栏-->
    <HorizontalLayout height="35" bkcolor="#FFD6DBE9" inset="4,4,8,6" >
      <HorizontalLayout width="185">
        <Control bkimage="logo.png" height="32" width="32"   />
        <Label text="duilib tutorial" height="32"   padding="8,-2,4,0"/>
      </HorizontalLayout>
      <HorizontalLayout childpadding="3" width="100">
        <Button height="32" width="32" normalimage="btn_min_normal.png" hotimage="btn_min_hovered.png" pushedimage="btn_min_pushed.png" />
        <Button height="32" width="32" normalimage="btn_max_normal.png" hotimage="btn_max_hovered.png" pushedimage="btn_max_pushed.png" />
        <Button height="32" width="32" normalimage="btn_close_normal.png" hotimage="btn_close_hovered.png" pushedimage="btn_close_pushed.png" />
      </HorizontalLayout>
    </HorizontalLayout>
    <!--窗口内容区域-->
    <HorizontalLayout bkcolor="#FF4D6082">

    </HorizontalLayout>
  </VerticalLayout>
</Window>
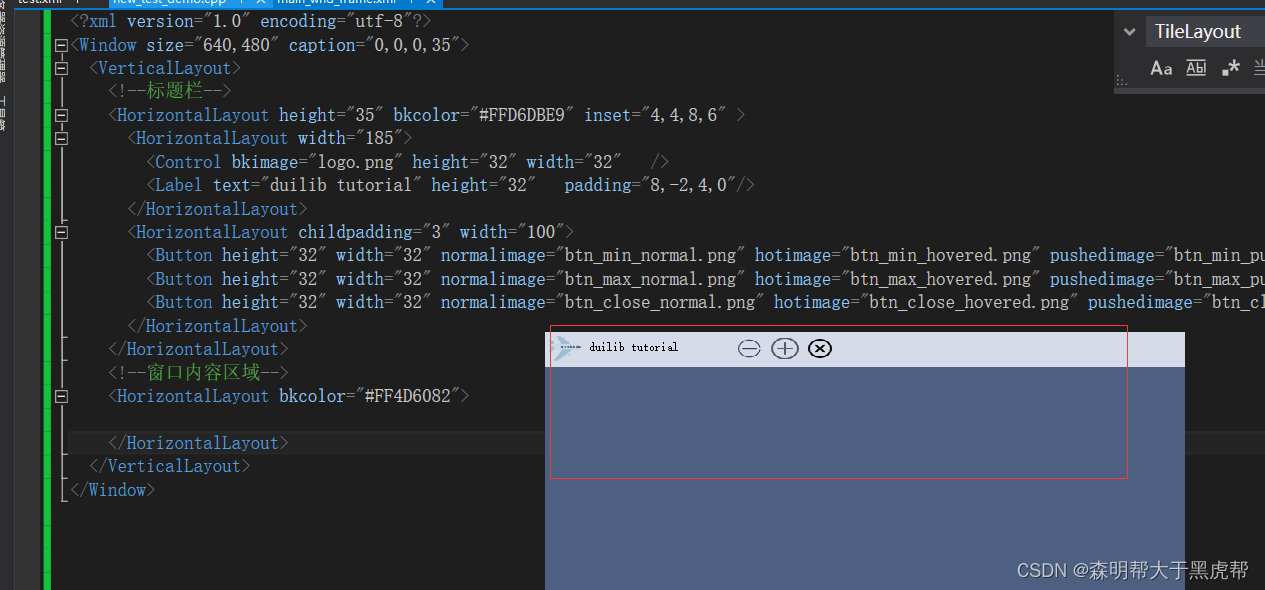
此时如果想让三个按钮靠右显示,我们可以使用 占位符 Control:
<?xml version="1.0" encoding="utf-8"?>
<Window size="640,480" caption="0,0,0,35">
  <VerticalLayout>
    <!--标题栏-->
    <HorizontalLayout height="35" bkcolor="#FFD6DBE9" inset="4,4,8,6" >
      <HorizontalLayout width="185">
        <Control bkimage="logo.png" height="32" width="32"   />
        <Label text="duilib tutorial" height="32"   padding="8,-2,4,0"/>
      </HorizontalLayout>
      <Control />
      <HorizontalLayout childpadding="3" width="100">
        <Button height="32" width="32" normalimage="btn_min_normal.png" hotimage="btn_min_hovered.png" pushedimage="btn_min_pushed.png" />
        <Button height="32" width="32" normalimage="btn_max_normal.png" hotimage="btn_max_hovered.png" pushedimage="btn_max_pushed.png" />
        <Button height="32" width="32" normalimage="btn_close_normal.png" hotimage="btn_close_hovered.png" pushedimage="btn_close_pushed.png" />
      </HorizontalLayout>
    </HorizontalLayout>
    <!--窗口内容区域-->
    <HorizontalLayout bkcolor="#FF4D6082">

    </HorizontalLayout>
  </VerticalLayout>
</Window>
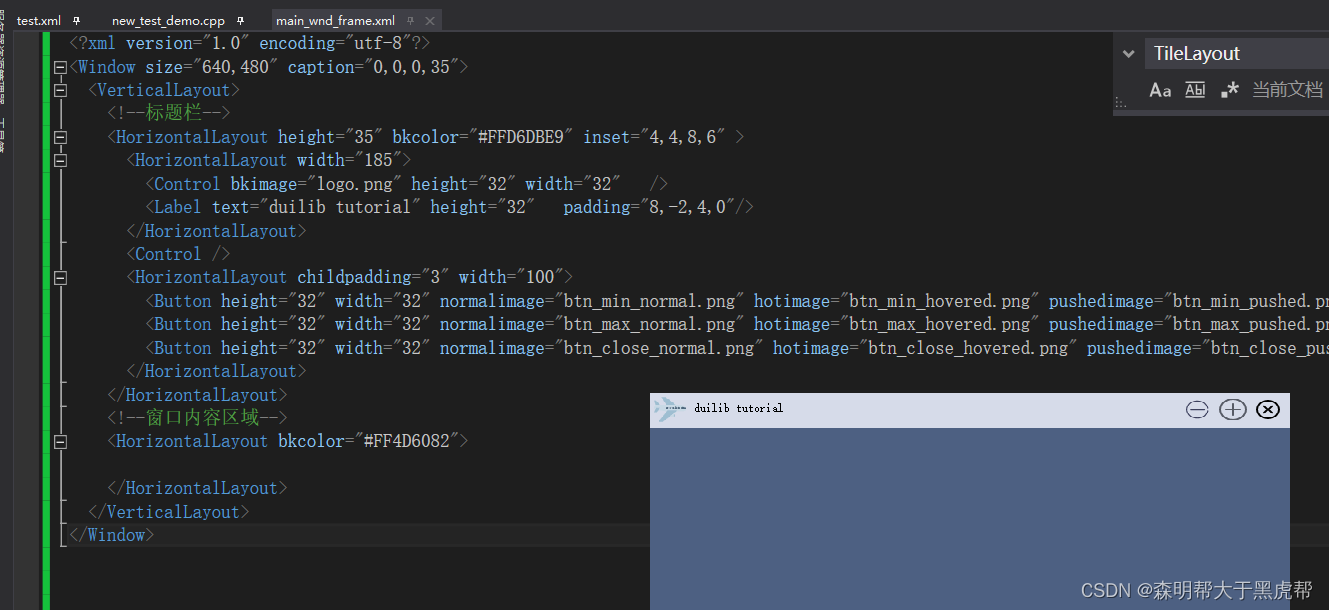
同样的代码我们只是在两个水平布局中间增加了一个空的 Control 控件,它会根据父容器的宽度无限拉伸,由于两侧的两个水平布局容器已经设置了固定宽度,那么它会 “野蛮” 的把剩下所有控件都占掉。这就是所谓的 占位符。如果你需要实现一个紧贴顶部和紧贴底部的容器,那么你可以使用垂直布局方式,中间同样增加一个占位符来实现需求。
到这里我们已经基本上把所有布局相关的内容都说的差不多了,如果还有更重要的内容我会一点点在补充。大家发现,除了之前我们构建窗口时写了一部分代码,剩下的内容都是我们通过 XML来实现的,并没有敲一行多余的代码。这就是 DuiLib,界面和业务有很大的分离性。接下来我们该看看怎么响应按钮的点击事件了。
5、默认样式
DuiLib 在 XML 语法中提供了一些默认样式功能,我们可以给指定控件预设一些默认的样式,当创建这种控件的时候,默认样式就会在其上面展现。比如我们希望所有按钮都有一个边框。那么可以像下面这样来编写 XML。
<?xml version="1.0" encoding="UTF-8"?>
<Window size="640,480" caption="0,0,0,35">
<Default name="Button" value="bordersize="3" bordercolor="#FF222222"" />
<VerticalLayout>
<!--标题栏-->
<HorizontalLayout height="50" bkcolor="#FFD6DBE9" inset="4,4,8,6" >
<HorizontalLayout width="185">
<Control bkimage="logo.png" height="32" width="32" />
<Label text="duilib tutorial" height="32" padding="8,-2,4,0" font="1" />
</HorizontalLayout>
<Control />
<HorizontalLayout childpadding="3" width="100">
<Button height="32" width="32" normalimage="btn_min_normal.png" hotimage="btn_min_hovered.png" pushedimage="btn_min_pushed.png" />
<Button height="32" width="32" normalimage="btn_max_normal.png" hotimage="btn_max_hovered.png" pushedimage="btn_max_pushed.png" />
<Button height="32" width="32" normalimage="btn_close_normal.png" hotimage="btn_close_hovered.png" pushedimage="btn_close_pushed.png" />
</HorizontalLayout>
</HorizontalLayout>
<!--窗口内容区域-->
<HorizontalLayout bkcolor="#FFD81E06">
</HorizontalLayout>
</VerticalLayout>
</Window>
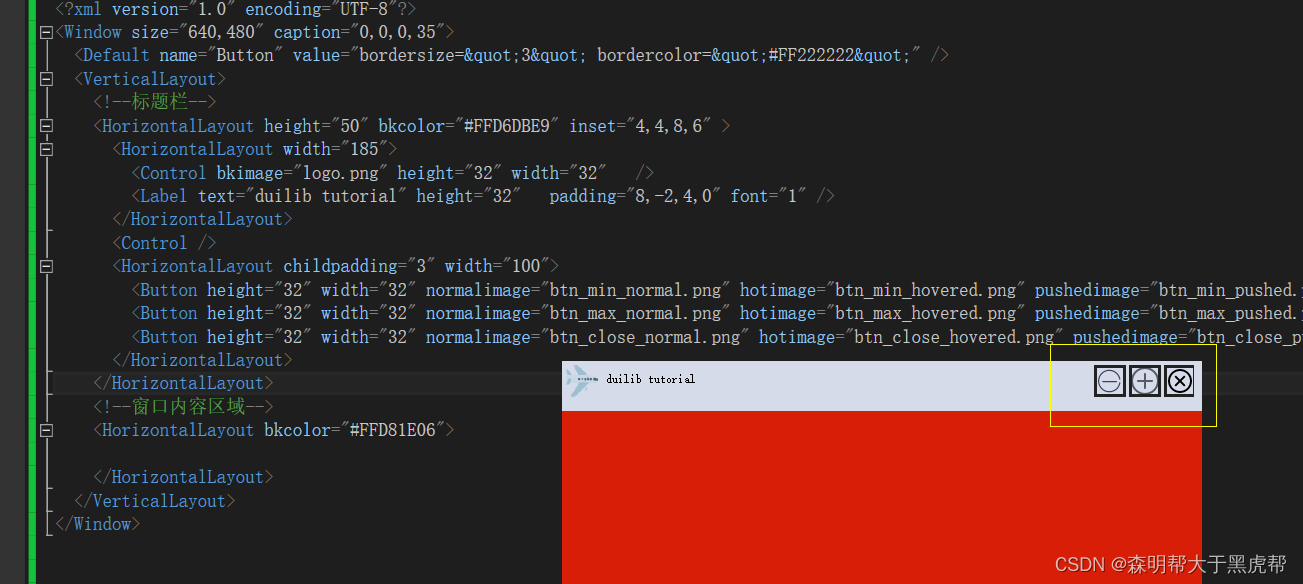
我们增加了一行:
<Default name="Button" value="bordersize="1" bordercolor="#FF222222"" />
设置其 name 属性为 “Button”,value 属性为样式描述,因为是作为 XML 的值来使用,所以双引号等要做一下转义。这也操作后,所有按钮都具备了 “bordersize=“1” bordercolor=”#FF222222" 两个属性。如下所示:
6、全局字体
像默认属性一样,全局字体也是可以让多个控件使用的一个属性,不过控件可以决定是否使用这个属性,而上面介绍的默认属性是强制的。使用方法如下:
<?xml version="1.0" encoding="UTF-8"?>
<Window size="640,480" caption="0,0,0,35">
<Default name="Button" value="bordersize="5" bordercolor="#FF222222"" />
  <Font shared="true" id="0" name="幼圆" size="12" default="true" />
  <Font shared="true" id="1" name="微软雅黑" size="18" />
<VerticalLayout>
<!--标题栏-->
<HorizontalLayout height="50" bkcolor="#FFD6DBE9" inset="4,4,8,6" >
<HorizontalLayout width="185">
<Control bkimage="logo.png" height="32" width="32" />
<Label text="duilib tutorial" height="32" padding="8,-2,4,0" font="1" />
</HorizontalLayout>
<Control />
<HorizontalLayout childpadding="3" width="100">
<Button height="32" width="32" normalimage="btn_min_normal.png" hotimage="btn_min_hovered.png" pushedimage="btn_min_pushed.png" />
<Button height="32" width="32" normalimage="btn_max_normal.png" hotimage="btn_max_hovered.png" pushedimage="btn_max_pushed.png" />
<Button height="32" width="32" normalimage="btn_close_normal.png" hotimage="btn_close_hovered.png" pushedimage="btn_close_pushed.png" />
</HorizontalLayout>
</HorizontalLayout>
<!--窗口内容区域-->
<HorizontalLayout bkcolor="#FFD81E06">
</HorizontalLayout>
</VerticalLayout>
</Window>
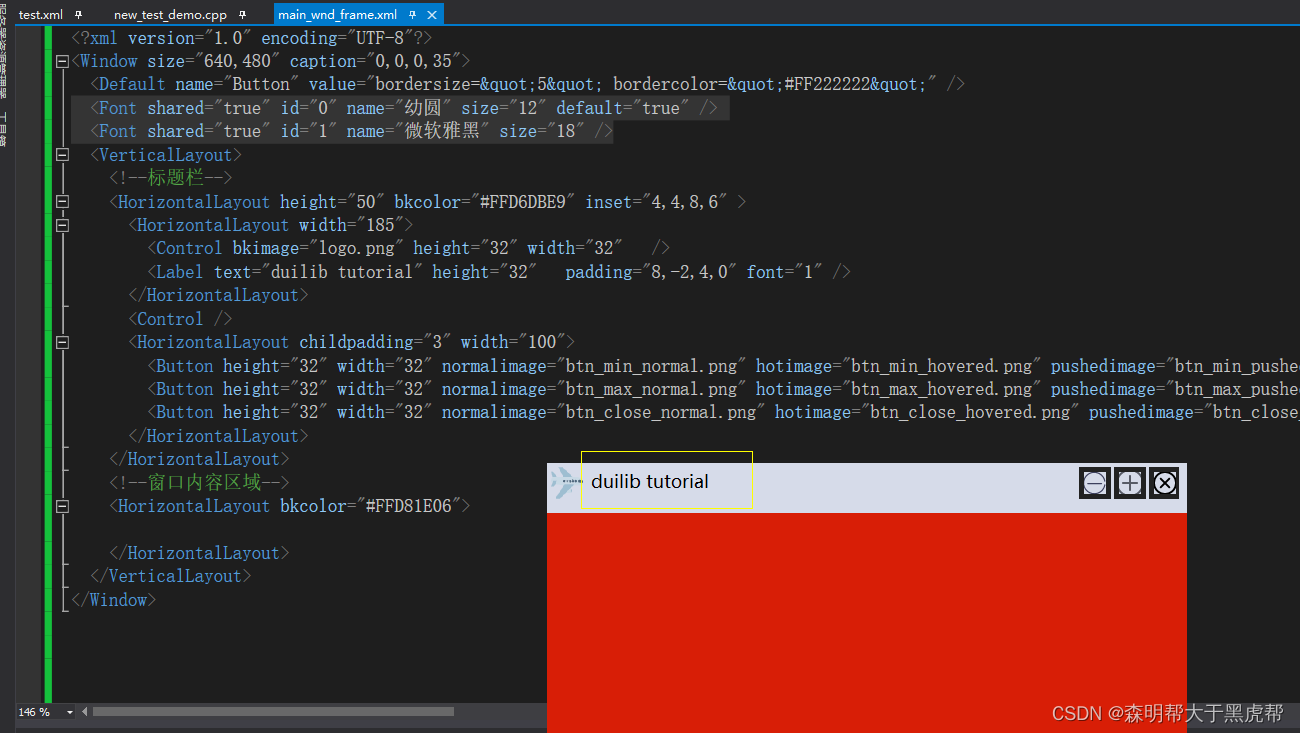
我们增加了两行:
<Font shared="true" id="0" name="幼圆" size="12" default="true" />
<Font shared="true" id="1" name="微软雅黑" size="18" />
并在标题的 Label 中增加了一个 Font=“1” 的属性,用意就是让这个 Label 使用 Font 编号为 1 的字体。而 Font 通过 id 属性指定了编号。这样再运行程序后,窗体标题就变成了微软雅黑 18 大小的字体。
Font 有如下属性可以使用
- name:字体名称。
- size:字体大小。
- bold:粗体。
- italic:斜体。
- underline:下划线。
- id:字体的编号。
- shared:是否共享。
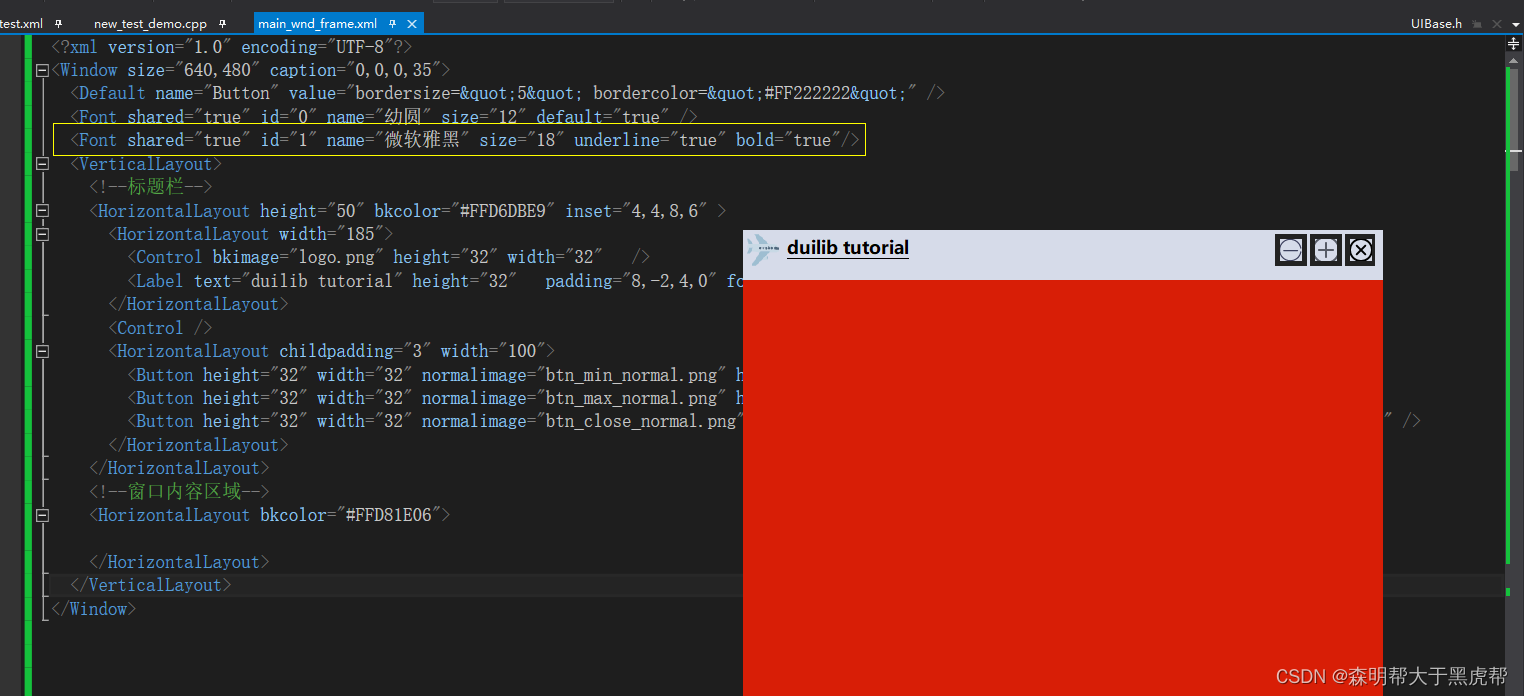
<?xml version="1.0" encoding="UTF-8"?>
<Window size="640,480" caption="0,0,0,35">
<Default name="Button" value="bordersize="5" bordercolor="#FF222222"" />
<Font shared="true" id="0" name="幼圆" size="12" default="true" />
<Font shared="true" id="1" name="微软雅黑" size="18" underline="true" bold="true"/>
<VerticalLayout>
<!--标题栏-->
<HorizontalLayout height="50" bkcolor="#FFD6DBE9" inset="4,4,8,6" >
<HorizontalLayout width="185">
<Control bkimage="logo.png" height="32" width="32" />
<Label text="duilib tutorial" height="32" padding="8,-2,4,0" font="1" />
</HorizontalLayout>
<Control />
<HorizontalLayout childpadding="3" width="100">
<Button height="32" width="32" normalimage="btn_min_normal.png" hotimage="btn_min_hovered.png" pushedimage="btn_min_pushed.png" />
<Button height="32" width="32" normalimage="btn_max_normal.png" hotimage="btn_max_hovered.png" pushedimage="btn_max_pushed.png" />
<Button height="32" width="32" normalimage="btn_close_normal.png" hotimage="btn_close_hovered.png" pushedimage="btn_close_pushed.png" />
</HorizontalLayout>
</HorizontalLayout>
<!--窗口内容区域-->
<HorizontalLayout bkcolor="#FFD81E06">
</HorizontalLayout>
</VerticalLayout>
</Window>
