本篇文章主要从事3部分
- 单个store下的文件进行使用
- 模块下进行使用(pinia不像vuex那样使用模块化了 直接在store下定义ts文件即可)
- pinia持久化使用
安装pinia : cnpm install pinia
安装持久化 cnpm install pinia-plugin-persistedstate
1.单文件: index.ts (先不要管user.ts)

index.ts
import { defineStore } from "pinia";
//定义接口限制state的类型
interface State {
  indexCount: number;
}
//const index = defineStore('index'{
//或者  id:'index'//  两种方式  这个name是store的唯一表示(自己定义名字)
const index = defineStore({
  id: "index",
  state: (): State => {
    return {
      indexCount: 10,
    };
  },
  getters: {
    // double: (state): number => state.indexCount * 2,
    double(): number {
      return this.indexCount * 2;
    },
  },
  actions: {
    increment() {
      this.indexCount++;
      return this.indexCount;
    },
  },
});

  export default index;
vue文件进行使用
<template>
  <div></div>
</template>

<script setup lang="ts">
// 引入store导出的
  import indexStore from "@/store";
  //这个就是把解构store的数据进行响应式 不然修改的时候源数据不会进行实时的更新
  import { storeToRefs } from "pinia";
  const indedex = indexStore();
  //对象解构
 const { indexCount, double } = storeToRefs(indedex);
 console.log(indexCount.value, "主入口解构的state");
 console.log(double.value, "主入口解构的getters");
</script>

<style scoped></style>

2.模块下进行使用
user.ts
import { defineStore } from "pinia";
export interface UserState {
  username: string;
}
const user = defineStore({
  id: "user",
  state(): UserState {
    return {
      username: "zhuzhu",
    };
  },
  getters: {},
  actions: {},
});
export default user;
在index.js引入
import { defineStore } from "pinia";
//引入user
import user from "./user";
interface State {
  indexCount: number;
}
const index = defineStore({
  id: "index", //  两种方式
  state: (): State => {
    return {
      indexCount: 10,
    };
  },
  getters: {
    // double: (state): number => state.indexCount * 2,
    double(): number {
      return this.indexCount * 2;
    },
  },
  actions: {
    increment() {
      this.indexCount++;
      return this.indexCount;
    },
    //修改state的属性
    revise(value:number){
     this.indexCount=value
    }
  },
});

// 导出 多文件
  export { index, user };
组件文件使用
<template>
  <div></div>
  <button @click='reviseIndexCount'>修改index模块下的indexCount</button>
</template>

<script setup lang="ts">
// 模块
  import { index, user } from "@/store";
  import { storeToRefs } from "pinia";
  //解构出来state和getters
  const { indexCount, double } = storeToRefs(index());
   const { username } = storeToRefs(user());
  //解构action方法
  const { increment ,revise} = index();


  console.log(indexCount.value, "indexCount");
    console.log(double.value, "double");
  console.log(username.value, "username");

  //直接调用action的方法即可
  console.log(increment(), "increment");
  const reviseIndexCount=()=>{
   revise(20)
  }
</script>

<style scoped></style>
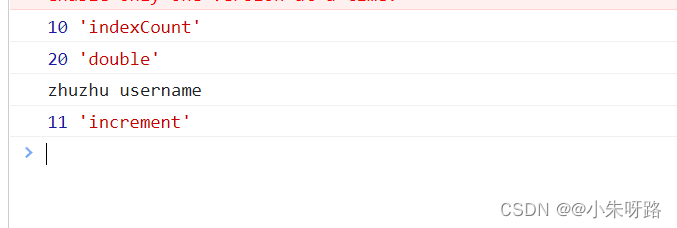
运行结果(我没运行修改的方法)
main.js引入
import { createApp } from "vue";
import { createPinia } from "pinia";
import "./style.css";
import App from "./App.vue";
const  pinia=createPinia();
createApp(App).use(pinia).mount("#app");
3.pinia数据持久化
import { defineStore } from "pinia";
import user from "./user";
import type { UserState } from "./user";
interface State {
  indexCount: number;
}
const index = defineStore({
  id: "index", //  两种方式
  state: (): State => {
    return {
      indexCount: 10,
    };
  },
  getters: {
    // double: (state): number => state.indexCount * 2,
    double(): number {
      return this.indexCount * 2;
    },
  },
  actions: {
    increment() {
      this.indexCount++;
      return this.indexCount;
    },
    //修改state的属性
    revise(value:number){
     this.indexCount=value
    }
  },
   // 所有数据持久化 存在localstore
    // persist: true,
  persist: {
    // 修改存储中使用的键名称,默认为当前 Store的 id
    key: "storekey", // 修改为 sessionStorage,默认为 localStorage
    storage: window.sessionStorage,
    // 部分持久化状态的点符号路径数组,[]意味着没有状态被持久化(默认为undefined,持久化整个状态)
    paths: ["indexCount"],
  },
});
/
// 导出 多文件
export { index, user };
main.js引入pinia持久化
import { createApp } from "vue";
import { createPinia } from "pinia";
import piniaPluginPersistedstate from 'pinia-plugin-persistedstate'
import "./style.css";
import App from "./App.vue";
const pinia=createPinia();
pinia.use(piniaPluginPersistedstate)
createApp(App).use(pinia).mount("#app");

