在本文中,我们将介绍纹理的基础知识。在之前的文章中,我们介绍了 将数据传递到着色器的主要方法,它们是inter-stage variables, uniforms, storage-buffers, and vertex-buffers。将数据传递到着色器的最后一种主要方式是纹理。
纹理通常表示二维图像。二维图像只是颜色值的二维数组,因此您可能想知道,为什么需要二维数组的纹理?可以将存储缓冲区用作二维数组。纹理的特别之处在于它们可以通过称为采样器的特殊硬件访问。采样器最多可以读取纹理中的 16 个不同值,并将它们以某种方式混合在一起,这对许多常见用例非常有用。( A sampler can read up to 16 different values in a texture and blend them together in a way that is useful for many common use cases.)
举个例子,假设我想绘制一个大于其原始尺寸的二维图像。
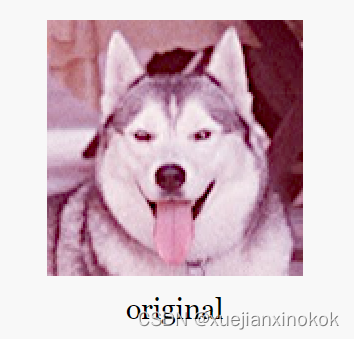
如果只是简单地从原始图像中取出一个像素来制作更大图像中的每个像素,效果是下面的第一个un-filtered示例。如果相反,对于较大图像中的给定像素,我们考虑原始图像中的多个像素,我们可以获得如下图 filtered 所示的结果,它应该有较少的马赛克。
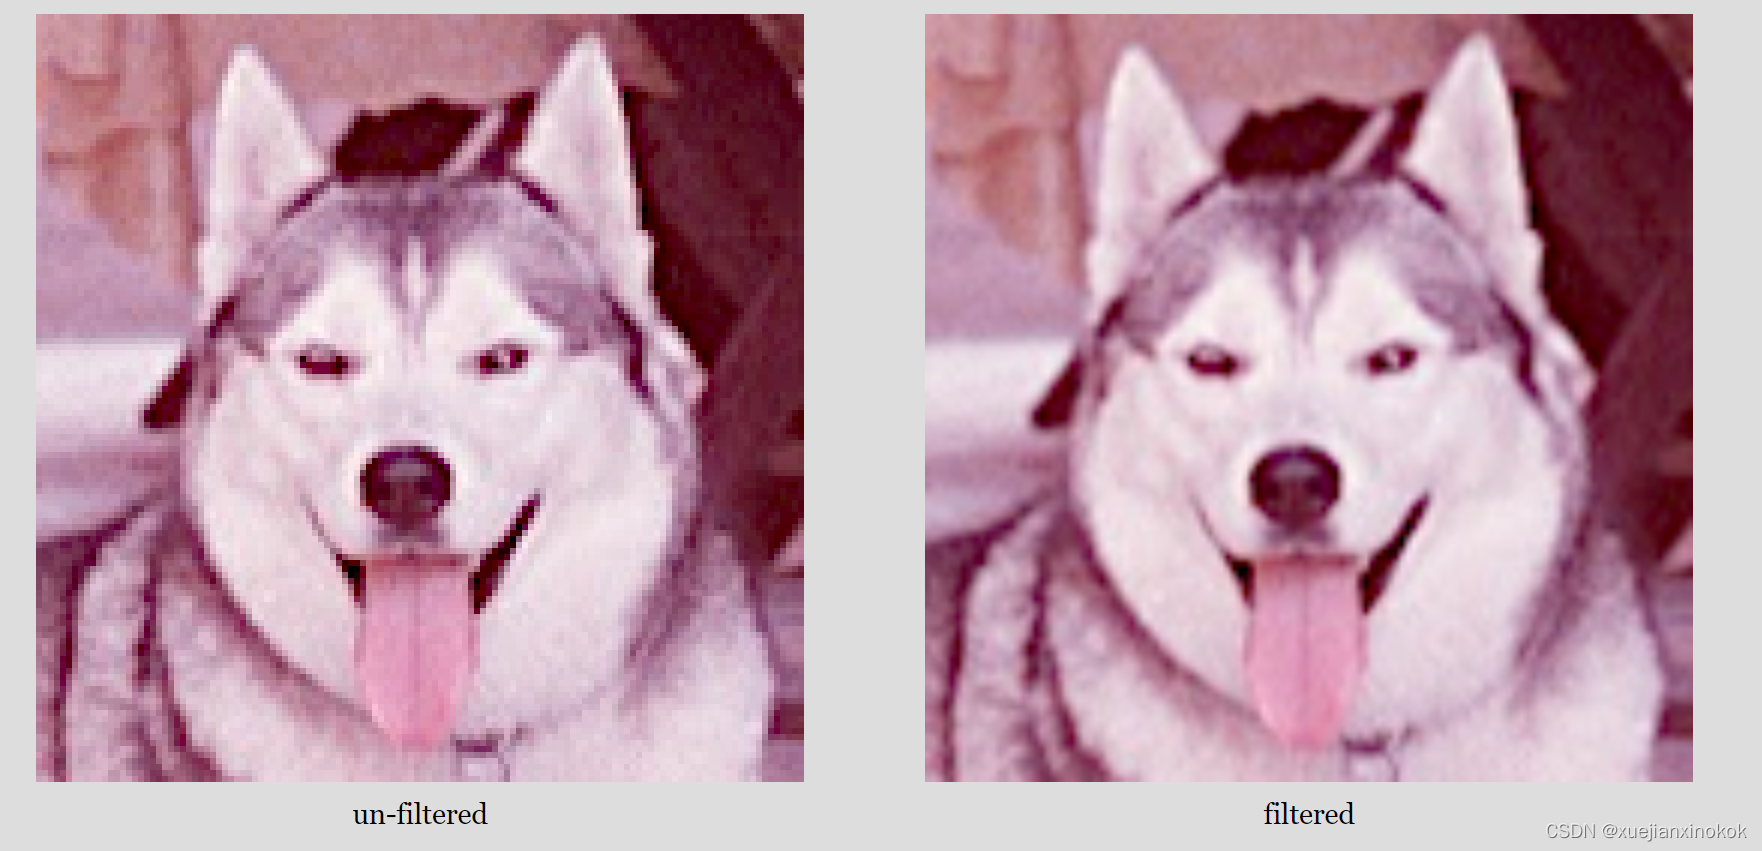
虽然有 WGSL 函数可以从纹理中获取单个像素,并且有一些用例,但这些函数并不是那么有趣,因为我们可以对存储缓冲区做同样的事情。有趣的 WGSL 纹理函数是过滤(filter )和混合( blend)多个像素的函数。
这些 WGSL 函数
第一个参数是要采样的纹理。第二个参数是指定如何采样纹理的采样器。第三个是采样位置的纹理坐标。
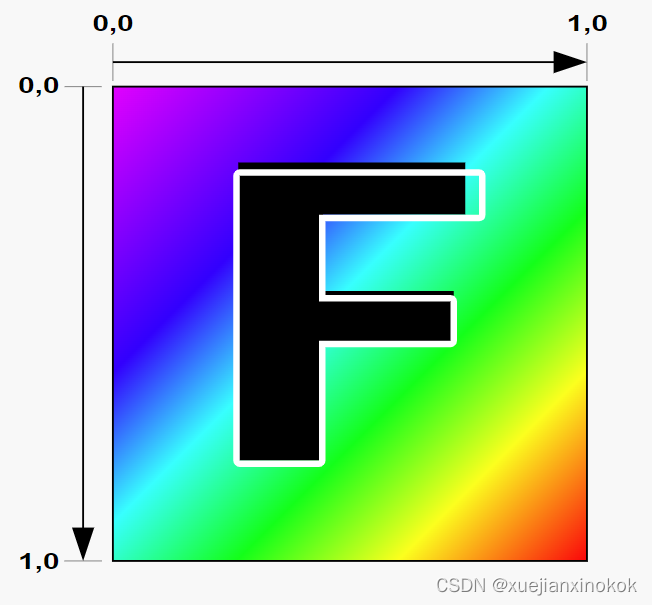
无论纹理的实际大小如何,采样纹理的纹理坐标从 0.0 到 1.0。 [注释1]
让我们从有关阶段间变量的文章中获取我们的示例之一,并将其修改为绘制带有纹理的四边形(2 个三角形)。
struct OurVertexShaderOutput {
  @builtin(position) position: vec4f,
  //@location(0) color: vec4f,
  @location(0) texcoord: vec2f,
};

@vertex fn vs(
  @builtin(vertex_index) vertexIndex : u32
) -> OurVertexShaderOutput {
  //var pos = array<vec2f, 3>(
  //  vec2f( 0.0,  0.5),  // top center
  //  vec2f(-0.5, -0.5),  // bottom left
  //  vec2f( 0.5, -0.5)   // bottom right
  //);
 // var color = array<vec4f, 3>(
 //   vec4f(1, 0, 0, 1), // red
 //   vec4f(0, 1, 0, 1), // green
 //   vec4f(0, 0, 1, 1), // blue
 // );
  var pos = array<vec2f, 6>(
    // 1st triangle
    vec2f( 0.0,  0.0),  // center
    vec2f( 1.0,  0.0),  // right, center
    vec2f( 0.0,  1.0),  // center, top

    // 2st triangle
    vec2f( 0.0,  1.0),  // center, top
    vec2f( 1.0,  0.0),  // right, center
    vec2f( 1.0,  1.0),  // right, top
  );

  var vsOutput: OurVertexShaderOutput;
  //vsOutput.position = vec4f(pos[vertexIndex], 0.0, 1.0);
  //vsOutput.color = color[vertexIndex];
  let xy = pos[vertexIndex];
  vsOutput.position = vec4f(xy, 0.0, 1.0);
  vsOutput.texcoord = xy; //顶点插值
  return vsOutput;
}

@group(0) @binding(0) var ourSampler: sampler;// 采样器
@group(0) @binding(1) var ourTexture: texture_2d<f32>;

@fragment fn fs(fsInput: OurVertexShaderOutput) -> @location(0) vec4f {
  //return fsInput.color;
  return textureSample(ourTexture, ourSampler, fsInput.texcoord);
}
上面我们从绘制 居中 三角形的 3 个顶点更改为在画布 右上角 绘制四边形的 6 个顶点。
而且更改了 OutVertexShaderOutput 以传递 texcoord , vec2f 以便可以将纹理坐标(在顶点色器生成)传递给片段着色器。更改了顶点着色器以将 vsOutput.texcoord 设置为与从硬编码位置数组中提取的剪辑空间位置相同。当传递给片段着色器时, vsOutput.texcoord 将在每个三角形的 3 个顶点之间进行插值。
然后我们声明了一个采样器和纹理,并在我们的 片段着色器 中引用它们。函数 textureSample 对纹理进行采样。第一个参数是要采样的纹理。第二个参数是指定如何采样纹理的采样器。第三个是采样位置的纹理坐标。
注意:将位置值作为纹理坐标传递并不常见,但在单位四边形(1 单位四边形)的这种特殊情况下,恰好我们需要的纹理坐标与位置匹配。这样做可以使示例更小更简单。通过顶点缓冲区提供纹理坐标会更常见。
现在我们需要创建一个纹理数据。我们将制作一个 5x7 纹素 F [注释2]
  const kTextureWidth = 5;
  const kTextureHeight = 7;
  const _ = [255,   0,   0, 255];  // red
  const y = [255, 255,   0, 255];  // yellow
  const b = [  0,   0, 255, 255];  // blue
  const textureData = new Uint8Array([
    b, _, _, _, _,
    _, y, y, y, _,
    _, y, _, _, _,
    _, y, y, _, _,
    _, y, _, _, _,
    _, y, _, _, _,
    _, _, _, _, _,
  ].flat());
希望您可以在其中看到 F 以及左上角的蓝色纹素(第一个值)。
我们将创建一个 rgba8unorm 纹理。 rgba8unorm 表示纹理将具有红色、绿色、蓝色和 alpha 值。每个值都是 8 位无符号的,并且在纹理中使用时将被归一化。 unorm 表示 unsigned normalized ,这是一种奇特的说法,表示值将从值(0 到 255)的无符号字节转换为值(0.0 到 1.0)的浮点值。
也就是说,如果在纹理中输入的值是 [64, 128, 192, 255] ,那么着色器中的值最终将是 [64 / 255, 128 / 255, 192 / 255, 255 / 255] ,或者换一种说法是 [0.25, 0.50, 0.75, 1.00]
现在有了制作纹理所需的数据
  const texture = device.createTexture({
    size: [kTextureWidth, kTextureHeight],
    format: 'rgba8unorm',
    usage: GPUTextureUsage.TEXTURE_BINDING | GPUTextureUsage.COPY_DST,
  });
对于 device.createTexture , size 参数应该很明显。格式是上面提到的 rgba8unorm 。对于 usage , GPUTextureUsage.TEXTURE_BINDING 表示我们希望能够将此纹理绑定到绑定组 [注释3] 和 COPY_DST 表示希望能够将数据复制到它。
接下来需要这样做并将数据复制到它。
  device.queue.writeTexture(
      { texture },
      textureData,
      { bytesPerRow: kTextureWidth * 4 },
      { width: kTextureWidth, height: kTextureHeight },
  );
对于 device.queue.writeTexture ,第一个参数是要更新的纹理。第二个是要复制给它的数据。第三个定义了在将数据复制到纹理时如何读取该数据。 bytesPerRow 指定从源数据的一行到下一行要获取多少字节。最后,最后一个参数指定副本的大小。
我们还需要做一个采样器
const sampler = device.createSampler();
需要将纹理和采样器都添加到一个绑定组中,该绑定组的绑定与放入着色器中的 @binding(?) 相匹配。
  const bindGroup = device.createBindGroup({
    layout: pipeline.getBindGroupLayout(0),
    entries: [
      { binding: 0, resource: sampler },
      { binding: 1, resource: texture.createView() },
    ],
  });
要更新我们的渲染,需要指定绑定组并渲染 6 个顶点以渲染由 2 个三角形组成的四边形。
    const pass = encoder.beginRenderPass(renderPassDescriptor);
    pass.setPipeline(pipeline);
    pass.setBindGroup(0, bindGroup);
    //pass.draw(3);  // call our vertex shader 3 times
    pass.draw(6);  // call our vertex shader 6 times
    pass.end();
运行它我们得到这个
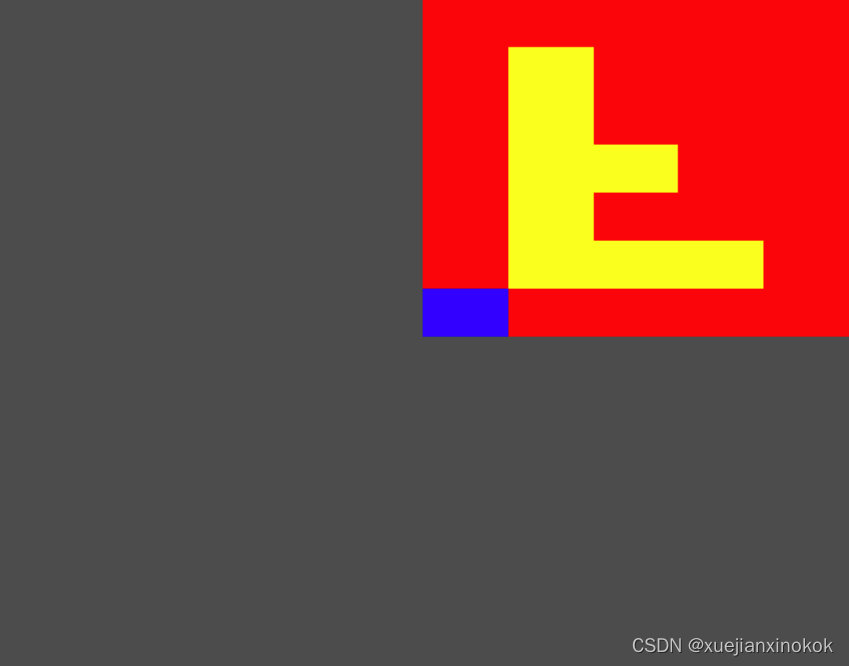
为什么F是倒过来的?
如果您返回并再次参考纹理坐标图,您可以看到纹理坐标 0,0 引用了纹理的第一个纹素。我们四边形画布中心的位置是 0,0,我们使用该值作为纹理坐标,所以它按照图表显示的方式进行操作,0,0 纹理坐标引用第一个蓝色纹素。
要解决此问题,有两种常见的解决方案。
- 翻转纹理坐标
在这个例子中,我们可以改变顶点着色器中的纹理坐标
  //vsOutput.texcoord = xy;
  vsOutput.texcoord = vec2f(xy.x, 1.0 - xy.y);
或片段着色器
  //return textureSample(ourTexture, ourSampler, fsInput.texcoord);
  let texcoord = vec2f(fsInput.texcoord.x, 1.0 - fsInput.texcoord.y);
  return textureSample(ourTexture, ourSampler, texcoord);
当然,如果我们通过顶点缓冲区或存储缓冲区提供纹理坐标,那么理想情况下我们会在源头翻转它们。
- 翻转纹理数据
 const textureData = new Uint8Array([
  // b, _, _, _, _,
  // _, y, y, y, _,
  // _, y, _, _, _,
  // _, y, y, _, _,
  // _, y, _, _, _,
  // _, y, _, _, _,
  // _, _, _, _, _,
   _, _, _, _, _,
   _, y, _, _, _,
   _, y, _, _, _,
   _, y, y, _, _,
   _, y, _, _, _,
   _, y, y, y, _,
   b, _, _, _, _,
 ].flat());
一旦我们翻转了数据,以前在顶部的数据现在在底部,现在原始图像的左下角像素是纹理中的第一个数据,现在纹理坐标 0,0 指的是什么。这就是为什么纹理坐标通常被认为是从底部的 0 到顶部的 1。

翻转数据非常普遍,甚至可以在从图像、视频和画布加载纹理时为您翻转数据。
1. magFilter
In the example above we use a sampler with its default settings. Since we are drawing the 5x7 texture larger than it’s original 5x7 texels the sampler uses what’s called the magFilter or, the filter used when magnifying the texture. If we change it from nearest to to linear then it will linearly interpolate between 4 pixels.
在上面的示例中,我们使用的采样器是默认设置。由于我们绘制的 5x7 纹理(即生成的图片)大于其原始 5x7 纹素(原始文素只是5x7,但基于此生成的图片尺寸大于5x7),因此采样器使用所谓的 magFilter 或使用纹理时进行放大过滤。如果将它从 nearest 更改为 linear ,那么它将在 4 个像素之间进行线性插值。
(从小图生成大图时需要放大处理,需要像素插值。参考上边的二哈图像)
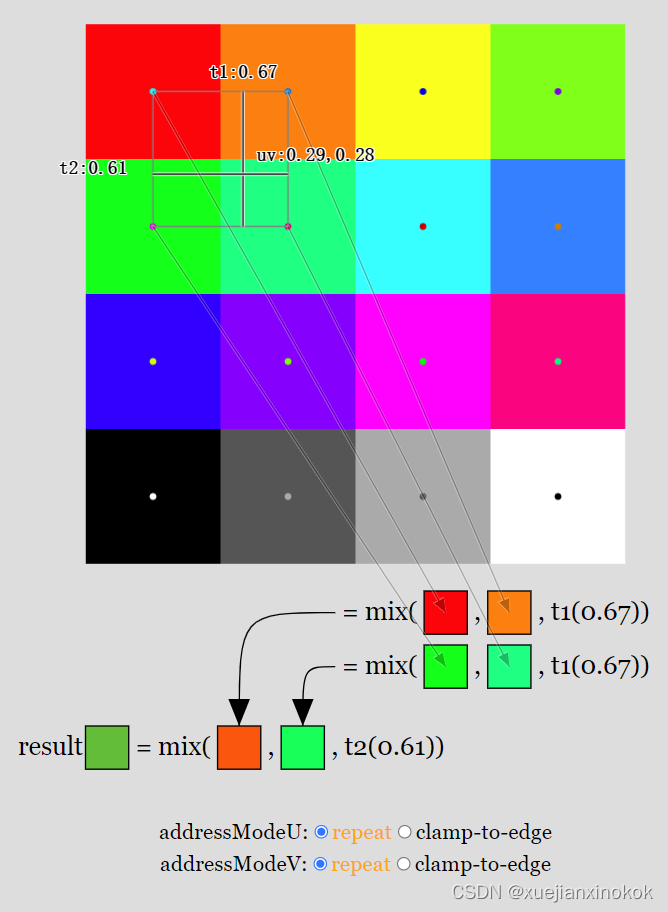
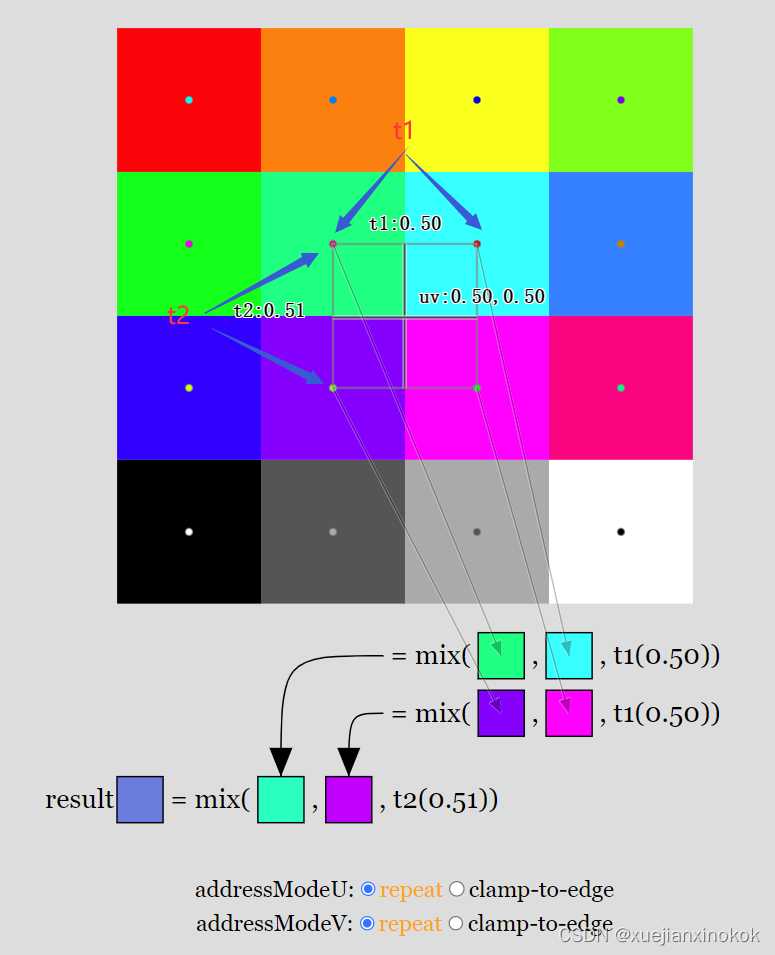
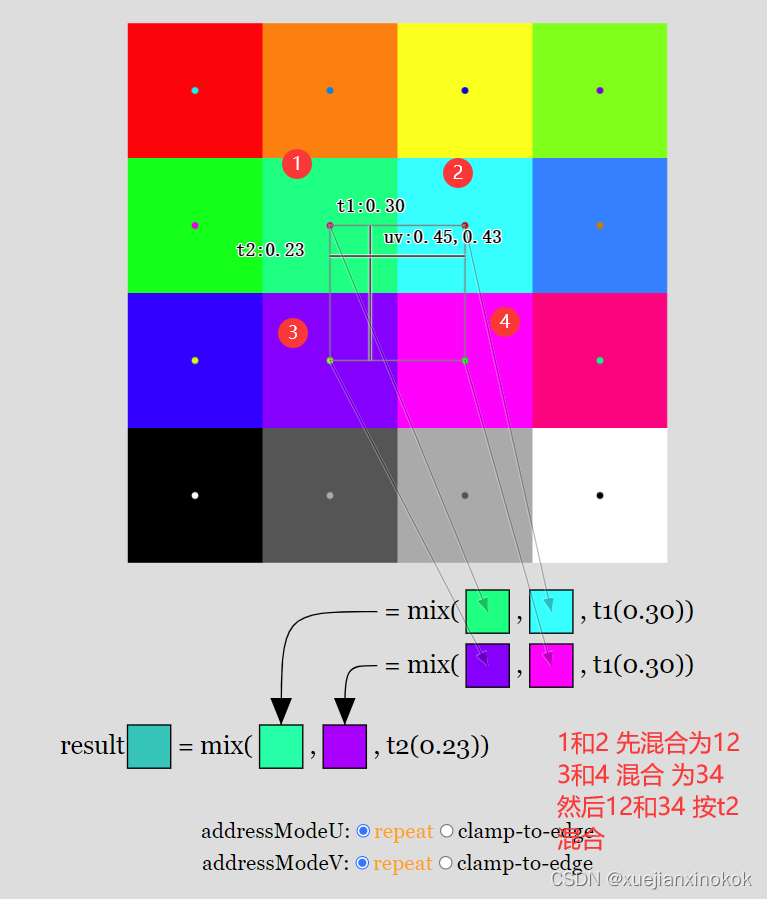
纹理坐标通常称为“UV”(发音为 you-vees),因此在上图中, uv 是纹理坐标。对于给定的 uv,选择最近的 4 个像素。 t1 是左上角所选像素的中心与其右上角中心的像素之间的水平距离,其中 0 表示我们水平位于左侧像素的中心,1 表示我们水平位于右侧所选像素的中心。 t2 类似但垂直(t2 是左上角所选像素中心与左下角像素中心的距离)。
t1 用于在 上边2 个像素之间“混合(mix)”以产生中间颜色。混合(mix)在 2 个值之间线性插值,因此当 t1 为 0 时,结果仅是第一个颜色。当 t1 = 1 时,结果只得到第二个颜色。 0 到 1 之间的值会产生比例混合。例如 0.3 将是第一个颜色的 70% 和第个种颜色的 30%。类似地,为下边的 2 个像素计算第二个中间颜色。最后, t2 用于将两种中间色混合成最终色。
Another thing to notice, at the bottom of the diagram are 2 more sampler settings, addressModeU and addressModeV. We can set these to repeat or clamp-to-edge [4]. When set to ‘repeat’, when our texture coordinate is within half a texel of the edge of the texture we wrap around and blend with pixels on the opposite side of the texture. When set to ‘clamp-to-edge’, for the purposes of calculating which color to return, the texture coordinate is clamped so that it can’t go into the last half texel on each edge. This has the effect of showing the edge colors for any texture coordinate that outside that range.
另一件需要注意的事情是,在图表的底部还有 2 个采样器设置, addressModeU 和 addressModeV 。我们可以将它们设置为 repeat 或 clamp-to-edge [注释4] 。当设置为“repeat”时,当纹理坐标在纹理边缘的半个纹素内时,我们环绕并与纹理另一侧的像素混合。当设置为“clamp-to-edge”时,为了计算要返回的颜色,纹理坐标被固定,因此它不能进入每条边的最后一半纹素。这具有显示该范围之外的任何纹理坐标的边缘颜色的效果。
让我们更新示例,以便我们可以使用所有这些选项绘制四边形。
首先让我们为每个设置组合创建一个采样器。我们还将创建一个使用该采样器的绑定组。
  const bindGroups = [];
  for (let i = 0; i < 8; ++i) {
   // const sampler = device.createSampler();
   const sampler = device.createSampler({
      addressModeU: (i & 1) ? 'repeat' : 'clamp-to-edge',
      addressModeV: (i & 2) ? 'repeat' : 'clamp-to-edge',
      magFilter: (i & 4) ? 'linear' : 'nearest',
    });

    const bindGroup = device.createBindGroup({
      layout: pipeline.getBindGroupLayout(0),
      entries: [
        { binding: 0, resource: sampler },
        { binding: 1, resource: texture.createView() },
      ],
    });
    bindGroups.push(bindGroup);
  }
我们将进行一些设置
  const settings = {
    addressModeU: 'repeat',
    addressModeV: 'repeat',
    magFilter: 'linear',
  };
在渲染时,我们将查看设置以决定使用哪个绑定组。
  function render() {
    const ndx = (settings.addressModeU === 'repeat' ? 1 : 0) +
                (settings.addressModeV === 'repeat' ? 2 : 0) +
                (settings.magFilter === 'linear' ? 4 : 0);
    const bindGroup = bindGroups[ndx];
   ...
现在我们需要做的就是提供一些 UI 来让我们更改设置,当设置更改时我们需要重新渲染。我正在使用一个名为“muigui”的库,它目前有一个类似于 dat.GUI 的 API
import GUI from '/3rdparty/muigui-0.x.module.js';

...

  const settings = {
    addressModeU: 'repeat',
    addressModeV: 'repeat',
    magFilter: 'linear',
  };

  const addressOptions = ['repeat', 'clamp-to-edge'];
  const filterOptions = ['nearest', 'linear'];

  const gui = new GUI();
  Object.assign(gui.domElement.style, {right: '', left: '15px'});
  gui.add(settings, 'addressModeU', addressOptions).onChange(render);
  gui.add(settings, 'addressModeV', addressOptions).onChange(render);
  gui.add(settings, 'magFilter', filterOptions).onChange(render);
上面的代码声明了 settings ,然后创建了一个 ui 来设置它们,并在它们发生变化时调用 render 。
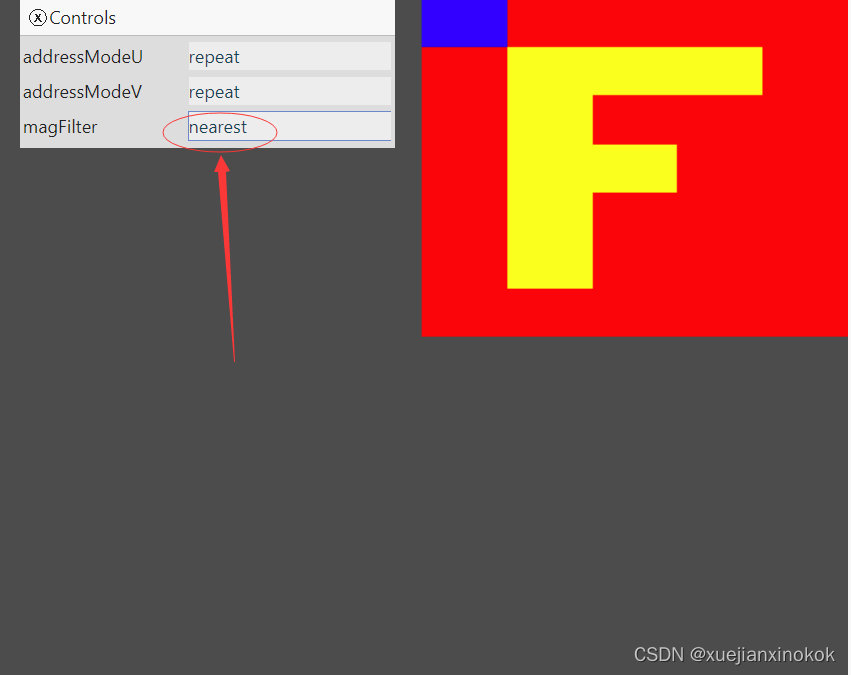
nearest 插值效果
linear 插值效果
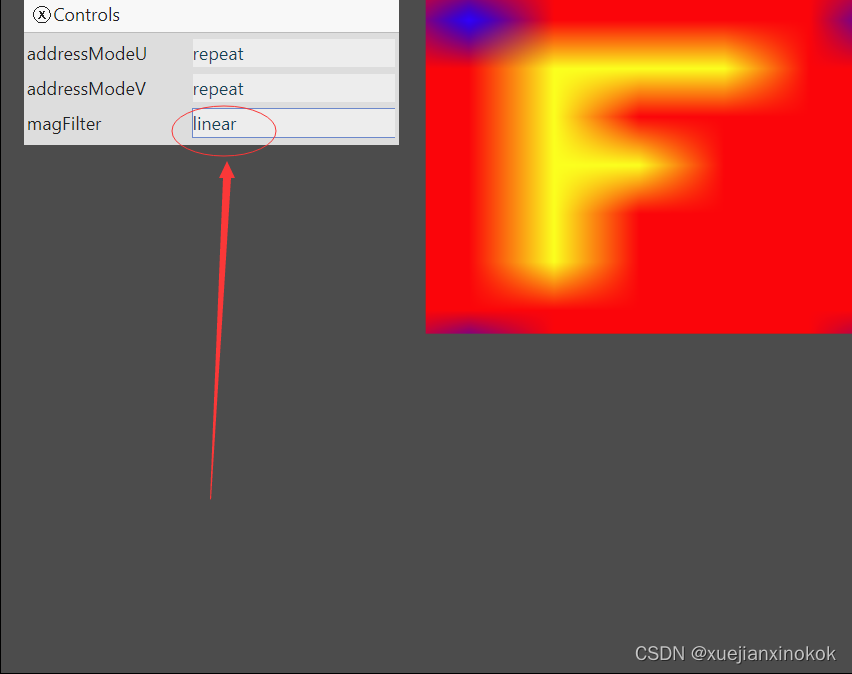
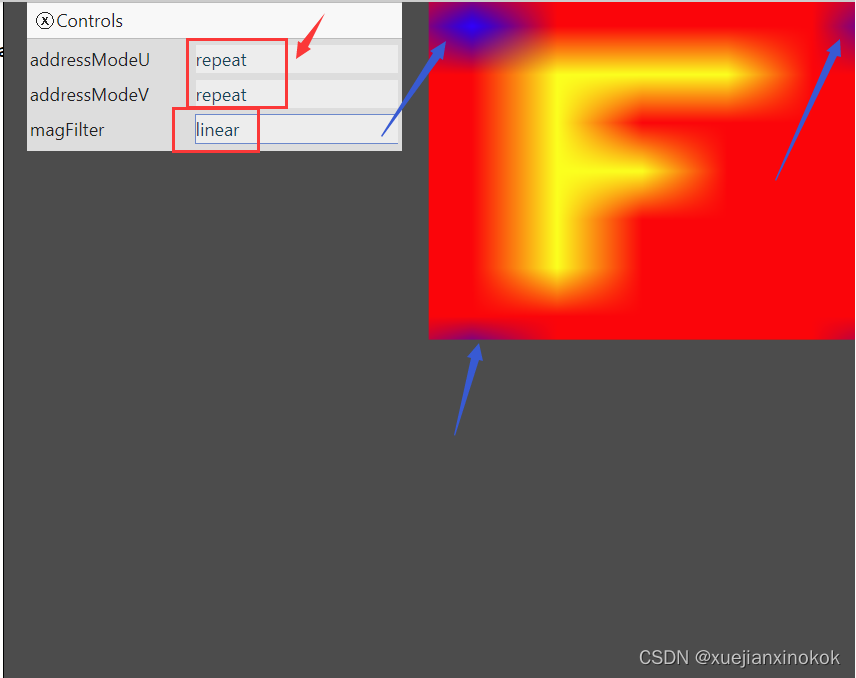
由于我们的片段着色器正在接收内插纹理坐标,当我们的着色器使用这些坐标调用 textureSample 时,它会获得不同的混合颜色,因为它被要求为每个正在渲染的像素提供颜色。注意地址模式设置为“repeat”时,我们可以看到 WebGPU 如何从纹理另一侧的纹素“采样”。
2. minFilter
还有一个minFilter 设置,当纹理绘制小于其尺寸时,它会执行与 magFilter 类似的数学运算(There is also a setting, minFilter, which does similar math to magFilter for when the texture is drawn smaller than its size.)。当设置为“linear”时,它还会选择 4 个像素并按照与上述类似的数学方法混合它们。
问题是,从较大的纹理中选择 4 个像素混合来渲染 1 个像素,颜色会改变并且会出现闪烁。
让我们这样做,以便我们可以看到问题
首先让我们把画布设为低分辨率。为此,我们需要更新 css,以便浏览器不会在我们的画布上执行相同的 magFilter: ‘linear’ 效果。可以通过如下设置 css 来做到这一点
canvas {
  display: block;  /* make the canvas act like a block   */
  width: 100%;     /* make the canvas fill its container */
  height: 100%;
  image-rendering: pixelated;
  image-rendering: crisp-edges;
}
接下来让我们在 ResizeObserver 回调中降低画布的分辨率
  const observer = new ResizeObserver(entries => {
    for (const entry of entries) {
      const canvas = entry.target;
      //const width = entry.contentBoxSize[0].inlineSize / 64 | 0;
      //const height = entry.contentBoxSize[0].blockSize / 64 | 0;
      const width = entry.contentBoxSize[0].inlineSize / 64 | 0;
      const height = entry.contentBoxSize[0].blockSize / 64 | 0;
      canvas.width = Math.min(width, device.limits.maxTextureDimension2D);
      canvas.height = Math.min(height, device.limits.maxTextureDimension2D);
      // re-render
      render();
    }
  });
  observer.observe(canvas);
我们将移动和缩放四边形,因此我们将添加一个统一缓冲区,就像我们在有关uniforms的文章中的第一个示例中所做的那样。
struct OurVertexShaderOutput {
  @builtin(position) position: vec4f,
  @location(0) texcoord: vec2f,
};

struct Uniforms {
  scale: vec2f,
  offset: vec2f,
};

@group(0) @binding(2) var<uniform> uni: Uniforms;

@vertex fn vs(
  @builtin(vertex_index) vertexIndex : u32
) -> OurVertexShaderOutput {
  var pos = array<vec2f, 6>(
    // 1st triangle
    vec2f( 0.0,  0.0),  // center
    vec2f( 1.0,  0.0),  // right, center
    vec2f( 0.0,  1.0),  // center, top

    // 2st triangle
    vec2f( 0.0,  1.0),  // center, top
    vec2f( 1.0,  0.0),  // right, center
    vec2f( 1.0,  1.0),  // right, top
  );

  var vsOutput: OurVertexShaderOutput;
  let xy = pos[vertexIndex];
  //vsOutput.position = vec4f(xy, 0.0, 1.0);
  vsOutput.position = vec4f(xy * uni.scale + uni.offset, 0.0, 1.0);
  vsOutput.texcoord = xy;
  return vsOutput;
}

@group(0) @binding(0) var ourSampler: sampler;
@group(0) @binding(1) var ourTexture: texture_2d<f32>;

@fragment fn fs(fsInput: OurVertexShaderOutput) -> @location(0) vec4f {
  return textureSample(ourTexture, ourSampler, fsInput.texcoord);
}
现在我们有了uniforms ,我们需要创建一个uniforms 缓冲区并将其添加到绑定组。
  // create a buffer for the uniform values
  const uniformBufferSize =
    2 * 4 + // scale is 2 32bit floats (4bytes each)
    2 * 4;  // offset is 2 32bit floats (4bytes each)
  const uniformBuffer = device.createBuffer({
    label: 'uniforms for quad',
    size: uniformBufferSize,
    usage: GPUBufferUsage.UNIFORM | GPUBufferUsage.COPY_DST,
  });

  // create a typedarray to hold the values for the uniforms in JavaScript
  const uniformValues = new Float32Array(uniformBufferSize / 4);

  // offsets to the various uniform values in float32 indices
  const kScaleOffset = 0;
  const kOffsetOffset = 2;

  const bindGroups = [];
  for (let i = 0; i < 8; ++i) {
    const sampler = device.createSampler({
      addressModeU: (i & 1) ? 'repeat' : 'clamp-to-edge',
      addressModeV: (i & 2) ? 'repeat' : 'clamp-to-edge',
      magFilter: (i & 4) ? 'linear' : 'nearest',
    });

    const bindGroup = device.createBindGroup({
      layout: pipeline.getBindGroupLayout(0),
      entries: [
        { binding: 0, resource: sampler },
        { binding: 1, resource: texture.createView() },
        { binding: 2, resource: { buffer: uniformBuffer }},
      ],
    });
    bindGroups.push(bindGroup);
  }
我们需要代码来设置uniforms 的值并将它们上传到 GPU。我们将对此进行动画处理,因此我们还将使用 requestAnimationFrame 更改代码以持续渲染。
  function render(time) {
    time *= 0.001;
    const ndx = (settings.addressModeU === 'repeat' ? 1 : 0) +
                (settings.addressModeV === 'repeat' ? 2 : 0) +
                (settings.magFilter === 'linear' ? 4 : 0);
    const bindGroup = bindGroups[ndx];

    // compute a scale that will draw our 0 to 1 clip space quad
    // 2x2 pixels in the canvas.
    const scaleX = 4 / canvas.width;
    const scaleY = 4 / canvas.height;

    uniformValues.set([scaleX, scaleY], kScaleOffset); // set the scale
    uniformValues.set([Math.sin(time * 0.25) * 0.8, -0.8], kOffsetOffset); // set the offset

    // copy the values from JavaScript to the GPU
    device.queue.writeBuffer(uniformBuffer, 0, uniformValues);

    ...

    requestAnimationFrame(render);
  }
  requestAnimationFrame(render);

  const observer = new ResizeObserver(entries => {
    for (const entry of entries) {
      const canvas = entry.target;
      const width = entry.contentBoxSize[0].inlineSize / 64 | 0;
      const height = entry.contentBoxSize[0].blockSize / 64 | 0;
      canvas.width = Math.min(width, device.limits.maxTextureDimension2D);
      canvas.height = Math.min(height, device.limits.maxTextureDimension2D);
      // re-render
      //render();
    }
  });
  observer.observe(canvas);
}
上面的代码设置了比例,以便我们在画布中绘制 2x2 像素大小的四边形。它还使用 Math.sin 将偏移量从 -0.8 设置为 +0.8,以便四边形在画布上缓慢地来回移动。
最后让我们将 minFilter 添加到我们的设置和组合中
  const bindGroups = [];
  for (let i = 0; i < 16; ++i) {
    const sampler = device.createSampler({
      addressModeU: (i & 1) ? 'repeat' : 'clamp-to-edge',
      addressModeV: (i & 2) ? 'repeat' : 'clamp-to-edge',
      magFilter: (i & 4) ? 'linear' : 'nearest',
      minFilter: (i & 8) ? 'linear' : 'nearest',
    });

...

  const settings = {
    addressModeU: 'repeat',
    addressModeV: 'repeat',
    magFilter: 'linear',
    minFilter: 'linear',
  };

  const addressOptions = ['repeat', 'clamp-to-edge'];
  const filterOptions = ['nearest', 'linear'];

  const gui = new GUI();
  Object.assign(gui.domElement.style, {right: '', left: '15px'});
  -gui.add(settings, 'addressModeU', addressOptions).onChange(render);
  -gui.add(settings, 'addressModeV', addressOptions).onChange(render);
  -gui.add(settings, 'magFilter', filterOptions).onChange(render);
  gui.add(settings, 'addressModeU', addressOptions);
  gui.add(settings, 'addressModeV', addressOptions);
  gui.add(settings, 'magFilter', filterOptions);
  gui.add(settings, 'minFilter', filterOptions);

  function render(time) {
    time *= 0.001;
    const ndx = (settings.addressModeU === 'repeat' ? 1 : 0) +
                (settings.addressModeV === 'repeat' ? 2 : 0) +
                //(settings.magFilter === 'linear' ? 4 : 0);
                (settings.magFilter === 'linear' ? 4 : 0) +
                (settings.minFilter === 'linear' ? 8 : 0);
我们不再需要在设置更改时调用 render ,因为我们一直在使用 requestAnimationFrame 进行渲染(通常称为“rAF”,这种渲染循环样式通常称为“rAF 循环”)

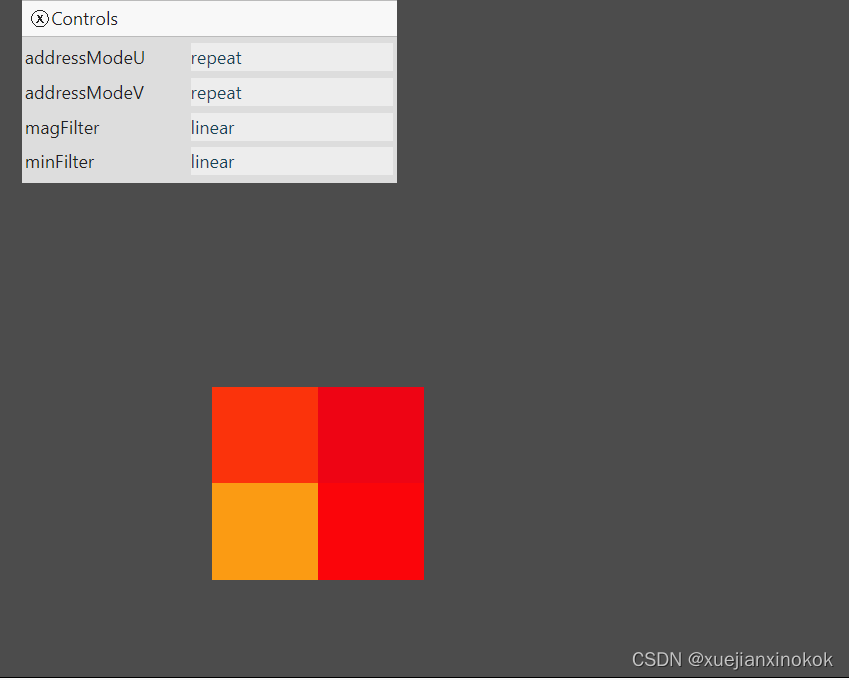
您可以看到四边形在闪烁并改变颜色。如果 minFilter 设置为 nearest ,那么对于四边形的每个 2x2 像素,它都会从我们的纹理中选取一个像素。如果将它设置为 linear ,那么它会执行我们上面提到的双线性过滤,但它仍然会闪烁。
一个原因是,四边形是用实数定位的,但像素是整数。纹理坐标是根据实数插值的,或者更确切地说,它们是根据实数计算的。
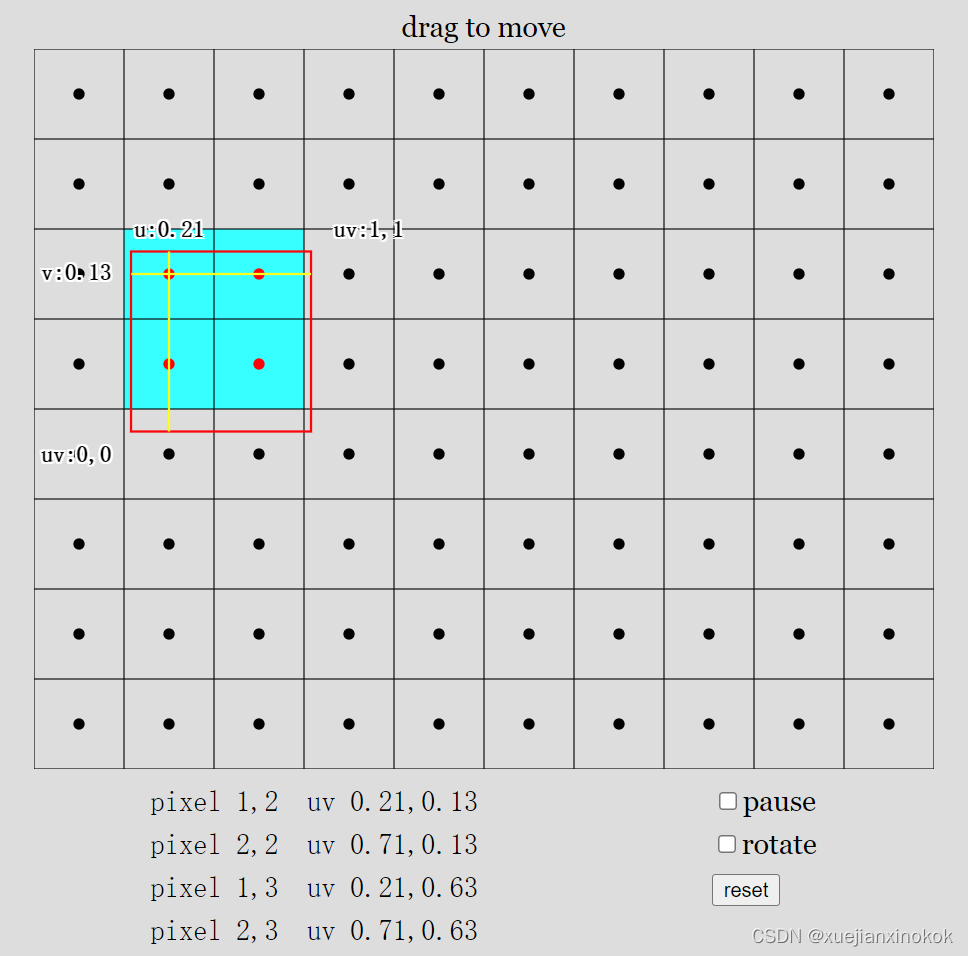
在上图中,红色矩形代表我们要求 GPU 根据我们从顶点着色器返回的值绘制的四边形。当 GPU 绘制时,它会计算哪些像素的中心在我们的四边形(我们的 2 个三角形)内。然后,它根据要绘制的像素中心相对于原始点所在位置的位置,计算要传递给片段着色器的插值级间变量值。在我们的片段着色器中,我们然后将该纹理坐标传递给 WGSL textureSample 函数并返回采样颜色,如上图所示。希望您能明白为什么颜色会闪烁。您可以看到它们混合成不同的颜色,具体取决于为正在绘制的像素计算的 UV 坐标。
纹理为这个问题提供了解决方案。这称为 mip 映射。我认为(但可能是错误的)“mipmap”代表“multi-image-pyramid-map”(纹理金字塔)。
“multi-image-pyramid-map” 意思是采用之前的纹理并创建一个较小的纹理,该纹理在每个维度上都是之前大小的一半,向下舍入。然后用第一个原始纹理的混合颜色填充较小的纹理。重复这个直到我们得到一个 1x1 的纹理。在我们的示例中,有一个 5x7 纹素纹理。在每个维度上除以 2 并向下舍入得到 2x3 纹素纹理。重复这样的操作,所以最终得到 1x1 纹素纹理。
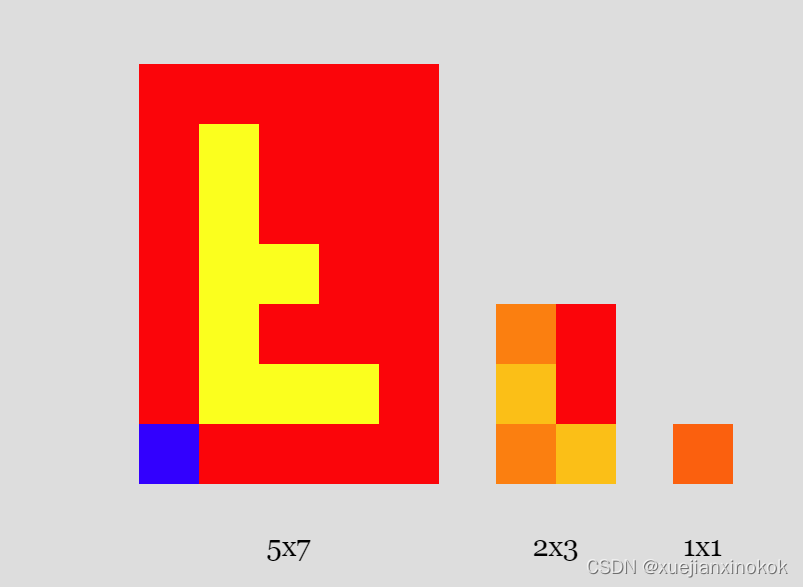
给定一个 mipmap,然后我们可以要求 GPU 在小于原始大小时选择更小的 mip 级别。这看起来会更好,因为它已经过“预混合”并且可以更好地代表按比例缩小时纹理的颜色。
将像素从一个 mip 混合到下一个 mip 的最佳算法是一个研究主题,也是一个观点问题。作为第一个想法,这里有一些代码通过双线性过滤(如上所示)从前一个 mip 生成每个 mip。
const lerp = (a, b, t) => a + (b - a) * t;
const mix = (a, b, t) => a.map((v, i) => lerp(v, b[i], t));
const bilinearFilter = (tl, tr, bl, br, t1, t2) => {
  const t = mix(tl, tr, t1);
  const b = mix(bl, br, t1);
  return mix(t, b, t2);
};

const createNextMipLevelRgba8Unorm = ({data: src, width: srcWidth, height: srcHeight}) => {
  // compute the size of the next mip
  const dstWidth = Math.max(1, srcWidth / 2 | 0);
  const dstHeight = Math.max(1, srcHeight / 2 | 0);
  const dst = new Uint8Array(dstWidth * dstHeight * 4);

  const getSrcPixel = (x, y) => {
    const offset = (y * srcWidth + x) * 4;
    return src.subarray(offset, offset + 4);
  };

  for (let y = 0; y < dstHeight; ++y) {
    for (let x = 0; x < dstWidth; ++x) {
      // compute texcoord of the center of the destination texel
      const u = (x + 0.5) / dstWidth;
      const v = (y + 0.5) / dstHeight;

      // compute the same texcoord in the source - 0.5 a pixel
      const au = (u * srcWidth - 0.5);
      const av = (v * srcHeight - 0.5);

      // compute the src top left texel coord (not texcoord)
      const tx = au | 0;
      const ty = av | 0;

      // compute the mix amounts between pixels
      const t1 = au % 1;
      const t2 = av % 1;

      // get the 4 pixels
      const tl = getSrcPixel(tx, ty);
      const tr = getSrcPixel(tx + 1, ty);
      const bl = getSrcPixel(tx, ty);
      const br = getSrcPixel(tx + 1, ty + 1);

      // copy the "sampled" result into the dest.
      const dstOffset = (y * dstWidth + x) * 4;
      dst.set(bilinearFilter(tl, tr, bl, br, t1, t2), dstOffset);
    }
  }
  return { data: dst, width: dstWidth, height: dstHeight };
};

const generateMips = (src, srcWidth) => {
  const srcHeight = src.length / 4 / srcWidth;

  // populate with first mip level (base level)
  let mip = { data: src, width: srcWidth, height: srcHeight, };
  const mips = [mip];

  while (mip.width > 1 || mip.height > 1) {
    mip = createNextMipLevelRgba8Unorm(mip);
    mips.push(mip);
  }
  return mips;
};
我们将在另一篇文章中介绍如何在 GPU 上执行此操作。现在,我们可以使用上面的代码生成 mipmap。
我们将纹理数据传递给上面的函数,它返回一个 mip 级别数据数组。然后我们可以创建一个具有所有 mip 级别的纹理
  const mips = generateMips(textureData, kTextureWidth);

  const texture = device.createTexture({
    label: 'yellow F on red',
    size: [mips[0].width, mips[0].height],
    mipLevelCount: mips.length,
    format: 'rgba8unorm',
    usage:
      GPUTextureUsage.TEXTURE_BINDING |
      GPUTextureUsage.COPY_DST,
  });
  mips.forEach(({data, width, height}, mipLevel) => {
    device.queue.writeTexture(
      { texture },
      textureData,
      { bytesPerRow: kTextureWidth * 4 },
      { width: kTextureWidth, height: kTextureHeight },
      { texture, mipLevel },
      data,
      { bytesPerRow: width * 4 },
      { width, height },
    );
  });
Notice we pass in mipLevelCount to the number of mip levels. WebGPU will then create the correct sized mip level at each level. We then copy the data to each level by specifying the mipLevel
请注意,我们将 mipLevelCount 传递给 mip 级别数。然后,WebGPU 将在每个级别创建正确大小的 mip 级别。然后我们通过指定 mipLevel 将数据复制到每个级别
Let’s also add a scale setting so we can see the quad drawn at different sizes.
我们还添加一个比例设置,以便我们可以看到以不同大小绘制的四边形。
  const settings = {
    addressModeU: 'repeat',
    addressModeV: 'repeat',
    magFilter: 'linear',
    minFilter: 'linear',
    scale: 1,
  };

  ...

  const gui = new GUI();
  Object.assign(gui.domElement.style, {right: '', left: '15px'});
  gui.add(settings, 'addressModeU', addressOptions);
  gui.add(settings, 'addressModeV', addressOptions);
  gui.add(settings, 'magFilter', filterOptions);
  gui.add(settings, 'minFilter', filterOptions);
  gui.add(settings, 'scale', 0.5, 6);

  function render(time) {

    ...

    //const scaleX = 4 / canvas.width;
    //const scaleY = 4 / canvas.height;
    //const scaleX = 4 / canvas.width * settings.scale;
    //const scaleY = 4 / canvas.height * settings.scale;
And with that the GPU is choosing the smallest mip to draw and the flickering is gone.
GPU 选择最小的 mip 进行绘制,闪烁消失了。
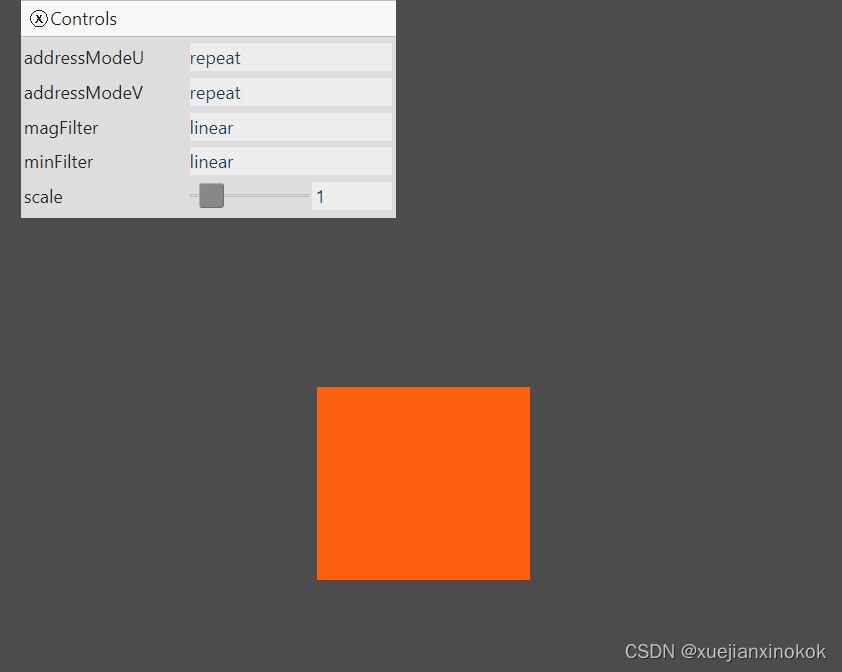
Adjust the scale and you can see as we get bigger, which mip level is used changes. There’s a pretty harsh transition between scale 2.4 and scale 2.5 where the GPU switches between mip level 0 (the largest mip level) and mip level 1 (the middle size). What to do about that?
调整比例,您可以看到随着我们变大,使用的 mip 级别发生变化。在比例 2.4 和比例 2.5 之间有一个相当苛刻的过渡,其中 GPU 在 mip 级别 0(最大 mip 级别)和 mip 级别 1(中间大小)之间切换。怎么办?
3. mipmapFilter
Just like we have a magFilter and a minFilter both of which can be nearest or linear, there is also a mipmapFilter setting which can also be nearest or linear.
就像我们有一个 magFilter 和一个 minFilter ,它们都可以是 nearest 或 linear ,还有一个 mipmapFilter 设置也可以是 nearest 或 linear 。
This chooses if we blend between mip levels. In mipmapFilter: ‘linear’, colors are sampled from 2 mip levels, either with nearest or linear filtering based on the previous settings, then, those 2 colors are again mixed in a similar way.
如果我们在 mip 级别之间混合,这会选择。在 mipmapFilter: ‘linear’ 中,颜色从 2 个 mip 级别采样,根据先前的设置使用最近或线性过滤,然后,这 2 种颜色再次以类似的方式被 mixed。
This comes up most when drawing things in 3D. How to draw in 3D is covered in other articles so I’m not going to cover that here but we’ll change our previous example to show some 3D so we can see better how mipmapFilter works.
这在以 3D 方式绘制事物时最常出现。如何在 3D 中绘制已在其他文章中介绍,因此我不会在这里介绍,但我们将更改之前的示例以显示一些 3D,以便我们可以更好地了解 mipmapFilter 的工作原理。
First let’s make some textures. We’ll make one 16x16 texture which I think will better show mipmapFilter’s effect.
首先让我们制作一些纹理。我们将制作一个 16x16 的纹理,我认为它会更好地显示 mipmapFilter 的效果。
  const createBlendedMipmap = () => {
    const w = [255, 255, 255, 255];
    const r = [255,   0,   0, 255];
    const b = [  0,  28, 116, 255];
    const y = [255, 231,   0, 255];
    const g = [ 58, 181,  75, 255];
    const a = [ 38, 123, 167, 255];
    const data = new Uint8Array([
      w, r, r, r, r, r, r, a, a, r, r, r, r, r, r, w,
      w, w, r, r, r, r, r, a, a, r, r, r, r, r, w, w,
      w, w, w, r, r, r, r, a, a, r, r, r, r, w, w, w,
      w, w, w, w, r, r, r, a, a, r, r, r, w, w, w, w,
      w, w, w, w, w, r, r, a, a, r, r, w, w, w, w, w,
      w, w, w, w, w, w, r, a, a, r, w, w, w, w, w, w,
      w, w, w, w, w, w, w, a, a, w, w, w, w, w, w, w,
      b, b, b, b, b, b, b, b, a, y, y, y, y, y, y, y,
      b, b, b, b, b, b, b, g, y, y, y, y, y, y, y, y,
      w, w, w, w, w, w, w, g, g, w, w, w, w, w, w, w,
      w, w, w, w, w, w, r, g, g, r, w, w, w, w, w, w,
      w, w, w, w, w, r, r, g, g, r, r, w, w, w, w, w,
      w, w, w, w, r, r, r, g, g, r, r, r, w, w, w, w,
      w, w, w, r, r, r, r, g, g, r, r, r, r, w, w, w,
      w, w, r, r, r, r, r, g, g, r, r, r, r, r, w, w,
      w, r, r, r, r, r, r, g, g, r, r, r, r, r, r, w,
    ].flat());
    return generateMips(data, 16);
  };
This will generate these mip levels
这将生成这些 mip 级别

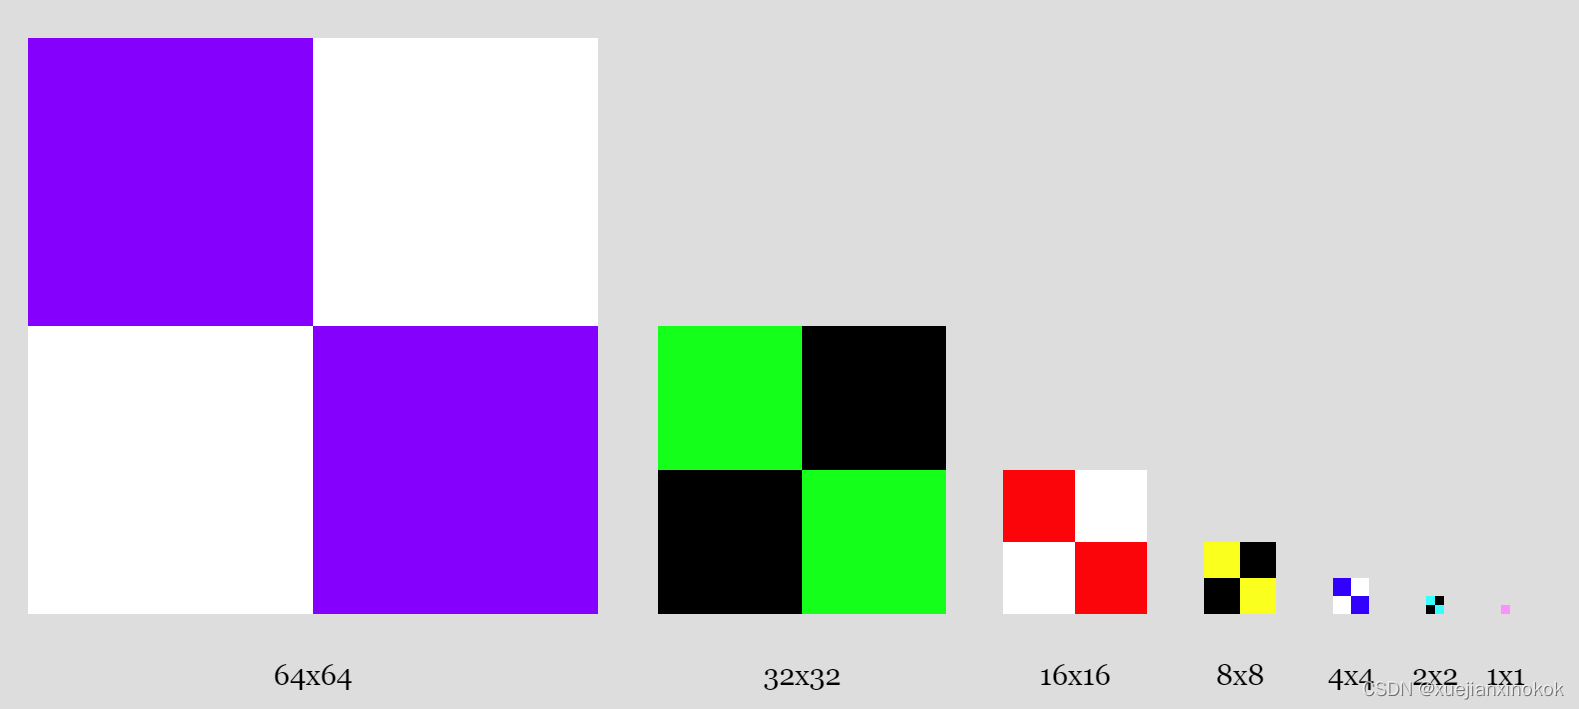
We’re free to put any data in each mip level so another good way to see what’s happening is to make each mip level different colors. Let’s use the canvas 2d api to make mip levels.
我们可以自由地将任何数据放入每个 mip 级别,因此查看正在发生的情况的另一种好方法是使每个 mip 级别具有不同的颜色。让我们使用 canvas 2d api 来制作 mip 级别。
  const createCheckedMipmap = () => {
    const ctx = document.createElement('canvas').getContext('2d', {willReadFrequently: true});
    const levels = [
      { size: 64, color: 'rgb(128,0,255)', },
      { size: 32, color: 'rgb(0,255,0)', },
      { size: 16, color: 'rgb(255,0,0)', },
      { size:  8, color: 'rgb(255,255,0)', },
      { size:  4, color: 'rgb(0,0,255)', },
      { size:  2, color: 'rgb(0,255,255)', },
      { size:  1, color: 'rgb(255,0,255)', },
    ];
    return levels.map(({size, color}, i) => {
      ctx.canvas.width = size;
      ctx.canvas.height = size;
      ctx.fillStyle = i & 1 ? '#000' : '#fff';
      ctx.fillRect(0, 0, size, size);
      ctx.fillStyle = color;
      ctx.fillRect(0, 0, size / 2, size / 2);
      ctx.fillRect(size / 2, size / 2, size / 2, size / 2);
      return ctx.getImageData(0, 0, size, size);
    });
  };
This code will generate these mip levels.
此代码将生成这些 mip 级别。
现在我们已经创建了数据,让我们创建纹理
  const createTextureWithMips = (mips, label) => {
    const texture = device.createTexture({
      //label: 'yellow F on red',
      label,
      size: [mips[0].width, mips[0].height],
      mipLevelCount: mips.length,
      format: 'rgba8unorm',
      usage:
        GPUTextureUsage.TEXTURE_BINDING |
        GPUTextureUsage.COPY_DST,
    });
    mips.forEach(({data, width, height}, mipLevel) => {
      device.queue.writeTexture(
          { texture, mipLevel },
          data,
          { bytesPerRow: width * 4 },
          { width, height },
      );
    });
    return texture;
  };

  const textures = [
    createTextureWithMips(createBlendedMipmap(), 'blended'),
    createTextureWithMips(createCheckedMipmap(), 'checker'),
  ];
We’re going to draw a quad extending into the distance in 8 location. We’ll use matrix math as covered in the series of articles on 3D.
我们将在 8 位置绘制一个延伸到远处的四边形。我们将使用 3D 系列文章中介绍的矩阵数学。
struct OurVertexShaderOutput {
  @builtin(position) position: vec4f,
  @location(0) texcoord: vec2f,
};

struct Uniforms {
 // scale: vec2f,
 // offset: vec2f,
  matrix: mat4x4f,
};

@group(0) @binding(2) var<uniform> uni: Uniforms;

@vertex fn vs(
  @builtin(vertex_index) vertexIndex : u32
) -> OurVertexShaderOutput {
  var pos = array<vec2f, 6>(

    vec2f( 0.0,  0.0),  // center
    vec2f( 1.0,  0.0),  // right, center
    vec2f( 0.0,  1.0),  // center, top

    // 2st triangle
    vec2f( 0.0,  1.0),  // center, top
    vec2f( 1.0,  0.0),  // right, center
    vec2f( 1.0,  1.0),  // right, top
  );

  var vsOutput: OurVertexShaderOutput;
  let xy = pos[vertexIndex];
  //vsOutput.position = vec4f(xy * uni.scale + uni.offset, 0.0, 1.0);
  vsOutput.position = uni.matrix * vec4f(xy, 0.0, 1.0);
  vsOutput.texcoord = xy * vec2f(1, 50);
  return vsOutput;
}

@group(0) @binding(0) var ourSampler: sampler;
@group(0) @binding(1) var ourTexture: texture_2d<f32>;

@fragment fn fs(fsInput: OurVertexShaderOutput) -> @location(0) vec4f {
  return textureSample(ourTexture, ourSampler, fsInput.texcoord);
}
Each of the 8 planes will use different combinations of minFilter, magFilter and mipmapFilter. That means each one needs a different bind group that contains a sampler with that specific combination of filters. Further, we have 2 textures. Textures are part of the bind group as well so we’ll need 2 bind groups per object, one for each texture. We can then select which one to use when we render. To draw the plane in 8 locations we’ll also need one uniform buffer per location like we covered in the article on uniforms.
8 个平面中的每一个都将使用 minFilter 、 magFilter 和 mipmapFilter 的不同组合。这意味着每个人都需要一个不同的绑定组,其中包含一个带有特定过滤器组合的采样器。此外,我们有 2 个纹理。纹理也是绑定组的一部分,因此每个对象需要 2 个绑定组,每个纹理一个。然后我们可以选择在渲染时使用哪个。要在 8 个位置绘制飞机,我们还需要每个位置一个统一的缓冲区,就像我们在关于制服的文章中介绍的那样。
  // offsets to the various uniform values in float32 indices
  const kMatrixOffset = 0;

  const objectInfos = [];
  for (let i = 0; i < 8; ++i) {
    const sampler = device.createSampler({
      addressModeU: 'repeat',
      addressModeV: 'repeat',
      magFilter: (i & 1) ? 'linear' : 'nearest',
      minFilter: (i & 2) ? 'linear' : 'nearest',
      mipmapFilter: (i & 4) ? 'linear' : 'nearest',
    });

    // create a buffer for the uniform values
    const uniformBufferSize =
      16 * 4; // matrix is 16 32bit floats (4bytes each)
    const uniformBuffer = device.createBuffer({
      label: 'uniforms for quad',
      size: uniformBufferSize,
      usage: GPUBufferUsage.UNIFORM | GPUBufferUsage.COPY_DST,
    });

    // create a typedarray to hold the values for the uniforms in JavaScript
    const uniformValues = new Float32Array(uniformBufferSize / 4);
    const matrix = uniformValues.subarray(kMatrixOffset, 16);

    const bindGroups = textures.map(texture =>
      device.createBindGroup({
        layout: pipeline.getBindGroupLayout(0),
        entries: [
          { binding: 0, resource: sampler },
          { binding: 1, resource: texture.createView() },
          { binding: 2, resource: { buffer: uniformBuffer }},
        ],
      }));

    // Save the data we need to render this object.
    objectInfos.push({
      bindGroups,
      matrix,
      uniformValues,
      uniformBuffer,
    });
  }
At render time we compute a viewProjection matrix.
在渲染时,我们计算一个 viewProjection 矩阵。
  function render() {
    const fov = 60 * Math.PI / 180;  // 60 degrees in radians
    const aspect = canvas.clientWidth / canvas.clientHeight;
    const zNear  = 1;
    const zFar   = 2000;
    const projectionMatrix = mat4.perspective(fov, aspect, zNear, zFar);

    const cameraPosition = [0, 0, 2];
    const up = [0, 1, 0];
    const target = [0, 0, 0];
    const cameraMatrix = mat4.lookAt(cameraPosition, target, up);
    const viewMatrix = mat4.inverse(cameraMatrix);
    const viewProjectionMatrix = mat4.multiply(projectionMatrix, viewMatrix);

    ...
Then for each plane, we select a bind group based on which texture we want to show and compute a unique matrix to position each plane
然后对于每个平面,我们根据要显示的纹理选择一个绑定组,并计算一个唯一的矩阵来定位每个平面
  let texNdx = 0;

  function render() {
    ...

    const pass = encoder.beginRenderPass(renderPassDescriptor);
    pass.setPipeline(pipeline);

    objectInfos.forEach(({bindGroups, matrix, uniformBuffer, uniformValues}, i) => {
      const bindGroup = bindGroups[texNdx];

      const xSpacing = 1.2;
      const ySpacing = 0.7;
      const zDepth = 50;

      const x = i % 4 - 1.5;
      const y = i < 4 ? 1 : -1;

      mat4.translate(viewProjectionMatrix, [x * xSpacing, y * ySpacing, -zDepth * 0.5], matrix);
      mat4.rotateX(matrix, 0.5 * Math.PI, matrix);
      mat4.scale(matrix, [1, zDepth * 2, 1], matrix);
      mat4.translate(matrix, [-0.5, -0.5, 0], matrix);

      // copy the values from JavaScript to the GPU
      device.queue.writeBuffer(uniformBuffer, 0, uniformValues);

      pass.setBindGroup(0, bindGroup);
      pass.draw(6);  // call our vertex shader 6 times
    });

    pass.end();
I removed the existing UI code, switched back from a rAF loop to rendering in the ResizeObserver callback, and stopped making the resolution low.
我删除了现有的 UI 代码,从 rAF 循环切换回 ResizeObserver 回调中的渲染,并停止降低分辨率。
  //function render(time) {
  //  time *= 0.001;
  function render() {

    ...

   // requestAnimationFrame(render);
  }
 // requestAnimationFrame(render);

  const observer = new ResizeObserver(entries => {
    for (const entry of entries) {
      const canvas = entry.target;
      //const width = entry.contentBoxSize[0].inlineSize / 64 | 0;
      //const height = entry.contentBoxSize[0].blockSize / 64 | 0;
      const width = entry.contentBoxSize[0].inlineSize;
      const height = entry.contentBoxSize[0].blockSize;
      canvas.width = Math.min(width, device.limits.maxTextureDimension2D);
      canvas.height = Math.min(height, device.limits.maxTextureDimension2D);
      render();
    }
  });
  observer.observe(canvas);
Since we’re no longer low-res we can get rid of the CSS that was preventing the browser from filtering the canvas itself.
因为我们不再是低分辨率的,所以我们可以摆脱阻止浏览器过滤画布本身的 CSS。
canvas {
  display: block;  /* make the canvas act like a block   */
  width: 100%;     /* make the canvas fill its container */
  height: 100%;
 // image-rendering: pixelated;
 // image-rendering: crisp-edges;
}
And we can make it so if you click the canvas it switches which texture to draw with and re-renders
我们可以做到,如果您单击画布,它会切换要绘制的纹理并重新渲染
  canvas.addEventListener('click', () => {
    texNdx = (texNdx + 1) % textures.length;
    render();
  });
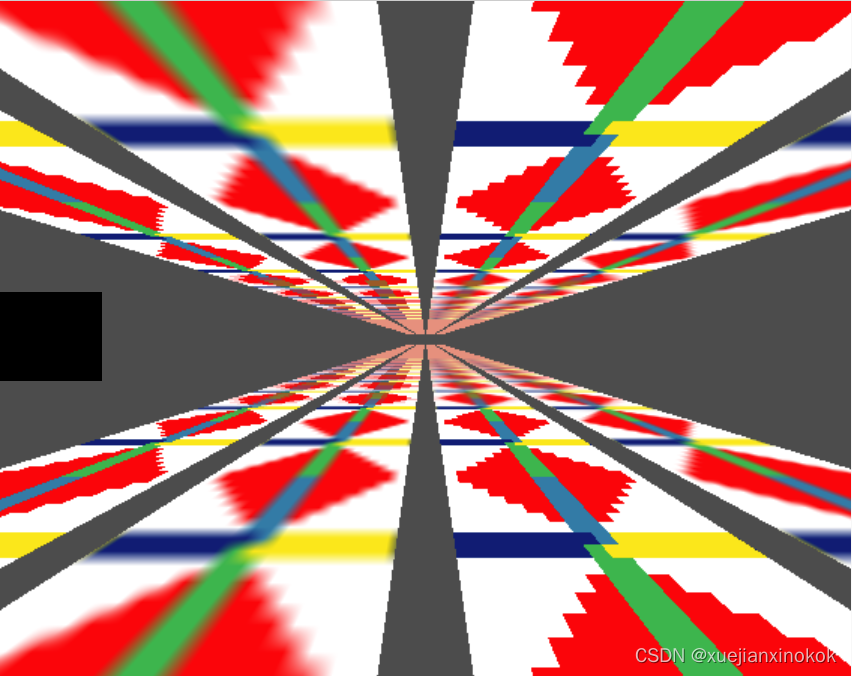
Hopefully you can see the progression form the top left with all filtering set to nearest to the bottom right where all filtering is set to linear. In particular since we added mipmapFilter in this example, if you click the image to show the checked texture where every mip level is a different color, you should be able to see that every plane at the top has mipmapFilter set to nearest so the point when switching from one mip level to the next is abrupt. On the bottom, each plane has mipmapFilter set to linear so blending happens between the mip levels.
希望您可以看到从左上角所有过滤设置为 nearest 到右下角所有过滤设置为 linear 的进度。特别是因为我们在这个例子中添加了 mipmapFilter ,如果你点击图像显示选中的纹理,其中每个 mip 级别都是不同的颜色,你应该能够看到顶部的每个平面都将 mipmapFilter 设置为 @ 4# 所以从一个 mip 级别切换到下一个级别的时间点是突然的。在底部,每个平面都将 mipmapFilter 设置为 linear ,因此混合发生在 mip 级别之间。
You might wonder, why not always set all filtering to linear? The obvious reason is style. If you’re trying to make a pixelated looking image then of course you might not want filtering. Another is speed. Reading 1 pixel from a texture when all filtering is set to nearest is faster then reading 8 pixels from a texture when all filtering is set to linear.
您可能想知道,为什么不总是将所有过滤都设置为 linear ?显而易见的原因是风格。如果您正在尝试制作像素化的图像,那么您当然可能不需要过滤。另一个是速度。当所有过滤设置为最近时从纹理读取 1 个像素比当所有过滤设置为线性时从纹理读取 8 像素更快。
TBD: Repeat 待定:重复
TBD: Anisotropic filtering
待定:各向异性过滤
4. 纹理类型和纹理视图(Texture Types and Texture Views)
到目前为止,我们只使用了 2d 纹理。有6种纹理
- “1d”
- “2d”
- “2d-array”
- “3d”
- “cube”
- “cube-array”
In some way you can kind of consider a “2d” texture just a “3d” texture with a depth of 1. And a “1d” texture is just a “2d” texture with a height of 1. Two actual differences, textures are limited in their maximum allowed dimensions. The limit is different for each type of texture “1d”, “2d”, and “3d”. We’ve used the “2d” limit when setting the size of the canvas.
在某种程度上,您可以将“2d”纹理视为深度为 1 的“3d”纹理。而“1d”纹理只是高度为 1 的“2d”纹理。两个实际差异,纹理是限制在其最大允许尺寸。每种类型的纹理“1d”、“2d”和“3d”的限制都不同。我们在设置画布大小时使用了“2d”限制。
      canvas.width = Math.min(width, device.limits.maxTextureDimension2D);
      canvas.height = Math.min(height, device.limits.maxTextureDimension2D);
Another is speed, at least for a 3d texture vs a 2d texture, with all the sampler filters set to linear, sampling a 3d texture would require looking at 16 texels and blending them all together. Sampling a 2d texture only needs 8 texels. It’s possible a 1d texture only needs 4 but I have no idea if any GPUs actually optimize for 1d textures.
另一个是速度,至少对于 3d 纹理与 2d 纹理而言,所有采样器过滤器都设置为 linear ,采样 3d 纹理需要查看 16 个纹素并将它们混合在一起。采样 2d 纹理只需要 8 个纹素。 1d 纹理可能只需要 4 个,但我不知道是否有 GPU 实际上针对 1d 纹理进行了优化。
We’ll cover “3d” textures in the article on tone mapping / 3dLUTs
我们将在有关色调映射/3dLUT 的文章中介绍“3d”纹理
A “cube” texture is a texture that represents the 6 faces of a cube. We’ll cover that in the article on cube maps
“cube”纹理是表示立方体的 6 个面的纹理。我们将在有关立方体贴图的文章中介绍
A “2d-array” is an array of 2d textures. You can then choose which texture of the array to access in your shader. They commonly used for terrain rendering among other things.
“二维数组”是二维纹理的数组。然后,您可以选择要在着色器中访问的数组纹理。它们通常用于地形渲染等。
A “cube-array” is an array of cube textures.
“立方体阵列”是立方体纹理的阵列。
Each type of texture has it’s own corresponding type in WGSL.
每种类型的纹理在 WGSL 中都有自己对应的类型。
- “1d”: texture_1d or texture_storage_1d
- “2d”: texture_2d or texture_storage_2d or texture_multisampled_2d as
well as a special case for in certain situations texture_depth_2d and
texture_depth_multisampled_2d - “2d-array”: texture_2d_array or texture_storage_2d_array and
sometimes texture_depth_2d_array - “3d”: texture_3d or texture_storage_3d
- “cube”: texture_cube and sometimes texture_depth_cube
- “cube-array”: texture_cube_array and sometimes
texture_depth_cube_array
We’ll cover some of this in actual use but, it can be a little confusing that when creating a texture (calling device.createTexture), there is only “1d”, “2d”, or “3d” as options and the default is “2d” so we have not had to specify the dimensions yet.
我们将在实际使用中介绍其中的一些内容,但是创建纹理(调用 device.createTexture )时可能会有点混乱,只有“1d”、“2d”或“3d”作为选项和默认值是“2d”所以我们还没有指定尺寸。
When we create a texture view, by calling someTexture.createView we can specify a type of view from the 6 above. A “2d-array” is just a view of a 2d texture multiple array layers. A “cube” is also just a view of 2d texture with 6 array layers. A “cube-array” is a 2d texture with some multiple of 6 array layers
当我们创建纹理视图时,通过调用 someTexture.createView ,我们可以从上面的 6 中指定一种视图类型。 “2d 数组”只是 2d 纹理多个数组层的视图。 “立方体”也只是具有 6 个阵列层的 2d 纹理视图。 “立方体阵列”是一个二维纹理,具有 6 个阵列层的倍数
5. 纹理格式(Texture Formats )
For now, this is the basics of textures. Textures are a huge topic and there’s a bunch more to cover
现在,这是纹理的基础知识。纹理是一个很大的话题,还有很多内容要讨论
We’ve used rgba8unorm textures through out this article but there are a ton of different texture formats.
我们在整篇文章中使用了 rgba8unorm 纹理,但有大量不同的纹理格式。
Here are the “color” formats though of course you don’t have to store colors in them.
这是“颜色”格式,当然你不必在其中存储颜色。
| format | renderable | multisample | storage | sample type | bytes per pixel |
|---|---|---|---|---|---|
| r8unorm | true | true | false | float | 1 |
| r8snorm | false | false | false | float | 1 |
| r8uint | true | true | false | uint | 1 |
| r8sint | true | true | false | sint | 1 |
| r16uint | true | true | false | uint | 2 |
| r16sint | true | true | false | sint | 2 |
| r16float | true | true | false | float | 2 |
| rg8unorm | true | true | false | float | 2 |
| rg8snorm | false | false | false | float | 2 |
| rg8uint | true | true | false | uint | 2 |
| rg8sint | true | true | false | sint | 2 |
| r32uint | true | false | true | uint | 4 |
| r32sint | true | false | true | sint | 4 |
| r32float | true | true | true | unfilterable-float | 4 |
| rg16uint | true | true | false | uint | 4 |
| rg16sint | true | true | false | sint | 4 |
| rg16float | true | true | false | float | 4 |
| rgba8unorm | true | true | true | float | 4 |
| rgba8unorm-srgb | true | true | false | float | 4 |
| rgba8snorm | false | false | true | float | 4 |
| rgba8uint | true | true | true | uint | 4 |
| rgba8sint | true | true | true | sint | 4 |
| bgra8unorm | true | true | false | float | 4 |
| bgra8unorm-srgb | true | true | false | float | 4 |
| rgb10a2unorm | true | true | false | float | 4 |
| rg11b10ufloat | false | false | false | float | 4 |
| rgb9e5ufloat | false | false | false | float | 4 |
| rg32uint | true | false | true | uint | 8 |
| rg32sint | true | false | true | sint | 8 |
| rg32float | true | false | true | unfilterable-float | 8 |
| rgba16uint | true | true | true | uint | 8 |
| rgba16sint | true | true | true | sint | 8 |
| rgba16float | true | true | true | float | 8 |
| rgba32uint | true | false | true | uint | 16 |
| rgba32sint | true | false | true | sint | 16 |
| rgba32float | true | false | true | unfilterable-float | 16 |
To read a format, like “rg16float”. the first letters are the channels supported in the texture so “rg16float” supports “rg” or red and green (2 channels). The number, 16, means those channels are 16bits each. The word at the end is what kind of data is in the channel. “float” is floating point data, “unorm” is unsigned normalized data (0 to 1), “snorm” is signed normalized data (-1 to +1). “sint” is signed integers. “uint” is unsigned integer. If there are multiple letter number combinations it’s specifying the number of bits for each channel. For example “rg11b10ufloat” is “rg11” so 11bits each of red and green. “b10” so 10bits of blue and they are all unsigned floating point numbers.
读取格式,例如“rg16float”。第一个字母是纹理中支持的通道,因此“rg16float”支持“rg”或红色和绿色(2 个通道)。数字 16 表示这些通道各为 16 位。最后的词是通道中的数据类型。 “float”是浮点数据,“unorm”是无符号归一化数据(0到1),“snorm”是有符号归一化数据(-1到+1)。 “sint”是有符号整数。 “uint”是无符号整数。如果有多个字母数字组合,它指定每个通道的位数。例如“rg11b10ufloat”是“rg11”所以红色和绿色各 11 位。 “b10”所以 10 位蓝色,它们都是无符号浮点数。
-
renderable 可渲染的
True means you can render to it (set its usage to
GPUTextureUsage.RENDER_ATTACHMENT) True 表示您可以渲染它(将其用法设置为
GPUTextureUsage.RENDER_ATTACHMENT) -
multisample 多样本
Can be multisampled 可以多重采样
-
storage 贮存
Can be written to as a storage texture 可以作为存储纹理写入
-
sampler type 采样器类型
This has implications for what type of texture you need to declare it
in WGSL and how you bind a sampler to a bind group. Above we used
texture_2d but for example, ‘sint’ would need texture_2d
and uint would need texture_2d in WGSL. 这会影响您需要在 WGSL
中声明哪种类型的纹理以及如何将采样器绑定到绑定组。上面我们使用了 texture_2d ,但是例如,‘sint’ 在 WGSL
中需要 texture_2d , uint 需要 texture_2d 。
In the sample type column, unfilterable-float means your sampler can only use nearest for that format and it means you need to may have to manually create a bind group layout, something me haven’t done before as we’ve been using ‘auto’ layout. This mostly exists because desktop GPU can generally filter 32bit floating point textures but, at least as of 2023, most mobile devices can not. If your adaptor supports the float32-filterable feature and you enable it when requesting a device then the formats r32float, rg32float, and rgba32float switch from unfilterable-float to float and these textures formats will work with no other changes.
在示例类型列中, unfilterable-float 表示您的采样器只能对该格式使用 nearest ,这意味着您可能需要手动创建一个绑定组布局,这是我以前没有做过的,因为我们一直在使用 ‘auto’ 布局。这主要是因为桌面 GPU 通常可以过滤 32 位浮点纹理,但至少到 2023 年为止,大多数移动设备不能。如果您的适配器支持 float32-filterable 功能并且您在请求设备时启用它,那么格式 r32float 、 rg32float 和 rgba32float 会从 unfilterable-float 切换到 float ,并且这些纹理格式将无法与其他格式一起使用变化。
And here are the depth and stencil formats
这是深度和模板格式
| format | renderable | multisample | storage | sampler type | bytes per pixel | copy src | copy dst | feature |
|---|---|---|---|---|---|---|---|---|
| depth32float | true | true | false | depth | 4 | true | false | |
| depth16unorm | true | true | false | depth | 2 | true | true | |
| stencil8 | true | true | false | uint | 1 | true | true | |
| depth24plus | true | true | false | depth | false | false | ||
| depth24plus-stencil8 | true | true | false | depth | false | false | ||
| depth32float-stencil8 | true | true | false | depth | false | false | depth32float-stencil8 |
-
feature 特征
means this optional feature is required to use this format.
表示需要此可选功能才能使用此格式。 -
copy src 复制源码
Whether you’re allowed to specify GPUTextureUsage.COPY_SRC 是否允许指定
GPUTextureUsage.COPY_SRC -
copy dst 复制数据表
Whether you’re allowed to specify GPUTextureUsage.COPY_DST 是否允许指定
GPUTextureUsage.COPY_DST
We’ll use a depth texture in an article in the series on 3d as well as the article about shadow maps.
我们将在 3d 系列文章以及有关阴影贴图的文章中使用深度纹理。
There’s also a bunch compressed texture formats which we’ll save for another article.
还有一堆压缩纹理格式,我们将保存到另一篇文章中。
接下来让我们介绍导入外部纹理。
6. 注释
注释1
Whether texture coordinates go up (0 = bottom, 1 = top) or down (0 = top, 1 = bottom) is a matter of perspective. What’s important is that texture coordinate 0,0 references the first data in the texture.
纹理坐标是向上(0 = 底部,1 = 顶部)还是向下(0 = 顶部,1 = 底部)是一个透视问题。重要的是纹理坐标 0,0 引用纹理中的第一个数据。
注释2
A texel is a “texture element” vs a pixel which is a “picture element”. For me texel and pixel are basically synonymous but some people prefer to use the world texel when discussing textures.
纹素是“纹理元素”,而像素是“图片元素”。对我来说纹素和像素基本上是同义词,但有些人在讨论纹理时更喜欢使用世界纹素。
注释3
Another common use for a texture is GPUTextureUsage.RENDER_ATTACHMENT which is used for a texture we want to render into. As an example, the canvas texture we get from context.getCurrentTexture() has its usage set to GPUTextureUsage.RENDER_ATTACHMENT. ↩︎
纹理的另一个常见用途是 GPUTextureUsage.RENDER_ATTACHMENT ,它用于我们要渲染到的纹理。例如,我们从 context.getCurrentTexture() 获得的画布纹理的用法设置为 GPUTextureUsage.RENDER_ATTACHMENT 。
注释4
There is also one more address mode, “mirror-repeat”. If our texture is “🟥🟩🟦” then repeat goes “🟥🟩🟦🟥🟩🟦🟥🟩🟦🟥🟩🟦” and mirror-repeat goes “🟥🟩🟦🟦🟩🟥🟥🟩🟦🟦🟩🟥”
还有一种地址模式,“镜像重复”。如果我们的纹理是“🟥🟩🟦”,那么重复“🟥🟩🟦🟥🟩🟦🟥🟩🟦🟥🟩🟦”然后镜像重复“🟥🟩🟦🟦🟩🟩🟦🟦” 🟩🥥”
原文地址
