本地开发环境说明
| 开发依赖 | 版本 |
|---|---|
| Spring Boot | 3.0.6 |
| Mybatis-Plus | 3.5.3.1 |
| dynamic-datasource-spring-boot-starter | 3.6.1 |
| JDK | 20 |
pom.xml主要依赖
    <dependencies>
    <dependency>
        <groupId>org.springframework.boot</groupId>
        <artifactId>spring-boot-starter-web</artifactId>
    </dependency>
    <dependency>
        <groupId>com.baomidou</groupId>
        <artifactId>mybatis-plus-boot-starter</artifactId>
    </dependency>
    <dependency>
        <groupId>com.baomidou</groupId>
        <artifactId>dynamic-datasource-spring-boot-starter</artifactId>
    </dependency>
    <!-- 根据需要修改数据库 -->
    <dependency>
        <groupId>com.h2database</groupId>
        <artifactId>h2</artifactId>
    </dependency>
</dependencies>
application.yml主要配置
debug: true
logging:
  level:
    root: debug

spring:
  datasource:
    dynamic:
      # druid连接池设置
      druid:
        #     配置初始化大小、最小、最大线程数
        initialSize: 5
        minIdle: 5
        #     CPU核数+1,也可以大些但不要超过20,数据库加锁时连接过多性能下降
        maxActive: 20
        #     最大等待时间,内网:800,外网:1200(三次握手1s)
        maxWait: 60000
        timeBetweenEvictionRunsMillis: 60000
        #     配置一个连接在池中最大空间时间,单位是毫秒
        minEvictableIdleTimeMillis: 300000
        validationQuery: SELECT 1
        testWhileIdle: true
        #     设置从连接池获取连接时是否检查连接有效性,true检查,false不检查
        testOnBorrow: true
        #     设置从连接池归还连接时是否检查连接有效性,true检查,false不检查
        testOnReturn: true
        #     可以支持PSCache(提升写入、查询效率)
        poolPreparedStatements: true
        #   配置监控统计拦截的filters,去掉后监控界面sql无法统计,'wall'用于防火墙
        filters: stat,wall,slf4j
        #     保持长连接
        keepAlive: true
        maxPoolPreparedStatementPerConnectionSize: 20
        useGlobalDataSourceStat: true
        connectionProperties: druid.stat.mergeSql=true;druid.stat.slowSqlMillis=500

        web-stat-filter:
          # 是否启用StatFilter默认值true
          enabled: true
          # 添加过滤规则
          url-pattern: /*
          # 忽略过滤的格式
          exclusions: /druid/*,*.js,*.gif,*.jpg,*.png,*.css,*.ico

        stat-view-servlet:
          # 是否启用StatViewServlet默认值true
          enabled: true
          # 访问路径为/druid时,跳转到StatViewServlet
          url-pattern: /druid/*
          # 是否能够重置数据
          reset-enable: false
          # 需要账号密码才能访问控制台,默认为root
          login-username: druid
          login-password: druid
          # IP白名单
          allow: 127.0.0.1
          # IP黑名单(共同存在时,deny优先于allow)
          deny:
      #  dynamic主从设置
      primary: first  #设置默认的数据源或者数据源组,默认值即为master
      strict: false  #设置严格模式,默认false不启动. 启动后在未匹配到指定数据源时候回抛出异常,不启动会使用默认数据源.
      datasource:
        first:
          driver-class-name: org.h2.Driver
          url: jdbc:h2:tcp://localhost/D:/ProgramFiles/h2database/data/test;MODE=MYSQL;
          username:
          password:
          type: com.alibaba.druid.pool.DruidDataSource
        second:
          driver-class-name: org.h2.Driver
          url: jdbc:h2:tcp://localhost/D:/ProgramFiles/h2database/data/test;MODE=MYSQL;
          username:
          password:
          type: com.alibaba.druid.pool.DruidDataSource

mybatis-plus:
  # 所有实体类所在包路径
  type-aliases-package: com.wen3.**.po
  # mapper.xmml文件路径,多个使用逗号分隔
  mapper-locations: classpath*:resources/mapper/*.xml
  configuration:
    log-impl: org.apache.ibatis.logging.slf4j.Slf4jImpl
多数据源整合Druid
SpringBoot启动类修改
package com.wen3.demo.mybatisplus;

import com.alibaba.druid.spring.boot3.autoconfigure.DruidDataSourceAutoConfigure;
import com.alibaba.druid.spring.boot3.autoconfigure.properties.DruidStatProperties;
import org.mybatis.spring.annotation.MapperScan;
import org.springframework.boot.SpringApplication;
import org.springframework.boot.autoconfigure.SpringBootApplication;
import org.springframework.boot.autoconfigure.jdbc.DataSourceProperties;
import org.springframework.boot.context.properties.EnableConfigurationProperties;

@MapperScan(basePackages = "com.wen3.demo.mybatisplus.dao")
@SpringBootApplication(exclude = {
        DruidDataSourceAutoConfigure.class
})
@EnableConfigurationProperties({DruidStatProperties.class, DataSourceProperties.class})
public class DemoMybatisplusApplication {

    public static void main(String[] args) {
        SpringApplication.run(DemoMybatisplusApplication.class, args);
    }
}
org.springframework.boot.autoconfigure.AutoConfiguration.imports
由于排除了DruidDataSourceAutoConfigure类的自动装载,就需要手工指定装配以下几个类
com.alibaba.druid.spring.boot3.autoconfigure.stat.DruidSpringAopConfiguration
com.alibaba.druid.spring.boot3.autoconfigure.stat.DruidStatViewServletConfiguration
com.alibaba.druid.spring.boot3.autoconfigure.stat.DruidWebStatFilterConfiguration
com.alibaba.druid.spring.boot3.autoconfigure.stat.DruidFilterConfiguration
查看DruidDataSourceAutoConfigure这个类的源码可以看出,需要把@Import带进来的几个类进行自动装配
@Configuration
@ConditionalOnClass({DruidDataSource.class})
@AutoConfigureBefore({DataSourceAutoConfiguration.class})
@EnableConfigurationProperties({DruidStatProperties.class, DataSourceProperties.class})
@Import({DruidSpringAopConfiguration.class, DruidStatViewServletConfiguration.class, DruidWebStatFilterConfiguration.class, DruidFilterConfiguration.class})
public class DruidDataSourceAutoConfigure {

}
Druid监控页面
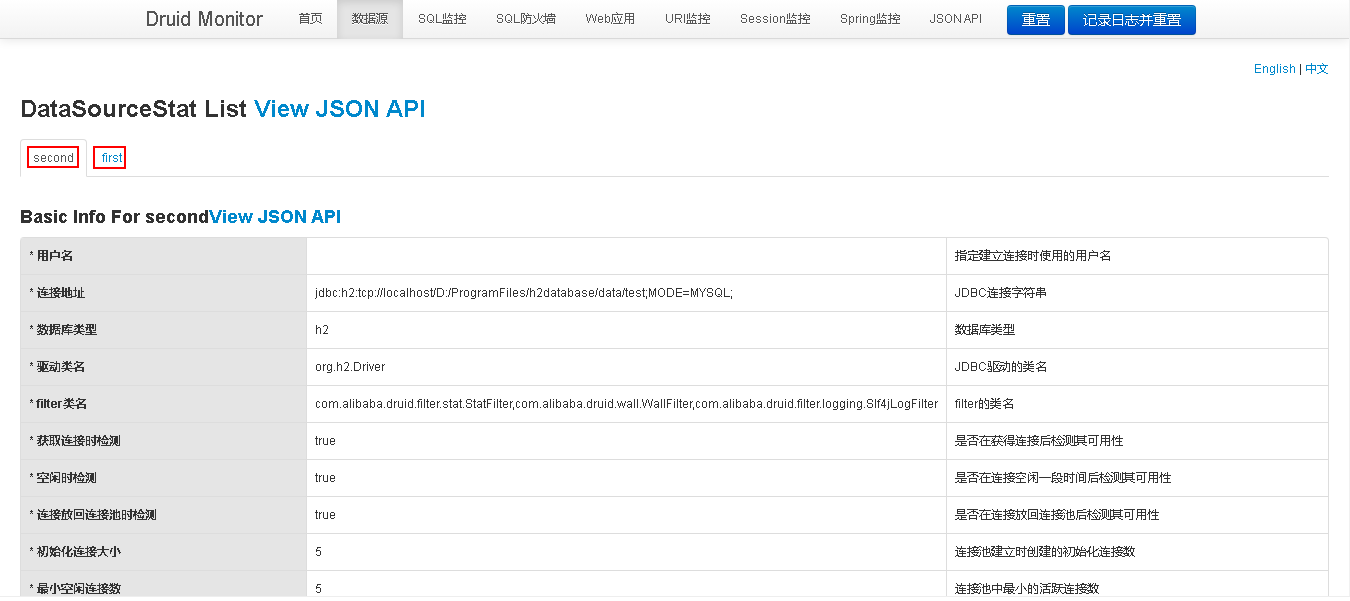
可以看到多数据源已经配置成功了,并且加入了Druid监控
Junit单元测试
UserMapper.java
package com.wen3.demo.mybatisplus.dao;

import com.baomidou.mybatisplus.core.conditions.query.QueryWrapper;
import com.baomidou.mybatisplus.core.mapper.BaseMapper;
import com.wen3.demo.mybatisplus.po.UserPo;
import org.apache.ibatis.annotations.Param;
import org.apache.ibatis.annotations.Select;

import java.util.Map;

/**
 * <p>
 *  Mapper 接口
 * </p>
 *
 * @since 2023-05-21
 */
public interface UserMapper extends BaseMapper<UserPo> {

    @Select("select i.* from XXL_JOB_INFO i join XXL_JOB_GROUP g on i.job_group=g.id ${ew.customSqlSegment} ")
    Map<String,Object> multiTableQuery(@Param("ew") QueryWrapper<UserPo> query);
}
User2Mapper.java
package com.wen3.demo.mybatisplus.dao;

import com.baomidou.dynamic.datasource.annotation.DS;
import com.baomidou.mybatisplus.core.conditions.query.QueryWrapper;
import com.baomidou.mybatisplus.core.mapper.BaseMapper;
import com.wen3.demo.mybatisplus.dao.UserMapper;
import com.wen3.demo.mybatisplus.po.UserPo;
import org.apache.ibatis.annotations.Param;
import org.apache.ibatis.annotations.Select;

import java.util.Map;

/**
 * <p>
 *  Mapper 接口
 * </p>
 *
 * @author tangheng
 * @since 2023-05-21
 */
@DS("second")
public interface User2Mapper extends BaseMapper<UserPo> {

    @Select("select i.* from XXL_JOB_INFO i join XXL_JOB_GROUP g on i.job_group=g.id ${ew.customSqlSegment} ")
    Map<String,Object> multiTableQuery(@Param("ew") QueryWrapper<UserPo> query);
}
使用
@DS注解指定使用的数据源,也可以放在Servie等其它类上,也可以放在具体类个方法上
User2MapperTest.java
package com.wen3.demo.mybatisplus.dao2;

import com.baomidou.mybatisplus.core.conditions.query.QueryWrapper;
import com.wen3.demo.mybatisplus.MybatisPlusSpringbootTestBase;
import com.wen3.demo.mybatisplus.dao.User2Mapper;
import com.wen3.demo.mybatisplus.dao.UserMapper;
import com.wen3.demo.mybatisplus.po.UserPo;
import jakarta.annotation.Resource;
import org.junit.jupiter.api.Test;
import org.springframework.beans.factory.annotation.Autowired;

import java.util.Map;

class User2MapperTest extends MybatisPlusSpringbootTestBase {

    @Resource
    private User2Mapper user2Mapper;
    @Resource
    private UserMapper userMapper;

    @Test
    void testMultiTableQuery() {
        QueryWrapper<UserPo> queryWrapper = new QueryWrapper<>();
        Map<String, Object> testResult = userMapper.multiTableQuery(queryWrapper);
        Map<String, Object> testResult2 = user2Mapper.multiTableQuery(queryWrapper);
        assertEquals(testResult.size(), testResult2.size());
    }
}
单元测试运行日志
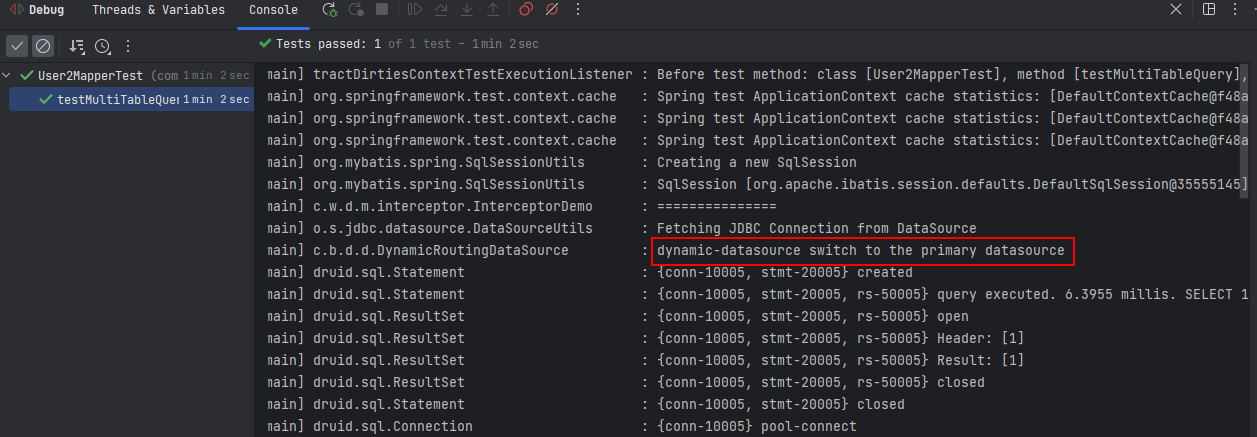
默认访问primary数据源

指定使用second数据源


